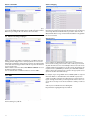
1
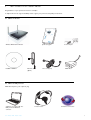
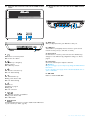
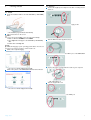
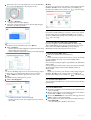
Register your product and get support at
www.philips.com/welcome
CGA7740N
EN
Wireless ADSL Modem Router
Table of contents
1
Important
2
4.4
Security webpages
9
9
1.1
Safety information
2
4.4.1
Firewall
1.2
Network range & speed information
2
4.4.2
Wireless Security
11
1.3
Conformity
2
4.4.3
WPS
12
1.4
Recycling and disposal
2
4.5
Home Network Settings webpages
13
1.5
FCC Radiation Exposure Statement
2
4.5.1
Status
13
1.6
Software licenses
2
4.5.2
Network settings
13
1.7
Disclaimer
2
4.5.3
Wireless
13
4.6
Advanced settings webpages
14
4.6.1
NAT
14
4.6.2
Maintenance
15
4.6.3
System
16
4.6.4
SNMP
16
4.7
UPNP
17
4.8
QoS
17
5
4.9
DDNS
17
2
Your Wireless ADSL Modem Router
3
2.1
What’s in the box
3
2.2
What else will you need
3
2.3
Overview of the front side of the
wireless ADSL modem router
4
Overview of the rear side of the
wireless ADSL modem router
4
2.4
3
Getting started
3.1
Install
5
4.10
Routing
18
3.2
Connect
5
4.11
SET UP WiZARD
18
3.3
Install a WiFi device
6
3.3.1
Install a Wireless USB adapter CCU7740N
6
3.3.2
Install another WiFi device
6
3.4
Install another WPS device
6
3.4.1
via the PIN method
6
3.4.2
via the PBC method
7
3.4.3
via the Manual configuration
7
4
Configuring the Wireless Modem Router
Technical data
20
6
Frequently asked questions
21
8
4.1
Log on the webpages
8
4.2
Webpages’ menu structure
8
4.3
ADSL / Internet Settings webpages
8
4.3.1
ADSL status
8
4.3.2
ISP settings
9
4.3.3
Parameters
9
4.3.4
DNS
9
Table of contents
5
1
1
Important
1.4 Recycling and disposal
Take time to read this user manual before you use your Wireless ADSL
Modem Router. It contains important information and notes regarding
your Wireless ADSL Modem Router.
1.1 Safety information
! Warning
• This equipment must only be powered with the Power Adapter
provided in the box.
• For use only with power supply "Leader : MU12-2150080-B2" and /
or "Jentec : AH1215-C".
• Always use the cables provided with the product.
• Radio equipment for wireless applications is not protected against
disturbance from other radio services.
• Do not expose the system to excessive moisture, rain, sand or heat
sources.
• The product should not be exposed to dripping or splashing.
• No object filled with liquids, such as vases, should be placed on the
product.
• Keep the product away from domestic heating equipment and direct
sunlight.
• Allow a sufficient amount of free space all around the product for
adequate ventilation.
• Do not open this product. Contact your ISP / cable provider
helpdesk.
1.2 Network range & speed information
• The environment : Radio signals can travel further outside of
buildings, and if the wireless components are in direct line of sight to
one another. Putting wireless components in high places helps avoid
physical obstacles and provides better coverage.
• Building construction such as metal framing and concrete or masonry
walls and floors will reduce radio signal strength. Avoid putting
wireless components next to large solid objects ; or next to large
metal object such as computers, monitors, and appliances.
• Wireless signal range, speed, and strength can be affected by
interference from neighbouring wireless networks and devices.
Electro-magnetic devices such as televisions, radios, microwave
ovens, and cordless phones, especially those with frequencies in the
2.4GHz range, may also interfere with wireless transmission.
• Standing or sitting too close to wireless equipment can also affect
radio signal quality.
• Adjusting the antenna : Do not place antennas next to large pieces of
metal, because this might cause interference.
Disposal instructions for old products :
The WEEE directive (Waste Electrical and Electronic Equipment
Directive ; 2002/96/EC) has been put in place to ensure that products
are recycled using best available treatment, recovery and recycling
techniques to ensure human health and high environmental protection.
Your product is designed and manufactured with high quality materials
and components, which can be recycled and reused.
Do not dispose of your old product in your general household waste
bin.
Inform yourself about the local separate collection system for electrical
and electronic products marked by this symbol :
Use one of the following disposal options :
• Dispose of the complete product (including its cables, plugs and
accessories) in the designated WEEE collection facilities.
• If you purchase a replacement product, hand your complete old
product back to the retailer. He should accept it as required by the
WEEE directive.
Packaging information :
Philips has marked the packaging with standard symbols designed to
promote the recycling and appropriate disposal of any waste.
A financial contribution has been paid to the associated national
recovery & recycling system.
The labeled packaging material is recyclable.
1.5 FCC Radiation Exposure Statement
This equipment complies with FCC radiation exposure limits set forth
for an uncontrolled environment. This equipment should be installed
and operated with minimum distance 20 cm between the radiator and
your body.
1.6 Software licenses
This product contains open source software packages. An overview of
these packages, the licences and / or notices that apply to them, and the
source code for a number of these packages are available in the on-line
product documentation, which is visible on www.p4c.philips.com.
1.3 Conformity
We, Philips declare that the product is in compliance with the essential
requirements and other relevant provisions of Directive 1999/5/EC.
You can find the Declaration of Conformity on www.p4c.philips.com.
Following this Directive, this product can be brought into service in the
following states :
B
IRL
P
D
2
✓
✓
✓
✓
DK
I
SU
CH
✓
✓
✓
✓
E
L
S
TR
✓
✓
✓
✓
GR
NL
UK
✓
✓
✓
F
A
N
✓
✓
✓
1.7 Disclaimer
This product is provided by "Philips" "as is" and without any express or
implied warranty of any kind of warranties, including, but not limited to,
the implied warranties of merchantability and fitness for a particular
purpose are disclaimed.
In no event shall Philips be liable for any direct, indirect, incidental,
special, exemplary, or consequential damages (including, but not limited
to, procurement of substitute goods or services ; loss of information,
data, or profits ; or business interruption) howsoever caused and on any
theory of liability, whether in contract, strict liability, or tort (including
negligence or otherwise) arising in any way out of the use of inability to
use this product, even if advised of the possibility of such damages.
Philips further does not warrant the accuracy or completeness of the
information, text, graphics, links or other items transmitted by this
product.
2
Your Wireless ADSL Modem Router
Congratulations on your purchase and welcome to Philips !
To fully benefit from the support that Philips offers, register your product at www.philips.com/welcome.
2.1 What’s in the box
CGA7740N
Quick start guide
1
2
3
Wireless ADSL Modem Router
Installation CDRom
Connect
Install
Enjoy
Quick start guide
Ethernet cable
(RJ-45)
Line cord (RJ-11)
Power adapter
ADSL Filter
2.2 What else will you need
W
EB
ADSL filter adapted to your telephone plug
A desktop or a laptop with free
USB port and an Ethernet
connector
Your Wireless ADSL Modem Router
OW
BR
SER
A web browser
An Internet connection
3
2.3 Overview of the front side of the wireless ADSL modem
router
2.4 Overview of the rear side of the wireless ADSL modem
router
I
o
A
B
C D E
WPS
ABCD
E
F
A ADSL port
ADSL port (RJ-11). Connect your ADSL line to this port.
G
A
ON : Power on, normal operation
OFF : Power off or failure
B
ON : ADSL loop is brought up
Blinking : Start up
OFF : ADSL loop is down
C
ON : Internet connection is up
OFF : No data transfering
D
ON : Wireless link is up
Blinking : Send / Receive data
OFF : No data transfering
B LAN ports
10/100 Ethernet ports (RJ-45). Connect devices to your local area
network on these ports (i.e., a PC, hub, or switch).
C Reset button
Use this button to reset the power and restore the default factory
settings. To reset without losing configuration settings, see “Reset”,
page 15.
D Power Inlet
Connect the included power adapter to this inlet
! Warning
Using the wrong type of power adapter may damage the ADSL Wireless
Base Station.
For use only with power supply "Leader : MU12-2150080-B2" and / or
"Jentec : AH1215-C".
E ON / OFF
Button to switch unit ON / OFF
E
ON : Success
Flash Flash : In progress
Blinking : Fail
OFF : No connection
F
ON : Ethernet connection is established
Blinking : Send / Receive data
OFF : Without link
G
button
Push and hold this button for 3 seconds to install another WPS device
on your network (see “WPS”, page 12).
4
Your Wireless ADSL Modem Router
3
Getting started
3.2 Connect
1 Connect the supplied power adapter to the 15V ===0.8A port and
switch on
3.1 Install
1 Insert the installation CD into the PC’s CD ROM (or DVD ROM)
drive
• The installation program will start automatically
Follow instructions on the screen
Note
If for some reason the installation does not start automatically :
1 Click on Windows START and then RUN
2 Type explorer and navigate to the CD ROM (or DVD ROM)
drive
3 Double-click on Setup.exe
Tip
By default, the language of your operating system will be choosen, but
you have 10 seconds if you want to select another one.
3 Click on the required language
2
Connect the power plug to the electricity supply socket
3
• Power light will turn on
Take the Ethernet cable supplied in the box
4
Connect this Ethernet cable to the LAN 1 port on the CGA7740N
5
Connect the other end of the Ethernet cable to your computer
6
• LAN 1 light will turn on
Take the supplied line cord
7
Connect the supplied line cord to the ADSL port
2
4
• The next screen will be displayed automatically
Click on the picture of the CGA7740N Wireless Modem Router
• The next screen will be displayed automatically
Getting started
5
8
Connect the other end of the supplied line cord to the ADSL filter
then connect the ADSL filter to the telephone socket
Note
At any time you can retrieve your wireless security settings using your
installation CD ROM on the computer where you installed your
gateway and by clicking on the security icon
of the menu page.
•
light will turn on
Then click on Continue
• A progress bar screen will be displayed
10 Select your country and Internet Service Provider (ISP) using the
information provided by your ISP
9
3.3 Install a WiFi device
If you want to install a WiFi device you have to retrieve your wireless
security settings using your installation CD ROM on the computer
where you installed your gateway and by clicking on the security icon
of the menu page.
Note
If your ISP is not in the default list, please select "Other".
11 Click on Continue
• A progress bar screen will be displayed, your parameters will be saved
and you will be connected to Internet
• Once the installation completed, the following screen will be displayed
Note
This screen is the Philips support site. It is a live Internet page, subject
to change. The screen displayed may differ from the one shown.
12 Click on Menu if you want to go back to the menu screen
Tip
Your WiFi network is running but not secured.
13 Click on Set Encryption
• Your WiFi network will be secured automatically
• You will not be able to choose your encryption key nor your network
name (SSID)
6
3.3.1 Install a Wireless USB adapter CCU7740N
If you have bought the starter kit CKA7740N, the Wireless USB
adapter CCU7740N is part of the box content. In that case you just
have to insert the installation CD ROM, provided with your
CKA7740N, and follow the instructions on the screen.
3.3.2 Install another WiFi device
1 Refer to the manual of the other WiFi device
Note
If you have previously secured your network (see 3.2 step 13) through
the easy installation, the name of your network (SSID) will be
"PHILIPS_xxxxxx".
If not secured previously through the easy installation, the SSID will be
"philips_install".
In case you have given another name to your network, bear in mind that
this name will be displayed instead of the "PHILIPS_xxxxxx" or
"philips_install".
Note
At any time you can retrieve your wireless security settings using your
installation CD ROM on the computer where you installed your
gateway and by clicking on the security icon
of the menu page.
3.4 Install another WPS device
You can install another WPS device on your network in any of the three
following ways :
3.4.1 via the PIN method
1 Check that your Wireless router and that the other WPS device are
connected and ON
2 On your Internet Browser, enter http://192.168.2.1 in the address
field and click on GO to access the webpages
3 Click on the WIRELESS tab on the left side of the page and select
PIN to open the corresponding subpage
4 Enter the PIN from the client device (the other WPS device) and
click START PIN
• The other WPS device is installed on your network
Getting started
3.4.2 via the PBC method
1 Check that your Wireless router and that the other WPS device are
connected and ON
2 Push and hold the WPS button, located on the front side on your
router, for 3 seconds
3 Push and hold the WPS button of the other WPS device for
3 seconds (refer to the manual of the other WPS device for
location)
• The other WPS device is installed on your network
OR
1 Check that your Wireless router and that the other WPS device are
connected and ON
2 On your Internet Browser, enter http://192.168.2.1 in the address
field and click on GO to access the webpages
3 Click on the WIRELESS tab on the left side of the page and select
PBC to open the corresponding subpage
4 Click on START PBC
• The other WPS device is installed on your network
Note
The push and hold procedure on the two WPS buttons (router and
other WPS device) has to be done within a two minutes’ interval.
3.4.3 via the Manual configuration
This method enables you to configure client devices without WPS
function.
1 On your Internet Browser, enter http://192.168.2.1 in the address
field and click on GO to access the webpages
2 Click on the WIRELESS tab on the left side of the page and select
Manual to open the corresponding subpage
3 Take note of the settings displayed and configure your non-WPS
device accordingly
• Your non-WPS device is installed on your network
Getting started
7
4
WEP
WPA/WPA2
802.1X
Wi-Fi Protected Setup
PIN
PBC
Manual
Configuring the Wireless Modem Router
Advanced users may want to change the configuration of their Wireless
Modem Router. This chapter explains how to access the configuration
webpages, show you the struture of these webpages and it describes
them.
4.1 Log on the webpages
1 Open your Internet Browser
2 Enter http://192.168.2.1 in the address field
3
Click on GO
• The following webpage will be displayed
Home Network Settings
Status
Network settings
Wireless
Channel and SSID
Advanced settings
NAT
Address Mapping
Virtual Server
Special Applications
NAT Mapping Table
Maintenance
Configuration Tools
Firmware Upgrade
Reset
System
Time Settings
Password Settings
Remote Management
SNMP Community
Community
Trap
UPNP
QoS
Traffic mapping
Traffic statistics
DDNS
Routing
Static route
RIP
Routing table
Note
The only default language is English.
4 To access the required webpage, click on the corresponding tab on
the left side of the page
4.2 Webpages’ menu structure
The table below describes the menu tree of the webpages.
SET UP WIZARD
Getting started
Wireless settings
ADSL settings
Confirm
Connection status
Note
It is highly recommended to use the Easy Install program
available on the provided CD ROM instead of the SET UP
WIZARD pages.
ADSL / Internet Settings
ADSL status
ISP settings
Parameters
DNS
Security
4.3.1 ADSL status
Firewall
Access Control
MAC Filter
URL blocking
Schedule Rule
Intrusion Detection
DMZ
Wireless Security
Wireless Encryption
Access control
8
4.3 ADSL / Internet Settings webpages
Click on "ADSL Status" which is located on the left side of the screen.
The left-hand side displays the main menu and the right-hand side shows
descriptive information.
Configuring the Wireless ADSL Modem Router
4.3.2 ISP settings
4.3.4 DNS
Click on VCx to open the ISP settings parameters window.
Domain Name Servers (DNS) are used to map a domain name (e.g.,
www.philips.com) with the IP address (e.g., 64.147.25.20). The DNS
address is usually configured automatically. If this is not the case, one or
more DNS address will be provided to you by your ISP.
4.4 Security webpages
4.4.1 Firewall
Enter the ISP settings parameters provided by your Internet Service
Provider here.
4.3.3 Parameters
The ADSL Wireless Base Station’s firewall inspects packets at the
application layer, maintains TCP and UDP session information including
time-outs and the number of active sessions, and provides the ability to
detect and prevent certain types of network attacks.
Network attacks that deny access to a network device are called
Denial-of-Service (DoS) attacks. DoS attacks are aimed at devices and
networks with a connection to the Internet. Their goal is not to steal
information, but to disable a device or network so users no longer have
access to network resources.
This page allows you to specify the ADSL standards to operate with.
You may explicitly set specific standard, or choose "Automatic" to
automatically negotiate with remote DSLAM.
The ADSL Wireless Base Station firewall function protects against the
following DoS attacks : IP Spoofing, Land Attack, Ping of Death, IP with
zero length, Smurf Attack, UDP port loopback, Snork Attack, TCP null
scan, and TCP SYN flooding.
The firewall does not significantly affect system performance, so we
advise leaving it enabled to protect your network. Select "Enable" and
click the "SAVE SETTINGS" button to open the Firewall submenus.
Configuring the Wireless ADSL Modem Router
9
Access Control
URL Blocking
Access Control allows users to define the outgoing traffic permitted or
not-permitted through the WAN interface. The default is to permit all
outgoing traffic.
The ADSL Wireless Base Station allows the user to block access to web
sites by entering either a full URL address or just a keyword. This
feature can be used to protect children from accessing violent or
pornographic web sites.
To add the PC to the filtering table :
1- Click "Add PC" on the Access Control screen
Schedule Rule
2- Define the appropriate settings for client PC services
3- Click "OK" and then click "SAVE SETTINGS" to save your settings
MAC filter
You may filter Internet access for local clients based on rules. Each
access control rule may be activated at a scheduled time. Define the
time schedule on this page, and apply the rule on the Access Control
page.
The ADSL Wireless Base Station can also limit the network access
based on the MAC address. The MAC Filtering Table allows the ADSL
Wireless Base Station to enter up to 32 MAC addresses that are
allowed to access to the WAN port.
1- Click "Yes" to enable, or "No" to disable this function
2- Enter the MAC address in the space provided and click "SAVE
SETTINGS" to confirm
10
Configuring the Wireless ADSL Modem Router
Intrusion Detection
Stateful Packet Inspection allows you to select different application
types that are using dynamic port numbers. If you wish to use the
Stateful Packet Inspection (SPI) to block packets, click on the "Yes" radio
button in the "Enable SPI and Anti-DoS firewall protection" field and
then check the inspection type that you need, such as Packet
Fragmentation, TCP Connection, UDP Session, FTP Service, H.323
Service, or TFTP Service.
When hackers attempt to enter your network, the router can alert
you by e-mail
If the mail server needs to authenticate your indentification before
sending out any e-mail, please fill related information in POP3 server,
username and password fields. Otherwise leave the three fields blank.
Connection Policy
Enter the appropriate values for TCP/UDP sessions as described in the
following table.
Note
The firewall does not significantly affect system performance, so we
advise enabling the prevention features to protect your network.
DMZ
Intrusion Detection Feature
Stateful Packet Inspection (SPI) and Anti-DoS firewall protection
(Default : Enabled) - The Intrusion Detection Feature of the ADSL
Wireless Base Station limits access for incoming traffic at the WAN
port. When the SPI feature is turned on, all incoming packets will be
blocked except for those types marked in the Stateful Packet Inspection
section.
RIP Defect (Default : Disabled) - If an RIP request packet is not
acknowledged to by the router, it will stay in the input queue and not
be released. Accumulated packets could cause the input queue to fill,
causing severe problems for all protocols. enabling this feature prevents
the packets from accumulating.
If you have a client PC that cannot run an Internet application properly
from behind the firewall, you can open the client up to unrestricted
two-way Internet access. Enter the IP address of a DMZ (Demilitarized
Zone) host on this screen. Adding a client to the DMZ may expose your
local network to a variety of security risks, so only use this option as a
last resort.
4.4.2 Wireless Security
Discard Ping to WAN (Default : Disabled) - Prevent a ping on the ADSL
Wireless Base Station’s WAN port from being routed to the network.
Scroll down to view more information.
Stateful Packet Inspection
This is called a "Stateful" packet inspection because it examines the
contents of the packet to determine the state of the communications ;
i.e., it ensures that the stated destination computer has previously
requested the current communication. This is a way of ensuring that all
communications are initiated by the recipient computer and are taking
place only with sources that are known and trusted from previous
interactions. In addition to being more rigorous in their inspection of
packets, stateful inspection firewalls also close off ports until connection
to the specific port is requested.
To make your wireless network safe, you should turn on the security
function.
When particular types of traffic are checked, only the particular type of
traffic initiated from the internal LAN will be allowed. For example, if
the user only checks "FPT Service" in the Stateful Packet Inspection
section, all incoming traffic will be blocked except for FTP connections
initiated from the local LAN.
Configuring the Wireless ADSL Modem Router
11
Wireless Encryption
To manually configure the encryption key, enter five hexadecimal pairs
of digits for each 64-bit key, or enter 13 pairs for the single 128-bit key.
(A hexadecimal digit is a number or letter in the range 0-9 or A-F).
Note that WEP protects data transmitted between wireless nodes, but
does not protect any transmissions over your wired network or over
the Internet.
WPA/WPA2
The ADSL Wireless Base Station supports WEP (Wired Equivalent
Privacy), WPA/WPA2 (Wi-Fi Protected Access), and 802.1x security
mechanisms. It is highly recommended to use WPA/WPA2 security.
Access Control
Wi-Fi Protected Access (WPA/WPA2) combines temporal key integrity
protocol (TKIP) and 802.1x mechanisms. It provides dynamic key
encryption and 802.1x authentication service.
802.1x
Access Control allows users to define the outgoing traffic permitted or
not-permitted through the WAN interface. The default is to permit all
outgoing traffic.
WEP
If 802.1x is used in your network, then you should enable this function
for the ADSL Wireless Base Station. These parameters are used for the
ADSL Wireless Base Station to connect to the authentication server.
4.4.3 WPS
If you use WEP to protect your wireless network, you need to set the
same parameters for the ADSL Wireless Base Station and all your
wireless clients.
You may automatically generate encryption keys or manually enter the
keys. To generate the key automatically with passphrase, check the
Passphrase box, enter a string of characters. Select the default key from
the drop down menu. Click "SAVE SETTINGS".
Note
The passphrase can consist of up to 32 alphanumeric characters.
12
Wi-Fi Protected Setup (WPS) enables typical users who possess little
understanding of traditional Wi-Fi configuration and security settings to
easily configure new wireless networks, to add new devices and to
enable security.
Configuring the Wireless ADSL Modem Router
WPS can be done in any of the following ways :
- PIN method
- PBC method
- Manual method
4.5 Home Network Settings webpages
4.5.1 Status
PIN
Enter the PIN from the client device and click Start PIN.
PBC
The Status page displays WAN/LAN connection status, firmware, and
hardware version numbers, illegal attempts to access your network, as
well as information on DHCP clients connected to your network. The
security log may be saved to a file by clicking "Save" and choosing a
location.
4.5.2 Network settings
Push and hold the WPS button, located on the front side on your
router, for 3 seconds or click Start PBC.
Manual
Use the Home Networking menu to configure the LAN IP address and
to enable the DHCP server for dynamic client address allocation.
4.5.3 Wireless
This method enables you to configure client devices without WPS
function.
The ADSL Wireless Base Station also operates as a wireless access
point, allowing wireless computers to communicate with each other. To
configure this function, you need to enable the wireless function, define
the radio channel, the domain identifier, and the security options.
Check "Enable" and click "SAVE SETTINGS".
Configuring the Wireless ADSL Modem Router
13
Channel and SSID
Address Mapping
You must specify a common radio channel and SSID (Service Set ID) to
be used by the ADSL Wireless Base Station and all of its wireless clients.
Make sure you configure all of its clients to the same values.
Allows one or more public IP addresses to be shared by multiple
internal users. This also hides the internal network for increased privacy
and security. Enter the Public IP address you wish to share into the
Global IP field. Enter a range of internal IPs that will share the global IP
into the "from" field.
4.6 Advanced settings webpages
Virtual Server
When you click on the Advanced Settings tab, you will first have this
warning window displayed. It is to warn people who are not used to
changing the configuration of their wireless modem router that changing
some of the device settings in Advanced Mode may cause this device to
become unresponsive.
Advanced Users can click on "Yes, enter Advanced Mode" to access
the different advanced settings.
It is recommended for non Advanced Users to click on "No".
4.6.1 NAT
If you configure the ADSL Wireless Base Station as a virtual server,
remote users accessing services such as web or FTP at your local site
via public IP addresses can be automatically redirected to local servers
configured with private IP addresses. In other words, depending on the
requested service (TCP/UDP port number), the ADSL Wireless Base
Station redirects the external service request to the appropriate server
(located at another internal IP address).
For example, if you set Type/Public Port to TCP/80 (HTTP or web) and
the Private IP/Port to 192.168.2.2/80, then all HTTP requests from
outside users will be transferred to 192.168.2.2 on port 80. Therefore,
by just entering the IP address provided by the ISP, Internet users can
access the service they need at the local address to which you redirect
them.
A list of ports is maintained at the following link :
http://www.iana.org/assignments/ports-numbers
Network Address Translation allows multiple users to access the
Internet sharing one public IP.
14
Configuring the Wireless ADSL Modem Router
Special Applications
"Restore" can be used to restore the saved backup configuration file.
"Restore to Factory Defaults" resets the ADSL Wireless Base Station to
the original settings. You will be asked to confirm your decision.
Firmware Upgrade
Some applications require multiple connections, such as Internet
gaming, video-conferencing, and Internet telephony.
These applications may not work when Network Address Translation
(NAT) is enabled. If you need to run applications that require multiple
connections, use these pages to specify the additional public ports to be
opened for each application.
NAT Mapping Table
Use the Firmware Upgrade screen to update the firmware or user
interface to the latest versions. Download the upgrade file from
www.philips.com/support (Model CGA5722), and save it to your hard
drive. Then click "Browse..." to look for the downloaded file. Click
"BEGIN UPGRADE". Check the Status page Information section to
confirm that the upgrade process was successful.
Reset
This page displays the current NAPT (Network Address Port
Translation) address mappings.
4.6.2 Maintenance
Use the Maintenance menu to backup the current configuration, restore
a previously saved configuration, restore factory settings, update
firmware, and reset the ADSL Wireless Base Station.
Configuration Tools
Click "REBOOT ROUTER" to reset the ADSL Wireless Base Station.
If you perform a reset from this page, the configuration will not be
changed back to the factory default settings.
Note
If you use the Reset button on the rear panel, the ADSL Wireless Base
Station performs a power reset. Press the button for over five seconds,
and the factory default settings will be restored.
Choose a function and click "Next>>".
"Backup" allows you to save the ADSL Wireless Base Station’s
configuration to a file.
Configuring the Wireless ADSL Modem Router
15
Remote Management
4.6.3 System
Time Settings
Select your local time zone from the drop down list. This information is
used for log entries and client filtering.
If you want to automatically synchronize the ADSL Wireless Base
Station with a public time server, check the box to "Enable Automatic
Time Server Maintenance". Select the desired servers from the drop
down menu.
Password Settings
By default, management access is only available to users on your local
network. However, you can also manage the ADSL Wireless Base
Station from a remote host by entering the IP address of a remote
computer on this screen. Check the Enabled check box, and enter the
IP address of the Host Address and click "SAVE SETTINGS".
Note
If you check "Enable" and specify an IP address of 0.0.0.0, any remote
host can manage the ADSL Wireless Base Station.
For remote management via WAN IP address you need to connect
using port 8080. Simply enter WAN IP address followed by :8080, for
example, 212.120.68.20:8080.
4.6.4 SNMP
Use the SNMP configuration screen to display and modify parameters
for the Simple Network Management Protocol (SNMP).
SNMP community
Use this page to change the password for accessing the management
interface of the ADSL Wireless Base Station.
Passwords can contain from 3~12 alphanumeric characters and are case
sensitive.
Note
If you lost the password, or you cannot gain access to the user interface,
press the blue reset button on the rear panel, holding it down for at
least five seconds to restore the factory defaults. By default, there is no
password to login to the user interface.
! Warning
When you reset the ADSL Wireless Base Station using the reset button,
all configuration settings will be lost, also your ISP setting (Internet
Service Provider).
Enter a maximum Idle Time Out (in minutes) to define a maximum
period of time for which the login session is maintained during inactivity.
If the connection is inactive for longer than the maximum idle time, it
will perform system logout, and you have to log in again to access the
management interface. (Default : 10 minutes)
16
A computer attached to the network, called a Network Management
Station (NMS), can be used to access this information. Access rights to
the agent are controlled by community strings. To communicate with
the ADSL Wireless Base Station, the NMS must first submit a valid
community string for authentication.
Parameters
Community
Access
Valid
Description
A community name authorized for
management access
Management access is restricted to Read Only
(Read) or Read / Write (Write)
Enables / Disables the entry
Note
Up to five community names may be entered.
Configuring the Wireless ADSL Modem Router
SNMP Trap
Specify the IP address of the NMS to notify when a significant event is
detected by the agent. When a trap condition occurs, the SNMP agent
sends an SNMP trap message to any NMS specified as a trap receiver.
4.7 UPNP
UPNP (Universal Plug and Play) settings
With Universal Plug and Play, a device can automatically join a network,
obtain an IP address, communicate its capabilities, and learn about the
presence and capabilities of other devices. Devices can then directly
communicate with each other. This further enables peer-to-peer
networking.
Traffic Mapping
Traffic Mapping allows you to describe up to 16 rules to classify traffic
into forwarding groups. You must specify the traffic type, the forwarding
method and the outgoing virtual connection (VC) that this traffic will be
routed to.
Traffic Statistics
The Traffic Statistic screen displays the outbound traffic statistics for all
forwarding methods over a 12 hour period.
4.9 DDNS
DDNS (Dynamic DNS) settings
4.8 QoS
The QoS Settings page allows the user to configure the bandwidth
allocation for each forwarding behavior. The QoS settings are described
below :
"Name" - Displays the name of the forwarding method, i.e., ’Best Effort’,
’Assured Forwarding’ or ’Expedited Forwarding’.
"Description" - Briefly describes the forwarding method employed.
"Priority" - ’Best Effort’ will have lowest priority as it is a basic
connectivity service with no guarantees. ’Expeditd Forwarding’ will have
highest priority. It provides low delay, low jitter and low loss delivery of
packets.
"Bandwidth Allocation" - You choose the minimum bandwidth for each
forwarding method.
DDNS text "Domain Name" is a series of alphanumeric strings
separated by periods that maps to the address of a network connection
and identifies the owner of the address.
Dynamic DNS provides users on the Internet with a method to tie their
domain name to a computer or server. DDNS allows your domain
name to follow your IP address automatically by having your DNS
records changed when your IP address changes.
The Server Configuration section automatically opens the TCP port
options checked in the Virtual Server section. Simply enter in the IP
Configuring the Wireless ADSL Modem Router
17
Address of your server, such as a web server, and then click on the port
option HTTP Port 80 so users can access your web server from the
Internet connection.
Routing table
This DNS feature is powered by a DDNS service provider. With a
DDNS connection you can host your own web site, email server, FTP
site, and more at your own location even if you have a dynamic IP
address. (Default : Disable)
4.10 Routing
These pages define routing related parameters, including static routes
and RIP (Routing Information Protocol) parameters.
Static route
4.11 SET UP WiZARD
Getting started
1- Click "Add" to add a new static route to the list
2- Click "SAVE SETTINGS" to save the configuration
RIP parameters
Make sure that you have a working ADSL subscription and that the
ADSL Wireless Base Station is connected to the ADSL phone line. You
can verify that the cable is connected correctly by looking at the ADSL
light on the top of the ADSL Wireless Base Station. The ADSL light
should be on solid after approximately 1 minute.
Wireless settings
RIP sends routing-update messages at regular intervals and when the
network topology changes. When a router receives a routing update
that includes changes to an entry, it updates its routing table to reflect
the new route. RIP routers maintain only the best route to a destination.
After updating its routing table, the router immediately begins
transmitting routing updates to inform other network routers of the
change.
In step 2 you can change the Wireless settings of the ADSL Wireless
Base Station. For easy installation it is advised to keep the default
settings. If you later would like to change any of the wireless settings you
can do so via the menu in the ADSL Wireless Base Station.
18
Configuring the Wireless ADSL Modem Router
ADSL settings
In step 3 you have to enter the settings applicable to your ADSL
Internet Service Provider (ISP) subscription. For easy installation you
can select your ISP from a list of predifined ADSL ISP’s per country.
If you cannot find your ISP in the list you can enter the settings manually.
To do so select as "Country" "others" and select from the "Internet
Service Provider" list the ADSL protocol your ISP is using (this should
be mentioned in the documentation you received from your ISP).
Confirm
Step 4 displays the ADSL settings you’ve entered and that will be used
to configure the ADSL Wireless Base Station. Please check that the
settings comply with the information you received from your ADSL ISP
subscription. If you want to make changes, click the "Back" button to go
back to Step 3.
After you have clicked "SAVE SETTINGS" the message "Your data is
being saved" will appear.
Configuring the Wireless ADSL Modem Router
19
5
Technical data
Ports
• Four 10/100Mbps Rj-45 Ports
• One ADSL RJ-11
ADSL Features
• Supports DMT line modulation
• Supports Annex A Full-Rate ADSL : up to 8 Mbps downstream, up to
1 Mbps upstream (G.992.1 & TI.143, Issue 2)
• Supports G.Lite ADSL : up to 1.5 Mbps downstream, up to 512 Kbps
upstream
• Dying GASP support
ATM Features
• RFC1483 Encapsulation (IP, Bridging and encapsulated routing)
• PPP over ATM (LLC & VC multiplexing) (RFC2364)
• Classical IP (RFC1577)
• Traffic shaping (UBR, CBR)
• OAM F4/F5 support
• PPP over Ethernet Client
Management Features
• Firmware upgrade via web based management
• Web based management (configuration)
• Power indicators
• Event and history logging
• Network ping
Security Features
• Password protected configuration access
• User authentication (PAP/CHAP) with PPP
• Firewall NAT NAPT
• VPN pass through (IPSec-ESP Tunnel mode, L2TP, PPTP)
Wireless Security
• WEP 64/128 bit
• WPA/WPA2
• WPA/WPA2-Personal (PSK)
• WPA-PSK with TKIP
• WPA2-PSK with AES
• WPA-PSK + WPA2-PSK with TKIP+AES.AES, or TKIP
• WPS : PIN and PBC methods
LAN Features
• IEEE 802.1d (self-learning transparent Bridging)
• DHCP Server
• DNS Proxy
• Static Routing, RIPv1 and RIP
Radio Features
• Wireless RF module Frequency Band
• 802.11n Radio : 2.4GHz
• 802.11g Radio : 2.4GHz
• 802.11b Radio : 2.4GHz
Europe - ETSI
• 2412~2472MHz (Ch1~Ch13)
Operating Channels IEEE 802.11n
• 13 channels (ETSI)
Operating Channels IEEE 802.11g
• 13 channels (ETSI)
Operating Channels IEEE 802.11b
• 13 channels (Europe)
Transmit Power and Sensitivity
TX Output Power : (Typical)
• 802.11b : 18.5 +/- 1dBm
• 802.11g : 14.5 +/- 1dBm@54Mbps
• 802.11n : 14.5 +/- 1dBm
RX Sensitivity : (Typical)
• -84 dBm@11Mbps
• -72 dBm@54Mbps
• -64 dBm@64-QAM, 20MHz channel spacing
• -61 dBm@64-QAM, 40MHz channel spacing
Environmental
Complies with the following standards :
Temperature : IEC 68-2-14
• 0 to 40 degrees C (Standard Operating)
• -20 to 70 degrees C (non-operation)
Humidity
• 5% to 95% (non-condensing)
Vibration
• IEC 68-2-36, IEC 68-2-6
Shock
• IEC 68-2-29
Drop
• IEC 68-2-32
Input Power
• 15V 0.8A
IEEE standards
• IEEE 802.3, 802.3u, 802.11g, 802.1d
• IUT G.dmt
• IUT G.Handshake
• IUT T.413 issue 2 - ADSL full rate
Standards Conformance Electromagnetic Compatibility
• CE, ETS 300 328, ETS 300 836 (Wireless)
• EN50081, EN50082, EN61000-3-2, EN61000-3-3 (EMC)
• Vista, WPS
Safety
• EN60950
Modulation Type
• 802.11n Draft-2.0 : OFDM (BPSK, QPSK, 16- and 64-QAM)
• 802.11g : OFDM (BPSK, QPSK, 16- and 64-QAM)
• 802.11b : CCK (11 Mbps, 5.5 Mbps), DQPSK (2 Mbps)
20
Technical data
6
Frequently asked questions
In this chapter you will find the most frequently asked questions and
answers about your Wireless ADSL Modem Router.
Set-up
I cannot connect using the Web browser
• Check that you have a valid network connection to your ADSL
Wireless Base Station
• Check all parameter settings with your Internet provider
• Check
and
signals
I forgot (or lost) the password. How do I reset my ADSL
Wireless Base Station (Factory Defaults) ?
• Make sure the ADSL Wireless Base Station is turned ON
• Use a pen to push the recessed reset button on the rear panel,
holding it down for at least five seconds
• Release the reset button and the ADSL Wireless Base Station restarts
! Warning
When you reset the ADSL Wireless Base Station using the reset button,
all configuration settings will be lost, also your ISP setting (Internet
Service Provider).
A Wireless PC cannot associate with my ADSL Wireless Base
Station
• Make sure that the WiFi function of your ADSL Wireless Base Station
is enabled
• Make sure the Wireless PC has the same SSID setting as your ADSL
Wireless Base Station. See webpage “Channel and SSID”.
• You need to have the same security settings on the Wireless PC and
your ADSL Wireless Base Station. See “Security webpages”.
The signals
do not switch ON. Cannot ping the
ADSL Wireless Base Station from the attached LAN.
• If you are using the Ethernet connection, verify that your TCP/IP is
properly installed and configured on your PC.
• Make sure the Ethernet cable (RJ45) is firmly connected to your
ADSL Wireless Base Station.
• Make sure you are using the correct cable type for your Ethernet
equipment
• Verify that the IP address is properly configured. For most
applications, you should use the ADSL Wireless Base Station DHCP
function to dynamically assign IP address to hosts on the attached
LAN. However, if you manually configure IP address on the LAN,
verify that the same network address and subnet mask are used for
both the ADSL Wireless Base Station and any attached LAN devices.
The Wireless network is often interrupted
• Move your Wireless PC closer to the ADSL Wireless Base Station to
find a better signal. If the signal is still weak, you can change the angle
of the antenna. There may be interference, possibly caused by
microwave ovens, a Wireless TV link or wireless phones. Adapt the
location of the interference sources or of the ADSL Wireless Base
Station.
• You can change the wireless channels on the ADSL Wireless Base
Station. See webpage “Channel and SSID”.
The Wireless Router is hot
• This is a normal behaviour
• Make sure to never cover the cooling slots
Product behaviour
The signal
does not switch on
• Make sure that the electrical power supply is plugged into a wall
outlet
• Make sure that the coaxial jack of the electrical power supply adapter
is plugged into your ADSL Wireless Base Station
• Make sure you are using the correct power supply for your Wireless
Modem Router
• Make sure that the power switch of your ADSL Wireless Base Station
is ON
• However, if your ADSL Wireless Base Station power if OFF after
running for a while, check for power loss or overcharge. (If your wall
outlet has a switch is it in position ON ?)
• If you still cannot isolate the problem, then the external power supply
may be defective. In this case, contact Technical Support for
assistance.
The signal
is OFF
• Make sure that the telephone cable (RJ11) is plugged into the ADSL
port of your ADSL Wireless Base Station and to your telephone wall
outlet or distributed filter
• Make sure that your landline works correctly. You can connect
another telephone in the place of your current product. If you do not
have tonality, the problem comes from your telephone line.
The signal
is always OFF
• Confirm with your Internet Service Provider that your Internet
service is active
• Confirm your Internet setting with your Internet Service Provider
Frequently asked questions
21
22
Copyright © 2007 Koninklijke Philips Electronics N.V.
All rights reserved.
Trademarks are the property of Koninklijke Philips Electronics N.V. or
their respective owners.
Specifications are subject to change without notice.
Document order number : 3111 285 42891