1
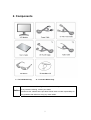
ZM-M220W User’s Guide
FCC STATEMENT
This equipment has been tested and found to comply with the limits for a Class
B digital device pursuant to part 15 of the FCC Rules. These limits are
designed to provide reasonable protection against harmful interference in a
residential installation. This equipment generates, uses and can radiate radio
frequency energy and, if not installed and used in accordance with the
instructions, may cause harmful interference to radio communications. However,
there is no guarantee that interference will not occur in a particular installation. If
this equipment does cause harmful interference to radio or television reception,
with can be determined by turning the equipment off and on, the user is
encouraged to try to correct the interference by one or more of the following
measures :
-Reorient or relocate the receiving antenna.
-Increase the separation between the equipment and receiver.
-Connect the equipment into an outlet on a circuit different from that to which
the receiver is connected.
-Consult the dealer or an experienced radio/TV technician for help.
-Only shielded interface cable should be used.
Finally, any changes or modifications to the equipment by the user not
expressly approved by the grantee or manufacturer could void the users
authority to operate such equipment.
1
• Contents
1. Warning & Cautions
2. Components
3. Connecting Monitor Cables
4. Function Keys
5. Display Specifications
6. Monitor Specifications
7. Monitor Elevation/Rotation/Swivel Functions
8. Troubleshooting
(When using 2D & 3D Modes)
2
1. Warning & Cautions
1-1. Warning
- Inserting objects into the monitor’s vents or A/V outlet can result in fire or electrocution.
- Do not disassemble, repair, or alter the product without the consent of the manufacturer. It
could result in electrocution.
- Do not pull on the cables to unplug the power cord or touch the power cord with wet hands.
1-2. Cautions
- Only use the enclosed power cord.
- Only connect the power plug to a grounded outlet.
- Plug the power plug all the way into the outlet to keep it stable.
- Keep the unit a certain distance away from the wall for good ventilation to prevent the increase
in internal temperature of the unit.
- Do not install on a place exposed to water, oil, or humidity.
- Install the monitor on a leveled and stable location and place the monitor in a gentle manner.
- Do not place candles, cigarettes, or other potential causes of fire on top of the monitor, and do
not install the monitor close to a heat source.
- Do not use or store any flammable spray or combustible materials near the monitor.
- Do not excessively bend the power cord or leave it under a heavy object.
- Make sure that the vents are not blocked by cloth or curtains.
- Keep and store the desiccating agent or vinyl wrap away from the reach of children.
- Leaving the unit faced down on the ground or exerting excessive force on the screen can
damage the LCD panel.
- Unplug the power plug when not using the monitor for an extended period of time.
- Remove the power cord when cleaning the monitor. Use a soft and dry cloth for cleaning the
monitor.
- Do not clean the product surface with wet cloth or chemicals such as industrial brighteners,
wax, benzene, alcohol, solvents, insect repellents, aromatics, lubricant, rinsing liquid etc.)
- If smoke or strange smell is emitted from the monitor, unplug the power and contact the A/S
Center.
3
- Zalman Tech Co., Ltd. is not responsible for any damages due to external causes, including
but not limited to, improper use, problems with electrical power, accident, neglect, alteration,
repair, improper installation, or improper testing.
- Using the monitor in 3D Mode for 1 whole hour or more (playing games, watching videos etc.)
could cause dizziness. Please take a brief rest after 1 hour of using the monitor in 3D (the time
for causing dizziness varies for each individual).
4
2. Components
*1 : For DVI Model Only.
*2 : For Audio Model Only.
Please make sure the following items are included with your monitor.
Notice
If any items are missing, contact your dealer.
Please use the cables that are provided. Zalman does not take responsibility for
any problems that arise from using any other cables.
5
3. Connecting Monitor Cables
No.
Input / Output
Cable Type
1
Power
Power Cord
2
PC
15-pin D-Sub Signal Cable
3
DVI(Optional)
DVI-D Cable *1(Optional)
4
SPK IN
Audio Cable *2
5
SPK OUT
External Speaker Cable (not included) *2
*1 : For DVI Model Only
*2 : For Audio Model Only
6
4. Function Keys
MENU
Opens / Closes the OSD Main Menu
SEL : Selects a command function.
SEL / AUTO
Auto : Optimizes image quality automatically. *1
1. Selects the previous control setting.
MUTE / ▲
2. Increases the current option value.
MUTE : Sound Mute On/Off button. *2
1. Selects the next control setting.
VOL / ▼
2. Decreases the current option value.
VOL : Adjusts the volume. *2
MODE
Changes the display mode.
Automatically Adjusts color and brightness according to the user’s preferred
environment setting.
• TEXT : Documents
MWE
• GAME: Games
• MOVIE : Movies
• SPORTS : Sports
• SMOOTH : Smooth
• USER: Users
Power On/Off toggle button.
*1 : For Analog Mode Only
7
*2 : For Audio Model Only
4-1 Picture Settings
● BRIGHTNESS : Changes the overall light intensity of the images being displayed.
● CONTRAST : Changes the ratio of light intensity between the brightest white and darkest
black.
● H POSTION : Adjusts the horizontal position of the display. *1
● V POSITION : Adjusts the vertical position of the display. *1
● PHASE
: Adjusts the phase for clear imaging. *1
● CLOCK
: Adjusts the clock for clear imaging *1
● AUTO ADJUST : Optimizes image quality automatically. *1
*1 : For Analog Mode Only.
Notice
There should not be problems with most graphics cards, but if the monitor displays
“static” or “noise”, select “Auto Adjust” to resolve the issue.
4-2 Color Settings
Pertains to Analog Mode only.
● COLOR TEMP : There are 3 Modes - User, Blue and Red.
To adjust Red, Green, Blue settings individually, select User Mode. Blue and
Red Modes reinforce each mode’s respective color setting, without the option
of individual color setting adjustment.
● RED,GREEN,BLUE : Adjusts each color’s setting.
● AUTO COLOR : Automatically adjusts the display’s color settings.
4-3 OSD Settings
● OSD H POSI : Adjusts the OSD Menu’s horizontal position.
● OSD V POSI : Adjusts the OSD Menu’s vertical position.
● OSD TIMER : Adjusts the OSD display time between 10 to 40 seconds.
● TRANSPARENCY : Adjusts OSD transparency.
8
4-4 MISC Settings
● LANGUAGE : Selects the language for the OSD Menu.
● RECALL : Loads factory default settings.
● INPUT SELECT : Selects the display’s input. *1
● AUDIO : Sets Audio function On / Off. *2
●SCREEN SIZE : Sets the screen ratio to ‘16:10’ or ‘4:3’.
*1 : For DVI Model Only. *2: For Audio Model Only.
Notice
The monitor’s initial settings are factory adjusted settings. For initial settings,
press the Auto button for display optimization.
9
5. Display Specifications
5-1 Display Modes and Frequencies
Mode
Resolution
Vertical
Pixel
Frequency(KHz)
Frequency(Hz)
Clock(MHz)
31.468
70.087
28.322
-/+
31.468
59.940
25.175
-/-
35.000
66.670
30.240
-/-
37.500
75.000
31.500
-/-
37.879
60.300
40.000
+/+
48.077
72.188
50.000
+/+
46.875
75.000
49.500
+/+
48.363
60.004
65.000
-/-
56.476
70.000
75.000
-/-
60.023
75.029
78.750
+/+
63.981
60.020
108.000
+,-/+,-
79.976
75.025
135.000
+/+
64.674
59.883
119.000
+/-
720 X 400
VGA
640 X 480
SVGA
XGA
800 X 600
1024 X 768
SXGA
1280 X 1024
WSXGA
1680 X 1050
Sync
Horizontal
Polarity
(H/V)
5-2 Power Saving
This monitor has a built-in power management system called Power Saving. This system
saves energy by switching your monitor into a low-power mode when it has not been
used for a certain amount of time. The monitor automatically returns to normal operation when
a key is pressed on the keyboard. For energy conservation, turn the monitor OFF when it is not
in use, or when leaving it unattended for long periods.
Power
Recovery
Consumption
Time
ON
Under 60W
-
Green
OFF
Less than 2W
Within 2 secs
Amber
State
10
LED Color
6. Monitor Specifications
MODE
Analog
Digital
LCD
Frequency
22Inch Wide (55.9cm)
Horizontal : 31.5 ~ 80KHz
Horizontal : 31 ~ 64KHz
Vertical : 56 ~ 75Hz
Vertical : 59 ~ 61Hz
Resolution
1680x1050@60Hz (WSXGA+)
Response time
5ms(TYP)
Brightness
300cd/㎡
3D View Angle
90°(L/R) / 10~12°(U/D)
Contrast Ratio
1000 : 1
Input Signal
RGB Analog
DVI Standard 1.0
Input / Output
15 pin D-Sub,
24pin DVI-D *1
Connectors
Audio In / Audio Out *2
Audio In / Audio Out *2
Power
AC 100~240V, 50/60Hz, 0.9A
Power
Max : 60W
Consumption
Standby Mode : 2W or Less
Dimension
524.7 mm(W) x 406.2 mm(H) x 243 mm(D)
- Tilting Degree : 0˚~ 30˚
Stand
- Elevation : 406.2mm ~ 530.2mm,
- Rotation : 0˚~ 90˚ (Clockwise)
- Swivel : ±30˚
Weight
Accessories
7.6kg
Manual / Power Cable / DVI-D Cable *1 / 15pin D-sub Cable /
Audio Cable *2 / 3D Glasses / 3D Installation CD
*1 : For DVI Models Only *2 : For Audio Models Only
11
7. Monitor Elevation/Rotation/Swivel Functions
Tip : Please remove the screw on the back of the stand to use the functions above.
** The display can be rotated 90 degrees and operated with downloaded or graphic card
manufacturer supplied display rotation software.
A display rotation software is not included with the monitor.
(Generally, a display rotation feature is included in the graphic card’s driver.)
12
13
8. Troubleshooting
<Cautions>
Opening the product may cause electrocution of the user or critical damage to the product.
Product malfunction arising from external causes, including but not limited to improper use,
problems with electrical power, accident, neglect, alteration, repair, improper installation, or
improper testing will only be repaired with a service charge.
<Steps to Take When a Problem Arises>
Please check the following items when a problem arises with the product. If the problem is not
fixed after following the steps below, then please contact an A/S Center nearest to your location.
8-1. In 2D Mode
1. If the LED does not light up / screen does not turn On
- Check to see if the monitor is running on Power-Saving Mode.
- Check to see if the monitor’s power is ON and if the Power Cord is properly connected.
2. If the screen is not clear (if flickering, interference, noise, etc. is present)
- Check the VGA Cable’s connection state.
- Check to see if the screen’s Refresh Rate is set to 75Hz or above. Setting the screen’s
refresh rate to 60Hz will provide the optimal screen state (adjust Clock and Phase).
3. If the screen is blurry
- Adjust the screen’s Phase.
- Set the screen’s Refresh Rate to 60Hz.
- Eliminate the external video signal.
4. If the screen is dark, too bright, or blurry
- Adjust the Brightness or Contrast.
14
8-2. In 3D Mode
1. Blurs and patterns are present when the screen is OFF.
- This phenomenon is the result of the interference of outer light present on the air layer
between the LCD screen and the 3D filter. The intensity of this pattern is very weak,
which makes it unnoticeable when the LCD screen is ON so the monitor can be used
without any inconvenience.
2. Images are presented as 2 images instead of in 3D.
1) If the enclosed polarized glasses are not worn
- This monitor must be viewed with the enclosed polarized glasses to view 3D effects.
[Note]
The enclosed glasses have been circularly polarized for compatibility with the monitor’s
3D filter. Using polarized glasses manufactured by other firms will not enable the
viewing of 3D images on this monitor, and even if they are circularly polarized glasses,
clear images cannot be viewed due to differences in optical characteristics.
2) If the monitor is viewed from beyond the view angle
- To view clear 3D imaging, the user’s eye level must be around the 3rd horizontal quarter
(from the bottom of the display) and the user should be approximately 30~60cm (1~2
feet) away from the monitor.
- The 3D effect is clearest within a horizontal angle of 90 degrees and a vertical angle of
12 degrees relative to the monitor.
3) If the resolution adjustment has not been made
- Set the monitor’s resolution to its maximum resolution in the monitor’s settings.
4) If right/left images have been swapped
- For 3D videos, set the player’s Right Eye Images to line up with the display’s Odd
Numbered Horizontal Lines.
- For 3D pictures, set the viewer’s Right Eye Images to line up with the display’s Odd
Numbered Horizontal Lines.
- If the graphics signal is accurate but the image has shifted up or down a line, adjust the
monitor’s V. Position under Menu-Picture settings.
15
3. If the image is seen in 2D and not 3D
- This monitor is a 2D/3D Convertible Monitor. Media that was produced in 2D can only be
viewed in 2D, and only media created in 3D can be viewed in 3D.
4. Reflections are seen on the screen
- This monitor has a glass 3D Filter attached to the front side of the LCD. It is not possible to
remove the reflections on its surface. Therefore, it is a good idea do not place a light source
behind the user. If a light source behind the user is unavoidable, adjust the monitor’s angle
so that the light source’s reflection does not show on the display.
16