1
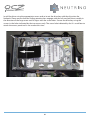
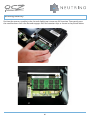
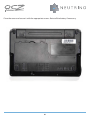
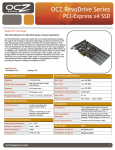
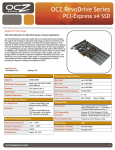
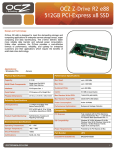
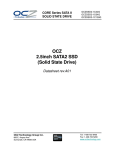
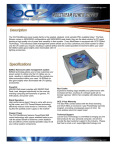
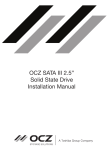
INSTALLATION GUIDE
OCZNBIA10A
Neutrino Installation Guide
Carefully remove the Neutrino Netbook from the bag and sleeve and inspect it for damage. The top
panel of the Neutrino Netbook is protected by an adhesive clear plastic sheet. Please do not remove
this until you are finished with the complete hardware installation to avoid scratches and damage to
the top cover.
Familiarize yourself with the netbook before opening it up and exposing the inside to dust and other
environmental factors! The picture below shows the position of the battery and the access panel for all
upgradeable and serviceable parts. The latter is secured by a total of six screws, no other screws should
be removed. The screw marked with an arrow also holds the HDD/SSD mounting bracket in place. After
removing the screws, gently lift the access panel at the tab marked with the asterisk to open.
It is highly recommended to remove the battery before opening the Neutrino Netbook to perform any
upgrade or installation of hardware.
01
Preparing / Replacing the Hard Disk Drive
The OCZ Neutrino Netbook uses a Serial ATA interface, therefore, any 2.5” mobile HDD/SSD selected for
this system needs to comply with the SATA standard. The HDD drive bay is located underneath the
access panel. Carefully remove the two remaining screws marked by the short arrows as shown below,
the screw marked by the long arrow was already removed earlier in the process of removing the access
panel.
02
Pull the black tab in the direction of the arrow to disengage the sliding retention bars from the rail as
shown below and remove the drive bay from the Netbook.
Fasten the four screws onto the harddrive and bracket.
03
Install the drive using the appropriate screws and re-insert the drive bay with the drive into the
Netbook. Please ensure that the sliding retention bars engage with the rails and pull the assembly in
the direction of the large arrow until it aligns with the screw holes. Secure the drive bay using the
screws in the holes indicated by the two arrows only. The screw hole indicated by the X is used later to
attach the access panel and is not used at this time.
04
Installing Memory
Position the memory module in the slot and slightly tap it to ensure full insertion. Then gently press
the module down until it lies flat and engages with the retention clips as shown in the picture below.
05
Close the cover and secure it with the appropriate screws. Reinstall the battery if necessary.
06
OCZ Technology Inc.
6373 San Ignacio Avenue
San Jose, CA 95119 USA
(408) 733-8400 Phone
(408) 733-5200 Fax
(408) 733-8400 Sales
TECHNICAL SUPPORT
For warranty support and technical information about your DIY Notebook, visit
www.ocztechnology.com. All OCZ PRODUCTS include free technical support for direct, expert advice.
Contact OCZ Technical support at (800) 459-1816 or email us at [email protected].
For support and technical information, please visit www.ocztechnology.com Copyright © OCZ
TECHNOLOGY GROUP 2009. ALL RIGHTS RESERVED