1
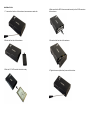
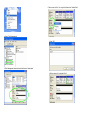
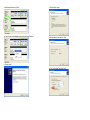
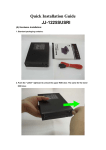
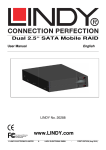
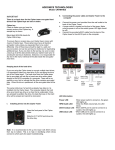
Enclosure Overview
RAID Setting
button
Power and individual drive activity LED
Backup
Removable front door
with ventilation holes
Addonics
T E C H N O L O G I E S
Eject for
Drive 1
Portable Dual Drive RAID Enclosure
Drive bay 1
Model: AE25RDESU
Eject for
Drive 2
Drive bay 2
Sturdy and heat resistant
aluminum enclosure
User’s Guide
eSATA 3Gbps
connection
FCC Warning Statement
This equipment has been tested and found to comply with the limits for a class B digital
device pursuant to Part 15 of the FCC rules. These limits are designed to provide
reasonable protection against harmful interference in a residential installation. This
equipment generates, uses and can radiate radio frequency energy. If not installed and
used in accordance with the instructions, it may cause harmful interference to radio
communications. However, there is no guarantee that interference will not occur in a
particular installation. If the equipment does cause harmful interference to radio or
television reception, which can be determined by turning the equipment on and off, the user
is encouraged to try and correct the interference by one or more of the following
suggestions.
Reorient or relocate the receiving antenna
Increase the distance between the equipment and the receiver
Connect the equipment to a different power outlet other than the one where receiver is
connected
Consult a certified television or radio technician
USB2.0 connection
RAID selection switch
Power switch
Power connector for
5V power adapter
(AAPAC5V)
Installation Guide
1. To remove the front door of the enclosure, loosen screws on each side.
4. Make sure that the SATA drives are seated correctly on the SATA connectors
of the enclosure.
2. Detach the front door of the enclosure.
5. Screw back the front door of the enclosure.
3. Slide the 2.5’’ SATA hard disk into the drive bay.
6. Tighten the screws (both sides) to secure the front door.
How to Configure Raid
Raid Setting Table
RAID Selection Switch
Display
RAID Status
4
2
1
c. Plug the other end of the mini USB data cable & USB power cable to USB ports
on your system.
Note: Due to the different layouts of Laptops, we suggest to plug the USB
cables on opposite sides of the Laptops to avoid weak power from the
same side USB ports.
Avoid using the front USB ports of desktop because, sometimes, it is too
weak to give enough power.
0
BIG (span)
OFF
OFF
OFF
1
JBOD (single)
OFF
OFF
ON
eSATA Connection
If you are connecting via eSATA, you will have to connect the USB power cable
or the 110/220V AC/DC 5V power adapter.
2
FAST (strip)
OFF
ON
OFF
Note:
3
SAFE (mirror)
OFF
ON
ON
4
SAFE33
ON
OFF
OFF
5
SAFE50
ON
OFF
ON
6
RESERVED
ON
ON
OFF
7
GUI ONLY
ON
ON
ON
To see 2 individual drives (JBOD single) using eSATA connection, the
enclosure must be connected to a port multiplier compatible SATA host
controller.
d. Turn on the power switch.
Power Switch
e. Press the “RAID Setting” button once.
Note:
Since the default Raid mode may be different from your new Raid mode
setting, it is required to press the “RAID Setting” button once before
using Portable Dual Drive RAID enclosure.
How to Build Raid JBOD
a. Setup Raid mode JBOD using RAID selection switch
1
JBOD (single)
OFF
OFF
ON
b. USB Connection
Plug in mini USB data cable & USB power cable as shown.
USB Power
Cable
USB Data Cable
f. Place the cursor on the My Computer icon on your desktop, do a right click and
choose “Manage” by clicking mouse left button
i. Place cursor on Disk 1, do a right click then select “Initialize Disk ”
g. Select “Disk Management” .
j. Press ”OK”
h. Disk Management shows the hard disks that are “Unallocated”
k. Refer to steps i & j to initialize Disk 2
l. Hard disks will become “Online”
m. Place cursor on Unallocated portion and select “New Partition”
o. Choose ”Next” again.
p. Set up partition size and click “Next”
n. Choose ”Next”
q. Tick “Quick format” and click ”Next”
r. Click ”Finish”
u. Format the other hard disk by referring to steps m ~ r.
s. Disk Management shows system is “Formatting”
v. When the drive has been formatted, “My Computer” will show two Physical
hard disks
t. When format is finish , it shows the drive as “Healthy”
How to build Raid : BIG(Span)
Set the DIP switch as above and Refer to Step b ~ v to build the Raid BIG(Span)
mode. This time you can see only 1 hard disk only(see following two pictures.)
0
BIG (span)
OFF
OFF
OFF
How to build Raid : SAFE50
Set the DIP switch as following and Refer to Step b ~ v to build the Raid SAFE50
mode. This time you can see 2 hard disks ( one is mirror hard disk and the other,
BIG. See following two pictures.
5
To hard disks
SAFE50
ON
OFF
ON
Two healthy hard disks
After Raid SAFE50 is finished, you can see two new hard disks, one is with Raid
mirroring and the other is with Raid BIG.
Trouble shooting
A Can only see “8GB Unallocated”
Possible reasons are:
A-1 You did not install any hard disk.
A-2 During initial installation you forgot to press “RAID Setting” button once.
A-3 You have change the Raid mode but forgot to press “RAID Setting” button
once.
H Can not see the correct device data under “57xx SteelVine Manager”
H-1 You can click the upper left icon “File” & click “Scan Drives” from pop-up
window to see it.
Technical Support
If you need assistance to get your unit functioning properly, please call Addonics
Technical Support. Our technical staff will be happy to assist you, but they will
need your help to do so. Calling the technical support staff without all the proper
information can be both time consuming and frustrating. Here are some tips to
help you out:
B Show wrong hard disk capacity or wrong hard disk numbers
B-1 Normally, it is because you have changed Raid mode setting but did not
delete the previous Raid partition. In this case, you will have to delete the
previous Raid partition on the hard disks and then, re-organize your hard
disks again.
MODEL NUMBER – Please have this number on hand.
SYSTEM INFORMATION – Type of computer, peripherals, etc.
OPERATING SYSTEM – What version of Windows
WHAT’S THE TROUBLE? – Give enough information
about your problem so that we can recreate and diagnose it.
FREE Software Drivers for all Addonics Technologies
Products are available 24 hours per day at the
World Wide Web Site: www.addonics.com
C Hard disk LED indicators are blinking with green/red
C-1 This is because the Safe (mirror) mode is rebuilding. It usually occurs during
initial setup of the Saf e(mirror) mode or you change the new hard disks.
C-2 The LED blinking will return to normal after rebuilding process is finished.
C-3 While the Safe(Mirror) is rebuilding or verifying, you can still use the hard
disks, only the performance will be slower than expected.
Contact Information
Phone:
408-573-8580
Fax:
408-573-8588
Email:
http://www.addonics.com/sales/query/
Internet:
http://www.addonics.com
D Hard disk LED light on Red or Red blinking
d-1 It means the this hard disk is not put in or not connected properly or the put in
hard disk is failed.
TECHNICAL SUPPORT
Phone:
408-453-6212
Hours:
8:30 am - 6:00 pm PST
Email:
http://www.addonics.com/support/query/
E Red LED “PWR/Backup” is blinking
E-1 It means you already push the ‘Back up” button and ready to proceed the
back up.
F LED “PWR/Back up” does not light on
F-1 It means the hard drive has problem under Safe(Mirror) Mode.
G When powering on, you can hear the ‘clicker’ sound
G-1 That means you have not connected the USB power cable to a USB port
properly or the USB power socket does not supply enough power.