1
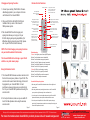
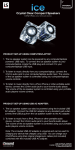
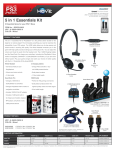
Package Contents:
• Main Speaker Unit
• Wireless Remote Control
• 3.5mm Audio Cable
i.Sound MAX
®
3. Select music from your iPod® and press play.
Adjust the volume to a desired listening level using
the i.Sound® MAX’s volume buttons. (make sure
that your iPod’s® volume is also set to a desirable
level)
• AC Adapter
• iPod® Spacer Brackets
• Instruction manual
i.Sound® MAX Set-up Instructions:
1. When using the i.Sound® MAX Speaker in battery
mode,remove the battery lid located on the
bottom of the main speaker and properly insert
4“AA” batteries as indicated in the battery
compartment. Replace the battery lid.
4. The i.Sound® MAX Speaker System has a battery
saving sleep mode function. If the iPod® is in
sleep mode or it’s power is off, the Max Speaker
will go to sleep mode and the green LED power
on indicator light will turn off. If the iPod® is
powered on, the Max Speaker will also power on.
In order to properly function, the Max Speaker
System requires a connected audio device that is
powered on.
2. When using a wall-outlet, use the included AC
adapter and plug it into the DC input jack on the
rear of the i.Sound® MAX Speaker System.
Note: only when using the AC adapter, your iPod will charge
while sitting in the speakers’ base.
®
5. Connecting your i.Sound® MAX to your computer
system.
Listening to music:
1. Place your iPod® into the speaker‘s dock. The MAX
Speaker System features different iPod® spacer
brackets. These spacers are used for different
models of iPod®. Choose the proper iPod® spacer
and snap it into the MAX’s docking area. (each
iPod® spacer bracket has the corresponding iPod®
name on it)
2. The i.Sound® MAX is also compatible with iPod®
shuffle as well as any other audio device with a
standard headphone jack.
• Using your existing iPod® USB or Firewire data
cable, connect the cable to the back of the
i.Sound® MAX and the other end to your
computer system of choice.
6. Power your i.Sound® MAX speaker system on and
prepare for MAXIMUM sound, data transfer and
iPod® charging with i.Sound® MAX.
For enhanced Bass press the
bass boost button located on
the i.Sound® Max Speaker.
To connect an iPod® shuffle or other audio device,
connect the included audio cable to your shuffle/audio
player’s headphone jack and than connect the audio
cable to the i.Sound® MAX’s line-in located on the back
of the i.Sound® MAX speaker.
Page 2
Page 1
PO Box 478
Torrance, CA 90508
www.dreamgear.net
www.isound.net
Remote Control Functions:
Charging and Syncing Function:
Volume up and down
1. Connect your exisiting iPod® USB or Firewire
data/charging cable to your computer of choice
and the back of the i.Sound® MAX.
The backlight button
awakens your iPod® from
sleep mode.
2. Plug your iPod® into the MAX’s iPod® dock
located at the top center of the i.Sound®
MAX speaker system.
A single press of the repeat
button sets your iPod® into the
repeat function, a second
press turns off the repeat
function.
Press once to rewind to the
next track or hold to
rewind the current track.
3.The i.Sound® MAX’s built in charging and
syncing dock allows you to enjoy all of your
iPod’s® charging and syncing capabiltites, (For
difficulties charging & syncing your iPod®, please
refer to your iPod®’s instruction manual)
A single press of the mute
button turns off the volume, a
second press of the mute
button restores the volume.
A single press of the shuffle button
sets your iPod® into the shuffle
function, a second press turns off
the shuffle function.
Press once to skip to the next
track or hold to fast forward the
current track.
The playlist up and down
buttons allow you to switch
to the previous or next
playlist that is stored in
your iPods® music library.
NOTE: The iPod® charging and syncing functions
only work with dockable iPod® models.
The i.Sound® MAX will not charge or sync iPod®
shuffle or any other music player.
Using the Remote Control:
1. The i.Sound® MAX features a wireless remote control
that controls nearly every feature of your iPod®. The
remote control uses infrared technology for transmit
ting signals to your i.Sound® MAX. For best
performance, always make sure you are directly in
front of your i.Sound® MAX speaker when using the
remote control.
2. For best performance, make sure you are within 10
feet of the Max Speaker when using the wireless
remote control.
Page 3
The album up and down
buttons allow you to switch to
the previous or next album.
One press pauses the music, a
second press restores the
music.
Troubleshooting:
Problem: I don’t get any sound from my MAX Speaker.
Solution: Confirm batteries are not drained/old.
Solution: Confirm batteries are properly inserted.
Solution: Confirm AC adapter is properly connected.
Solution: Confirm Max Speaker is not in sleep mode.
Solution: Confirm iPod® is properly connected.
Problem: My iPod® is not charging or syncing.
Solution: Confirm iPod® is properly connected.
Solution: Confirm Data/Sync cable is connected.
Solution: Confirm AC adapter is connected.
i.Sound® MAX Battery Usage Notes:
• When using the i.Sound® MAX with batteries there will be a slight loss of
overall volume.
• When using batteries and pressing the bass button on the i.Sound® MAX
you may notice a slight lessening of the overall bass effect.
• If you notice any loss of sound quality when powering the i.Sound® MAX
speaker with batteries, please replace the batteries with a new set.
• Due to the powerful amplifier in the i.Sound® MAX speaker, always try
and us the AC adapter whenever possible to save battery life and enjoy the
i.Sound® MAX speaker at its fullest.
Page 4
FOR TECHNICAL SUPPORT
PLEASE CONTACT: 1-877-999-DREAM
We carry a full line of video game accessories, iPod® accessories and a complete line of i.Sound® speakers for iPod®, PSP™, PC and much more...
For more information about dreamGEAR® products please visit us @ www.dreamgear.net
PO Box 478
Torrance, CA 90508
www.dreamgear.net
www.isound.net