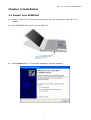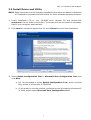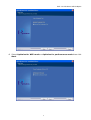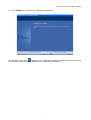
1
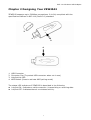
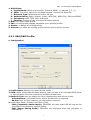
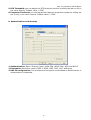
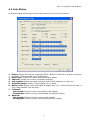
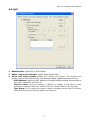
Copyright Statement
is the registered trademark of Zonet Technology Inc. All the products and
product names mentioned herein are the trademarks or registered trademarks of their
respective holders. Copyright of the whole product as integration, including its
accessories and software, belongs to Zonet Technology Inc. Without the permission of
Zonet Technology Inc., any individual or party is not allowed to copy, plagiarize, imitate
or translate it into other languages.
All the photos and product specifications mentioned in this manual are for references
only. As the upgrade of software and hardware, there will be changes. And if there are
changes, Zonet is not responsible for informing in advance. If you want to know more
about our product information, please visit our website at www.zonetusa.com .
802.11n Wireless USB Adapter
Table of Contents
Chapter 1. Introduction………………………………………………………………………P.1
1.1 Welcome………………………………………………………….……………………….P.1
1.2 Product Feature…………………..………………………………………………………P.1
1.3 Content of Package…………………………….………………….……………………P.1
1.4 Before You Begin……….………………………………………………………………P.2
Chapter 2. Design Your ZEW2542………..……………………………………….…….P.3
Chapter 3. Installation………………………………………………………………………P.4
3.1 Install Your ZEW2542……..…………………….……………………………………P.4
3.2 Install Driver and Utility………………………………………………………………P.5
Chapter 4. Configuration……………………………………………………………..……P.8
4.1 Profile…………………………………………………………………………………..….P.8
4.1.1 Add/Edit Profile………………………………………………………….……P.9
4.2 Link Status…….…………………………………………………………………..……P.12
4.3 Site Survey...……………………………………………………………………………P.13
4.4 Statistics……………..………….………………………………………………………P.14
4.5 Advanced...………………………………………………………………………………P.15
4.6 QoS...…..…………………………………………………………………………………P.16
4.7 WPS Configuration……………………………………………………………………P.17
4.8 About………………………………………………………………………………………P.17
Chapter 5. Use Zero Configuration…………………………………………………….P.18
Chapter 6. Soft AP………………..………………………………………….…………..P.23
6.1 Start Soft AP…………..…………………………………………………………….….P.23
6.2 Configuration……………..………………………………………………………..……P.24
6.3 Access Control…………………..………………………………………………………P.25
6.4 MAC Table……..……..………….………………………………………………………P.26
6.5 Switch to Working Station Mode………………………..…………………………P.26
Chapter 7. Specifications………………………………………………………………….P.27
Chapter 8. TroubleShooting…………………………………………………………….P.28
802.11n Wireless USB Adapter
Chapter 1 Introduction
1.1 Welcome
Thank you for purchasing Zonet ZEW2542-802.11n wireless USB adapter. ZEW2542
connects you with IEEE802.11n(Draft 2.0) networks at receiving rate up to an incredible
300Mbps! By using the reflection signal, 802.11n's “Multiple In, Multiple Out” (MIMO)
technology increases the range and reduces “dead spots” in the wireless coverage area.
Unlike ordinary wireless networking of 802.11b/g standards that are confused by
wireless reflections, MIMO can actually use these reflections to increase four times
transmission range of 802.11g products. Besides, when both ends of the wireless link are
802.11n products, MIMO technology can utilize twice radio band to increase three times
transmission speed of ordinary 802.11g standard products, and can comply with
backwards 802.11b/802.11g standards.
Soft AP supported by ZEW2542 can help you establish wireless LAN networking with
lowest cost. Besides, WPS (PBC and PIN) encryption method can free you from
remembering the long passwords. Complete WMM function makes your voice and video
more smooth.
1.2 Product Feature
Complies with IEEE 802.11n (Draft 2.0), IEEE 802.11g, IEEE 802.11b standards
Provides USB 2.0 interface
Provides 300Mbps receiving rate and 150Mbps sending rate
Supports 20MHz/40MHz frequency width
Supports Soft AP to establish your wireless LAN networking with lowest cost
Supports 64/128-bit WEP, WPA, WPA2 encryption methods and 802.1x security
authentication standard
Supports WPS (PBC and PIN) encryption method to free you from remembering
long passwords
Supports WMM to make your voice and video more smooth
Supports Windows 2000 / XP / 2003 / Vista
1.3 Contents of Package
One
One
One
One
ZEW2542
USB Cable
Installation CD w/User Manual
Quick Installation Guide
Contact your local authorized reseller or the store purchased from for any items
damaged and/or missing.
1
802.11n Wireless USB Adapter
1.4 Before You Begin
You must have the following:
A laptop computer/desktop PC with an available USB 2.0/1.1 slot
Minimum 300MHz processor and 32MB memory
At least 100MB of available disk space
Windows 2000, 2003, XP, 2003, Vista
A CD-ROM Drive
USB controller properly installed and working in the laptop computer
802.11n or 802.11b/g Access Point (for infrastructure Mode) or another 802.11n or
802.11b/g wireless adapter (for Ad-Hoc; Peer-to-Peer networking mode.)
2
802.11n Wireless USB Adapter
Chapter 2 Designing Your ZEW2542
ZEW2542 supports up to 300Mbps connections. It is fully compliant with the
specifications defined in 802.11n (Draft 2.0) standard.
2
1
3
4
1.
2.
3.
4.
USB Connector
Connector Cap (To protect USB connector when not in use)
Link/Activity LED
WPS Button (Press to activate WPS pairing mode)
The status LED indicators of ZEW2542 is described in the following.
Lnk/Act ON : Indicates a valid connection / transmitting or receiving data
Lnk/Act OFF: Indicates there’s no wireless activity.
3
802.11n Wireless USB Adapter
Chapter 3 Installation
3.1 Install Your ZEW2542
Power on your PC, let the operating system boot up completely, and log in as
needed.
Hold ZEW2542 and insert it into a USB slot.
Select Cancel when “Found New Hardware” window appears.
4
802.11n Wireless USB Adapter
3.2 Install Driver and Utility
NOTE: Snap-shot screens of the following installation procedure are based on Windows
XP. Installation procedures will be similar for other windows operating systems.
1. Insert Installation CD to your CD-ROM drive. Browse CD and double-click
setup.exe in Driver folder to execute it. The wizard will run and install all necessary
files to your computer automatically.
2. Click Next to accept the Agreement. Or click Cancel to cancel the installation.
3. Select Ralink Configuration Tool or Microsoft Zero Configuration Tool then
click Next.
a. It’s recommended to select Ralink Configuration Tool, which provides
fully access to all function of ZEW2542.
b. If you prefer to use the wireless configuration tool provided by Windows XP
or Vista, please select Microsoft Zero Configuration Tool.
5
802.11n Wireless USB Adapter
4. Select Optimize for WiFi mode or Optimize for performance mode then click
Next.
6
802.11n Wireless USB Adapter
5. Click Finish to complete the software installation.
You will see a tray icon
appear in your system tray at the bottom of the screen after
the software and hardware installation completed successfully.
7
802.11n Wireless USB Adapter
Chapter 4 Configuration
Right-click the tray icon
configuration utility.
and then click Launch Config Utilities to use Ralink
4.1 Profile
Profile can keep your favorite wireless setting among your home, office, and other
public hotspot. You may save multiple profiles and activate the one at your preference.
8
802.11n Wireless USB Adapter
1. Definitions:
a. Profile Name: Name of the profile, preset to PROF* (* indicate 1, 2, 3,)
b. SSID: The public name of a wireless network, Service Set IDentifier
c. Network Type: Infrastructure and/or Ad-Hoc
d. Authentication: Open, Shared, (Leap), WPA-PSK, WPA2-PSK, WPA and WPA2
e. Encryption: WEP, TKIP, AES, and None
f. Channel: Channel of the connected wireless network
2. Add : to create a new profile
3. Edit : to edit/modify/change parameter of an existing profile
4. Delete : to delete an existing profile
5. Activate : to make an existing profile become active and to connect
4.1.1 Add/Edit Profile
a. Configuration
1. Profile Name: Specify one name for the profile
2. SSID: Name of intended wireless network, User can key in the intended SSID name
or use pull down menu to select from available Access Point.
3. Network Type: you can select one from Infrastructure and Ad-hoc modes
Infrastructure: A wireless Router and/or Access Point is required.
Ad-hoc: Peer-to-Peer network, no base station required.
4. Power Save Mode: Choose from CAM or PSM.
CAM (Constantly Awake Mode): ZEW2542 will stay power-ON as long as the
computer is connected to a power outlet.
PSM (Power Saving Mode): ZEW2542 will hibernate when the computer is
hibernating.
9
802.11n Wireless USB Adapter
5. RTS Threshold: you can adjust the RTS threshold number by sliding the bar or key in
the value directly. Default value = 2347
6. Fragment Threshold: you can adjust the Fragment threshold number by sliding the
bar or key in the value directly. Default value = 2346
b. Authentication and Security
1. Authentication: Open, Shared, (Leap), WPA-PSK, WPA2-PSK, WPA and WPA2
2. Encryption: Algorithm used in BSS or IBSS, WEP, TKIP, AES, and None
3. 802.1x configuration: It is an advanced encryption mode based on Radius server or
authentication credentials.
10
802.11n Wireless USB Adapter
c. 802.1X
1. Authentication Type: The type selected here must be identical to the type of the
802.1x authentication type you’re using.
2. Session Resumption: Enable or Disable.
3. Domain Name: Input the domain name of 802.1x authentication. This field will be
grayed out when authentication type is not EAP-FAST.
4. Use Client: If the authentication type is using PEAP or TTLS, you can use the
certificate stored on your computer. If the authentication type is using TLS/Smart
Card, this box is always checked.
5. Allow unauthenticated provision mode: This box is always checked and can not
be modified.
6. Use protected authentication credential: If the authentication type is using
EAP-FAST, you can use protected authentication credential by check this box.
7. Remove: Remove the credential you imported previously.
8. Import: Import the authentication credential file (PAC or al file format), you’ll be
prompted to select a credential file from your computer.
9. Protocol: Select the protocol of tunneled authentication. This pull-down menu is
only available when authentication type is using PEAP or TTLS. When using
EAP-FAST as authentication type, the protocol setting is always Generic Token
Card and can not be changed.
10. Password Mode: Select the password mode of EAP-FAST authentication mode.
This setting is hidden when the authentication type is not EAP-FAST.
11
802.11n Wireless USB Adapter
4.2 Link Status
Link status page shows detail information about the current connection.
1. Status: Shows the current connected SSID / BSSID. If there’s no active connection
currently, “Disconnected” will be displayed.
2. Extra Info: Shows link status and its transmit power
3. Channel: Shows the current connected channel
4. Link Quality: Based on signal strength and TX/RX packet error rate (%)
5. Signal Strength: Shows in percentage (%) or dBm
6. Noise Level: Shows noise and signal strength ratio (%). If the value of this item is
high, data transfer rate will drop.
7. Transmit:
Link Speed: Shows current transmitting rate (Mbps)
Throughput: Shows current transmitting throughput (Kbps)
8. Receive:
Link Speed: Shows current receiving rate (Mbps)
Throughput: Shows current receiving throughput (Kbps)
12
802.11n Wireless USB Adapter
4.3 Site Survey
Under Site Survey tab, you will know information of all surrounding wireless networks
from the last scan. Click Rescan to update and refresh. Or Select a SSID to add to
your profile.
Indicates your current connected network.
13
802.11n Wireless USB Adapter
4.4 Statistics
Statistics page displays the detail counter information based on 802.11 MIB counters.
This page translates that MIB counters into a format easier for user to understand
14
802.11n Wireless USB Adapter
4.5 Advanced
The following figure shows Advance function of UI
1. Wireless mode: Select from 802.11B only, 802.11 B/G mixed, 802.11 B/G/N
mixed, and 802.11G only
2. Enable Tx BURST: Ralink’s proprietary frame burst mode. Suggest using with an
Access Point that has the same technology.
3. Enable TCP Window Size: Check this box and the configuration utility will adjust
TCP window size automatically to get better performance.
4. Fast Roaming at: Fast to roaming, setup by transmitting power
5. Enable CCX(Cisco Compatible eXtensions):
a. LEAP – Turn on CCKM
b. Enable Radio Measurement: channel measures every 0~2000 milliseconds
15
802.11n Wireless USB Adapter
4.6 QoS
1. WMM Enable: Enable Wi-Fi Multi-Media
2. WMM - Power Save Enable: Enable WMM Power Save
3. Direct Link Setup Enable: Enable DLS (Direct Link Setup). This function will
greatly improve the data transfer rate between WMM-enabled wireless devices.
MAC Address: Input the MAC address of another WMM-enabled wireless device
you wish to establish a direct link.
Timeout Value: must be between 0~65535 in integer. If the value is zero
represents it always connects. Default value of Timeout Value is 60 seconds.
Tear Down: If you want to remove a specific wireless device from DLS table,
select the device and click this button to remove it.
16
802.11n Wireless USB Adapter
4.7 WPS Configuration
WPS page supports the configuration setup using PIN configuration method or PBC
configuration method. WPS(Wi-Fi Protected Setup) is to simplify the security setup and
management of Wi-Fi networks.
1.
2.
3.
4.
5.
6.
7.
8.
WPS AP List: Display the information of surrounding APs with WPS IE from last
scan result, including SSID, BSSID, Channel, ID (Device Password ID),
Security-Enabled.
Rescan: Update information on surrounding wireless network.
Information: Display the information about WPS IE on the selected network, list
including Authentication Type, Encryption Type, Config Methods, Device Password
ID, Selected Registrar, State, Version, AP Setup Locked, UUID-E and RF Bands
PIN Code: 8-digit numbers.
Config Mode: Enrollee or external Registrar
Detail: Information about Security and Key in the credential.
Connect: Connect to the selected network inside credentials.
Rotate: Connect to the next network inside credentials.
17
802.11n Wireless USB Adapter
9.
10.
11.
12.
13.
Disconnect: Stop WPS action and disconnect this active link.
Export Profile: Export all credentials to Profile.
Delete: Delete an existing credential.
PIN: Start to add to AP using PIN configuration method
PBC: Start to add to AP using PBC configuration method
Note: When clicking PIN or PBC button, please don't click Rescan within two-minute. If you want
to abort this setup within the interval, restart PIN/PBC or press Disconnect to stop WPS.
14. WPS associate IE: Send the association request with WPS IE during WPS setup.
15. WPS probe IE: Send the probe request with WPS IE during WPS setup.
4.8 About
Display information about ZEW2542, such as Utility version/date, Driver version/date,
EEPROM version and Firmware version.
18
802.11n Wireless USB Adapter
Chapter 5 Use Zero Configuration
Windows XP and Vista has a built-in wireless network configuration utility “Windows Zero
Configuration” (WZC). It is a built in service to configure your wireless clients from
Windows
1. Start using WZC, right click the tray utility
and select Use Zero Configuration
as Configuration utility.
2. The windows wireless network connection will appear, double click the wireless
network icon
on the system tray to check the wireless network, choose the
network and click Connect to setup the association.
3. If your wireless router has been encrypted, there will be a window appeared for input
the key. Please input the key and click Connect, then the connection connect.
19
802.11n Wireless USB Adapter
4. To configure the wireless connect properties, please right click the wireless icon in
the system tray and choose Status to open the page Wireless Network
Connection Status.
5. Click Properties button in General page and choose the tab Wireless Networks to
add the SSID of available network by clicking Add, if there are several available
networks, linking priority could be configured by the button Move up and Move
down. The icon
shows the current linked AP. Click Properties to configure
authentication of wireless connection.
20
802.11n Wireless USB Adapter
21
802.11n Wireless USB Adapter
6. Advanced page configures firewall and connection sharing.
22
802.11n Wireless USB Adapter
Chapter 6 Soft AP
ZEW2542 has two modes: working station and Soft AP. After start Soft AP, ZEW2542 will
be an AP to accept any wireless device access.
6.1 Start Soft AP
After starting ZEW2542 driver, you will see icon
in the system tray.
Right click the icon and choose Switch to AP Mode, the tray icon will change to
and the soft AP configuration Utility window will appear as below.
23
,
802.11n Wireless USB Adapter
6.2 Configuration
In soft AP configuration Utility page, you can make some basic configurations, such as
wireless network name, mode, channel and authentication.
Click Security Setting button to make different security configurations of wireless
communication, and you can choose the authentication type or encryption type.
24
802.11n Wireless USB Adapter
6.3 Access Control
Choose Access Control tab to start MAC control. Access control includes Allow All and
Reject All. After editing the MAC address access list, only the MAC in the Allow All list
could access the Soft AP.
25
802.11n Wireless USB Adapter
6.4 MAC Table
MAC Table page shows the information of the wireless devices accessed to this soft AP.
6.5 Switch to Working Station mode
In the Soft AP mode, right-click the icon
in the system tray and choose Switch to
Station Mode, then ZEW2542 is switching to working station mode with an interface of
working station.
26
802.11n Wireless USB Adapter
Chapter 7. Specifications
General Features
Standards
IEEE 802.11n, IEEE 802.11g, IEEE 802.11b standards
Interface
USB2.0
OS
Windows 2000/ XP/ Vista
User interface
Easy to use user configuration software
roaming
Support multipoint auto roaming and configuration;
Support wireless network environments auto detect.
LED
Link / activity
Antenna type
Two printed antennas
Power
5V bus powered
RF and baseband Technical Features
Frequency range
2.4000 ~ 2.4835GHz
Radio data rate
11n (20MHz): up to 144Mbps
11n (40MHz): up to 300Mbps
11g: 54/48/36/24/12/9/6Mbps
11b: 11/5.5/2/1Mbps
Modulation
OFDM, CCK, BPSK, QPSK
Spectrum Spread Technology DSSS
Transmit output power
11n: 14~15 dBm
OFDM: 15dBm ± 2dBm
11Mbps CCK: 16~18dBm
Antenna Gain
2dBi*2
Channels
11 Channels (USA, Canada)
13 Channels (Europe)
14 Channels (Japan)
Transmission Distance
Indoor up to 150m (limited to environment)
Outdoor up to 450m (limited to environment)
Media Access Protocol
WMM
Data security
WPA/WPA2; 64/128-bit WEP; Cisco CCX Support
Environmental and Physical
Operation Temp.
0°C ~ 50°C
Storage Temp.
-20º C ~ 70º C
Operation Humidity
5% ~ 90% RH non-condensing
Storage Humidity
5% ~ 90% RH non-condensing
27
802.11n Wireless USB Adapter
Chapter 8. TroubleShooting
This chapter provides solutions to problems that may occur during the installation and
operation of ZEW2542. Read the descriptions below to solve your problems.
1. The ZEW2542 does not work properly.
Reinsert ZEW2542 into your PC’s USB slot.
Right click on My Computer and select Properties. Select the device manager and click on
the Network Adapter. You will find ZEW2542 if it is installed successfully. If you see the
yellow exclamation mark, the resources are conflicting. You will see the status of
ZEW2542. If there is a yellow question mark, please check the following:
Make sure that your PC has a free IRQ (Interrupt ReQuest, a hardware interrupt on a
PC.)
Make sure that you have inserted the right adapter and installed the proper driver. If
ZEW2542 does not function after attempting the above steps, remove it and do the
following:
Uninstall the driver software from your PC.
Restart your PC and repeat the hardware and software installation as specified in this
User Guide.
2. I cannot communicate with the other computers linked via Ethernet in the
Infrastructure configuration.
Make sure that the PC to which ZEW2542 is associated is powered on.
Make sure that ZEW2542 is configured on the same channel and with the same security
options as with the other computers in the Infrastructure configuration.
3. What should I do when the computer with ZEW2542 installed is unable to
connect to the wireless network and/or the Internet?
Check that the LED indicators for the broadband modem are indicating normal activity. If
not, there may be a problem with the broadband connection.
Check that the LED indicators on the wireless router are functioning properly. If not,
check that the AC power and Ethernet cables are firmly connected.
Check that the IP address, subnet mask, gateway, and DNS settings are correctly
entered for the network.
In Infrastructure mode, make sure the same Service Set Identifier (SSID) is specified on
the settings for the wireless clients and access points.
In Ad-Hoc mode, both wireless clients will need to have the same SSID. Please note that
it might be necessary to set up one client to establish a BSS (Basic Service Set) and wait
briefly before setting up other clients. This prevents several clients from trying to
establish a BSS at the same time, which can result in multiple singular BSSs being
established, rather than a single BSS with multiple clients associated to it.
Check that the Network Connection for the wireless client is configured properly.
If Security is enabled, make sure that the correct encryption keys are entered on both
ZEW2542 and the access point.
28
802.11n Wireless USB Adapter
4. I can’t find any wireless access point / wireless device in Site Survey
function.
Click Rescan for few more times and see if you can find any wireless access point or
wireless device.
Please move closer to any known wireless access point.
Ad-hoc function must be enabled for the wireless device you wish to establish a
direct wireless link.
Please adjust the position of ZEW2542 (you may have to move your computer if
you’re using a notebook computer) and click Rescan button for few more times. If
you can find the wireless access point or wireless device you want to connect by
doing this, try to move closer to the place where the wireless access point or
wireless device is located.
5. Nothing happens when I click Launch config utilities
Please make sure ZEW2542 is inserted into your computer’s USB port. If the Ralink
configuration utility’s icon is black, ZEW2542 is not detected by your computer.
Reboot the computer and try again.
Remove ZEW2542 and insert it into another USB port.
Remove the driver and re-install.
6. I can not establish connection with a certain wireless access point
Click Connect for few more times.
If the SSID of access point you wish to connect is hidden (nothing displayed in SSID
field in Site Survey function), you have to input correct SSID of the access point you
wish to connect.
You have to input correct passphrase / security key to connect an access point with
encryption.
The access point you wish to connect only allows network cards with specific MAC
address to establish connection. Please go to About tab and write the value of
Phy_Addess down, then present this value to the owner of access point to add the
MAC address of your ZEW2542 to owner’s access point’s list.
7. The network is slow / having problem when transferring large files
Move closer to the place where access point is located.
Enable Wireless Protection in Advanced tab.
Try a lower TX Rate in Advanced tab.
Disable Tx Burst in Advanced tab.
Enable WMM in QoS tab if you need to use multimedia / telephony related
applications.
Disable WMM – Power Save Enable in QoS tab.
There could be too much people using the same radio channel. Ask the owner of the
access point to change the channel number.
29