Transcript
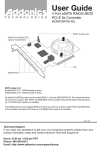
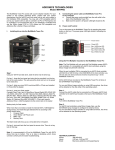
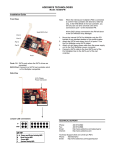
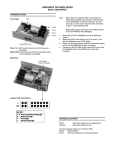
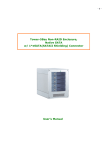
ADDONICS TECHNOLOGIES
Model: ADSA3GPX8-4E
Installation Guide
Angled View
Hard Drive Activity LED
Jumper connections
BIOS Jumper
(J4)
Fan
Confirming Serial ATA RAID Driver Installation
1. Right click the My Computer icon and select Properties.
2. Click Device Manager in the Menu Tree.
3. Click the “+” sign in front of SCSI and RAID Controllers.
You should see Silicon Image SiI3124 SoftRAID 5
Controller.
Note:
Another option to create a RAID set is to press F4 or
CTRL+S from the boot up screen. Read and follow the
instruction inside the BIOS screen.
eSATA
Ports
BIOS Jumper (J4)
Enable BIOS (1-2) – RAID firmware is active
Disable BIOS (2-3) – Base firmware is active
Windows Base Driver Installation
Note:
If you are only configuring independent drives using
the host controller all you need to install is the
driver and set the BIOS jumper to Disable BIOS.
1.
By default, the BIOS jumper is set to enable BIOS (1-2) for
the ADSA3GPX8-4E. This means that when you boot into a
system, after POST, the RAID BIOS of the controller card
with the attach devices shows up. The RAID driver needs to
be installed.
2.
3.
If the BIOS jumper is set to disable BIOS (2-3) when you
boot into a system, after POST, the RAID BIOS of the
controller card does NOT show up. The BASE driver needs
to be installed.
Software Installation for RAID:
Note: Install the SATA Utilities from the CD that came with
your package first before installing the Host Controller.
A. From the CD start-up menu select SATA RAID
Utilities. Select Model #ADSA3GPX8-4E.
B. Unzip the file on your drive.
C. Click on the folder that matches your OS. Run the
3124-W-I32-R_version.msi.
4.
5.
Connect the SATA host controller to an available PCI –
Express slot.
Turn computer ON. When Windows boots up, the
“Found New Hardware Wizard” pops on the screen and
the Silicon Image SiI3124 SATALink Controller is
identified.
Place the Driver Disk on your optical drive. Select
automatically look for driver on the wizard.
Wait while the wizard installs the software…
After driver installation, it is recommended to restart
your system.
Confirming Serial ATA Base Driver Installation
1. Right click the My Computer icon and select Properties.
2. Click Device Manager in the Menu Tree.
3. Click the “+” sign in front of SCSI and RAID Controllers.
You should see Silicon Image SiI 3124 SATALink
Controller.
Hardware Installations:
1. Power OFF PC and remove its cover.
2. Select an empty PCI-E 8x slot and insert the SATA
Controller.
3. Makes sure to secure the bracket with a screw.
4. Close the PC’s cover.
Windows 2000, XP, 2003 server Driver Installations
1. Turn computer ON. When Windows boots up, “A
New Hardware Found” pops on the screen and the
Addonics Serial ATA PCI Host Controller is
identified.
2. At the “Add New Hardware Wizard Window, click
“Next”
3. Choose “Select for the best driver for your devices”,
and click “Next”
4. If using a driver that has not been digitally signed
by Microsoft, you will be asked if you want to
continue the installation. Click Continue.
5. When the new hardware wizard has finish installing
the Serial ATA card. Click “Finish” to complete the
installations.
TECHNICAL SUPPORT
Email:
Internet:
http://www.addonics.com/sales/query/
http://www.addonics.com
Technical Support (8:30 am to 6:00 pm PST)
Phone:
408 453-6212
Email:
http://www.addonics.com/support/query/