1
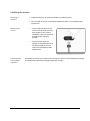
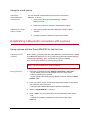
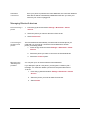
Parrot MKi9100 User guide 1 Contents Contents .................................................................................................................... 2 Installation................................................................................................................. 3 Before you begin ..................................................................................................................................... 3 Checking the car configuration ...................................................................................................... 3 Caution .......................................................................................................................................... 3 Removing the car stereo ............................................................................................................... 3 Installing the kit ........................................................................................................................................ 4 Car stereo with ISO connectors .................................................................................................... 4 Car stereo with line-in.................................................................................................................... 4 Installing the electronic box ........................................................................................................... 5 Installing the kit‟s power cable ...................................................................................................... 6 Checking the wiring ....................................................................................................................... 6 Installing the audio connectors ...................................................................................................... 6 Installing the individual components ........................................................................................................ 7 Installing the double microphone .................................................................................................. 7 Installing the remote control .......................................................................................................... 8 Installing the screen .................................................................................................................... 10 Getting started ........................................................................................................ 11 Navigating through the menus............................................................................................................... 11 Associating the remote control to the electronic box .................................................................. 11 Commands .................................................................................................................................. 11 Using the vocal menus ................................................................................................................ 12 Establishing a Bluetooth connection with a phone ................................................................................ 12 Using a phone with the Parrot MKi9100 for the first time ............................................................ 12 Managing Bluetooth devices ....................................................................................................... 13 Synchronizing the phonebook ............................................................................................................... 14 Phone....................................................................................................................... 15 Making and receiving calls .................................................................................................................... 15 Making a call ............................................................................................................................... 15 Receiving a call ........................................................................................................................... 16 Using the Parrot MKi9100 while on a call ................................................................................... 16 Using voice recognition ......................................................................................................................... 18 Receiving a call via voice recognition ......................................................................................... 18 Making a call via voice recognition .............................................................................................. 18 Music ....................................................................................................................... 20 Using the Parrot MKi9100 with an external source ............................................................................... 20 Using the Parrot MKi9100 with an iPod / iPhone ........................................................................ 20 Using the Parrot MKi9100 with a USB peripheral ....................................................................... 21 Using the Parrot MKi9100 with an audio player connected via Bluetooth .................................. 21 Using the Parrot MKi9100 with an analogue audio player .......................................................... 22 Commands ............................................................................................................................................ 22 Settings ................................................................................................................... 23 Brightness ................................................................................................................................... 23 Ringtone ...................................................................................................................................... 23 Call .............................................................................................................................................. 23 Activating the external noise elimination ..................................................................................... 24 Audio ........................................................................................................................................... 25 2 Installation WARNING: We advise our customers to have the Parrot MKi9100 fitted by a professional. Before you begin Checking the car configuration The cables supplied with the kit feature ISO connectors and two pairs of line-out jacks. The line-out jacks can be used if your audio system features this option (use of an amplifier). Several set-ups are therefore possible depending on the type of car stereo and your vehicle. If your car stereo is not fitted with ISO connectors, you need to purchase an ISO adapter cable to simplify the wiring procedure. Refer to the range of ISO adapters on our website. Caution Unplug the battery before installing the kit‟s power cable. Before you install the individual components, check that the installation locations have been selected in such a way that the cable length is sufficient to connect every element. Do not install any component (screen, remote control…) in the airbag deployment area. Once the installation is complete, make sure that no cables are pinched. Removing the car stereo Remove your car stereo from you vehicle. You may need release keys to do so. ► Refer to your car stereo user guide or contact your car dealer for more information. Remove the audio system from your vehicles dashboard to access the wiring harness. The mute function is used to cut the sound of your car stereo to enable a phone call. The choice of the mute-in jack depends on your car stereo‟s configuration. 3 Installing the kit Car stereo with ISO connectors 1. Connect the male connectors of the hands-free kit to the car stereo. 2. Join the vehicle‟s audio and power supply cables to the female connectors of the Parrot MKi9100. 3. On the installation cable, connect the free yellow wire to one of the audio system‟s corresponding mute-in jacks if available (mute in 1, mute in 2 or mute in 3). Car stereo with line-in Use this type of connection by wiring the line-out (brown & white wire or red & black wire) to your car stereo‟s line-in. Using the two pairs of line-out will enable you to take advantage of the music function in stereo over your vehicle‟s speakers. 4 On the installation cable, connect the free yellow wire to the corresponding audio system‟s mute-input if available (mute in 1, mute in 2 or mute in 3). Installing the electronic box Avoid installing the electronic box near heating or air-conditioning system, on a spot directly exposed to sunlight or behind metal walls. Make sure the electronic box stays fixed once it is installed and that it will not move while you are driving. Do not reinstall the car stereo forcibly. If you are short of space behind the car stereo to install the electronic box, consider installing it in the glove box. 5 Installing the kit‟s power cable Note : In order to check the wiring, connect the screen before placing it on the dashboard. ► Refer to the Checking the wiring section for more information. Refer to your car stereo‟s wiring diagram. The red wire of the kit‟s cable must correspond to the constant +12V supply, the orange wire to the ignition +12V and the black wire to ground. Check that the orange wire is not connected to the constant +12V supply, as you could run down the vehicle‟s battery. Note : On some vehicles, there is no ignition +12V on the vehicle’s connectors. You must therefore connect the orange power supply wire to the fuse box or another ignition power source. Checking the wiring To perform the installation check, turn the ignition on then off once the Parrot MKi9100 is installed: the message “Goodbye!” must be displayed. If it is not the case, it is necessary to inverse the positions of the red and orange wires. Indeed, the red wire of the power cable must be connected to the permanent 12V, the orange wire to the 12V ignition and the black wire to the ground. This can be done simply by reversing both fuse holders located on the Parrot wiring. Installing the audio connectors Installing the music cable binding system The music cable binding system allows you to adjust the cable length while reducing its wear. 1. Drill a 20 mm hole in your dashboard (glove compartment or parcel tray). 2. Insert manually two flexible arms of the binding system. 3. Use a flat screwdriver in order to insert the last two arms. > You can now connect your music cable to the bluebox . 6 Installing the music cable Connect the music cable to the electronic box and place the USB / iPod / Jack connectors into the glove box, the central console or the parcel tray depending on the configuration of your dashboard. Make sure that the cable is not pinched. Note : Use the provided protection cap to protect the connectors. Installing the individual components Installing the double microphone Selecting a location In order to get hi-quality conversations, we advise you to respect the following recommendations: Make sure the microphone is installed as close to the mouth of the user as possible. The ideal distance is 60 cm. The best possible location for the microphone is near the rear-view mirror. The microphone needs to be pointed towards the user. 7 D < 60 cm α < 45° Make sure the microphone is not exposed to the air stream from air vents. Do not install the microphone cable in heating, ventilation or air conditioning systems. Mounting the double microphone The mounting location for the microphone must be clean and free from grease or dust. Prior to installation, clean the area with an appropriate cleansing product. Once you have stuck the support on the dashboard, wait for approximately 2 hours to make sure the adhesive tape adheres well. Installing the remote control Installing the remote control on the steering wheel If you want to place the remote control on the steering wheel, make sure it is securely attached, so that it does not move when you are driving. 8 WARNING: Do not install the remote control on the outside of the steering wheel and ensure it does not get in the way when driving. Installing the remote control on the dashboard If you want to place the remote control on the dashboard, stick the doublesided tape located on the flat side of the bracket to fix it against the dashboard. You can then insert the remote onto the bracket. WARNING: Once you have stuck the support on the dashboard, wait for approximately 2 hours to make sure the adhesive tape adheres well. Replacing the battery The remote control only works with a 3V CR2032 battery. Make sure the battery is correctly positioned before inserting it into the remote control. 9 Installing the screen Selecting a location Install the screen in an easily accessible and visible location. Do not install the screen in the airbag deployment area or in a possible head impact area. Mounting the screen The mounting location for the screen must be clean and free from grease or dust. Prior to installation, clean the area with an appropriate cleansing product. Once you have stuck the support on the dashboard, wait for approximately 2 hours to make sure the adhesive tape adheres well. Avoiding theft and sunlight exposure Remember to remove your screen when leaving the vehicle to avoid tempting any wouldbe thieves and to prevent prolonged exposure to sunlight. 10 Getting started WARNING : If the remote control doesn’t seem to be associated to the electronic box while using the Parrot MKi for the first time, refer to the Associating the remote control to the electronic box section. Navigating through the menus Associating the remote control to the electronic box If the remote control doesn‟t seem to be associated to the electronic box while using the Parrot MKi for the first time, press several times the button while holding down the «Pairing remote control» message is said. and buttons until the This has to be done during a 30 seconds period once the ignition is turned on. Commands Accessing the main menu Browsing through the menus Exiting the menu Press the central jog wheel to access the menus. > The kit says the name of the current menu. Turn the jog wheel to browse through the menus. Press the button or the jog wheel to confirm. Press the button to get back to the previous menu. Press the button to exit the menu or get back to the Now Playing screen if a song is currently being played. 11 Using the vocal menus Activating / deactivating the vocal menus You can activate or deactivate the vocal menus of the Parrot MKi9100. To do so: 1. Press the jog wheel and select Settings > Audio > Spoken menus. 2. Press the jog wheel to activate or deactivate this option. Adjusting the vocal menus volume 1. Press the jog wheel and select Settings > Audio > Menu Volume. 2. Use the jog wheel to adjust the volume and confirm. Establishing a Bluetooth connection with a phone Using a phone with the Parrot MKi9100 for the first time Adjusting the kit visibility Before pairing your phone with the Parrot MKi9100, make sure that it is visible by all Bluetooth ® devices. To do so press the jog wheel and select Settings > Bluetooth >Visibility. Then, make sure this option is selected. If it is not the case, select it by pressing the jog wheel. Note : The Parrot MKi9100 is visible by default. Pairing a phone 1. Press the jog wheel and select Settings > Bluetooth > Pair with…. > If your mobile phone‟s model appears in the list, select it and confirm by pressing the jog wheel. > If your mobile phone model doesn‟t appear in the list, select the Other phones option. 2. From your phone, search for Bluetooth peripherals. Refer to your phone user guide for more information. > The list of the available Bluetooth peripherals is displayed. 3. Select « Parrot MKi9100 » in the list. 4. Enter « 0000 » on your phone when you are prompted to enter a PIN code. > «Pairing successful» is displayed on the screen of the Parrot MKi9100. 12 Automatic connection Once your phone is paired to the Parrot MKi9100, the connection between both devices will be automatically established each time you enter your vehicle if your screen is plugged in. Managing Bluetooth devices Disconnecting a phone 1. Press the jog wheel and select Settings > Bluetooth > Paired devices. 2. Select the phone you want to disconnect from the kit. 3. Select Disconnect. Connecting an already used phone The Parrot MKi9100 automatically connects itself to the last phone you used with it. If you want to connect the Parrot MKi9100 to another phone you already paired: 1. Press the jog wheel and select Settings > Bluetooth > Paired devices. 2. Select the phone you want to connect to the Parrot MKi9100. 3. Select the Connect option. Managing the “Memory full” problem You can pair up to 10 devices with the Parrot MKi9100. If you attempt to pair an 11th phone, you will get the « Memory full » message. You must then delete a phone from the paired devices list. To do so: 1. Press the jog wheel and select Settings > Bluetooth > Paired devices. 2. Select the phone you want to delete from the list. 3. Select Delete. 13 Synchronizing the phonebook Note : Only contacts stored in the memory of the phone will be synchronised in the kit’s memory. Automatic synchronisation With most of the Bluetooth phones, the phonebook is automatically synchronized in the kit‟s memory. Refer to the compatibility section of our website for more information. WARNING : The automatic synchronization is limited to 2 000 contacts for each paired phone. Sending contacts via Object Push If your phone doesn‟t support automatic synchronization, you can also send contacts from your mobile to the car kit via Object Push. To do so: 1. Press the jog wheel and select Phone > Receive contacts. 2. Refer to your phones „user guide for more information about sending contacts via Object Push. Deleting a contact Note : You can only delete contacts sent via Object Push. 1. Press the jog wheel and select Phone > Contacts management. 2. Select the contact you want to delete. 3. Press the jog wheel and select Delete contact. Deleting all contacts Note : You can only delete contacts sent via Object Push. Press the jog wheel and select Phone > Delete all contacts. 14 Phone Before using your Parrot MKi9100 telephone function, you first have to connect it with your phone / PDA. ► For more information,refer to the Establishing a Bluetooth connection with a phone section. Making and receiving calls The network signal at the top of the screen shows wether you are in range of the cellular network and can make and receive calls. The more bars, the stronger the signal. Making a call Calling a contact in the phonebook If the contact you want to call is in the phonebook of the phone connected to the Parrot MKi9100: 1. Press the jog wheel to enter the main menu and select Phonebook. 2. Select a letter and press the jog wheel. > Once the contact chosen: - Dialling a number Press the button to call this contact. Or use the jog wheel to choose between different numbers of the same contact. If the contact you want to call is not in the phonebook of the phone connected to the Parrot MKi9100, stop your vehicle in a safe location, press the jog wheel and select Phonebook > Dial a number. You can then use the jog wheel to select the digits. You can also make the call directly from your phone. Bringing up the last dialled number Hold down the key of the Parrot MKi9100 for two seconds to redial the last dialled number. 15 Receiving a call An incoming call is indicated by a ringtone. The name of the caller is announced if his details are stored in the phonebook of the phone connected to the Parrot MKi9100. Answering a call Press the button to answer an incoming call. Declining a call Press the button to decline an incoming call. Using the Parrot MKi9100 while on a call Adjusting the volume Transfering a call to the phone Use the jog wheel during a call to adjust the communication volume. > The volume setting is saved for subsequent calls. During a call, if you want to continue the conversation on your phone (private conversation), press the button of the Parrot MKi9100. > The call is automatically transferred to the phone. If you want to switch back to the kit, press the Muting a call Managing a second call button again. If you want to deactivate the microphone during a call, press the button : you will still hear your caller but your caller will not be able to hear you. Press the button to reactivate it again. During a call, you can receive another call if your phone supports this functionality. Press the button to accept the second incoming call. > The first call is automatically put on hold. Press the button to decline the second incoming call. You can also hang up directly from your phone. Press the button to switch from a call to another. 16 Managing voice mail During a call, the Parrot MKi9100 allows you to send DTMFs to manage your voice mail for example. To do so : 1. Press the jog wheel to access the DTMF menu. > « 0 » is displayed by the kit. 2. Use the jog wheel to select your DTMF between the following possibilities : 0,1,2,3,4,5,6,7,8,9,# or *. 3. Press the jog wheel to send this DTMF to your phone. Ending a call Press the button to end a call. 17 Using voice recognition Receiving a call via voice recognition To receive a call via voice recognition, magic words must be activated. Activating / deactivating the magic words Note : Magic words are activated by default. 1. Press the jog wheel and select Phone > Voice Commands > Magic words. 2. Press the jog wheel to activate/deactivate the magic words. Accepting a call Say « Accept » to answer an incoming call. Declining a call Say « Reject » to decline an incoming call. Making a call via voice recognition Calling a contact with one phone number 1. Press the button to launch the voice recognition feature. > The Parrot MKi9100 asks you the name of the contact you want to call. 2. Say the name of the contact. > The call is automatically launched if the voice tag is correctly understood. > If it is not the case, a confirmation message is asked. 3. Confirm if necessary by saying “Yes” or “call”. 18 Calling a contact with several phone numbers If there are several phone numbers associated to the contact you want to call, you can specify the type of number. To do so, the following vocal commands are available: - Home - At home Exiting voice recognition mode Press the - Work At work Office At office At the office - Mobile Cellular Cell On mobile On cellular On cell On mobile phone On cellular phone On cell phone Mobile phone Cellular phone Cell phone - Other General Default Preferred button to exit voice recognition mode. 19 Music Using the Parrot MKi9100 with an external source Notes : - While playing a song, press the button to get to main menu. - While navigating through the menus, press the button to get to the Now Playing screen. Using the Parrot MKi9100 with an iPod / iPhone WARNING: Make sure your iPod is updated before using it with the Parrot MKi9100. Compatibility If you are using the Parrot MKi9100 with the iPod Mini, iPod Photo, iPod 3G and iPod Shuffle, then connect your iPod to the Parrot MKi9100 using the Jack cable. Use the iPod connector if you are using another model of iPod or an iPhone. Playing music files If your iPod / iPhone is connected to the Parrot MKi9100 via the iPod connector : 1. Press the jog wheel and select iPod. 2. Select one of the classification criteria (artist, album, songs, genres, playlist) and press the jogwheel. Note : Use the and content of your iPod. buttons to navigate more easily through the 3. Select the song and press the jog wheel. If your iPod is connected to the Parrot MKi9100 via the jack cable, refer to the Using the Parrot MKi9100 with an analogue player section. 20 Using the Parrot MKi9100 with a USB peripheral WARNING: If your Parrot MKi9100 is connected to an iPhone and an USB flash drive, the iPhone has priority: you can only browse through your iPhone content. 1. Connect the USB flash drive or the MP3 player using the USB cable. 2. Press the jog wheel and select USB. > You access the content of your USB peripheral. Note : Use the drive. - If the tags of your audio files are correctly defined, select one of the classification features (artist, album, songs, genres, playlist) and press the jog wheel. - If the tags of your audio files are not defined, select Directories or Flat directories. and buttons to navigate more easily through the content of your USB flash 3. Select the song and press the jog wheel. Using the Parrot MKi9100 with an audio player connected via Bluetooth Compatibility Playing a music file You can use the Parrot MKi9100 to listen to songs stored on your mobile phone / PDA / smartphone. Your mobile phone must support the Bluetooth® A2DP profile (Advanced Audio Distribution Profile). If you are using a Bluetooth audio player for the 1st time, you have to pair both devices. ► Refer to the Pairing a phone section. If both devices are already paired : 1. Press the jog wheel and select Settings > Bluetooth > Paired devices. 2. Choose an audio player and press the jog wheel. 3. Select Play Bluetooth audio. 4. Get back to main menu and select Audio Bluetooth. 5. Start playing a song on your audio player. 21 Note : Volume for calls and for streaming audio work separately. Using the Parrot MKi9100 with an analogue audio player 1. Connect your audio player to the Parrot MKi9100 using the Jack connector. 2. Press the jog wheel and select Line In. 3. Start playing a song on your audio player. WARNING: The Next/Previous tracks functions are not available if the Parrot MKi9100 is connected to the audio player via the Jack connector. Commands To do so Proceed this way Pause a song Press the button. Resume playback Press the button. Raise or lower the volume Turn the jog wheel. Rewind or fast-forward Hold down the Restart a song Press the button. Skip to the next song Press the button. Skip to the previous song Press the button twice. Get to the audio effects menu Hold down the seconds. or buttons. button for 2 22 Settings Brightness You can adapt the screen brightness of the Parrot MKi9100. To do so : 1. Press the jog wheel and select Settings > Brightness. 2. Select Night mode or Day mode. Note : You can also adjust the brightness parameter by holding down the jog wheel for 2 seconds. Ringtone To adjust the volume of the ringtone which indicates an incoming call : 1. Press the jog wheel and select Settings > Audio > Ringtone volume. 2. Use the jog wheel to adjust the volume. Call Displaying / hiding identification If you do not want your phone number to be displayed on your contact‟s phone while making a call, activate the Allow #31# option. To do so: 1. Press the jog wheel and select Phone > Advanced Settings > Allow #31#. 2. Select Activate. Deactivate the Allow #31# option to allow your contacts to see your number while you are calling them. Making an international call You can configure the Parrot MKi9100 to add a prefix while making a call from or towards a foreign country. To do so: 1. Press the jog wheel and select Phone > Advanced settings > Change + to. 2. Select the prefix you want to use. 23 Activating the external noise elimination In order to improve the listening comfort of your interlocutor, the Parrot MKi9100 allows you to tone down the noise from outside your car (motorcycles, trucks) if your window is open. To activate / deactivate this setting, press the jog wheel and select Settings > Audio > Lateral noise detection. WARNING: Make sure the double microphone is angled towards the driver before activating the Lateral noise reduction effect. If not, the driver’s voice will be considered as an external noise. Lateral noise detection effect activated – Microphone correctly installed 24 Lateral noise detection effect deactivated – Microphone misplaced Audio Note : While playing a song, hold down the menu. Using the equalizer button for 2 seconds to access to the audio effects The equalizer allows you to adjust the low, medium and high frequencies depending on your preferences. To activate or deactivate it: 1. Press the jog wheel and select Audio effects > Equalizer. 2. Press the jog wheel to activate or deactivate this option. You can choose between 10 default presets to adapt the frequencies to the music style you are listening to. To do so: 1. Press the jog wheel and select Audio effects > Settings > Equalizer presets. 2. Use the jog wheel to select a preset. 25 Using the Virtual Super Bass The Virtual Super Bass effect allows you to amplify the low frequencies. To activate or deactivate it: 1. Press the jog wheel and select Audio effects > Virtual Super Bass. 2. Press the jog wheel to activate or deactivate this option. You can change the settings of the Virtual Super Bass effect by selecting Audio effects > Settings > Vsb preferences.. Setting the Parrot MKi9100 to repeat songs 1. Press the jog wheel and select Audio effects > Settings > Repeat. 2. Activate or deactivate the option by pressing the jog wheel. WARNING : If you are using the Parrot MKi9100 with an iPod, select Audio effects > Settings > Repetition (iPod). Setting the Parrot MKi9100 to shuffle songs WARNING: The shuffle option is only available if you are using the Parrot MKi9100 with an iPod. Modifying this option on the Parrot MKi9100 will not modify your iPod settings. To activate or deactivate the random playback of the music files: 1. Press the jog wheel and select Audio effects > Settings > Random. 2. Press the jog wheel to activate or deactivate this option. Deactivating the Mute on Streaming This option automatically mutes the tuner when a song is played. This option is activated by default. You can deactivate this option and mute the tuner manually via the Mute cable. To do so, press the jog wheel then select Settings > Audio > Mute on Streaming. Press the jog wheel to deactivate this option. 26