1
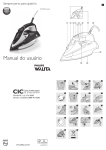
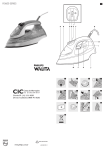
English
Introduction
Congratulations on your purchase and welcome to Philips Walita! To fully benefit from
the support that Philips Walita offers, register your product at www.walita.com.br.
General description (Fig. 1)
A Spray nozzle
B Cap of filling opening
C Steam boost
D Spray button
E Steam control
F Ionic DeepSteam button (RI4444, RI4440, RI4430)
G Ionic DeepSteam light (RI4444, RI4440, RI4430)
H Temperature dial
I RI4425, RI4422, RI4420, RI4412: Amber temperature light with red automatic
shut-off (AUTO/OFF) indication. RI4415, RI4411, RI4410: Amber temperature
light
J RI4444, RI4440, RI4430: Amber temperature light with red automatic shutoff (AUTO/OFF) indication
K Mains cord
L Type plate
M Soleplate
N Calc-Clean button
Not shown: Heat-resistant protective cover (RI4444, RI4440 only)
Not shown: Delicate fabric protector (RI4425, RI4415 only)
Important
Read this user manual carefully before you use the appliance and save it for future
reference.
-------
-------
----
Danger
Never immerse the iron in water.
Warning
Check if the voltage indicated on the type plate corresponds to the local mains
voltage before you connect the appliance.
Do not use the appliance if the plug, the mains cord or the appliance itself shows
visible damage, or if the appliance has been dropped or leaks.
If the mains cord is damaged, you must have it replaced by Philips Walita, a
service centre authorised by Philips Walita or similarly qualified persons in order
to avoid a hazard.
Never leave the appliance unattended when it is connected to the mains.
This appliance is not intended for use by persons (including children) with
reduced physical, sensory or mental capabilities, or lack of experience and knowledge, unless they have been given supervision or instruction concerning use of
the appliance by a person responsible for their safety.
Children should be supervised to ensure that they do not play with the appliance.
Do not let the mains cord come into contact with the hot soleplate of the iron.
Caution
Only connect the appliance to an earthed wall socket.
Check the mains cord regularly for possible damage.
The soleplate of the iron can become extremely hot and may cause burns if
touched.
When you have finished ironing, when you clean the appliance, when you fill or
empty the water tank and also when you leave the iron even for a short while:
set the steam control to position 0, put the iron on its heel and remove the
mains plug from the wall socket.
Always place and use the iron on a stable, level and horizontal surface.
Do not put perfume, vinegar, starch, descaling agents, ironing aids or other chemicals in the water tank.
This appliance is intended for household use only.
Electromagnetic fields (EMF)
This Philips Walita appliance complies with all standards regarding electromagnetic
fields (EMF). If handled properly and according to the instructions in this user manual,
the appliance is safe to use based on scientific evidence available today.
Before first use
1 Remove any sticker, protective foil or plastic from the soleplate.
2 Rinse and dry the filling cup.
Preparing for use
Filling the water tank
1 Make sure the appliance is unplugged.
2 Set the steam control to position 0 (= no steam) (Fig. 2).
3 Open the cap of the filling opening.
4 Tilt the iron backwards and use the filling cup to fill the water tank with tap
water up to the maximum.  (Fig. 3)
Do not fill the water tank beyond the MAX indication.
Do not put perfume, vinegar, starch, descaling agents, ironing aids or other chemicals in the water tank.
,, If the tap water in your area is very hard, we advise you to mix it with an equal
portion of distilled water, or to use distilled water only.
5 Close the cap of the filling opening (‘click’) (Fig. 4).
Setting the temperature
1 RI4444, RI4440 only: Remove the heat-resistant protective cover (Fig. 5).
Do not leave the heat-resistant protective cover on the soleplate during ironing.
2 Put the iron on its heel.
3 To set the required ironing temperature, turn the temperature dial to the appropriate position (Fig. 6).
Check the laundry care label for the required ironing temperature:
-- 1 for synthetic fabrics (e.g. acrylic, nylon, polyamide, polyester)
-- 1 for silk
-- 2 for wool
-- 3 for cotton
-- MAX for linen
If you do not know what kind or kinds of fabric an article is made of, determine the
right ironing temperature by ironing a part that will not be visible when you wear or
use the article.
Silk, woollen and synthetic materials: iron the reverse side of the fabric to prevent
shiny patches. To prevent stains, do not use the spray function.
Start ironing the articles that require the lowest ironing temperature, such as those
made of synthetic fibres.
4 Put the mains plug in an earthed wall socket.
,, The amber temperature light goes on.
5 When the amber temperature light has gone out, wait a while before you start
ironing.
The temperature light goes on from time to time during ironing.
Using the appliance
Note:The iron may give off some smoke when you use it for the first time.This stops after
a short while.
Steam ironing
1 Make sure that there is enough water in the water tank.
2 Set the required ironing temperature (see chapter ‘Preparing for use’, section
‘Setting the temperature).
3 Set the appropriate steam setting. Make sure that the steam setting you select
is suitable for the set ironing temperature: (Fig. 7)
-- 1 - 3 for moderate steam (temperature settings 2 to 3)
-- 4 - 6 for strong steam (temperature settings 3 to MAX)
Note:The iron starts to produce steam as soon as it reaches the set temperature.
Note: If the set ironing temperature is too low (MIN to 2), water may drip from the
soleplate (see chapter ‘Features, section ‘Drip stop’).
Ironing with Ionic DeepSteam (RI4444, RI4440, RI4430 only)
When you use the Ionic DeepSteam function during steam ironing, the steam
produced is finer than during regular steam ironing. Fine steam reaches deeper,
especially into thick fabrics. This helps you to remove stubborn creases easily.
1 Follow steps 1 to 3 in section ‘Steam ironing’.
2 Press and hold the Ionic DeepSteam button (Fig. 8).
,, The Ionic DeepSteam light goes on and you hear a humming sound.  (Fig. 9)
3 The iron now produces Ionic DeepSteam to help you remove even the toughest creases.
Note:The Ionic DeepSteam function is only effective when it is used in combination with
a steam setting and a temperature setting between  2 and MAX.
Note: Do not use the Ionic DeepSteam function when you iron without steam and/or at
low temperature settings. However, ironing at low temperatures without steam with the
Ionic DeepSteam function switched on will not damage the iron.
Note:The Ionic DeepSteam output may vary from time to time, depending on the ironing
temperature.
Ironing without steam
1 Set the steam control to position 0 (= no steam) (Fig. 2).
Do not use the Ionic DeepSteam function, as this function has no effect when you
iron without steam.
2 Set the required ironing temperature (see chapter ‘Preparing for use’, section
‘Setting the temperature’).
After ironing
1 Remove the mains plug from the wall socket.
2 If you have been steam ironing, empty the water tank.
3 Let the iron cool down in a safe place.
Features
Spray function
You can use the spray function at any temperature to moisten the article to be
ironed. This helps remove stubborn creases.
1 Make sure that there is enough water in the water tank.
2 Press the spray button several times to moisten the article to be
ironed (Fig. 10).
Steam boost function
A steam boost from the special Steam Tip soleplate helps remove stubborn creases.
The steam boost enhances the distribution of steam into every part of your garment.
The steam boost function can only be used at temperature settings between 3
and MAX.
1 Press and release the steam boost button (Fig. 11).
Vertical steam boost
1 You can also use the steam boost function when you hold the iron in vertical
position.  (Fig. 12)
This is useful for removing creases from hanging clothes, curtains etc.
Never direct the steam at people.
Drip stop
This iron is equipped with a drip-stop function: the iron automatically stops producing steam when the temperature is too low, to prevent water from dripping out of
the soleplate. When this happens, you may hear a sound.
Automatic shut-off function (RI4444, RI4440, RI4430, RI4425, RI4422,
RI4420, RI4412 only)
The automatic shut-off function automatically switches off the iron if it has not been
moved for a while.
,, The red AUTO/OFF indication of the temperature light flashes to indicate
that the iron has been switched off by the automatic shut-off function.
To let the iron heat up again:
1 Pick up the iron or move it slightly.
,, The red AUTO/OFF indication goes out.
,, If the temperature of the soleplate has dropped below the set ironing temperature, the amber temperature light goes on.
2 If the amber temperature light goes on after you have moved the iron, wait
for it to go out before you start ironing.
Heat-resistant protective cover (RI4444, RI4440 only)
You can store the iron on the heat-resistant protective cover immediately after ironing. It is not necessary to let the iron cool down first.
Do not use the heat-resistant protective cover during ironing.
1 Put the iron on the heat-resistant protective cover (Fig. 18).
2 Insert the tip of the soleplate into the heat-resistant protective cover (1) and
then press down the heel of the iron (2).
--
Environment
Do not throw away the appliance with the normal household waste at the end
of its life, but hand it in at an official collection point for recycling. By doing this,
you help to preserve the environment (Fig. 19).
Guarantee & service
If you need information or if you have a problem, please visit the Philips Walita website at
www.walita.com.br or contact the Philips Walita Customer Care Centre in your country
(you find its phone number in the worldwide guarantee leaflet). If there is no Customer
Care Centre in your country, go to your local Philips Walita dealer or contact the Service
Department of Philips Walita Domestic Appliances and Personal Care BV.
Troubleshooting
If the appliance does not work or does not work properly, first check the list below. If
the problem is not mentioned in this list, the appliance probably has a defect. In that
case we advise you to take the appliance to your dealer or to an authorised Philips
Walita service centre.
Problem
Possible cause
Solution
The iron is
plugged in, but the
soleplate is cold.
There is a connection
problem.
Check the mains cord, the plug and
the wall socket.
The temperature dial
is set to MIN.
Set the temperature dial to the
required position.
There is not enough
water in the water
tank.
Fill the water tank (see chapter
‘Preparing for use’, section ‘Filling the
water tank’).
The steam control is
set to position 0.
Set the steam control to a position
between 1 and 6 (see chapter
‘Using the appliance’, section ‘Steam
ironing’).
The iron is not hot
enough and/or the
drip-stop function has
been activated.
Set an ironing temperature that is
suitable for steam ironing ( 2 to
MAX). Put the iron on its heel and
wait until the temperature light has
gone out before you start ironing.
You have used the
steam boost function
too often within a
very short period.
Continue ironing in horizontal position and wait a while before you use
the steam boost function again.
The iron is not hot
enough.
Set an ironing temperature at which
the steam boost function can be
used ( 3 to MAX). Put the iron
on its heel and wait until the temperature light has gone out before
you use the steam boost function.
You have not closed
the cap of the filling
opening properly.
Press the cap until you hear a click.
You have put an additive in the water tank.
Rinse the water tank and do not put
any additive in the water tank.
The set temperature
is too low for steam
ironing.
Set a temperature of or  2 higher.
You have used the
steam boost function
at a temperature setting below 3.
Set the temperature dial to a setting
between  3 and MAX.
Water drips from
the soleplate
after the iron has
cooled down or
has been stored.
You have put the iron
in horizontal position
with water still left in
the water tank.
Empty the water tank.
Flakes and impurities come out
of the soleplate
during ironing.
Hard water forms
flakes inside the
soleplate.
Use the Calc-Clean function one or
more times (see chapter ‘Cleaning
and maintenance’, section ‘Using the
Calc-Clean function’).
The red light
flashes (RI4444,
RI4440, RI4430,
RI4425, RI4422,
RI4420, RI4412
only).
The automatic
shut-off function
has switched off the
iron (see chapter
‘Features’, section
‘Automatic shut-off
function’).
Move the iron slightly to deactivate
the automatic shut-off function. The
red AUTO/OFF light goes out.
The iron makes a
humming sound.
The Ionic DeepSteam
function is on.
If you hear the humming sound
when you iron without steam, stop
pressing the Ionic DeepSteam button. The Ionic DeepSteam function
has no effect when you iron without
steam.
The iron does
not produce any
steam.
The iron does not
produce a steam
boost.
Water droplets
drip onto the fabric during ironing.
Note: If the amber temperature light does not go on after you move the iron, the soleplate still has the right temperature and the iron is ready for use.
Delicate fabric protector (RI4425, RI4415 only)
The delicate fabric protector protects delicate fabrics from heat damage and shiny
patches.
With the delicate fabric protector you can iron delicate fabrics (silk, wool and nylon)
at temperature settings 3 to MAX in combination with all steam functions available on the iron.
The delicate fabric protector reduces the soleplate temperature instantly, thus allowing you to iron delicate fabrics safely.
If you do not know what kind or kinds of fabric an article is made of, determine the
right ironing temperature by ironing a part that is not visible when you wear or use
the article.
1 Put the iron on the delicate fabric protector (‘click’) (Fig. 13).
Cleaning and maintenance
Cleaning
1 Wipe flakes and any other deposits off the soleplate with a damp cloth and a
non-abrasive (liquid) cleaning agent.
To keep the soleplate smooth, avoid hard contact with metal objects. Never use a
scouring pad, vinegar or other chemicals to clean the soleplate.
2 Clean the upper part of the iron with a damp cloth.
3 Regularly rinse the water tank with water. Empty the water tank after you
have rinsed it.
Double-Active Calc System
The Double-Active Calc System consists of an Anti-Calc tablet inside the water tank
combined with the Calc-Clean function.
1 The Anti-Calc tablet prevents scale from clogging the steam vents. This tablet is
constantly active and does not need to be replaced.
2 The Calc-Clean function removes the scale particles from the iron.
Using the Calc-Clean function
Use the Calc-Clean function once every two weeks. If the water in your area is very
hard (i.e. when flakes come out of the soleplate during ironing), use the Calc-Clean
function more frequently.
1 Make sure the appliance is unplugged.
2 Set the steam control to position 0.
3 Fill the water tank to the maximum level.
Do not put vinegar or other descaling agents in the water tank.
4 Set the temperature dial to MAX (Fig. 14).
5 Put the plug in an earthed wall socket.
6 Unplug the iron when the temperature light goes out.
7 Hold the iron over the sink, press and hold the Calc-Clean button and gently
shake the iron to and fro (Fig. 15).
,, Steam and boiling water come out of the soleplate. Impurities and flakes (if
any) are flushed out.
8 Release the Calc-Clean button as soon as all the water in the tank has been
used up.
Repeat the Calc-Clean process if the iron still contains a lot of impurities.
After the Calc-Clean process
1 Put the plug back into the wall socket and let the iron heat up to let the
soleplate dry.
2 Unplug the iron when it has reached the set ironing temperature.
3 Move the hot iron gently over a piece of used cloth to remove any water
stains that may have formed on the soleplate.
4 Let the iron cool down before you store it.
Storage
1 Set the steam control to position 0 and unplug the iron.
2 Empty the water tank (Fig. 16).
3 Let the iron cool down in a safe place.
4 Wind the mains cord and fix it with the cord binder.  (Fig. 17)
5 Store the iron on its heel on a stable surface.
RI4444, RI4440, RI4430, RI4425, RI4422, RI4420,
RI4415, RI4412, RI4411, RI4410
2
3
4
5
6
7
8
9
10
11
12
13
14
15
16
17
18
19
www.walita.com.br
1
u
4239.000.6816.1
Português do Brasil
Introdução
Parabéns pela sua compra e bem-vindo à Philips Walita! Para aproveitar ao máximo o
suporte oferecido pela Philips Walita, registre o produto em www.walita.com.br.
Descrição geral (fig. 1)
Bocal do spray
Tampa da abertura do reservatório
Sistema de vapor
Botão do spray
Controle do vapor
Botão do Ionic DeepSteam (modelos RI4444, RI4440, RI4430)
Luz do Ionic DeepSteam (modelos RI4444, RI4440, RI4430)
Controle de temperatura
Modelos RI4425, RI4422, RI4420, RI4412: Luz piloto amarela de temperatura com indicador vermelho do desligamento automático (AUTO/
OFF). RI4415, RI4411, RI4410: Luz piloto amarela de temperatura
J Modelos RI4444, RI4440, RI4430: Luz piloto amarela de temperatura com indicador vermelho de desligamento automático (AUTO/OFF)
K Fio
L Placa do modelo
M Base
N Botão Calc-Clean
Não aparente: Capa de proteção resistente ao calor (somente modelos RI4444,
RI4440)
Não aparente: Protetor para tecidos delicados (somente modelos RI4425, RI4415)
A
B
C
D
E
F
G
H
I
Importante
Leia este manual atentamente antes de usar o aparelho e guarde-o para consultas
futuras.
-------
-------
----
Perigo
Nunca mergulhe o ferro na água.
Aviso
Antes de ligar o aparelho, verifique se a voltagem indicada é a mesma da tomada.
Não utilize o aparelho se o plugue, o fio ou o próprio aparelho apresentarem
danos visíveis ou se o aparelho tiver sofrido alguma queda ou estiver vazando.
Se o fio estiver danificado, deverá ser substituído pela Philips Walita, por uma das
assistências técnicas autorizadas ou por técnicos igualmente qualificados para
evitar situações de risco.
Nunca deixe o aparelho ligado à corrente elétrica sem vigilância.
Este aparelho não deve ser usado por pessoas (inclusive crianças) com capacidades físicas, mentais ou sensoriais reduzidas ou pouca experiência e conhecimento, a menos que sejam supervisionadas ou instruídas sobre o uso do aparelho
por uma pessoa responsável por sua segurança.
Crianças pequenas devem ser supervisionadas para que não brinquem com o
aparelho.
Não permita que o fio toque na base quente do ferro.
Cuidado
Conecte o aparelho somente a uma tomada elétrica aterrada.
Verifique o fio regularmente para identificar possíveis danos.
A base do ferro pode ficar muito quente e causar queimaduras sérias se for
tocada.
Quando terminar o trabalho, quando limpar o ferro, quando encher ou esvaziar
o reservatório de água e também quando se afastar do ferro mesmo que seja
por breves instantes, regule o controle do vapor para a posição 0, coloque o
ferro em posição de descanso e desligue o plugue da tomada.
Sempre apóie e use o ferro em uma superfície estável, nivelada e horizontal.
Nunca adicione perfume, vinagre, goma, agentes descalcificadores, produtos para
passar roupa ou produtos químicos no reservatório de água.
Este aparelho deve ser usado apenas para uso doméstico.
Campos eletromagnéticos
Este aparelho Philips Walita atende a todos os padrões relacionados a campos eletromagnéticos. Se manuseado adequadamente e de acordo com as instruções deste
manual do usuário, a utilização do aparelho é segura baseando-se em evidências
científicas atualmente disponíveis.
Antes da primeira utilização
1 Retire todos os adesivos, todas as proteções ou plásticos da base do ferro.
2 Lave e seque o copo de abastecimento do reservatório.
Preparação para o uso
Abastecimento do reservatório de água
1 Verifique se o aparelho está desconectado da tomada elétrica.
2 Regule o controle do vapor para a posição 0 (= sem vapor) (fig. 2).
3 Abra a tampa da abertura do reservatório.
4 Incline o ferro para trás e use o copo do reservatório para enchê-lo com água
da torneira até o nível máximo.  (fig. 3)
Não ultrapasse a indicação MAX.
Nunca adicione perfume, vinagre, goma, agentes descalcificadores, produtos para
passar roupa ou produtos químicos no reservatório de água.
,, Se a água de sua residência tiver calcário, aconselhamos misturá-la com a
mesma quantidade de água destilada ou usar apenas água destilada.
5 Feche a tampa da abertura do reservatório (você ouvirá um clique) (fig. 4).
Seleção da temperatura
1 Somente modelos RI4444, RI4440: Retire a capa protetora resistente ao
calor (fig. 5).
Não deixa a capa protetora na base do ferro durante sua utilização.
2 Coloque o ferro em posição de descanso (vertical).
3 Para regular a temperatura, gire o botão de temperatura até a indicação
apropriada (fig. 6).
Verifique a etiqueta da peça de roupa para saber qual a temperatura indicada:
-- 1 para tecidos sintéticos (exemplo: acrílico, náilon, poliamida, poliéster)
-- 1 para seda
-- 2 para lã
-- 3 para algodão
-- MAX para linho
Se não souber o tipo do tecido, calcule a temperatura certa passando o ferro sobre
uma parte da peça de roupa que não fique à vista quando vestida.
Seda, lã e materiais sintéticos: passe-os pelo lado do avesso para evitar que fiquem
brilhantes. Para evitar manchas, não use o spray.
Comece passando peças que precisam de uma temperatura mais baixa, como tecidos
feitos de fibra sintética.
4 Conecte o plugue a uma tomada elétrica aterrada.
,, A luz piloto amarela da temperatura se acende.
5 Depois que a luz piloto amarela da temperatura se apagar, aguarde um pouco
antes de começar a passar.
A luz piloto acende de vez em quando durante o uso.
Utilização do aparelho
Nota: Quando você liga o ferro pela primeira vez, é normal ele liberar uma pequena
quantidade de fumaça. Em pouco tempo, isso não ocorrerá mais.
Passar com vapor
1 Verifique se há água suficiente no reservatório de água.
2 Selecione a temperatura recomendada (consulte o capítulo ‘Preparação para o
uso’, seção ‘Ajuste da temperatura’).
3 Selecione a posição de vapor apropriada.Verifique se a posição de vapor escolhida é adequada à temperatura selecionada: (fig. 7)
-- 1 - 3 para vapor moderado (ajustes de temperatura entre / e /)
-- 4 - 6 para vapor máximo (ajustes de temperatura entre / e MAX)
Nota: O ferro começa a produzir vapor assim que atinge a temperatura selecionada.
Nota: Se a temperatura escolhida for muito baixa (MIN e /), a água pode pingar pela
base (consulte o capítulo ‘Recursos, seção ‘Corta-pingos’).
Passar com o Ionic DeepSteam (somente modelos RI4444, RI4440,
RI4430)
Quando a função Ionic DeepSteam é usada para passar com vapor, o vapor produzido é mais fino do que o normal. O vapor fino penetra mais fundo, especialmente em
tecidos grossos. Isso ajuda a eliminar rugas teimosas com mais facilidade.
1 Siga as etapas de 1 a 3 na seção ‘Passar com vapor’.
2 Pressione e mantenha pressionado o botão Ionic DeepSteam (fig. 8).
,, A luz do Ionic DeepSteam acende e você ouvirá um ruído.  (fig. 9)
3 O ferro produz o Ionic DeepSteam para ajudar a remover até as rugas mais
teimosas.
Nota: A função Ionic DeepSteam só é eficaz com um ajuste de vapor e um ajuste de
temperatura entre / e MAX.
Nota: Não use a função Ionic DeepSteam quando passar sem vapor e/ou com um ajuste
de temperatura baixo. No entanto, passar a baixas temperaturas sem vapor com a
função Ionic DeepSteam ligada não danificará o ferro.
Nota: O resultado do Ionic DeepSteam pode variar de vez em quando, dependendo da
temperatura.
Passar sem vapor
1 Regule o controle do vapor para a posição 0 (= sem vapor) (fig. 2).
Não use a função Ionic DeepSteam, pois ela não tem efeito quando você passa
roupas sem vapor.
2 Selecione a temperatura recomendada (consulte o capítulo ‘Preparação para o
uso’, seção ‘Ajuste da temperatura’).
Após a utilização
1 Retire o plugue da tomada.
2 Se tiver passado com vapor, esvazie o reservatório de água após o uso.
3 Deixe o ferro esfriar em um local seguro.
Recursos
Spray
Você pode usar o spray a qualquer temperatura para umedecer a peça que será
passada. Isso ajuda a eliminar rugas teimosas.
1 Verifique se há água suficiente no reservatório de água.
2 Aperte o botão do spray várias vezes para umedecer a peça de roupa que será
passada (fig. 10).
Sistema de vapor
As saídas de vapor especial na ponta da base ajudam a eliminar rugas teimosas. As
saídas por toda a base melhoram a distribuição do vapor para cada parte da roupa.
O sistema de vapor só pode ser usado em ajustes de temperatura entre / e MAX.
1 Pressione e solte o botão do sistema de vapor (fig. 11).
Sistema de vapor vertical
Capa de proteção resistente ao calor (somente modelos RI4444,
RI4440)
Você pode guardar o ferro na capa de proteção resistente ao calor imediatamente
após a utilização, sem precisar esperar que ele esfrie.
Não use a capa de proteção resistente ao calor ao passar.
1 Coloque o ferro na capa de proteção resistente ao calor (fig. 18).
2 Coloque a ponta da base na capa de proteção resistente ao calor (1) e pressione o ferro para baixo na posição de descanso (2).
--
Meio ambiente
Não descarte o aparelho com o lixo doméstico no final de sua vida útil. Leve-o
a um posto de coleta oficial para que possa ser reciclado. Com esse ato, você
ajuda a preservar o meio ambiente (fig. 19).
Garantia e assistência técnica
Se necessitar de informações ou tiver algum problema, visite a página da Philips Walita
em www.walita.com.br ou contate o Atendimento ao Cliente Philips Walita do seu
país (os números de telefone encontram-se no folheto da garantia mundial). Se não
existir um Atendimento ao Cliente no seu país, dirija-se a um representante Philips
Walita local ou contate o Departamento de Assistência Técnica de Eletrodomésticos
e Cuidados Pessoais da Philips Walita.
Resolução de problemas
Se o aparelho não funcionar ou não funcionar corretamente, verifique primeiro a
lista abaixo. Se a lista não mencionar o problema, o aparelho provavelmente está com
defeito. Nesse caso, recomendamos que você leve o aparelho para um representante
ou uma assistência técnica autorizada Philips Walita.
Problema
Possível causa
Solução
O ferro está ligado,
mas a base continua
fria.
Há algum problema
na conexão.
Verifique o fio, o plugue e a tomada
elétrica
O botão de temperatura está na
posição MIN.
Regule-o para a temperatura
apropriada.
O reservatório
não possui água
suficiente.
Encha o reservatório de água (vide
‘Preparação para o uso’, seção
‘Como encher o reservatório de
água’).
O controle de vapor
está na posição 0.
Ajuste o controle de vapor para
uma posição entre 1 e 6 (consulte
o capítulo ‘Utilização do aparelho’,
seção ‘Passar com vapor’).
O ferro não está
quente o suficiente
e/ou a função cortapingos foi ativada.
Selecione uma temperatura
adequada para passar com vapor
(entre / e MAX). Coloque o ferro
em posição de descanso e aguarde
até que a lâmpada piloto de
temperatura apague para começar
a passar.
O ferro não produz
vapor.
1 Você pode usar o vapor quando o ferro estiver na posição vertical.  (fig. 12)
Isso é útil para remover rugas de roupas penduradas, cortinas, etc.
Nunca aponte o jato de vapor na direção de alguém.
Corta-pingos
Este ferro está equipado com um sistema antigotejamento: o ferro deixa automaticamente de emitir vapor quando a temperatura é muito baixa para evitar que a água
pingue pela base do ferro. Quando isso acontece poderá se ouvir um ‘clique’.
Função de desligamento automático (somente modelos RI4444,
RI4440, RI4430, RI4425, RI4422, RI4420, RI4412)
A função de desligamento automático desliga o ferro automaticamente quando ele
não é movimentado por um tempo determinado.
,, O indicador AUTO/OFF vermelho da luz piloto de temperatura pisca para
indicar que o ferro foi desligado pela função de desligamento automático.
Para que ferro esquente novamente:
1 Pegue o ferro ou movimente-o ligeiramente.
,, O indicador AUTO/OFF vermelho se apaga.
,, Se a temperatura da base cair abaixo da temperatura escolhida, a luz piloto
amarela de temperatura acende.
2 Se a luz piloto se acender depois que você mover o ferro, aguarde que ela se
apague antes de recomeçar a passar.
Nota: Se a luz piloto amarela de temperatura não acender após a movimentação do
ferro, a base ainda está na temperatura certa e o ferro está pronto para o uso.
Protetor para tecidos delicados (somente RI4425, RI4415)
O ferro produz
vapor em pouca
quantidade.
Pingos d’água caem
no tecido quando
uso o ferro.
Esse protetor protege tecidos delicados contra danos do calor e manchas brilhantes.
Com ele, você pode passar tecidos delicados (seda, lã e náilon) em ajustes de temperatura entre / e MAX com as funções de vapor disponíveis no ferro.
O protetor para tecidos delicados reduz a temperatura da base instantaneamente,
permitindo que tecidos delicados sejam passados com segurança.
Se não souber o tipo do tecido, calcule a temperatura certa passando o ferro sobre
uma parte da peça de roupa que não fique à vista quando vestida.
1 Coloque o ferro no protetor para tecidos delicados (você ouvirá um
clique) (fig. 13).
Limpeza e manutenção
Limpeza
1 Retire as partículas e qualquer outra sujeira da base com um pano úmido e
um produto de limpeza (líquido) não abrasivo.
Para manter a base lisa, evite passar o ferro com força em objetos de metal. Nunca
use palha de aço, vinagre ou outros produtos químicos para limpar a base.
2 Limpe a parte de cima do ferro com um pano úmido.
3 Regularmente, lave o reservatório de água, esvaziando-o após a limpeza.
Sistema Double-Active Calc
O Sistema Double-Active Calc consiste em um tablete anticalcário dentro do reservatório de água combinada com a função Calc-Clean.
1 O tablete anticalcário evita que partículas acumuladas entupam as saídas de
vapor. Ele está sempre ativo e não precisa ser substituído.
2 A função Calc-Clean remove partículas acumuladas no ferro.
Uso da função Calc-Clean
Use a função ‘Calc Clean’ de quinze em quinze dias. Se a água na sua região é muito
pesada (isto é, se saírem pequenos flocos de calcário da base do ferro enquanto
estiver passando), use a função anticalcário (‘Calc Clean’) com mais freqüência.
1 Verifique se o aparelho está desconectado da tomada elétrica.
2 Regule o controle do vapor para a posição 0.
3 Encha o reservatório de água até o nível máximo.
Não insira vinagre ou outros produtos químicos no reservatório de água.
4 Regule o botão de temperatura para a posição MAX (fig. 14).
5 Conecte o plugue a uma tomada de parede aterrada.
6 Desconecte o plugue da tomada elétrica quando a luz piloto da temperatura apagar.
7 Segure o ferro sobre a pia, pressione e mantenha pressionado o botão CalcClean e sacuda suavemente o ferro (fig. 15).
,, O vapor e a água fervendo saem pela base do ferro. As impurezas e as partículas (se houver) serão eliminadas.
8 Solte o botão Calc-Clean assim que esvaziar toda a água do reservatório.
Repita o processo Calc-Clean se o ferro ainda apresentar muitas impurezas.
Após o processo Calc-Clean
1 Conecte o plugue novamente à tomada elétrica e deixe o ferro aquecer para
secar a base.
2 Desconecte o plugue da tomada elétrica quando o ferro atingir a temperatura
selecionada.
3 Passe o ferro quente suavemente sobre um pedaço de pano usado para retirar
possíveis manchas na base.
4 Deixe o esfriar antes de guardá-lo.
Para guardar a aparelho
1 Regule o controle de vapor para a posição 0 e desconecte o plugue da tomada.
2 Esvazie o reservatório de água (fig. 16).
3 Deixe o ferro esfriar em um local seguro.
4 Enrole o fio e prenda-o com o prendedor.  (fig. 17)
5 Guarde o ferro em posição de descanso em uma superfície estável.
O vapor extra foi
usado muitas vezes
em um período muito curto de tempo.
Continue passando na posição horizontal e aguarde um pouco antes
de usar novamente o vapor extra.
O ferro não está
quente o suficiente.
Selecione uma temperatura na qual
o sistema de vapor possa ser usado
(entre / e MAX). Coloque o ferro
em posição de descanso e aguarde
até a luz piloto de temperatura
apagar antes de usar o sistema de
vapor.
A tampa da abertura
do reservatório não
foi fechada corretamente.
Pressione a tampa do reservatório
de água até ouvir um clique.
Você colocou um
produto no reservatório de água.
Lave-o e não coloque nenhum
produto.
A temperatura
escolhida é muito
baixa para passar
com vapor.
Selecione uma temperatura de / ou
superior.
O sistema de vapor
foi usado em uma
temperatura muito
baixa /.
Regule o controle de temperatura
para uma posição entre / e MAX.
A água pinga da
base depois que o
ferro esfriou ou foi
guardado.
Você colocou o ferro Esvazie o reservatório de água.
na posição horizontal
e o reservatório de
água não estava vazio.
Partículas e impurezas saem da base
do ferro durante
sua utilização.
A água dura (com
calcário) forma depósitos no interior da
base do ferro.
Use a função Calc-Clean uma ou
mais vezes (consulte o capítulo
‘Limpeza e manutenção’, seção ‘Uso
da função Calc-Clean’).
A luz vermelha
pisca (somente
modelos RI4444,
RI4440, RI4430,
RI4425, RI4422,
RI4420, RI4412).
A função de desligamento automático
desligou o ferro
(consulte o capítulo
‘Recursos’, seção
‘Função de desligamento automático’).
Movimente o ferro suavemente
para desativar a função de desligamento automático. A luz piloto
vermelha AUTO/OFF apagará.
O ferro emite um
ruído.
A função Ionic DeepSteam está ligada.
Se ouvir um ruído quando passar
sem vapor, pare de pressionar o
botão Ionic DeepSteam. A função
Ionic DeepSteam não funciona
quando você passa sem vapor.
CERTIFICADO DE GARANTIA
ATENÇÃO
Este certificado é uma vantagem adicional oferecida ao consumidor, porém,
para que o mesmo tenha validade é imprescindível que seja apresentada a
competente NOTA FISCAL de compra do produto.
Com este produto, a WALITA tem como objetivo atender plenamente o consumidor,
proporcionando a garantia na forma aqui estabelecida.
1 - Esta garantia é complementar à legal e estipula que todas as partes e componentes,
ficam garantidos integralmente contra eventuais defeitos de peças ou de fabricação
que venham a ocorrer no prazo de 2 (dois) anos a partir da data de entrega do
produto ao consumidor, conforme expresso na nota fiscal de compra.
2 - Se o consumidor vier a transferir a propriedade deste produto, a garantia ficará
automaticamente transferida, respeitando o prazo de validade, contado a partir da
1ª aquisição.
3 - Constatado o eventual defeito de fabricação, o consumidor deverá entrar em contato com a Assistência Técnica Autorizada mais próxima.
4 - Nas demais localidades onde não exista Assistência Técnica Autorizada as despesas
de transporte do produto correm por conta do consumidor.
5 - No prazo de garantia as partes, peças e componentes eventualmente defeituosos,
serão trocados gratuitamente, assim como a mão de obra aplicada.
6 - Esta garantia fica extinta se ocorrer uma das hipóteses a seguir:
a) Se o defeito for ocasionado pelo uso não domiciliar ou mau uso e em desacordo com as recomendações do manual de instruções do produto,
b) Se o produto foi examinado, alterado, adulterado, fraudado, ajustado ou consertado por oficina ou pessoa não autorizada pelo fabricante,
c) Se qualquer peça, parte ou componente agregado ao produto, se caracterizar
como não original,
d) Se ocorrer a ligação deste produto em voltagem diversa da indicada no produto,
e) Se o número de série que identifica o produto, estiver de alguma forma adulterado ou rasurado,
f) Por casos fortuitos ou de força maior, bem como aqueles causados por agentes
da natureza.
7 - Não está coberta por esta garantia a mudança ou alteração de voltagem do
produto.
PHILIPS DO BRASIL LTDA. divisão WALITA
AV. OTTO SALGADO, 250 - DISTR. INDUSTR. CLÁUDIO G. NOGUEIRA - VARGINHA
MINAS GERAIS - CEP 37066-440
CX. POSTAL 311 - CNPJ(MF) 61 086 336/0144-06
INDÚSTRIA BRASILEIRA- MARCA REGISTRADA
1
2
3
4
5
6
7
8
9
10
11
12
13
14
15
16
17
18
19