1
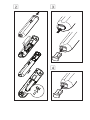
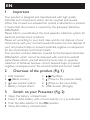
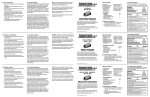
Register your product and get support at
www.philips.com/welcome
EN User manual
Philips Presenter
SNP3000
1
a
b
c
d
g
e
f
h
2
3
4
LASER LIGHT
DO NOT STARE INTO BEAM
CLASS 2 LASER PRODUCT
Wavelength : 645 - 660nm
Maximum Power < 1mW
IEC 60825-1:1993 + A1:1997 + A2:2001
EN 60825-1:1994 + A2:2001 + A1:2002
CAUTION
RISK OF EXPLOSION IF BATTERY IS REPLACED
BY AN INCORRECT TYPE.
DISPOSE OF USED BATTERIES ACCORDING TO THE
INSTRUCTIONS
Complies with
IDA Standards
DB100486
EN
1
Important
Your product is designed and manufactured with high quality
materials and components, which can be recycled and reused.
When this crossed-out wheeled bin symbol is attached to a product
it means that the product is covered by the European Directive
2002/96/EC.
Please inform yourself about the local separate collection system for
electrical and electronic products.
Please act according to your local rules and do not dispose of your
old products with your normal household waste. Correct disposal of
your old product helps to prevent potential negative consequences
for the environment and human health.
Your product contains batteries covered by the European Directive
2006/66/EC, which cannot be disposed with normal household
waste.Please inform yourself about the local rules on separate
collection of batteries because correct disposal helps to prevent
negative consequences for the environmental and human health.
2
Overview of the product (Fig. 1)
1. LED indicator;
3.
(Blank screen);
5.
Laser pointer button;
7. Battery compartment;
3
1
2
3
4
2.
Play/Stop;
4. (Move to the previous slide);
6. (Move to the next slide);
8. USB receiver (Dongle)
Switch on your Presenter (Fig. 2)
Open the battery compartment.
Insert 1 AAA battery with correct polarity (+/-) as indicated.
Push the slide selector to the ON position.
Close the battery compartment.
When battery is installed:
• To switch on the Presenter, push the USB receiver into the
Presenter and then remove the USB receiver from it.
• To switch off the Presenter, push the USB receiver to the end.
4
Auto-connect
1 Ensure that your notebook is switched on and active.
2 Ensure that your Presenter is switched on.
• If the USB receiver is inserted into your Presenter, release the
USB receiver from your Presenter (Fig. 3).
3 Plug the USB receiver into a USB host on your notebook.
» Auto-connection starts.
» If connection is successful, the LED indicator indicates 1 long
blink.
» If connection fails, the LED indicator indicates 2 long blinks.
» The LED blinks upon ever y successful communication
between the Presenter and the USB receiver.
E Tip
• After use, inser t the USB receiver into your Presenter for
storage (Fig. 4).
• Upon the first installation on Mac, Keyboard Set Assistant
may appear and prompt that the keyboard cannot be
identified. Just click Continue to finish the installation, and
then the Presenter will work accordingly.
5
Troubleshooting
No transmission.
Ensure that you use the Presenter
within effective range.
Light on your Presenter
blinks 3 times.
Replace battery on the Presenter.
Light on your Presenter
does not blink.
Ensure that the Presenter is
switched on.
Replace battery on the Presenter.
© 2010 Koninklijke Philips Electronics N.V.
All rights reserved.
Specifications are subject to change
without notice.Trademarks are the
property of Koninklijke Philips Electronics
N.V. or their respective owners.
UM_V2.3