1
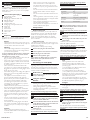
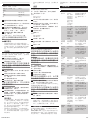
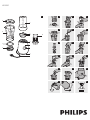
HR2850
1
3
4
5
6
7
8
9
10
11
12
13
14
15
16
17
18
19
–-MAXMAX –
A
2
E
B
F
G
M
H
J
K
L
–-MAXMAX –
–-MAXMAX –
D
I
–-MAXMAX –
C
ENGLISH
Introduction
Congratulations on your purchase and welcome
to Philips! To fully benefit from the support that
Philips offers, register your product at www.philips.
com/welcome.
A
B
C
D
E
F
G
H
I
J
K
L
M
General description (Fig. 1)
Lid of blender beaker
Blender beaker
Sealing ring of blender blade unit
Blender blade unit
Chopper beaker
Chopper blade unit
Sealing ring of chopper blade unit
Safety lock
Motor unit
Pulse button
Cord storage groove
Mains cord
Filter
Important
Read this user manual carefully before you use the
appliance and save it for future reference.
-
Danger
Never immerse the motor unit in water or any
other liquid, nor rinse it under the tap. Only use
a moist cloth to clean the motor unit.
Warning
Check if the voltage indicated on the appliance
corresponds to the local mains voltage before
you connect the appliance.
To avoid a hazardous situation due to inadvertent
resetting of the thermal cut-out, never connect
this appliance to a timer switch.
- Do not use the appliance if the mains cord, the
plug or other parts are damaged.
- If the mains cord is damaged, you must have it
replaced by Philips, a service centre authorised
by Philips or similarly qualified persons in order
to avoid a hazard.
- Never reach into the blender beaker with
your fingers or an object while the appliance is
plugged in or operates. The cutting edges of the
blade unit are very sharp.
- If the blade unit gets stuck, unplug the appliance
before you remove the ingredients that block
the blade unit.
- This appliance is not intended for use by
persons (including children) with reduced
physical, sensory or mental capabilities, or lack
of experience and knowledge, unless they
have been given supervision or instruction
concerning use of the appliance by a person
responsible for their safety.
- Children should be supervised to ensure that
they do not play with the appliance.
- Never let the appliance operate unattended.
- Never use the blender beaker or the chopper
beaker to switch the appliance on and off.
- Do not use the chopper to grind very hard
ingredients such as nutmeg and Chinese rock
sugar.
- Do not use the chopper to mix liquids or to
crush ice cubes. Use the blender to process
these ingredients.
- Do not touch the cutting edges of the blade
units when you handle or clean them. They are
very sharp and you can easily cut your fingers
on them.
-
-
Caution
Always unplug the appliance before you
assemble, disassemble or make adjustments to
any of the parts.
4222.002.7032.3
-
-
Never use any accessories or parts from
other manufacturers or that Philips does
not specifically recommend. If you use such
accessories or parts, your guarantee becomes
invalid.
Do not exceed the maximum level indicated
on the blender beaker and the chopper
beaker.
Do not exceed the quantities indicated in the
tables.
Let hot ingredients cool down before you put
them in the blender beaker or chopper beaker
(max. temperature 80°C).
Never operate the blender for more than 1
minute without interruption.
Never operate the chopper for more than 30
seconds without interruption.
Safety features
Built-in safety lock
This feature ensures that you can only switch on
the appliance if you have assembled the blender
beaker or the chopper beaker correctly on the
motor unit. If the blender beaker or chopper
beaker is assembled correctly, the built-in safety
lock is unlocked.
Thermal cut-out
The appliance is equipped with a thermal cut-out
that automatically cuts off the power supply to the
appliance if it overheats.
If the appliance suddenly stops running:
1 Remove the plug from the wall socket.
2 Let the appliance cool down for 30 minutes.
3 Put the plug in the wall socket.
4 Switch on the appliance again.
Note: Contact your Philips dealer or an authorised
Philips service centre if the thermal cut-out is
activated too often.
Electromagnetic fields (EMF)
This Philips appliance complies with all standards
regarding electromagnetic fields (EMF). If handled
properly and according to the instructions in this
user manual, the appliance is safe to use based on
scientific evidence available today.
Before first use
1 Clean all parts except the motor unit (see
chapter ‘Cleaning’).
Using the appliance
Blender
The blender is intended for:
- Blending fluids, e.g. dairy products, sauces, fruit
juices, soups, mixed drinks, shakes.
- Mixing soft ingredients, e.g. pancake batter.
- Pureeing cooked ingredients, e.g cooked beans.
- Preparing baby food.
Do not touch the cutting edges of the blender
blade unit when you handle or clean it. They are
very sharp and you can easily cut your fingers on
them.
1 Make sure the sealing ring is placed properly
onto the blender blade unit.
2 Insert the blender blade unit into the bottom
of the blender beaker (1). Turn the blade unit
clockwise to fix it (2) (Fig. 2).
3 Put the ingredients in the blender
beaker (Fig. 3).
See the table for the recommended quantities.
Never fill the blender beaker with ingredients
that are hotter than 80°C.
Ingredients blender
Quantities
fruit
20g
vegetables
60g
vegetable juice
100g vegetables + water
(optional)
milkshake
120g fruit + 250ml milk
ice cubes
max. 6 small ice cubes
soups
400ml water
4 Place the blender beaker on the motor unit
(1). Turn the blender beaker clockwise to fix
it (‘click’) (2) (Fig. 4).
Do not exert too much pressure on the blender
beaker.
5 Put the lid on the beaker (1). Turn the lid
until the sieve is located in front of the spout
(2) (Fig. 5).
6 Put the plug in the wall socket and press the
pulse button.
Hold the motor unit firmly with both hands
when the appliance operates.
Never operate the blender for more than 1
minute without interruption.
If you have not finished blending after 1 minute,
release the pulse button and wait 1 minute before
you continue. If the appliance becomes hot, let it
cool down before you continue.
Never reach into the blender beaker with your
fingers or an object (e.g. a spatula) while the
blender operates.
-
-
-
Tips
If the ingredients stick to the wall of the
blender beaker, unplug the appliance and
remove the ingredients from the wall with a
spatula (Fig. 6).
To avoid spillage, never fill the beaker above
the MAX indication (0.6 litres).
Cut solid ingredients into smaller pieces
(1-2cm) before you put them in the blender
beaker. Do not process a large quantity of solid
ingredients at the same time. Process a series
of small batches instead.
You can pour liquid ingredients (e.g. oil) into
the blender beaker through the opening in the
lid while the appliance operates (Fig. 7).
Chopper
-
The chopper is intended for chopping
moist ingredients such as meat, onion, garlic
etc (Fig. 8).
Do not touch the cutting edges of the chopper
blade unit when you handle or clean it. They are
very sharp and you can easily cut your fingers on
them.
Do not use the chopper to grind very hard
ingredients such as nutmeg and Chinese rock
sugar.
1 Cut the ingredients into smaller pieces
(approx. 1-2cm) and put them in the chopper
beaker (Fig. 9).
See the table for the recommended quantities.
Do not fill the chopper beaker beyond the MAX
indication.
Do not fill the blender beaker beyond the MAX
indication.
2/9
Ingredients chopper
Quantities
presoaked seeds and
20-50g
grains, e.g. lotus seed, paste,
rice etc.
chili paste (chillies, shallot,
garlic, etc.)
50g
garlic
20-100g
onions
20-100g
meat
30g
2 Make sure the sealing ring is placed properly
onto the chopper blade unit.
3 Place the blade unit on the chopper beaker
(1). Turn the blade unit clockwise to fix it
(2) (Fig. 10).
4 Turn the assembled chopper upside down
and place it on the motor unit (1). Turn
the chopper clockwise to fasten it (2)
(‘click’) (Fig. 11).
5 Put the plug in the wall socket and press the
pulse button (Fig. 12).
Hold the motor unit firmly with both hands
when the appliance operates.
Do not operate the chopper for more than 30
seconds at a time.
-
Tips
If ingredients stick to the blade unit or the
beaker wall or if the appliance shakes because
the food is not evenly distributed, switch off the
appliance. Remove the chopper beaker from
the motor unit. Shake the chopper beaker until
the ingredients come loose or are properly
distributed.
Filter
You can use the filter to obtain delicious fresh fruit
juices, cocktails or soy milk (see section ‘Recipes’ in
this chapter). All pips and skins remain in the filter.
1 Put the filter in the blender beaker (Fig. 13).
Make sure the filter fits properly on the bottom of
the beaker.
2 Put the ingredients in the filter (Fig. 14).
Never fill the filter beyond the MAX indication.
Do not use the filter to process hot ingredients.
3 Pour water or another liquid (milk, juice, etc.)
into the blender beaker.
-
-
Then release the pulse button and add another
small quantity. Repeat this procedure until you
have processed all the ingredients. Always keep
the lid on the blender beaker during processing.
To get the best result when you make fruit
juices and cocktails, add approx. 150ml water
to 100g fruit. You can also use other liquids, e.g.
to make cocktails.
Soak hard ingredients, e.g. soy beans, before
you process them.
Recipes
Soy milk
This recipe can only be prepared with the filter.
Note: After you have processed one batch, always let
the appliance cool down before you process the next
batch.
Ingredients:
- 50g dried soy beans
- 400ml water
2 Put the soaked soy beans in the filter. Pour
400ml of water into the blender beaker and
blend for 30 seconds.
3 Bring the soy milk to the boil in a pan, then
add sugar to taste and leave to simmer until
all the sugar has melted.
4 Serve hot or cold.
Carrot juice
Ingredients:
- 240g carrots
- 360ml water
1 Cut the carrots into small pieces.
2 Put the water and the pieces of carrot in the
blender beaker.
3 Blend for 1 minute.
Cleaning
Cleaning the appliance is easiest immediately after
use.
Do not touch the cutting edges of the blade units
when you handle or clean them. They are very
sharp and you can easily cut your fingers on them.
Never use scouring pads, abrasive cleaning agents
or aggressive liquids such as petrol or acetone to
clean the appliance.
Note: Parts of the appliance may become discoloured
when the appliance is used to process ingredients
that contain a lot of pigment such as carrots and
tomato paste.This is normal.
5 Press the pulse button (Fig. 16)
1 Unplug the appliance.
6 When you have finished processing, release
the pulse button.
2 Remove the blender or chopper from the
motor unit.
Leave the lid on the blender beaker and leave
the filter in the beaker.
3 Clean the motor unit with a moist cloth.
8 For optimal results, put the beaker with the
remaining ingredients (and some extra liquid,
if necessary) back onto the appliance and let
it run for a few more seconds.
9 Pour out the rest of the drink.
-
Tips
When you process a large quantity, we advise
you not to put all the ingredients in the filter at
the same time. Start to process a small quantity
and let the appliance run for a few seconds.
4222.002.7032.3
Guarantee and service
If you need service or information or if you have a
problem, please visit the Philips website at www.
philips.com or contact the Philips Consumer Care
Centre in your country (you find its phone number
in the worldwide guarantee leaflet). If there is no
Consumer Care Centre in your country, go to your
local Philips dealer.
1 Soak the soy beans for 4 hours before you
process them. Set them aside to drain.
4 Put the lid on the blender beaker to fix the
filter. Make sure that the sieve on the lid is
located in front of the spout of the blender
beaker (Fig. 15).
7 Remove the blender beaker from the motor
unit. Pour out the drink through the spout of
the blender beaker (Fig. 17).
-
Environment
Do not throw away the appliance with the
normal household waste at the end of its life,
but hand it in at an official collection point for
recycling. By doing this, you help to preserve
the environment (Fig. 19).
Never immerse the motor unit in water nor rinse
it under the tap.
4 Clean the detachable parts in warm water
with some washing-up liquid and rinse them
under the tap.
If necessary, remove the rubber sealing rings from
the chopper and blender blade units and rinse
them with water.
Do not touch the cutting edges of the blade units
when you handle or clean them. They are very
sharp and you can easily cut your fingers on them.
5 Wind excess mains cord round the base of
the appliance for easy storage (Fig. 18).
3/9
Troubleshooting
Problem
Possible cause
Solution
The appliance does not
work
The appliance is
equipped with a
safety lock. If the
blender beaker or
chopper beaker
is not assembled
properly on the
motor unit, the
appliance does not
work.
Unplug the appliance. Check if the blender
beaker or chopper beaker is assembled
properly (see chapter ‘Using the appliance’).
The appliance is
equipped with a
thermal cut-out. If the
appliance overheats,
the thermal cut-out
automatically cuts off
the power supply to
the appliance.
Unplug the appliance and let it cool down for
30 minutes. Then put the plug back into the
wall socket and press the button to determine
if the appliance works again.
The blade unit is blocked.
There is too much
food in the beaker.
Unplug the appliance and remove some of the
contents from the blender jar. Process a smaller
quantity.
The motor unit gives off an
unpleasant smell during the
first few times of use.
This is normal.
If the appliance continues to give off this smell
after you have used it a few times, make sure
you do not process too large quantities and do
not exceed the maximum processing times.
The appliance makes a lot
of noise.
The blender beaker
lid is not properly
assembled.
Make sure the lid is properly assembled and
the sieve in the lid is in front of the spout of
the blender beaker.
The appliance makes a lot of
noise, smells, feels hot to the
touch, emits smoke, etc.
There is too much
food in the beaker.
Unplug the appliance and remove some of the
contents from the blender jar. Process a smaller
quantity.
You let the appliance
operate too long
without interruption.
Do not operate the blender for more than 1
minute at a time. Do not operate the chopper
for more than 30 seconds at a time.
The sealing ring is
not or not properly
placed on the blender
blade unit and/or
the blade unit is not
properly attached to
the blender beaker.
Unplug the appliance. Place the sealing ring
properly on the blade unit and/or attach the
blade unit properly to the blender beaker.
You have filled the
blender jar beyond
the MAX indication
Unplug the appliance and remove some of the
contents from the blender jar. Process a smaller
quantity.
The sealing ring is
not or not properly
placed on the
chopper blade unit.
Unplug the appliance. Remove the blade unit
and place the sealing ring properly on the blade
unit.
The blender beaker leaks.
The chopper leaks.
4222.002.7032.3
4/9
簡介
恭喜您購買本產品並歡迎加入飛利浦!請於
www.philips.com/welcome 註冊您的產品,來
善用飛利浦提供的支援。
一般說明 (圖 1)
A
B
C
D
E
F
G
H
I
J
K
L
M
果汁壺蓋
果汁壺
果汁機刀組的密封環
果汁機刀組
切碎機容器
切碎機刀組
切碎機刀組的密封環
安全鎖
馬達座
瞬間按鈕
電線儲藏溝槽
電線
濾網
重要事項
在使用本產品前,請先仔細閱讀本使用手冊,
並保留說明以供日後參考。
-
-
-
-
危險
不可將馬達座整個浸在水中或其他液體
裡,亦不可放在水龍頭下沖洗;請以濕布
清潔馬達座。
警示
在您連接電源之前,請檢查本地的電源電
壓是否與產品所標示的電源電壓相符。
為避免不當重設過熱保險裝置導致危險情
況發生,請勿將本電器連接至定時器。
如果電線、插頭或其他附件受損時,請勿
使用本產品。
如果電線損壞,必須交由飛利浦、飛利浦
授權之服務中心,或是具備相同資格的技
師更換,以免發生危險。
當果汁壺插上電源或運轉中時,請勿以手
指或其他物品碰觸果汁壺。研磨刀片非常
銳利。
如果刀組卡住,請先拔掉插頭,再將卡住
刀片的食材取出。
本產品不適合供下列人士 (包括小孩) 使
用:身體官能或心智能力退化者,或是經
驗與使用知識缺乏者。他們需要有負責其
安全的人員在旁監督,或指示產品的使用
方法,方可使用。
請勿讓孩童將本產品當成玩具。
不可在無人看顧的情況下任由果菜機運
作。
不可使用果汁壺或切碎機容器來開啟或關
閉產品電源。
切勿使用切碎機來研磨堅硬的食材,如肉
豆蔻和冰糖。
請勿使用切碎機來混合液體或是攪碎冰
塊。請使用攪拌機來處理這些食材。
處理或清潔時,請避免碰觸刀組之刀鋒。
刀鋒相當鋒利,因此很容易會割傷手指。
警告
在您組裝、拆解或調整任何零件之前,請
務必拔除本產品插頭。
請勿使用其他製造商的任何配件或零件,
或非飛利浦建議之配件或零件。如果您使
用此類配件或零件,保固即會失效。
請勿超過果汁壺和切碎機容器的最高容量
刻度。
請勿超過表格中註明的用量。
請先讓高溫的食材冷卻後,再倒入果汁壺
或切碎機容器 (最高溫度 80°C)。
不可讓果汁機持續運轉超過 1 分鐘以上。
切碎機的連續操作時間不可超過 30 秒。
不可讓果汁機持續運轉超過 1 分鐘以上。
安全功能
繁體中文
內置安全鎖
本功能可確保唯有果汁壺或切碎機容器正確組
裝情況下,才能夠開啟果汁機電源,如果果汁
壺或切碎機容器組裝正確,內建安全鎖即自動
解除。
過熱保險裝置
本電器裝有過熱保險裝置,萬一電器過熱,可
自動切斷電源。
如果電器突然停止操作:
1將插頭拔離牆上插座。
2等待 30 分鐘,讓電器冷卻。
果汁機在運轉時,請勿將手指或其他物品 (例
如:果醬刀) 伸進果汁壺中。
提示
如果食材卡在果汁壺的壁面,請先拔除插
頭,利用刮刀將壁上的食材刮下。 (圖 6)
為避免果汁濺灑,壺裡的食材不可超過「
MAX」的標示 (0.6 公升)。
請先將固體食材切成小塊狀 (1-2 公分大
小),再放入果汁壺裡。請勿一次處理大量
的固體食材;請改以少量多次的方式來進
行處理。
當果汁機在運轉時,您可以將液體食材 (例
如:油) 透過果汁壺蓋上的開口倒入攪拌杯
中。 (圖 7)
-
3將插頭插入插座。
4再次開啟本電器。
-
注意: 如果過熱保險裝置的啟動過於頻繁,
請洽飛利浦經銷商,或飛利浦授權之服務中
心。
切碎機
-
電磁場 (EMF)
本飛利浦產品符合電磁場 (electromagnetic
fields,EMF) 所有相關標準。若正確處理及依
照本使用手冊之說明進行操作,根據現有之科
學文獻來看,使用本產品並無安全顧慮。
第一次使用前
1請清潔除了馬達座以外的所有零件 (請參閱
「清潔」單元)。
使用此電器
果汁機
切碎機的用途是切碎濕的食材,例如肉
類、洋蔥、大蒜等等。 (圖 8)
清潔時避免觸碰切碎機刀組的刀鋒。刀鋒相當
鋒利,接觸刀鋒很容易會割傷手指。
切勿使用切碎機來研磨堅硬的食材,如肉豆蔻
和冰糖。
1將食材切成小塊 (約 1-2 公分),然後放入
切碎機容器中。 (圖 9)
請參閱附表以瞭解建議的使用量。
切碎機容器裡的食材不可超過「MAX」的標
示。
攪拌機的用途:
- 攪拌液體,例如乳製品、醬汁、果汁、
湯、混合飲料、奶昔等。
- 攪拌軟質食材,例如煎餅奶糊。
- 將煮熟的食材壓成泥狀,例如煮熟的豆
類。
- 製作嬰兒食品。
食材切碎機
用量
預先泡水的種子與榖
類,例如蓮子、糊狀
物、稻米等
20-50 公克
辣椒醬 (辣椒、青蔥、
大蒜等等)
50 公克
大蒜
20-100 公克
1確認密封環妥善放在果汁機刀組上。
洋蔥
20-100 公克
2將果汁機刀組裝入果汁壺的底部 (1)。以順
時針方向旋轉刀組加以固定 (2)。 (圖 2)
肉
30 克
清潔時避免觸碰果汁機刀組的刀鋒。刀鋒相當
鋒利,接觸刀鋒很容易會割傷手指。
3將食材放入果汁壺中。 (圖 3)
請參閱附表以瞭解建議的使用量。
果汁壺內的食材不可超過「MAX」刻度。
請勿將溫度超過 80°C 的食材裝入果汁壺
中。
食材攪拌機
用量
水果
20 公克
蔬菜
60 公克
蔬菜汁
蔬菜 100 公克 + 水 (適量)
奶昔
水果 120 公克 + 牛奶 250
毫升
冰塊
最多 6 個小冰塊
湯
水 400 毫升
2確認密封環妥善放在切碎機刀組上。
3將刀組放置在切碎機容器上 (1)。以順時針
方向旋轉刀組加以固定 (2)。 (圖 10)
4將組裝好的切碎機倒置,放在馬達座上
(1)。以順時鐘方向旋轉切碎機加以固定
(2) (直到聽見「喀噠」一聲)。 (圖 11)
5將插頭插入牆壁的插座,然後按下瞬間按
鈕。 (圖 12)
操作本電器時,請以雙手穩穩握住馬達座。
請勿一次操作切碎機超過 30 秒。
-
提示
如果食材黏住刀組或黏在容器壁面,或者
如果產品因食物分佈不勻而搖晃,請關閉
產品電源。將切碎機容器要從馬達座拆
下。搖晃切碎機容器直到食材掉落或分佈
均勻。
濾網
4將果汁壺裝到馬達座上 (1)。以順時針方向
旋轉果汁壺加以固定 (直到聽到「喀達」一
聲) (2)。 (圖 4)
請勿對果汁壺過度施力。
5將上蓋放到果汁壺上 (1)。旋轉上蓋直到篩
網位在壺嘴前方 (2)。 (圖 5)
6將插頭插入牆壁的插座,然後按下瞬間按
鈕。
操作本電器時,請以雙手穩穩握住馬達座。
4222.002.7032.3
如果您需要的攪拌時間超過 1 分鐘,請先放開
瞬間按鈕並稍候 1 分鐘之後再繼續。若果汁機
變得過燙,請讓它稍微冷卻之後再繼續。
您可以使用濾網來攪打出美味的新鮮果汁、雞
尾酒或豆漿 (請參閱本章「食譜」一節)。核籽
和果皮都會完全留在濾網中。
1將濾網放入果汁壺中。 (圖 13)
確定濾網妥善安裝在容器的底部。
2將食材置於濾網中。 (圖 14)
濾網的盛裝量不可超過「MAX」刻度。請勿用
本濾網處理熱的食材。
5/9
3將水或其他液體 (牛奶、果汁等) 倒入果汁
壺中。
如有必要,請將橡膠密封環從切碎機或果汁機
刀組中取出,用水沖洗。
4蓋上果汁壺的上蓋將濾網加以固定。確定
上蓋所附篩網的位置是在果汁壺嘴的前
方。 (圖 15)
處理或清潔時,請避免碰觸刀組之刀鋒。刀鋒
相當鋒利,因此很容易會割傷手指。
5按下瞬間按鈕 (圖 16)
5將多出的電源線繞在電器機的基座四周,
可方便儲藏。 (圖 18)
6完成處理後,請放開瞬間按鈕。
將蓋子留在果汁壺上,將濾網留在容器中。
7從馬達座拆下果汁壺。從果汁壺的壺嘴倒
出飲料。 (圖 17)
8為達最佳效果,請將盛裝其餘食材的果汁
壺 (如有需要,可連同其他多出來的液體)
放回到果汁機上,再多打幾秒鐘。
9這時即可將其餘的飲料倒出。
-
-
提示
請注意,當您處理大量食材時,我們建議
不要將所有的食材一次放入過濾器內。一
開始先處理少量的食材,並讓果汁機運轉
幾秒鐘,之後放開瞬間按鈕,再另外加入
少量的食材。重複這個步驟直到您處理完
所有食材為止。在處理期間,果汁壺一定
要蓋上上蓋。
製作果汁或雞尾酒時,為達到最佳效果,
100 公克的水果約搭配 150 毫升的水。您
也可以使用其他液體,例如製作雞尾酒。
處理黃豆等堅硬的食材之前,可先浸泡一
段時間。
-
環境保護
本產品壽命結束時請勿與一般家庭廢棄
物一併丟棄。請將該產品放置於政府指
定的回收站,此舉能為環保盡一份心
力。 (圖 19)
保證書與服務
若您需要相關服務或資訊,或是有任何問
題,請瀏覽飛利浦網站,網址為 www.philips.
com,或連絡您當地的飛利浦顧客服務中心
(您可以在全球保證書上找到連絡電話)。若您
當地沒有顧客服務中心,請洽詢當地的飛利浦
經銷商。
故障排除
問題
可能原因
電器無法啟動
本產品內建安全鎖。若 將本產品的插頭拔掉。檢查果汁壺或
果汁壺或切碎機容器未 切碎機容器是否組裝妥當 (請參閱「
正確安裝於馬達座上, 使用此電器」單元)。
就無法操作本產品。
本電器裝有過熱保險裝 請將電源切斷並讓它冷卻 30 分鐘,
置,萬一電器過熱,過 然後再將插頭插回牆面插座中,按下
熱保險裝置會自動切斷 按鈕確認電器是否再度運轉。
產品電源。
食譜
豆漿
本食譜只能搭配濾網製作。
注意: 處理完一份食物之後,請務必讓本產
品冷卻,然後再繼續處理下一份。
材料:
- 50 公克的脫水黃豆
- 水 400 毫升
1開始處理前,先將黃豆浸泡 4 小時,然後
讓其瀝乾。
2將浸泡過的黃豆放入濾網。在果汁壺中倒
入 400 毫升的水,然後攪打 30 秒。
刀組卡住。
容器內放入太多食物。 請先拔掉插頭,倒出果汁壺內的部分
食材,以進行少量處理。
頭幾次使用時,馬達座傳出
異味。
這是正常現象。
若產品在使用幾次之後仍發出異味,
請確定您沒有處理過量的食材,並確
定機器運轉沒有超過處理時間上限。
電器發出很大的噪音。
果汁壺上蓋可能沒有
裝好。
請確定將上蓋裝好,而且上蓋中的篩
網位於果汁壺嘴的前方。
本產品發出很大的噪音、產
生異味、過熱、冒煙等。
容器內放入太多食物。 請先拔掉插頭,倒出果汁壺內的部分
食材,以進行少量處理。
電器運作的時間過長而 請勿讓果汁機持續運轉超過 1 分鐘
沒有中斷休息。
以上。請勿一次操作切碎機超過 30
秒。
3加熱到沸騰,然後加糖調味,接下來用文
火慢煮直到所有的糖都溶解。
4熱飲或冷飲皆適宜。
果汁壺會滲漏。
胡蘿蔔汁
材料:
- 240 公克的胡蘿蔔
- 水 360 毫升
1將胡蘿蔔切成小塊。
2將水和切好的胡蘿蔔放入果汁壺。
解決方法
密封環沒有裝到果汁機 請將本產品的插頭拔掉。將密封環妥
刀組上或是沒有裝好, 善裝在刀組上,和/或將刀組確實裝
和/或刀組沒有妥善裝
置在果汁壺中。
置在果汁壺中。
果汁壺內的食材已超過 請先拔掉插頭,倒出果汁壺內的部分
「MAX」刻度。
食材,以進行少量處理。
切碎機滲漏。
密封環沒有裝到切碎
拔掉電器插頭。取出刀組,將密封環
機刀組上或沒有裝好。 妥善裝到刀組上。
3攪打 1 分鐘。
清潔
使用本產品後馬上清潔最容易處理。
處理或清潔時,請避免碰觸刀組之刀鋒。刀鋒
相當鋒利,因此很容易會割傷手指。
絕對不可使用鋼絲絨、磨蝕性的清潔劑或侵蝕
性的液體 (例如汽油或丙酮) 清潔本產品。
注意: 當使用本產品處理胡蘿蔔和蕃茄泥等
富含色素的食材時,本產品的零件可能會因此
變色。此為正常現象。
1將本產品的插頭拔掉。
2從馬達座拆下果汁機或切碎機。
3請用濕布清潔馬達座。
請勿將馬達座浸在水中或用水龍頭沖洗。
4使用洗潔精在溫水中清潔可拆式零件,然
後在水龍頭下沖洗。
4222.002.7032.3
6/9
- 切勿用切碎器碾碎非常硬的物
料,如肉豆蔻和冰糖等。
产品简介
- 切碎器不可用于混合液体或碾碎
感谢您的惠顾,欢迎光临飞利浦!为了您能充
冰块。请使用搅拌机加工这些物
分享受飞利浦提供的支持,请注册您的产品,
料。
网址为 www.philips.com/welcome。
- 使用或清洗时切勿接触刀片组件
一般说明 (图 1)
的刀刃。刀刃非常锋利,很容易
A 搅拌杯盖
割伤手指。
B 搅拌杯
注意
C 搅拌杯刀片组件的密封圈
- 在拆、装或调校产品的任何部件
D 搅拌杯刀片组件
E 碎肉加工杯
之前,务必拔下电源插头。
F 切碎器刀片组件
- 切勿使用其它制造商生产的或未
G 切碎器刀片组件的密封圈
H 安全锁
经飞利浦特别推荐的附件或部
I 马达装置
件。如果您使用了此类附件或部
J 暂动按钮
件,则本产品的保修将会失效。
K 电线储藏槽
L 电源线
- 不要超出搅拌杯和碎肉杯上所标
M 过滤网
注的最大刻度。
注意事项
- 不要超出表中所示的份量。
使用产品之前,请仔细阅读本使用 - 须待高温原料冷却后(最高温度
80 摄氏度),方可将它们放入
说明书,并妥善保管以备日后参
搅拌杯或碎肉杯加工。
考。
- 切勿让搅拌机持续操作超过 1
危险
分钟。
- 切勿将马达浸入水或其它液体
中,也不要在自来水下冲洗。只 - 切勿让切碎器持续操作超过 30
秒钟。
能用湿布擦洗马达装置。
警告
安全功能
- 在将产品连接电源之前,请先检
内置安全锁
查产品所标电压与当地的供电电 此功能可确保只有将搅拌杯或碎肉杯正确安装
在马达装置上之后,产品才能打开电源。如果
压是否相符。
搅拌杯或碎肉杯安装正确,则内置安全锁将被
- 为避免因不慎重置过热保护装置 解锁。
而发生危险,切勿将本产品连接
过热保护装置
本产品配有过热保护装置,当产品过热时可自
到计时器。
动切断其电源。
- 如果电源线、插头或其它部件受 如果产品突然停止运行:
损,则不要使用产品。
1将插头从电源插座上拔下。
- 如果电源软线损坏,为避免危
2让产品冷却 30 分钟。
险,必须由制造厂或其维修部或 3将插头插入插座。
类似的专职人员来更换。
4重新启动本产品。
- 在产品已接插电源或正在运行
注: 如果过热保护装置启用过于频繁,请联
时,切勿将手指或其它物体伸入 系飞利浦经销商或经授权的飞利浦服务中心。
搅拌杯内。刀片组件的刀刃非常
电磁场 (EMF)
锋利。
这款飞利浦产品符合关于电磁场 (EMF) 的所有
- 如果刀片组件被卡住,请先拔下 相关标准。据目前的科学证明,如果正确使用
电源插头,然后清除堵塞刀片组 并按照本用户手册中的说明进行操作,本产品
是安全的。
件的原料。
- 本产品不打算由肢体不健全、感
初次使用之前
觉或精神上有障碍或缺乏相关经 1清洗除了马达装置之外的所有部件(
见“清洗”一章)。
验和知识的人(包括儿童)使
用,除非有负责他们安全的人对
使用本产品
他们使用本产品进行监督或指
搅拌机
导。
- 应照看好儿童,确保他们不玩耍 此搅拌机适用于:
- 混合液体,如奶制品、调料、果汁、汤、
这些产品。
混合饮料、鸡尾酒等。
- 切勿让儿童在无人看管的情况下 - 混合软性物料,如薄饼面糊。
- 搅拌煮熟的物料(如煮熟的豆类),
使用本产品。
- 制作婴儿食品。
- 切勿使用搅拌杯或碎肉加工杯打 清洗时切勿接触搅拌杯刀片组件的
开或关闭产品电源。
刀刃。刀刃非常锋利,很容易割伤
手指。
简体中文
4222.002.7032.3
1确保密封圈正确放置在搅拌杯刀片组件
上。
2将搅拌杯刀片组件插入搅拌杯底部 (1)。顺
时针转动刀片组件将其固定 (2)。 (图 2)
3将物料放入搅拌杯。 (图 3)
参阅表格中的建议份量。
切勿超过 MAX 最高刻度。
切勿将温度高于摄氏 80°C 的物
料装入搅拌杯中。
搅拌物料
份量
水果
20 克
蔬菜
60 克
蔬菜汁
100 克蔬菜 + 水(
适量)
奶昔
120 克水果 + 250 毫
升牛奶
冰块
最多 6 小块冰块
汤
400 毫升水
4将搅拌杯安装到马达装置上 (1)。顺时针
转动搅拌杯将其拧紧 (“咔哒”一声)
(2)。 (图 4)
切勿向搅拌杯施加过大的压力。
5将盖子放在搅拌杯上 (1)。转动盖子直到滤
网位于杯口前方 (2)。 (图 5)
6将电源插头插入插座并按暂动按钮。
当产品在运转时,用双手扶稳马达装置。
切勿让搅拌机持续操作超过 1 分
钟。
如果 1 分钟后仍未搅拌好,请松开暂动按钮,
等待 1 分钟后再继续使用。如果产品变热,应
先让其冷却后再继续使用。
当搅拌机运转时,切勿将手指或其
它物体(如铲子)伸入搅拌杯内。
使用提示
-
-
如果有物料粘在搅拌杯的杯壁上,请先关
闭产品电源,然后用刮铲铲下杯壁上的物
料。 (图 6)
为避免物料溢出,放入的物料不可超过搅
拌杯的 MAX 最高刻度(0.6 升)。
将固体物料放入搅拌杯之前,应先将它们
切成小块(1-2 厘米)。不要一次加工大
量固体物料。大量固体物料应分成多次进
行加工。
您可以在产品运转时打开杯盖,将液体配
料(例如油)倒入搅拌杯。 (图 7)
切碎器
-
切碎器主要用于切碎湿的物料,如肉、洋
葱、蒜等。 (图 8)
清洗时切勿接触切碎器刀片组件的
刀刃。刀刃非常锋利,很容易割伤
手指。
切勿用切碎器碾碎非常硬的物料,
如肉豆蔻和冰糖等。
1将物料切成小块(约 1-2 厘米),然后将
其放入碎肉杯。 (图 9)
参阅表格中的建议份量。
切勿超过 MAX 最高刻度。
7/9
切碎物料
份量
预先浸泡的籽和谷物,
如莲籽、面团、大米等
20-50 克
辣椒酱(红辣椒、葱、
蒜等)
50 克
蒜
20-100 克
洋葱
20-100 克
肉
30 克
2确保密封圈正确放置在切碎器刀片组件
上。
3将刀片组件放在碎肉杯上 (1)。顺时针转动
刀片组件将其固定 (2)。 (图 10)
4将安装好的切碎器翻转过来,放在马达
装置 (1) 上。顺时针转动切碎器将其拧
紧 (2)(“咔哒”一声)。 (图 11)
5将电源插头插入插座并按暂动按
钮。 (图 12)
当产品在运转时,用双手扶稳马达装置。
切勿让切碎器持续运转超过 30
秒。
使用提示
-
如果有物料粘在刀片组件或搅拌杯壁上,
或者由于食品分布不均而使产品摇晃,请
先关闭产品电源,从马达装置上取下切碎
器,然后摇动它直到物料松脱或分配均
匀。
过滤网
您可以使用过滤网做出美味的新鲜果汁、鸡尾
酒和豆浆(见本章“食谱”部分)。过滤网可
以过滤所有果核和果皮。
1将过滤网放入搅拌杯内。 (图 13)
确保过滤网在搅拌杯底部放置到位。
2将物料倒入过滤网。 (图 14)
放入过滤网的原料不可超过其最高
(MAX) 刻度。请勿使用过滤网加工
过热的物料。
3将水或其它液体(牛奶、果汁等)倒入搅
拌杯。
4将盖子放在搅拌杯上以固定过滤网。
确保盖中的滤网位于搅拌杯的杯嘴前
方。 (图 15)
5按下暂动按钮 (图 16)
6加工完成之后,请松开暂动按钮。
让盖子留在搅拌杯上,并让过滤网
留在搅拌杯中。
7从马达装置上取下搅拌杯。通过搅拌杯的
杯嘴倒出饮料。 (图 17)
8要获得最佳效果,可将含有剩余物料(如
果需要,可再添加一些液体)的搅拌杯重
新放回到产品上,并让其再加工数秒钟。
9倒出剩余的饮料。
-
-
-
食谱
豆浆
4222.002.7032.3
顾客服务中心,则可以与当地的飞利浦经销商
联系。
故障排除
此食谱只能用过滤器来准备。
问题
可能的原因
解决方法
注: 加工完一批物料之后,务必让机器冷
却,然后再加工下一批。
原料:
- 50 克干大豆
- 400 毫升水
产品不
能工作
本产品配
有安全
锁。如果
搅拌杯或
碎肉杯未
正确安装
到马达装
置上,则
产品将无
法工作。
拔掉产品插头。检
查搅拌杯或碎肉杯
是否安装正确(
见“使用产品”一
章)。
本产品配
有过热保
护装置。
如果产品
过热,过
热保护装
置便会自
动切断其
电源。
拔下产品的电源插
头,让产品冷却 30
分钟。然后将电源
插头重新插回插座
并按相应按钮确定
产品是否还在工
作。
刀片组
件被堵
塞。
大口杯里
的食物太
多。
拔下产品的电源插
头,从搅拌杯内倒
出一些物料,然后
进行小量加工。
马达装
置在头
几次使
用时发
出难闻
的气
味。
这是正常
的。
如果多次使用后,
产品仍会发出此气
味,则应确保您没
有加工过量的物料
并且没有超过加工
时间的最大限制。
产品噪
间过
大。
搅拌杯盖
安装不正
确。
确保杯盖安装正
确,并且盖中的滤
网位于搅拌杯的杯
嘴前方。
设备噪
声很
大、有
难闻的
气味、
发烫、
冒烟
等。
大口杯里
的食物太
多。
拔下产品的电源插
头,从搅拌杯内倒
出一些物料,然后
进行小量加工。
产品不间
断运转的
时间过
长。
切勿让搅拌机持续
运转超过 1 分钟。
切勿让切碎器连续
运转超过 30 秒。
密封圈没
有正确放
置在搅拌
杯刀片组
件上和/或
刀片组件
没有正确
安装在搅
拌杯上。
拔下产品电源插
头。将密封圈正确
放置在搅拌杯刀片
组件上和/或将刀片
组件正确安装在搅
拌杯上。
放入搅拌
杯的原料
超过了搅
拌杯的最
高 (MAX)
刻度。
拔下产品的电源插
头,从搅拌杯内倒
出一些物料,然后
进行小量加工。
切碎器刀
片组件上
没有密封
圈或者密
封圈没有
放好。
拔下产品电源插
头。卸下刀片组件
并将密封圈正确放
置在刀片组件上。
1加工大豆之前先将其浸泡 4 小时,然后将
水沥干。
2将泡软的大豆放入过滤网。将 400 毫升水
注入搅拌杯,并搅拌 30 秒。
3在平底锅中将豆浆烧开,加糖调味。然后
用慢火煮,直到糖全部化开。
4冷饮热饮均可。
胡萝卜汁
原料:
- 240 克胡罗卜
- 360 毫升水
1将胡萝卜切成小块。
2将切好的胡萝卜放入搅拌杯中,加入一些
水。
3搅拌 1 分钟。
清洁
使用之后立即清洗产品最容易洗净。
使用或清洗时切勿接触刀片组件的
刀刃。刀刃非常锋利,很容易割伤
手指。
不要使用钢丝绒、研磨性清洁剂或
腐蚀性液体(例如汽油或丙酮)来
清洁产品。
注: 如使用本产品加工含大量色素的物料(
例如胡萝卜和西红柿酱),机器配件可能会变
色。这是正常的。
1拔掉产品插头。
2从马达上卸下搅拌器或切碎器。
3用湿布清洁马达装置。
切勿将马达装置浸入水中,也不要
在水龙头下冲洗。
4用加有少量清洁剂的温水清洗可拆卸的部
件,并将它们放到水龙头下冲洗。
必要时,可以取下切碎器和搅拌杯刀片组件上
的橡胶密封圈并用水冲洗。
搅拌杯
泄漏。
使用或清洗时切勿接触刀片组件的
刀刃。刀刃非常锋利,很容易割伤
手指。
5将多余的电源线绕在设备的底座上以便存
放。 (图 18)
使用提示
加工大量物料时,建议您不要在过滤网中
一次放入全部物料。首先加工一小部分物
料,让产品运转几秒钟,然后松开暂动按
钮,再加入一小部分物料。重复这一过
程,直至加工完所有的物料。加工过程中
盖子应始终盖在搅拌杯上。
在制作果汁和鸡尾酒时,为获得最佳效
果,可在 100 克水果中加入大约 150 毫升
水。如果是制作鸡尾酒等,您还可以加入
其它液体。
在加工坚硬的物料(如大豆)之前要先浸
泡。
环保
-
弃置产品时,请不要将其与一般生活垃圾
堆放在一起;应将其交给官方指定的回收
中心。这样做有利于环保。 (图 19)
保修和服务
如果您需要服务或信息,或如果您有任何问
题,请访问飞利浦网站:
www.philips.com。您也可与您所在地的飞利
浦顾客服务中心联系(可从全球保修卡中找
到电话号码)。如果您的所在地没有飞利浦
切碎器
泄漏。
8/9
2008/05/23
4222.002.7032.3
9/9