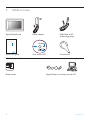
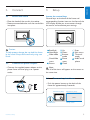
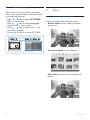
1
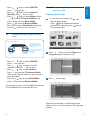
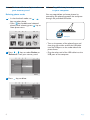
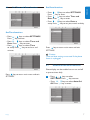
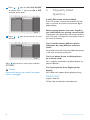
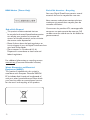
Register your product and get support at
www.philips.com/welcome
PhotoFrame
7FF2FPAS
EN User manuals
1
1.
What is in box
2
2. Connect
2.1 Attach the Stand
2.2 Connect the power adaptor
3
3
3
3. Setup
3.1 Turn on the photo frame
3.2 Chose Language
3
3
4
4. 4.1 4.2 4.3 4.4 4.5 4.6 4.7 Enjoy
View pre-stored photos
View photos from your memory card
Copy or copy all photos from your
memory card
Delete or Delete all photos from your memory card
Copy/ Delete photos by connecting
to your computer
Set Time and Date functions
Set Auto on/off timer functions
4
4
5
5
5.
Frequently asked questions
8
6. Service and Warranty
9
Content
ENGLISH
Content
6
6
7
7
1
1.
What is in box
Digital PhotoFrame Power adaptor
Digital photo display
USB Cable to PC
(male B type plug)
7FFI series
Quick start guide
1
2
3
Connect
Setup
Enjoy
Quick start guide
User manual CD
Frame Stand
What else you’ll need
AC
Power outlet
Digital Photos on memory card or PC
What is in box
Connect
2.1
Attach the Stand
3.
Setup
ENGLISH
2.
Locate the control keys
Control keys on the back of the frame and
• Place the head of the stand in the socket.
corresponding function icons on the front of the
• Rotate counterclockwise until the stand clicks LCD display enable you to maneuver through
into place.
the menus and customize your settings.
Caution:
To help prevent damage, do not hold the frame
by the stand. Grasp the frame firmly using two
hands.
2.2
Connect the power adaptor
• Connect the supplied power adaptor to the photo frame and then plug it to a power outlet.
Back/Left
Next/Right
Slide mode
Show/Hide
menu
Return
Up
Down
Browse
mode
Photo
menu
Clock
Enter
Main menu
Thumnail
mode
Add/Cancel
photo
Note:
Not all of the icons will appear on the screen at
the same time.
3.1
Turn on the photo frame
• Push the power button on the back of the frame for approximately 2seconds.
PhotoFrame (back)
Power button
Connet / Setup
PhotoFrame (front)
Startup screen
3.2
Choose language
Menu buttons are on the back of the photo
frame. Icons indicate location of buttons found
on the back of the panel.
• Press
,
keys to select SETTINGS. Press
key to enter.
• Press
,
keys to select Language settings. Press
key to enter.
• Press
,
keys to select. Press
key
to set your language.
• Use
key to return and exit SETTINGS.
MainMenu OK
PhotoFrame (front) Language Setting
Up
Down
Right
PhotoFrame (back)
4.
Enjoy
4.1
View pre-stored photos
There are 3 view modes to choose from:
Browse Mode: manual viewing of photos
one by one.
Left
Thumbnail Mode: list of all photos.
Slide Mode: automatic, rotating display of photos.
Setup / Enjoy
4.2
4.3
Copy or copy all photos from your memory card
Copying photo mode
,
1 • In the thumbnail mode, use
keys to select photo.
• Press
key to add/cancel selected
photos. After selecting, press
key to
show photo menu.
View photos from your memory card
Photo display (underside)
Use left slot for Secure
Digital/MMC/xD/Memory
Stick card. Slide card with
end first and face up.
left slot
right slot
User right slot for Compact
Flash card. Slide card with
end first and
face down.
• Press
,
keys to select PHOTO.
Press
key to enter.
• Press
,
keys to select inserted
memory card. Press
key to enter.
• Press
,
keys to select Album.
Press
key to enter Thumbnail Mode,
After a few seconds, photos in your memory
card will appear.
• Then press
key to enter Slide Mode,
press
key to enter Browse Mode.
,
keys to select Copy to or
2 Press
Copy all to your memory card.
3 Press
key to copy.
If the memory card is inserted before the power
is ON, Slideshow will automatically start.
Photo frame will keep a resized copy of the
photo until it’s internal memory is full (message
shown).
Enjoy
ENGLISH
• Press
,
keys to select PHOTO.
Press
key to enter.
• Press
,
keys to select Internal
Memory. Press
key to enter.
• Press
,
keys to select Album. Press
key to enter Thumbnail Mode, and
press
key to enter Slide Mode,
press
key to enter Browse Mode.
• You may also enter Slide Mode directly by pressing
key from the main menu.
4.4
Delete or Delete all photos from your memory card
Deleting photo mode
,
1 • In the thumbnail mode, use
keys to select photo.
• Press
key to add/cancel selected
photos. After selecting, press
key to
show photo menu.
4.5
Copy/ Delete photos by connecting
to your computer
You may copy, delete and move photos by
connecting the photo framewith the computer
through the provided USB cable.
USB port
,
keys to select Delete or
2 Press
Delete all from your memory card.
3 Press
• Turn on the power of the photo frame, and
then plug the smaller end of the USB cable
into the USB port on the underside of the
photo frame.
• Plug the other end of the USB cable into the
USB port of the computer.
key to delete.
Enjoy
Set Time and Date functions
Set Date functions
• Press
,
keys to select SETTINGS.
Press
key to enter.
• Press
,
keys to select Time and
Date. Press
key to enter.
• Press
,
keys to select Date to
setup. Press
key to set year, month and day.
Set Time functions
• Press
,
keys to select SETTINGS.
Press
key to enter.
• Press
,
keys to select Time and
Date. Press
key to enter.
• Press
,
keys to select Time
to setup. Press
key to set hour and
minutes.
Press
key to return main menu and exit
SETTINGS.
Caution:
Time and date settings are erased if the photo
frame is unplugged.
4.7
Set Auto on/off timer functions
Photo display can be enabled to turn on and off
at pre-set times daily.
Press
key to return main menu and exit
SETTINGS.
Enjoy
,
keys to select
1 • Press
SETTINGS. Press
key to enter.
• Press
,
keys to select Auto On/
Off. Press
key to enter.
ENGLISH
4.6
,
keys to select Set On/Off
2 Press
to switch. Press
key to set On or Off,
and then press enter.
5.
Frequently Asked Questions
Is the LCD screen touch-enabled?
The LCD screen is not touch-enabled. Use the
keys in the back of the frame to control digital
photo display.
,
3 Press
off time.
keys to set auto on or auto
After copying photos, how can I check to
see if the photos are already stored inside?
The photos are copied after the screen confirms
with “Finished” message.You may review them in
the internal memory.
Can I switch between different photo
slideshows by using different memory
cards?
Yes, photo frame will show the slideshow photos
in the card currently connected.
Press
key to return main menu and exit
SETTINGS.
Caution:
Auto on/off settings are erased if the photo
frame is unplugged.
Can I use photo frame to delete photos
on memory card?
Yes, it supports operations to delete photos on
external devices.
Can I print photos from Digital photo
display?
No, it does not support direct photo printing.
Need help?
support web site
Online help: www.philips.com/welcome
Enjoy / Frequently Asked Questions
Service and Warranty
OneYearLimitedWarranty(forUSand
Canadaonly)
Philips warrants that this product shall be free
from defects in material, workmanship and
assembly, under normal use, in accordance with
the specifications and warnings, for a period
of one year from the date of purchase. This
warranty extends only to the original purchaser
of the product, and is not transferable. To
exercise your rights under this warranty, you
must provide proof of purchase in the form of
an original sales receipt that shows the product
name and the date of purchase. For customer
support or to obtain warranty service, please
visit our website www.philips.com/welcome or
Contact Philips Customer Care Center at:
1-888-PHILIPS (1-888-744-5477) IN U.S.A.,
Puerto Rico, or U.S. virgin islands. 1-800-6616162 (French speaking), 1-888-PHILIPS (1888-744-5477) (English or Spanish speaking) in
Canada. THERE ARE NO OTHER EXPRESS OR
IMPLIED WARRANTIES. Philips liability is limited
to repair or, at its sole option, replacement of
the product. Incidental, special and consequential
damages are disclaimed where permitted by law.
This warranty gives you specific legal rights.You
may also have other rights that vary from state
to state.
Recycling Information for Customers
Philips establishes technically and economically
viable objectives to optimize the environmental
performance of the organization’s product,
service and activities.
From the planning, design and production
stages, Philips emphasizes the important of
making products that can easily be recycled. At
Philips, end-of-life management primarily entails
participation in national take-back initiatives
and recycling programs whenever possible,
preferably in cooperation with competitors.
Service and Warranty
There is currently a system of recycling up and
running in the European countries, such as The
Netherlands, Belgium, Norway, Sweden and
Denmark.
ENGLISH
6.
In U.S.A., Philips Consumer Electronics
North America has contributed funds for the
Electronic Industries Alliance (EIA) Electronics
Recycling Project and state recycling initiatives
for end-of-life electronics products from
household sources. In addition, the Northeast
Recycling Council (NERC) - a multi-state
non-profit organization focused on promoting
recycling market development - plans to
implement a recycling program.
In Asia Pacific, Taiwan, the products can be taken
back by Environment Protection Administration
(EPA) to follow the IT product recycling
management process, detail can be found in web
site www.epa.gov.tw
Banned Substance Declaration
This product comply with RoHs and Philips BSD
(AR17-G04-5010-010) requirements
CE Declaration of Conformity
Philips Consumer Electronics declare under our
responsibility that the product is in conformity
with the following standards
• EN60950-1:2001 (Safety requirement of Information Technology Equipment)
• EN55022:1998/A1:2001/A2:2003 (Radio
Disturbance requirement of Information
Technology Equipment)
• EN55024:1998/A1:2001/A2:2003 (Immunity
requirement of Information Technology
Equipment)
• EN61000-3-2:2006 (Limits for Harmonic
Current Emission)
• EN61000-3-3:1995/A1:2001/A2:2006
(Limitation of Voltage Fluctuation and Flicker)
following provisions of directives applicable
• 2006/95/EC (Low Voltage Directive)
• 2004/108/EC (EMC Directive)
• 2006/95/EC (Amendment of EMC and
Low Voltage Directive) and is produced by a
manufacturing organization on ISO9000 level.
Federal Communications Commission
(FCC) Notice (U.S. Only)
Note:
This equipment has been tested and found
to comply with the limits for a Class B digital
device, pursuant to Part 15 of the FCC Rules.
These limits are designed to provide reasonable
protection against harmful interference in a
residential installation. This equipment generates,
uses and can radiate radio frequency energy
and, if not installed and used in accordance with
the instructions, may cause harmful interference
to radio communications. However, there is
no guarantee that interference will not occur
in a particular installation. If this equipment
does cause harmful interference to radio or
television reception, which can be determined
by turning the equipment off and on, the user is
encouraged to try to correct the interference
by one or more of the following measures:
• Reorient or relocate the receiving antenna.
• Increase the separation between the equipment and receiver.
• Connect the equipment into an outlet on a
circuit different from that to which the receiver is connected.
• Consult the dealer or an experienced radio/
TV technician for help.
Caution:
Changes or modifications not expressly
approved by the party responsible for
compliance could void the user’s authority to
operate the equipment.
Connections to this device must be made with
shielded cables with metallic RFI/EMI connector
hoods to maintain compliance with FCC Rules
and Regulations.
To prevent damage which may result in fire or
shock hazard, do not expose this appliance to
rain or excessive moisture.
10
THIS CLASS B DIGITAL APPARATUS MEETS
ALL REQUIREMENTS OF THE CANADIAN
INTERFERENCE-CAUSING EQUIPMENT
REGULATIONS.
FCC Declaration of Conformity
Model Number: 7FF2FPAS
Trade Name:
Philips
Responsible Party: Philips Accessories
and Computer
Peripherals 1881 Route 46 West
Ledgewood, NJ 07852
DeclarationofConformityforProducts
MarkedwithFCCLogo,UnitedStates Only
PHILIPS 7FF2FPAS
This device complies with Part 15 of the FCC
Rules. Operation is subject to the following two
conditions: (1) this device may not cause harmful
interference, and (2) this device must accept any
interference received, including interference that
may cause undesired operation.
Commission Federale de la
Communication (FCC Declaration)
Note:
Cet équipement a été testé et déclaré conforme
auxlimites des appareils numériques de class
B,aux termes de l’article 15 Des règles de
la FCC. Ces limites sont conçues de façon à
fourir une protection raisonnable contre les
interférences nuisibles dans le cadre d’une
installation résidentielle. CET appareil produit,
utilise et peut émettre des hyperfréquences
qui, si l’appareil n’est pas installé et utilisé selon
Service and Warranty
EN 55022 Compliance (Czech Republic
Only)
Caution:
Toutes modifications n’ayant pas reçu
l’approbation des services compétents
en matière de conformité est susceptible
d’interdire à l’utilisateur l’usage du présent
équipement.
ADVARSEL:
SØRG VED PLACERINGEN FOR, AT
NETLEDNINGENS STIK OG STIKKONTAKT
ER NEMT TILGÆNGELIGE.
Paikka/Ilmankierto
Les raccordements à cet appareil doivent être
réalisés avec des câbles blindés à protections
métalliques pour les connecteurs RFI/EMI afin de
maintenir la conformité avec les Règlements et
la Législation du FCC.
CET APPAREIL NUMERIQUE DE LA CLASSE
B RESPECTE TOUTES LES EXIGENCES DU
REGLEMENT SUR LE MATERIEL BROUILLEUR
DU CANADA.
ENGLISH
les consignes données, peuvent causer des
interférences nuisibles aux communications
radio. Cependant, rien ne peut garantir l’absence
d’interférences dans le cadre d’une installation
particulière. Si cet appareil est la cause
d’interférences nuisibles pour la réception des
signaux de radio ou de télévision, ce qui peut
être décelé en fermant l’équipement, puis en
le remettant en fonction, l’utilisateur pourrait
essayer de corriger la situation en prenant les
mesures suivantes:
• Réorienter ou déplacer l’antenne de réception.
• Augmenter la distance entre l’équipement et le récepteur.
• Brancher l’équipement sur un autre circuit que celui utilisé par le récepteur.
• Demander l’aide du marchand ou d’un technicien chevronné en radio/télévision.
NorthEuropeInformation(Nordic
Countries)
VARNING:
FÖRSÄKRA DIG OM ATT HUVUDBRYTARE
OCH UTTAG ÄR LÄTÅTKOMLIGA, NÄR DU
STÄLLER DIN UTRUSTNING PÅPLATS.
Placering/Ventilation
VAROITUS:
SIJOITA LAITE SITEN, ETTÄ VERKKOJOHTO
VOIDAAN TARVITTAESSA HELPOSTI
IRROTTAA PISTORASIASTA.
Plassering/Ventilasjon
ADVARSEL:
NÅR DETTE UTSTYRET PLASSERES, MÅ
DU PASSE PÅ AT KONTAKTENE FOR
STØMTILFØRSEL ER LETTE Å NÅ.
Service and Warranty
11
BSMI Notice (Taiwan Only)
Endoflifedirectives-Recycling
Your new Digital PhotoFrame contains several
materials that can be recycled for new uses.
Votre nouveau cadre photo contient plusieurs
matériaux qui peuvent être recyclés pour de
nouvelles utilisations.
End-of-LifeDisposal
• This product contains materials that can
be recycled and reused. Specialized companies
can recycle your product to increase the
amount of reusable materials and to minimize
the amount to be disposed of.
• Please find out about the local regulations on
Comme tous les produits ACL, cette appareille
contenant une petit quantité de mercure, SVP
se débarrasser en accord avac les lois fédéral et
gouvernemental.
how to dispose of your old Digital PhotoFrame from
your local Philips dealer.
• (For customers in Canada and U.S.A.)
Dispose of in accordance to local-state and
federal regulations.
For additional information on recycling contact
www.eia.org (Consumer Education Initiative)
Waste Electronics and Electrical
Equipment (WEEE)
This product is labelled with this symbol in
accordance with European Directive 2002/96/
EC to indicate that it must not be disposed of
with your other household waste. Please check
your local city office or waste disposal service
for the return and recycling of this product.
12
Service and Warranty
©2008 Koninklijke Philips N.V.
All rights reserved.