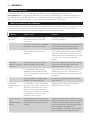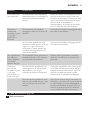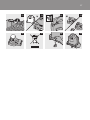
1
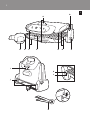
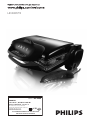
HD4409/93
Solo para México
Modelo:
HR7744
Procesador de Alimentos
110-127 V~ 50/60 Hz 1000 W
PHILIPS MEXICANA, S.A. DE C.V.
Av. La Palma No. 6 Col. San Fernando
La Herradura Huixquilucan Edo de México.
C.P. 52784, TEL. 52 69 90 00
HECHO EN CHINA
-135-
LEA CUIDADOSAMENTE SU INSTRUCTIVO
ANTES DE USAR SU APARATO
Modelo:
HD 4409
ASADOR
110-127 V~, 50-60 Hz 1400 W
PHILIPS MEXICANA, S.A. DE C.V.
Av. La Palma No. 6 Col. San Fernando
La Herradura Huixquilucan Edo de México.
C.P. 52784, TEL. 52 69 90 00
HECHO EN PORTUGAL
-135-
LEA CUIDADOSAMENTE SU INSTRUCTIVO
ANTES DE USAR SU APARATO
Solo para México
Modelo:
HR 2084
2
3
A
H
G
F
1
B
E
G
I
K
L
J
M
D
C
4
HD4409
English 6
Español 14
6
English
Introduction
Congratulations on your purchase and welcome to Philips! To fully benefit from the support that
Philips offers, register your product at www.philips.com/welcome.
General description (Fig. 1)
A
B
C
D
E
F
G
H
I
J
K
L
M
Fold-out feet
Red power-on light & green ready-to-cook light
Temperature control
Reversible grilling plates
Fixing clips of grilling plates
Cool-touch handgrips
Drainage grooves
Grease tray (2 pcs)
Storage hook for grease trays
Cord storage facility
Timer display
Timer button
Two-in-one spatula and tongs
Important
Read this user manual carefully before you use the appliance and save it for future reference.
Danger
-- Do not immerse the appliance or the mains cord in water or any other liquid.
Warning
-- Check if the voltage indicated on the appliance corresponds to the local mains voltage before
you connect the appliance.
-- If the mains cord is damaged, you must have it replaced by Philips, a service centre authorised by
Philips or similarly qualified persons in order to avoid a hazard.
-- This appliance is not intended for use by persons (including children) with reduced physical,
sensory or mental capabilities, or lack of experience and knowledge, unless they have been given
supervision or instruction concerning use of the appliance by a person responsible for their
safety.
-- Children should be supervised to ensure that they do not play with the appliance.
-- Do not let the mains cord hang over the edge of the table or worktop on which the
appliance stands.
-- Keep the mains cord away from hot surfaces.
-- Do not let the appliance operate unattended.
-- Never leave the spatula/tongs on the grilling plate when it is hot.
----------
Caution
Only connect the appliance to an earthed wall socket.
Put the appliance on a flat, stable surface with sufficient free space around it.
Always preheat the grilling plates before you put any food between them.
The accessible surfaces may become hot when the appliance is operating.
Be careful of spattering fat when you grill fatty meat or sausages.
Always unplug the appliance after use.
Always clean the appliance after use.
Only turn the plates when they are cold and clean.
Let the appliance cool down completely before you remove the grilling plates, clean the
appliance or put it away.
English
7
-- Never touch the grilling plates with sharp or abrasive items, as this damages the non-stick
surface.
-- Make sure you reassemble the grilling plates properly after you have removed them.
-- This appliance is intended for normal household use only. It is not intended for use in
environments such as staff kitchens of shops, offices, farms or other work environments. Nor is it
intended to be used by clients in hotels, motels, bed and breakfasts and other residential
environments.
-- Never connect this appliance to an external timer switch or remote control system in order to
avoid a hazardous situation.
-- If the appliance is used improperly or for professional or semi-professional purposes or if it is
not used according to the instructions in the user manual, the guarantee becomes invalid and
Philips refuses any liability for damage caused.
Electromagnetic field (EMF)
This Philips appliance complies with all standards regarding electromagnetic fields (EMF). If handled
properly and according to the instructions in this user manual, the appliance is safe to use based on
scientific evidence available today.
Before first use
1 Remove the insert between the grilling plates and remove any stickers.
2 Wipe the outside of the appliance with a damp cloth.
3 Clean the plates thoroughly (see chapter ‘Cleaning’).
Note:The appliance may produce some smoke when you use it for the first time.This is normal.
Using the appliance
Reversible grilling plates
This grill is supplied with reversible grilling plates with a normal ribbed side and a flat side.You can
use both sides of the grilling plates in the three different positions described below. The flat side of
the grilling plates is particularly suitable for stir-frying, baking eggs and pancakes and cooking
marinated ingredients.
Note: Do not cook ingredients with a lot of fat on the flat side of the grilling plates.The flat side does not
have a drainage groove, so the extra fat cannot drain away.
Note:When you use the flat side of the grilling plates, always put the appliance in horizontal
position (Fig. 2).
Only turn the plates when they are cold and clean.   (Fig. 3)
Sloped and horizontal use
-- The grilling surface can be used both sloped and horizontally.
-- The standard grilling position for the ribbed side of the grilling plates is the sloped position. In
this position, the fat or juice that comes out of the food runs off the plates into the grease tray
or trays.
-- The appliance is fitted with fold-out feet. When you fold out these feet, you can put the grilling
plates in horizontal position. Use this position to prepare low-fat ingredients such as fruit and
vegetables that slide down the ribbed plates easily when the plates are in sloped position (Fig. 4).
-- The horizontal position is the standard grilling position for the flat side of the grilling plates, as
this side does not have a drainage groove.
8
English
Three grilling positions
-- Contact grill position (Fig. 5)
This position is especially suitable for quick high-temperature grilling on both sides (rump steaks,
hamburgers etc.) and for making toasted sandwiches or paninis.
Note: Both grilling plates are in contact with the food.
-- Gratin grill position (Fig. 6)
This is the ideal position to grill and cook au gratin at the same time. The gratin grill position is also
suitable for the preparation of all kinds of ‘open’ toasts, e.g. with egg, tomato, peppers and/or onion
rings, covered with cheese.
Note:The upper grilling plate must not touch the food.
-- Party grill position (Fig. 7)
In this position, the health grill offers a large grilling surface for the preparation of all kinds of snacks,
such as shashlik, satay, vegetables, fruits etc.
With the health grill in party grill position and the flat side of the grilling plates pointing upwards,
you can use the grilling surface to stir-fry ingredients and bake eggs or pancakes.
1 Fully unwind the cord from the storage facility in the hinges of the appliance (Fig. 8).
2 If necessary, turn the plates so that the side you wish to use is pointing upwards.
3 Make sure the grill is closed (Fig. 9).
4 Put the plug in the wall socket.
5 Turn the temperature control to the temperature setting that is appropriate for the
ingredients to be grilled. See the table at the end of this booklet.
,, The red power-on light goes on to indicate that the grill is heating up.
Never let the appliance operate unattended.
6 Wait until the green ready-to-cook light goes on and then open the grill to put the
ingredients on the grilling plate or plates.
Be careful: the grilling plates are hot.
-- Contact grill and gratin grill positions: open the grill halfway (Fig. 10).
-- Party grill position: open the grill halfway and pull the upper grilling plate up to its highest
position (1). Then put the grill in open position (2) (Fig. 11).
7 If the grill is in sloped position, place the grease tray or trays under the drainage groove or
grooves to collect fat or juice.
Note:When you use the flat side of the grilling plates, do not put the appliance in sloped position.
-- Contact grill and gratin grill positions: place one grease tray underneath the drainage groove of
the bottom grilling plate (Fig. 12).
-- When you grill ingredients that contain a lot of fat or juice on the ribbed side of the grilling
plates and with the grill in horizontal position, you may also need to place the grease tray/trays
in order to prevent fat or juice from dripping on the worktop.
Note: Do not cook ingredients with a lot of fat on the flat side of the grilling plates.The flat side does not
have a drainage groove, so the extra fat cannot drain away.
-- Party grill position with the ribbed sides of the grilling plates pointing upwards: use both grease
trays. Place one tray underneath the drainage groove of each grilling plate (Fig. 13).
8 Use the spatula/tongs provided to place the ingredients on the grilling plate or plates (Fig. 14).
For an optimal result, place the ingredients in the centre of the grilling plate or plates.
The grilling time depends on the type of ingredients, their thickness and your personal taste. See the
table at the end of this booklet for recommended grilling times.
English
9
Note: During the grilling process, the green ready-to-cook light goes out from time to time to indicate that
the health grill is heating up to the preset temperature setting.
-- Contact grill position: put the food in the middle of the lower grilling plate.
-- Gratin grill position: put the food in the middle of the lower grilling plate.
-- Party grill position: spread the food on top of the grilling surface. Turn the food from time to
time with spatula/tongs provided.
9 Close the grill (only for contact grill and gratin grill positions).
-- Contact grill position: lower the upper grilling plate carefully onto the ingredients. The upper
grilling plate now rests on the food. In this way, the food is grilled evenly on both sides (Fig. 15).
-- Gratin grill position: pull the upper grilling plate up to its highest position (1) and then put it in
horizontal position (2). The upper grilling plate must not touch the food (Fig. 16).
10Open the appliance when the required grilling time has elapsed (only for contact grill and
gratin grill positions).
11Remove the food.
Use the spatula/tongs provided to remove the food from the appliance. Do not use metal, sharp or
abrasive kitchen utensils.
12If you want to grill another batch of food, remove excess oil from the plates with a piece of
kitchen paper.
Loosen any caked food or grease carefully with the spatula/tongs provided and remove it from the
plates. Use the spatula with the serrated end for the ribbed section of the plates.
13Wait until the green ready-to-cook light goes on before you put the food on the grilling plate
or plates.
Timer
The timer indicates the end of the grilling time, but does NOT switch off the appliance.
Note:You can also use the health grill without setting the timer.
1 Press the timer button to set the grilling time in minutes.  (Fig. 17)
,, The set time becomes visible on the display.
2 Keep the button pressed to put the minutes forward quickly. Release the button once the
required grilling time has been reached.
The maximum time that can be set is 99 minutes.
,, Three seconds after you have set the grilling time, the timer starts to count down.
,, While the timer counts down, the remaining grilling time flashes on the display. The last
minute is displayed in seconds.
Note:You can erase the timer setting by pressing the timer button for 3 seconds (at the moment the time
flashes) until ‘00’ appears.
3 When the preset time has elapsed, you hear an audible signal. After 10 seconds, the audible
signal is repeated. Press the timer button to stop the audible signal.
Grilling times
At the end of this booklet, you find a table with ingredients you can prepare with the health grill. The
table shows which temperature to select, how long the food has to be grilled and the appropriate
position of the grill. The time necessary to preheat the appliance is not included in the indicated
grilling time.
The grilling time and temperature depend on the type of food that is prepared (e.g. meat), its
thickness and its temperature and also on your own taste. See also the indications on the health grill.
10
English
Note: During the grilling process, the green ready-to-cook light goes on and off from time to time.This
means that the health grill is heating up to the preset temperature setting.When this happens, you can
simply continue grilling.
Tips
-- With the health grill in horizontal party grill position and the flat side of the grilling plates
pointing up, the grill is extremely suitable for stir-frying, baking eggs and small pancakes and for
cooking marinated ingredients.
-- Lightly grease the food to be grilled with a little butter or oil.This prevents excess butter or oil
from smoking.
-- The health grill is unsuitable for grilling breadcrumbed food.
-- Sausages tend to burst when you grill them. To prevent this, punch a few holes in them with a
fork.
-- For the best result, make sure the pieces of meat you use are not too thick (approx. 1.5cm).
-- Fresh meat gives better grilling results than frozen or defrosted meat.
-- When you prepare satay, chicken, pork or veal, first sear the meat at a high temperature
(position 5). Then set the temperature control one position lower and grill the food until it is
done.
-- You can also use the health grill as a thermostatically controlled hotplate, which automatically
keeps your dishes at the required temperature. Put the appliance in the party grill position and
set the temperature control to position 2 or 3. Cover the grilling plates with aluminium foil with
the shiny side facing upwards.  (Fig. 18)
-- If you want to defrost frozen food, put the appliance in the gratin grill position, wrap the frozen
food in aluminium foil. Set the temperature control to position 1 or 2. The defrosting time
depends on the weight of the food.
Cleaning
Never use abrasive cleaning agents and materials, as this damages the non-stick coating of the
plates.
Never immerse the appliance in water.
1 Unplug the appliance and let it cool down.
2 Remove excess oil from the plates with a piece of kitchen paper before you remove the
plates.
3 Remove the grilling plates (Fig. 19).
To remove the plates, press on the fixing clips on the appliance and then lift the plates out of the
appliance.
4 Clean the grilling plates, grease trays and spatula/tongs with a soft cloth or sponge in hot
water with some washing-up liquid or in the dishwasher (Fig. 20).
Soak the grilling plates in hot water for five minutes with some washing-up liquid to remove
residues. This loosens any caked food or grease.
5 Dry the grilling plates and reassemble them (Fig. 21).
-- Put the appliance in the party grill position.
-- Place the rear edge of the grilling plates on the appliance (1). Lower the grilling plates onto the
appliance and press them down under the fixing clip (2).
6 Close the grill.
7 Clean the outside of the appliance with a damp cloth.
English 11
Replacement
Replacing the battery
The battery lasts approximately two years in case of normal domestic use. This timer runs on 1
button-type L1131 (1.55V) lithium battery, which is generally available.
1 Put the appliance in party grill position and remove the screw from the hinge (Fig. 22).
2 Close the appliance, turn it around, put it in upright position and remove the two screws
from the hinge (Fig. 23).
3 Remove the hinge cover from the hinge and take the timer out of the hinge cover (Fig. 24).
4 Open the battery compartment cover of the timer with a coin and remove the old battery.
Dispose of the old battery (see chapter ‘Environment’) (Fig. 25).
5 Place the new battery in the battery compartment with the + pole facing the battery
compartment cover (Fig. 26).
6 Place the battery compartment cover back onto the timer. Use a coin to fasten it again.
7 Insert the timer into the hinge cover and reattach the hinge cover to the hinge.
8 Insert and tighten the screws in reverse order. Start with the appliance in upright position
and then put it in party grill position.
Environment
-- Non-rechargeable batteries contain substances that may pollute the environment. Do not throw
away non-rechargeable batteries with the normal household waste, but dispose of them at an
official collection point for batteries. Always remove the non-rechargeable battery before you
discard and hand in the appliance at an official collection point.
-- Do not throw away the appliance with the normal household waste at the end of its life, but
hand it in at an official collection point for recycling. By doing this, you help to preserve the
environment (Fig. 27).
Storage
1 Wind the cord around the storage facility in the hinges of the appliance.  (Fig. 28)
2 Nest the grease trays and attach them to the storage hook on the bottom of the
appliance.  (Fig. 29)
3 Store the appliance in upright position in a safe and dry place.
Guarantee & service
If you need service or information or if you have a problem, please visit the Philips website at
www.philips.com or contact the Philips Consumer Care Centre in your country (you find its phone
number in the worldwide guarantee leaflet). If there is no Consumer Care Centre in your country,
go to your local Philips dealer.
Troubleshooting
This chapter summarises the most common problems you could encounter with the appliance. If
you are unable to solve the problem with the information below, contact the Consumer Care
Centre in your country or online at www.philips.com.
12
English
Problem
Possible cause
Solution
The appliance
does not work.
The plug is not properly inserted
in the wall socket.
Put the plug properly in the wall socket.
The socket to which the appliance
is connected is not live.
Check if the power supply works. If it
works, plug in another appliance to
check if the socket is live.
The mains cord is damaged.
If the mains cord is damaged, you must
have it replaced by Philips, a service
centre authorised by Philips or similarly
qualified persons in order to avoid a
hazard.
The first few times you use the
appliance, it may produce some
smoke.
This is normal. After you have used the
appliance a few times, the appliance
stops producing smoke.
The set grilling temperature is too
high for the ingredients you are
grilling.
See the table at the end of this booklet
for the recommended temperature
setting for various types of food.
Food or grease has caked onto
the grilling plates.
Carefully clean the grilling plates after
each use.
The appliance
produces heavy
smoke
You turned the grilling plates
without cleaning them first. Food
caked on the other side of the
plates drips onto the heating
elements and scorches during
grilling. This may cause heavy
smoke.
Make sure that you clean the plates
thoroughly before turning them.
The food is not
properly grilled.
You have set a too
low temperature setting or you
have not grilled the food long
enough.
Turn the temperature control to a
higher temperature setting and/or grill
the food for a longer time. See the table
at the end of this booklet for the
recommended temperature setting and
grilling time for various types of food.
The food is
grilled too darkly.
You have set a too high
temperature setting or you have
grilled the food too long.
Turn the temperature control to a lower
temperature setting and/or grill the food
for a shorter time. See the table at the
end of this booklet for the
recommended temperature setting and
grilling time for various types of food.
During grilling, fat
or juice drips
onto the
worktop.
You have not put the grease tray/
trays under the drainage groove/
grooves.
Place the grease tray/trays under the
drainage groove/grooves.
The appliance
produces some
smoke.
English 13
Problem
Possible cause
Solution
You have grilled ingredients
that contain a lot of fat or
juice with the grill in horizontal
position without putting the
grease tray/trays under the
drainage groove/grooves.
Place the grease tray/trays under the
drainage groove/grooves.
Ingredients (e.g.
cheese) stick to
the upper grilling
plate.
You have prepared au gratin
dishes or open toasts with the
appliance in contact grill position.
Only prepare au gratin dishes and open
toasts at the gratin grill position.
During grilling, fat
or juice remains
on the grilling
plate.
You grill ingredients that contain a
lot of fat on the ribbed side of the
grilling plates with the grill in
horizontal position.
When you grill ingredients that contain a
lot of fat on the ribbed side of the
grilling plates, always make sure you
place the grill in sloped position so that
the fat can run into the grease trays.
You grill ingredients on the flat
side of the grilling plate and this
side does not have a drainage
groove.
Let the grilling plates cool down
sufficiently and then clean them
thoroughly before you turn them. Fold in
the fold-out feet and place the drip trays
under the drainage grooves before you
continue to grill your food.
Food table (Fig. 30)
1 Food table
14
Español
Introducción
Enhorabuena por la compra de este producto y bienvenido a Philips. Para sacar el mayor partido de
la asistencia que Philips le ofrece, registre su producto en www.philips.com/welcome.
Descripción general (fig. 1)
A
B
C
D
E
F
G
H
I
J
K
L
M
Patas desplegables
Piloto rojo de encendido y piloto verde de listo para cocinar
Control de temperatura
Placas del grill reversibles
Clips de sujeción de las placas del grill
Asas de tacto frío
Ranuras de drenaje
Bandeja recogegrasa (2 unidades)
Gancho para guardar las bandejas recogegrasa
Recogecable
Display del temporizador
Botón del temporizador
Pinzas y espátula dos en una
Importante
Antes de usar el aparato, lea atentamente este manual de usuario y consérvelo por si necesitara
consultarlo en el futuro.
Peligro
-- No sumerja el aparato ni el cable de red en agua u otros líquidos.
Advertencia
-- Antes de enchufar el aparato, compruebe si el voltaje indicado en el mismo se corresponde con
el voltaje de red local.
-- Si el cable de alimentación está dañado, debe ser sustituido por Philips o por un centro de
servicio autorizado por Philips, con el fin de evitar situaciones de peligro.
-- Este aparato no debe ser usado por personas (adultos o niños) con su capacidad física, psíquica
o sensorial reducida, ni por quienes no tengan los conocimientos y la experiencia necesarios, a
menos que sean supervisados o instruidos acerca del uso del aparato por una persona
responsable de su seguridad.
-- Asegúrese de que los niños no jueguen con este aparato.
-- No deje que el cable de alimentación cuelgue del borde de la mesa o encimera donde esté
colocado el aparato.
-- Mantenga el cable de alimentación alejado de superficies calientes.
-- No deje nunca el aparato en funcionamiento sin vigilancia.
-- No deje nunca la pinza-espátula sobre las placas de asar cuando estén calientes.
Precaución
Conecte el aparato sólo a un enchufe con toma de tierra.
Coloque el aparato sobre una superficie plana y estable con suficiente espacio libre alrededor.
Precaliente siempre las placas del grill antes de colocar cualquier alimento en las mismas.
Las superficies accesibles pueden calentarse cuando el aparato está funcionando.
Tenga cuidado con las salpicaduras de grasa que se puedan producir al preparar carne grasa o
salchichas.
-- Desenchufe siempre el aparato después de usarlo.
-- Limpie siempre el aparato después de usarlo.
-- Dele la vuelta a las placas sólo si están frías y limpias.
------
Español 15
-- Deje que el aparato se enfríe completamente antes de quitar las placas del grill, limpiar el
aparato y guardarlo.
-- No toque nunca las placas del grill con objetos afilados o abrasivos, ya que podría dañar la
superficie antiadherente.
-- Asegúrese de volver a montar las placas del grill correctamente después de haberlas quitado.
-- Este aparato está diseñado sólo para un uso doméstico normal, no para un uso en entornos
como las cocinas de los comercios, oficinas, granjas u otros entornos laborales. Tampoco lo
deben usar los clientes de hoteles, moteles, hostales en los que se ofrecen desayunos ni de
entornos residenciales de otro tipo.
-- Para evitar situaciones de peligro, no conecte nunca este aparato a un interruptor con
temporizador externo ni a un sistema de control remoto.
-- Si se utiliza el aparato de forma incorrecta, con fines profesionales o semiprofesionales, o de un
modo que no esté de acuerdo con las instrucciones de uso, la garantía quedará anulada y Philips
no aceptará responsabilidades por ningún daño.
Campos electromagnéticos (CEM)
Este aparato Philips cumple todos los estándares sobre campos electromagnéticos (CEM). Si se
utiliza correctamente y de acuerdo con las instrucciones de este manual, el aparato se puede usar
de forma segura según los conocimientos científicos disponibles hoy en día.
Antes de utilizarlo por primera vez
1 Quite el cartón que hay entre las placas del grill y retire cualquier pegatina.
2 Limpie la parte exterior del aparato con un paño húmedo.
3 Limpie muy bien las placas (consulte el capítulo “Limpieza”).
Nota: Puede que el aparato emita algo de humo cuando lo utilice por primera vez. Esto es normal.
Uso del aparato
Placas del grill reversibles
Este grill incluye unas placas reversibles con un lado estriado normal y otro liso. Puede utilizar ambos
lados de las placas del grill en las tres posiciones que se describen a continuación. El lado liso de las
placas del grill es especialmente adecuado para saltear, preparar huevos y tortitas, y cocinar
ingredientes adobados.
Nota: No cocine ingredientes con mucha grasa en el lado liso de las placas del grill. Este lado no dispone
de ranuras de drenaje, por lo que no se puede escurrir el exceso de grasa.
Nota: Cuando utilice el lado liso de las placas del grill, coloque siempre el aparato en posición
horizontal (fig. 2).
Dele la vuelta a las placas sólo si están frías y limpias.  (fig. 3)
Uso inclinado y horizontal
-- La superficie del grill se puede usar en posición inclinada u horizontal.
-- La posición normal del lado estriado de las placas del grill es inclinada. En esta posición, la grasa
o los jugos que suelte la comida resbalarán por las placas hacia la/s bandeja/s recogegrasa.
-- El aparato cuenta con unas patas desplegables. Cuando éstas se despliegan, se pueden colocar
las placas del grill en posición horizontal. Use esta posición para preparar ingredientes bajos en
grasa, como frutas y hortalizas, que se deslizan fácilmente por las placas cuando éstas están
inclinadas (fig. 4).
-- La posición normal del lado liso de las placas del grill es horizontal, ya que este lado no dispone
de ranura de drenaje.
16
Español
Tres posiciones del grill
-- Posición de contacto (fig. 5)
Esta posición es especialmente adecuada para cocinar a alta temperatura de forma rápida por
ambos lados (tiernos bistecs, hamburguesas, etc.), y para preparar sándwiches o paninis calientes.
Nota: Ambas placas del grill están en contacto con la comida.
-- Posición de gratinado (fig. 6)
Ésta es la posición idónea para cocinar y gratinar al mismo tiempo. Esta posición también es
adecuada para preparar todo tipo de tostadas ‘abiertas’, por ejemplo, con huevo, tomate, pimiento y
aros de cebolla cubiertos con queso.
Nota: La placa superior del grill no debe tocar la comida.
-- Posición plancha (fig. 7)
En esta posición el Health Grill ofrece una amplia superficie para preparar a la plancha variedad de
alimentos, como brochetas, pinchitos, verduras, frutas, etc.
Con el Health Grill en posición plancha y el lado liso de las placas del grill hacia arriba, se puede
utilizar la superficie para saltear ingredientes y para preparar huevos o tortitas.
1 Desenrolle por completo el cable del recogecable situado en las bisagras del aparato (fig. 8).
2 Si es necesario, dele la vuelta a las placas para que el lado que desea utilizar quede hacia
arriba.
3 Asegúrese de que el grill está cerrado (fig. 9).
4 Enchufe el aparato a la toma de corriente.
5 Ajuste el control de temperatura a la posición apropiada para los ingredientes que vaya a
cocinar. Consulte la tabla que se encuentra al final de este folleto.
,, El piloto rojo de encendido se ilumina para indicar que el grill se está calentando.
No deje nunca el aparato en funcionamiento sin vigilancia.
6 Espere a que se encienda el piloto verde de listo para cocinar y luego abra el grill para poner
los ingredientes en la/s placa/s.
Tenga cuidado ya que las placas del grill están calientes.
-- Posición de gratinado y posición de contacto: abra el grill hasta la mitad (fig. 10).
-- Posición plancha: abra el grill hasta la mitad y tire hacia arriba de la placa superior hasta su
posición más alta(1). Después coloque el grill en posición abierta (2) (fig. 11).
7 Si el grill está en posición inclinada, coloque una o dos bandejas recogegrasa bajo la/s ranura/s
de drenaje para recoger la grasa o los jugos.
Nota: Cuando utilice el lado liso de las placas del grill, no coloque el aparato en posición inclinada.
-- Posición de contacto y posición de gratinado: coloque una bandeja recogegrasa bajo la ranura
de drenaje de la placa inferior del grill (fig. 12).
-- Cuando prepare ingredientes con una gran cantidad grasa o jugos en el lado estriado de las
placas del grill y con éste colocado en posición horizontal, también deberá colocar la/s bandeja/s
recogegrasa para evitar que la grasa o los jugos goteen en la encimera.
Nota: No cocine ingredientes con mucha grasa en el lado liso de las placas del grill. Este lado no dispone
de ranuras de drenaje, por lo que no se puede escurrir el exceso de grasa.
-- Posición plancha con el lado estriado de las placas del grill hacia arriba: utilice las dos bandejas
recogegrasa. Coloque cada una de ellas bajo la ranura de drenaje de cada placa del grill (fig. 13).
8 Utilice las pinzas-espátula proporcionada para colocar los ingredientes en la/s placa/s del
grill (fig. 14).
Para lograr un resultado óptimo, coloque los ingredientes en el centro de la/s placa/s del grill.
Español 17
El tiempo de cocinado depende del tipo de ingredientes, de su grosor y de su gusto personal.
Consulte la tabla que hay al final de este folleto para conocer los tiempos de cocinado
recomendados.
Nota: Durante el proceso de cocinado, el piloto verde de listo para cocinar se apaga de vez en cuando
para indicar que el Health Grill se está calentando para alcanzar la temperatura establecida.
-- Posición de contacto: coloque los alimentos en el centro de la placa inferior del grill.
-- Posición de gratinado: coloque los alimentos en el centro de la placa inferior del grill.
-- Posición plancha: distribuya los alimentos por la superficie de cocinado. Deles la vuelta de vez en
cuando con las pinzas-espátula que se proporcionan.
9 Cierre el grill (únicamente para las posiciones de gratinado y de contacto).
-- Posición de contacto: baje con cuidado la placa superior del grill sobre los ingredientes. La placa
superior del grill queda ahora apoyada sobre la comida. De este modo los alimentos se cocinan
de manera uniforme por ambos lados (fig. 15).
-- Posición de gratinado: tire hacia arriba de la placa superior del grill hasta su nivel más alto (1) y
colóquela en posición horizontal (2). La placa superior del grill no debe tocar la comida (fig. 16).
10Abra el aparato cuando haya transcurrido el tiempo de cocinado necesario (únicamente para
las posiciones de contacto y de gratinado).
11Retire los alimentos.
Utilice las pinzas-espátula proporcionadas para retirar la comida. No use utensilios de cocina
metálicos, afilados o abrasivos.
12Si desea cocinar otro lote de alimentos, elimine el exceso de aceite de las placas con papel
de cocina.
Reblandezca cuidadosamente los restos de alimentos o grasa con las pinzas-espátula y retírelos de
las placas. Utilice la espátula con el extremo dentado para la parte estriada de las placas.
13Espere a que el piloto verde de listo para cocinar se encienda antes de poner los alimentos
en la/s placa/s del grill.
Temporizador
El temporizador indica el final del tiempo de preparación, pero NO desconecta el aparato.
Nota:También puede utilizar el Health Grill sin programar el temporizador.
1 Pulse el botón del temporizador para programar el tiempo de preparación en
minutos.  (fig. 17)
,, El tiempo establecido se muestra en la pantalla.
2 Mantenga el botón pulsado para establecer los minutos con mayor rapidez. Suelte el botón
una vez haya llegado al tiempo de preparación deseado.
El tiempo máximo que se puede establecer es de 99 minutos.
,, Tres segundos después de haber establecido el tiempo de preparación, el temporizador
empezará la cuenta atrás.
,, Mientras el temporizador realiza la cuenta atrás, el tiempo de preparación restante parpadea
en el display. El último minuto se muestra en segundos.
Nota: Puede borrar la programación del temporizador pulsando el botón del temporizador durante
3 segundos (en el momento en que el tiempo parpadea) hasta que aparezca “00”.
3 Cuando haya transcurrido el tiempo seleccionado, oirá una señal sonora. A los diez segundos,
la señal se repetirá. Para detener la señal sonora pulse el botón del temporizador.
18
Español
Tiempos de preparación
Al final de este folleto encontrará una tabla con los ingredientes que puede preparar con el Health
Grill. La tabla muestra qué temperatura seleccionar, durante cuánto tiempo ha de cocinar los
alimentos y la posición adecuada del grill. El tiempo necesario para precalentar el aparato no está
incluido en el tiempo de cocinado indicado.
El tiempo y la temperatura de cocinado dependen del tipo, grosor y temperatura del alimento a
cocinar, así como de su gusto personal. Consulte también las indicaciones que aparecen en el Health
Grill.
Nota: Durante el proceso de cocinado, el piloto verde de listo para cocinar se enciende y se apaga de vez
en cuando. Esto significa que el Health Grill se está calentando para alcanzar la temperatura establecida.
Cuando esto ocurra, sencillamente puede seguir cocinando.
Consejos
-- Con el Health Grill en posición plancha horizontal y el lado liso de las placas del grill hacia arriba,
el grill es particularmente adecuado para saltear, preparar huevos y pequeñas tortitas, y cocinar
ingredientes adobados.
-- Unte ligeramente la comida que vaya a cocinar con un poco de mantequilla o aceite.
-- El Health Grill no es adecuado para cocinar alimentos empanados.
-- Las salchichas tienden a reventarse cuando se cocinan. Para evitarlo, pínchelas con un tenedor.
-- Para obtener los mejores resultados, asegúrese de que los trozos de carne no sean demasiado
gruesos (de unos 1,5 cm).
-- La carne fresca ofrece mejores resultados que la congelada o la descongelada cuando se cocina
en el grill.
-- A la hora de preparar pinchitos de pollo, cerdo o ternera, primero dore la carne a temperatura
alta (posición 5). Luego puede seleccionar una posición inferior de temperatura y seguir
cocinando los alimentos hasta que estén hechos.
-- También se puede utilizar el Health Grill para mantener los platos calientes a una determinada
temperatura controlada por termostato. Coloque el aparato en la posición plancha y ponga el
control de temperatura en la posición 2 ó 3. Cubra las placas del grill con papel de aluminio, con
la parte brillante hacia arriba.  (fig. 18)
-- Si desea descongelar comida congelada, coloque el aparato en la posición de gratinado, envuelva
la comida en papel de aluminio. Coloque el control de temperatura en la posición 1 ó 2. El
tiempo de descongelado dependerá del peso del alimento.
Limpieza
No utilice nunca agentes ni materiales de limpieza abrasivos porque dañan la capa antiadherente
de las placas.
No sumerja nunca el aparato en agua.
1 Desenchufe el aparato y déjelo enfriar.
2 Elimine el exceso de aceite de las placas con papel de cocina antes de quitar las placas.
3 Quite las placas del grill (fig. 19).
Para quitar las placas, presione los clips de sujeción y luego levántelas para extraerlas.
4 Lave las placas del grill, las bandejas recogegrasa y las pinzas-espátula en agua caliente con un
poco de detergente líquido, frotándolas con un paño suave o una esponja, o introdúzcalas en
el lavavajillas (fig. 20).
Sumerja las placas del grill en agua caliente con un poco de detergente líquido durante cinco
minutos para eliminar los residuos. Esto reblandece los restos de alimentos o la grasa pegada.
Español 19
5 Seque las placas del grill y vuelva a montarlas (fig. 21).
-- Coloque el aparato en la posición plancha.
-- Coloque el borde de atrás de las placas sobre el aparato (1). Baje las placas del grill y
presiónelas para que queden sujetas por el clip (2).
6 Cierre el grill.
7 Limpie la parte exterior con un paño húmedo.
Sustitución
Sustitución de la pila
En el caso de un uso doméstico normal, la pila dura aproximadamente dos años. Este temporizador
funciona con una pila de botón de litio L1131 (1,55 V), disponible en muchos establecimientos.
1 Coloque el aparato en posición plancha y quite el tornillo de la bisagra (fig. 22).
2 Cierre el aparato, dele la vuelta, colóquelo en posición vertical y quite los dos tornillos de la
bisagra (fig. 23).
3 Quite la cubierta de la bisagra y saque el temporizador (fig. 24).
4 Abra la cubierta del compartimento de la pila del temporizador con una moneda y saque la
pila usada. Deseche la pila usada (consulte el capítulo “Medio ambiente”) (fig. 25).
5 Coloque la nueva pila en su compartimento con el polo positivo (+) mirando hacia la
cubierta del compartimento de la pila (fig. 26).
6 Vuelva a colocar la cubierta del compartimento de la pila en el temporizador. Utilice una
moneda para volver a fijarla en su sitio.
7 Inserte el temporizador en la cubierta de la bisagra y vuelva a colocar la cubierta en la
bisagra.
8 Inserte y apriete los tornillos en orden inverso. Comience con el aparato colocado en
posición vertical y luego colóquelo en posición plancha.
Medio ambiente
-- Las pilas no recargables contienen sustancias que pueden contaminar el medio ambiente. No
tire las pilas no recargables con la basura normal del hogar, deposítelas en un punto de recogida
oficial para pilas. Quite siempre la pila no recargable antes de deshacerse del aparato y llevarlo a
un punto de recogida oficial.
-- Al final de su vida útil, no tire el aparato junto con la basura normal del hogar. Llévelo a un
punto de recogida oficial para su reciclado. De esta manera ayudará a conservar el medio
ambiente (fig. 27).
Almacenamiento
1 Enrolle el cable en el recogecable situado en las bisagras del aparato.  (fig. 28)
2 Coloque las bandejas recogegrasa una dentro de la otra y fíjelas con el gancho de
almacenamiento de la parte inferior del aparato.  (fig. 29)
3 Guarde el aparato colocándolo de pie en un lugar seguro y seco.
20
Español
Garantía y servicio
Si necesita información o si tiene algún problema, visite la página Web de Philips en
www.philips.com, o póngase en contacto con el Servicio de Atención al Cliente de Philips en su
país (hallará el número de teléfono en el folleto de la garantía mundial). Si no hay Servicio de
Atención al Cliente de Philips en su país, diríjase a su distribuidor local Philips.
Guía de resolución de problemas
En este capítulo se resumen los problemas más frecuentes que pueden surgir. Si no puede resolver
el problema con la siguiente información, póngase en contacto con el Servicio de Atención al
Cliente de su país o consulte la siguiente página en línea: www.philips.com.
Problema
Posible causa
Solución
El aparato no
funciona.
La clavija no se ha enchufado
correctamente a la toma de
corriente.
Enchufe el aparato correctamente a la
toma de corriente.
El enchufe al que está conectado
el aparato no tiene corriente.
Compruebe si hay suministro de energía.
Si es así, enchufe otro aparato para
comprobar que la toma está activa.
El cable de alimentación está
dañado.
Si el cable de alimentación está dañado,
debe ser sustituido por Philips o por un
centro de servicio autorizado por Philips,
con el fin de evitar situaciones de
peligro.
Las primeras veces que use el
aparato, puede ocurrir esto.
Es normal. Después de que haya usado
el aparato unas cuantas veces, éste
dejará de producir humo.
La temperatura de cocinado
ajustada es demasiado elevada
para los ingredientes que se están
cocinando.
Consulte la tabla que hay al final de este
folleto para conocer la temperatura
recomendada para los diversos tipos de
alimentos.
Se ha quedado comida o grasa
pegada a las placas del grill.
Limpie con cuidado las placas del grill
tras cada uso.
El aparato
produce mucho
humo
Le ha dado la vuelta a las placas
del grill sin limpiarlas primero. Los
alimentos cocinados en el otro
lado de las placas gotean en las
resistencias y se queman durante
la preparación, lo que puede
producir mucho humo.
Asegúrese de limpiar bien las placas
antes de darles la vuelta.
Los alimentos no
están
suficientemente
hechos.
Ha establecido una temperatura
demasiado baja o no ha cocinado
los alimentos durante suficiente
tiempo.
Ajuste el control de temperatura a una
posición más elevada o cocine la comida
durante más tiempo. Consulte la tabla
que se encuentra al final de este folleto
para conocer la temperatura
recomendada y el tiempo de cocinado
para los diversos tipos de alimentos.
El aparato
produce un poco
de humo.
Español 21
Problema
Posible causa
Solución
Los alimentos se
han quemado.
Ha establecido una temperatura
demasiado alta o ha cocinado los
alimentos durante demasiado
tiempo.
Ajuste el control de temperatura a una
posición más baja o cocine la comida
durante menos tiempo. Consulte la tabla
que se encuentra al final de este folleto
para conocer la temperatura
recomendada y el tiempo de cocinado
para los diversos tipos de alimentos.
Durante el
proceso de
cocinado, la grasa
o los jugos
gotean en la
encimera.
No ha puesto la/s bandeja/s
recogegrasa bajo la/s ranura/s de
drenaje.
Coloque la/s bandeja/s recogegrasa bajo
la/s ranura/s de drenaje.
Ha cocinado ingredientes que
contienen mucha grasa o muchos
jugos con el grill en posición
horizontal sin haber puesto la/s
bandeja/s recogegrasa bajo la/s
ranura/s de drenaje.
Coloque la/s bandeja/s recogegrasa bajo
la/s ranura/s de drenaje.
Hay ingredientes
(por ejemplo
queso) pegados
en la placa
superior del grill.
Ha preparado platos gratinados o
tostadas ‘abiertas’ con el aparato
en la posición de contacto.
Prepare platos gratinados o tostadas
‘abiertas’ solamente en la posición de
gratinado.
Durante el
proceso de
cocinado, la grasa
o los jugos
permanecen en
la placa del grill.
Está cocinando ingredientes con
mucha grasa en el lado estriado
de las placas y con el grill
colocado en posición horizontal.
Si prepara ingredientes con mucha grasa
en el lado estriado de las placas del grill,
asegúrese siempre de colocar el grill en
posición inclinada para que la grasa
resbale hacia las bandejas recogegrasa.
Está cocinando ingredientes en el
lado liso de la placa del grill y este
lado no dispone de ranura de
drenaje.
Deje que las placas del grill se enfríen lo
suficiente y límpielas bien antes de darles
la vuelta. Pliegue las patas desplegables y
coloque las bandejas de goteo bajo las
ranuras de drenaje antes de continuar
con la preparación de los alimentos.
Tabla de alimentos (fig. 30)
1 Tabla de alimentos
22
23
24
25
30
J
A
B
Min.
K
C
B
J
4-6
4-5
A B
J K
3-4
4-5
A
J K
4-6
4
A B
J K
5-8
4-5
A B
J
6-9
4-5
B
J
6-8
4-5
B
J K
4-6
4-5
A B
J K
4-8
5
A B
J K
3-5
3-4
C
J K
3-5
3-4
A B
J K
3-5
3-4
B C
J K
2-3
4
A B
J K
7-9
5
B
J K
3-4
4
A
K
3-5
4-5
A
K
5-10
4-5
26
2
3
4
5
6
7
8
9
11
12
13
16
17
10
1
2
14
15
1
2
18
19
20
21
2
1
27
22
1
23
24
1
25
2
+
3
26
+
2
27
28
29
4222.200.0240.2