1
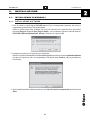
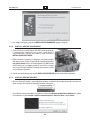
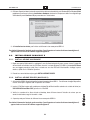
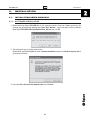
Indice
PCI USB 2.0
INDICE
PREMESSA
CONDIZIONI AMBIENTALI
AVVERTENZE GENERALI
II
II
II
DICHIARAZIONE CE DI CONFORMITA'
II
1. GENERALITA’
1.1. CONTENUTO DELLA CONFEZIONE
1.2. CARATTERISTICHE
1.3. REQUISITI MINIMI
1.1
1.1
1.1
1.1
2. INSTALLAZIONE
2.1. INSTALLAZIONE IN WINDOWS®
2.1.1. INSTALLAZIONE SOFTWARE
2.1.2. INSTALLAZIONE HARDWARE
2.1.3. INSTALLAZIONE DRIVER
2.2. INSTALLAZIONE IN MACOS® X
2.2.1. INSTALLAZIONE HARDWARE
2.2.2. INSTALLAZIONE DRIVER (MACOS® X)
2.1
2.1
2.1
2.2
2.2
2.3
2.3
2.3
I
Premessa
PCI USB 2.0
PREMESSA
È vietata la riproduzione di qualsiasi parte di questo manuale, in qualsiasi forma, senza esplicito consenso scritto della Digicom
S.p.A. Il contenuto di questo manuale può essere modificato senza preavviso.
Ogni cura è stata posta nella raccolta e nella verifica della documentazione contenuta in questo manuale, tuttavia la Digicom non
può assumersi alcuna responsabilità derivante dall’utilizzo della stessa.
Tutte le altre marche, prodotti e marchi appartengono ai loro rispettivi proprietari.
PRECAUZIONI
Al fine di salvaguardare la sicurezza, l’incolumità dell’operatore e il funzionamento dell’apparato, devono essere
rispettate le seguenti norme per l’installazione. Il sistema, compresi i cavi, deve venire installato in un luogo privo o
distante da:
l Polvere, umidità, calore elevato ed esposizione diretta alla luce del sole.
l Oggetti che irradiano calore. Questi potrebbero causare danni al contenitore o altri problemi.
l Oggetti che producono un forte campo elettromagnetico (altoparlanti Hi-Fi, ecc.)
l Liquidi o sostanze chimiche corrosive.
CONDIZIONI AMBIENTALI
Temperatura ambiente da 0 a +50°C
Umidità relativa dal 5 a 95% n.c.
Si dovrà evitare ogni cambiamento rapido di temperatura e umidità.
AVVERTENZE GENERALI
Per evitare scosse elettriche, non aprite l’apparecchio o il trasformatore. Rivolgetevi solo a personale qualificato.
Scollegate il cavo di alimentazione dalla presa a muro quando non intendete usare l’apparecchio per un lungo
periodo di tempo. Per scollegare il cavo tiratelo afferrandolo per la spina. Non tirate mai il cavo stesso.
In caso di penetrazione di oggetti o liquidi all’interno dell’apparecchio, scollegate il cavo di alimentazione e fatelo
controllare da personale qualificato prima di utilizzarlo nuovamente.
PULIZIA DELL’APPARATO
Usate un panno soffice asciutto senza l’ausilio di solventi.
VIBRAZIONI O URTI
Attenzione a non causare vibrazioni o urti.
AVVISO
Questo è un apparecchio di classe A.
In un ambiente residenziale questo apparecchio può provocare radio disturbi. In questo caso può essere richiesto
all'utilizzatore di prendere misure adeguate
DICHIARAZIONE
DI CONFORMITA'
Noi, Digicom S.p.A. via Volta 39 - 21010 Cardano al Campo (Varese - Italy), dichiariamo sotto la nostra esclusiva
responsabilità, che il prodotto a nome PCI USB 2.0, soddisfa la direttiva 89/336/CEE (compatibilità elettromagnetica).
Le norme sono:
EN 55022
EN 61000-3-2
EN 61000-3-3
EN 55024
Smaltimento delle apparecchiature obsolete
Tutti i prodotti elettrici ed elettronici devono essere smaltiti separatamente rispetto alla raccolta differenziata
municipale, mediante impianti di raccolta specifici designati dal governo o dalle autorità locali. Quando sul
prodotto è riportato il simbolo di un bidone della spazzatura barrato da una croce, significa che l’apparato
è coperto dalla direttiva europea 2002/96/EC (WEEE).
Sono previste sanzioni in caso di smaltimento abusivo di detti prodotti.
II
Generalità
PCI USB 2.0
1.
GENERALITA’
Gentile cliente,
Ti ringraziamo di aver scelto Digicom PCI USB 2.0.
Questo dispositivo ti permetterà di aggiornare il
tuo computer con 5 porte USB 2.0 in modo semplice
e veloce.
Potrai così aumentare la velocità di trasferimento dei tuoi dati fino
a 480Mbit/s, ovvero 40 volte più veloce rispetto al precedente
supporto USB 1.1
Se utilizzi periferiche USB 1.1, potrai comunque collegarle a
Digicom PCI USB 2.0, infatti tutte le cinque porte sono compatibili con il supporto USB 1.1, con velocità fino a
12Mbit/s.
Per ottenere le migliori prestazioni, collega i tuoi dispositivi USB 2.0 a Digicom PCI USB 2.0, utilizzando cavi
certificati USB 2.0
1.1.
CONTENUTO DELLA CONFEZIONE
l Digicom PCI USB 2.0
l Cd-Rom Driver
l Guida rapida
1.2.
l
l
l
l
l
l
l
l
1.3.
CARATTERISTICHE
Supporto USB 2.0
Trasferimento dati fino a 480Mbit/s
4 porte USB 2.0 esterne per Hard Drives esterni, Scanner, Telecamere digitali, ecc.
1 porta USB interna per espansioni USB 2.0
Compatibile con i dispositivi USB 1.1
Supporto nativo per Windows® Vista/XP
Driver per Windows® 2000/Me/98SE
Compatibile con MacOS® X
REQUISITI MINIMI
l 1 slot PCI libero
l Windows® 98SE o superiore
l MacOS® 10.1.x o superiore
1.1
Installazione
PCI USB 2.0
2.
INSTALLAZIONE
2.1.
INSTALLAZIONE IN WINDOWS®
2.1.1. INSTALLAZIONE SOFTWARE
1. Prima di inserire la scheda Digicom PCI USB 2.0 nel PC per il riconoscimento automatico, devi avviare il
programma di installazione per l’utilizzo del prodotto.
Inserisci il Cd-Rom trovato nella confezione, ed avvia il file contenuto nella cartella dei driver utilizzando la
funzionalità Esegui di Windows®: Start / Esegui / Sfoglia… cerca e seleziona il file nella cartella dei driver (es.
D:\PCI USB 2.0\Drivers\Windows\U2v2_062.exe) e conferma con il pulsante OK.
2. Il programma copierà tutti i file necessari per l’installazione.
Durante l’installazione, Windows®XP e Windows®2000 potrebbero visualizzare la finestra Installazione Software
che descrive l’importanza della firma digitale/logo di Windows®: premi Continua / Si per procedere con
l’installazione.
3. Al termine dell’installazione software, seleziona la scelta No, I will restart my computer later e premi il pulsante
Close.
2.1
Installazione
PCI USB 2.0
4. Ora, spegni il computer e procedi all’INSTALLAZIONE HARDWARE spiegata di seguito.
2.1.2. INSTALLAZIONE HARDWARE
1. Prima di inserire la scheda Digicom PCI USB 2.0 nel computer per
il riconoscimento automatico, devi avviare il programma di
installazione per l’utilizzo del prodotto, come indicato in
INSTALLAZIONE SOFTWARE.
2. Dopo aver spento il computer, e scollegato il cavo di alimentazione
dalla presa a muro, rimuovi il coperchio del computer ed individua
uno slot PCI libero. Inserisci la scheda Digicom PCI USB 2.0 nello
slot PCI libero con una leggera pressione, quindi fissa la scheda
con una vite. Richiudi il computer e ricollega la presa elettrica, quindi
riavvia il Sistema Operativo.
3. Procedi ora come indicato nei paragrafi INSTALLAZIONE DRIVER relativo al tuo Sistema Operativo.
2.1.3. INSTALLAZIONE DRIVER
1. All’avvio, Windows® rileverà il nuovo dispositivo hardware e installerà i driver automaticamente. In questo caso
vedrai scorrere velocemente le finestre di rilevazione automatica.
Alcuni Sistemi Operativi potrebbero visualizzare la finestra Installazione guidata Nuovo Hardware, in questo
caso, seleziona la scelta Installa il software automaticamente o Cerca un driver e premi Avanti.
2.2
Installazione
PCI USB 2.0
2. Il Sistema Operativo rileverà automaticamente i driver del costruttore del chip-set. Windows®XP e Windows®2000
potrebbero visualizzare la finestra Installazione Hardware che descrive l’importanza della firma digitale/Logo
di Windows®: premi Continua / Si per procedere con l’installazione.
3. Ad installazione terminata, puoi iniziare ad utilizzare le tue nuove porte USB 2.0
Per ulteriori informazioni tecniche, puoi consultare l’area Supporto sul nostro sito Internet www.digicom.it,
oppure inviare un’e-mail all’indirizzo [email protected]
2.2.
INSTALLAZIONE IN MACOS® X
2.2.1. INSTALLAZIONE HARDWARE
1. Dopo aver spento il Macintosh®, e scollegato il cavo di alimentazione dalla presa a muro, rimuovi il coperchio
del macintosh ed individua uno slot PCI libero. Inserisci la scheda Digicom PCI USB 2.0 nello slot PCI libero
con una leggera pressione, quindi fissa la scheda con una vite. Richiudi il Macintosh® e ricollega la presa
elettrica, quindi riavvia il Sistema Operativo.
2. Procedi ora come indicato nel paragrafo INSTALLAZIONE DRIVER.
2.2.2. INSTALLAZIONE DRIVER (MACOS® X)
1. All’avvio, MacOS® X rileverà ed installerà automaticamente i driver USB 1.1 . Per utilizzare al meglio il dispositivo,
installa i driver per il supporto USB 2.0 presenti nel Cd-Rom.
2. Inserisci il Cd-Rom trovato nella confezione nel lettore Cd del Macintosh® e seleziona la cartella dei driver (es.
\PCI USB 2.0\Drivers\Mac OS X) quindi avvia il file .IMG
3. Verifica la creazione di un disco virtuale sul desktop, dove all’interno troverai l’installer da avviare: per una
corretta installazione, segui le istruzioni a video.
4. A questo punto puoi iniziare ad utilizzare le tue nuove porte USB 2.0
Per ulteriori informazioni tecniche, puoi consultare l’area Supporto sul nostro sito Internet www.digicom.it,
oppure inviare un’e-mail all’indirizzo [email protected]
2.3
Index
PCI USB 2.0
INDEX
PREFACE
ENVIROMENTAL CONDITION
GENERAL WARNINGS
II
II
II
DECLARATION CE OF CONFORMITY
II
1. GENERALITY
1.1. PACKAGE CONTENT
1.2. FEATURES
1.3. MINIMUM REQUIREMENTS
1.1
1.1
1.1
1.1
2. INSTALLATION
2.1. INSTALLATION UNDER WINDOWS®
2.1.1. SOFTWARE INSTALLATION
2.1.2. HARDWARE INSTALLATION
2.1.3. DRIVER INSTALLATION
2.2. INSTALLATION UNDER IN MACOS® X
2.2.1. HARDWARE INSTALLATION
2.2.2. DRIVER INSTALLATION (MACOS® X)
2.1
2.1
2.1
2.2
2.2
2.3
2.3
2.3
I
Preface
PCI USB 2.0
PREFACE
All rights reserved; no part of this publication may be reproduced, stored in a retrieval system, or trasmitted in any
form or by any means, electronic, otherwise, without the prior written permission of Digicom S.p.A. The contents of
this booklet may be modified without notice. Every possible care has been taken in testing and putting together all
the documentation contained in this booklet, however Digicom can not take any responsability brought by the use
of this booklet.
ENVIROMENTAL CONDITION
Enviromental temperature from 0 to + 50°C
Relative humidity from 5 to 95% n.c.
Rapid changes of temperature or humidity should be avoided (0,03°C/min).
l Dust, humidity, heat from direct sun light.
l Objects which irradiate heat. These could cause damage to the container or other problems.
l Objects which produce a strong electtromagnetic field (loudspeakers, etc.)
l Liquids or chemical corrosive substances.
GENERAL WARNINGS
To avoid electric shock, the equipment should never be opened. Ask qualified personnel help. To disconnect the
cable pull it by the plug, never pull it by the cable itself. If there should be liquid or object penetration in the equipment,
disconnect the cable and call a qualified personnel for testing.
Cleaning the terminal
Use a clean and soft cloth. Wet the cloth with water or natural detergent if it is necessary to remove any stains.
Never use chemical products such as petrol or solvents.
Vibration or dropping
Caution against vibrations and dropping.
DECLARATION
OF CONFORMITY
We, Digicom S.p.A. with registered office at: via Volta 39 - 21010 Cardano al Campo (Varese - Italy) declare under
our sole responsability that the product PCI USB 2.0 satisfies the basic requirements of the below indicated
Directive 89/336/CEE: EN 55022 EN 61000-3-2
EN 61000-3-3
EN 55024
Disposal of out-of-date equipments
All the electrical and electronic products must be disposed as separate waste with respect to the separate
municipal collection, through specific collection systems indicated by the local authorities.
A crossed garbage can on a product indicates that this equipment is subject to the 2002/96/CE (WEEE)
European Directive.
In case of abusive disposal of these products, sanctions are applicable.
II
Generality
PCI USB 2.0
1.
GENERALITY
Dear Customer,
Thanks for choosing Digicom PCI USB 2.0. This
device will allow you to upgrade your computer with
5 USB 2.0 ports easily and quickly.
You can increase the data transfer up to 480Mbit/s, 40 times faster
than the previous USB1.1 support. You can still connect your USB
1.1 peripherals to Digicom PCI USB 2.0; all the five ports comply
with the USB 1.1 support, with a speed up to 12Mbit/s.
For best performances, connect your USB 2.0 devices to the
Digicom PCI USB 2.0 through USB 2.0 certified cables.
1.1.
PACKAGE CONTENT
l Digicom PCI USB 2.0
l Cd-Rom Driver
l Quick Guide
1.2.
l
l
l
l
l
l
l
l
1.3.
FEATURES
USB 2.0 support
Compatible with USB1.1 devices
Data transfer rate up to 480Mbit/s
4 USB external port for external Hard Drives, Scanner, Digital cameras, etc.
1 USB internal port for USB 2.0 expansion
Native support for Windows® Vista/XP
Driver for Windows® 2000/Me/98SE
Compatible with MacOS® X
MINIMUM REQUIREMENTS
l 1 availble PCI slot
l Windows 98SE or higher
l MacOS® 10.1.x or higher
1.1
Installation
PCI USB 2.0
2.
INSTALLATION
2.1.
INSTALLATION UNDER WINDOWS®
2.1.1. SOFTWARE INSTALLATION
1. Before connecting Digicom PCI USB 2.0, run the software installation. Insert the Cd-Rom you found in the
package, then go through the following steps: Start / Run / Browse… search and select the file in the Driver
folder (e.g. D:\PCI USB 2.0\Drivers\Windows\U2v2_062.exe) and click OK.
2. The software will copy all the files automatically.
Windows®XP and Windows®2000 will show a Software Installation window: click Continue Anyway / Yes to
continue the installation.
3. Now, select No, I will restart my computer later and click Close.
2.1
Installation
PCI USB 2.0
4. Shut down your computer and follow with HARDWARE INSTALLATION.
2.1.2. HARDWARE INSTALLATION
1. Before connecting Digicom PCI USB 2.0, run the software
installation. (see SOFTWARE INSTALLATION paragraph).
2. After having turned off the computer and unplugged the power cord,
remove the computer’s cover. Select an available PCI slot and push
firmly, but gently, until Digicom PCI USB 2.0 is well seated. Put
back the computer’s cover, reconnect the power cord and power on
the computer.
2.1.3. DRIVER INSTALLATION
1. Windows® will detect a new hardware and it will install the driver automatically. You will see the Found New
Hardware windows.
Some Operating System will show Found New Hardware Wizard, in this case, select Install the software
automatically or Search for a driver and click Next.
2. The Operating System will install the chip-set drivers automatically.
Windows®XP and Windows®2000 will show the Hardware Installation window, about Windows® Logo: click
Continue Anyway / Yes to continue the installation.
2.2
Installation
PCI USB 2.0
3. Once finished you can start to use your new USB 2.0 ports.
For further information, connect to the Support area on our website www.digicom.it, or write an e-mail to
[email protected]
2.2.
INSTALLATION UNDER MACOS® X
2.2.1. HARDWARE INSTALLATION
1. After having turned off the Macintosh® and unplugged the power cord, remove the macintosh cover. Select an
available PCI slot and push firmly, but gently, until Digicom PCI USB 2.0 is well seated. Put back the macintosh
cover, reconnect the power cord and power on the Macintosh®.
2.2.2. DRIVER INSTALLATION (MACOS® X)
1. MacOS® X will detect a new hardware and it install the USB 1.1 driver support automatically. For full USB 2.0
performances, install the driver supplied in the Cd-Rom.
2. Insert the Cd-Rom you found in the package, then search and select the .IMG file in the Driver folder (e.g. \PCI
USB 2.0\Drivers\Mac OS X) and double click it.
3. A new drive containing the installer will appear on the desktop. Run the installer and follow the given instructions.
4. Now, you can start to use your new USB 2.0 ports.
For further information, connect to the Support area on our website www.digicom.it, or write an e-mail to
[email protected]
2.3
ITALY - 21010 Cardano al Campo VA
via A. Volta 39