1
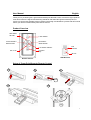
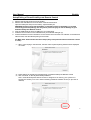
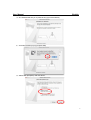
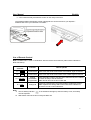
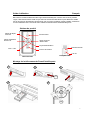
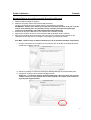
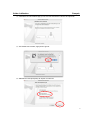
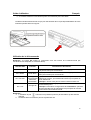
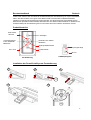
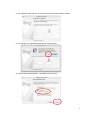
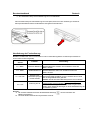
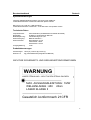
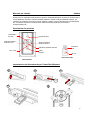
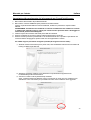
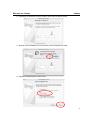
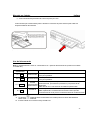
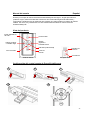
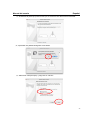
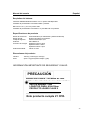
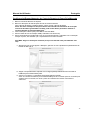
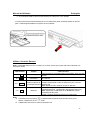
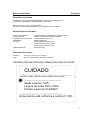
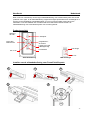
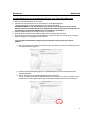
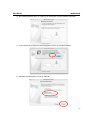
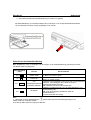
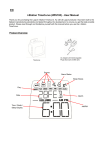
PowerPoint / Keynote Remote Control (LG290)
User Manual
User Manual
Guide d’utilisation
Benutzerhandbuch
Manuale per l’utente
Manual del usuario
Manual do Utilizador
Handboek
English
Français
Deutsch
Italiano
Español
Português
Nederlands
Product Code. LG290
www.logic3.com
User Manual
English
Thank you for purchasing the Logic3 PowerPoint/Keynote Remote Control. As with all Logic3 products
it has been built to the highest manufacturing standards and tested throughout its development, to
ensure you get the best possible product. Please read through and familiarise yourself with this manual
before you use the PowerPoint/Keynote Remote Control.
Product Overview
Start Slide /
Alt+Tab
Laser Pointer
Previous Slide /
Black Screen
Next Slide /
White Screen
Link
Indicator
Low Power Indicator
Function
Key
Esc / Link
ID Link
USB Receiver
Remote Control
Setup of PowerPoint/Keynote Remote Control
1
2
3
BATTERY
CR2032
4
5
1
User Manual
English
Setup/Pairing of PowerPoint/Keynote Remote Control
1. Remove the Remote Control from the Holder.
2. Remove the USB Receiver from the back of the Remote Control.
Open the battery lid and put in the battery, replace battery lid.
WARNING: Please ensure that the battery is inserted correctly. If the battery is inserted
incorrectly (reversed polarity), this may cause personal injury as well as damage to your
PowerPoint/Keynote Remote Control
3. Plug the USB Receiver into the USB port of your Note Book.
4. Press the ID Link button on the USB Receiver (Link Indicator will light up).
5. Press and hold the FN and Link button on the remote control until the Link Indicator on the Receiver
starts to blink, this will indicate pairing is successful.
For MAC OS.X. Please follow the below steps (Only to be performed the first time the remote
is used):(1) When you first plug-in the Receiver, the Mac OS X keyboard pairing window will be displayed
on screen.
(2) Follow Pairing as explained in Setup/Pairing of PowerPoint/Keynote Remote Control
(3) Click 'Continue’ on the Keyboard Setup Assistant.
Note : PowerPoint/Keynote Remote Control is designed to be seen by your system as a
keyboard to enable you to use it without installing additional software drivers (re-spin this as
needed).
2
User Manual
English
(4)The assistant will ask you to press the key right of the shift key.
(5)A window will then pop up just press Skip
(6)Select 'ISO (European)' and click 'Done'.
3
User Manual
English
(7)Your PowerPoint/Keynote Remote Control is now ready to be used.
The PowerPoint/Keynote Remote Control is designed so it can be stored into your Express /
PCMCIA card slot of your notebook in its holder.
Use of Remote Control
Note: The FN button is used in combination with the remote control buttons (FN functions indicated in
Blue Characters).
Button with Blue
character
Function
Fn + Black
screen black
Press to turn the whole screen black. Press “Black” again to resume.
Fn + White
screen white
Press to turn the whole screen white. Press “White” again to resume.
Fn + Alt+Tab
Fn + Link
How to operate
Press and hold Fn button, click Alt+Tab to select the file, then release
Change
presentation Fn button to swap to the file selected.
program/files Note: Alt/Tab does not function in Mac OS
Change ID
Please see “Setup/Pairing of PowerPoint/Keynote Remote Control”.
Note: Implement ID change ONLY when serious RF interference
causes the remote control malfunction.
Note:
a. The low battery indicator
on the Presenter will light up when the battery is low, the battery
must be replaced.
b. Slide button does not function on Keynote MAC OS
4
User Manual
English
System Requirements
Windows 2000/XP/Windows Vista PC with a USB port
Presentation software: PowerPoint 2000 or later
Mac OS X v.10.4 and 10.5 with a USB port
Presentation software: PowerPoint v. X for Mac OS X or later
Product Specifications
Frequency Range:
Remote Range:
Operating Voltage:
Power:
Power Consumption:
Output Power:
2400-2483 MHz (16 multi channels and 65535 ID channels)
66feet (20 metres) indoors
Remote control 2.6V-3.3V
Battery CR2032 x1
Normal Operation <5mA
Laser Operation <30mA
Sleep Operation <10µA
Under 1mW
Product Dimensions
Size:
Weight:
75mm(L) x 34mm(W) x 5mm(H)
Approx 14g (including receiver and battery)
IMPORTANT SAFETY AND HEALTH INFORMATION
5
User Manual
English
WARNING! RISK OF INJURY!
Laser beam can cause permanent damage to eyes. Do not look into the laser beam or shine the
laser beam into your eyes, other peoples’ eyes, or pet’s eyes.
WARNING! RISK OF INJURY!
Keep this device away from Children. This is a working tool, not a toy or entertainment device. It
should only be used by adults.
Trouble Shooting
Problem
What Should I Do?
Ensure that the Remote Control and Dongle is connected, check
the Link Indicator on the Dongle is LIT.
Ensure the battery of the remote control is inserted correctly
Remote control does not function
Replace the remote control battery with a new one
Check System compatability
Ensure you are within the remote range (20metres)
Should you have any connection or setup problems with the PowerPoint/Keynote Remote Control
(LG290) please contact our Technical Support Hotline on +44 (01923) 471 000 National/International
call rates apply or E-mail [email protected] Spare parts are available for some models at our
website www.logic3.com
6
Guide d’utilisation
Français
Merci d’avoir acheté la télécommande Logic3 PowerPoint/Keynote. Comme avec tous les produits
Logic3, cette télécommande a été conçue selon les normes de fabrication les plus élevées et testée
tout au long de son développent afin d’assurer que vous ayez le meilleur produit possible. Veuillez lire
et vous familiariser avec ce manuel avant d’utiliser la télécommande PowerPoint/Keynote.
Schéma du produit
Diapo de départ
/Alt+Tab
Pointeur laser
Diapo précédente
/Écran noir
Diapo suivante
/Écran blanc
Voyant d’alimentation
Indicateur de lien
ESC. / Lien
Touche de fonction
Lien ID
Récepteur USB
Télécommande
Montage de la télécommande PowerPoint/Keynote
1
2
3
PILE
CR2032
4
5
7
Guide d’utilisation
Français
Montage/Pairage de la télécommande PowerPoint/Keynote
1. Retirez la télécommande du support.
2. Retirez le récepteur USB de l’arrière de la télécommande.
Ouvrez le couvercle de la pile, insérez une pile, puis replacez le couvercle.
ATTENTION : Veuillez vous assurer que la pile est correctement insérée. Si la pile n’est pas
insérée correctement (avec une polarité inverse), cela peut provoquer des dommages
corporels et endommager votre télécommande PowerPoint/Keynote.
3. Branchez le récepteur USB dans le port USB de votre ordinateur portable.
4. Appuyez sur le bouton de lien ID sur le récepteur USB (l’indicateur de lien s’allume).
5. Appuyez et maintenez enfoncé le bouton FN et de Lien sur la télécommande jusqu’à ce que
l’indicateur de lien clignote sur le récepteur. Cela indique que le pairage a réussi.
Pour MAC, veuillez suivre les étapes suivantes (lors de la première utilisation uniquement) :
(1)Lorsque vous branchez le récepteur pour la première fois, la fenêtre de jumelage de clavier
de Mac OS X s'affiche à l'écran.
(2)Suivez le jumelage en suivant les instructions Montage/Pairage du Powerpoint/Keynote.
(3)Cliquez sur Continuer dans l'Assistant réglages clavier.
Remarque : le contrôle à distance PowerPoint/Keynote a été conçu pour être reconnu
comme clavier par votre système afin de vous permettre de l'utiliser sans installer de
logiciel pilote supplémentaire.
8
Guide d’utilisation
Français
(4)L'assistant vous demande d'appuyer sur la touche à droite de la touche de majuscule.
(5)Une fenêtre s'ouvre alors, appuyez sur Ignorer.
(6)Sélectionnez 'ISO (Européen)' et cliquez sur Terminé.
9
Guide d’utilisation
Français
(7)Le contrôle à distance PowerPoint/Keynote est maintenant prêt à être utilisé.
La télécommande PowerPoint est conçue pour être stockée dans Le port Express/PCMCIA de votre
ordinateur portable dans son support.
Utilisation de la télécommande
Remarque : Le bouton FN s’utilise en combinaison avec les boutons de la télécommande (les
fonctions FN sont indiquées en caractères bleus).
Bouton avec
caractère bleu
Fonction
FN + Black
Écran noir
FN + White
Écran blanc
FN + Alt+Tab
Changer le
programme/les
fichiers de
présentation
FN + Link
Change l’ID
Comment faire fonctionner
Appuyez pour rendre l’écran tout entier noir. Appuyez sur « Black »
(noir) de nouveau pour recommencer.
Appuyez pour rendre l’écran tout entier blanc. Appuyez sur « White »
(blanc) de nouveau pour recommencer.
Appuyez et maintenez enfoncé le bouton FN, cliquez sur Alt+Tab pour
sélectionner le fichier, puis relâchez le bouton FN pour passer au
fichier sélectionné.
Remarque : Alt/Tab n’est pas une fonction valide sur Mac OS.
Veuillez consulter «Montage/pairage de la télécommande
PowerPoint/Keynote».
Remarque : Exécutez le changement d’ID UNIQUEMENT quand de
sérieuses interférences de radiofréquence provoquent le mauvais
fonctionnement de la télécommande.
Remarque :
a. L’indicateur de pile
s’allume sur le présentoir quand la pile est faible et qu’elle doit être
changée.
b. Le Bouton Slide ne fonctionne pas sur Keynote Mac OS
10
Guide d’utilisation
Français
Configuration requise
Windows 2000/XP/Windows Vista PC avec port USB
Logiciel de présentation : PowerPoint 2000 ou ultérieur
Mac OS X v.10.4 et 10.5 avec port USB
Logiciel de présentation : PowerPoint v. X pour Mac OS X ou ultérieur.
Spécifications du produit
Bande de fréquences :
Distance :
Tension de fonctionnement :
Alimentation :
Consommation électrique :
Puissance de sortie :
2400-2483 MHz (16 multicanaux avec 65535 ID)
20 mètres en intérieur
Télécommande 2,6 V-3,3 V
Pile CR2032 x 1
Fonctionnement normal < 5 mA
Fonctionnement laser < 30 mA
Fonctionnement en veille < 10 µA
inférieure à 1 MW
Dimensions du produit
Taille : 75 mm (L) x 34 mm (l) x 5 mm (H)
Poids : environ 14 g (récepteur et pile compris)
INFORMATIONS IMPORTANTES CONCERNANT LA SÉCURITÉ ET LA
SANTÉ
ATTENTION
NE PAS REGARDER DANS LE RAYONNEMENT LASER
PUISSANCE D'ÉMISSION : 1 mW
LONGUEUR : 650 ± 20 nm
APPAREIL LASER CLASSE II
Ce produit est en conformité avec 21 CFR.
11
Guide d’utilisation
Français
AVERTISSEMENT ! RISQUES DE BLESSURES !
Un rayon laser peut provoquer des dommages permanents à vos yeux. Ne regardez pas
directement dans le rayon laser et ne faites pas briller le rayon laser dans vos yeux, dans les yeux
d’autres personnes ou dans les yeux de votre animal domestique.
AVERTISSEMENT ! RISQUES DE BLESSURES !
Gardez cet appareil hors de portée des enfants C’est un outil de travail et non un jouet ou un
dispositif de divertissement. Il doit uniquement être utilisé par des adultes.
Dépannage
Problème
Que dois-je faire ?
Assurez-vous que la télécommande et la clé électronique sont
branchées, vérifiez que l’indicateur de lien sur la clé électronique
est ALLUMÉ.
La télécommande ne fonctionne
pas.
Assurez-vous que la pile de la télécommande est correctement
insérée.
Remplacez la pile de la télécommande par une nouvelle pile.
Vérifiez la compatibilité du système.
Assurez-vous que vous êtes dans les limites de la plage à distance
(20 mètres).
Si vous avez le moindre problème de connexion ou de montage avec la télécommande
PowerPoint/Keynote (LG290), veuillez contacter notre service d’assistance technique au : +44 1923
471 000 – tarifs d’appels nationaux/internationaux en vigueur ou envoyez un e-mail à
[email protected]. Des pièces de rechange sont disponibles pour certains modèles sur notre site
Web www.logic3.com.
12
Benutzerhandbuch
Deutsch
Vielen Dank, dass Sie sich zum Kauf der PowerPoint/Keynote-Fernbedienung von Logic3 entschieden
haben. Wie alle Produkte von Logic3 wurde dieses Gerät nach höchsten Produktionsstandards
gefertigt und während der Entwicklung laufend getestet. Auf diese Weise soll sichergestellt werden,
dass Sie ein optimales Produkt erhalten. Bitte lesen Sie sich dieses Nutzerhandbuch vor Gebrauch der
PowerPoint/Keynote-Fernbedienung durch und machen Sie sich mit dessen Funktionen vertraut.
Produktüberblick
Folie starten
/ Alt+Tab
Laserzeiger
Vorausgegangene
Folie / schwarzer
Bildschirm
Nächste Folie / weißer
Bildschirm
Niedriger Batteriestand
Empfangsanzeige
Funktionstaste
Esc / Link
ID-Link
USB-Empfangsteil
Fernbedienung
Installation der PowerPoint/Keynote-Fernbedienung
1
2
3
BATTERIE
CR2032
4
5
13
Benutzerhandbuch
Deutsch
Installation/Koppeln der PowerPoint/Keynote-Fernbedienung
1. Nehmen Sie die Fernbedienung aus der Halterung heraus.
2. Nehmen Sie das USB-Empfangsteil aus der Rückseite der Fernbedienung heraus.
Öffnen Sie das Batteriefach, legen Sie die Batterie ein und setzen Sie den Deckel wieder auf das
Batteriefach auf.
WARNUNG: Bitte darauf achten, dass die Batterie korrekt eingesetzt ist. Inkorrektes
Einsetzen der Batterie (vertauschte Pole) kann zu Personenverletzungen sowie zur
Beschädigung Ihrer PowerPoint/Keynote-Fernbedienung führen.
3. Stecken Sie das USB-Empfangsteil in den USB-Anschluss Ihres Notebooks ein.
4. Drücken Sie die ID-Link-Taste auf dem USB-Empfangsteil (die Empfangsanzeige leuchtet auf).
5. Drücken Sie die FN-Taste und die Link-Taste auf der Fernbedienung und halten Sie diese so lange
niedergedrückt, bis die Empfangsanzeige auf dem Empfangsteil anfängt zu blinken. Dies bedeutet,
dass die Kopplung erfolgreich war.
Befolgen Sie für MAC bitte die unten stehenden Schritte (diese müssen nur bei der ersten
Inbetriebnahme ausgeführt werden):
(1) Wenn Sie den Empfänger das erste Mal anschließen, wird das Mac-OS-XTastaturverbindungsfenster auf dem Bildschirm angezeigt.
(2) Befolgen Sie die Schritte zum Verbindungsaufbau, wie im Abschnitt "Installation/Koppeln der
PowerPoint-/Keynote-Fernbedienung" beschrieben.
(3) Klicken Sie im Assistenten für die Tastatureinrichtung auf "Weiter".
Hinweis: Die PowerPoint-/Keynote-Fernbedienung wurde entwickelt, um von Ihrem System als
Tastatur erkannt zu werden, sodass Sie sie verwenden können, ohne zusätzliche
Softwaretreiber installieren zu müssen.
14
(4)Der Assistent fordert Sie auf, die Taste rechts neben der Shift-Taste zu drücken.
(5)Ein Fenster wird angezeigt. Klicken Sie auf "Überspringen".
(6)Wählen Sie "ISO (Europäisch)", und klicken Sie auf "Fertig".
15
Benutzerhandbuch
Deutsch
(7)Ihre PowerPoint-/Keynote-Fernbedienung ist nun einsatzbereit.
Die PowerPoint-/Keynote-Fernbedienung ist so konzipiert, dass sie in ihrer Halterung im Schlitz für
die Express/PCMCIA-Karte Ihres Notebooks untergebracht werden kann.
Handhabung der Fernbedienung
Hinweis: Die FN-Taste wird in Kombination mit den Fernbedienungstasten verwendet (FN-Funktionen
sind in blauer Schrift dargestellt).
Tasten mit blauer
Schrift
Fn + Black
Fn + White
Fn + Alt+Tab
Fn + Link
Funktion
Verwendung
Durch Niederdrücken dieser Tastenkombination wird der
Schwarzer Bildschirm gesamte Bildschirm schwarz. Zum Fortfahren erneut auf
„Black“ drücken.
Durch Niederdrücken dieser Tastenkombination wird der
Weißer Bildschirm gesamte Bildschirm weiß. Zum Fortfahren erneut auf
„White“ drücken.
Bei niedergedrückter Fn-Taste auf Alt+Tab klicken. Die
Änderung des
gewünschte Datei auswählen. Durch Loslassen der Fn-Taste
Präsentationsprogram
wird die ausgewählte Datei geändert.
ms/ der Dateien
Hinweis: Alt/Tab ist in Mac-Betriebssystemen nicht enthalten
Änderung der ID
Bitte lesen Sie sich den Abschnitt „Installation/Koppeln der
PowerPoint/Keynote-Fernbedienung“ durch.
Hinweis: ID-Änderungen sollten NUR DANN vorgenommen
werden, wenn starke RF-Störungen zu einer Betriebsstörung der
Fernbedienung führen.
Hinweis:
a. Bei schwacher Batterie leuchtet die Batteriestandsanzeige
Batterie austauschen.
b. Der taste Slide funktioniert auf Keynote Mac OS nicht
auf dem Presenter auf.
16
Benutzerhandbuch
Deutsch
Systemanforderungen
Windows 2000/XP/Windows Vista PC mit einem freien USB-Port
Präsentationssoftware: PowerPoint 2000 oder spätere Version
Mac OS X v.10.4 und 10.5, USB-Anschluss
Präsentationssoftware: PowerPoint v. X für Mac OS X oder spätere Version
Technische Daten
Frequenzbereich:
Reichweite:
Betriebsspannung:
Stromversorgung:
Stromverbrauch:
Ausgangsleistung:
2400-2483 MHz (16 Multikanäle und 65535 ID-Kanäle)
20 Meter in geschlossenen Räumen
Fernbedienung 2,6V-3,3V
Batterie CR2032 x 1
Normalbetrieb <5 mA
Laserbetrieb <30mA
Schlafmodus <10mA
1mW
Produktabmessungen
Abmessungen: 75mm (H) x 34mm (B) x 5mm (T).
Gewicht: ca.
14g (einschließlich Empfangsteil und Batterie)
WICHTIGE SICHERHEITS- UND GESUNDHEITSINFORMATIONEN
WARNUNG
LASER STRAHLUNG – NICHT IN DEN STRAHL BLICKEN
MAX. AUSGANGSLEISTUNG : 1MW
WELLENLANGE : 650 20nm
LASER KLASSE II
Gesetzlich konformnach 21CFR
17
Benutzerhandbuch
Deutsch
WARNUNG! VERLETZUNGSGEFAHR!
Laserstrahlen können irreparable Augenschäden verursachen. Blicken Sie nicht in den Laserstrahl
und richten Sie den Laserstrahl nicht auf Ihre eigenen Augen oder die Augen von Personen oder
Tieren.
WARNUNG! VERLETZUNGSGEFAHR!
Das Gerät von Kindern fernhalten. Dieses Gerät ist ein Arbeitsgerät, das weder als Spielzeug noch
zur Unterhaltung bestimmt ist. Das Gerät sollte aussschließlich von Erwachsenen verwendet werden.
Fehlersuche/-behebung
Problem
Fernbedienung funktioniert nicht
Abhilfe
Sorgen Sie dafür, dass Fernbedienung und Dongle angeschlossen
sind. Überprüfen Sie, dass die Empfangsanzeige auf dem Dongle
LEUCHTET.
Vergewissern Sie sich, dass die Batterie korrekt in die
Fernbedienung eingesetzt ist
Tauschen Sie die Batterie der Fernbedienung durch eine neue
Batterie aus
Systemkompatibilität überprüfen
Vergewissern Sie sich, dass Sie sich innerhalb der Reichweite der
Fernbedienung befinden (20 Meter)
Sollten Sie irgendwelche Probleme mit dem Anschluss oder der Installation der PowerPoint/KeynoteFernbedienung (LG290) haben, wenden Sie sich bitte an unsere Technische Support-Hotline, Tel. +44
(01923) 471 000 – Es gelten die Gebühren für Inlands-/Auslandsgespräche – oder senden Sie uns
eine E-Mail an [email protected]. Für einige Modelle können Ersatzteile über unsere Website
www.logic3.com bestellt werden.
18
Manuale per l’utente
Italiano
Grazie per aver acquistato il telecomando Logic3 per PowerPoint/Keynote. Come tutti i prodotti Logic3,
è stato fabbricato secondo i massimi standard produttivi e testato a tutti gli stadi dello sviluppo, per
garantire che all’utente sia fornito il prodotto migliore possibile. Leggere attentamente e familiarizzarsi
con il contenuto di questo manuale prima di utilizzare il telecomando per presentazioni
PowerPoint/Keynote.
Panoramica del prodotto
Inizia Slide /
Alt+Tab
Puntatore laser
Slide precedente /
Schermo nero
Slide successiva/
Schermo bianco
Indicatore
Link
Indicatore di bassa potenza
Tasto
funzioni
Esc / Link
ID Link
Ricevitore USB
Telecomando
Impostazione del telecomando per PowerPoint/Keynote
1
2
3
BATTERIA
CR2032
4
5
19
Manuale per l’utente
Italiano
Impostazione/Accoppiamento del telecomando per PowerPoint/Keynote
1. Rimuovere il telecomando dal portatelecomando.
2. Rimuovere il ricevitore USB dalla parte posteriore del telecomando.
Aprire il coperchio della batteria e inserire la batteria; rimettere in posizione il coperchio della
batteria.
AVVERTENZA: Controllare che la batteria sia inserita correttamente. Se la batteria è inserita
in modo errato (polarità inversa), questo può causare lesioni personali oltre a danneggiare il
telecomando per PowerPoint/Keynote
3. Inserire la spina del ricevitore USB nella porta USB del notebook.
4. Premere il pulsante ID Link sul ricevitore USB (la spia del link si accende).
5. Premere e tenere premuto il pulsanti FN e Link sul telecomando fino a quando la spia del link sul
ricevitore inizia a lampeggiare; questo indica che l’accoppiamento è riuscito.
Per il MAC segui la procedura di seguito riportata (da eseguire una sola volta):(1)Quando inserisci il Ricevitore per la prima volta, sarà visualizzata sullo schermo la finestra di
Pairing da tastiera per Mac OS.
(2)Esegui la procedura di Pairing come illustrato in Impostazione/Accoppiamento di
PowerPoint/Keynote Remote Control.
(3)Clicca su 'Continua’ nel Keyboard Setup Assistant.
Nota : PowerPoint/Keynote Remote Control è sviluppato in modo che il tuo sistema possa
identificarlo come una tastiera per permetterti di usarlo senza installare driver aggiuntivi.
20
Manuale per l’utente
Italiano
(4)L'assistente ti chiederà di premere il tasto a destra del tasto Maiusc (Shift).
(5)Quando viene visualizzata una nuova finestra, premi semplicemente Salta.
(6)Seleziona 'ISO (Europeo)' e clicca 'Fatto'.
21
Manuale per l’utente
Italiano
(7)Il tuo PowerPoint/Keynote Remote Control è pronto per l'uso.
Il telecomando per PowerPoint/Keynote è studiato in modo tale da poter essere riposto nello slot
Express/ PCMCIA del notebook.
Uso del telecomando
Nota: il pulsante FN viene usato in combinazione con i pulsanti del telecomando (funzioni FN indicate
a caratteri blu).
Pulsante con
carattere blu
Funzione
Fn + Nero
schermo nero
Fn + Bianco
schermo bianco
Fn + Alt+Tab
Premere e tenere premuto il pulsante Fn. Fare clic su Alt+Tab per
Cambia
selezionare il file, poi rilasciare il pulsante Fn per passare al file
programma/file
selezionato.
presentazione
Nota: Alt/Tab non è una funzione nel sistema operativo Mac
Fn + Link
Cambia ID
Istruzioni
Premere per far diventare tutto lo schermo nero. Premere “Nero” di
nuovo per riprendere.
Premere per far diventare tutto lo schermo bianco. Premere “Bianco” di
nuovo per riprendere.
Vedere “Impostazione del telecomando per PowerPoint/Keynote”.
Nota: Implementare il cambiamento di ID SOLTANTO quando
un’interferenza RF seria provoca il malfunzionamento del telecomando.
Nota:
a. L’indicatore
di batteria bassa sul Presenter si accende quando la carica della batteria è
bassa. Sostituire la batteria.
b. Il bottone Slide non funziona su Keynote Mac OS
22
Manuale per l’utente
Italiano
Requisiti di sistema
Windows 2000/XP/Windows Vista PC con una porta USB disponibile
Software di presentazione: PowerPoint 2000 o versione successiva
Mac OS X v.10.4 e 10.5 con una porta USB
Software di presentazione: PowerPoint v. X per Mac OS X o versione successiva
Specifiche del prodotto
Range frequenza:
Raggio telecomando:
Tensione di funzionamento:
Potenza:
Assorbimento di potenza:
Potenza d’uscita:
2400-2483 MHz (16 canali multipli e 65535 canali ID)
20 metri all’interno
Telecomando 2,6 V-3,3 V
1 batteria CR2032
Funzionamento normale <5 mA
Funzionamento laser <30 mA
Funzionamento sleep <10 µA
sotto 1 mW
Dimensioni del prodotto
Dimensioni:
Peso:
75 mm(L) x 34 mm(P) x 5 mm(H)
Circa 14 g (ricevitore e batteria inclusi)
IMPORTANTI INFORMAZIONI SULLA SALUTE E SICUREZZA
ATTENZION
RADIAZIONE LASER – NON FISSARE IL FASCIO
USCITA MASSIMA: 1 Mw
LUNGHEZZA ONDA: 650± 20 nm
PRODOTTO LASER DI CLASSE II
Questo prodotto è conforme alle normative 21 CFR.
23
Manuale per l’utente
Italiano
AVVERTENZA! RISCHIO DI LESIONI!
Il fascio laser può cause danni permanenti alla vista. Non fissare il fascio laser né dirigere mai il
fascio laser verso i propri occhi, gli occhi di altre persone o di animali domestici.
AVVERTENZA! RISCHIO DI LESIONI!
Tenere questo dispositivo lontano dai bambini. Questo è un attrezzo da lavoro, non è un giocattolo
né un dispositivo per l’intrattenimento. Deve essere utilizzato esclusivamente da persone adulte.
Risoluzione di problemi
Problema
Che cosa dovrei fare?
Accertarsi che il telecomando e il dongle siano collegati. Controllare
che la spia del link sul dongle sia ILLUMINATA.
Il telecomando non funziona
Accertarsi che la batteria del telecomando sia inserita
correttamente
Sostituire la batteria del telecomando con una nuova
Controllare la compatibilità del sistema
Accertarsi di trovarsi entro il raggio del telecomando (20 metri)
Per eventuali problemi di connessione o impostazione del telecomando per presentazioni
PowerPoint/Keynote (LG290) rivolgersi alla hotline di assistenza tecnica, al n. +44 (01923) 471 000 (Si
applicano le tariffe telefoniche nazionali / internazionali) o inviare un’e-mail a [email protected]
- Le parti di ricambio sono disponibili per alcuni modelli nel nostro sito Web www.logic3.com
24
Manual del usuario
Español
Gracias por comprar el control remoto de PowerPoint/Keynote de Logic3. Al igual que todos los
productos Logic3, éste se ha fabricado conforme a las normas más exigentes de fabricación y
comprobado a través de todo su desarrollo para asegurar que usted reciba un producto de máxima
calidad. Por favor, lea y familiarícese con este manual antes de utilizar el control remoto de
PowerPoint/Keynote.
Vista del producto
Iniciar diapositiva /
Alt+Tab
Puntero láser
Diapos.
siguiente /
Pantalla blanca
Diapos. anterior
/ Pantalla negra
Indicador potencia baja
Indicador de
conexión
Tecla de
función
Esc/ Conexión
Conexión ID
Receptor USB
Control remoto
Configuración del control remoto de PowerPoint/Keynote
1
2
3
PILA
CR2032
4
5
25
Manual del usuario
Español
Configuración/Enlace del control remoto de PowerPoint/Keynote
1. Extraiga el control remoto del portacontrol.
2. Extraiga el receptor USB de la parte posterior del control remoto.
Abra la cubierta de la pila e inserte la pila; vuelva a colocar la cubierta de la pila.
AVISO: Por favor, asegúrese de insertar la pila correctamente. Si la pila se inserta
incorrectamente (polaridad invertida) podrían producirse lesiones, así como daños en el
control remoto de PowerPoint/Keynote.
3. Conecte el receptor USB al puerto USB de su Notebook.
4. Pulse el botón Conexión ID del receptor USB (el indicador de Conexión se iluminará).
5. Pulse y sujete el botón FN y Conexión del control remoto hasta que el Indicador de Conexión del
receptor comience a parpadear; esto indicará que el enlace es satisfactorio.
Para MAC siga las siguientes indicaciones (únicamente debe hacerlo la primera vez que
conecta el dispositivo):
(1)Cuando conecte por primera vez el Receptor, se mostrará la pantalla de sincronización de
teclado para Mac OS X.
(2)Realice la sincronización tal y como se explica en Configuración/Enlace del control
remoto para PowerPoint/Keynote.
(3)Haga clic en «Continuar» en el Asistente Configuración Teclado.
Nota: el control remoto para PowerPoint/Keynote está diseñado para que aparezca en el sistema
como un teclado. De esta manera puede utilizarlo sin instalar controladores de software
adicionales.
26
Manual del usuario
Español
(4)El asistente le pedirá que pulse la tecla que se encuentra a la derecha de la tecla Shift.
(5)Aparecerá una pantalla emergente. Pulse Omitir.
(6)Seleccione «ISO (Europeo)» y haga clic en «Hecho».
27
Manual del usuario
Español
(7)Su control remoto para PowerPoint/Keynote ya está listo para utilizarse
El control remoto de PowerPoint se ha diseñado para poder almacenarlo con su portacontrol en la
ranura de la tarjeta Express/PCMCIA de su Notebook.
Uso del control remoto
Nota: El botón FN se utiliza en combinación con los botones del control remoto (las funciones FN se
indican en letras azules).
Botón con letra
azul
Función
Fn + Black
Pantalla negra
Fn + White
Pantalla blanca
Fn + Alt+Tab
Fn + Link
Cómo operarla
Pulse para convertir en negra toda la pantalla. Pulse “Black” otra vez
para restaurar.
Pulse para convertir en blanca toda la pantalla. Pulse “White” otra
vez para restaurar.
Pulse y sujete el botón Fn; haga clic en Alt+Tab para seleccionar el
Cambiar
programa/archivos archivo; suelte el botón Fn para cambiar al archivo seleccionado.
de presentación Nota: Alt/Tab no es una función en Mac OS
Cambiar ID
Por favor, consulte “Configuración/enlace del control remoto de
PowerPoint/Keynote”.
Nota: Realice un cambio de ID SÓLO cuando interferencias serias
de RF provoquen el malfuncionamiento del control remoto.
Nota:
a.
El indicador de pila baja
del Presentador se iluminará cuando la pila esté baja; la pila
deberá cambiarse.
b. El botón Slide no funciona sobre Keynote Mac OS
28
Manual del usuario
Español
Requisitos del sistema
Windows 2000/XP/Windows Vista PC con un puerto USB disponible
Software de presentación: PowerPoint 2000 o posterior
Mac OS X v.10.4 y 10.5 con puerto USB
Software de presentación: PowerPoint v. X para Mac OS X o posterior
Especificaciones de producto
Gama de frecuencia:
Gama remota:
Voltaje de régimen:
Potencia:
Consumo de energía:
Potencia de salida:
2400-2483 MHz (16 multicanales y 65535 canales ID)
66 pies (20 metros) en el interior
Control remoto 2,6V-3,3V
Pila CR2032 x1
Operación normal <5mA
Operación láser <30mA
Operación inerte <10µA
Inferior a 1mW
Dimensiones del producto
Tamaño:
Peso:
75mm(L) x 34mm(A) x 5mm(G)
Aprox. 14g (incluyendo receptor y pila)
INFORMACIÓN IMPORTANTE DE SEGURIDAD Y SALUD
PRECAUCIÓN
RADIACIÓN LÁSER – NO MIRE AL HAZ
SALIDA MÁXIMA: 1mW
LONGITUD ONDA: 650± 20nm
PRODUCTO LÁSER CLASE II
Este producto cumple 21 CFR.
29
Manual del usuario
Español
AVISO! ¡RIESGO DE LESIÓN!
El haz láser puede causar daños oculares permanentes. No mire al haz láser ni apunte el haz
láser a sus ojos, los de otras personas, o los de mascotas.
AVISO! ¡RIESGO DE LESIÓN!
Mantenga este dispositivo alejado de los niños. Ésta es una herramienta de trabajo, no es un
juguete ni un dispositivo para entretenimiento. Sólo deberá ser utilizado por adultos.
Resolución de problemas
Problema
El control remoto no funciona
Qué debo hacer?
Asegúrese de que el control remoto y el Dongle (llave electrónica)
estén conectados; compruebe que el Indicador de Conexión del
Dongle está ILUMINADO.
Asegúrese de que la pila del control remoto esté insertada
correctamente.
Cambie la pila del control remoto por una nueva.
Compruebe la compatibilidad del sistema.
Asegúrese de que está dentro del alcance remoto (20 metros).
Si experimenta problemas de conexión o configuración con el control remoto de PowerPoint/Keynote
(LG290), por favor, póngase en contacto con nuestra Hotline de Apoyo Técnico al +44 (01923) 471
000 – Se aplicarán las tarifas telefónicas nacionales/internacionales, o envíe un e-mail a
[email protected] - En nuestro sitio web www.logic3.com encontrará recambios disponibles para
algunos modelos.
30
Manual do Utilizador
Português
Obrigado por adquirir o Controlo Remoto de PowerPoint/Keynote Logic3. Como acontece com todos
os produtos Logic3, o Controlo Remoto de PowerPoint Logic3 obedece aos mais altos padrões de
produção e foi testado ao longo do seu desenvolvimento, para garantirmos que é o melhor produto
possível. Por favor leia e familiarize-se com este manual antes de começar a utilizar o Controlo
Remoto de PowerPoint/Keynote..
Visão Geral do Produto
Iniciar
Diapositivo
/ Alt+Tab
Apontador Laser
Diapositivo
Anterior / Ecrã
Negro
Diapositivo
Seguinte /
Ecrã Branco
Indicador de Pouca Bateria
Indicador
Link
Tecla
Função
Esc / Link
ID Link
Receptor USB
Controlo Remoto
Configuração do Controlo Remoto de PowerPoint/Keynote
1
2
3
BATERIA
CR2032
4
5
31
Manual do Utilizador
Português
Configuração/Emparelhamento do Controlo Remoto de PowerPoint/Keynote
1. Remova o Controlo Remoto do Suporte.
2. Remova o Receptor de USB da parte de trás do Controlo Remoto.
Abra a tampa da bateria e instale a bateria, volte a colocar a tampa da bateria.
Aviso: Por favor certifique-se de que a bateria está inserida correctamente. A colocação
incorrecta da bateria (polaridade invertida), pode causar danos pessoais e danificar o
Controlo Remoto de PowerPoint/Keynote.
3. Insira o Receptor USB na porta para USB do seu Note Book.
4. Prima o botão ID Link no Receptor USB (o Indicador Link ilumina-se).
5. Prima continuamente os botões FN e Link do Controlo Remoto até o Indicador Link no Receptor
começar a piscar; isso indicará que o emparelhamento foi bem-sucedido.
Para MAC: Segue as instruções em baixo (só é preciso efectuar este procedimento uma
vez):(1)Na primeira vez em que ligares o Receptor, aparece no ecrã a janela de emparelhamento de
teclado do Mac OS X.
(2)Segue o Emparelhamento explicado em Configuração/Emparelhamento do Comando à
Distância para PowerPoint/Keynote.
(3)Clica em “Continuar” no Assistente de Configuração do Teclado.
Nota: O Comando à Distância para PowerPoint/Keynote foi concebido para ser encarado pelo
sistema como um teclado, de modo a poder ser instalado sem utilizar controladores
adicionais.
32
Manual do Utilizador
Português
(4)O assistente pede-te para carregares na tecla ao lado da tecla Shift.
(5)Aparece depois uma janela onde basta carregar em Avançar.
(6)Selecciona “ISO (Europeu)” e clica em “Concluído”.
33
Manual do Utilizador
Português
(7)O Comando à Distância para PowerPoint/Keynote está pronto a ser utilizado.
O Controlo Remoto de PowerPoint/Keynote foi concebido para poder armazenar dados na ranhura
para o cartão Express/PCMCIA no suporte do seu notebook.
Utilizar o Controlo Remoto
Nota: O botão FN utiliza-se com os botões do controlo remoto (as funções FN estão indicadas com
Caracteres Azuis).
Botão com
Carácter Azul
Fn + Black
Fn + White
Fn + Alt+Tab
Fn + Link
Função
Como funciona
Prima para tornar o ecrã todo negro. Prima “Black” outra vez para
retomar.
Prima para tornar o ecrã todo branco. Prima “White” outra vez
ecrã branco
para retomar.
Prima continuamente o botão Fn, clique Alt+Tab para seleccionar
Mudar programa de o ficheiro, depois solte o botão Fn para trocar para o ficheiro
apresentação/ficheiros seleccionado.
Nota: Alt/Tab não tem qualquer função em Mac OS
Por favor “Configuração/Emparelhamento do Controlo Remoto de
PowerPoint/Keynote” (Apresentador ExpressCard Sem Fios).
Mudar ID
Nota: Implemente as alterações ao ID SOMENTE quando
interferência de RF grave
impedir o controlo remoto de funcionar correctamente.
ecrã negro
Nota:
a. O indicador de pouca bateria
no Apresentador ficará iluminado quando restar pouca
bateria; a bateria tem de ser substituída.
b. O Botão Slide não funciona sobre Keynote Mac OS
34
Manual do Utilizador
Português
Requisitos do Sistema
Computador com Windows 2000/XP/Windows Vista e porta USB disponível
Software de apresentação: PowerPoint 2000 ou posterior
Mac OS X v.10.4 e 10.5 com conexão USB
Software de apresentação: PowerPoint v. X para Mac OS X ou posterior
Especificações do Produto
Alcance da Frequência:
Alcance Remoto:
Voltagem de Funcionamento:
Alimentação:
Consumo:
Potência de Saída:
2400-2483 MHz (16 multicanais e canais ID 65535)
20 metros (66 feet) em espaços fechados
Controlo Remoto 2.6V-3.3V
Bateria CR2032 x1
Funcionamento Normal <5mA
Funcionamento a Laser <30mA
Funcionamento Inactivo <10µA
Abaixo de 1mW
Dimensões do produto
Tamanho:
Peso:
75 mm (C) x 34 mm (L) x 5 mm (A)
Aprox. 14 g (incluindo o receptor e a bateria)
INFORMAÇÕES IMPORTANTES SOBRE SEGURANÇA E SAÚDE
CUIDADO
RADIAÇÃO LASER - NÃO OLHE DIRECTAMENTE PARA O FEIXE
Saída máxima: 1mW
Largura de onda: 650 ± 20nm
Produto Laser de CLASSE II
Este produto está conforme a norma 21 CFR
35
Manual do Utilizador
Português
ADVERTÊNCIA! RISCO PARA A SAÚDE!
Os raios laser podem causar danos permanentes aos olhos. Não olhe para raios laser nem os
direccione para os seus olhos, os olhos de outras pessoas ou os olhos de animais.
ADVERTÊNCIA! RISCO PARA A SAÚDE!
Mantenha este dispositivo longe do alcance das crianças. Este produto é uma ferramenta de
trabalho, não é um brinquedo nem um dispositivo de entretenimento. Só deve ser utilizado por
pessoas adultas.
Resolução de Problemas
Problema
O Que devo Fazer?
Certifique-se de que o Controlo Remoto e o Dongle estão ligados;
certifique-se de que o indicador Link do Dongle está iluminado.
O Controlo Remoto não funciona
Certifique-se de que a bateria do controlo remoto está inserida
correctamente
Substitua a bateria do controlo remoto por uma nova
Verifique a Conpatibilidade do Sistema
Certifique-se de que está dentro do raio de alcance remoto (20
metros)
Se tiver quaisquer problemas de ligação ou configuração do Controlo Remoto de PowerPoint/Keynote
(LG290), por favor contacte a Nossa Linha de Suporte Técnico no número +44 (01923) 471 000 –
Vigoram as tarifas de ligação nacionais e internacionais. Ou contacte-nos por e-mail para
[email protected] Para alguns modelos, as peças para substituição podem ser obtidas a partir do
nosso website www.logic3.com
36
Handboek
Nederlands
Dank u wel voor uw aankoop van de Logic3-afstandsbediening voor PowerPoint/Keynote. Net als alle
producten van Logic3, is de afstandsbediening volgens de hoogste productienormen vervaardigd en in
de loop van de ontwikkeling herhaaldelijk getest om u een zo goed mogelijk product te kunnen
aanbieden. Lees het handboek door en maak uzelf vertrouwd met de inhoud voordat u de
afstandsbediening voor PowerPoint/Keynote voor het eerst gebruikt.
Productoverzicht
Startdia /
Alt+Tab
Laserwijzer
Vorige dia /
zwart scherm
Volgende dia /
wit scherm
Lampje voor lage
batterijspanning
Link-lampje
Functietoets
Esc / Link
ID Link
USB-ontvanger
Afstandsbediening
Instellen van de afstandsbediening voor PowerPoint/Keynote
1
2
3
BATTERIJ
CR2032
4
5
37
Handboek
Nederlands
Instellen/Koppelen van de afstandsbediening voor PowerPoint/Keynote
1. Neem de afstandsbediening uit de houder.
2. Verwijder de USB-ontvanger van de achterkant van de afstandsbediening.
Open de batterijkap en steek de batterij erin. Doe de kap weer dicht.
WAARSCHUWING: Let op dat de batterij op de juiste manier aangebracht wordt. Als de
batterij verkeerd om wordt aangebracht (omgekeerde polariteit), kan dit persoonlijk letsel en
beschadiging van de afstandsbediening voor PowerPoint veroorzaken.
3. Steek de USB-ontvanger in de USB-poort van uw notebook.
4. Druk op de ID Link-knop op de USB-ontvanger (het Link-lampje gaat branden).
5. Houd de FN en Link-knop op de afstandsbediening ingedrukt tot het Link-lampje op de ontvanger
begint te knipperen. Het koppelen is dan voltooid.
Volg voor MAC onderstaande stappen op (dit hoeft alleen bij de eerste keer worden
gedaan):(1)Als u de ontvanger voor het eerst aansluit wordt er een Mac OS X synchronisatiescherm voor
het toetsenbord weergegeven.
(2)Volg de instructies zoals aangegeven in Instellen/Koppelen van de PowerPoint/Keynote
Afstandsbediening
(3)Klik op 'Doorgaan’ in de Instellingsassistent voor toetsenbord.
Let op : de PowerPoint/Keynote Afstandsbediening is ontworpen om door je systeem als een
toetsenbord te worden gezien zodat dat je aanvullende softwaredrivers hoeft te installeren.
38
Handboek
Nederlands
(4)De instellingsassistent zal u nu vragen op de rechtertoets of op de shifttoets te drukken.
(5)In het venster dat vervolgens wordt weergegeven moet u op Overslaan drukken
(6)Selecteer 'ISO (European)' en klik op 'Voltooid'.
39
Handboek
Nederlands
(7)Uw PowerPoint/Keynote Afstandsbediening is nu klaar voor gebruik
De afstandsbediening voor PowerPoint/Keynote is ontworpen om in de Express/PCMCIA-kaartsleuf
van uw notebook te kunnen worden opgeslagen in zijn houder.
Gebruik van de afstandsbediening
N.B.: De FN-knop wordt in combinatie met de knoppen op de afstandsbediening gebruikt (FN-functies
met blauwe tekens aangegeven).
Knop met blauw
teken
Fn + Black
Fn + Wit
Fn + Alt+Tab
Fn + Link
Functie
Hoe te bedienen
Indrukken om het hele scherm zwart te maken. Druk nogmaals
op “Black” om verder te gaan.
Indrukken om het hele scherm wit te maken. Druk nogmaals op
scherm wit
“White” om verder te gaan.
Houd de Fn-knop ingedrukt en klik op Alt+Tab om het bestand te
Van
selecteren. Laat vervolgens de Fn-knop los om het
presentatieprogramma/geselecteerde bestand te ruilen.
bestanden wisselen
N.B.: Alt/Tab is niet een functie van Mac OS
Raadpleeg “Instellen/koppelen van de afstandsbediening voor
PowerPoint/Keynote”..
ID wijzigen
N.B.: Voer de ID-wijziging ALLEEN uit indien de
afstandsbediening
niet goed werkt door HF-storing.
scherm zwart
N.B.:
a. Het lampje voor lage batterijspanning
gaat branden wanneer de batterij bijna leeg is. De
batterij moet dan vervangen worden.
b. De Knoop Slide werkt niet op Keynote Mac OS
40
Handboek
Nederlands
Systeemvereisten
Windows 2000/XP/Windows Vista pc met een beschikbare USB-poort
Presentatiesoftware: PowerPoint 2000 of later
Mac OS X v.10.4 en 10.5 met een USB-aansluiting
Presentatiesoftware: PowerPoint v. X voor Mac OS X of later
Productspecificaties
Frequentiebereik:
Bereik afstandsbediening:
Bedrijfsspanning:
Vermogen:
Stroomverbruik:
Afgegeven vermogen:
2400-2483 MHz (16 multi-kanalen en 65535 ID-kanalen)
20 meter binnen
Afstandsbediening 2,6 V-3,3 V
Batterij CR2032 x1
Bij normaal gebruik <5 mA
Bij gebruik van de laser <30 mA
In de slaapstand <10 µA
Onder 1 mW
Productafmetingen
Afmetingen:
75 mm(L) x 34 mm(B) x 5 mm(H)
Gewicht: Ong. 14 g (inclusief ontvanger en batterij)
BELANGRIJKE INFORMATIE VOOR VEILIGHEID EN GEZONDHEID
VOORZICHTIG
LASERSTRALING – NIET IN STRAAL
MAX. AFGEGEVEN VERMOGEN:
1 mW
GOLFLENGTE: 650 ± 20 nm
KLASSE II LASERPRODUCT.
Dit product voldoet aan 21 CFR.
41
Handboek
Nederlands
WAARSCHUWING! LETSELGEVAAR!
De laserstraal kan permanente beschadiging van de ogen veroorzaken. Kijk niet rechtstreeks in
de laserstraal en richt de laserstraal niet in uw ogen, de ogen van anderen, of de ogen van huisdieren.
WAARSCHUWING! LETSELGEVAAR!
Bewaar dit apparaat buiten het bereik van kinderen. Dit apparaat is bedoeld als werktuig, niet als
speelgoed of ter vermaak. Het mag uitsluitend door volwassenen gebruikt worden.
Problemen oplossen
Probleem
Wat moet ik doen?
Controleer of de afstandsbediening en de dongle aangesloten zijn.
Controleer of het Link-lampje op de dongle brandt.
De afstandsbediening werkt niet
Controleer of de batterij van de afstandsbediening juist aangebracht
is
Vervang de batterij van de afstandsbediening door een nieuwe
Controleer de systeemcompatibiliteit
Zorg ervoor dat u op de juiste afstand staat (max. 20 meter)
Mocht u problemen hebben bij het aansluiten of instellen van de afstandsbediening voor
PowerPoint/Keynote (LG290), raadpleeg dan onze technische hulplijn via +44 (0)19 23 47 10 00
(internationaal beltarief) of via e-mail [email protected]. Voor sommige modellen zijn
reserveonderdelen verkrijgbaar op onze website, www.logic3.com
42
FEDERAL COMMUNICATIONS COMMISSION
This device complies with Part 15 of the FCC Rules. Operation is subject to the following two
conditions:(1) this device may not cause harmful interference, and (2) this device must accept any
interference received, including interference that may cause undesired operation.
NOTE
This equipment has been tested and found to comply with the limits for a Class B digital device,
pursuant to Part 15 of the FCC Rules. These limits are designed to provide reasonable protection
against harmful interference in a residential installation. This equipment generates, uses and can
radiated radio frequency energy and, if not installed and used in accordance with the instructions, may
cause harmful interference to radio communications. However, there is no guarantee that interference
will not occur in a particular installation If this equipment does cause harmful interference to radio or
television reception, which can be determined by turning the equipment off and on, the user is
encouraged to try to correct the interference by one or more of the following measures:
-Reorient or relocate the receiving antenna.
-Increase the separation between the equipment and receiver.
-Connect the equipment into an outlet on a circuit different from that to which the receiver is connected.
-Consult the dealer or an experienced radio/TV technician for help.
Changes or modifications not expressly approved by the party responsible for compliance could void the
user‘s authority to operate the equipment.
This device and its antenna(s) must not be co-located or operating in conjunction with any other
antenna or transmitter.
43