1
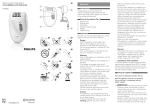
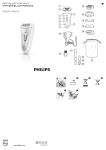
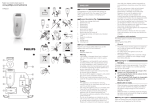
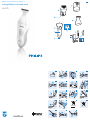
Register your product and get support at
1
www.philips.com/welcome
HP6375
4203.000.6717.2
2
3
4
5
6
7
8
9
10
11
12
13
14
15
16
17
18
19
20
Preparing for use
Charging
English
Introduction
Congratulations on your purchase and welcome to Philips! To fully benefit from
the support that Philips offers, register your product at www.philips.com/welcome.
General description (Fig. 1)
A Setting selector
B Precision comb
C Epilating head
D Precision trimmer
E On/off slide
FHandle
G Socket for appliance plug
H Setting indicator
IAdapter
J Appliance plug
K Charging light
L Cleaning brush
Important
Read this user manual carefully before you use the appliance and save it for
future reference.
-----
--
----------
--
--
Danger
Make sure the adapter does not get wet.
Warning
Check if the voltage indicated on the adapter and on the appliance
corresponds to the local mains voltage before you connect the appliance.
The adapter contains a transformer. Do not cut off the adapter to replace
it with another plug, as this causes a hazardous situation.
This appliance is not intended for use by persons (including children) with
reduced physical, sensory or mental capabilities, or lack of experience
and knowledge, unless they have been given supervision or instruction
concerning use of the appliance by a person responsible for their safety.
Children should be supervised to ensure that they do not play with the
appliance.
Caution
Use, charge and store the appliance at a temperature between 15°C and 35°C.
Only use the adapter supplied to charge the appliance.
If the adapter is damaged, always have it replaced with one of the original
type in order to avoid a hazard.
Do not use the appliance when one of the attachments or combs is
damaged or broken as this may cause injury.
Be careful with hot water. Always check if the water is not too hot, to
prevent your hands from getting burnt.
This appliance is only intended for epilating and trimming the bikini area.
Do not use it for another purpose.
Never try to trim your eyelashes.
When you use the epilating head, keep the running appliance away from
your scalp hair, eyebrows, eyelashes, clothes, threads, cords, brushes etc. to
prevent damage and injuries.
If the appliance is subjected to a major change in temperature, pressure or
humidity, let the appliance acclimatise for 30 minutes before you use it.
Compliance with standards
This Philips appliance complies with all standards regarding
electromagnetic fields (EMF). If handled properly and according to the
instructions in this user manual, the appliance is safe to use based on
scientific evidence available today.
This appliance complies with the internationally approved safety regulations and
can be safely used in the bath or shower and cleaned under the tap (Fig. 2).
Charge the appliance for at least 10 hours before you use it for the first time
and after a long period of disuse.
When the appliance is fully charged, it has a cordless operating time of up to
60 minutes. Do not charge the appliance for more than 24 hours.
The appliance does not run from the mains.
Make sure the appliance is switched off during charging.
1Insert the appliance plug into the appliance (Fig. 3).
2Put the adapter in the wall socket.
,, The charging light on the adapter goes on to indicate that the appliance
is charging (Fig. 4).
Note:The charging light does not change colour and does not go out when the
appliance is fully charged.
Optimising the lifetime of the rechargeable battery
----
Remove the adapter from the wall socket when the battery is fully
charged (which takes 10 hours).
Do not leave the appliance plugged into the wall socket for more than
24 hours.
Discharge the battery completely twice a year by letting the motor run
until it stops. Then fully recharge the battery.
Attaching/detaching attachments
The epilating head and the precision trimmer can be attached and detached in
the same way.
1To attach the attachment, push it onto the appliance (Fig. 5).
2To detach the attachment, pull it off the appliance.  (Fig. 6)
Using the appliance
Make sure that the appliance is fully charged before you start to use it.
It is not possible to run the appliance from the mains when the battery is empty.
Note: Do not move the appliance too fast. Make smooth and gentle movements.
Trimming the bikini line with precision trimmer and precision
comb
Use the precision trimmer with the precision comb to trim your bikini line.
1Put the precision trimmer on the appliance (see section ‘Attaching/
detaching attachments’ in chapter ‘Preparing for use’).
2Slide the precision comb into the guiding grooves on both sides of the
appliance (Fig. 7).
3Press the setting selector (1) and slide the comb upwards or
downwards (2) to set the desired setting (Fig. 8).
,, The coloured circle on the handle shows the selected setting.
The table shows which hair lengths you achieve with the different settings.
When you trim for the first time, start at the highest setting (5) to familiarise
yourself with the precision trimmer.
Settings of precision comb
Setting
Hair length after trimming
1
2mm
2
4mm
3
6mm
4
8mm
5
10mm
4Push the on/off slide upwards to switch on the appliance.
5Move the precision trimmer with the precision comb slowly through
the hair (Fig. 9).
-- To trim in the most effective way, move the appliance against the direction
of hair growth.
-- Since all hair does not grow in the same direction, you need to move the
appliance in different directions (upward, downward or across).
-- Make sure that the flat part of the comb is always fully in contact with the
skin to obtain an even result.
-- To make trimming easier, stretch the skin with your free hand during
trimming (Fig. 10).
6Regularly remove cut hair from the comb.
If a lot of hair has accumulated in the comb, remove the comb from the
appliance and blow and/or shake the hair out of it.
Styling with precision trimmer
Use the precision trimmer without the precision comb to style your bikini line.
1Put the precision trimmer (without precision comb) on the appliance
(see section ‘Attaching/detaching attachments’ in chapter ‘Preparing for
use’) (Fig. 5).
,, Trimming without the precision comb results in a hair length of approx.
0.6mm.
2If necessary, remove the precision comb from the precision trimmer.  (Fig. 11)
3Push the on/off slide upwards to switch on the appliance.
4Move the appliance towards the desired contour of your bikini line.
Touch the hair lightly with the precision trimmer.  (Fig. 12)
The trimmer can be applied:
1 with the trimmer teeth pointing straight towards the skin.  (Fig. 13)
2 with the flat part of the trimmer pointing straight towards the skin (Fig. 14)
You can be as creative as you like when you style your bikini line. You can even
draw and cut out a template, for instance a heart shape, which you can use to
create a personal style.
Note:We advise you not to use the precision trimmer in the shower, because an
even trimming result cannot be guaranteed.
Epilating with epilating head
Use the epilating head to epilate your bikini line.
Do not use the epilating head on irritated skin or skin with varicose veins,
rashes, spots, moles (with hairs) or wounds. People with a reduced immune
response or people who suffer from diabetes mellitus, haemophilia or
immunodeficiency should also consult their doctor first.
Note:Your skin may become a little red and irritated the first few times you use
the epilating head.This phenomenon soon disappears as your skin gets used to
epilation and the hairs that grow back become thinner and softer. If the irritation
does not disappear within 3 days, we advise you to consult your doctor.
Note:We advise you not to use the epilating head in the shower, because a good
epilating result cannot be guaranteed.
Tip: Epilating is easier just after taking a bath or shower.You get the best result if
your skin is completely dry when you start epilating.
1Put the epilating head on the appliance (see section ‘Attaching/detaching
attachments’ in chapter ‘Preparing for use’).
2Push the on/off slide upwards to switch on the appliance.
3Place the appliance perpendicularly onto the skin so that the epilating
attachment is in proper contact with the skin.
4Stretch the skin with your free hand to make the hairs stand upright.
5Move the appliance slowly against the direction of hair growth (Fig. 15).
Do not exert any pressure.
Cleaning
Never use scouring pads, abrasive cleaning agents or aggressive liquids such
as petrol or acetone to clean the appliance.
Note:The appliance does not need to be lubricated.
1Switch off the appliance, pull the adapter out of the wall socket and pull
the appliance plug out of the appliance.
2Remove any comb and/or attachment from the appliance.
3Blow and/or shake out any hair that has accumulated in the attachments
and/or combs.
4Clean the attachments and the combs with the cleaning brush or under
the tap.
5Clean the adapter and the handle with the cleaning brush or with a dry cloth.
Keep the adapter dry.
Replacement
If the adapter is damaged, always have it replaced with one of the original type
in order to avoid a hazard.
Only replace damaged or worn attachments or combs with original Philips
replacement attachments or combs
Philips replacement attachments, combs and adapters are available from your
Philips dealer and authorised Philips service centres.
If you have any difficulties obtaining an adapter or replacement attachments
and combs for the appliance, contact the Philips Consumer Care Centre in
your country (you find its phone number in the worldwide guarantee leaflet).
---
Environment
Do not throw away the appliance with the normal household waste
at the end of its life, but hand it in at an official collection point for
recycling (Fig. 16).
The built-in rechargeable battery contains substances that may pollute
the environment. Always remove the battery before you discard and hand
in the appliance at an official collection point. Dispose of the battery at
an official collection point for batteries. If you have trouble removing the
battery, you can also take the appliance to a Philips service centre. The staff
of this centre will remove the battery for you and will dispose of it in an
environmentally safe way.  (Fig. 17)
1Remove the adapter from the wall socket and pull the appliance plug
out of the appliance.
2Let the appliance run until the motor stops.
3If there is an attachment on the handle, remove the attachment.
4Pry the inner part out of the housing with a screwdriver.  (Fig. 18)
5Pull the inner part out of the appliance (Fig. 19).
6Remove the rechargeable battery from the inner part with a
screwdriver.  (Fig. 20)
7Cut the wires close to the battery with a pair of household scissors.
Do not connect the appliance to the mains again after you have removed
the rechargeable battery.
Guarantee & service
If you need service or information or if you have a problem, please visit the Philips
website at www.philips.com or contact the Philips Consumer Care Centre in your
country (you find its phone number in the worldwide guarantee leaflet). If there is
no Consumer Care Centre in your country, go to your local Philips dealer.
Preparação para o uso
Carregamento
Português do Brasil
Introdução
Parabéns pela sua compra e bem-vindo à Philips!
Para aproveitar ao máximo o suporte oferecido pela Philips,
registre o produto em www.welcome.philips.com/br_pt/.
Carregue o aparelho por no mínimo 10 horas antes de usá-lo pela primeira
vez e após um longo período sem utilizá-lo.
Quando o aparelho está totalmente carregado, o tempo de operação sem fio
é de até 60 minutos. Não carregue o aparelho por mais de 24 horas.
Descrição geral (fig. 1)
A Seletor de ajuste
B Pente de precisão
C Cabeça depiladora
D Aparador preciso
E Controle deslizante liga/desliga
FCabo
G Orifício para encaixe do plugue
H Indicador de ajuste
IAdaptador
J Plugue do aparelho
K Luz piloto de recarga
L Escova de limpeza
O aparelho não funciona ligado ao sistema elétrico.
Importante
Leia este manual do usuário atentamente antes de usar o aparelho e guarde-o
para consultas futuras.
--
-----
--
----------
--
--
Perigo
Não molhe o adaptador.
Aviso
Antes de conectar o aparelho, verifique se a tensão indicada no adaptador
e no aparelho é a mesma da tomada.
O adaptador contém um transformador. Não retire o adaptador para
substituí-lo por outro plugue, pois isso pode causar uma situação de risco.
Este aparelho não deve ser usado por pessoas (inclusive crianças) com
capacidades físicas, mentais ou sensoriais reduzidas ou pouca experiência e
conhecimento, a menos que sejam supervisionadas ou instruídas sobre o
uso do aparelho por uma pessoa responsável por sua segurança.
Crianças devem ser supervisionadas para que não brinquem com o
aparelho.
Atenção
Use, carregue e guarde o aparelho a uma temperatura entre 15°C e 35°C.
Só use o adaptador fornecido para carregar o aparelho.
Se o adaptador estiver danificado, substitua-o sempre por um adaptador
original para evitar situações de risco.
Não use-o quando um dos acessórios ou pentes estiver danificado ou
quebrado, pois isso pode causar ferimentos.
Tome cuidado com água quente. Sempre verifique se a água não está
muito quente para evitar queimaduras nas mãos.
Este aparelho destina-se apenas a depilar e aparar a área íntima. Não
use-o para outros fins.
Nunca tente aparar os cílios.
Para evitar danos e ferimentos, quando usar a cabeça depiladora, não use
o aparelho no couro cabeludo, sobrancelhas, cílios, roupas, tecidos, cordas,
escovas, etc.
Se o aparelho for sujeito a uma grande mudança de temperatura, pressão
ou umidade, deixe-o aclimatar por 30 minutos antes de usá-lo.
Conformidade com padrões
Este aparelho Philips atende a todos os padrões relacionados a campos
eletromagnéticos. Se manuseado de modo adequado e de acordo com
as instruções deste manual do usuário, a utilização do aparelho é segura
baseando-se em evidências científicas atualmente disponíveis.
Este aparelho está em conformidade com regulamentações de segurança
aprovadas internacionalmente e pode ser usado com segurança na
banheira ou no chuveiro e lavado em água corrente (fig. 2).
Verifique se o aparelho está desligado durante o carregamento.
1Insira o plugue no aparelho (fig. 3).
2Conecte o adaptador a uma tomada na parede.
,, A luz piloto de recarga no adaptador ficará acesa para indicar que o
aparelho está sendo carregado (fig. 4).
Nota: A luz piloto de recarga não muda de cor nem apaga quando o aparelho
está totalmente carregado.
Otimização da duração da bateria recarregável
--
--
Remova o adaptador da tomada da parede quando a bateria estiver
totalmente carregada (o que leva 10 horas).
Não deixe o aparelho conectado à tomada da parede por mais de 24
horas.
Descarregue completamente a bateria duas vezes por ano deixando o
motor funcionando até parar. Em seguida, recarregue-a totalmente.
Encaixe/desencaixe de acessórios
A cabeça depiladora e o aparador preciso podem ser encaixados e
desencaixados da mesma maneira.
1Para encaixar o acessório, empurre-o na direção do aparelho (fig. 5).
2Para soltá-lo, puxe-o do aparelho.  (fig. 6)
Utilização do aparelho
Verifique se o aparelho está totalmente carregado antes de começar a usá-lo.
Não é possível usar o aparelho ligado ao sistema elétrico quando a bateria
estiver vazia.
Nota: Não mova o aparelho rápido demais. Faça movimentos suaves.
Aparar a área íntima com o aparador preciso e o pente de
precisão
Use o aparador preciso com o pente de precisão para aparar a área íntima.
1Coloque o aparador preciso no aparelho (consulte a seção ‘Encaixe/
desencaixe de acessórios’ no capítulo ‘Preparação para o uso’).
2Deslize o pente de precisão nos entalhes de guia em ambos os lados do
aparelho (fig. 7).
3Pressione o seletor de ajuste (1) e deslize o pente para cima e para
baixo (2) para selecionar o ajuste desejado (fig. 8).
,, O círculo colorido no cabo mostra o ajuste selecionado.
A tabela mostra as alturas que os pêlos terão com cada ajuste.
Quando você aparar pela primeira vez, use o ajuste maior (5) para se
familiarizar com o aparador preciso.
Ajustes do pente de precisão
Ajuste
Altura dos pêlos após serem aparados
1
2 mm
2
4 mm
3
6 mm
4
8 mm
5
10 mm
4Empurre o botão liga/desliga para cima para ligar o aparelho.
5Mova o aparador preciso com o pente de precisão lentamente sobre os
pêlos (fig. 9).
-- Para aparar de maneira mais eficiente, passe o aparelho na direção oposta
ao crescimento dos pêlos.
-- Como os pêlos não crescem todos na mesma direção, é preciso mover o
aparelho em direções diferentes (para cima, para baixo e de um lado para
o outro).
-- Verifique se a parte plana do pente está totalmente em contato com a
pele para obter um resultado ainda melhor.
-- Para que seja mais fácil aparar os pêlos, estique a pele com a mão que
estiver livre para que os pêlos fiquem estendidos (fig. 10).
6Remova regularmente os cabelos cortados do pente.
Se ocorrer o acúmulo de pêlos no pente, remova-os assoprando ou agitando
o aparelho.
Modelagem com o aparador preciso
Use o aparador preciso sem o pente de precisão para modelar a área íntima.
1Coloque o aparador preciso (sem o pente de precisão) no aparelho
(consulte a seção ‘Encaixe/desencaixe de acessórios’ no capítulo
‘Preparação para o uso’) (fig. 5).
,, Aparar sem o pente de precisão resulta em pêlos de aproximadamente
0,6 mm.
Troca
Se o adaptador estiver danificado, substitua-o sempre por um adaptador original
para evitar situações de risco.
Só substitua acessórios ou pentes gastos ou danificados por acessórios ou
pentes de reposição Philips originais.
Os acessórios de reposição, pentes e adaptadores Philips estão disponíveis com
o representante ou a assistência técnica autorizada Philips.
Se tiver dificuldade em obter um adaptador ou acessórios de reposição e
pentes para o aparelho, entre em contato com o Atendimento ao Cliente
Philips do seu país (os números de telefone encontram-se no folheto da
garantia mundial).
2Se necessário, remova o pente de precisão do aparador preciso.  (fig. 11)
3Empurre o botão liga/desliga para cima para ligar o aparelho.
4Mova o aparelho na direção do contorno que deseja dar aos
pêlos da área íntima. Toque suavemente nos pêlos com o aparador
preciso.  (fig. 12)
O aparador pode ser aplicado:
1 com os dentes do aparador voltados para a pele.  (fig. 13)
2 com a parte plana do aparador voltada para a pele (fig. 14)
Use sua criatividade para modelar a área íntima. Você ainda pode fazer um
desenho em um papel, como um coração, e usá-lo para criar um estilo pessoal.
Nota: Recomendamos não usar o aparador preciso no chuveiro, pois não é possível
garantir um resultado homogêneo.
Depilação com a cabeça depiladora
Use a cabeça depiladora para depilar a área íntima.
Não use a cabeça depiladora em peles irritadas ou com varizes, arranhões,
espinhas, pêlos encravados, verrugas (com pêlos) ou feridas. Pessoas
com baixa imunidade ou que sofrem de diabetes mielitus, hemofilia ou
imunodeficiência devem consultar um médico antes de usar o aparelho.
Nota: Sua pele pode ficar um pouco vermelha e irritada nas primeiras vezes
em que usar a cabeça depiladora. Isso é absolutamente normal e desaparece
rapidamente. Quando começar a usar o aparelho com mais freqüência, sua pele
se acostumará à depilação, a irritação desaparecerá e os pêlos ficarão mais finos
e macios. Se a irritação não desaparecer em três dias, recomendamos consultar
um médico.
Nota: Recomendamos não usar a cabeça depiladora no chuveiro, pois não é
possível garantir um bom resultado.
Dica: A depilação é mais fácil depois do banho. Para melhores resultados, a pele
deverá estar completamente seca quando você iniciar a depilação.
1Coloque a cabeça depiladora no aparelho (consulte a seção ‘Encaixe/
desencaixe de acessórios’ no capítulo ‘Preparação para o uso’).
2Empurre o botão liga/desliga para cima para ligar o aparelho.
3Passe o aparelho perpendicularmente sobre a pele para que o depilador
fique em contato com a pele de forma adequada.
4Estique a pele com a mão que estiver livre para que os pêlos fiquem
estendidos.
5Passe o aparelho lentamente na direção contrária ao crescimento dos
pêlos (fig. 15).
Não empregue nenhuma força.
Limpeza
Nunca use palhas de aço, agentes de limpeza abrasivos ou líquidos agressivos
como querosene ou acetona para limpar o aparelho.
Nota: O aparelho não precisa de lubrificação.
1Desligue o aparelho, retire o adaptador da tomada da parede e
desconecte o plugue do aparelho.
2Remova qualquer pente e/ou acessório do aparelho.
3Assopre e/ou retire pêlos acumulados nos acessórios e/ou pentes.
4Limpe os acessórios e os pentes com a escova de limpeza ou em água
corrente.
5Limpe o adaptador e o cabo com a escova de limpeza ou com um
pano seco.
Mantenha o adaptador seco.
---
Meio ambiente
Não descarte o aparelho com o lixo doméstico no final de sua vida útil.
Leve-o a um posto de coleta oficial para que possa ser reciclado (fig. 16).
A bateria interna recarregável contém substâncias que podem poluir o
meio ambiente. Sempre remova a bateria do aparelho antes de descartálo e levá-lo a um posto oficial de coleta. Descarte as baterias em um
posto oficial de coleta de baterias. Se tiver dificuldade em removê-la, você
também poderá levar o aparelho a uma assistência técnica Philips, que fará
esse procedimento e descartará a bateria em um local seguro ao meio
ambiente.  (fig. 17)
1Remova o adaptador da tomada da parede e desconecte o plugue do
aparelho.
2Deixe o aparelho funcionando até que o motor pare.
3Se houver um acessório no cabo, retire-o.
4Separe a parte interna do compartimento com uma chave de
fenda.  (fig. 18)
5Puxe a parte interna para fora do aparelho (fig. 19).
6Remova a bateria recarregável da parte interna usando uma chave de
fenda.  (fig. 20)
7Corte os fios próximos à bateria com uma tesoura doméstica.
Não reconecte o aparelho ao sistema elétrico após remover a bateria
recarregável.
Garantia e assistência técnica
Se precisar de assistência técnica ou informações, ou tiver algum problema, visite
o site da Philips em www.philips.com ou entre em contato com a Central de
Atendimento ao Cliente Philips do seu país (o número de telefone encontra-se
no folheto da garantia mundial). Se não existir uma Central de Atendimento
ao Cliente Philips no seu país, dirija-se a um representante local da Philips.