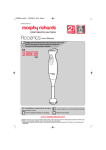
1
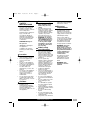
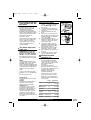
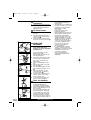
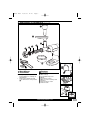
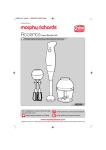
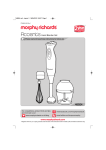
48955 Rev1
23/5/06
11:45
Page 1
Kitchen machine
with attachments
Please read and keep these instructions
Getting the best from your new
appliance...
Safety
Ensure the attachments have stopped rotating before lifting the
mixer head upwards.
Operation
Never run the mixer for longer than 10 minutes as it will
overheat, a safety cut out will come into operation. Switch off
and allow to cool down for 3 minutes.
Never run the blender for more than 1 minute. Allow to cool
down for 3 minutes.
It is advisable to use the splash cover on the bowl for whisking.
To register for your 5 year guarantee ring the Helpline
numbers below.
Please have the following information available:
Serial number:
and model number: 48955 (see
page 12 for guarantee details)
For replacement parts, help with using your Morphy Richards products,
problems and lots more, contact us by phone or through our website.
UK Helpline: 0870 060 2609
Replacement parts: 0870 167 6640
Ireland 1800 409119
www.morphyrichards.com
48955 Rev1
23/5/06
11:45
Page 2
CONTENTS
2
Important safety instructions
3
Electrical requirements
3
Features
4
Unpacking and using your appliance for the first time
5
The mixer tools and their uses
5
Using the mixer
5
Using the blender
6
Additional attachments
7
Cleaning
11
Top tips
11
Dedicated helpline
11
Your guarantee
12
www.morphyrichards.com
48955 Rev1
23/5/06
11:45
Page 3
IMPORTANT
SAFETY
INSTRUCTIONS
•
The use of any electrical
appliance requires the
following of basic common
sense safety rules.
•
Primarily there is danger of
injury or death and
secondly the danger of
damage to the appliance.
These are indicated in the
text by the following two
conventions:
Personal safety
•
WARNING: Danger to
the person!
IMPORTANT: Damage to
the appliance!
In addition we offer the
following essential safety
advice.
Other safety
considerations
•
Location
•
•
•
•
•
•
Remove all packaging and
retain for future reference.
Ensure the appliance is
used on a firm, flat
surface.
Do not use the appliance
outdoors or in a bathroom.
Do not place the appliance
on a highly polished
wooden surface as
damage may occur to the
surface.
Do not place the appliance
on or near a hot surface
such as a hot plate or
radiant rings or near a
naked flame.
Do not let the mains lead
overhang the edge of the
table or work-top, or touch
hot surfaces.
Children
•
Children do not
understand the dangers
associated with operating
electrical appliances.
Never allow children to use
this appliance.
WARNING: Take care
when handling metal
blades they are very
sharp.
Avoid touching moving
parts. Keep hands, hair,
clothing as well as spatula
and other utensils away
from the appliance during
operation, to prevent
personal injury and / or
damage to the appliance.
WARNING: To protect
against risk of electric
shock NEVER immerse
the base unit in water
or in any other liquid
and always ensure the
electrical connections
are kept dry.
•
•
•
•
•
•
•
•
•
•
Disconnect the appliance
from the mains supply
when not in use, before
taking off attachments and
before cleaning. Never pull
on the cord to unplug the
appliance.
Do not operate any
appliance with a damaged
cord or plug or after the
appliance malfunctions or
has been damaged in any
manner. Ring the helpline
number for advice on
examination and repair.
Unplug the appliance
when not in use.
The use of attachments or
tools not recommended or
sold by Morphy Richards
may cause fire, electric
shock or injury.
Do not use the appliance
for other than its intended
use.
Do not overfill. This could
cause damage to the
motor.
It is advisable to operate
the mixer with the splash
cover in place.
When blending hot liquids
remove the goblet from the
blender lid.
Do not use with boiling
liquids.
Do not let the mains lead
come into contact with the
rotating blades.
The power cord cannot be
www.morphyrichards.com
replaced. Contact Morphy
Richards for advice.
Electrical
requirements
Check that the voltage on
the rating plate of your
appliance corresponds
with your house electricity
supply which must be A.C.
(Alternating Current).
If the socket outlets in
your home are not suitable
for the plug supplied with
this appliance, the plug
should be removed and
the appropriate one fitted.
WARNING: The plug
removed from the
mains lead, if severed,
must be destroyed as a
plug with bared flexible
cord is hazardous if
engaged into a live
socket outlet.
Should the fuse in the
13amp plug require
replacement, a 5 amp
BS1362 fuse must be
fitted.
WARNING: This
appliance must be
earthed.
3
48955 Rev1
23/5/06
11:45
Page 4
·
⁄
¤
‡
‹
›
fi
fl
Â
Ê
‚
„
‰
Á
Ë
Features
⁄
¤
‹
›
fi
fl
‡
·
Outlet cover for blender
Base unit
Speed/pulse selector
Plug/cord storage
Release lever
Bowl locater
Mixer head
For attachments (optional extra,
certain countries only - Meat Mincer &
Vegetable Shredder)
4
www.morphyrichards.com
È
Í
‚ Splash cover
„ Splash cover opening
‰
Â
Ê
Á
Ë
È
Í
(to add ingredients)
Bowl
Filler cap
Blender lid
Blender jug
Beater
Dough hook
Whisk
48955 Rev1
23/5/06
11:45
Page 5
Unpacking and using
your machine for the
first time
Carefully unpack your new
kitchen machine and all its
attachments and tools,
checking them against the
illustrations at the beginning of
this book to familiarise yourself
with the product. Wash all the
parts which are safe to
immerse in water.
•
2
3
4
5
The mixer tools and
their uses
7
Wash all parts before first use,
see cleaning instructions page
11.
Whisk
Use the whisk attachment for
whisking eggs, cream, instant
puddings, all in one cake
mixes, creaming margarine with
sugar (use a block margarine at
room temperature) and mixing
eggs into sponge and fruit
cakes.
•
1
Never immerse the base unit in
water or any other liquid. This
may be wiped over with a
clean, damp cloth - but only
when unplugged from the
electrical outlet.
WARNING: Never run the
mixer for longer than 10
minutes as it will overheat.
Allow to cool for 3 minutes.
Don’t use the whisk for heavy
mixtures as you could damage
it.
Use the splash cover.
Dough hook
Use the dough hook for yeast
mixtures.
Beater
Use beater for mixing flour or
fruit into cake mixes and
making short crust pastry.
Splash cover
The splash cover is used to
prevent any splash back of
ingredients. The opening can
be used to add ingredients
during mixing. When you are
putting the splash guard on,
slide it across the bowl and
around the mixer head and slot
into place.
A
Using the mixer
6
8
9
Turn the release knob to the
‘unlock’
position and raise
the mixer head A. You will
hear a click.
Locate the bowl in the bowl
locater by inserting and turning
clockwise.
Put the ingredients into the
bowl.
Choose a tool, insert the tool
into the attachment head, push
up and twist anti-clockwise to
lock in place B.
Lower the mixer head by
holding the release knob in the
‘unlock’ position, push down
until it clicks shut.
Locate the splash cover (if
required) over the attachment
head then slide across until it
has slotted in to place.
Plug the mixer into the mains
outlet, then select a speed.
Mix until desired consistency is
reached.
To switch off, turn the speed
selector switch back to ‘O’.
B
Choosing which
speed to use
•
•
•
If you have something in the
bowl that might splash (e.g.
cream or flour), use the bowl
cover, then start on the lowest
speed and increase if
necessary.
If you feel the machine
labouring, increase the speed.
Use the pulse setting when you
require a short burst at
maximum speed, (usually
required if whisking).
This may help you to select a
speed for most tasks. These
guides are recommendations.
Please adjust the mixer speed
as necessary.
Setting
Attachments
Fold, stir or cream butter and sugar
1-4
BeaterË
Making pastry
1-4
Beater Ë
Kneading
1-4
Dough hook È
Mix cake mixes, cookie dough, mash
potatoes
5-10
Beater Ë
Whisking
10-Max & pulse
Whisk Í
Blending
10-Max & pulse
Blender Á
www.morphyrichards.com
5
48955 Rev1
23/5/06
11:45
Page 6
To add more
ingredients
1
1
2
3
Turn the splash guard until the
opening is facing you to add
further ingredients during the
mixing process.
•
To remove tools
•
Switch the mixer off and unplug
the unit.
Turn the release knob to the
‘unlock’ position and raise the
mixer head C.
Push up, twist clockwise and
pull down to remove the tool D.
•
C
USING THE
BLENDER
D
1
E
2
3
4
5
6
F
7
WARNING: To prevent injury
keep hands and other
utensils out of the jug while
blending food.
•
Use the blender for soups,
drinks, mayonnaise,
breadcrumbs, biscuit crumbs
and chopping nuts.
•
Ensure the mixer head is in the
down position and that there
are no tools inserted in the
mixer head.
Put your ingredients into the
jug.
Remove the outlet cover with
two hands E.
Put the lid and goblet onto the
jug, rotating clockwise to lock
F.
Place the blender onto the
outlet and turn clockwise to
lock in position G.
Switch on by using the speed
switch. Refer to ‘Choosing
which speed to use’.
To remove the blender turn it
anti-clockwise and lift off.
Hints for blending
•
G
•
•
•
•
6
Never remove the blender or its
lid until the blades have
completely stopped rotating.
Never blend boiling hot liquids.
Never run the blender for more
than 1 minute.
Do not put dry ingredients into
the blender before switching
on. Cut them into cubes and
drop them through the goblet
while the machine is running.
Do not process spices such as
cloves, dill and cumin seeds as
www.morphyrichards.com
they damage the blender’s
plastic parts.
The blender is not suitable as a
storage container. Do not leave
ingredients to stand inside it
either before or after
processing.
Never exceed the 1 litre
maximum capacity.
When making mayonnaise, put
all ingredients, except oil into
the blender. Then with the
machine running, remove the
goblet and add the oil slowly
and evenly. When smoothing or
blending foods with strong
colour (eg. carrots) the plastic
parts of the appliance may
become discoloured. Use
cooking oil to clean any
discoloured parts.
For blending and chopping,
select a slow speed for soft
ingredients, increase the speed
if required to produce the
consistency required.
Select a high speed for
chopping or blending hard
ingredients.
48955 Rev1
23/5/06
11:45
Page 7
ADDITIONAL ATTACHMENTS
(Optional extra)
⁄
¤
‡
fl
fi
›
‹
·
„
H
‚
Meat Mincer
attachment
•
•
Always unplug the product
before putting on or taking off
attachments
Remove the attachment hub
cover at the front of the product
H.
Features
⁄
¤
‹
›
fi
fl
‡
·
‚
„
Food pusher
Food tray and feed tube
Mincer body
Food advancing screw
Blade
Fine mincer screen
Mincer screen securing collar
Spanner
Coarse mincer screen
Collector dish
I
J
www.morphyrichards.com
7
48955 Rev1
23/5/06
11:45
K
Page 8
Assembly
instructions
•
L
•
•
•
•
M
•
•
•
•
•
Fit the cutting blade to the food
advancing screw, ensuring that
the blade is in the correct
orientation (sharp edges facing
outwards).
The screw has a square profile
which the blade will locate onto
I.
Fit the screw into the mincer
body.
Select the appropriate mincer
screen for the application and
place over the end of the shaft.
Ensure that the cutout on the
screen locates to the tab on the
attachment body.
Fit the mincer screen securing
collar. Take care when fitting the
collar to prevent damage to the
product.
Hold down the attachment
retainer pin whilst fitting the
attachments J.
Align the flats of the shaft end to
approximately the same angle as
that of the drive and insert into
the drive J.
Rotate the attachment slightly
until it locates to the drive and
push into place.
Release the attachment retainer
pin and rotate the attachment
slightly until the hole on the
attachment locates to the
retainer pin on the main unit
drive hub K.
Tighten the securing collar as
much as possible. The best
way to do this is to hold the
feed tube with one hand and
the spanner in the other hand
and turn clockwise L.
NOTE: it may be necessary to
tighten this collar again during
use.
•
8
Fit the food tray into the food
throat and locate the tray
underneath the outlet to catch
processed food M.
www.morphyrichards.com
Operating
Instructions
•
•
•
•
•
•
•
The fine mincer screen is for
raw and cooked meat, fish and
small nuts.
The coarse mincer screen is for
raw meat, fish, nuts,
vegetables, hard cheese, fruit
peel and dried fruit.
Fit the appropriate screen as
described above in assembly
instructions.
Cut the meat and vegetables
into cubes of 25mm maximum.
Feed the cubed food into the
feed tube.
Use the pusher to move the
food down the tube, no
pressure is required at all.
Operate the machine on Speed
4.
48955 Rev1
23/5/06
11:45
Page 9
N
⁄
¤
fi
›
O
‹
P
fl
‡
·
VEGETABLE
SHREDDER
ATTACHMENT
•
•
Always unplug the product
before putting on or taking off
attachments
Remove the attachment hub
cover at the front of the
product.N
Features
⁄
¤
‹
›
fi
fl
‡
·
Food pusher
Main housing and feed tube
Drive shaft
Fine grating / shredding
cone
Cone retaining collar
Coarse grating / shredding
cone
Fine slicing cone
Coarse slicing cone
Assembly
instructions
•
•
•
•
•
•
•
•
•
Choose the appropriate cone
for the application.
Affix the shaft to the cone by
aligning the fixing tabs on the
shaft to the holes in the base of
the cone.
Twist the shaft clockwise to
lock into place O.
Locate the shaft end into the
main housing hub.
Screw the cone retaining collar
into place. Take care when
fitting the collar to prevent
damage to the product.
Hold down the attachment
retainer pin whilst fitting the
attachments.
Align the flats of the shaft end
to approximately the same
angle as that of the drive and
insert into the drive P.
Rotate the attachment slightly
until it locates to the drive and
push into place Q.
Release the attachment retainer
pin and rotate the attachment
slightly until the hole on the
attachment locates to the
retainer pin on the main unit
drive hub R.
www.morphyrichards.com
Q
R
9
48955 Rev1
23/5/06
11:45
Page 10
Operating
Instructions
•
•
•
•
•
•
•
•
10
The fine shredder is for finely
shredding and the coarse
shredder is for coarsely
shredding hard or crisp
vegetables (e.g. carrots,
turnips, potatoes, but also hard
cheese, nuts and dry bread).
The thick slicer is for slicing
firm foods. It is particularly
suitable for preparing
vegetables to be steamed,
fried, creamed or scalloped.
The thin slicer is suitable for
shredding vegetables for
coleslaw, potato crisps, bread,
celery, cucumber, nuts and
pickles.
Fit the appropriate shredding or
slicing cones as described
above in assembly instructions.
Cut the vegetables into cubes
of 25mm maximum.
Feed the cubed vegetables into
the feed tube.
Use the pusher to move the
food down the tube, no
pressure is required at all.
Operate the machine on Speed
4.
www.morphyrichards.com
48955 Rev1
23/5/06
11:45
Page 11
Cleaning your
kitchen machine
Top tips
If the mixer stops during
operation, it is because the unit
has overheated due to
overloading and the protection
device has activated.
Before cleaning and maintenance,
switch the appliance off and
unplug from the mains.
1
2
3
4
•
Remove all attachments. All
attachments can be washed in
warm soapy water. Ensure that
they are thoroughly dried.
Wipe the outside of the mixer with
a damp cloth, then leave to air
dry. Never use abrasives or
immerse in water.
Wash the bowl in hot soapy
water. After cleaning re-fit the
bowl. This will keep the mixer
head mechanism covered.
Fill the blender with warm water,
fit the lid and goblet, then switch
on to MAX for 20-30 seconds.
Empty then rinse. Wipe then leave
to air dry.
Do not leave the blender in water
to soak or leave water in the
blender.
Switch the mixer off and unplug
from the mains.
Remove some of the ingredients
to reduce the load. Let the
machine cool down for 3 minutes.
Plug the unit back in, then
reselect the speed and continue
to use. If the mixer does not
restart immediately, allow to stand
for additional time, then retry.
If the unit is still not working call
the helpline for further advice.
DEDICATED
HELPLINE
If you have any difficulty with your
appliance, do not hesitate to call.
We are more likely to be able to
help than the store from where
you bought it.
Please have the following
information ready to enable our
staff to deal with your enquiry
quickly:
•
•
•
Name of the product
Model number as shown on the
underside of the appliance or
rating plate
Serial number
UK Helpline
Replacement Parts
Ireland Helpline
0870 060 2609
0870 167 6640
1800 409119
www.morphyrichards.com
11
48955 Rev1
23/5/06
11:45
Page 12
YOUR FIVE YEAR
GUARANTEE
Available on
registration
This 5 year
guarantee is only valid
when registered directly
with Morphy Richards. If
you do not register your
product it is guaranteed
for 2 years
To validate your 5 year
guarantee, telephone our
consumer helpline.
Once you have registered
your product you will
receive written
confirmation from Morphy
Richards, please retain this
information.
Please refer to your 2 year
guarantee for more details.
YOUR TWO
YEAR
GUARANTEE
It is important to retain the
retailers receipt as proof of
purchase. Staple your
receipt to this back cover
for future reference.
Please quote the following
information if the product
develops a fault. These
numbers can be found on
the base of the product.
Model no.
Serial no.
All Morphy Richards
products are individually
tested before leaving the
factory. In the unlikely
event of any appliance
proving to be faulty within
28 days of purchase it
should be returned to the
place of purchase for it to
be replaced.
If the fault develops after
28 days and within the
guarantee period from the
original purchase date, you
should contact the
Helpline number quoting
Model number and Serial
number on the product, or
write to Morphy Richards
at the address shown. You
will be asked to return the
product (in secure,
adequate packaging) to
the address below along
with a copy of proof of
purchase.
Subject to the exclusions
set out below (see
Exclusions) the faulty
appliance will then be
repaired or replaced and
dispatched usually within 7
working days of receipt.
If for any reason this item
is replaced during the
guarantee period, the
guarantee on the new item
will be calculated from
original purchase date.
Therefore it is vital to retain
your original till receipt or
invoice to indicate the date
of initial purchase.
To qualify for the
guarantee the appliance
must have been used
according to the
instructions supplied.
2
3
4
5
or damage caused in
transit.
The appliance has been
used on a voltage supply
other than that stamped
on the products.
Repairs have been
attempted by persons
other than our service staff
(or authorised dealer).
Where the appliance has
been used for hire
purposes or non domestic
use.
Morphy Richards are not
liable to carry out any type
of servicing work, under
the guarantee.
This guarantee does not
confer any rights other
than those expressly set
out above and does not
cover any claims for
consequential loss or
damage. This guarantee is
offered as an additional
benefit and does not affect
your statutory rights as a
consumer.
•
This guarantee is valid in
the UK and Ireland only
Exclusions
Morphy Richards shall not
be liable to replace or
repair the goods under the
terms of the guarantee
where:
1 The fault has been caused
or is attributable to
accidental use, misuse,
negligent use or used
contrary to the
manufacturers
recommendations or
where the fault has been
caused by power surges
For electrical products sold within the
European Community. At the end of the
electrical products useful life it should not
be disposed of with household waste.
Please recycle where facilities exist.
Check with your Local Authority or
retailer for recycling advice in your
country.
The After Sales Division
Morphy Richards Ltd
Morphy Richards products are intended for household use only.
Morphy Richards has a policy of continuous improvement in product quality and
design. The company, therefore reserves the right to change the specification of its
models at any time.
12
www.morphyrichards.com
Mexborough, South Yorkshire,
England, S64 8AJ
Helpline (office hours)
UK 0870 060 2609
Republic of Ireland 1800 409119
FP48955MUK Rev1 05/06