1
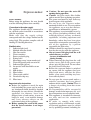
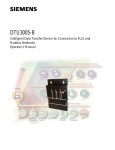
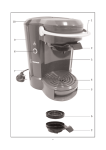
8
1
9
10
2
3
11
4
12
13
5
14
6
15
7
12
3
● Caution : Do not open the water fill
Espresso maker
opening during operation.
● Caution: the glass carafe, filter holder
and steam tube heat up during operation.
● The power cord must be kept well away
Dear Customer,
Before using the appliance, the user should
read the following instruc-tions carefully.
●
Connection to the mains supply
The appliance should only be connected to
an earthed socket installed in accordance
with the regulations.
Make sure that the supply voltage
corresponds with the voltage marked on the
rating label. This product complies with all
binding CE labelling directives.
●
Familiarisation
1. Indicator light (red)
2. Multiple-function switch
3. Hot water outlet
4. Water container
5. Power cord with plug
6. Rating label
7. Measuring scoop / steam nozzle tool
8. Water fill opening with screw-in lid
9. Indicator light (green)
10. Steam tube with detachable steam
nozzle
11. Milk frother
12. Filter holder
13. Glass carafe with lid
14. Detachable drip tray
15. Filter insert
●
●
●
●
●
Important safety instructions
● Before the appliance is used, the main
body including the power cord as well as
any attachment fitted should be checked
thoroughly for any defects. Should the
appliance, for instance, have been
dropped onto a hard surface, it must no
longer be used: even invisible damage
may have adverse effects on the
operational safety of the appliance.
● Before opening the screw-in lid, ensure
that the water container is no longer
pressurised.
●
●
●
8
from hot parts of the appliance.
Do not leave the espresso maker
unattended while in use. Do not position
the appliance on or near hot surfaces,
open flames or inflammable vapours.
This appliance is not intended for use by
any person (including children) with
reduced physical, sensory or mental
capabilities, or lacking experience and
knowledge, unless they have been given
supervision or instruction concerning the
use of the appliance by a person
responsible for their safety.
Children should be supervised to ensure
that they do not play with the appliance.
Always remove the plug from the wall
socket after use, as well as
- in cases of malfunction and
- during cleaning.
When removing the plug from the wall
socket, never pull on the power cord;
always grip the plug itself. Do not allow
the power cord to hang free.
Before the espresso maker is switched
on, ensure that the appliance has been
filled with water, and that the filter
holder, glass carafe and drip tray have
been correctly fitted.
Do not open the steam nozzle unless a
suitable container has been placed
underneath the nozzle. Caution! There is
a danger of scalding from hot steam
being emitted.
No responsibility will be accepted if
damage results from improper use, or if
these instructions are not complied with.
This appliance is intended for domestic
use only and not for commercial
applications.
In order to comply with safety
regulations and to avoid hazards, repairs
of electrical appliances must be carried
out by qualified personnel, including the
replacement of the power cord. If repairs
are needed, please send the appliance to
one of our customer service departments.
The address can be found in the
appendix to this manual.
- Use the measuring scoop to fill the filter
insert with the desired amount of
espresso coffee; fill loosely and do not
press it down. The corresponding
markings for the correct amount of
espresso coffee can be found inside the
filter insert.
Remove any excess coffee from the rim
of the filter holder.
- Fit the filter holder to the appliance in
such a way that the protruding lugs go
inside the corresponding recesses on the
hot water outlet. The arrow mark on the
filter holder must be correctly aligned
with the beginning of the corresponding
mark on the housing.
- To lock, turn the filter holder firmly to
the right so that the dot on the holder is
correctly aligned with the dot on the
housing.
- Slide the glass carafe with its lid in place
onto the drip tray under the filter holder.
● Ensure that the lid opening is properly
positioned underneath the filter holder.
- Insert the plug into a suitable wall outlet
and turn the multiple-function switch so
that the espresso symbol is aligned with
the arrow mark on the housing. The red
indicator light comes on.
- After a short time the water will start to
boil and will then be forced by pressure
through the filter insert into the glass
carafe.
- Wait until all the water has passed
through. Only when the red indicator
light has been replaced by the green light
may the appli-ance be switched off.
- The carafe can now be removed from the
appliance.
Operation
Multiple-function switch
The multiple-function switch has the
following settings:
Steam symbol: steam nozzle open,
heating element switched on.
0
Appliance is switched off.
Espresso symbol: hot water outlet
open, heating element switched on.
Indicator lights
The red indicator light is lit when the heating
element is switched on and brewing is in
progress.
Once brewing is finished, the red light goes
out and the green light comes on.
Before using for the first time
Before making espresso for the first time, let
the appliance go through two or three
filtration cycles using the indicated
maximum amount of water, but without
using any ground coffee. This should also be
done if the appliance has not been used for
an extended period of time.
Making espresso
- Open the screw-in lid by turning it anticlockwise.
- Fill the container with cold tap water.
The glass carafe shows arrow-shaped
level marks for two or four cups. Only
the required amount of water should be
used for each brewing cycle (max. 4
cups).
- Replace the lid and close it by turning it
clockwise.
- Place the filter insert inside the filter
holder.
To release the excess pressure from the
water container and thus depressurise the
appliance:
- Place a suitable container under the
steam nozzle and turn the
multiplefunction switch so that the steam
symbol is aligned with the arrow mark on
the housing, until steam is no longer
9
emitted.
- Switch the appliance off again.
The filter holder may now be removed
for cleaning. The filter insert can be held
in place while being emptied by means of
the sieve holder on the handle.
- If several consecutive brewing cycles are
required, switch off the espresso maker
after each cycle and let the appliance cool
down for approx. 5 minutes.
-
-
Making cappuccino
While the espresso is being made, the milk
frother can be used to prepare the frothedup milk needed for the cappuccino.
- Fill a suitable heat-resistant jug with
about 100 ml of fresh, cold milk from the
fridge.
- To prevent the milk from spilling over
during the frothing process, the jug
should be only two-thirds full.
- When preparing the desired amount of
espresso, it is best to make four cups in
one cycle, so that when the glass carafe
has been filled with fresh espresso coffee
up to the steam symbol any available
steam can still be used.
- When preparing smaller quantities of
espresso, the steam can be drawn off just
before the brewing cycle is complete and
all the espresso has passed through the
system.
- Position the jug underneath the steam
tube in such a way that the milk frother is
just submerged in the milk.
- Turn the multiple-function switch so that
the steam symbol is aligned with the
arrow mark on the housing. The steam
nozzle is now open.
- Once the milk is sufficiently frothy, turn
the switch back to the espresso symbol to
continue the espresso cycle. Once the
espresso is ready, use a spoon to spread
the milk froth over its surface.
-
mark on the carafe).
Pour the milk to be frothed (or other
beverage to be heated) into a suitable
heat-resistant jug (fill jug to max. twothirds only).
Position the jug underneath the steam
tube in such a way that the milk frother is
just submerged in the milk.
Turn the multiple-function switch so that
the steam symbol is aligned with the
arrow mark on the housing. The steam
nozzle is now open.
After a brief heating period, steam will
be emitted.
General Care and Cleaning
● Disconnect the appliance from the power
supply.
- After each use, place a suitable container
underneath the steam nozzle and release
any excess steam. This will depressurise
the water container and, at the same
time, help to clean the steam nozzle.
Wipe the exterior of the milk frother
with a damp cloth afterwards.
- If necessary, the steam nozzle can be
taken off for cleaning; ensure, however,
that the appliance has cooled down
completely before the nozzle is removed.
Pull off the milk frother, then proceed to
remove the steam nozzle by unscrewing
it in an anti-clockwise direction, using the
hexagonal hole in the measuring scoop as
a spanner.
- To remove any remaining water from the
water container, take away all other parts
and unscrew the lid. Pour out the water
through the water fill opening.
● To avoid the risk of electric shock, do not
clean the appliance with water and do
not immerse it in water.
● Do not use abrasives or harsh cleaning
solutions.
- The exterior housing may be wiped with
a damp, lint-free cloth.
- The glass carafe, filter holder, filter insert
and drip tray may be cleaned in warm
water using a mild detergent; do not
Separate steam function
- Fill the water container with the
equivalent of 1 cup of water (lower-level
10
clean these parts in a dish-washer.
by any unauthorised person, or damaged
through misuse.
This guarantee naturally does not cover
wear and tear, nor breakables such as glass
and ceramic items, bulbs etc. If the product
fails to operate and needs to be returned,
pack it carefully, enclosing your name and
address and the reason for return. If within
the guarantee period, please also provide the
guarantee card and proof of purchase.
Descaling instructions
Depending on the water quality (lime
content) in your area as well as the
frequency of use, all thermal household
appliances using hot water need descaling
(i.e. removal of lime deposits) on a regular
basis to ensure proper functioning.
When the brewing process takes longer than
normal, it is likely that descaling is necessary.
- Mix four cups of water with a
commercially available descaling solution
(follow the manufacturer’s information
for the right concentration).
- Pour the mixture into the water
container.
- Let the espresso maker run through 1 or
2 brewing cycles as described in the
section Making espresso, but without
using the filter insert and without putting
in any coffee.
- To cleanse the system after descaling,
operate the appliance a further two times
with clean water only.
- Rinse the screw-in lid, filter holder and
glass carafe in clean water.
● Do not pour descalers into enamelled
sinks.
Disposal
Do not dispose of old or defective
appliances in domestic garbage;
this should only be done through
public collection points.
Guarantee
This product is guaranteed against defects in
materials and workmanship for a period of
two years from the date of purchase. Under
this guarantee the manufacturer undertakes
to repair or replace any parts found to be
defective, providing the product is returned
to one of our authorised service centres. This
guarantee is only valid if the appliance has
been used in accordance with the
instructions, and provided that it has not
been modified, repaired or interfered with
11