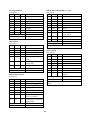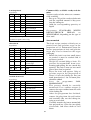
1
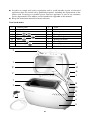
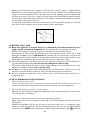
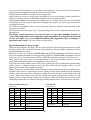
Bread-maker
TABLE OF CONTENTS
Technical specifications
18
Important safety instructions
19
Your bread-maker
20
Control panel
21
Using the bread-maker
23
Programme functions
24
Before first use
25
Operation
25
Cleaning and care
26
Troubleshooting and questions
26
Recipes
27
Guarantee
32
TECHNICAL SPECIFICATIONS
Art.-Nr.:
Operating voltage:
Power consumption:
Baking capacity:
Approximate dimensions:
Weight:
Timer:
Programme functions:
Accessories:
BM 3986
230 V~, 50 Hz
800 W
max. 750g flour for a 1000 – 1600g loaf
42 cm (W) x 26 cm (D) x 29 cm (H)
6.8 kg
Pre-programmable up to 13 hours
10
Measuring cup, measuring spoon, extractor for
kneading hooks
This product complies with all binding CE labelling directives.
18
IMPORTANT SAFETY INSTRUCTIONS
Before using the bread-maker, please read the following instructions carefully.
● The housing surfaces, steam vents and baking-tin heat up during operation and remain
hot for a short while after use: remember not to touch any hot parts of the unit. Be sure
to use an oven-cloth or suitable gloves when removing the bread.
● The bread-maker should only be connected to an earthed socket installed in accordance
with the regulations. Make sure that the supply voltage corresponds with the voltage
marked on the rating label.
● Always switch off the bread maker after use and remove the plug from the wall socket,
as well as
- in case of any malfunction during use,
- when removing the baking-tin,
- during cleaning.
● When removing the plug from the wall socket, never pull on the power cord; always grip
the plug itself. Do not allow the cord to hang free; the cord must be kept well away from
hot parts of the appliance.
● Before the appliance is used, the main body, including the power cord as well as any
attachment fitted, should be checked thoroughly for any defects. Should the appliance,
for instance, have been dropped onto a hard surface, it must no longer be used: even
invisible damage may have adverse effects on the operational safety of the appliance.
● The power cord should be regularly examined for any signs of damage. In the event of
such damage being found, the appliance must no longer be used.
● This appliance is not intended for use by any person (including children) with reduced
physical, sensory or mental capabilities, or lacking experience and knowledge, unless
they have been given supervision or instruction concerning the use of the appliance by a
person responsible for their safety.
● Children should be supervised to ensure that they do not play with the appliance.
● Ensure a minimum distance of 10 cm to walls or other objects. Do not position or
operate the appliance close to or underneath any hanging objects such as curtains or
other inflammable materials, and do not position any objects on top of the appliance
while it is in use.
● Always place the unit on a level, heat-resistant non-slip work surface.
● Do not allow the appliance or its power cord to touch hot surfaces or come into contact
with any heat sources (e.g. oven-plates or open flames).
● Do not operate the appliance unless the baking-tin with the ingredients has been placed
inside the unit.
● Do not expose the appliance to rain or moisture and do not operate the appliance
outdoors or on wet surfaces. Always ensure that it is well protected from water splashes.
Never immerse the plug, the power cord or the appliance itself in water.
● The appliance is not intended to be operated by means of an external timer or separate
remote-control system
● This appliance is intended for domestic use only and not for commercial applications.
● No responsibility will be accepted if damage results from improper use, or if these
instructions are not complied with.
● The use of any accessories other than those provided by the manufacturer may result in
damage to the appliance; there is also a possibility of severe personal injury.
● Do not touch any moving parts during operation. Do not put your fingers or hands inside
the unit, unless it is disconnected from the mains supply and has cooled down
completely.
19
● In order to comply with safety regulations and to avoid hazards, repairs of electrical
appliances must be carried out by qualified personnel, including the replacement of the
power cord. If repairs are needed, please send the appliance to one of our customer
service departments. The address can be found in the appendix to this manual.
● Keep this instruction manual for future reference.
Your bread-maker
1.
Control panel
A
B
C
D
E
F
LCD-display
Timer
/
Browning control
Menu
Start / Stop
Bread weight
2.
3.
4.
5.
6.
7.
8.
9.
10.
Vents
Lid
Viewing window
Baking compartment
Bread baking-tin
Baking-tin handle
Housing
Kneading hooks
On/off switch (at rear of unit)
2
3
4
10
F
A
C
1
7
B
2
D
E
5
9
6
8
20
Control panel
A LCD-display
The LCD-display shows the selected programme as well as the remaining programme
time. An active programme is indicated by the continuously flashing colon in the time
display.
Example:
In this case, programme 5 (for WHOLEMEAL BREAD) has been selected via the
button. The display shows: 5 3:40. The bread weight is shown in the form of a
triangular symbol in the upper right part of the display, just beneath the larger bread
symbol (
). The selected browning level is shown as 'MEDIUM', indicated in the
form of a triangular symbol in the upper centre part of the display.
The total programme running time is 3 hours and 40 minutes.
B Timer
/
Programmes 1, 3, 5, 7, 8 and 10 may be started with a delayed timer setting, enabling the
selected programme to finish up to 13 hours later.
Example:
You want to start the programme at 20h00, and you would like your bread to be finished
at 7h30 the next morning. Accordingly, the total programme running time will be 11
hours and 30 minutes.
- Use the
button to select the desired programme.
- Press
or
until the display shows a total running time of 11:30.
- Add the ingredients following the instructions given in the section Operation. Avoid
any contact between the yeast and fluids or salt.
● The best baking results can be achieved only if the ingredients are used in their correct
relative quantities, ensuring that the dough cannot rise above the edge of the bakingtin. We therefore recommend that only recipes are used which have been tried before
with satisfactory results.
● Do not use the timer function where a recipe requires the use of perishable ingredients
such as eggs, fresh milk or fruit. The timer function is also unsuitable for recipes which
require the addition of any ingredients (e.g. nuts, grains or dried fruits) during the
second kneading phase.
C Browning
Baking programmes 1, 2, 3, 4, 5, 6, and 8 allow for a pre-selection of the desired level of
browning; three settings are available. The selected level of browning is shown in the
form of a triangular symbol in the upper centre part of the display.
LIGHT
MEDIUM
DARK
D Menu
Press the
button until the desired programme is shown in the LCD-display (A).
The menu allows for 10 different programmes to be selected:
21
Menu
Weight
Pre-heating
1
2
3
4
5
Biscuits/Pastry
6
Dough
7
Baking
8
Jam,
9
Sandwich
10
1300
Wholemeal
marmalade
750
Short
1300
White/
French bread
750
heating
22
Quick
1300
2:47
heat.), 8 min.
w. heating
3:20
2:45
11
Standard
750
40
on/off
37
-
3
22
22
-
5
20
3
17
15
(Motor off – Heating
-
on/off)
3
3
3,5
3
2
3
-
3
-
3
2
Stirring
-
13
2:44
-
-
2. Kneading phase
Acoustic signal
Display message
2
-
-
45
2
16
-
-
1
2
-
-
-
18
2
1:49
-
-
-
1
2
-
-
-
-
39
1. Kneading phase
-
45
-
45
-
-
12.5 min. (w/o.
-
-
1
-
-
-
13
1:33
45
-
18
-
22
56
5
1
7
1
-
cooking
16
45
1
25
-
35
60
-
20
1st rising phase
1
7
1
27
-
20
13
Smoothing phase
18
-
50
2:34
2nd rising phase
1
25
2:57
Smoothing phase
45
2:54
Final rising phase
80
-
45 stirring /
65
-
62
65
16
55
55
-
62
-
55
-
Baking
-
Standing phase
-
3:09
(without heating)
1:20
60
1:00
1:50
13 hrs
2:00
-
3:40
13 hrs
3:30
13 hrs
60
1:52
-
3:50
13 hrs
60
1:58
-
60
3:30
13 hrs
60
3:20
13 hrs
-
Keeping warm
Programme running time
Timer
(pre-programming)
22
E START/STOP button
The
button starts or terminates a programme. The continuously flashing colon in the
LCD time display indicates that the programme has been activated.
Protection against wrong input:
Once a programme has been started, all other control buttons will remain blocked until
the baking process has finished, or until the
button has been pressed for a minimum
of 2 seconds.
When pressing any control button, wait until the correct input is acknowledged by a beep
signal before releasing the button.
F Loaf weight
Baking programmes 1, 5 and 10 allow for pre-selection of the loaf size. The selected
weight is indicated in the form of a triangular symbol beneath the corresponding bread
symbol on the LCD display.
= for loaves of approx. 750g to 900g
= for loaves of approx. 1000g to 1600g
USING THE BREAD-MAKER
Your new bread-maker allows you to:
- bake breads to various recipes, some of which can be found in the appendix to this
manual. However, this bread-maker also allows you to use commercially available readyto-bake mixtures with up to 750g of solid ingredients (for a loaf of up to 1600g).
- knead dough for bread rolls, pizza etc., and let the dough rise.
Additional important instructions
- Always use an oven-cloth or suitable gloves when touching the unit after use, or when
handling freshly baked bread.
- Only recipes with a flour content of up to750g should be used with this bread-maker.
Should the flour content fall short of this minimum, thorough kneading of the dough
cannot be ensured. Excessive flour content may result in the dough rising over the edge
of the baking-tin.
- In the case of a power failure, the programme must be re-started. If the programme was
still in the kneading phase when the power failure occurred, the cycle can be re-started
using the same ingredients. Otherwise, fresh ingredients must be used.
- During the kneading process, water vapour may condense on the viewing window.
However, this condensation will disappear during the baking phase.
- To ensure evenly baked bread, do not open the lid during the baking process.
- After use, allow sufficient time for the bread-maker and the baking-tin to cool down
before cleaning them thoroughly.
- The baking-tin and the kneading hooks have a non-stick coating. In order to prevent
damage, do not use any metallic, hard, sharp or pointed objects on the coating.
- Caution: Operating the bread-maker empty could result in damage to the unit by
overheating of the empty baking-tin.
23
Caution
- In the event of any smoke coming from the baking compartment, be sure to keep the
door firmly closed, but immediately remove the plug from the wall socket. Do not, under
any circumstances, try to smother or extinguish smouldering dough with water. Dough
may catch fire if it is allowed to rise over the edge of the baking-tin and touch the heating
element. It is therefore important to follow the quantity limits given in the recipes.
- Always make sure that the unit is placed well out of children’s reach, especially while it is
operating.
- Do not place the unit on soft or inflammable surfaces (e.g. carpets). Always ensure that it
is placed on a firm, level work surface. Always position the unit in such a way that it
cannot fall over.
- Do not touch the steam vents at the rear of the lid, nor the viewing window in the lid:
these parts heat up during operation.
- Before cleaning the appliance, ensure it is disconnected from the power supply and has
cooled down completely.
PROGRAMME FUNCTIONS
1 =
STANDARD
This programme is used most frequently and suitable for breads with a high content of wheat
flour.
2 =
QUICK
Suitable for quick baking of breads with high wheat flour content.
3 =
WHITE BREAD/FRENCH BREAD
Suitable for light dough, e.g. for white bread/French bread.
4 =
SHORT PROGRAMME
Suitable for quick baking of breads, where the loaves turn out lighter than usual. The
quantities used should therefore be for smaller loaves only.
5 =
WHOLEMEAL
In comparison to the STANDARD setting, this programme has extended rising and baking
phases, since the dough for bread with a high rye or wholemeal flour content tends to rise
less strongly than dough containing wheat flour.
6 =
BISCUITS, PASTRY
Suitable for preparing biscuits, when using baking powder instead of yeast.
7 =
DOUGH (TEIG)
This programme does not include a baking phase. After the programme has finished, the
dough (e.g. pizza dough) can be removed and then baked in a conventional oven.
8 =
BAKING (BACKEN)
Suitable for baking dough (e.g. dough previously kneaded using the DOUGH programme).
In this way, the rising phase can be modified according to the type of dough before the
BAKING programme is started.
If the loaf does not show the desired degree of browning, this programme may also be
started directly after the bread baking programme has finished.
24
9 =
JAM, MARMALADE
Suitable for preparing jam or marmalade. During preparation, make sure the baking-tin is
only two thirds full of all the ingredients (approx. 900g), since the mixture may tend to foam
up.
10 =
SANDWICH
Suitable for baking sandwich bread.
BEFORE FIRST USE
- Insert the plug into a suitable wall socket and switch the appliance on.
- Use the
button to select programme 8 (BAKING).
- Press the
button and let the unit heat up for approximately 10 minutes with the lid
open. This will remove the smell typically encountered when first activating the heating
elements. Ensure sufficient ventilation. To prevent the baking-tin from over-heating, be
sure to remove it before switching the unit on.
- Afterwards, press the
button for at least 2 seconds, remove the plug from the wall
socket and allow the unit to cool down. The baking-tin itself must be thoroughly cleaned
before it is used for the first time.
OPERATION
- Open the lid and remove the baking-tin.
- Fit the kneading hooks into their sockets inside the baking-tin.
- For best results, always put liquids in first, followed by solid ingredients such as flour.
- Finally, add the yeast. Be sure to avoid any contact between the yeast and salt or liquids
when using the timer.
- Replace the baking-tin in the unit. Make sure that the tin locks firmly into place. Before
starting the programme, close the lid, insert the plug into a suitable wall socket and
switch the appliance on.
- Use the
button to select the desired baking programme. Each time the button is
pressed, the display changes to the next programme in the sequence.
- Using the
button, the desired level of browning can be pre-selected in programmes 1,
2, 3, 4, 5, 6 and 8. The following settings are available: light (
), medium (
) and
(
) dark.
- Baking programmes 1, 5 and 10 allow for pre-selection of the bread size, using the
button.
- If you wish to start the programme with a timer delay, the desired total running time can
now be set.
- Otherwise, press the
button to start the kneading and/or baking process.
- During the second kneading phase in programmes 1, 2, 5, 6 und 10, an acoustic signal
indicates that additional ingredients such as fruits and nuts can be added to the dough.
Do not open the lid after this second kneading phase, but wait until the programme has
finished.
- Once the bread or dough is ready, a multiple acoustic signal is heard and the time display
shows 0:00. Press the
button for at least 2 seconds and open the lid.
- Should you forget to press the
button and to remove the bread immediately in the
programmes 1, 2, 3, 5 and 10, it will be kept warm automatically for a period of 60
minutes. This is to ensure that no condensation can collect in the baking-tin.
- Carefully remove the baking-tin using oven cloths. Do not place the hot baking-tin on
any heat-sensitive surfaces.
25
- Remove the bread from the baking-tin. To loosen the bread, it may be lightly shaken.
Should one of the kneading hooks be stuck in the bread, it should be carefully removed
using the extractor supplied. Insert the extractor into the opening of the kneading hook
and cant it in such a way that it grips the lower end of the hook. Pull the hook carefully
from the loaf, preferably with its blade first. To facilitate extracting the blade, a small cut
can be made in that part of the loaf.
To allow the underside of the loaf to cool down as well, it should be placed on a suitable
wire rack. Do not attempt to cut the bread until it has cooled down.
CLEANING AND CARE
● Before the appliance is cleaned, ensure it is switched off, disconnected from the power
supply and has cooled down completely. Do not immerse the bread-maker in water.
- Remove the baking-tin from the appliance, and take out the kneading hooks.
The baking-tin and the kneading hooks may be cleaned using hot water and a mild
detergent. Do not use any rough material for cleaning. If you are unable to separate the
kneading hooks from the baking tin using normal force, let it soak in lukewarm water for
approximately 30 minutes. Do not use excessive force to remove the hooks.
● To prevent damage to the drive-shaft seal, the baking-tin should not be left soaking for
any extended period of time. Do not clean the baking-tin in a dish-washer.
- The inside of the lid may be cleaned with a slightly damp, soft cloth. The interior of the
appliance should be cleaned with a soft, dry cloth.
● Do not use cleaning agents specifically designed for baking ovens, and do not use any
abrasives or harsh cleaning solutions, vinegar or bleaching agents for cleaning.
● Before storing the appliance, always ensure that it has cooled down and that it is
completely dry.
TYPICAL PROBLEMS AND QUESTIONS
1. The bread has a strong smell.
Check whether the correct amount of yeast was used. Too much yeast causes an
unpleasant smell and makes the loaf rise too much. Always use fresh ingredients.
2. The baked bread is wet and has a sticky surface.
Remove the bread from the appliance immediately after baking, and place it onto a wire
rack, allowing it to cool down.
3. Pressing the Start button fails to activate the selected programme.
Make sure that the unit is properly connected to the mains supply and that it has been
switched on.
Should the appliance still be too hot after a previous work cycle, an automatic safety
switch prevents the appliance from resuming operation. In that case, the LED-display
shows the letters HHH, and a continuous acoustic signal is heard. Press the
button for
26
2 seconds, and remove the baking-tin with the ingredients from the unit. Allow the
bread-maker to cool down for about 10 - 20 minutes with the lid open before you attempt
to start the programme again.
The message EEE on the display indicates a temperature sensor malfunction. In this
case, the appliance must be checked by a qualified person.
4. The loaf has risen too high.
Reduce the amount or quantity of yeast, water or flour used.
5. The loaf has not risen high enough
Increase the amount of yeast, water or sweeteners. Ensure that the correct order is used
when putting the ingredients into the baking-tin: first the liquid ingredients followed by
the solid ingredients, finally the yeast.
Note: bread made of rye or wholemeal flour tends to rise less than bread made of wheat
flour.
6. After the baking phase has started, the dough collapses inwards.
The dough is too light. Slightly reduce the quantity of liquids or the amount of yeast, or
use a programme with a shorter rising phase. You may also try increasing the amount of
salt.
7. The dough is too soft or too sticky.
The dough texture may become smoother if a spoonful of flour is added during
kneading.
8. The dough is very difficult to knead.
Add a spoonful of water during the kneading process.
9. What is the significance of the numbers characterising different flour types?
The higher the number of the flour, the higher the fibre content and the darker the
colour.
10. What is wholemeal flour?
Wholemeal flour is made from whole grain and therefore has a higher fibre content. It is
recognisable by its darker colour. However, wholemeal bread does not necessarily turn
out darker.
Recipes
Recipe information
The recipes suggested in this manual may be modified to taste by adding various ingredients
of your choice.
Depending on your taste, you may add e.g. wheat germ, sun flower seeds, herbs, caraway
seeds, ground pepper, ground nuts, muesli, hominy grits, finely cut bacon cubes etc.
These ingredients may be added after the acoustic signal, approximately 5 – 10 minutes after
the second kneading phase has started, but only for the following programmes:
STANDARD, QUICK, WHOLEMEAL, BISCUITS/PASTRY and SANDWICH.
The bread-maker is designed to process recipes with a flour content of up to 750g. In order
27
to prevent the dough rising over the edge of the baking-tin and to ensure that the dough is
properly and thoroughly kneaded, do not exceed these limits.
All ingredients should have normal room temperature.
Sugar assists the yeast as a rising agent, and tends to let the crust become darker and thicker.
Salt gives a firmer texture to the dough and slows the rising process down.
When adding additional ingredients of liquid nature to a recipe, make sure that the quantity
of liquid given in the recipe is reduced accordingly. This applies e.g. when eggs, fresh cheese
or yoghurt are used.
For all those programmes, where the bread weight cannot be adjusted, either quantity in the
recipes may be used.
The information in the recipes (e.g. 750g and 1000g) refers to the approximate weight of the
finished loaf.
The baking results depend on several factors such as air pressure, humidity, hardness of
water, room temperature or the temperature of the ingredients. If a recipe does not turn out
to your taste right away, we recommend modifying the suggested recipes accordingly, as
described in the section 'Typical problems and questions'.
Special information for allergic people
With this bread-maker you may also use flour mixtures specifically formulated for people
allergic to grain. The loaves will turn out relatively firm even when higher quantities of yeast
or baking powder are used.
However, in this case only the STANDARD and QUICK programmes should be used, in
each case choosing the darker browning setting. With the STANDARD programme, the loaf
turns out to have a stronger crust, while the QUICK programme results in a weaker crust.
With gluten-free flour types, pre-programming is not recommended. Always start the
programme immediately after the ingredients have been put in.
If you observe flour residue on the walls of the baking-tin, open the lid during the kneading
phase, and use a rubber scraper to move the flour back into the dough so that it can be
properly processed. Close the lid afterwards.
When using yeast, the kneading hooks should be removed after the final kneading phase.
Sprinkle some flour on your fingers before taking out the hooks. Removing the kneading
hooks is necessary to prevent air pockets building up inside the loaf, as the dough rises only
a little. Add a few drops of oil onto the dough afterwards and spread it evenly over the
dough surfaces, using a dough scraper or your fingers. This will help to prevent deep cracks
which might otherwise be caused by the high baking temperatures. Close the lid afterwards.
White bread/French bread
Ingredients:
750g 1000g
Ingredients
1
2
1
1/
tsp.
dry yeast
390
600
g
wheat flour type 405
2
3
tbs.
sugar
1
1
1 /2
2 /4
tsp.
salt
1
1
1 /2
2 /4
tbs.
butter
140
220
ml
milk
120
180
ml
water
Programme:
WHITE BREAD/FRENCH BREAD
Browning:
MEDIUM
Onion bread
Ingredients:
860g 1180g
3
/4
1
540
760
50
75
1
1
1
11/2
350
500
Programme:
28
pack
g
g
tsp.
tsp.
ml
Ingredients
dry yeast
wheat flour type 1050
fried onions
sugar
salt
water
QUICK
Seven-grain bread
Wheat and rye bread with soy seeds
Ingredients:
Ingredients:
800g
1600g
3
Ingredients
750g
/4
1
pack
dry yeast
700
g
wholemeal flour
1
250
500
215
11/4
325
13/4
g
tsp.
7-grain flakes
salt
11/4
13/4
tsp.
1/
1/
25
45
ml
water
WHOLEMEAL
MEDIUM
1
4
3
4
460
640
Programme:
Browning:
Wheat bread
Ingredients:
750g 1100g
1
13/4
300
420
200
280
1
1 /2
21/2
21/2
11/2
11/2
21/2
290
450
Programme:
Browning:
1120g
13/4
tsp.
Ingredients
dry yeast
350
g
wheat flour type 550
220
11/2
300
21/2
g
tsp.
rye flour type 1150
salt
sugar
1
13/4
tsp.
sugar
tbs.
vinegar
180
240
ml
water
g
butter
160
3
/4
220
11/4
ml
tbs.
buttermilk
sourdough powder from
tsp.
g
g
tsp.
tsp.
tsp.
ml
Wheat and rye bread
Ingredients:
750g 1100g
11/4
13/4
tsp.
230
350
g
230
350
g
11/2
21/2
tsp.
1
3
/4
/4
tsp.
220
350
ml
110
175
ml
11/2
21/2
Programme:
Browning:
tsp.
sour dough
30
45
g
soy seeds
3
1
/4
1 /4
tsp.
bread spice
Programme:
STANDARD
Browning:
MEDIUM
The soy seeds are added after the acoustic signal.
Ingredients
dry yeast
wheat flour type 1050
wheat flour type 405
salt
honey or sugar-beet
syrup
sourdough powder from
sour dough
water
STANDARD
DARK
Cheese bread
Ingredients:
760g 1100g
13/4
11/4
230
350
230
350
1
1 /2
21/2
3
/4
11/4
170
270
140
210
45
70
Programme:
Ingredients
dry yeast
wheat flour type 550
rye flour type 1150
salt
sugar
water
natural plain yoghurt,
3,5% fat content
tsp.
g
g
tsp.
tsp.
ml
ml
g
Ingredients
dry yeast
wheat flour type 550
rye flour type 1150
salt
sugar
water
buttermilk
finely grated Emmental
cheese
STANDARD
Browning:
DARK
The grated cheese is added after the acoustic
signal.
sourdough powder from
sour dough
STANDARD
MEDIUM
29
Bran bread
3-Pauly flour mix gluten-free for bread, rolls and
Ingredients:
dough bases
Ingredients:
750g
1
1300g
11/4
tsp.
dry yeast
1150g
340
1
/4
11/2
525
3
/4
21/2
g
cup
tbs.
wheat flour type 550
wheat bran
sugar
2
pack
dry yeast
700
30
g
g
flour mix
butter
11/2
21/2
tbs.
milk powder
11/2
tsp.
salt
1/
2
2/
tsp.
salt
570
ml
11/2
21/2
tbs.
butter
290
440
ml
water
Programme:
Browning:
1
2
1
Ingredients
Programme:
Browning:
375
570
Browning:
ml
warm water
STANDARD
DARK
Hint: with these ingredients, dough may be
kneaded in the DOUGH programme for making
bread rolls or a dough base.
STANDARD
MEDIUM
Italian white bread
Ingredients:
900g 1300g
3
/4
1
pack
100
150
g
475
650
g
1
1
1 /2
tsp.
1
tbs.
1
1 /2
1
1
1 /2
tsp.
Ingredients
Sweet bread
Ingredients:
750g 1180g
Ingredients
3
4
/
1
pack dry yeast
500
700
g
wheat flour type 550
2
3
tbs.
honey
1
tsp.
salt
1
1 /2
2
4
eggs
25
35
g
butter
275
400
ml
fresh milk
Browning:
QUICK or SHORT
Note: for the SHORT programme, only the
quantities specified for the 750g-loaf should be
used; otherwise the loaf might become too big,
Ingredients
dry yeast
hominy grits
wheat flour type 550
sugar
vegetable oil
salt
water
SANDWICH
Rye-wholemeal-wheat bread
Ingredients:
750g 1150g
Ingredients
21/4
tsp.
dry yeast
11/2
230
350
g
wheat flour type 1050
230
350
g
rye wholemeal flour
3
1
1 /4
tsp.
salt
1
/2
1
tsp.
sugar
290
440
ml
water
1
2
3 /2
tbs.
sourdough powder from
sour dough
Programme:
WHOLEMEAL
Browning:
DARK
as the texture is generally lighter with this
programme.
30
Sourdough bread
Commercially available ready-to-bake
mixes
Various ready-to-bake mixes are commercially available.
- Put up to 750g of the ready-to-bake mix
and the required amount of dry yeast
into the baking-tin.
- Add the corresponding quantity of
liquid.
Ingredients:
740g
1
1050g
11/2
pack
dry yeast
250
340
g
rye flour
250
1
340
11/2
g
tsp.
wheat flour type 1050
salt
/4
tsp.
bread spice
/2
3
/
3
1
1
2
350
Ingredients
/
pack
dry sourdough
450
ml
water
4
Programme: STANDARD, WHITE
BREAD/FRENCH
BREAD
or
WHOLEMEAL, depending on the type of
flour used.
Programme:
STANDARD
Browning:
MEDIUM
Note: dry sourdough is a concentrate and is
available in pack form of 15g.
Wheat bread
Ingredients:
750g 1100g
1
13/4
220
340
230
360
1
2
1 /2
/2
11/2
1
1
2
210
320
120
180
Programme:
Browning:
tsp.
g
g
tsp.
tsp.
tsp.
ml
ml
Jam, marmalade
The basic recipe consists of finely cut or
puréed fruit and gelatine sugar in the
proportion of 2:1. Information about the
correct proportions of fruit and gelatine
sugar may also be found on the sugar
packaging.
- Before the fruit is cut into small pieces
or puréed, it must be washed and, if
necessary, peeled.
- Weigh out around 900g of fruit. To
prevent the marmalade from overfoaming and spilling, do not exceed this
quantity. The fruit is now cut into small
pieces (max 1cm) or puréed.
- Place the fruit and approx. 500g of
gelatine sugar in the proportion of
about 2:1 into the baking-tin. For jam
made from berries, 1 tbs. of lemon juice
should be added.
- Start
the
programme
JAM,
MARMALADE.
- This process should be carefully
monitored. Use a rubber scraper to
remove the sugar residue from the walls
of the baking-tin.
- After the programme has finished,
remove the plug from the wall socket
and carefully take out the baking-tin,
using an oven cloth.
- Carefully transfer the jam or marmalade
into prepared jars. Close the jars tightly
afterwards, and allow them to cool
down.
Ingredients
dry yeast
wheat flour type 550
wheat flour type 1050
salt
sugar
sourdough powder from
sour dough
buttermilk
milk
STANDARD
MEDIUM
Oat flake bran bread
Ingredients:
750g 1050g
3
/4
11/2
360
470
110
145
1
1 /2
2
2
23/4
2
23/4
380
490
Programme:
Browning:
tsp.
g
g
tbs.
tsp.
tbs.
ml
Ingredients
dry yeast
wheat flour type 550
oat flake bran
sugar
salt
butter
milk
WHOLEMEAL
MEDIUM
31
- The baking-tin should be thoroughly rinsed immediately after use.
Pizza dough
Ingredients:
2
tsp.
Ingredients
dry yeast
400
g
wheat flour type 550
2
tsp.
salt
1
tsp.
sugar
3
230
tbs.
ml
olive oil
water
Programme:
-
DOUGH
Once the programme has finished, remove the dough from the baking-tin.
Smear a baking tray with olive oil and spread the dough out with a rolling pin.
Let the dough rise at room temperature for approximately 30 minutes.
Spread the dough with the toppings of your choice, and let it bake for 15-25 minutes at
200° C in a pre-heated baking oven, until the cheese has melted and spreads evenly, and
the dough is brown around the edges.
Abbreviations:
Tsp. = teaspoon (measuring spoon: 1 tsp.) = 5 ml
1
/2 tsp. = one half teaspoon
Tbs. = tablespoon (measuring spoon: 1 tbs.) = 15 ml
g = gram
ml = millilitre
Measuring cup: 1 cup = 250 ml
Disposal
Do not dispose of old or defective appliances in domestic garbage; this should only be
done through public collection points.
GUARANTEE
This product is guaranteed against defects in materials and workmanship for a period of two
years from the date of purchase. Under this guarantee the manufacturer undertakes to
repair or replace any parts found to be defective, providing the product is returned to one of
our authorised service centres. This guarantee is only valid if the appliance has been used in
accordance with the instructions, and provided that it has not been modified, repaired or
interfered with by any unauthorised person, or damaged through misuse.
This guarantee naturally does not cover wear and tear, nor breakables such as glass and
ceramic items, bulbs etc. If the product fails to operate and needs to be returned, pack it
carefully, enclosing your name and address and the reason for return. If within the guarantee
period, please also provide the guarantee card and proof of purchase.
32