1
Welcome:
Dear user, thanks for purchasing this product.
Much investment in time and effort has gone into its development, and it is our hope
that it will give you many years of trouble-free service.
Safety Notice:
1. Do not drop, puncture or disassemble the camera; otherwise the warranty will be voided.
2. Avoid all contact with water, and dry hands before using.
3. Do not expose the camera to high temperature or leave it in direct sunlight. Doing so may
damage the camera.
4. Use the camera with care. Avoid pressing hard on the camera body.
5. For your own safety, avoid using the camera when there is a storm or lightning.
'RQRWXVHEDWWHULHVRIGLIIHUHQWVSHFL¿FDWLRQV'RLQJVRPD\OHDGWRWKHSRWHQWLDOIRUVHULRXV
damage.
7. Remove the battery during long periods between usage, as a deteriorated battery may affect
the functionality of the camera.
8. Remove the battery if it shows signs of leaking or distortion.
9. Use only the accessories supplied by the manufacturer.
10. Keep the camera out of the reach of infants.
11. Risk of explosion if battery is replaced by an incorrect type.
12. Dispose of used batteries according to the instructions.
FCC Compliance Statement:
This device complies with Part 15 of the FCC Rules. Operation is
subjected to the following two conditions: (1) this device may not cause
harmful interference, and (2) this device must accept any interference
received, including interference that may cause undesired operation.
This equipment has been tested and found to comply with limits for a
Class B digital device, pursuant to Part 15 of the FCC rules. These limits
are designed to provide reasonable protection against harmful interference in residential
installations. This equipment generates, uses, and can radiate radio frequency energy, and if
not installed and used in accordance with the instructions, may cause harmful interference to
radio communications.
However, there is no guarantee that interference will not occur in a particular installation. If this
equipment does cause interference to radio or television equipment reception, which can be
determined by turning the equipment off and on, the user is encouraged to try to correct the
interference by one or more of the following measures:
-Reorient or relocate the receiving antenna.
-Move the equipment away from the receiver.
-Plug the equipment into an outlet on a circuit different from that to which the receiver is
connected.
-Consult the dealer or an experienced radio/television technician for additional suggestions.
<RXDUHFDXWLRQHGWKDWDQ\FKDQJHRUPRGL¿FDWLRQVWRWKHHTXLSPHQWQRWH[SUHVVO\DSSURYHG
by the party responsible for compliance could void Your authority to operate such equipment.
If the time arises to throw away your product, please
recycle all the components possible.
Batteries and rechargeable batteries are not to be
disposed in your domestic waste! Please recycle
them at your local recycling point.
Together we can help to protect the environment.
Ŷ'( Umweltschutz
Geben Sie das Gerät am Ende der Lebensdauer nicht in den normalen HausPOO%ULQJHQ6LHHV]XP5HF\FOLQJ]XHLQHURI¿]LHOOHQ6DPPHOVWHOOH$XIGLHVH
Weise helfen Sie die Umwelt zu schonen.
Ŷ)5 Environnement
1HMHWH]SDVO¶DSSDUHLOHQ¿QGHYLHDYHFOHVRUGXUHVPpQDJqUHVPDLVGpSRVH]
OHjXQHQGURLWSUpYXjFHWHIIHWSDUOHVSRXYRLUVSXEOLFVSRXUVRQUHF\FODJH9RXV
DLGHUH]DLQVLjSURWpJHUO¶HQYLURQQHPHQW
Ŷ,7 Ambiente
$¿QHYLWDQRQJHWWDUHTXHVWRDSSDUHFFKLRQHOODQRUPDOHUDFFROWDGHLUL¿XWLPD
portalo presso uno dei punti di raccolta autorizzati. In questo modo contribuirai a
preservare l’ambiente.
Ŷ(6 Medio ambiente
Cuando vaya a deshacerse de este aparato, no lo tire con la basura normal del
KRJDUGHSRVtWHORHQXQSXQWRGHUHFRJLGDR¿FLDOSDUDVXUHFLFODGR$OKDFHUOR
contribuirá a preservar el medio ambiente.
Ŷ1/ Milieu
Gooi het apparaat aan het einde van zijn levensduur niet weg met het normale
KXLVYXLOPDDUOHYHUKHWLQRSHHQRI¿FLHHOYHU]DPHOSXQWRPKHWWHODWHQUHF\FOHQ
Op deze wijze helpt u om het milieu te beschermen.
Ŷ37 Meio ambiente
Quando chegar a altura de se desfazer do aparelho, não o deite fora juntamente
FRPRVHXOL[RGRPpVWLFRQRUPDO'HYHUiFRORFiORQXPSRQWRGHUHFROKDR¿FLDO
para efeitos de reciclagem. Ao fazê-lo, estará a contribuir para a preservação do
meio ambiente.
Ŷ3/ĝURGRZLVNRQDWXUDOQH
1LHQDOHĪ\Z\U]XFDüWHJRXU]ąG]HQLDSR]DNRĔF]HQLXMHJRĪ\ZRWQRĞFL]QRUPDO
Q\PLĞPLHFLDPLGRPRZ\PLDOHQDOHĪ\SU]HND]DüMHGRR¿FMDOQHJRSXQNWX]ELyUNL
ZFHOXUHF\NOLQJX3RPRĪHWRZRFKURQLHĞURGRZLVNDQDWXUDOQHJR
Ŷ58Ɂɚɳɢɬɚɨɤɪɭɠɚɸɳɟɣɋɪɟɞɵ
ɉɨɨɤɨɧɱɚɧɢɢɫɪɨɤɚɫɥɭɠɛɵɧɟɜɵɛɪɚɫɵɜɚɣɬɟɩɪɢɛɨɪɜɦɟɫɬɟɫɨɛɵɱɧɵɦɢ
ɛɵɬɨɜɚɦɢɨɬɯɨɞɚɦɢɚɫɞɚɜɚɣɬɟɜɫɩɟɰɢɚɥɶɧɵɟɩɭɧɤɬɵɩɪɢɟɦɚɉɨɫɬɭɩɚɹ
ɬɚɤɜɵɫɩɨɫɨɛɫɬɜɭɟɬɟɞɟɥɭɫɨɯɪɚɧɟɧɢɹ
ɨɤɪɭɠɚɸɳɟɣɫɪɟɞɵ
Sicherheitshinweise:
1. Lassen Sie die Kamera nicht fallen und beschädigen und zerlegen Sie die Kamera nicht,
andernfalls erlischt die Gewährleistung.
9HUPHLGHQ6LHMHJOLFKHQ.RQWDNWGHV*HUlWVPLW:DVVHUXQGWURFNQHQ6LHVLFKGLH+lQGH
ab, bevor Sie es verwenden.
3. Setzen Sie die Kamera keinen hohen Temperaturen aus und lassen Sie das Gerät nicht in
direkter Sonneneinstrahlung liegen. Andernfalls könnten Schäden an der Kamera auftreten.
9HUZHQGHQ6LHGLH.DPHUDEHKXWVDP9HUPHLGHQ6LHHVVWDUNHQ'UXFNDXIGDV
Kameragehäuse auszuüben.
9HUZHQGHQ6LHGLH.DPHUD]X,KUHUHLJHQHQ6LFKHUKHLWQLFKWEHL*HZLWWHUQRGHU%OLW]VFKODJ
9HUZHQGHQ6LHNHLQH%DWWHULHQPLWDQGHUHQ6SH]L¿NDWLRQHQ$QGHUQIDOOVN|QQHQXQWHU
Umständen schwere Schäden am Gerät entstehen.
7. Entfernen Sie die Batterie, wenn Sie das Gerät längere Zeit nicht verwenden, da
mängelbehaftete Batterien die Funktionalität der Kamera beeinträchtigen können.
(QWIHUQHQ6LHGLH%DWWHULHIDOOVGLHVH$Q]HLFKHQYRQ$XVULQQHQRGHU9HUIRUPXQJHQDXIZHLVW
9HUZHQGHQ6LHDXVVFKOLHOLFKYRP+HUVWHOOHUDQJHERWHQHV=XEHK|U
%HZDKUHQ6LHGLH.DPHUDDXHUKDOEGHU5HLFKZHLWHYRQ.LQGHUQDXI
11. Es besteht ein Explosionsrisiko, wenn die Batterie durch einen falschen Typ ersetzt wird.
12. Entsorgen Sie nach den Anweisungen gebrauchte Batterien.
Notice de sécurité:
1HSDVIDLUHWRPEHUSHUFHURXGpPRQWHUODFDPpUDVLQRQODJDUDQWLHHVWDQQXOpH
(YLWHUWRXWFRQWDFWDYHFO¶HDXHWD\H]OHVPDLQVVqFKHVORUVTXHYRXVO¶XWLOLVH]
1HSDVH[SRVHUODFDPpUDjGHKDXWHVWHPSpUDWXUHVQHSDVODODLVVHUGLUHFWHPHQWVRXVOH
VROHLO9RXVULVTXH]VLQRQGHO¶HQGRPPDJHU
8WLOLVHUODFDPpUDDYHFVRLQ(YLWHUG¶DSSX\HUWURSIRUWVXUOHFRUSVGHODFDPpUD
3RXUYRWUHSURSUHVpFXULWppYLWHUG¶XWLOLVHUODFDPpUDSHQGDQWXQHWHPSrWHRXXQRUDJH
(YLWHUG¶XWLOLVHUGHVSLOHVGHGLIIpUHQWHVPDUTXHVRXGHGLIIpUHQWVW\SHVHQPrPHWHPSV
Cela risque de causer des dommages importants.
6RUWLUOHVSLOHVORUVTXHODFDPpUDUHVWHLQXWLOLVpHSHQGDQWORQJWHPSVFDUGHVSLOHVTXLVH
GpWpULRUHQWULVTXHQWG¶HPSrFKHUOHERQIRQFWLRQQHPHQWGHODFDPpUD
6RUWLUOHVSLOHVVLYRXVFRQVWDWH]TX¶HOOHVIXLHQWRXTX¶HOOHVVHGpIRUPHQW
9. Utiliser exclusivement les accessoires fournis par le fabricant.
*DUGHUODFDPpUDKRUVGHSRUWpHGHVHQIDQWV
11. Risque d’explosion en cas d’utilisation de batterie de type incorrect.
'LVSRVH]OHVEDWWHULHVXWLOLVpHVFRQIRUPpPHQWDX[LQVWUXFWLRQVGRQQpHVGDQVOHPDQXHO
Avviso per la sicurezza:
1. Non far cadere, forare o smontare la videocamera diversamente si annullerà la garanzia.
2. Evitare il contatto con l’acqua ed asciugarsi le mani prima dell’uso.
3. Non esporre la videocamera ad alte temperature o lasciarla alla luce diretta del sole.
Diversamente si danneggia la videocamera.
4. Maneggiare la videocamera con cura. Evitare di esercitare pressioni sul corpo della
videocamera.
5. Per la propria sicurezza evitare di utilizzare la videocamera durante i temporali.
1RQXVDUHEDWWHULHGLYHUVHGDTXHOOHVSHFL¿FDWH'LYHUVDPHQWHVLSXzFUHDUHLOSRWHQ]LDOHGL
seri danni.
5LPXRYHUHODEDWWHULDTXDQGRODYLGHRFDPHUDQRQqXWLOL]]DWDSHUSHULRGLSUROXQJDWLSRLFKp
OHEDWWHULHGHWHULRUDWHLQÀXLVFRQRVXOODIXQ]LRQDOLWjGHOODYLGHRFDPHUD
8. Rimuovere le batterie se mostrano segni di perdita di liquido o distorsione.
9. Utilizzare solamente gli accessori forniti dal produttore.
10. Tenere la videocamera fuori della portata dei bambini.
5LVFKLRGLHVSORVLRQHVHODEDWWHULDqVRVWLWXLWDGDXQWLSRHUUDWR
12. Inserire le batterie secondo le istruzioni.
Aviso de seguridad:
1. No deje caer, perfore ni desmonte la cámara; si lo hace, la garantía quedará invalidada.
(YLWHTXHHQWUHHQFRQWDFWRFRQHODJXD\VpTXHVHODVPDQRVDQWHVGHXWLOL]DUHOSURGXFWR
3. No exponga la cámara a altas temperaturas ni la deje donde incida sobre ella la luz directa
del sol. Si lo hace, la cámara puede resultar dañada.
8WLOLFHODFiPDUDFRQFXLGDGR1RHMHU]DPXFKDSUHVLyQHQHOFXHUSRGHODFiPDUD
5. Por su propia seguridad, no utilice la cámara cuando haya tormenta o rayos.
1RXWLOLFHEDWHUtDVGHHVSHFL¿FDFLRQHVGLIHUHQWHV6LORKDFHODFiPDUDSRGUtDVXIULUGDxRV
irreparables.
7. Quite la batería si no va a utilizar la cámara durante un prolongado período de tiempo, ya
que una batería deteriorada puede afectar a la funcionalidad de la misma.
4XLWHODEDWHUtDVLPXHVWUDVLJQRVGHIXJDRGLVWRUVLyQ
8WLOLFH~QLFDPHQWHDFFHVRULRVHVSHFL¿FDGRVSRUHOIDEULFDQWH
10. Mantenga la cámara fuera del alcance de los niños.
5LHVJRGHH[SORVLyQVLODEDWHUtDVHVXVWLWX\HSRURWUDGHXQWLSRLQFRUUHFWR
12. Disponga las baterías según las instrucciones.
Veiligheidsmaatregelen:
1. Laat de camera niet vallen. Doorboor en demonteer hem niet. U zou de garantie ermee
ongeldig maken.
9HUPLMGFRQWDFWPHWZDWHUHQJHEUXLNGHFDPHUDDOOHHQPHWGURJHKDQGHQ
3. Stel de camera niet bloot aan hoge temperaturen en laat hem niet in direct zonlicht liggen. U
kunt er de camera mee beschadigen.
4. Gebruik de camera zorgvuldig. Druk niet hard op de behuizing.
5. Gebruik, voor uw eigen veiligheid, de camera niet tijdens een storm of onweer.
6. Gebruik geen batterijen van verschillende merken door elkaar. U kunt er ernstige schade
mee veroorzaken.
9HUZLMGHUGHEDWWHULMHQDOVXGHFDPHUDODQJHUHWLMGQLHWJHEUXLNW6OHFKWHEDWWHULMHQNXQQHQ
de werking van de camera aantasten.
9HUZLMGHUGHEDWWHULMHQDOV]HJDDQOHNNHQHQDOV]HYHUYRUPG]LMQ
9. Gebruik alleen de toebehoren die door de fabrikant zijn aanbevolen.
10. Houd de camera buiten bereik van kinderen.
5LVLFRRSRQWSORI¿QJDOVGHEDWWHULMZRUGWYHUYDQJHQGRRUHHQRQMXLVWW\SH
9HUZLMGHUOHJHEDWWHULMHQLQRYHUHHQVWHPPLQJPHWGHLQVWUXFWLHV
Normas de Segurança:
1. Não deixe cair, não fure e não desmonte a câmara, pois caso contrário a garantia perderá
a sua validade.
2. Evite todo o contacto com a água e seque as mãos antes de utilizar a câmara.
3. Não exponha a câmara a altas temperaturas e não a deixe exposta à luz solar directa. Isto
SRGHGDQL¿FDUDFkPDUD
4. Utilize a câmara cuidadosamente. Evite exercer pressão sobre o corpo da câmara.
3DUDVXDSUySULDVHJXUDQoDHYLWHXWLOL]DUDFkPDUDGXUDQWHDRFRUUrQFLDGHWHPSHVWDGHV
ou relâmpagos.
6. Evite utilizar pilhas de marcas ou tipos diferentes ao mesmo tempo. Isto pode provocar
danos graves.
7. Retire as pilhas quando a câmara não for utilizada por longos períodos, uma vez que as
pilhas deterioradas podem afectar a funcionalidade da câmara.
8. Retire as pilhas se estas mostrarem sinais de fuga ou corrosão.
8WLOL]HDSHQDVRVDFHVVyULRVIRUQHFLGRVSHORIDEULFDQWH
10. Mantenha a câmara fora do alcance das crianças.
11. Risco de explosão se a bateria for substituída por uma outra de tipo incorrecto.
12. Colocação das baterias de acordo com as instruções.
8ZDJDGRW\F]ąFDEH]SLHF]HĔVWZD
1LHQDOHĪ\XSXV]F]DüG]LXUDZLüOXEUR]ELHUDüNDPHU\ZSU]HFLZQ\PUD]LHQDVWąSL
XQLHZDĪQLHQLHJZDUDQFML
1DOHĪ\XQLNDüNRQWDNWX]ZRGąLSU]HGXĪ\FLHPQDOHĪ\Z\VXV]\üUĊFH
1LHQDOHĪ\QDUDĪDüNDPHU\QDZ\VRNąWHPSHUDWXUĊOXESR]RVWDZLDüMąEH]SRĞUHGQLRQD
VáRĔFX0RĪHWRVSRZRGRZDüXV]NRG]HQLHNDPHU\
.DPHUĊQDOHĪ\XĪ\ZDü]]DFKRZDQLHPRVWURĪQRĞFL1LHQDOHĪ\PRFQRQDFLVNDüREXGRZ\
kamery.
'ODZáDVQHJREH]SLHF]HĔVWZDQDOHĪ\XQLNDüXĪ\ZDQLDNDPHU\SRGF]DVEXU]\OXE
Z\áDGRZDĔDWPRVIHU\F]Q\FK
1LHQDOHĪ\XĪ\ZDüEDWHULLRUyĪQ\FKVSHF\¿NDFMDFK0RĪHWRVSRZRGRZDüSRZDĪQH
uszkodzenie.
%DWHULĊQDOHĪ\Z\MąüSU]\GáXJLFKRNUHVDFKQLHXĪ\ZDQLDSRQLHZDĪMHMXV]NRG]HQLHPRĪH
XQLHPRĪOLZLüG]LDáDQLHNDPHU\
%DWHULĊQDOHĪ\Z\MąüJG\Z\ND]XMHR]QDNLSU]HFLHNDQLDOXERGNV]WDáFHQLD
1DOHĪ\XĪ\ZDüZ\áąF]QLHDNFHVRULyZGRVWDUF]RQ\FKSU]H]SURGXFHQWD
.DPHUĊQDOHĪ\WU]\PDüSR]D]DVLĊJLHPG]LHFL
:\PLDQDEDWHULLQDEDWHULĊQLHSUDZLGáRZHJRW\SXJUR]LMHMHNVSOR]Mą
=XĪ\WHEDWHULHQDOHĪ\XVXZDü]JRGQLH]LQVWUXNFMDPL
ɉɚɦɹɬɤɚɩɨɬɟɯɧɢɤɟɛɟɡɨɩɚɫɧɨɫɬɢ
ɇɟɪɨɧɹɣɬɟɧɟɩɪɨɛɢɜɚɣɬɟɢɧɟɪɚɡɛɢɪɚɣɬɟɤɚɦɟɪɭɜɩɪɨɬɢɜɧɨɦɫɥɭɱɚɟɝɚɪɚɧɬɢɹ
ɛɭɞɟɬɚɧɧɭɥɢɪɨɜɚɧɚ
ɇɟɞɨɩɭɫɤɚɣɬɟɫɨɩɪɢɤɨɫɧɨɜɟɧɢɹɤɚɦɟɪɵɫɜɨɞɨɣɢɫɭɲɢɬɟɪɭɤɢɩɟɪɟɞɟɟ
ɢɫɩɨɥɶɡɨɜɚɧɢɟɦ
ɇɟɩɨɞɜɟɪɝɚɣɬɟɤɚɦɟɪɭɜɨɡɞɟɣɫɬɜɢɸɜɵɫɨɤɨɣɬɟɦɩɟɪɚɬɭɪɵɢɥɢɩɪɹɦɵɯɫɨɥɧɟɱɧɵɯ
ɥɭɱɟɣɗɬɨɦɨɠɟɬɩɪɢɜɟɫɬɢɤɩɨɜɪɟɠɞɟɧɢɸɤɚɦɟɪɵ
ɉɨɥɶɡɭɣɬɟɫɶɤɚɦɟɪɨɣɨɫɬɨɪɨɠɧɨɇɟɧɚɠɢɦɚɣɬɟɫɭɫɢɥɢɟɦɧɚɤɨɪɩɭɫɤɚɦɟɪɵ
ȼɰɟɥɹɯɫɨɛɫɬɜɟɧɧɨɣɛɟɡɨɩɚɫɧɨɫɬɢɧɟɢɫɩɨɥɶɡɭɣɬɟɤɚɦɟɪɭɜɨɜɪɟɦɹɝɪɨɡɵɢɥɢ
ɦɨɥɧɢɣ
ɇɟɢɫɩɨɥɶɡɭɣɬɟɛɚɬɚɪɟɢɫɞɪɭɝɢɦɢɯɚɪɚɤɬɟɪɢɫɬɢɤɚɦɢɌɚɤɢɟɞɟɣɫɬɜɢɹɦɨɝɭɬɩɪɢɜɟɫɬɢɤ
ɫɟɪɶɟɡɧɨɦɭɩɨɜɪɟɠɞɟɧɢɸɤɚɦɟɪɵ
ɂɡɜɥɟɤɚɣɬɟɛɚɬɚɪɟɸɟɫɥɢɤɚɦɟɪɚɧɟɢɫɩɨɥɶɡɭɟɬɫɹɞɥɢɬɟɥɶɧɨɟɜɪɟɦɹɬɚɤɤɚɤ
ɢɫɩɨɪɱɟɧɧɚɹɛɚɬɚɪɟɹɦɨɠɟɬɧɚɪɭɲɢɬɶɮɭɧɤɰɢɨɧɢɪɨɜɚɧɢɟɤɚɦɟɪɵ
ɂɡɜɥɟɤɚɣɬɟɛɚɬɚɪɟɸɩɪɢɧɚɥɢɱɢɢɩɪɢɡɧɚɤɨɜɩɪɨɬɟɱɤɢɢɥɢɞɟɮɨɪɦɚɰɢɢ
ɂɫɩɨɥɶɡɭɣɬɟɬɨɥɶɤɨɩɪɢɧɚɞɥɟɠɧɨɫɬɢɩɨɫɬɚɜɥɹɟɦɵɟɩɪɨɢɡɜɨɞɢɬɟɥɟɦɤɚɦɟɪɵ
ɏɪɚɧɢɬɟɤɚɦɟɪɭɜɧɟɞɨɫɬɭɩɧɨɦɞɥɹɞɟɬɟɣɦɟɫɬɟ
ɉɪɢɡɚɦɟɧɟɛɚɬɚɪɟɢɧɚɛɚɬɚɪɟɸɧɟɜɟɪɧɨɝɨɬɢɩɚɦɨɠɟɬɩɪɨɢɡɨɣɬɢɜɡɪɵɜ
ɍɬɢɥɢɡɢɪɭɣɬɟɢɫɩɨɥɶɡɨɜɚɧɧɵɟɛɚɬɚɪɟɢɫɨɝɥɚɫɧɨɢɧɫɬɪɭɤɰɢɢ
7DEOHRI&RQWHQWV
Getting Started................................................................ 1
Knowing your camcorder parts ............................................................. 1
Installing the battery.............................................................................. 2
Charging the battery ............................................................................. 2
Inserting a memory card (optional) ....................................................... 2
Turning on/off your camcorder.............................................................. 2
Setting language................................................................................... 3
Reading LCD indicators........................................................................ 3
Basic Operations ............................................................ 4
Recording a video clip .......................................................................... 4
Recording a voice clip........................................................................... 4
Taking a still picture .............................................................................. 5
Playing back your recordings................................................................ 6
Playing back your recordings on PC..................................................... 7
&RQQHFWLQJWKHFDPFRUGHUWR79 .......................................................... 8
Advanced Operations .................................................... 10
Menu operation..................................................................................... 10
Menu items in Camera mode................................................................ 10
Menu items in Playback mode.............................................................. 11
Menu items in Setting mode ................................................................. 12
Battery Life Indicator............................................................................. 13
Battery Life............................................................................................ 13
Storage Capacity .................................................................................. 14
System Requirements .......................................................................... 14
6SHFL¿FDWLRQV........................................................................................ 15
Getting Started
Knowing your camcorder parts
,QWHUQDO
Microphone
/HQV
Speaker
([WHUQDO
Microphone
Flash strobe
Battery cover
7ULSRGVRFNHW
SD/MMC card slot
/&'PRQLWRU
OK key/
Joystick 5-way
AV connector/
(DUSKRQH
Zoom (in/out) button
86%FRQQHFWRU
+'287
02'(EXWWRQ
3RZHUEXWWRQ
Shutter button
Delete button
Macro mode switch
0(18EXWWRQ
Flash switch
5HVROXWLRQVZLWFK
Strap hook
3OD\EXWWRQ
5HFRUGEXWWRQ
AF lock switch
1
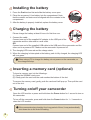
,QVWDOOLQJWKHEDWWHU\
1. Press the 3XVKEXWWRQ¿UVWDQGVOLGHWKHEDWWHU\FRYHURSHQ
2. Place the accessory Li-Ion battery into the compartment. Note
that the metallic contacts must be aligned with the contacts in the
compartment.
3. After the battery is properly installed, replace the battery cover.
Charging the battery
3OHDVHFKDUJHWKHEDWWHU\DWOHDVWKRXUVIRU¿UVWWLPHXVH
1. Connect the cable.
Connect one end of the supplied AC adapter to the USB port of the
camcorder and the other end to a wall outlet.
25
Connect one end of the supplied USB cable to the USB port of the camcorder and the
other end to a powered PC. Make sure the camcorder is powered off.
2. The charging LED turns red and the charge starts.
3. When the charging is interrupted or the battery pack is fully charged, the charging LED
will turn green.
When using a PC to charge the battery, do not power on the camcorder, or
the charge will stop.
,QVHUWLQJDPHPRU\FDUGRSWLRQDO
To insert a memory card, do the followings:
(1) Open the SD/MMC card cover.
(2) Gently push the card until the card reaches the bottom of the slot.
To remove the memory card, gently push the card and it will pop up. Then pull the card
out of the slot.
7XUQLQJRQRII\RXUFDPFRUGHU
Open the LCD monitor or press and hold down the 3RZHU button for 1 second to turn on
the camcorder.
To turn off the camcorder, press and hold down the 3RZHU button for 1 ~ 3 seconds or
close the LCD monitor.
If the camcorder stays inactive for a long period of time, it may automatically
shut down due to the Auto-Off setting.
2
Setting language
1. Power on the camcorder.
2. Press the 02'( key to enter the 02'( menu.
3. Use the Joystick switch to select the Setting mode and press OK to enter the menu
screen.
4. Use the Joystick to select the /DQJXDJH item, and then Press OKWRFRQ¿UP
5. Move the Joystick up/down to select a language.
6. When done, press OKWRFRQ¿UPWKHVHWWLQJ
5HDGLQJ/&'LQGLFDWRUV
00:00:05
Digital zoom
Optical zoom
00:06:40
1
Mode icon
Zoom ratio indicator
9LGHRUHVROXWLRQ
Flash
Picture resolution
White balance
Continuous shot
Remaining recordable time
AF lock
NightShot
Focus
Stabilizer
Internal memory/SD card inserted
Recording time
Battery life
3
Basic Operations
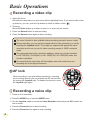
5HFRUGLQJDYLGHRFOLS
1. Adjust the focus:
Normally the camcorder can auto focus without adjusting focus. If you want to take closeup pictures, you can push the Up button to switch to Macro mode ( ).
2. Zooming:
Move the Zoom button up or down to zoom in or zoom out the screen.
3. Press the 5HFRUG button to start recording.
4. Press the 5HFRUG button again to stop recording.
The zoom function is also available during recording (except in macro mode).
During recording, you can capture images with the video resolution you set by
pressing the Joystick switch. The image you captured will appear the same
resolution as the one you set for video recording except in 1080P resolution
mode.
The camcorder has built-in electronic stabilizer, which can only be activated
LQ+'3I:9*$I,Q+'3I+'3IPRGHWKLV
function is disabled.
It’s normal that the camcorder will feel slightly warm with continuous use /
recording due to its high performance.
AF lock
When recording in one spot without zooming in / zooming
out or moving around, you can activate the AF lock function
by moving the Joystick right. To disable this function, move
the Joystick right again.
5HFRUGLQJDYRLFHFOLS
AF lock switch
1. Power on the camcorder.
2. Press the 02'( key to enter the 02'( menu.
3. Use the Joystick switch to select the 9RLFH5HFRUGHU mode and press OK to enter the
menu screen.
4. Press the 5HFRUG button to start recording
5. Press the 5HFRUG button again to stop recording.
4
7DNLQJDVWLOOSLFWXUH
1. Adjust the focus:
Normally the camcorder can auto focus without adjusting focus. If you want to take closeup pictures, you can push the Up button to switch to Macro mode ( ).
2. Zooming:
Move the Zoom button up or down to zoom in or
zoom out the screen.
3. Press the Shutter button half way down and hold for
the camcorder to auto focus. When the focus frame
turns green, press the button fully down to take a still
picture.
focus frame
Due to the sensor capture feature, the LCD preview and ratio of still picture
capture will vary depending upon different video resolution settings. The image
capture of the camera is set where as video resolutions are different.
Video resolution
3UHYLHZ
7DNLQJSLFWXUHV
and focusing
16:9 ratio
4:3 ratio
16:9 ratio
4:3 ratio
HD 1080P(1440x1080)
HD 60f(1280x720)
HD 30f(1280x720)
:9*$I[
Continuous shot
While in preview mode you can capture continuous images
(at video resolution) by “clicking and holding down” the
Joystick. The camcorder will continuously snap shots (up
to 10 per second) until you release the Joystick, or until the
memory is full.
Continuous shot function is disabled in HD
1080P(30f) mode.
OK key / Joystick 5-way
5
3OD\LQJEDFN\RXUUHFRUGLQJV
1. Press the 02'( button and use the Joystick to switch to “My Works” mode.
Or press the 3OD\3DXVH button (
) on the left side of the LCD monitor.
2. There are three folders below My works: 9LGHR3LFWXUHDQG9RLFH6HOHFW9LGHR
3LFWXUHRU9RLFHDQGWKHQSUHVVWKHOK key to enter the index mode.
3. Operations in playback mode:
File type
How to...
Action
Index mode
Shift between Index
mode and Fullscreen mode
In Index mode, press the OK key to switch to Fullscreen mode. In Full-screen mode, press the 02'(
button to switch to Index mode.
6KLIWEHWZHHQ¿OHV
1. In Index mode: Use the Joystick to move the
highlight box.
2. In Full-screen mode: Use the Joystick to move
left or right.
Start playing
:KHQVHOHFWHGLQIXOOVFUHHQPRGHWKH¿OH
automatically starts playing.
Pause/Resume
playing
During playing/While paused, press the OK key.
Adjust the volume
level
During playing, use the Joystick to move up or down.
Stop playing
During playing, press the 02'( button.
Return to the
preview screen
Press the Shutter button.
Fast forward
During playing, use the Joystick to move right. To
stop, press the 02'( button.
Fast backward
During playing, use the Joystick to move left. To stop,
press the 02'( button.
Zoom in/out
Use the Joystick to move up or down.
Lock/Release zoom
ratio
When the zoom ratio is greater than 1.0x, press the
OK key.
Browse the enlarged
picture
When the zoom ratio is locked, use the Joystick to
browse the picture.
Full-screen mode
9LGHR$XGLR
Picture
6
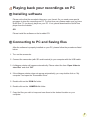
3OD\LQJEDFN\RXUUHFRUGLQJVRQ3&
,QVWDOOLQJVRIWZDUH
Please notice that the recorded videos are .mov format. So you need some special
SURJUDPVWRYLHZWKHUHFRUGLQJVRQ3&)RU¿UVWWLPHXVHSOHDVHPDNHVXUH\RXKDYH
QuickTime 7.0 (or above) player on your PC. If not, please download the QuickTime
player from the website.
25
Please install the software on the bundled CD.
&RQQHFWLQJWR3&DQG6DYLQJ¿OHV
After the software is properly installed on your PC, please follow the procedures listed
below.
1. Turn on the camcorder.
2. Connect the camcorder (with SD card inserted) to your computer with the USB cable.
3. A dialogue window will appear automatically. Please select the item “Open folder to
YLHZ¿OHV” and click “OK”.
4. If the dialogue window does not appear automatically, you may double click on “My
computer” and open the “Removable Drive”.
5. Double-click on the '&,0¿OHIROGHU
6. Double-click on the0(',$¿OHIROGHU
&RS\WKH¿OHV\RXZLVKWRNHHSDQGVDYHWKHPWRWKHGHVLUHGORFDWLRQRQ\RXU
computer.
7
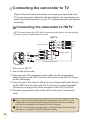
&RQQHFWLQJWKHFDPFRUGHUWR79
Please follow the below instructions to connect your camcorder and
79YLDDFFHVVRU\$9FDEOHVIRUUHDOWLPHGLVSOD\<RXFDQGLVSOD\\RXU
YLGHRFOLSVDQGVWLOOSLFWXUHVRQ\RXU79VKDULQJWKHPZLWK\RXUIULHQGV
and family.
&RQQHFWLQJWKHFDPFRUGHUWR+'79
+'79KHUHE\PHDQVWKH+'79EXLOWLQFRPSRQHQWLQSXWSRUWVWKXVFDQSHUIRUP
HD high resolution quality while connected.
HD TV
(green)
(blue)
Component Video in
(red)
(red)
(white)
AV
Component Audio in
<AV cable> (yellow)
HD OUT
(Do not plug in Yellow Cable)
<Component Video cable>
7XUQRQ\RXU+'79
2. Turn on the Camcorder.
3. Plug one end of the component video cable into the (Component
9LGHR,1SRUWRQWKH+'79DQGWKHRWKHUHQGLQWRWKH+'287SRUW
on the Camcorder.
3OXJRQHHQGRIWKHRWKHU$9FDEOHLQWRWKH&RPSRQHQW$XGLR,1SRUW
RQWKH+'79DQGWKHRWKHUHQGLQWRWKH$9SRUWRQWKH&DPFRUGHU
3OHDVHGRQRWSOXJLQWKH\HOORZFRQQHFWRUWRWKH+'79¶V$9,1
3UHVVWKHLQSXWVZLWFKPRGHRQWKH+'79DQGVHOHFW³&RPSRQHQW
Input”.
,I\RXUHFRUGDQ+'UHVROXWLRQFOLSZKLOHFRQQHFWHGWR\RXU+'79WKH79
GLVSOD\YLGHRUHVROXWLRQZLOOGRZQVL]HWR:9*$UHVROXWLRQGXHWRGDWDELW UDWHEXWWKHUHFRUGHG¿OHZLOOUHPDLQ+'ZLWKQRFKDQJH
7KH+'79ZLOOGLVSOD\\RXUYLGHRFOLSVLQL¿HOGVUHVROXWLRQPRGH although it is recorded in 1080P (30 frames) setting.
8
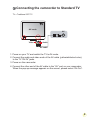
&RQQHFWLQJWKHFDPFRUGHUWR6WDQGDUG79
79 7UDGLWLRQDO&5779
AV mode
AV
$9,1
Video
Audio
AV cable
3RZHURQ\RXU79DQGVZLWFKWKH79WR$9PRGH
&RQQHFWWKHDXGLRDQGYLGHRHQGVRIWKH$9FDEOH\HOORZZKLWHUHGFRORU
WRWKH79³$9,1´MDFNV
3. Power on the camcorder.
&RQQHFWWKHRWKHUHQGRIWKH$9FDEOHWRWKH³$9´SRUWRQ\RXUFDPFRUGHU
:KHQWKHSRSXSPHVVDJHDSSHDUVRQWKHVFUHHQSOHDVHVHOHFW³$92XW´
9
Advanced Operations
Menu operation
7KHPHQXLWHPVSURYLGHVHYHUDORSWLRQVIRU\RXWR¿QHWXQH\RXUFDPHUDIXQFWLRQV
The following table gives details on menu operations.
How to...
Action
Bring up the menu
Press the 0(18 button.
Move the highlight bar
Use the Joystick to move up or down.
(QWHUVXEPHQX&RQ¿UPDQLWHP
Press the OK key.
Exit menu/Go back to upper menu
Press the 0(18 button (when in sub-menu).
Menu items in Camera mode
3RZHURQĺ3UHVVWKHMenu button.
,WHP
9LGHR
Resolution
Option
HD 1080P(30f)
Set the video resolution to HD 1080P (1440x1080 pixels).
HD 60f(720P)
Set the video resolution to HD 60f (1280x720 pixels).
HD 30f(720P)
Set the video resolution to HD 30f (1280x720 pixels).
:9*$
I'9'
Picture
Resolution
Flash Strobe
6HWWKHYLGHRUHVROXWLRQWR:9*$I[SL[HOV
3M
Set picture resolution to 3 mega pixels.
5M
Set picture resolution to 5 mega pixels.
8M
Set picture resolution to 8 mega pixels.
On
7KHÀDVKLVIRUFHGWR¿UHLQHYHU\VKRW
Auto
Off
7KHÀDVKDXWRPDWLFDOO\¿UHVZKHQWKHOLJKWLQJLVLQVXI¿FLHQW
7KHÀDVKLVGLVDEOHG
On/Off
Enabling this setting allows you to take a photograph with a dark
background. Since the shutter speed will slow down when taking
photographs at a dark place, we recommend using a tripod to
eliminate blurring from hand shake.
Warning: Noise increases when NightShot is enabled.
:DUQLQJ7KHVWDELOL]HUIXQFWLRQLVGLVDEOHGZKHQ1LJKW6KRW
is enabled.
(9
-2~+2
Enabling this setting allows you to take a photograph with a dark
background. Since the shutter speed will slow down when taking
photographs at a dark place, we recommend using a tripod to
eliminate blurring from hand shake.
Warning: Noise increases when NightShot is enabled.
Selftimer
On/Off
Enable/Disable the selftimer. After the selftimer is turned on, the
camera will have ten seconds delay before recording when the
Shutter button is pressed.
NightShot
10
Description
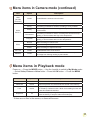
Menu items in Camera mode (continued)
,WHP
Option
Continuous
Shot
(at video
resolution)
On/Off
Auto
White
Balance
Enable/Disable continuous shot function.
The camera automatically adjusts white balance.
Sunny
This setting is suitable for outdoor recording in sunny weather.
Cloudy
This setting is suitable for recording in cloudy weather or shady
environments.
Fluorescent
Tungsten
Normal
Effect
Description
%ODFN:KLWH
7KLVVHWWLQJLVVXLWDEOHIRULQGRRUUHFRUGLQJZLWKÀXRUHVFHQWODPS
lighting, or environments with high color temperature.
This setting is suitable for indoor recording with incandescent lamp
lighting, or environments with low color temperature.
Make recordings in natural color.
Make recordings in black and white.
Classic
Make recordings in sepia-toned color.
AF Lock
On/Off
Enable/Disable auto focus function.
Stabilizer
On/Off
Enable/Disable stabilizer function. Stabilizer function can prevent
the image from blurring causing by hand shake.
0HQXLWHPVLQ3OD\EDFNPRGH
3RZHURQĺ3UHVVWKH02'(EXWWRQĺ8VHWKH-R\VWLFNWRVZLWFKWRMy Works mode
ĺ6HOHFW9LGHR3LFWXUH or Voice IROGHUĺ3UHVVWKHOKEXWWRQĺ3UHVVWKH0(18
button.
,WHP
Option
Delete One
Yes/No
'HOHWHFXUUHQW¿OH
Delete All
Yes/No
'HOHWHDOOSLFWXUHVDQGYLGHRDXGLR¿OHVVWRUHGLQWKHPHPRU\
Lock
Yes/No
6LQJOHPXOWLSOHRUDOO¿OHVFDQEHORFNHG$ORFNHG¿OHFDQQRW
be erased by a delete function. While the formatting function will
HUDVHDOOORFNHGXQORFNHG¿OHV
Repeat All
All
Description
The camera displays images/video clips in sequence. You can
press the OK key to stop the slide show/video play.
,IWKHUHDUHQR¿OHVLQWKHFDPHUDQRLWHPVZLOOEHVHHQ
11
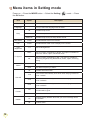
Menu items in Setting mode
3RZHURQĺ3UHVVWKH02'(EXWWRQĺ6HOHFWWKHSetting (
the OK button.
,WHP
Option
Clock
-
Set date and time.
Language
-
Let you select the language used for OSD.
Beep
Description
Off
Disable beep sound.
On
Enable beep sound.
Shutter On
) PRGHĺ3UHVV
Disable beep sound, but keep Shutter sound.
Start Movie
On/Off
Enable/Disable start movie function.
Icon
On/Off
Enable/Disable OSD icons to display on the screen.
LCD
Brightness
1~4
Set LCD brightness.
NTSC
6HW79V\VWHPFRPSDWLELOLW\WR176&7KLVRSWLRQLVVXLWDEOHIRU
$PHULFD7DLZDQ-DSDQDQG.RUHDDUHDV
PAL
6HW79V\VWHPFRPSDWLELOLW\WR3$/7KLVRSWLRQLVVXLWDEOHIRU
*HUPDQ\(QJODQG,WDO\1HWKHUODQGV&KLQD-DSDQDQG+RQJ
Kong.
50Hz
6HWÀLFNHUIUHTXHQF\WR+]
60Hz
6HWÀLFNHUIUHTXHQF\WR+]
796\VWHP
Flicker
Off
1 min
The camera automatically shuts down when staying inactive for
over 1 minute.
3 min
The camera automatically shuts down when staying inactive for
over 3 minutes.
5 min
The camera automatically shuts down when staying inactive for
over 5 minutes.
Auto Off
Yes
)RUPDWWKHVWRUDJHPHGLXP1RWHWKDWDOO¿OHVVWRUHGLQWKH
medium will be gone.
No
Cancel action.
On
Restore factory defaults. Note that your current settings will be
overridden.
Off
Cancel action.
Format
Default
12
Disable Auto-off function.
Menu items in Setting mode (continued)
* Flicker settings table:
5HJLRQ
England
Germany
France
Italy
Spain
Netherlands
Russia
Setting
50Hz
50Hz
50Hz
50Hz
50Hz
50Hz
50Hz
5HJLRQ
Portugal
America
Taiwan
China
-DSDQ
Korea
Thailand
Setting
50Hz
60Hz
60Hz
50Hz
50/60Hz
60Hz
50Hz
%DWWHU\/LIH,QGLFDWRU
,FRQ
Description
Full battery life
Moderate battery life
Low battery life
7KHÀDVKVWUREHDQGWKH/('OLJKWVZLOOEHGLVDEOHG´
Empty battery life
Note: To avoid sudden outage of power supply, you are recommended to replace the
battery when the icon indicates low battery life.
%DWWHU\/LIH
Still picture
Video clip
Number of shots
Recording time (minute)
110
50
* shoot every 30 seconds
ÀDVKLVRII
*** resolution is set to 5M (2592x1944)
* resolution is set to 720P 60f
(1280x720 @60f)
Note: This table is for your reference only. The actual battery life depends on your battery
type and recharge level.
13
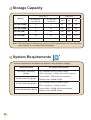
Storage Capacity
9LGHRPLQ
Memory
Still picture
HD 1080P 30f /
HD 720P 60f
HD 720P 30f /
:9*$I
8M
5M
3M
SD card (256MB)
3
7
95
145
230
SD card (512MB)
7
15
190
290
460
SD card (1GB)
15
30
380
580
920
SD card (2GB)
30
60
770
1160
1840
SD card (4GB)
60
120
1540
2320
3680
Note: The actual value of capacity may vary (up to ± 30%) depending on the color saturation
and complexity of your subject and surroundings.
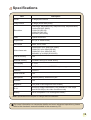
6\VWHP5HTXLUHPHQWV
System requirements are different in different video resolution settings:
9LGHR5HVROXWLRQ
HD 1080P (1440x1080)
@30fps
HD 60f (1280x720) @60fps
HD 30f (1280x720) @30fps
3&V\VWHPUHTXLUHPHQWV
26 :LQGRZV;3639LVWDRUDERYH
&38 3HQWLXP*+]&RUH'XDORUDERYH
6\VWHP5$0 *%*%UHFRPPHQGHG
*UDSKLFFDUG 0%RI5$0
26 :LQGRZV;3639LVWDRUDERYH
&38 3HQWLXP*+]RUDERYH
:9*$I[#ISV
14
6\VWHP5$0 0%*%UHFRPPHQGHG
*UDSKLFFDUG 0%RI5$0
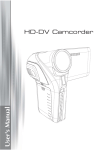
6SHFL¿FDWLRQV
,WHP
Description
Model
5 Mega-pixel camera
Image sensor
5 Mega (2592x1944 pixels)
Resolution
Still image: 3M(2048x1536); 5M(2592x1944); 8M(3200x2400)
1440x1080 (HD 1080P)
1280x720 (HD 60f)
1280x720 (HD 30f)
[:9*$I
Lens
Optical zoom lens
Digital zoom
;;LQ3PRGH
File format
029-3(*:$9
9LGHRIUDPHUDWH
1440x1080, up to 30fps (HD 1080P)
1280x720, up to 60fps (HD 60f)
1280x720, up to 30fps (HD 30f)
[XSWRISV:9*$I
Internal memory
Yes
External memory
SD/MMC card (up to 32GB SDHC)
LCD display
3” LCD
79RXW
+'79&RPSRQHQWRXW176&3$/V\VWHPVXSSRUWHG
Interface
USB 2.0
9RLFHUHFRUGHU
Yes
Microphone
internal (stereo); external mic jack
Speaker
Yes
Nightshot
Yes (both in still image and video modes)
E.I.S.
Electronic Image Stabilization (Only available in 720P 60fps
DQG:9*$ISVWKHYLGHRUHVROXWLRQPRGH
Battery
NP60 compatible Li-ion rechargeable battery
Note:6SHFL¿FDWLRQVDUHVXEMHFWWRFKDQJHZLWKRXWQRWL¿FDWLRQ
For more information on camcorder details and more advanced operations, please
refer to the electronic manual included in the accessory CD.
15