1
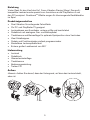
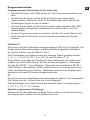
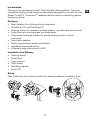
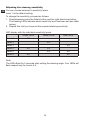
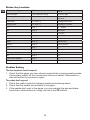
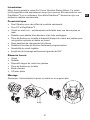
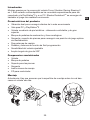
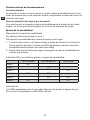
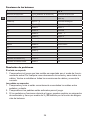
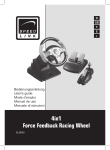
User‘s Guide Bedienungsanleitung Mode d‘emploi Instrucciones de manejo Manuale di istruzioni 2in1 Force Vibration Racing Wheel SL-6693-SBK Inhalt / Content 2/3 Deutsch Einleitung Produkteigenschaften Lieferumfang Aufbau Anschluss an eine Spielekonsole oder den PC Digital/Analog-Modus Betriebseigenschaften Einstellung der Lenkempfindlichkeit Programmierfunktion Tastenfunktion Problembehebung Garantie Falls Sie Hilfe benötigen... 5 5 5 5 6 7 8 8 9 10 11 11 11 English Introduction Features Included in the Delivery Setup Connecting to a games console or PC Digital/Analogue mode Automatic functions Adjusting the steering sensitivity Programming function Button/key functions Problem Solving Warranty Should you need assistance... 13 13 13 13 14 15 15 16 17 18 19 19 19 Français Introduction Caractéristiques Éléments fournis Montage Raccordement à une console ou à l’ordinateur Configuration requise Mode numérique/analogique Caractéristiques lors de l’utilisation Réglage de la sensibilité du volant Fonction de programmation 21 21 21 21 22 22 23 24 24 25 Fonctions des touches En cas de problème Garantie Si vous avez besoin d’aide… 26 27 27 27 Español Introducción Características del producto Componentes suministrados Montaje Conexión a una consola de videojuegos o a un PC Modos analógico/digital Características de funcionamiento Ajuste de la sensibilidad Función de programación Funciones de los botones Resolución de problemas Garantía Si precisas ayuda... 29 29 29 29 30 31 32 32 33 34 35 35 35 Italiano Introduzione Caratteristiche del prodotto In dotazione con la fornitura Montaggio Collegamento ad una console giochi o ad un PC Modalità analogica e digitale Caratteristiche di funzionamento Impostazione della sensibilità di guida Configurazione dei pulsanti Funzione dei pulsanti Ricerca guasti e possibili soluzioni Garanzia In caso di supporto tecnico... 37 37 37 37 38 39 40 40 41 42 43 43 43 DE S icherheitshinweise Wichtig! Bevor Sie dieses Produkt verwenden, lesen Sie bitte die Sicherheits- und Warnhinweise im Handbuch. Bewahren Sie dieses Handbuch auf, um zu einem späteren Zeitpunkt darauf zurückgreifen zu können. Haftungsausschluss Die Jöllenbeck GmbH übernimmt keine Haftung für Schäden am Produkt oder Verletzungen von Personen aufgrund von unachtsamer, unsachgemäßer, falscher oder nicht dem vom Hersteller angegebenen Zweck entsprechender Verwendung des Produkts. Fehlerbeseitigung/Reparatur Versuchen Sie nicht, das Gerät selbst zu warten oder zu reparieren. Überlassen Sie jegliche Wartungsarbeiten dem zuständigen Fachpersonal. Nehmen Sie keine Veränderungen am Gerät vor. Dadurch verlieren Sie jegliche Garantieansprüche. Feuchtigkeit/Wärmequellen Verwenden Sie das Gerät nicht in der Nähe von Wasser (z. B.Waschbecken, Badewannen etc.), und halten Sie es von Feuchtigkeit, tropfenden oder spritzenden Flüssigkeiten sowie Regen fern. Setzen Sie das Gerät keinen hohen Temperaturen, hoher Luftfeuchtigkeit oder direktem Sonnenlicht aus. Reinigung Verwenden Sie zum Reinigen des Gerätes bitte ein weiches, trockenes Tuch. Lassen Sie das Gerät nie mit Benzol, Verdünner oder anderen Chemikalien in Berührung kommen. Standort Stellen Sie das Gerät auf eine stabile Unterlage, um zu verhindern, dass es herunterfällt und dabei Personen oder das Gerät zu Schaden kommen. Bestimmungsgemäßer Gebrauch • Das Gerät darf nur mit den dafür vorgesehenen Originalteilen verwendet werden. • Das Produkt darf nur in geschlossenen und trockenen Räumen verwendet werden. • Die bestimmungsgemäße Verwendung beinhaltet das Vorgehen gemäß der Installationsanleitung. Für Schäden, die durch unsachgemäßen Gebrauch entstehen, übernimmt der Hersteller keine Haftung. Einleitung DE Vielen Dank für den Kauf des 2in1 Force Vibration Racing Wheel. Das multikompatible Lenkrad wurde speziell zum Anschluss an die PlayStation®2 und den PC konzipiert. DualshockTM Effekte sorgen für überzeugende Realitätsnähe im Spiel. Produkteigenschaften • Dual Vibration für aufregende Fahreffekte • Für PC und PlayStation®2 geeignet • Lenkradkranz aus Kunstleder -extrem griffig und komfortabel • Pedalblock mit analogem Gas- und Bremspedal • Tischklemme und Beinauflage für optimale Spielposition ohne Verrücken • Zwei Schaltwippen • Pedale und Funktionstasten einfach programmierbar • Einstellbare Lenkempfindlichkeit • Extrem großer Lenkbereich von 250° Lieferumfang • Lenkrad • Pedalblock • Oberschenkelauflage • Tischklemme • Bedienungsanleitung • Treiber CD Aufbau Hinweis: Achten Sie darauf, dass der Untergrund, auf dem das Lenkrad steht, eben ist. DE Tischbefestigung 1. Befestigen Sie die Tischklemme an der Unterseite des Lenkrads (s. Abb.) 2. Stellen Sie das Lenkrad auf den Tisch und befestigen Sie die Schraube der Tischklemme, bis das Lenkrad nicht mehr verrutschen kann. Beinauflage 1. Packen Sie die Oberschenkelauflagen aus. 2. Drehen Sie das Lenkrad auf den Kopf und befestigen Sie die Auflagen in den dafür vorgesehenen Löchern. 3. Setzen Sie das Lenkrad nun wie in der Abb. gezeigt auf Ihre Oberschenkel. Anschluss an eine Spielekonsole oder den PC Anschluss an die PlayStation®2 Hinweis: Schließen Sie das Lenkrad nicht über den USB-Anschluss des Kabels an die PlayStation®2 an! An der PlayStation®2 funktioniert es ausschließlich über den PlayStation®2-Stecker des Lenkrads. 1. Schalten Sie Ihre PlayStation®2 Spielekonsole aus. 2. Schließen Sie den PlayStation®2-Anschluss des Lenkrades an den Port1 Ihrer PlayStation®2 Konsole an. 3. Schließen Sie den Pedalblock an das 6-Pin-Kabel des Lenkrads an. 4. Schalten Sie das Fernsehgerät und die Spielekonsole an. Hinweis: Zur automatischen Erkennung des Lenkbereichs bitte NICHT das Lenkrad berühren! Das Lenkrad stellt sich automatisch ein. Anschluss an den PC über den USB-Port Hinweis: 1. USB-Betrieb wird nicht von Windows® 95/NT unterstützt. 2. Schließen Sie das Lenkrad nicht an einen USB-Hub an. Es funktioniert nur, wenn es direkt an den USB-Port des PCs angeschlossen wird. Systemvoraussetzungen: • IBM PC • Windows®98 oder höher • Freier USB-Port •20MB freier Speicherplatz Verbinden Sie den USB-Stecker mit den USB-Port des PCs. Treiber-Installation für Windows®98 und höher DE 1. Vor der Treiber-Installation muss das Lenkrad an den PC angeschlossen werden. Legen Sie dann die mitgelieferte Treiber-CD-ROM in Ihr CD-ROMLaufwerk ein. 2. Falls das Installationsmenü nicht automatisch starten sollte, klicken Sie auf Start > Ausführen > Durchsuchen und wählen Sie Ihr CD-ROM-Laufwerk aus. 3. Doppelklicken Sie dann auf die Datei setup.exe 4. Falls die Abfrage nach der digitalen Signatur für Windows® erscheint, bestätigen Sie die Meldung, um mit der Installation fortzufahren. Folgen Sie den Anweisungen auf dem Bildschirm. 5. Nach Beendigung der Installation starten Sie Ihren PC erneut. Klicken Sie nach dem Neustart auf Start > Einstellungen > Systemsteuerung. Doppelklicken Sie auf Gamecontroller. In dem sich öffnenden Fenster sollte Ihr Lenkrad mit dem Status „Ok“ aufgeführt sein. Klicken Sie auf Eigenschaften, um das Lenkrad zu testen. Eine Kalibrierung des Lenkrads ist nicht notwendig. Das Lenkrad unterstützt eine dynamische Kalibrierung, die beim Anstecken des Gerätes automatisch ausgeführt wird. Digital/Analog-Modus: Sie können bei diesem Lenkrad für die PlayStation®2 zwischen Analog-/und Digital-Modus wählen. Um einen Modus auszuwählen, drücken Sie die Mode-Taste, bis Sie im gewünschten Modus sind. LED-Anzeige Digital-Modus Analog-Modus --- Rot Hinweis: Bei einigen Spielen, wie z.B. GT3™ funktioniert das Lenkrad nur im AnalogModus. Der Digital-Modus gewährleistet die Kompatibilität zu älteren Spielen. DE Betriebseigenschaften Auto-Zentrierung Beim Anschließen des Lenkrads an die Konsole wird das Lenkrad automatisch zentriert, so dass keine umständlichen Einstellungen über das Optionsmenü des Spiels vorzunehmen sind. Automatische Erkennung des größtmöglichen Lenkbereichs Mit dieser Funktion wird bei dem Lenkrad automatisch der größtmögliche Lenkbereich eingestellt, ohne umständliche Einstellungen über das Optionsmenü des Spiels vornehmen zu müssen. Einstellung der Lenkempfindlichkeit Es stehen 6 Empfindlichkeitslevels zur Verfügung. Standardmäßig ist Level 1 eingestellt. Um die Empfindlichkeit einzustellen, gehen Sie wie folgt vor: 1. Drücken Sie die Select-Taste und gleichzeitig die Richtungstaste mit Pfeil nach rechts. Die blinkenden LEDs zeigen an, welche Empfindlichkeitsstufe gewählt wurde (s. Tabelle unten) 2. Wiederholen Sie diesen Schritt, bis Sie die gewünschte Lenkempfindlichkeit eingestellt haben LED-Anzeige bei den einzelnen Empfindlichkeitsstufen: Grüne LEDs Level 1 Gelbe LEDs XX Level 2 XX Level 3 Level 4 XX XX XX Level 5 Level 6 Rote LEDs XX XX XX XX Hinweis: Die LEDs blinken circa 5 Sekunden nach Einstellen des Lenkwinkels. Bei Level 4-6 blinken jeweils vier LEDs. Programmierfunktion Programmieren einer Tastenfunktion auf eine andere Taste Drücken Sie Select. Alle LEDs blinken auf. Der Programmiermodus ist nun aktiv. Drücken Sie die Taste, dessen Funktion Sie auf eine andere Taste legen möchten. Jeweils vier LEDs für die Pedale bzw. zwei LEDs für die Schaltwippen fangen nun an zu blinken. Drücken Sie die Taste, auf die Sie die Funktion legen möchten. Alle LEDs blinken wieder durchgehend. Wiederholen Sie die Schritte 2 und 3 für weitere Tasten. Um den Programmiermodus zu verlassen, drücken Sie erneut Select oder warten Sie sechs Sekunden, bis das Lenkrad automatisch den Modus verlässt. PlayStation®2 Die rechte und linke Schaltwippe sind werksseitig auf R2 und L2 eingestellt. Die Pedale sind als Beschleunigungs- und Bremspedale eingestellt und besitzen die gleiche Funktion wie die Tasten X und . Die Schaltwippen und Pedale können auf folgende Tasten umbelegt werden: , X, , , L1, L2, R1, R2, L3 (ß), R3 (à) und RY-Achse (áâ). Einige Spiele verwenden als Standard für Gas und Bremse den rechten Analogstick. Um die Pedalfunktionen auf den rechten Analogstick zu übertragen drücken Sie START + linke Pfeiltaste + Gaspedal und anschließend START + linke Pfeiltaste + Bremspedal. Diese Funktion wird nur im Analogmodus unterstützt. Die Einstellung geht verloren, sobald das Lenkrad in den Digitalmodus geschaltet wird oder die Konsole ausgeschaltet wird. PC Die rechte und linke Schaltwippe sind werksseitig als Tasten 1 und 2 eingestellt. Die Pedale sind als Y-Achse hoch und runter eingestellt. Die Schaltwippen und Pedale können auf folgende Tasten umbelegt werden: 1, 2, 3, 4, 5, 6, 7, 8, 11, 12, Y-Achse. Reset aller vorgenommenen Einstellungen Drücken Sie für drei Sekunden die Mode-Taste, entfernen Sie das Lenkrad von der Konsole oder schalten Sie die Spielekonsole aus. DE DE Tastenfunktion Tastenbeschriftung PC PS ®2 Richtungstasten POV (Richtungstasten) Richtungstasten Lenkrad links/rechts X1-Achse Links- und Rechtsbewegung des linken Sticks Linkes Pedal Y1-Achse () Analoge -Taste Rechtes Pedal Y1-Achse () Analoge X Taste Taste 1 Taste Taste 4 Taste Taste 2 Taste Taste 3 Taste Mode Taste 10 Mode Taste Start Taste 10 Start Taste Select Taste 9 Select Taste L1 Taste 7 L1 L2 Taste 6 L2 R2 Taste 5 R2 R1 Taste 8 R1 Linke Schaltwippe Taste 2 L2 Rechte Schaltwippe Taste 1 R2 Problembehebung Das Lenkrad reagiert nicht. 1. Überprüfen Sie, ob das von Ihnen gewählte Spiel den aktuellen Betriebsmodus unterstützt. Schalten Sie ggf. die Konsole aus und entfernen Sie alle Kabel. Stellen Sie die Verbindung dann wieder her und schalten Sie die Konsole ein. Die Pedale reagieren nicht. 1. Überprüfen Sie die Kabelverbindung zwischen Pedalen und Lenkrad. 2. Überprüfen Sie, ob die Pedale im Spiel aktiviert sind. 3. Sollten die Pedale im Spiel nicht funktionieren, können Sie über die Tastenumbelegungs-Funktion oder über X und die Gas- und Bremsfunktion umbelegen bzw. ausführen. 10 Garantie DE Für dieses Produkt gewähren wir Ihnen eine Garantie von zwei Jahren ab Kaufdatum auf Verarbeitung und alle eingebauten Teile. Falls Sie Hilfe benötigen... Bei technischen Problemen wenden Sie sich bitte an unseren technischen Support. Die Hotline-Nummer finden Sie auf der Rückseite dieser Bedienungsanleitung. 11 GB I mportant S afety I nformation Important! Before using this product, read the instruction manual for important safety information. Please retain this manual for future reference and warranty information. Excemption from Liability No liability will attach to Jöllenbeck GmbH if any damage, injury or accident is attributable to inattentive, inappropriate, negligent or incorrect operation of the machinery whether or not caused deliberately. Troubleshooting & Servicing Do not attempt to service or repair the device yourself. Refer all servicing to qualified service personnel. Do not attempt to modify the device in any way. Doing so could invalidate your warranty. Cleaning When cleaning the device, please use a soft, dry cloth. Never use benzine, paint thinner, or other chemicals on the device. Location Place the device in a stable location, so it will not fall causing damage to the device or bodily harm. Intended use • The product may only be used with the original parts intended for it. • The product may only be used in closed and dry rooms. • The intended use includes adherence to the specified installation instructions. The manufacturer accepts no liability for damage arising due to improper use. Moisture and heat sources Do not use this apparatus near water (for example, sinks, baths, pools) or expose it to rain, moisture, or dripping or splashing liquids. Do not expose the unit to high temperatures, high humidity or direct sunlight. 12 Introduction Thank you for purchasing the 2in1 Force Vibration Racing Wheel. The multiGB compatible steering wheel has been specifically designed for use with the PlayStation®2 and PC. DualshockTM feedback effects make for captivating realism during your game. Features • Dual Vibration for a thrilling driving experience • Suitable for PC and PlayStation®2 • Steering wheel rim covered in artificial leather – excellent grip and comfort • Pedal block with analogue gas and brake pedal • Table clamp and thigh support for optimal playing position without movement • Two control paddles • Easily programmable pedals and buttons • Adjustable steering sensitivity • Extremely large steering lock of 250° Included in the Delivery • Steering wheel • Pedal block • Thigh support • Table clamp • Operating manual • Driver CD Setup Note: Make sure the surface on which the steering wheel is mounted is level. 13 Table mounting 1. Fix the table clamp to the underside of the steering wheel (see picture beGB low). 2. Place the steering wheel on the table and turn the table clamp screw sufficiently tight enough so that the steering wheel cannot slip. Thigh support 1. Unpack the thigh supports. 2. Turn the steering wheel upside down and fasten the supports in the holes provided. 3. Place the steering wheel on your thighs as shown in the picture. Connecting to a games console or PC Connecting to PlayStation®2 Note: Do not connect the steering wheel to the PlayStation®2 using the USB connector on the cable! It will only work with the PlayStation®2 when you use the steering wheel’s PlayStation®2 connector. 1. Switch off your PlayStation®2 games console. 2. Connect the PlayStation®2 plug on your steering wheel to Port 1 on your PlayStation®2 console. 3. Connect the pedal block to the 6-pin cable of the steering wheel. 4. Switch on the TV and games console. Note: For automatic detection of the steering wheel, DO NOT touch the steering wheel! The steering wheel configures itself automatically. Connecting to a PC via the USB port Note: 1. USB operation is not supported by Windows®95/NT. 2. Do not connect the steering wheel to a USB hub. It will only work when connected directly to the USB port of your PC. System requirements: • IBM PC • Windows®98 or higher • Free USB port •20 MB free hard disk space Connect the USB connector to the USB port on your PC. 14 Driver installation for Windows®98 and higher 1. The steering wheel must be connected to the PC before installing the driver. GB Insert the supplied driver CD into your CD-ROM drive. 2. If the installation menu does not start automatically, click on Start > Run > Browse and select your CD-ROM drive. 3. Double click on the file setup.exe 4. If a window requesting a digital signature for Windows appears, acknowledge the message to continue installation. Follow the on-screen instructions. 5. Reboot your PC once the installation has completed. After rebooting, select Start > Settings > Control Panel. Double click on Game Controllers. In the window that opens, your steering wheel should be listed with status “OK”. Click on Properties to test the steering wheel. It is not necessary to calibrate the steering wheel. The steering wheel supports dynamic calibration, which takes place automatically when plugging in the device. Digital/Analogue mode: For PlayStation®2, you can choose between analogue and digital mode with this steering wheel. To select a mode, press the mode button until you are in the required mode. LED display Digital mode Analogue mode --- Red Note: With some games, such as GT3™, the steering wheel only works in analogue mode. Digital mode ensures compatibility with older games. Automatic functions Auto-centring On connecting the steering wheel to the console, the wheel is automatically centred so you don’t have to make laborious settings in the game’s options menu. Automatic detection of the widest possible steering lock This function automatically sets the greatest possible steering lock for the steering wheel so you don’t have to make laborious settings in the game’s options menu. 15 Adjusting the steering sensitivity You can choose between 6 sensitivity levels. GB Level 1 is the default setting. To change the sensitivity, proceed as follows: 1. Simultaneously press the Select button and the right directional button. The flashing LEDs indicate which sensitivity level has been set (see table below). 2. Repeat this until you have set the required steering sensitivity. LED display with the individual sensitivity levels: Green LEDs Level 1 Yellow LEDs XX Level 2 XX Level 3 Level 4 XX XX XX Level 5 Level 6 Red LEDs XX XX XX XX Note: The LEDs flash for 5 seconds after setting the steering angle. Four LEDs will flash respectively for Levels 4-6. 16 Programming function: Remapping a button function to another button GB Press Select. All LEDs will flash. Programming mode is now active. Press the button whose function you want to remap to another button. Either four LEDs for the pedals or two LEDs for the control paddles will now start to flash. Press the button which you want to remap the function to. All LEDs will flash continuously. Repeat steps 2 and 3 for remaining buttons. To exit programming mode, press Select again or wait six seconds, after which the steering wheel will automatically exit programming mode. PlayStation®2 The right and left control paddles are set to R2 and L2 as factory default. Pedals are set to gas and brake and have the same functions as the buttons X and . The control paddles and pedals can be remapped to the following buttons: , X, , , L1, L2, R1, R2, L3 (ß), R3 (à) and RY axis (áâ). Some games use the right analogue stick for gas and brake as standard. To transfer the pedal function to the right analogue stick press START + left directional button + gas pedal, followed by START + left directional button + brake pedal. This function is only supported in analogue mode. The setting is deleted if the steering wheel is switched to digital mode or if the games console is switched off. PC The right and left control paddles are set to Keys 1 and 2 as factory default. The pedals are set to Y axis up and down. The control paddles and pedals can be remapped to the following keys: 1, 2, 3, 4, 5, 6, 7, 8, 11, 12, Y axis. Resetting all changes made Either press „Mode“ for three seconds, or unplug the steering wheel from the games console, or turn the games console off. 17 Button/key functions GB Button marking PC PS ®2 Direction pad POV (direction keys) Direction pad Steering wheel left/right X1 axis Left and right movement of the left stick Left pedal Y1 axis () Analogue button Right pedal Y1 axis () Analogue X button Key 1 Key 4 button Key 2 button Key 3 button Mode Key 10 Mode button Start Key 10 Start button Select Key 9 Select button L1 Key 7 L1 L2 Key 6 L2 R2 Key 5 R2 R1 Key 8 R1 Left control paddle Key 2 L2 Right control paddle Key 1 R2 button Problem Solving The steering wheel doesn’t respond. 1. Check that the game you have chosen supports the current operating mode. If necessary, switch off the console and remove all cables. Reconnect cables and switch the console on again. The pedals don’t respond. 1. Check the cable connection between pedals and steering wheel. 2. Check that the pedals are activated in the game. 3. If the pedals don’t work in the game, you can reassign the gas and brake functions to other buttons or simply use the X and buttons. 18 Warranty We guarantee this product to be free of defects in workmanship and materials for a period of two (2) years from the original date of purchase. Should you need assistance... Our technical support team will be happy to help with any technical problems. The hotline number can be found on the back of this manual. 19 GB I nstructions FR Important! Avant d‘utiliser ce produit, consultez le manuel d‘instructions. Vous y trouverez des informations importantes sur la sécurité. Conservez ce manuel pour référence ultérieure. Entretien Ne tenez pas d‘effectuer vous-même l’entretien du dispositif ni de le réparer. Pour les opérations d’entretien, adressez-vous à du personnel qualifié. N‘essayez jamais d‘apporter une quelconque modification au dispositif. Cela pourrait annuler votre garantie. de sécurité Emplacement Placez l‘unité sur un support stable, car toute chute risquerait de les endommager ou de cuser des dommages corporels. Nettoyer l‘unité Pour nettoyer l‘unité, veuillez utilisez un chiffon doux et sec. N‘appliquez jamais de benzine, de diluant ou autre produit chimique sur le dispositif. Utilisation conforme • L’appareil ne doit être utilisé qu’avec les pièces originales prévues à cet effet. Humidité et sources de chaleur • Le produit ne doit être utilisé que Évitez d’utiliser l’appareil à proximité dans des locaux fermés et secs. de l’eau (évier, baignoire ou piscine • L’utilisation conforme implique par ex.) ou de l’exposer aux intemde respecter les instructions d’installation. péries, à l’humidité, ou à des écoule• Le fabricant décline toute responments ou des projections de liquides. N‘exposez pas le dispositif à une temsabilité en cas de dommages dus à pérature élevée, une humidité excessiune utilisation incorrecte. ve ou au rayonnement direct du soleil. 20 Introduction Merci d’avoir acheté le volant 2in1 Force Vibration Racing Wheel. Ce volant multicompatible a été spécialement conçu pour pouvoir être raccordé sur une PlayStation®2 ou un ordinateur. Ses effets DualshockTM donnent au jeu une dimension réaliste convaincante. Caractéristiques • Dual Vibration pour des effets de conduite saisissants • Pour PC et PlayStation®2 • Volant en simili-cuir – extrêmement confortable avec une bonne prise en main • Pédalier avec pédale d’accélérateur et de frein analogique • Pince de fixation sur la table et dispositif d’appui du volant aux jambes pour une position optimale et stable en jouant • Deux papillons de changement de vitesse • Pédales et touches de fonction facilement programmables • Sensibilité du volant réglable • Amplitude de braquage extrêmement grande de 250° Éléments fournis • Volant • Pédalier • Dispositif d’appui du volant aux jambes • Pince de fixation sur la table • Mode d’emploi • CD avec pilote Montage Remarque : faites attention à poser le volant sur un support plat. 21 FR Fixation sur la table 1. Fixez la pince sur la face inférieure du volant. 2. Placez le volant sur la table et serrez la vis de la pince de manière à ce que FR le volant ne puisse pas déraper. Dispositif d’appui du volant aux jambes 1. Déballez les appuis pour jambes. 2. Tournez le volant à l’envers et fixez les appuis dans les trous prévus à cet effet. 3. Placez ensuite le volant sur vos cuisses comme indiqué sur l’illustration. Raccordement à une console ou à l’ordinateur Raccordement à une console PlayStation®2 Remarque : n’utilisez pas la prise USB de l’adaptateur fourni pour raccorder le volant à la PlayStation®2 ! Le volant ne fonctionne que s’il est raccordé à la PlayStation®2 par la fiche PlayStation®2. 1. Éteignez votre console PlayStation®2. 2. Raccordez la prise PlayStation®2 du volant au port 1 de votre console PlayStation®2. 3. Reliez le pédalier au câble à 6 broches du volant. 4. Allumez le téléviseur et la console. Remarque : NE PAS toucher le volant lors de la détection automatique de l’amplitude de braquage ! Le volant se règle automatiquement. Raccordement à l’ordinateur par le port USB Remarque : 1. Le mode USB n’est pas pris en charge sous Windows®95/NT. 2. Ne raccordez pas le volant à un hub USB. Il ne fonctionne que s’il est raccordé directement au port USB de l’ordinateur. Configuration requise : • PC IBM • Windows®98 ou plus • Port USB libre •20 Mo d’espace disque libre Reliez la fiche USB au port USB de votre ordinateur. 22 Installation du pilote pour Windows®98 et plus 1. Avant d’installer le pilote, il est nécessaire de raccorder le volant à l’ordinateur. Insérez dans le lecteur de CD-ROM le CD-ROM fourni comprenant le pilote. 2. Si le programme d’installation ne démarre pas automatiquement, allez sur Démarrer > Exécuter > Parcourir et sélectionnez le lecteur de CD-ROM. 3. Double-cliquez sur le fichier setup.exe. 4. Si vous voyez apparaître une fenêtre relative à la signature numérique pour Windows, confirmez le message pour pouvoir poursuivre l’installation. Suivez les instructions qui s’affichent à l’écran. 5. À la fin de l’installation, redémarrez votre ordinateur. Après avoir redémarré votre système, allez sur Démarrer > Paramètres > Panneau de configuration. Double-cliquez sur Contrôleurs de jeu. Le volant doit figurer dans la fenêtre qui s’ouvre alors à l’écran et être suivi de la mention « OK ». Cliquez sur Propriétés pour tester le volant. Il n’est pas nécessaire d’étalonner le volant. Un étalonnage dynamique du volant est effectué automatiquement lors du raccordement. Mode numérique/analogique : Ce volant pour PlayStation®2 vous donne le choix entre le mode analogique et numérique. Pour sélectionner un mode, appuyez sur la touche Mode jusqu’à ce que le mode de votre choix soit activé. Affichage lumineux Mode numérique Mode analogique --- Rouge Remarque : dans certains jeux, par exemple GT3™, le volant ne fonctionne qu’en mode analogique. Le mode numérique garantit la compatibilité avec des jeux plus anciens. 23 FR Caractéristiques lors de l’utilisation Auto-centrage Lorsque vous raccordez le volant à la console, le volant est automatiquement FR centré, ce qui vous évite de procéder à des réglages complexes dans le menu des options du jeu. Détection automatique de l’amplitude de braquage maximale Cette fonction règle automatiquement le volant sur l’amplitude de braquage maximale, sans que vous ayez besoin de procéder à des réglages complexes dans le menu des options du jeu. Réglage de la sensibilité du volant Vous avez le choix entre 6 niveaux de sensibilité. Le volant est réglé par défaut sur le niveau 1. Pour régler la sensibilité, procédez de la manière suivante : 1. Appuyez sur la touche Select et en même temps sur la touche avec la flèche vers la droite. Les voyants clignotants indiquent le niveau de sensibilité sélectionné (voir tableau ci-dessous). 2. Répétez cette opération jusqu’à ce que le volant soit réglé sur le niveau de sensibilité de votre choix. Code lumineux des différents niveaux de sensibilité Voyants verts Niveau 1 Voyants jaunes XX Niveau 2 XX Niveau 3 Niveau 4 XX XX XX Niveau 5 Niveau 6 Voyants rouges XX XX XX XX Remarque : les voyants clignotent environ 5 secondes après réglage de l’angle de braquage. Pour les niveaux 4 à 6, quatre voyants clignotent à chaque fois. 24 Fonction de programmation Programmation pour attribuer à une touche une fonction affectée à une autre touche Appuyez Select. Tous les voyants clignotent. Le mode de programmation est alors activé. Appuyez sur la touche correspondant à la fonction que vous souhaitez affecter à une autre touche. Les quatre voyants des pédales ou les deux voyants des papillons de changement de vitesse se mettent alors à clignoter. Appuyez sur la touche à laquelle vous souhaitez attribuer la fonction. Tous les voyants clignotent de nouveau. Répétez les étapes 2 et 3 pour programmer d’autres touches. Pour quitter le mode de programmation, appuyez de nouveau sur Select + ou bien attendez six secondes que le volant quitte automatiquement le mode de programmation. PlayStation®2 Les papillons de changement de vitesse droit et gauche sont réglés par défaut sur R2 et L2. Les pédales sont configurées comme pédales d’accélération et de freinage et ont la même fonction que les touches X et . Les papillons de changement de vitesse et les pédales peuvent être affectés aux touches suivantes : , X, , , L1, L2, R1, R2, L3 (ß), R3 (à) et axe RY (áâ). Certains jeux utilisent par défaut le stick analogique droit pour les fonctions d’accélération et de freinage. Pour attribuer au stick analogique droit les fonctions des pédales, appuyez sur START + flèche vers la gauche + pédale d’accélérateur, puis sur START + flèche vers la gauche + pédale de frein. Cette fonction n’est prise en charge qu’en mode analogique. Le réglage est annulé dès que le volant passe en mode numérique ou que la console est éteinte. PC Les papillons de changement de vitesse droit et gauche sont réglés par défaut sur les touches 1 et 2. Les pédales sont configurées comme axe Y vers le haut et vers le bas. Les papillons de changement de vitesse et les pédales peuvent être affectés aux touches suivantes : 1, 2, 3, 4, 5, 6, 7, 8, 11, 12, axe Y. Réinitialisation de tous les réglages opérés Appuyez durant trois secondes sur Mode, débranchez le volant de la console ou éteignez la console. 25 FR Fonctions des touches FR Nom des touches PC PS ®2 Touches de direction POV (touches de direction) Touches de direction Volant vers la gauche/droite Axe X1 Mouvement vers la gauche et vers la droite du stick de gauche Pédale de gauche Axe Y1 () Touche analogique Pédale de droite Axe Y1 () Touche X analogique Touche 1 Touche Touche 4 Touche Touche 2 Touche Touche 3 Touche Mode Touche 10 Touche Mode Start Touche 10 Touche Start Select Touche 9 Touche Select L1 Touche 7 L1 L2 Touche 6 L2 R2 Touche 5 R2 R1 Touche 8 R1 Papillon de changement de vitesse gauche Touche 2 L2 Papillon de changement de vitesse droit Touche 1 R2 En cas de problème Le volant ne réagit pas. 1. Vérifiez que le jeu prend en charge le mode actuellement sélectionné. Éteignez le cas échéant la console et débranchez tous les câbles. Reprenez les branchements et rallumez la console. Les pédales ne réagissent pas. 1. Vérifiez le câblage entre les pédales et le volant. 2. Vérifiez que les pédales sont activées dans le jeu. 3. Si les pédales ne fonctionnent pas en cours de jeu, vous pouvez utiliser la fonction de changement de programmation des touches ou les touches X et pour modifier la programmation de la fonction d’accélération et de frein ou exécuter la fonction. 26 Garantie Nous accordons sur ce produit une garantie de deux ans à compter de la date d’achat couvrant les défauts de fabrication et tous les composants. Si vous avez besoin d’aide… En cas de problèmes techniques, veuillez vous adresser à notre service d’assistance technique. Vous trouverez le numéro de téléphone au dos de ce mode d’emploi. 27 FR N otas ES importantes sobre la seguridad Importante! Antes de utilizar este producto, lea el manual de instrucciones para obtener informaciones importantes acerca de la seguridad. Guarde el manual de instrucciones para consultas en el futuro. Soluciòn de problemas No intente reparar el dispositivo usted mismo. Remita todas las reparaciones al personal de servicio cualificado. No intente modificar el dispositivo de ninguna manera. Si lo hace, la garantía perdería validez. Colocación Coloque el dispositivo en un lugar estable para evitar posibles caídas que pudieran ocasionar lesiones físicas o dañar el producto. Limpiar el dispositivo Cuando limpie el dispositivo, por favor utilice un paño suave y seco. Nunca utilice bencina, removedor u otro químico para limpiarlo. Uso según instrucciones • El dispositivo sólo se puede usar con las piezas originales correspondientes. Humedad y fuentes de calor • El producto se utilizará siempre en No utilice este aparato en lugares espacios cerrados y secos. cercanos a agua (por ejemplo, frega• El uso según las instrucciones dores, bañeras, piscinas, etc.) ni lo incluye un procedimiento de exponga a lluvia, humedad ni líquidos instalación según las mismas que pueden gotear o salpicar. Evite instrucciones. El fabricante no se exponer la unidad a altas temperatuhace responsable de los daños que pudieran derivarse de un uso ras, humedad excesiva o rayos del sol. inadecuado del producto. 28 Introducción Muchas gracias por la compra del volante Force Vibration Racing Steering 2 en 1. Este volante multicompatible se ha concebido especialmente para ser conectado a la PlayStation®2 y a un PC. Efectos DualshockTM se encargan de trasladar al juego una realidad convincente. Características del producto • Vibración dual para conseguir efectos de lo más emocionante • Vale para PC y PlayStation®2 • Volante recubierto de piel sintética – altamente confortable y de gran sujeción • Bloque de pedales de aceleración y freno analógicos • Sargenta y soporte de piernas para conseguir una posición de juego optima sin deslizamiento • Dos palancas de cambio • Pedales y botones de función de fácil programación • Sensibilidad del volante ajustable • Amplio ángulo de giro de 250° Componentes suministrados • Volante • Bloque de pedales • Soporte para las piernas • Sargenta • Instrucciones de manejo • CD para controlador Montaje Advertencia: Hay que procurar que la superficie de montaje sobre la cual descansa el volante sea lisa. 29 ES Sujeción de mesa 1. Sujeta la sargenta a la parte inferior del volante (ver fig. más abajo) 2. Coloca el volante sobre la mesa y rosca el tornillo de la sargenta hasta que el volante no pueda deslizarse. Soporte de piernas ES 1. Saca el soporte del embalaje. 2. Gira el volante poniéndolo boca arriba y sujeta los soportes en los orificios previstos para ello. 3. Coloca el volante sobre tus piernas como indica la figura que viene a continuación Conexión a una consola de videojuegos o a un PC Conexión a PlayStation®2 Advertencia: ¡No conectar el volante a la PlayStation®2 a través del puerto USB del adaptador! En PlayStation®2 sólo funciona mediante el conector PlayStation®2 del volante. 1. Desconecta tu consola PlayStation®2. 2. Enchufa el conector PlayStation2 del volante al puerto 1 de la consola PlayStation®2. 3. Conecta el bloque de pedales al cable de 6 pines del volante. 4. Conecta el aparato de TV y la consola. Advertencia: Para detectar automáticamente el ángulo de giro ¡NO tocar el volante! El volante es autoajustable. Conexión a un PC a través del puerto USB Advertencia: 1. Ten muy en cuenta que Windows®95/NT no soporta el sistema USB. 2. No conectes el volante a un hub USB (concentrador). Sólo funciona si se conecta directamente al puerto USB de un ordenador. Requerimientos del sistema: • PC IBM • Windows®98 o superior • Puerto USB libre •20MB libres en la memoría El conector USB al puerto USB de tu ordenador. 30 Instalación del controlador para Windows®98 o superiores 1. Antes de instalar el controlador, hay que conectar el volante al PC. Inserta a continuación el CD ROM del controlador adjunto en la unidad de CDs. 2. Si no se inicia la instalación automática del programa, haz clic en Inicio > Ejecutar > Examinar que se abre y selecciona la unidad de CD-ROM. ES 3. Haz doble clic en el archivo setup. exe. 4. Si aparece la entrada de la firma digital de Windows, acepta esta opción para continuar con la instalación. Sigue las instrucciones que aparecen en pantalla. 5. Después de finalizar la instalación reinicia tu ordenador. Después de reiniciar el PC haz clic en Inicio > Configuración > Panel de control. Haz doble clic en Controlador de juegos. En la ventana que se abre aparecerá en la lista el volante en el estado „OK“ (aceptar). Haz clic sobre Propiedades para poder hacer un test del volante. No se precisa la calibración del volante. El volante soporta calibración dinámica que se ejecuta automáticamente al conectar el dispositivo. Modos analógico/digital: Puedes seleccionar en este volante para PlayStation®2 entre modos analógico y digital. Para seleccionar pulsa el botón Modo hasta que llegues al modo que estás buscando. Indicador LED Modo digital Modo analógico --- Rojo Advertencia: En algunos juegos como el GT3™ funciona el volante sólo en modo analógico. El modo digital facilita la compatibilidad con juegos más antiguos. 31 Características de funcionamiento Centrado automático Al conectar el volante a una consola el volante realiza automáticamente el centrado, de manera que no se precisan ajustes complicados a través del menú de ES opciones del juego. Detección automática del rango de giro más amplio Con esta función el volante se ajusta automáticamente al ángulo de giro más amplio, sin tener que realizar ajustes en el menú de opciones del juego. Ajuste de la sensibilidad Dispones de 6 niveles de sensibilidad. Por defecto está seleccionado el nivel 1. Pata ajustar la sensibilidad del volante procede como sigue: 1. Pulsa el botón select y al mismo tiempo el botón de dirección en forma de flecha hacia la derecha. Cuando los LEDs parpadean, indican el nivel de sensibilidad seleccionado (ver tabla más abajo) 2. Repite esta acción hasta que hayas conseguido ajustar la sensibilidad del volante que quieres. Indicador LED y los distintos grados o niveles de sensibilidad: LEDs verdes Nivel 1 LEDs amarillos XX Nivel 2 XX Nivel 3 Nivel 4 XX XX XX Nivel 5 Nivel 6 LEDs rojos XX XX XX XX Advertencia: Los LEDs parpadean unos 5 segundos después de ajustar el ángulo de giro. En el nivel 4-6 parpadean cuatro LEDs cda vez. 32 Función de programación Programación de una función pasándola de un botón a otro Pulsa Select. Todos los LEDs parpadean. El modo programador se ha activado. Pulsa el botón cuya función quieres asignar a otro botón. Verás que parpadean cuatro LEDs para los pedales y dos LEDs para las palancas del cambio. Pulsa el botón al cual quieres asignar la función. Todos los LEDs vuelven a parpadear. Repite los pasos 2 y 3 para cualquier otro botón al que quieras asignar una función. Para salir del modo programador pulsa de nuevo Select o espera unos seis segundos hasta que el volante salga automáticamente del modo. PlayStation®2 Las palancas de cambio izq. y dcha. vienen programadas por defecto en R2 y L2. Los pedales están ajustados para las funciones de acelerador y freno y tienen las mismas funciones que los botones X y . Las palancas de cambio y pedales se pueden asignar también a los siguientes botones: , X, , , L1, L2, R1, R2, L3 (ß), R3 (à) y el eje RY (áâ). Algunos juegos se sirven normalmente del stick analógico derecho para acelerar y frenar. Para asignar las funciones al stick analógico derecho, pulsa START + botón flecha izq. + pedal acelerador y a continuación START + botón flecha izq. + pedal freno. Esta función sólo la soporta el modo analógico. Los ajustes se pierden en cuanto el volante se activa en modo digital o se desconecta la consola. PC Las palancas de cambio izq. y dcha. vienen programadas por defecto en los botones 1 y 2. Los pedales se ajustan como eje Y arriba y abajo. Las palancas de cambio y pedales se pueden asignar también a los siguientes botones: 1, 2, 3, 4, 5, 6, 7, 8, 11, 12, eje Y. Reset de todos los ajustes y cambios realizados Pulsa durante tres segundos „Mode“, retira el volante de la consola o apágala. 33 ES Funciones de los botones ES Rotulación de botones PC PS ®2 Botones de dirección POV (botones de dirección) Botones de dirección Volante izq./dcha. Eje X1 Movimiento izq. /dcha. del stick izq. Pedal izq. Eje Y1 () Botón analógico Pedal dcho. Eje Y1 () Botón X analógico Botón 1 Botón Botón 4 Botón Botón 2 Botón Botón 3 Botón Modo Botón 10 Botón modo Inicio Botón 10 Botón Inicio Select Botón 9 Botón select L1 Botón 7 L1 L2 Botón 6 L2 R2 Botón 5 R2 R1 Botón 8 R1 Palanca de cambio izq, Botón 2 L2 Palanca de cambio dcha. Botón 1 R2 Resolución de problemas El volante no responde: 1. Comprueba si el juego que has metido es soportado por el modo de funcionamiento actual. En cualquier caso desconecta la consola y saca todos los cables. Vuelve a restablecer todas las conexiones de cables y conecta la consola. Los pedales no responden: 1. Comprueba y mira si están correctamente conectados los cables entre pedales y volante. 2. Comprueba si los pedales están activados para el juego. 3. Si los pedales no funcionan durante el juego, puedes cambiar su asignación de acelerador y freno por medio de X y asistido por la función de asignación de botones. 34 Garantía Este producto tiene una garantía de dos años a partir de la fecha de compra tanto para defectos de fabricación como de sus componentes. Si precisas ayuda... En caso de surgir cualquier problema, acude a los especialistas que te proporcionarán todo tipo de soporte técnico. El número de nuestra línea Hotline, se encuentra al dorso de estas instrucciones de manejo. 35 ES I mportanti informazioni in materia di sicurezza Importante! Prima di utilizzare il prodotto, è necesIT sario leggere attentamente nel manuale d’istruzione le avvertenze sulla sicurezza, nonché generali. Conservare accuratamente il presente manuale d‘istruzioni al fine di poterlo successivamente consultare nuovamente: Ricerca guasti/riparazione Non riparate l’apparecchio e non effettuate la manutenzione da soli. Per lavori di riparazione o manutenzione rivolgeteVi a personale competente specializzato. Non apportate da soli nessuna modifica all’apparecchio. Facendo ciò, perderete ogni diritto di garanzia. Umidità e fonti di calore Non utilizzate l’apparecchio in prossimità d’acqua (p. es. in prossimità di lavandini, vasche da bagno o piscine) e tenetelo lontano da luoghi umidi, da sprizzi o gocce d’acqua, nonché dalla pioggia. Non esporre il dispositivo ad alte temperature, umidità o luce solare diretta. Pulitura Pulire il dispositivo utilizzando un panno morbido e asciutto. Non usare mai benzina, diluenti o altri prodotti chimici. Collocazione Sistemare il dispositivo in una posizionare stabile. onde evitare di ferirsi o danneggiare il volante stessi se questi dovessero cadere. Uso appropriato dei dispositivi • È consentito utilizzare il dispositivo solo ed esclusivamente con i componenti originali previsti. • È consentito utilizzare il prodotto solo ed esclusivamente in ambienti chiusi, nonché asciutti. • Un uso appropriato del dispositivo implica un procedimento conforme alle disposizioni di installazione. Il costruttore esclude ogni tipo di responsabilità per danni derivanti da un uso improprio del dispositivo. 36 Introduzione Congratulazioni per aver acquistato il nostro volante 2in1 Force Vibration Racing Wheel. Questo volante, dalla elevata compatibilità, è stato studiato appositamente per il collegamento alla PlayStation®2, nonché al PC. Gli effetti Dualshock estremamente autentici fanno sì che il gioco risulti altrettanto autentico. Caratteristiche del prodotto • Dual Vibration per effetti di guida emozionanti • Compatibile sia con il PC, sia con la PlayStation®2 • Volante in similpelle – estremamente maneggevole e comodo • Blocco pedali con pedale del freno e dell’accelerazione analogico • Morsetto da tavolo e supporto gambe per una posizione di gioco ottimale senza spostarsi • Due levette integrate • Pedali e tasti di funzione semplici da configurare • Sensibilità di guida regolabile • Sterzabilità (250°) estremamente ampia In • • • • • • dotazione con la fornitura Volante Blocco pedali Supporto appoggiagambe Morsetto da tavolo Manuale d'istruzioni CD-ROM con driver Montaggio Nota bene: accertatevi che la superficie su cui fissare il dispositivo sia piana. 37 IT Fissaggio al tavolo 1. Fissate il morsetto da tavolo alla base del volante (v. fig. in basso). 2. Appoggiate il volante sul tavolo e avvitate la vite del morsetto da tavolo finché il volante non possa più scivolare. Supporto appoggiagambe 1. Estraete il supporto appoggiagambe dalla confezione. IT 2. Ribaltate il volante e fissate il supporto appoggiagambe negli appositi fori. 3. Appoggiate quindi il volante sulle gambe come illustrato nella figura. Collegamento ad una console giochi o ad un PC Collegamento alla PlayStation®2 Nota bene: non collegate il volante alla PlayStation®2 mediante l’interfaccia USB dell’adattatore in dotazione con la fornitura! Un corretto funzionamento del volante, collegato ad una PlayStation®2, è garantito solo ed esclusivamente mediante collegamento con il connettore PlayStation®2 del volante stesso. 1. Spegnete la vostra console giochi PlayStation®2. 2. Collegate il connettore PlayStation®2 del volante alla porta 1 della vostra PlayStation®2. 3. Collegate il blocco pedali al cavo a 6 pin del volante. 4. Accendete infine il televisore e la console giochi. Nota bene: per un corretto riconoscimento automatico della sterzabilità, NON è consentito toccare il volante! Il volante effettua un’autoconfigurazione. Collegamento del volante al PC tramite interfaccia USB Nota bene: 1. Il funzionamento del dispositivo mediante interfaccia USB non è supportato da Windows®95/NT. 2. Non collegate il volante ad un Hub USB. È garantito un corretto funzionamento del dispositivo solo ed esclusivamente in caso di diretta connessione all’interfaccia USB del PC. Requisiti di sistema: • PC IBM • Compatibile con Windows®98 o superiore • Una porta USB disponibile • Spazio di memoria necessario 20 MB Collegate in seguito il connettore USB all’interfaccia USB del vostro PC. 38 Driver per Windows®98 o OS superiori 1. Prima di procedere all’installazione dei driver, è necessario collegare il volante al PC. Inserite il CD-ROM contenente il driver in dotazione con la fornitura nell’unità CD-ROM. 2. Nel caso in cui il programma d’installazione non venga avviato in automatico, cliccate su Start > Esegui > Sfoglia… e selezionate l’unità CD-ROM. 3. Fate doppio clic sul file setup.exe 4. Nel caso in cui venga richiesta la firma digitale per Windows®, confermate il messaggio e continuate l’installazione. Seguire le istruzioni sullo schermo. 5. Ad installazione ultimata, si renderà necessario il riavvio del PC. Cliccate dopo il riavvio del PC su Start > Impostazioni > Pannello di controllo. Fate doppio clic su Periferiche di gioco.Nella finestra che verrà in seguito visualizzata, il volante dovrebbe essere contrassegnato con un “OK”. Cliccate infine su Proprietà per procedere alla fase di test del volante. Non è necessaria alcuna calibratura del volante. Il volante supporta infatti la calibratura dinamica effettuata automaticamente in fase di collegamento del dispositivo. Modalità analogica e digitale: Utilizzando questo volante alla PlayStation®2 è possibile scegliere la modalità digitale o analogica. Per selezionare una modalità, premete il pulsante Mode finché non si sia selezionata la modalità desiderata. Indicatore LED Modalità digitale Modalità analogica --- Rosso Nota bene: In alcuni giochi, come p.e. GT3™, il volante funziona soltanto in modalità analogica. La modalità digitale garantisce in compenso la compatibilità con videogiochi di vecchia generazione. 39 IT Caratteristiche di funzionamento Centratura automatica In fase di collegamento del volante alla console giochi, il volante effettua una centratura automatica per cui non è più necessario effettuare fastidiose impostazioni dal menù opzioni dei relativi videogiochi. IT Riconoscimento automatico della sterzabilità più ampia possibile Con questa funzione il volante viene automaticamente impostato su un grado di sterzabilità più ampia possibile per cui non è più necessario effettuare fastidiose impostazioni dal menù opzioni dei relativi videogiochi. Impostazione della sensibilità di guida Si dispone di 6 livelli di sensibilità di guida. Per default è impostato il livello 1. Per impostare la sensibilità di guida, procedete come qui seguito descritto: 1. Premete contemporaneamente il pulsante Select e il pulsante di direzione con la freccia verso destra. I LED lampeggianti indicano quale livello di sensibilità sia stato selezionato (v. tabella sottostante) 2. Ripetete questo procedimento finché non si sia selezionato il livello di sensibilità di guida desiderato Gli indicatori LED con i rispettivi livelli di sensibilità di guida: LED verde Livello 1 LED giallo XX Livello 2 XX Livello 3 Livello 4 XX XX XX Livello 5 Livello 6 LED rosso XX XX XX XX Nota bene: i LED lampeggiano circa 5 secondi dopo l’impostazione dell’angolazione di guida. Dal livello 4 al livello 6 lampeggiano rispettivamente quattro LED. 40 Programmazione Assegnazione della funzione di un tasto ad un altro tasto Premete „Select“. Tutti i LED lampeggiano. La modalità di programmazione è adesso attiva. Premete quindi il tasto la cui funzione si intende assegnare ad un altro tasto. Rispettivamente sia i quattro LED dei pedali, sia i due LED delle levette IT integrate iniziano a lampeggiare. Premete quindi il tasto di cui si intende assegnare la funzione. Tutti i LED lampeggiano ininterrottamente. Ripetete le operazioni descritte ai punti 2 e 3 per la programmazione di ulteriori tasti. Per abbandonare la modalità di programmazione, premete nuovamente Select oppure attendete sei secondi finché il volante non abbia abbandonato automaticamente la modalità di programmazione. PlayStation2 Le levette integrate, rispettivamente a destra e a sinistra, sono impostate in fabbrica su R2 e L2. I pedali sono configurati come pedale dell’acceleratore e del freno ed espletano le stesse funzioni espletate dai tasti X e . Le funzioni espletate dalle levette integrate e dai pedali possono essere assegnate ai seguenti tasti: , X, , , L1, L2, R1, R2, L3 (ß), R3 (à) e asse RY (áâ). Alcuni videogiochi utilizzano per default lo stick analogico destro come acceleratore e freno. Per assegnare la funzione di pedale allo stick analogico destro, premete START + freccia verso sinistra + il pedale dell’acceleratore ed infine START + freccia verso sinistra + il pedale del freno. Questa funzione viene supportata solamente in modalità analogica. Questa impostazione va persa non appena il volante sia stato commutato in modalità digitale oppure finché la console giochi non venga spenta. PC Le levette integrate, rispettivamente a destra e a sinistra, sono impostate in fabbrica sui tasti 1 e 2. I pedali sono configurati come asse Y per movimenti verso l’alto e il basso. Le funzioni espletate dalle levette integrate e dai pedali possono essere assegnate ai seguenti tasti: 1, 2, 3, 4, 5, 6, 7, 8, 11, 12, asse Y. Ripristino di tutte le impostazioni effettuate Premete per due secondi „Mode“, scollegate il volante dalla console giochi oppure spegnete la console giochi. 41 Funzione dei pulsanti IT Dicitura dei pulsanti PC PS ®2 Pulsanti di direzione POV (pulsanti digitali di direzione) Pulsanti di direzione Volante verso sinistra/destra asse X1 movimento verso destra e verso sinistra dello stick sinistro Pedale sinistro asse Y1 () pulsante analogico Pedale destro asse Y1 () pulsante X analogico pulsante 1 tasto pulsante 4 tasto pulsante 2 tasto pulsante 3 tasto Mode pulsante 10 pulsante Mode Start pulsante 10 pulsante Start Select pulsante 9 pulsante Select L1 pulsante 7 L1 L2 pulsante 6 L2 R2 pulsante 5 R2 R1 pulsante 8 R1 Levetta integrata sinistra pulsante 2 L2 Levetta integrata destra pulsante 1 R2 Ricerca guasti e possibili soluzioni Il volante non reagisce. 1. Verificate che il videogioco scelto supporti la modalità attualmente selezionata. Eventualmente spegnete e riaccendete la console e scollegate tutti i cavi. Ricollegate la console per infine riaccenderla. I pedali non reagiscono. 1. Controllate che i pedali e il volante siano collegati correttamente. 2. Verificate che nel gioco i pedali siano stati attivati. 3. Nel caso in cui i pedali nel videogioco non funzionino, è possibile eseguire ossia assegnare la funzione di acceleratore e di freno con la funzione di configurazione dei pulsanti o con i pulsanti X e . 42 Garanzia Per questo prodotto concediamo una garanzia della durata di due anni a partire dalla data di acquisto. La garanzia copre i difetti di fabbricazione, nonché quelli dei componenti integrati. In caso di supporto tecnico... Nel caso in cui dovessero verificarsi ulteriori problemi tecnici, vi preghiamo di contattare i nostri tecnici. A tale proposito, troverete sul retro di questo manuale di istruzioni il numero del servizio di assistenza tecnica. 43 IT Jöllenbeck GmbH Kreuzberg 2 D-27404 Weertzen Germany Phone: +49 (0) 4287 9244 690 Web: www.speed-link.com SL-6693-SBK Version 1.0 © 2007 Jöllenbeck GmbH. All rights reserved. All product names mentioned in this manual may be trademarks or registered trademarks and are the property of their respective owners. Information contained herein is subject to change without notice. This publication or parts of it may not be reproduced without the express consent of the publisher.