1
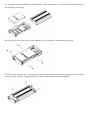
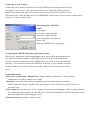
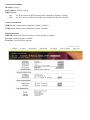
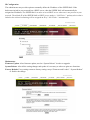
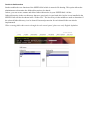
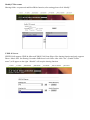
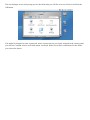
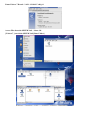
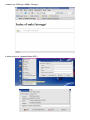
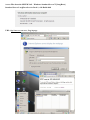
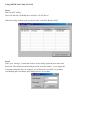
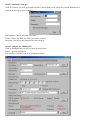
SPEED NAS User Guide
Overview
SPEED NAS adds advantage to sharing and managing data over internet and intranet. With account and
password management, enhances personal or company’s data security and privacy. Also, SPEED NAS
supports UPNP & XBOX 360’s music and photo files sharing to create more fun ability.
Package includes:
SPEED NAS enclosure x 1pc.
Securing Screws x 2pcs.
RJ-45 cable (Standard) x 1pc.
A to B type USB Cable (Standard) x 1pc.
Power adapter (AC100~240V to DC12V/5V 2A Dual power) x 1pc.
User Guide x 1pc.
Network and OS support
Network : Apple Safari / Linux Mozilla / Internet Explorer
Windows O.S. : Win98se / ME / 2000 / Server / XP / Vista (32/64bit)
Mac O.S. : 10.3.x or later
Linux
Hard Disk support
3.5 inch SATA I or SATA II hard drive
System setup
USB Host Driver:
Win98SE ( CD driver)
WinME / 2000 / Server / XP / Vista (None, bulk only)
Performance
USB Transmission: Full Speed 20-25MBytes/Sec. , High Speed 480Mbytes/Sec.
NAS Transmission: Upload Speed 7.5Mbytes/Sec. , Download Speed 8.5Mbytes/Sec
Before operating
First, using Windows OS’s Utility Tool “ScanIP” program to locate SPEED NAS’s IP address either on
Router, Hub or Switch Hub. After confirm IP address, type the IP address on internet browser’s URL space
to search. SPEED NAS can be found thereafter.
SPEED NAS unit has to power switch “on” in order for PC to recognize it. When changing to
LAN, switch the NAS unit power to “off”. Detach the USB cord and Attach the RJ45 cable and
switch the power to “ON” to recognize it.
Hardware Installation
A. Remove the two screws on the back of the enclosure with a screwdriver.
B. Loose the four screws on the surface of the unit. These screws will be used later to minimize the gap
between the heat sink and your hard drive.
C. The plastic bracket should slide out effortlessly. Insert your hard drive, connect the SATA interface from
the enclosure accordingly.
D. Secure your hard drive to the bracket with the four screws that are included in the package.
E. Reverse the procedure by re-inserting the bracket to the aluminum casing and securing all the screws that
was previously removed. Congratulations, you have completed the hardware installation
Connecting the SPEED NAS to your Computer
The SPEED NAS is a multifunctional hard drive enclosure. In addition to being a network storage device,
you can also use it as a stand-alone external hard drive via the USB interface.
Max OS X
Driver installation is not required for systems using Mac OS 10.1.2 or above. Simply connect the SPEED
NAS using the included USB cable and access the data by clicking the “Untitled” HDD icon located on your
Desktop.
Windows 2000/XP/ME
Driver installation is not required for Windows 2000/XP and Windows Me. Simply connect the SPEED
NAS using the included USB cable and access the data via “My Computer”.
Windows 98 (Download Drivers)
To utilize the USB connectivity, please visit the following URL for to download the driver:
http://images.fantec.de/Driver_Software_FANTEC_LD-H35SNU2.zip
Please ensure that you install the device driver before connecting the USB port. When you
complete the driver installation, reboot your computer, connect the SPEED NAS to your
computer and access the data via “My Computer”
You can also access data in the SPEED NAS connecting it directly using the Ethernet cable with your
computer. The SPEED NAS will have a default IP of 169.254.0.1 when connected directly.
Connecting to your Network
Connect the power adapter to the back panel of the SPEED NAS and plug the other end to a
wall outlet or power strip. Connect the network cable to the LAN port on the back of the
SPEED NAS and the other end of the network cable to a port on your hub, switch or router.
The Ethernet port on the SPEED NAS is Auto-MDI/MDIX, which means you can connect it using either a
crossover or a direct network cable.
Start Setting NAS GUI(Web)
admin
Log-in page,
User name : admin (Default)
Password : admin (Default)
Select “Remember my password”
Select “OK”
Will enter SPEED NAS’s setting page.
Configuring the SPEED NAS (Other Operating Systems)
When you are planning to perform administrative tasks from a different operating system,
you will need to input IP address of the SPEED NAS in the browser URL address bar.
If you do not know the IP address of the SPEED NAS, you will have to do this additional
procedure. You will need to connect the SPEED NAS directly to your computer, input the
default IP address 169.254.0.1 in the browser URL address bar to access the web control
panel.
System Information
․Host Name / Group Name / Administrator: Name changeable. But must do “System Reboot”
(Maintenance) in order to complete the change.
․Date/Time: Set at local time and date, Daylight Saving Time adjustment also available.
SNTP setting either Enable / Disable, Time Server please self-set, Time Zone please set at local or
preferable zone.
․File Language: Please must set at “User” computer’s operating system language. This is to prevent sharing
file’s name appear unreadable code, SPEED NAS’s system fail and unable to upload or download. It also
does not support Web’s multi-language access.
․Firmware Version: Firmware / Loader version
Network Information
IP address: (Auto)
MAC address: Factory setting.
DHCP Server:
ON:
for NAS connect at HUB, sharing status changeable (Enable / Disable)
OFF:
for NAS connect at Router, sharing status changeable (Enable / Disable)
Service Information
SMB Service: sharing status changeable (Enable / Disable).
FTP Service: sharing status changeable (Enable / Disable).
Disk Information
DISK ID: Hard Drive Model, Firmware Version and Series Number
Free Size: Hard Disk space available.
Total Size: Total Hard Disk capacity.
IP Configuration
The administrator may use this option to manually define the IP address of the SPEED NAS. If the
hub/router/switch in your network has a DHCP server, then the SPEED NAS will automatically be
assigned an IP address. The SPEED NAS can also act as a DHCP server when one is not present in your
network. The default IP of the SPEED NAS in DHCP server mode is “169.254.0.1” and any device that is
linked to the network containing will be assigned an IP of “169.254.0.x” automatically.
Maintenance
Firmware Update: After firmware update, need to “System Reboot” in order to upgrade.
System Reboot: After all the setting changes and update it’s necessary to reboot to gain new functions.
Factory Default: Every setting returns to factory setting except “Firmware and Loader”. “System Reboot”
to finalize the change.
Samba Administration
Samba enables the core function of the SPEED NAS which is network file sharing. This option allows the
administrator to determine the folders/directories to be shared.
In here, you can create, rename and delete folders/directories in your SPEED NAS. All the
folders/directories in the root directory that were previously in your hard drive before it was installed in the
SPEED NAS will also be shown in the “Folder List”. The arrow keys in the middle are used to determine if
the selected folder/directory is to be shared. Password protection for each shared folder can also be
implemented.
When creating folders/directories through the web control panel, please use only English alphabets.
FTP Configuration
Abbreviated from File Transfer Protocol, FTP enables file exchange between computers on the Internet. The
SPEED NAS can work as a stand-alone FTP server when it is assigned a static IP. Anonymous FTP is
disabled by default. The administrator can determine if the users have read or write permission and the
“Home Directory” will be the folder/directory the anonymous user can access upon logging in. The Account
List displays the current FTP user accounts, the administrator can add new users, modify their permissions,
temporary disable users and delete users.
Add account folder
Modify FTP Account:
Sharing folder: set password and Read/Write function, after setting please click “Modify”
UPNP AV Server
SPEED NAS supports UPNP & Microsoft XBOX 360 Game Player files sharing function and only supports
Photo / Music files. Set Sharing List under SMB lower level folder. After click “Set”, (Enable”Folder
name”) will appear on the right. “Disable” will stop the sharing function.
Disk Utility
HDD format at FAT32
Sleep Time function is a power save utility when SPEED NAS is not operational. (Delay time setting is from
5~60 min.) This way can prolong the operational life of HDD.
Scan Disk provides HDD internal information.
(Note: If HDD format with PC under NTFS format, SPEED NAS will not recognize it.)
Scan Disk [Press Start]: Show hard disk information.
Access Files from the SPEED NAS – Windows
In Windows, the data can be accessed by searching for the SPEED NAS in the “Network Neighborhood” (as
a computer with the name “Storage”). Or you can access the data in the SPEED NAS with the following
instructions.
The follow screenshots are taken from a PC running Windows XP SP2 and may vary slightly
from your computer screen.
Click on the Windows Start button, select “Run” from the menu and a dialogue box
as shown will appear. Type “//storage” in the field and click “OK”.
If you change the SPEED NAS’s hostname, you will need to replace the word “storage” with it. For
example, if you changed your hostname to “FileServer”, please type “\\FileServer” instead.
The Windows Explorer will appear and you should be able to see all the folders that were previously
selected to be shared under “SMB Server” in the control panel. Clicking on the corresponding folder will
reveal the files in that folder.
Access Files from the SPEED NAS – Mac OS
If the client computer is an Apple Macintosh running Mac OS, they will have to follow the procedure below
to mount each shared folder as an SMB share to access the data.
These screenshots are taken from a iMac running OS 10.3.x and may vary slightly from your computer
display.
Under Finder, select Go >> Connect to Server or use the hotkey <Command +K>
The next dialogue screen will prompt you for the folder that you will like to access.
Select it and click the OK button.
If you change the SPEED NAS’s hostname, you will need to replace the word “storage” with it. For
example, if you changed your hostname to “FileServer”, please type “smb://FileServer” instead.
The next dialogue screen will prompt you for the folder that you will like to access. Select it and click the
OK button.
You might be prompted to enter a password, unless a password was previously assigned in the control panel,
you can leave it blank. After a successful mount, a network folder icon will be created based on the folder
you selected as shown.
Linux Fedora 7 Kernel : 2.6.21-1.3194.fc7 x86_64
Access Files from the SPEED NAS – Linux OS
[ Fedora 7 ] search the SPEED NAS[Share Folder]
Another way, URL type “SMB : //Storage/ “
Connect to Server [ Optional Share FTP ]
Access Files from the SPEED NAS – Windows Standard Server™[LongHorn]
Standard Server LongHorn Service Pack 1,v126 Build 6001
URL : ftp://xxx.xxx.xxx.xxx , Log-in page
Using SPEED NAS Utility SCANIP
Step 1.
Run “ScanIP” Utility
Insert CD into the CD-ROM drive and click “SCAN IP.exe”
When the utility window pops up, please click “search for Remote NAS”
Step 2
Enter your “Storage” system and click to use the utility. Input the user name and
Password. The default username and password are both “admin”. If you forget the
Username and password you changed, you will need to reset NAS” by pushing
And holding the reset button at the back panel for 20 seconds.
Step 3 Connect the “Storage”
Click on Connect, you will be prompted for the Connect Disk screen, Enter the required information to
connect the Storage to your computer.
Disk number: Choose disk label you want.
Folder: Choose the share for folder you want to connect.
Password: You can set the password for extra security.
Step 4 Configure the SPEED NAS
Click on Management, you will see the following screen.
Status – System Information
The interface is similar to the web configuration page.
FAQ (Frequently Asked Questions)
1.
The SPEED NAS displays error messages / crashes during the file transmission?
Please ensure you update patches for your operating system frequently. The latest firmware for the
NAS is also available to download from our website at: http://www.
2.
Does the SPEED NAS support power management?
Yes, when there isn’t any hard drive activity within 5~60 minutes, the NAS will power down to reduce
power consumption. The sleep time can be configured via the web control panel.
3.
How does the SPEED NAS achieve its data sharing capabilities?
Utilizing the SMB (Server Message Block) protocol, the NAS allows any computer client that supports
TCP/IP, NetBuei or IPX/SPX to share files. The built-in FTP server also allows any clients with internet
connectivity to access the NAS.
4.
What is the hard disk size limitation for the SPEED NAS?
The NAS support LBA (48-bit Logical Block Addressing) which in theory includes all hard drives up
to 2 terabytes.
5.
Why does the SPEED NAS only supports FAT32 format?
As a cross platform file server, FAT32 format is compatible with all major operating systems
(Windows/Mac OS/Linux). Under the LAN mode a FAT32 format is the single file size limitation of
127 GB.
6.
How does the SPEED NAS DHCP service work?
The SPEED NAS functions as a DHCP(Dynamic Host Configuration Protocol) server when it does not
detect the presence of other DHCP servers in its network. DHCP is an Internet protocol for automating
the configuration of computers that use TCP/IP by automatically assigning IP addresses.
7.
What are the naming limitations of the files located in the SPEED NAS?
The maximum length of a folder/directory/file name is 12 characters. Invalid characters such as “* \ : "
< > . ? /” may not be used.
8.
What kind of hard drive is compatible with the SPEED NAS?
The NAS supports 3.5” SATA I /SATA II hard drives which are mostly manufactured after 2005. Below
is a list of manufacturer websites you can refer to for more information on the hard drive you own.
y
Western Digital
http://www.westerndigital.com
http://www.hitachigst.com
y
IBM/Hitachi
y
Samsung
http://www.samsung.com
y
Seagate
http://www.seagate.com
y
Maxtor
http://www.maxtor.com
9.
How to reset default setting?
Please try to reset the drive as follows:
1. shut down the SPEED NAS
2. disconnect all cables except of power
3. press the RESET button, switch on the SPEED NAS and keep this button pressed for about 10 sec.
4. switch off the SPEED NAS
10. How to share data over internet?
NAS shares files using Point to Point method. There are many brand of Router (ex. D-link) when using
remote hosting will cause unable to link up. We recommend using popular FTP program or CuteFTP
for downloading.
11. Listing for EU countries language support please see:
http://www.rerecognition.com/htm/country.htm
12. GUI(Web Setting) : Only available in English.
13. Why use SPEED NAS’s Disk Utility to format hard disk?
If using Windows to format with NTFS, SPEED NAS will not recognize the HDD.