1
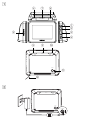
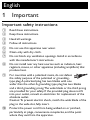
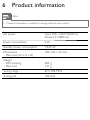
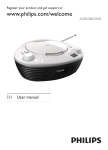
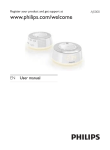
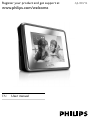
Register your product and get support at
www.philips.com/welcome
EN
User manual
AJL303/12
1
f
g
f
REPEAT ALARM
ALARM 1
BRIGHTNESS CONTROL
ALARM 2
a
b
MENU
OK
SD/MMC
e
c
VOL
d
h
i
j
CLOCK
TUNING
SLEEP
DC IN 5V
k
l
2
SLEEP
DC IN 5V
DC IN 5V
TUNING
CLOCK
English
1
Important
Important safety instructions
a
Read these instructions.
b
Keep these instructions.
c
Heed all warnings.
d
Follow all instructions.
e
Do not use this apparatus near water.
f
Clean only with dry cloth.
g
Do not block any ventilation openings. Install in accordance
with the manufacturer’s instructions.
h
Do not install near any heat sources such as radiators, heat
registers, stoves, or other apparatus (including amplifiers) that
produce heat.
i
For countries with a polarized mains, do not defeat
the safety purpose of the polarized or groundingtype plug. A polarized plug has two blades with one
wider than the other. A grounding type plug has two blades
and a third grounding prong. The wide blade or the third prong
are provided for your safety. If the provided plug does not fit
into your outlet, consult an electrician for replacement of the
obsolete outlet.
Caution: To prevent electric shock, match the wide blade of the
plug to the wide slot, fully insert.
j
Protect the power cord from being walked on or pinched,
particularly at plugs, convenience receptacles, and the point
where they exit from the apparatus.
k
Only use attachments/accessories specified by the manufacturer.
l
Use only with the cart, stand, tripod, bracket, or
table specified by the manufacturer or sold with the
apparatus. When a cart is used, use caution when
moving the cart/apparatus combination to avoid injury
from tip-over.
m
Unplug this apparatus during lightning storms or when unused
for long periods of time.
n
Refer all servicing to qualified service personnel. Servicing is
required when the apparatus has been damaged in any way, such
as power-supply cord or plug is damaged, liquid has been spilled
or objects have fallen into the apparatus, the apparatus has been
exposed to rain or moisture, does not operate normally, or has
been dropped.
o
Apparatus shall not be exposed to dripping or splashing.
p
Do not place any sources of danger on the apparatus (e.g. liquid
filled objects, lighted candles).
q
This product may contain lead and mercury. Disposal of
these materials may be regulated due to environmental
considerations. For disposal or recycling information, please
contact your local authorities or the Electronic Industries
Alliance: www.eiae.org.
This user manual has been printed on non-polluting paper.
All unnecessary packaging has been omitted. We have tried to make
the packaging easy to separate into three materials: cardboard (box),
polystyrene foam (buffer) and polyethylene (bags, protective foam
sheet.) Your system consists of materials which can be recycled and
reused if disassembled by a specialized company.
This electronic equipment contains a large number of materials that can
be recycled. If you are disposing of an old machine, please take it to a
recycling center.
Please observe the local regulations regarding disposal of packaging
materials, exhausted batteries and old equipment.
Norge
Typeskilt finnes på apparatens underside.
Observer:Nettbryteren er sekundert innkoplet.Den
innebygde netdelen er derfor ikke frakoplet nettet
så lenge apparatet er tilsluttet nettkontakten.
For å redusere faren for brann eller elektrisk støt,
skal apparatet ikke utsettes for regn eller fuktighet.
Notice
Any changes or modifications made to this device that are not expressly
approved by Philips Consumer Electronics may void the user’s authority
to operate the equipment.
2
Your clock radio
Congratulations on your purchase, and welcome to Philips! To fully
benefit from the support that Philips offers, register your product at
www.philips.com/welcome.
Introduction
With this clock radio, you can enjoy FM radio as well as the audio and
picture files stored in a memory card.
You can set two separate alarm timings. For the alarm sound, you can
select the audio files stored in the internal memory or a memory card.
What’s in the box
Check and identify the contents of your package:
•
Main unit
•
AC power adaptor
•
User manual
•
Quick start guide
Overview of the main unit (see 1)
a
MENU
Access home menu.
•
Access previous menu.
•
b
OK
•
•
•
•
•
Confirm an entry or a selection.
For clock: play/pause slideshow.
For radio: play/mute radio play.
For music: play/pause the selected item.
For photo slideshow: play/pause/zoom.
,
c
•
•
•
•
Move cursor up/down.
For clock/photo: rotate photo clockwise/anti-clockwise.
For radio: change preset number.
For music: select different play modes.
d
VOL
Adjust the volume level.
•
e
SD/MMC
SD/MMC card slot
•
f
ALARM 1/ALARM 2
Set, activate or deactivate alarm.
•
g
REPEAT ALARM/BRIGHTNESS CONTROL
Repeat the alarm.
•
Select display brightness level.
•
h
CLOCK
Press to change clock position on the screen.
•
Press and hold to set clock.
•
i
TUNING
Tune to radio stations.
•
For photo/music: select the previous/next item.
•
j
SLEEP
Set, activate or deactivate sleep timer.
•
k
DC IN 5V
Power supply socket.
•
l
Antenna
3
Get started
Caution
• Use the controls only as stated in this user manual.
Always follow the instructions in this chapter in sequence.
If you contact Philips, you will be asked for the model and serial number
of your clock radio. The model number and serial number are on the
back of your clock radio. Write the numbers here:
Model No. __________________________
Serial No. ___________________________
Connect power
Caution
• Risk of electric shock! When you disconnect the power supply, always pull the
plug from the socket. Never pull the cord.
•
Connect the supplied AC adaptor to the set and to the AC
outlet. (see 2)
Select on-screen display language
1
2
3
4
5
Press MENU.
» The home menu appears.
Select [Settings], then press OK.
» The setting menu appears.
Select [Language], then press OK.
Select an option, then press OK to confirm.
Press MENU to exit the setting menu.
Set time and date
1
2
3
4
5
6
7
8
9
Press MENU.
Select [Settings] -> [Clock] -> [Set time], then press OK.
Press
to set the hour, then press OK to confirm.
Press
to set the minute, then press OK to confirm.
Select [Set date], then press OK.
Press
to set the day, then press OK to confirm.
Press
to set the month, then press OK to confirm.
Press
to set the year, then press OK to confirm.
Press MENU to exit the setting menu.
4
Use your clock radio
Display clock
1
2
Press MENU.
Select [Clock], then press OK.
» The current time and alarm status are displayed on a
background of photos from the internal memory.
•
To stop the slideshow, press OK. Press again to resume
slideshow.
•
.
To change the background photo, press TUNING
•
To change the clock position on the screen, press CLOCK.
Listen to FM radio
1
2
Press MENU, then select [Radio].
Press TUNING
to tune to a radio station.
To search for a radio station automatically:
1 Press and hold TUNING / .
» The radio tunes to a station with strong reception
automatically.
2
•
Repeat step 1 if necessary until you find the desired station.
until you have
To tune to a weak station, press TUNING
found optimal reception.
Tip
• Extend or adjust the antenna for optimum reception.
Turn off radio
To turn off the radio, press OK. Press again to turn on the radio.
Program radio stations
You can store up to 20 FM radio stations in the memory manually or
automatically.
Manual programming
1
2
3
4
5
Tune to a station.
Press and hold OK for about 2 seconds.
» The preset number flashes.
Press
to allocate a number from 1-20 to this station.
Press OK to confirm.
Repeat steps 1-4 to store other stations.
Automatic programming
Automatic programming starts from preset 1. Any previous presets are
erased.
1 Press MENU.
2 Select [Settings] -> [Auto tune], then press OK.
» All available stations are programmed.
» After all stations are stored, the first preset station
automatically plays.
View photos
1
2
3
Insert an SD/MMC card into the SD/MMC card slot.
» The home menu appears.
Select [Photo] from the home menu.
» Thumbnail previews of the photos stored in the card are
displayed.
Press OK.
» A slideshow of the stored photos starts from the photo
selected.
•
To pause, press OK. Press again to resume play.
•
•
•
•
To select the previous/next photo, press TUNING
.
To rotate clockwise, press .
To rotate counter-clockwise, press .
To display clock while viewing photos, press CLOCK.
Listen to SD/MMC card audio
1
2
3
Insert an SD/MMC card into the SD/MMC card slot.
» The home menu appears.
Select [Music] from the home menu.
Select a folder/file, then press OK.
» The file is played.
To pause, press OK. Press again to resume play.
•
.
To select the previous/next item, press TUNING
•
To select different play modes: Repeat one, Repeat all, and
•
.
shuffle, press
To set the current music as sleep music, press and hold
•
SLEEP.
Set the alarm timer
Note
• Before you start, ensure that the clock is set correctly.
You can set two separate alarm timings. For the alarm sound, you can
select the audio files stored in the internal memory or a memory card.
1 Press ALARM 1/ALARM 2.
» The Alarm 1/ALarm 2 icon and the clock digits are displayed
2
3
Press
to set the hour, then press OK to confirm.
Press
to set the minute, then press OK to confirm.
» At the set time, the alarm sounds and the volume increase
gradually.
Stop the alarm
•
When the alarm sounds, press any button except REPEAT
ALARM/BRIGHTNESS CONTROL.
Repeat the alarm
•
When the alarm sounds, press REPEAT ALARM/BRIGHTNESS
CONTROL.
flashes.
»
» The alarm repeats once every 9 minutes.
Switch off the alarm
•
To switch off the alarm, press ALARM 1/ALARM 2 repeatedly
changes to .
unitl
Tip
• When the alarm sounds, if no button is pressed, the alarm continues for 30
minutes.
Set sleep timer
The clock radio can switch to standby automatically after a set period
of time (measured in minutes). You can select the audio that is activated
during this period.
Activate radio
1
2
Tune to a radio station.
Press SLEEP repeatedly to select a time.
» The radio turns off after the set period of time.
Activate SD/MMC card audio
1
2
Repeat steps 1-3 (see ‘Listen to SD/MMC card audio’).
Press SLEEP repeatedly to select a time.
» The audio play stops after the set period of time.
Activate preset sleep music
1
2
In clock or photo mode, press SLEEP repeatedly to select a time.
Press
to select sleep music.
•
[Relaxation 1]
•
[Relaxation 2]
•
[Relaxation 3]
» The music play stops after the set period of time.
Deactivate sleep timer
•
5
Press SLEEP repeatedly until [OFF] is displayed.
Adjust settings
Change time format
1
2
3
4
5
Press MENU.
Select [Settings] -> [Clock] -> [Format].
Press OK to toggle between [12 hour] and [24 hour].
Select [Date format].
Press OK to toggle between [DD - MM - YYYY] and [YYYY
- MM - DD].
Select clock style
1
2
Press MENU.
Select [Settings] -> [Clock style].
3
4
Press OK, then select an option.
[Format]: select digital or analog clock
•
•
[Color]: select clock color
Press MENU to exit the setting menu.
Tip
• If you select analog clock, the clock color remains white when it is in the middle
of the screen.
Select alarm music and photo
1
2
3
Press MENU.
Select [Settings] -> [Alarm 1]/[Alarm 2].
Press OK, then select an option.
[Alarm music]: select alarm music.
•
[Alarm photo]: select alarm photo.
•
Tip
• In photo or music mode, press and hold ALARM 1/ALARM 2 to save the
current photo/music as the alarm photo/music.
Activate auto dim timer
1
2
3
4
5
6
Press MENU.
Select [Settings] -> [Auto dim timer] -> [Auto dim].
Press OK to select [ON].
Select [Start], then press OK.
Press
to set the hour, then press OK to confirm.
Press
to set the minute, then press OK to confirm.
»
7
8
The time at which auto dim starts is set.
Select [End].
Repeat steps 5-6 to set the end time.
» The time at which auto dim ends is set.
Select slideshow settings
1
2
3
Press MENU.
Select [Settings] -> [Slideshow].
Press OK, then select an option.
•
[Slideshow sequence]: display photos sequentially or
randomly
•
[Slideshow effect]: select slideshow effects
•
[Slideshow frequency]: select slideshow intervals.
Play photo with music
1
2
3
Press MENU.
Select [Settings] -> [Photo with music playback].
Press OK to select [ON].
Restore original settings
1
2
Press MENU, then select [Settings] -> [Restore default settings].
Press OK.
» A confirmation box is displayed.
6
Product information
Note
• Product information is subject to change without prior notice.
AC power
Input: 100 - 240 V, 50/60 Hz
Output: 5 V, 800 mA
Power consumption
4W
Standby power consumption
<0.45 W
Dimensions
- Main unit (W x H x D)
100 x 82 x 33 mm
Weight
- With packing
- Main unit
385 g
137 g
Tuning range
87.5-108 MHz
Tuning grid
100 KHz
7
Troubleshooting
Caution
• Never remove the casing of this clock radio.
To keep the warranty valid, never try to repair the system yourself.
If you encounter problems when using this clock radio, check the
following points before requesting service. If the problem remains
unsolved, go to the Philips web site (www.Philips.com/support). When
you contact Philips, ensure that your clock radio is nearby and the
model number and serial number are available (see ‘Get started’ ).
No power
Ensure that the AC power adaptor is connected properly.
•
Ensure that there is power at the AC outlet.
•
No sound
Adjust the volume.
•
Poor radio reception
Fully extend the antenna.
•
Timer does not work
Set the clock correctly.
•
Switch on the timer.
•
Clock/timer setting erased
Power has been interrupted or the power adaptor has been
•
disconnected.
Reset the clock/timer.
•
© 2008 Koninklijke Philips Electronics N.V.
All rights reserved.