1
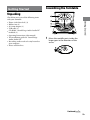
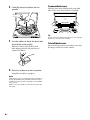
WARNING To reduce the risk of fire or electric shock, do not expose this apparatus to rain or moisture. To prevent fire, do not cover the ventilation of the apparatus with news papers, table-cloths, curtains, etc. And don’t place lighted candles on the apparatus. To prevent fire or shock hazard, do not place objects filled with liquids, such as vases, on the apparatus. Do not install the appliance in a confined space, such as a bookcase or built-in cabinet. The unit is not disconnected from the AC power source (mains) as long as it is connected to the wall outlet, even if the unit itself has been turned off. Install this system so that the power cord can be unplugged from the wall socket immediately in the event of trouble. Notice for the customers in the U.S.A. This symbol is intended to alert the user to the presence of uninsulated “dangerous voltage” within the product’s enclosure that may be of sufficient magnitude to constitute a risk of electric shock to persons. This symbol is intended to alert the user to the presence of important operating and maintenance (servicing) instructions in the literature accompanying the appliance. The Caution Marking is put on the Bottom Enclosure. GB Important Safety Instructions 1) Read these instructions. 2) Keep these instructions. 3) Heed all warnings. 4) Follow all instructions. 5) Do not use this apparatus near water. 6) Clean only with dry cloth. 7) Do not block any ventilation openings. Install in accordance with the manufacturer’s instructions. 8) Do not install near any heat sources such as radiators, heat registers, stoves, or other apparatus (including amplifiers) that produce heat. 9) Do not defeat the safety purpose of the polarized or grounding-type plug. A polarized plug has two blades with one wider than the other. A grounding type plug has two blades and a third grounding prong. The wide blade or the third prong are provided for your safety. If the provided plug does not fit into your outlet, consult an electrician for replacement of the obsolete outlet. 10)Protect the power cord from being walked on or pinched particularly at plugs, convenience receptacles, and the point where they exit from the apparatus. 11)Only use attachments/accessories specified by the manufacturer. 12)Use only with the cart, stand, tripod, bracket, or table specified by the manufacturer, or sold with the apparatus. When a cart is used, use caution when moving the cart/apparatus combination to avoid injury from tip-over. 13)Unplug this apparatus during lightning storms or when unused for long periods of time. 14)Refer all servicing to qualified service personnel. Servicing is required when the apparatus has been damaged in any way, such as power-supply cord or plug is damaged, liquid has been spilled or objects have fallen into the apparatus, the apparatus has been exposed to rain or moisture, does not operate normally, or has been dropped. WARNING This equipment has been tested and found to comply with the limits for a Class B digital device, pursuant to Part 15 of the FCC Rules. These limits are designed to provide reasonable protection against harmful interference in a residential installation. This equipment generates, uses, and can radiate radio frequency energy and, if not installed and used in accordance with the instructions, may cause harmful interference to radio communications. However, there is no guarantee that interference will not occur in a particular installation. If this equipment does cause harmful interference to radio or television reception, which can be determined by turning the equipment off and on, the user is encouraged to try to correct the interference by one or more of the following measures: Reorient or relocate the receiving antenna. Increase the separation between the equipment and receiver. Connect the equipment into an outlet on a circuit different from that to which the receiver is connected. Consult the dealer or an experienced radio/TV technician for help. CAUTION You are cautioned that any changes or modification not expressly approved in this manual could void your authority to operate this equipment. If you have any questions about this product, you may call: Sony Customer Information Services Center 1-800-222-7669 or http://www.sony.com/ Declaration of Conformity Trade Name : SONY Model Name : PS-LX300USB (Stereo Turntable System) Responsible Party : Sony Electronics Inc. Address : 16450 W. Bernardo Dr, San Diego, CA92127 USA Telephone No. : 858-942-2230 This device complies with Part 15 of the FCC Rules. Operation is subject to the following two conditions. (1) This device may not cause harmful interference, and (2) this device must accept any interference received, including interference that may cause undesired operation. Notice for the customers in Canada This class B digital apparatus complies with Canadian ICES-003. NOTICE FOR THE CUSTOMERS IN THE UNITED KINGDOM A moulded plug complying with BS1363 is fitted to this equipment for your safety and convenience. Should the fuse in the plug supplied need to be replaced, a fuse of the same rating as the supplied one and approved by ASTA or BSI to BS1362, (i.e., marked with or mark) must be used. If the plug supplied with this equipment has a detachable fuse cover, be sure to attach the fuse cover after you change the fuse. Never use the plug without the fuse cover. If you should lose the fuse cover, please contact your nearest Sony service station. Notice for customers: the following information is only applicable to equipment sold in countries applying EU directives. The manufacturer of this product is Sony Corporation, 1-7-1 Konan Minato-ku, Tokyo, 108-0075 Japan. The Authorized Representative for EMC and product safety is Sony Deutschland GmbH, Hedelfinger Strasse 61, 70327 Stuttgart, Germany. For any service or guarantee matters, please refer to the addresses given in separate service or guarantee documents. For the customers in Europe Disposal of Old Electrical & Electronic Equipment (Applicable in the European Union and other European countries with separate collection systems) This symbol on the product or on its packaging indicates that this product shall not be treated as household waste. Instead it shall be handed over to the applicable collection point for the recycling of electrical and electronic equipment. By ensuring this product is disposed of correctly, you will help prevent potential negative consequences for the environment and human health, which could otherwise be caused by inappropriate waste handling of this product. The recycling of materials will help to conserve natural resources. For more detailed information about recycling of this product, please contact your local Civic Office, your household waste disposal service or the shop where you purchased the product. This equipment has been tested and found to comply with the limits set out in the EMC Directive using a connection cable shorter than 3 meters. GB Table of Contents About This Manual.....................................................4 Getting Started Unpacking.......................................................................5 Assembling the Turntable.....................................5 Connecting an Audio Device..............................7 Operations Playing a Vinyl Record..............................................8 Recording Audio Tracks on Your Computer.............................................................9 Additional Information Precautions.................................................................. 15 Maintenance............................................................... 16 Troubleshooting....................................................... 17 Specifications............................................................. 20 Parts and Controls................................................... 21 GB About This Manual Thank you for purchasing the Sony Stereo Turntable System. Before operating the unit, please read this manual thoroughly and retain it for future reference. IBM and PC/AT are registered trademarks of International Business Machines Corporation. Microsoft, Windows and Windows Vista are either registered trademarks or trademarks of Microsoft Corporation in the United States and / or other countries. In this manual, Microsoft® Windows® XP Home Edition and Microsoft® Windows® XP Professional are referred to as Windows XP. In this manual, Microsoft® Windows Vista® Home Basic, Windows Vista® Home Premium, Windows Vista® Business, and Windows Vista® Ultimate are referred to as Windows Vista. In this manual, Microsoft® Windows 7® Home Premium, Microsoft® Windows 7® Professional, and Microsoft® Windows 7® Ultimate are referred to as Windows 7. Sound Forge is a trademark or registered trademark of Sony Creative Software Inc. in the United States and other countries. All other names of systems and products are trademarks or registered trademarks of their respective owners. TM and ® marks are omitted in this manual. Getting Started Assembling the Turntable Unpacking Getting Started Check that you received the following items with your turntable: Platter (with drive belt) (1) Rubber mat (1) 45 r/min adaptor (1) USB cable (1) CD-ROM, “Sound Forge Audio Studio LE” included (1) Operating Instructions (this manual) The installation guide for “Sound Forge Audio Studio LE” Recording audio tracks of a vinyl record to your computer Please read this first. 1 Move the metallic parts inside the larger gear in the direction of the arrow. Continued GB 2 Carefully place the platter on the spindle. To remove the dust cover With the dust cover fully opened, grasp both sides of the cover, then remove it carefully. Hinge pocket Hinge Tip 3 Use the ribbon to hook the drive belt around the motor pulley. Make sure not to twist the drive belt. After looping the belt, do not forget to remove the ribbon. 4 Place the rubber mat on the platter. Turntable assembly is complete. Note When the AC power cord is plugged after assembling or moving the turntable, the turntable sometimes rotates and the tone arm descends to the platter even if START is not pressed. If this occurs, press STOP to return the tone arm to the arm stand. GB You can use the turntable leaving the dust cover removed. In that case, store the cover correctly. To install the dust cover Insert the hinge pockets on the dust cover into the hinges on the rear of the cabinet. Connecting an Audio Device The phono cable comes attached to the rear of the cabinet. 3 Connect the AC power cord. Connect the AC power cord to an AC wall outlet after completing all of the connections by performing steps 1 and 2. 1 Set the PHONO/LINE switch (on to a wall outlet Getting Started the rear of the turntable) according to the jacks of your stereo system (amplifier). • When your stereo system (amplifier) has PHONO input jacks (connect to PHONO input jacks) set to PHONO. The Equalizer function is off. • When your stereo system (amplifier) does not have PHONO input jacks (connect to AUX, VIDEO input jacks, etc.) set to LINE. The Equalizer function is on. 2 Connect the cable with the white plug to the white (L) jack and connect the cable with the red plug to the red (R) jack. Make sure to insert the plugs firmly into the jacks. If the plugs are not inserted firmly, noise may occur. GB 3 Set the SIZE SELECTOR to 17 or 30. 4 Turn the protective cover to expose Operations Playing a Vinyl Record the stylus. 5 Close the dust cover. 6 Press START. The platter starts rotating. Note 45 r/min adaptor STOP UP/DOWN 1 Place a vinyl record on the platter. Lower the volume of the amplifier to prevent damage to it. If the tone arm descends and the stylus touches the vinyl record, a loud creaking noise may occur and harm the amplifier or speakers. Adjust the volume of the amplifier after the stylus descends. 7 Adjust the volume on your amplifier. When playback is finished The tone arm returns to the arm stand automatically, then the platter stops rotating. To stop playing Press the STOP button. The tone arm returns to the arm stand. The platter stops rotating. Note Place only one vinyl record on the platter at a time. If two or more vinyl records are stacked on the platter, the stylus will not make proper contact with the grooves and the quality of reproduction will be impaired. 2 Press the Speed select button to select the speed. GB To pause playing Press the UP/DOWN button to raise the stylus off the vinyl record. To play a different part of the vinyl record 1 After performing step 4, press the UP/ DOWN button, then lift the tone arm. 2 Move the tone arm to the position you desire. The tone arm descends to the record, then playback starts. To play a 17-cm vinyl record Place the supplied 45 r/min adaptor on the spindle. When you have finished using the adaptor, put it back in the adaptor tray. You can record audio tracks of a vinyl record on your computer by: • Connecting the turntable and your computer using the supplied USB cable • Using the supplied software, “Sound Forge Audio Studio LE” System requirements for the computer to be connected to the turntable* • Compliant computer: IBM PC/AT or compatible computers • Operating systems: Windows® XP Home Edition Service Pack 2 or higher Windows® XP Professional Service Pack 2 or higher Windows Vista® Home Basic Windows Vista® Home Premium Windows Vista® Business Windows Vista® Ultimate Windows 7 Home Premium Windows 7 Professional Windows 7 Ultimate Pre-installed (manufacturer installed only) Operations 3 Press the UP/DOWN button. Recording Audio Tracks on Your Computer –Operating systems other than those listed above are not supported. –Windows XP 64 bit and Windows Vista 64 bit are not supported. –The supplied Sound Forge Audio Studio LE supports Windows XP 32 bit and Windows Vista 32 bit/64 bit. Version 9.0d or higher supports Windows 7 32 bit/64 bit. • Hardware Environment: –Port: USB port** * Required when recording audio tracks of a vinyl record onto a computer via a USB connection. **The USB jack of the turntable supports USB (fullspeed). Continued GB Notes •For the operating environment mentioned above, the turntable is not guaranteed to operate with all computers. •The turntable is not guaranteed to operate with home built computers, operating systems that are personally up-graded or multiple operating systems. •The turntable is not guaranteed to operate with functions such as system suspend, sleep (stand-by mode) and hibernation, on all computers. Installing the supplied software Before recording, install the supplied software, “Sound Forge Audio Studio LE.” Once you install the software into your computer, you do not have to install it again other than that you need to re-install it. 1 Insert the supplied CD-ROM into the CD drive of your computer. 2 Install the software according to onscreen instructions. Tip For details about installing the software, refer to the “Sound Forge Audio Studio LE” installation guide. Connecting the USB cable Connect the turntable and the computer with the supplied USB cable. To the USB jack USB cable (supplied) To the USB port Computer (not supplied) 10GB Notes The turntable is not guaranteed to operate with a USB hub or USB extension cable. Use the supplied USB cable. Connect the USB cable into the USB jack/USB port securely, or may cause a malfunction. Disconnect the USB cable when it is not in use , or it may cause noise. When the turntable and computer are connected via USB cable, the audio that is adjusted with the turntable equalizer is input to the USB port of the computer, when playing the turntable to record audio tracks on your computer. USB drivers are included in operating systems if you are using Windows XP, Windows Vista or Windows 7. USB drivers will be installed automatically when the system is connected to the computer for the first time. For details, refer to the manual of your computer. Setting up your computer: Windows XP ([Control Panel] is in [Category View]) 1 Select [Control Panel] from the [Start] menu. 2 Click [Sounds, Speech, and Audio Devices]. 3 Click [Sounds and Audio Devices]. 4 Click the [Audio] tab. 5 Select [USB Audio CODEC] for [Default device:] of [Sound recording]. ([Control Panel] is in the [Control Panel Home] view) 1 Select [Control Panel] from the [Start] menu. 2 Click [Hardware and Sound]. 3 Click [Sound]. 4 Click the [Recording] tab. 5 Select [USB Audio CODEC] for Operations Tip Setting up your computer: Windows Vista [Microphone]. 6 Click [Set default]. 7 Select [USB Audio CODEC], then click [Properties]. 8 Click the [Advanced] tab. 9 Select [2 channel, ...] (ex: [2 channel, 16 bit, 44100 Hz (CD Quality)]) from the [Default Format] drop-down list. 10 Click [OK]. Note To input stereo signal from the turntable to the computer, performing steps 7 through 10 is necessary. You can set the signal input level for Windows Vista SP1 or higher. For details, refer to your computer’s operating instructions. 6 Click [OK]. Continued 11GB Setting up your computer: Windows 7 ([Control Panel] is in the [Category] view) 1 Select [Control Panel] from the [Start] menu. 2 Click [Hardware and sound]. 3 Click [Manage audio devices] in [Sound]. 4 Click the [Recording] tab, and check if To set the signal input level 1 Click the [Levels] tab in the [USB Audio CODEC] property screen. 2 Move the slider to 0. 3 Adjust the slider using the cursor key. The appropriate setting for the turntable is 2 in the [0, 0, 1, 2, 3, …] level display. Check that the mute button is not active at this time. Level display Slider Mute button [Default device] is set for [USB Audio CODEC]. 5 Select [USB Audio CODEC], and then click [Properties]. 6 Click the [Advanced] tab. 7 Select [2 channel, …] (ex: [2 channel, 16 bit, 44100 Hz (CD Quality)] or [2 channel, 16 bit, 48000 Hz (DVD Quality)]) from the [Default Format] drop-down list. 8 Click [OK]. Note To input a stereo signal from the turntable to the computer, steps 5 through 8 are necessary. 12GB 4 Click [OK]. Note Do not exceed the recommended setting range when setting the input level (such as setting the left side all the way to 0 or increasing the numerical value of the level display). Doing so may cause the sound not to be output or to be distorted. Outputting audio through your computer’s speakers Setting your default playback device using Windows Vista ([Control Panel] is in the [Category] view) When first connecting the turntable and computer using the USB cable, [Speaker USB Audio CODEC] is automatically added to [Playback device], and set to [Default device]. In this state, audio is not output through your computer speakers. Set the computer according to the operating system you use as follows: 1 Select [Control Panel] from the [Start] Setting your default playback device using Windows XP 5 On the [Playback] tab, select your 1 Select [Control Panel] from the [Start] menu. 2 Select [Sounds and Audio Devices]. 3 Click the [Audio] tab. 4 In the [Sound playback] box, select your computer’s sound card from the [Default device] drop-down list. This device may vary depending on your computer. For details, refer to your computer’s documentation. 5 Click [Apply], and then click [OK] to close the [Sounds and Audio Devices Properties] screen. 2 Select [Hardware and Sound]. 3 Select [Manage audio devices]. 4 Select the [Playback] tab. computer’s speakers and click the [Set Default]. This device may vary depending on your computer. For details, refer to your computer’s documentation. Operations Perform the following steps to change your computer’s playback device settings: menu. 6 Click [OK] to close the [Sound] screen. Setting your default playback device using Windows 7 ([Control Panel] is in the [Category] view) 1 Select [Control Panel] from the [Start] menu. 2 Select [Hardware and Sound]. 3 Select [Manage audio devices]. 4 Select the [Playback] tab. 5 On the [Playback] tab, select your computer’s speakers and click the [Set Default]. This device may vary depending on your computer. For details, refer to your computer’s documentation. 6 Click [OK] to close the [Sound] screen. Continued 13GB Setting the default playback device in Sound Forge Audio Studio LE 1 Start the Sound Forge Audio Studio LE software. 2 Select [Preferences] from the [Options] menu. 3 Select the [Audio] tab. 4 Select [Microsoft Sound Mapper] from the [Audio device type] drop-down list. 5 Click [Apply], and then click [OK] to close the [Preferences] screen. If you still cannot hear audio Check the connection. Exit Sound Forge Audio Studio LE once and then restart the software. 14GB Recording audio tracks from the turntable on a computer For details on recording operations, refer to the supplied document titled “Recording audio tracks of a vinyl record to your computer.” For details about using the software, refer to the “Sound Forge Audio Studio LE” quick start guide (on the supplied CD-ROM) or on-line help of the software. Reference guides for the supplied software Refer to the following instructions: The installation guide for “Sound Forge Audio Studio LE”: Refer to this supplied manual to install “Sound Forge Audio Studio LE.” The “Sound Forge Audio Studio LE” tutorial: This tutorial provides easy instructions on how to operate the software. After installing the software, the tutorial appears when you launch the software for the first time. The “Sound Forge Audio Studio LE” quick start guide (on the supplied CD-ROM): This provides instructions on the basic operation of the software. Additional Information Precautions On placement Place the unit on a level surface. Avoid placing the unit near electrical appliances (such as a television, hair dryer, or fluorescent lamp) which may cause hum or noise. Place the unit where it will not be subject to any vibration, such as from speakers, slamming of doors, etc. Keep the unit away from direct sunlight, extremes of temperature, and excessive dust and moisture. If you have any question or problem concerning your unit that is not covered in this manual, please consult your nearest Sony dealer. Note on recording The recorded music is limited to private use only. Use of the music beyond this limit requires permission of the copyright holders. Additional Information On safety Before operating the unit, check that the operating voltage of your unit is identical with that of your local power supply. Should any solid object or liquid fall into the cabinet, unplug the unit and have it checked by qualified personnel before operating it any further. Unplug the unit from the wall outlet if it is not to be used for an extended period of time. To disconnect the cord, pull it out by the plug. Never pull the cord itself. On repacking Keep the carton and packing materials. They provide an ideal container to transport the unit. 15GB Maintenance Stylus and record care In order to prevent premature stylus and record wear, the stylus and record should be cleaned before playback. To clean the stylus, brush it from back to front using a good quality stylus cleaning brush. Do not clean the stylus with your finger tip. When using a fluid stylus cleaner, make sure not to moisten the stylus too much. Replacing the stylus The life expectancy of the stylus tip is about 500 hours. To preserve good sound quality and avoid damage to your records, we recommend replacing the stylus within this time limit. For a replacement stylus, consult your nearest Sony dealer. To remove the stylus 1 Turn off and unplug the AC power cords of the turntable and amplifier. 2 Protect the stylus with the stylus cover. Stylus cover 3 Grasp the stylus holder and pull it To clean your records, wipe thoroughly using a good quality record cleaner. downward away from the body of the cartridge/headshell as shown. Cartridge/headshell Cleaning the cabinet and dust cover Clean the cabinet and dust cover periodically using a soft dry cloth. If stains are difficult to remove, use a cloth moistened with a mild detergent solution. Do not use solvents such as alcohol, benzine or thinner, since they will damage the finish. 16GB Stylus holder To install the stylus Do this procedure with the stylus protected by the stylus cover. 1 Grasp both sides of the stylus holder, then insert the stylus grip into the cartridge/ headshell receptacle. Stylus holder Stylus cover Stylus grip 2 Push up the stylus holder until it clicks so Do not leave any space. Note Do not push the stylus cover forcefully. Otherwise, the exposed stylus from the cover may cause injury, or damage the stylus. Before going through the check list below, first make sure that: The power cord is securely connected. The speaker cords are securely connected. Should any problem persist after you have made these checks, consult your nearest Sony dealer. Playing a vinyl record The tone arm skips, skates or does not advance. The turntable is not level. Place the turntable on a level surface. The record is dirty or scratched. Clean the record with a commercially available record cleaning kit, or replace the record. Poor sound quality, excessive noise, intermittent sound, etc… The stylus is dirty or worn. Remove dust on the stylus using a stylus cleaning brush, or replace the worn stylus (see page 16). Dust or dirt has collected on the vinyl record. Clean the record using a good quality record cleaner. Continued Additional Information that it locks completely. Troubleshooting 17GB Rumble or low-frequency howl*. The turntable is placed too close to speakers. Move speakers away from the turntable. * This phenomenon, called “acoustic feedback”, occurs when vibrations from the speakers are transmitted through the air or via solid objects (such as shelves, a cabinet, or the floor) to the turntable where they are picked up by the stylus, amplified and reproduced through the speakers. There is noise. When the PHONO cable is not connected to the PHONO input jacks of your stereo system (amplifier), the turntable is connected to your computer using the USB cable. –Set the PHONO/LINE switch on the rear of the turntable to LINE. * When set to LINE, do not connect the PHONO cable to the PHONO input jacks of your stereo system (amplifier). –Make sure that the end of the PHONO cable is not touching metal. The turntable is connected to your computer using the USB cable. If you directly connect your stereo system (amplifier) or other devices while the USB cable is connected, noise may occur. Tempo is incorrect. Incorrect r/min. Set the r/min setting to match the one indicated on the vinyl record. (Select “33” for 33 1/3 r/min records or “45” for 45 r/min records.) The drive belt is twisted. Straighten the belt. The drive belt is deteriorated. Replace the drive belt. For details, consult your nearest Sony dealer. Platter does not rotate. Make sure the power cord is inserted all the way into an AC wall outlet. Make sure that the drive belt is looped around the motor pulley completely. The drive belt is broken. Replace the drive belt. For details, consult your nearest Sony dealer. Sound is too low or distorted. The turntable is not connected to the PHONO IN inputs on the amplifier (see page 7). 18GB USB connection/recording The turntable is not detected on your computer. Disconnect the supplied USB cable, and connect it again. With the turntable and the computer connected, restart the computer. Disconnect the supplied USB cable, and restart the computer. After restarting, connect the computer and the turntable with the supplied USB cable. The device setting of your computer may not be set correctly. –When first connecting the turntable and the computer using the USB cable or connecting to a different USB port, the USB device drivers may be automatically installed once again. To confirm if the driver is correctly installed, check as follows: For Windows XP ([Control Panel] is in [Category View]) 1 Select [Control Panel] from the [Start] menu. 2 Click [Performance and Maintenance]. 3 Click [System]. 4 Click the [Hardware] tab, and then click [Device manager]. 5 Check the [Device manager] screen. Check the devices installed as follows. –[USB Human Interface Devices] and [HIDcompliant consumer control device] under [Human Interface Devices] –[USB Audio Device] under [Sound, video and game controllers] –[USB Composite Device] under [Universal Serial Bus controllers] For Windows Vista ([Control Panel] is in the [Control Panel Home] view) 1 Select [Control Panel] from the [Start] menu. 2 Select [System and Maintenance]. 3 Select [Device Manager]. 4 Check the [Device manager] screen. For Windows 7 ([Control Panel] is in the [Category] view) 1 Select [Control Panel] from the [Start] menu. 2 Click [Hardware and sound]. 3 Click [Device Manager] in [Devices and Printers]. 4 Check the [Device Manager] screen. Check the devices installed as follows. –[HID-compliant consumer control device] and [USB Input Device] under [Human Interface Devices] –[USB Audio CODEC] under [Sound, video and game controllers] –[USB Composite Device] under [Universal Serial Bus controllers] Notes When connecting to different USB ports, you may have to install USB drivers. When connecting to different USB ports, the computer automatically installs the driver again. In such case, check that the driver is correctly installed as in this procedure. You cannot record sound to your computer from the turntable, or the sound is distorted. The audio recording device of your computer is not set correctly. See pages 11 – 14 to check the device settings. The signal input level exceeds the recommended setting range; adjust it (see page 12). There is noise in recorded sound. There are electrical wires, fluorescent lights or mobile phones near the turntable. Move away from any possible sources of electromagnetic interference. The supplied software does not launch. Thirty days have passed since the software was installed, and user registration has not been completed. Complete the user registration. Additional Information Check the devices installed as follows. –[USB Human Interface Devices] and [HIDcompliant consumer control device] under [Human Interface Devices] –[USB Audio CODEC] under [Sound, video and game controllers] –[USB Composite Device] under [Universal Serial Bus controllers] The recorded sound is disrupted. The CPU of your computer is overloaded. Exit other applications. Other USB devices are connected to your computer and being operated simultaneously. Quit operating other USB devices. You are being asked to enter the serial number in the startup screen of the supplied software. Installation has failed. Uninstall the software, and then reinstall it. If you are running resident software such as antivirus software, shut it down while installing the supplied software. Notes For details on the operation of your computer, refer to the operating instructions of your computer. There can be some breakdowns that cannot be solved even with Troubleshooting. In such cases, contact your nearest Sony dealer. 19GB Specifications Motor and Platter Drive system: Belt-drive Motor: DC motor Platter: 295 mm dia. (aluminum die-cast) Speeds: 33 1/3 and 45 r/min, 2 speed Wow and flutter: Less than 0.25% (WRMS) Signal to noise ratio: More than 50 dB (DIN-B) Tone Arm Type: Dynamic balanced straight-shaped with soft damping control Effective arm length: 195 mm USB jack Power supply: USB bus power compliant (5 V, 100 mA) (The power is supplied by the PC which is connected with an attached USB cable) Output jack: Plug-in-power system (Dedicated USB jack) USB series B connector USB (full-speed) 20GB General Power requirements: North American model: 120 V AC, 60 Hz Other models: 230 – 240 V AC, 50/60 Hz Power consumption: 2W Dimensions: Approx. 420 × 95 × 360 mm (16 1/2 × 3 5/8 × 14 1/4 in) (w/h/d) Mass: 3.3 kg (7 lb 5 oz) Design and specifications are subject to change without notice. Parts and Controls Hinge 45 r/min adaptor Tone arm Speed select button Arm stand Rubber mat Finger lift Platter SIZE SELECTOR Cartridge and headshell STOP button START button UP/DOWN button Insulator PHONO/LINE switch Dust cover USB jack Front Additional Information Spindle Rear 21GB 22GB Additional Information 23GB