1
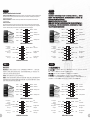
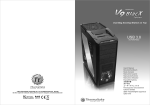
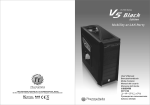
VJ2000 Series
User's Manual
Benutzerhandbuch
Mode d’emploi
Manual del usuario
Manuale dell’utente
安裝說明書
用戶手冊
ユーザーズマニュアル
Руководство пользователя
kullanıcı elkitabı
C 2008 Thermaltake Technology Co., Ltd. All Rights Reserved. 2008.04
All other registered trademarks belong to their respective companies. www.thermaltake.com
Tested To Comply
With FCC Standards
FOR HOME OR OFFICE USE
Specification
Contents
Chapter 1. Product Introduction
1.1
Specification
02
Chapter 2. Installation Guide
2.1
Side Panels Disassembly
03
2.2
Motherboard Installation
04
2.3
5.25” Drives Installation
05
2.4
3.5" Drives Installation
07
Model
VJ2000BNS
2.5
3.5" HDD Installation
09
2.6
Power Supply Unit (PSU) Installation
11
Dimension (H*W*D)
PCI Card Installation
12
Net Weight
5.73 kg / 12.63 lb
2.8
Front Fan Installation (for VJ2000BWS only)
13
Windows Side Panel
N/A
2.9
Top Fan Installation (Optional)
14
Material
2.7
VJ2000BWS
Middle Tower
Case Type
431 x 190 x 488 mm / 16.9 x 7.5 x 19.2 inch
6.15 kg / 13.56 lb
Yes
SECC
Black
Color
Front (intake) : Optional
Chapter3 Leads Installation Guide
120 x 120 x 25 mm fan or 140 x 140 x 25 mm fan
3.1
Case LED connection
15-19
3.2
USB 2.0 connection
15-19
3.3
Audio Connection
Front (intake) :
Rear (exhaust) :
120 x 120 x 25 mm Blue LED Fan 1300rpm,17dBA
120 x 120 x 25 mm TurboFan (1300rpm,17dBA)
or 140 x 140 x 25 mm fan (optional)
Rear (exhaust) :
Side (intake) : Optional
Cooling System
15-19
Two 120 x 120 x 25 mm fan or
120 x 120 x 25 mm TurboFan 1300rpm,17dBA
Two 140 x 140 x 25 mm fan
Top (exhaust) : Optional
Top (exhaust) : Optional
120 x 120 x 25 mm fan or 140 x 140 x 25 mm fan
120 x 120 x 25 mm fan or 140 x 140 x 25 mm fan
MB Tray (intake) : Optional
MB Tray (intake) : Optional
70 x 70 x 10 mm fan
70 x 70 x 10 mm fan
Chapter4 Other
4.1
Toughpower / Purepower / TR2
power supply series (optional)
1
20
Motherboard
9.6” x 9.6” (Micro ATX), 12” x 9.6”(ATX)
Drive Bays
-5.25" Drive Bay
-3.5" Drive Bay
-3.5" Drive Bay(Hidden)
11
4 x 5.25", 2 x 3.5"
5 x 3.5"
I/O Ports
USB 2.0 x 2, HD Audio x 1
Expansion Slots
7
Liquid Cooling Hole
Support 1/2”、3/8”、1/4” water tube
2
Side Panels Disassembly
English /
Unscrew thumbscrews and slide side
panels off from the chassis.
Deutsche /
Lösen Sie die Flügelschrauben und
schieben Sie die Seitentafeln vom
Gehäuse.
Motherboard Installation
繁體中文 /
移除機殼後 方 四 顆 拇 指螺絲然後將 側 版 向 後
滑動移開
简体中文 /
移除机箱后方四颗拇指螺丝然后将侧版向后
滑动移开
日本語 /
Français /
Dévissez les vis papillons et faites glisser
les panneaux latéraux hors du châssis.
3
蝶ねじを抜いて、サイドパネルをシャー
シからスライドさせながら出します。
Español /
Русский /
Desatornille los tornillos de mano y deslice
los paneles laterales para extraerlos del
chasis.
Отверните винты с накатанными головками
и снимите боковые панели с корпуса.
Italiano /
Türkçe /
Svitare le viti ad aletta e far scorrere i
pannelli laterali fuori dallo chassis.
Elle sıkılan vidaları gevşetin ve yan panelleri
kaydırarak kasadan çıkarın.
English /
繁 體中文 /
1. Lay down the chassis
2. Install the motherboard in proper
location and secure it with screws.
1. 將 機 殼 平 放
Deutsche /
1. Legen Sie das Gehäuse ab
2. Installieren Sie die Hauptplatine in
der richtigen Position und sichern
Sie es mit Schrauben.
Français /
1. Déposez le châssis
2. Installez le ventilateur dans
l'emplacement adéquat et sécurisez-le
avec des vis.
Español /
1. Tumbe el chasis
2. Instale la placa madre en la ubicación
correcta y asegúrela con tornillos.
2. 將 主 機 板 安 裝在合適的 位 置 並 用 螺絲鎖上
简体中文 /
1. 将机箱平放
2. 将主板安装在合适的位置并用螺丝锁上
日本語 /
1. シャーシを横にします
2. マザーボードを適切な場所に取り付け、
ねじで締め付けます。
Русский /
1. Положите корпус.
2. Установите материнскую плату в
надлежащее место и закрепите ее с
помощью винтов.
Italiano /
Türkçe /
1. Poggiare lo chassis
2. Installare la scheda madre nella
posizione appropriata e fissarla con
delle viti.
1. Kasayı yan yatırın.
2. Anakartı uygun yere takın ve vidalarla
sabitleyin.
4
5.25" Drives Installation
4
6
2
5
3
1
Italiano /
1. Tirare il pulsante del pannello anteriore
per sganciarlo dallo chassis.
2. Rimuovere il coperchio in plastica
dell’alloggiamento dell’unità da 5,25”.
3. Rimuovere il coperchio in metallo
dell’alloggiamento dell’unità da 5,25”.
4. Ruotare il dispositivo di blocco in seno
antiorario per sbloccare e rimuovere
tale dispositivo.
5. Inserire il disco rigido e fissare il
dispositivo di blocco in posizione.
6. Ruotare il dispositivo di blocco in senso
orario per chiudere il dispositivo.
日本語 /
1. フロントパネルの下部を引っ張って、
シャーシから取り外します。
2. 5.25”ドライブベイのプラスチックカバー
を取り外します。
3. 5.25”ドライブベイの金属カバーを取り
外します。
4. ロックデバイスを反時計方向に回して
ロック解除し、取り外します。
5. ハードウェアを挿入し、ロックデバイスを
ハードウェアの所定の位置にロックします。
6. ロックデバイスを時計方向に回して
デバイスをロックします。
繁體中文 /
Русский /
1. Потяните за нижнюю часть передней
панели, чтобы отсоединить ее от корпуса.
2. Снимите пластмассовую заглушку
отсека 5,25-дюймового дисковода.
3. Снимите металлическую заглушку
отсека 5,25-дюймового дисковода.
4. Поверните фиксирующее устройство
против часовой стрелки, чтобы
разблокировать и снять его.
5. Вставьте оборудование и установите
фиксирующее устройство на место.
6. Для блокировки устройства поверните
фиксирующее устройство по часовой
стрелке.
1. 拉面板底部,將面板從底盤拆下。
2. 拆下 5.25" 磁碟機槽的塑膠蓋。
5
English /
1. Pull the bottom of the front panel to
detach it from the chassis.
2. Remove the 5.25" drive bay plastic cover.
3. Remove the 5.25" drive bay metal cover.
4. Turn the lock device counterclockwise
to unlock and remove the lock device.
5. Insert the hardware and attach the
lock device to the hardware in place.
6. Turn the lock device clockwise to lock
the device.
Français /
1. Tirez sur le bas du panneau avant pour le
démonter du châssis.
2. Retirez le couvercle en plastique de la baie 5.25"
3. Retirez le couvercle en métal de la baie pour
lecteur 5.25"
4. Tournez le verrou dans le sens contraire des
aiguilles d'une montre pour déverrouiller et
retirez le verrou.
5. Insérez le lecteur et mettez le verrou sur le
lecteur qui est en place.
6. Tournez le verrou dans le sens des aiguilles
d'une montre pour verrouiller
Deutsche /
1. Ziehen Sie am unteren Rand der
Vorderseitentafel, um sie vom Gehäuse
zu entfernen.
2. Entfernen Sie die Plastikabdeckung des
5,25 Zoll Schachts.
3. Entfernen Sie die Metallabdeckung des
5,25 Zoll Schachts.
4. Drehen Sie die Verriegelung gegen den
Uhrzeigersinn, um sie zu öffnen und zu
entfernen.
5. Schieben Sie die Hardware hinein und
bringen Sie die Verriegelung zur Fixierung
der Hardware an.
6. Drehen Sie die Verriegelung im
Uhrzeigersinn, um sie zu schließen.
Español /
1. Tire de la parte inferior del panel frontal para
separarlo del chasis.
2. Extraiga la cubierta de plástico de la bahía de
unidad de 5,25 pulgadas.
3. Extraiga la cubierta metálica de la bahía de
unidad de 5,25 pulgadas.
4. contrario a las agujas del reloj para
desbloquearlo y extraerlo.
5. Inserte el hardware y acople el dispositivo
de cierre al hardware ubicado en su lugar.
6. Gire el dispositivo de cierre en el sentido de
las agujas del reloj para cerrarlo.
3. 拆下 5.25" 磁碟機槽的金屬蓋。
4. 依逆時鐘方向轉動將 5.25" 無螺絲扣具
取下
5. 插入硬體裝置並裝上扣具
6. 依照順時針方向將無螺絲扣具裝上並固定
简体中文 /
1. 拉面板底部,将其从底板卸下。
2. 卸下 5.25” 驱动器槽的塑料盖。
3. 卸下 5.25” 驱动器槽的金属盖。
4. 依逆时钟方向转动将5.25”无螺丝扣具取下
5. 插入硬件装置并装上扣具
6. 依照顺时针方向将无螺丝扣具装上并固定
Türkçe /
1. Ön paneli alt kısmından çekerek
kasadan ayırın.
2. 5.25” sürücü bölmesinin plastik
kapağını çıkarın.
3. 5.25” sürücü bölmesinin metal
kapağını çıkarın.
4. Kilidini açmak için, kilit parçasını saatin ters
yönünde döndürün ve kilidi açıldıktan sonra
çıkarın.
5. Donanımı yerleştirin ve kilit parçasını,
donanım üzerindeki yerine yerleştirin.
6. Kilitleme parçasını saat yönünde döndürerek
aygıtı kilitleyin.
6
3.5" Drives Installation
2
1
Italiano /
日本語 /
1. Rimuovere il coperchio in metallo
1. 3.5”ドライブベイの金属カバーを取り外
dell’alloggiamento dell’unità da 3,5”.
2. Fissarlo con le viti.
します。
2. ネジでしっかり固定します。
。
English /
Français /
繁體中文 /
Русский /
1. Remove the 3.5” drive bay metal cover.
1. Retirez le couvercle en métal de la baie pour
1. 拆下 3.5" 磁碟機槽的金屬蓋。
1. Снимите металлическую заглушку
2. Secure it with screws.
lecteur 3.5"
2. 使用螺絲將其固定。
отсека 3,5-дюймового дисковода.
2. Закрепите ее с помощью винтов.
2. Sécurisez avec des vis.
Deutsche /
Español /
简体中文 /
Türkçe /
1. Entfernen Sie die Metallabdeckung des
1. Extraiga la cubierta metálica de la bahía de
1. 卸下 3.5” 驱动器槽的金属盖。
1. 3.5” sürücü bölmesinin metal
3,5 Zoll Schachts.
2. Sichern Sie sie mit Schrauben.
unidad de 3,5 pulgadas.
2. Asegúrela con tornillos.
2. 用螺丝固定。
kapağını çıkarın.
2. Vidalarla sabitleyin.
.
7
8
3.5" HDD Installation
1
3
2
9
Italiano /
日本語 /
1. Ruotare il dispositivo di blocco in seno
antiorario per sbloccare e rimuovere
tale dispositivo.
2. Inserire il disco rigido e fissare il
dispositivo di blocco in posizione.
3. Ruotare il dispositivo di blocco in senso
orario per chiudere.
1. ロックデバイスを反時計方向に回して
ロック解除し、取り外します。
2. ハードウェアを挿入し、ロックデバイスを
ハードウェアの所定の位置にロックします。
3. ロックデバイスを時計方向に回してロック
します。
English /
Français /
繁 體中文 /
Русский /
1. Turn the lock device counterclockwise
to unlock and remove the lock device.
2. Insert the hardware into the HDD cage
and attach the lock device to the
hardware in place.
3. Turn the lock device clockwise to lock.
1. Tournez le verrou dans le sens contraire des
aiguilles d'une montre pour déverrouiller et
retirez le verrou.
2. Insérez le lecteur et mettez le verrou sur le
lecteur qui est en place.
3. Tournez le verrou dans le sens des aiguilles
d'une montre pour verrouiller.
1. 依逆時鐘方向 轉 動 將 無螺絲扣具取 下
1. Поверните фиксирующее устройство
против часовой стрелки, чтобы
разблокировать и снять его.
2. Вставьте оборудование и установите
фиксирующее устройство на место.
3. Для блокировки поверните фиксирующее
устройство по часовой стрелке.
2. 插入硬體裝置 並 裝 上 無螺絲扣具
3. 依照順時針方 向 將 無 螺絲扣具裝上 並 固 定
Deutsche /
Español /
简体中文 /
Türkçe /
1. Drehen Sie die Verriegelung gegen den
Uhrzeigersinn, um sie zu öffnen und zu
entfernen.
2. Schieben Sie die Hardware hinein und
bringen Sie die Verriegelung zur Fixierung
der Hardware an.
3. Drehen Sie die Verriegelung im
Uhrzeigersinn, um sie zu schließen.
1. Gire el dispositivo de cierre en el sentido
contrario a las agujas del reloj para
desbloquearlo y extraerlo.
2. Inserte el hardware y acople el dispositivo de
cierre al hardware ubicado en su lugar.
3. Gire el dispositivo de cierre en el sentido de
las agujas del reloj para cerrar.
1. 依逆时钟方向转动将无螺丝扣具取下
1. Kilidini açmak için, kilit parçasını saatin ters
2. 插入硬件装置并装上无螺丝扣具
yönünde döndürün ve kilidi açıldıktan sonra
çıkarın.
2. Donanımı yerleştirin ve kilit parçasını,
donanım üzerindeki yerine yerleştirin.
3. Kilit parçasını, kilitlemek için saat yönünde
döndürün.
3. 依照顺时针方向将无螺丝扣具装上并固定
10
Power Supply Unit (PSU) Installation
PCI Card Installation
1
2
3
English /
Install the power supply unit in proper
location and secure it with screws.
繁 體 中文 /
將 電 源供應器放置 在 正 確 的 位置,並用螺 絲
固 定 鎖上
English /
1. Pull open the holder.
2. Insert the PCI card into the PCI slot.
3. Push to fasten the holder.
繁體中文 /
1. 移 動PCI無螺絲 機 構 以 鬆 開固定扣具
2. 插 入 PCI裝置於PCI插 槽 中
3. 向 下 壓 入PCI扣具並 固 定 PCI裝置
Deutsche /
Montieren Sie das Netzteil an der
korrekten Position und befestigen
Sie es mit Schrauben.
简体中文 /
将电源供应器放置在正确的位置,并用螺丝
固定锁上
Deutsche /
1. Ziehen Sie den Halter auf.
2. Stecken Sie die PCI Karte in den PCI
Steckplatz.
3. Drücken Sie den Halter ein, um ihn
zu sichern.
简体中文 /
1. 移动PCI无螺丝机构以松开固定扣具
2. 插入PCI装置于PCI插槽中
3. 向下压入PCI扣具并固定PCI装置
Français /
Installez l'alimentation dans l'emplacement
adéquat et sécurisez-la avec des vis.
Español /
Instale la unidad de fuente de alimentación
en la ubicación correcta y asegúrela con
tornillos.
Italiano /
Installare l’unità di alimentazione nella
posizione appropriato e fissarla con delle
viti.
11
日本語 /
電源装置を適切な場所に取り付け、ねじで
締め付けます。
Français /
1. Tirez pour ouvrir le support.
2. Insérez la carte PCI dans le slot PCI.
3. Poussez pour fixer le support.
日本語 /
1. ホルダーを引っ張って開けます。
2. PCIカードをPCIスロットに挿入します
3. ホルダーを押して締め付けます。
Русский /
Установите блок питания в надлежащее
место и закрепите его с помощью винтов.
Türkçe /
Güç kaynağı birimini doğru yere takın ve
vidalarla sabitleyin.
Русский /
Español /
1. Tire para abrir el sostenedor.
2. Inserte la tarjeta del PCI en la ranura
para el PCI.
3. Empuje para sujetar el sostenedor.
1. Потяните держатель до открытого
состояния.
2. Вставьте плату PCI в разъем PCI.
3. Надавите, чтобы закрепить держатель.
Italiano /
1. Tirare per aprire l'alloggiamento.
2. Inserire la scheda PCI nello slot PCI.
3. Premere per fissare l'alloggiamento.
Türkçe /
1. Tutucuyu çekerek açın.
2. PCI kartını PCI yuvasına yerleştirin.
3. Tutucuyu iterek sabitleyin.
12
Front Fan Installation
(for VJ2000BWS only)
English /
1. Unscrew and detach the fan filter from
the case.
2. Install the fan in proper location.
3. Attach the fan filter back to the case and
secure it with screws.
Deutsche /
1. Lösen Sie die Schrauben und entfernen
Sie den Ventilatorfilter vom Gehäuse.
2. Installieren Sie den Ventilator in seiner
vorgesehenen Position.
3. Bringen Sie den Ventilatorfilter wieder am
Gehäuse an und sichern Sie ihn mit Schrauben.
Français /
1. Dévissez et démontez le filtre de ventilateur
du boîtier.
2. Installez le ventilateur dans l'emplacement
adéquat.
3. Remontez le filtre de ventilateur au boîtier
et sécurisez le avec des vis.
Español /
1. Desatornille y separe el filtro del ventilador
de la caja.
2. Instale el ventilador en la ubicación correcta.
3. Acople el filtro del ventilador de nuevo a la
caja y asegúrelo con tornillos.
13
Italiano /
1. Svitare e sganciare il filtro della ventola
dal case.
2. Installare la ventola nella posizione
appropriate.
3. Posizionare il filtro della ventola
posteriormente al case e fissarlo con viti.
Top Fan Installation (Optional)
繁體中文 /
English /
繁體中文 /
1. 鬆 開 風 扇 濾 罩 的螺絲,將其 從 機 箱 拆 下。
1. Install the top fan in proper location and
1. 將頂置風扇安裝在合適的位置,並用
2. 將 風 扇 安 裝 在 合適的位置。
secure it with screws.
3. 將 風 扇 濾 罩 裝 回機箱,並用 螺 絲 固 定 。
简体中文 /
1. 拧下机箱的风扇网罩的螺丝并将其卸下。
2. 在适当位置安装风扇。
3. 将风扇网罩装回机箱并拧紧螺丝将其固定。
日本語 /
1. ケースからファンフィルタのねじをゆるめ
取り外します。
2. ファンを適切なロケーションに取り付けます。
3. ファンフィルタをケースの背面に取り付け、
ねじで固定します。
Русский /
1. Отвинтите фильтр вентилятора и
отсоедините его от корпуса.
2. Установите вентилятор в надлежащее место.
3. Верните фильтр вентилятора на место и
закрепите его с помощью винтов.
Türkçe /
1. Fan filtresinin vidalarını sökün ve filtreyi
kasadan çıkarın.
2. Fanı, uygun konuma takın.
3. Fan filtresini yeniden kasaya takın ve
vidalarla sabitleyin.
螺絲固定。
Deutsche /
简体中文 /
1. Installieren Sie den oberen Ventilator in
1. 在适当位置安装顶部风扇并拧紧螺丝将
seiner vorgesehenen Position und
其固定。
sichern Sie ihn mit Schrauben.
Français /
日本語 /
1. Installez le ventilateur dans l'emplacement
1. 上部ファンを適切な場所に取り付け、
adéquat et sécurisez-le avec des vis.
ねじで締め付けます。
Español /
Русский /
1. Instale el ventilador superior en la
1. Установите верхний вентилятор в
ubicación correcta y asegúrelo con
надлежащее место и закрепите его с
tornillos.
помощью винтов.
Italiano /
Türkçe /
1. Installare la ventola superire nella
1. Üst fanı uygun konuma takın ve
posizione appropriata e fissarla con viti.
vidalarla sabitleyin
14
Leads Installation Guide
Français
English
Guide d'installation des fils
Leads Installation Guide
Case LED connection / On the front of the case, you can find some LEDs and switch leads. Please consult your
Connexion des voyants du boîtier / Sur la face avant du boîtier, vous trouverez plusieurs voyants et les fils des
user manual of your motherboard manufacturer, then connect these leads to the panel header on the motherboard.
boutons. S'il vous plaît consultez le guide d'utilisateur du fabricant de votre carte mère, puis connectez ces fils aux
connecteurs sur la carte mère.
USB 2.0 connection / Please consult your motherboard manual to find out the section of “USB connection”
Audio Connection / Please refer to the following illustration of Audio connector and your motherboard user manual.
Connexion USB 2.0 / S'il vous plaît consultez le manuel de votre carte mère à la section "Connexion USB"
Please select the motherboard which used AC’97 or HD Audio(Azalia),(be aware of that your audio supports AC’97
or HD Audio (Azalia)) or it will damage your device(s)
Connexion audio / S'il vous plaît référez vous à l'illustration suivante du connecteur audio et au guide de l'utilisateur
PORT1 L
RED
PORT1 R
BROWN
PORT2 R
YELLOW
SENSE_SEND
PORT2 L
de votre carte mère. S'il vous plaît sélectionnez une carte mère supportant AC'97 ou HD Audi (Azalia), (faites attention
que votre audio supporte l'AC'97 ou HD Audio (Azalia)) sinon cela pourrait endommager votre matériel.
BLACK
AUD GND
PORT1 L
BLACK
PRESENCE#
PORT1 R
BROWN
PORT2 R
YELLOW
ORANGE SENSE1_RETURN
PURPLE
SENSE_SEND
KEY
BLUE
GREEN
SENSE2_RETURN
PORT2 L
AUDIO AZALIA Function
Front Microphone
MIC IN
RED
input Signal
Front Microphone
BROWN
MIC
POWER
Power
Front Right Channel
R-OUT YELLOW
Audio Signal
BLACK
YELLOW R-RET
L-OUT
BLUE
Rear Right Channel
Audio Signal
Rear Left Channel
Audio Signal
Front Left Channel
Audio Signal
L-OUT
AUDIO AC'97 Function
SENSE2_RETURN
BLACK
GROUND
Front
Audio Ground
NC
YELLOW R-RET
Rear Right Channel
Audio Signal
KEY
BLUE
BLUE
L-RET
Rear Left Channel
Audio Signal
AUDIO AC'97 Function
Anschlüsse herstellen
Gehäuse-LED-Verbindungen / Auf der Gehäusevorderseite finden Sie einige LEDs und Verbindungen. Bitte nehmen
Sie die Gebrauchsanweisung Ihres Motherboard Herstellers zur Hilfe und schließen Sie diese Verbindungen an die Panel
Header Belegung des Motherboards an.
USB 2.0 Anschluss / Bitte nehmen Sie die Gebrauchsanweisung Ihres Motherboards zur Hilfe und lesen Sie unter
dem Kapitel „USB Anschlüsse“ nach.
Audio Anschlüsse / Bitte beachten Sie die folgende Abbildung der Audio Anschlüsse und die Anweisung in der
Gebrauchsanweisung Ihres Motherboards. Bitte wählen Sie das Motherboard, das AC’97 oder HD Audio(Azalia)
verwendet, (achten Sie darauf, dass Ihr Audio AC’97 bzw. HD Audio (Azalia unterstützt)). Andernfalls entstehen
schwere Schäden an Ihrem(n) Gerät(en)!!!
PORT1 L
RED
PORT1 R
BROWN
PORT2 R
YELLOW
SENSE_SEND
PORT2 L
Guía de Instalación de Cables
Conexión del LED de la caja / En la parte frontal de la caja, encontrará algunos LED y cables de interruptores. Consulte
el manual del usuario del fabricante de la placa madre, a continuación conecte estos cables al conector de la placa madre.
Conexión USB 2.0 / Consulte el manual de la placa madre para obtener más información sobre el apartado “Conexión USB"
Conexión de Audio / Consulte la siguiente ilustración del conector de Audio y el manual del usuario de la placa madre.
Seleccione la placa madre que utiliza AC’97 o HD Audio (Azalia), (asegúrese de que su audio admite AC’97 o HD Audio
(Azalia)) si no, sus dispositivos resultarán dañados
BLACK
AUD GND
PORT1 L
BLACK
PRESENCE#
PORT1 R
BROWN
PORT2 R
YELLOW
ORANGE SENSE1_RETURN
PURPLE
SENSE_SEND
KEY
BLUE
GREEN
SENSE2_RETURN
PORT2 L
AUDIO AZALIA Function
Front Microphone
MIC IN
RED
input Signal
Front Microphone
MIC POWER BROWN
Power
Front Right Channel
R-OUT YELLOW
Audio Signal
NC
15
GREEN
Español
Deutschez
Front Left Channel
Audio Signal
PRESENCE#
KEY
BLUE
NC
L-RET
AUD GND
BLACK
ORANGE SENSE1_RETURN
PURPLE
Front Microphone
MIC IN
RED
input Signal
Front Microphone
BROWN
MIC
POWER
Power
Front Right Channel
R-OUT YELLOW
Audio Signal
KEY
BLUE
BLACK
AUDIO AZALIA Function
Front
Audio Ground
NC
NC
Front Left Channel
Audio Signal
GROUND
RED
L-OUT
BLUE
BLACK
GROUND
Rear Right Channel
Audio Signal
Front Microphone
MIC IN
RED
input Signal
Front Microphone
MIC POWER BROWN
Power
Front Right Channel
R-OUT YELLOW
Audio Signal
NC
KEY
BLUE
AUDIO AC'97 Function
L-RET
BLACK
AUD GND
BLACK
PRESENCE#
ORANGE SENSE1_RETURN
PURPLE
KEY
BLUE
GREEN
SENSE2_RETURN
AUDIO AZALIA Function
Front
Audio Ground
NC
YELLOW R-RET
RED
Rear Left Channel
Audio Signal
Front Left Channel
Audio Signal
L-OUT
BLUE
BLACK
GROUND
Front
Audio Ground
NC
YELLOW R-RET
Rear Right Channel
Audio Signal
KEY
BLUE
AUDIO AC'97 Function
L-RET
Rear Left Channel
Audio Signal
16
Italiano
简体中文
Guida di installazione dei contatti
线材安装说明
Connessione del LED del case / Nella parte anteriore del case, sono presenti alcuni contatti per interruttori e LED.
Consultare il manuale utente del produttore della scheda madre, quindi connettere i contatti alla parte superiore del
pannello sulla scheda madre.
Connessione USB 2.0 / Consultare il manuale per la scheda madre che comprende la sezione relative alla
“connessione USB”.
Connessione audio /
Fare riferimento all’illustrazione riportata di seguito del connettore Audio e al manuale utente per la scheda madre.
Selezionare la scheda madre relativa a AC’97 o HD Audio (Azalia) e considerare che il supporto audio è compatibile
con AC’97 o HD Audio (Azalia); in caso contrario, le periferiche potrebbero venire danneggiate.
机壳LED连接方式 / 在机壳前方的面板后面,可以找到一些LED与开关线材(POWER Switch….),请参考主板
使用说明书,并将机壳上的线材正确地连接到主板上,这些线材通常都会印有标签在上面,如果没有的话,请找
出机壳前方面板上线材原本的位置以知道正确的来源。
USB 连接 / 请参考主板使用手册找出主板上的USB连接孔位
音效连接 / 请根据下面的音源接头图示与主板使用手册来连接音效装置,请确认主板上的音效装置是支持AC' 97
音效或是HD音效(Azalia),装置错误可能会导致主板音效装置的毁损,某些主板的音效装置不会与下方的图标完
全相同,请参酌主板使用手册以得到正确的安装信息
PORT1 L
RED
PORT1 R
BROWN
PORT2 R
YELLOW
SENSE_SEND
PORT2 L
BLACK
AUD GND
PORT1 L
BLACK
PRESENCE#
PORT1 R
BROWN
PORT2 R
YELLOW
ORANGE SENSE1_RETURN
PURPLE
SENSE_SEND
KEY
BLUE
GREEN
SENSE2_RETURN
PORT2 L
AUDIO AZALIA Function
Front Microphone
MIC IN
RED
input Signal
Front Microphone
BROWN
MIC
POWER
Power
Front Right Channel
R-OUT YELLOW
Audio Signal
BLACK
YELLOW R-RET
L-OUT
BLUE
Rear Right Channel
Audio Signal
Rear Left Channel
Audio Signal
Front Left Channel
Audio Signal
L-OUT
AUDIO AC'97 Function
GREEN
SENSE2_RETURN
BLACK
GROUND
Front
Audio Ground
NC
YELLOW R-RET
Rear Right Channel
Audio Signal
KEY
BLUE
BLUE
L-RET
Rear Left Channel
Audio Signal
AUDIO AC'97 Function
日本語
繁體中文
線材安裝說明
リード線の取り付けガイド
機殼LED連接方式 / 在機殼前方的面板後面,可以找到一些LED與開關線材(POWER Switch….),請參考主機板
使用說明書,並將機殼上的線材正確地連接到主機板上,這些線材通常都會印有標籤在上面,如果沒有的話,請找
出機殼前方面板上線材原本的位置以知道正確的來源。
ケース LED の接続 / ケース前面には、LEDとスイッチリード線があります。 マザーボードメーカーのユーザーマニュアルを
参照し、これらのリード線をマザーボードのパネルヘッダに接続してください。
USB 2.0の接続 / マザーボードのマニュアルを参照して、「USB接続」のセクションを探します。
オーディオ接続 / オーディオコネクタの次の図とマザーボードのユーザーマニュアルを参照してください。
AC’97またはHDオーディオ(Azalia)を使用するマザーボードを選択してください(オーディオがAC’97またはHDオーディオ
(Azalia)をサポートしていることを確認してください)。サポートしていないと、デバイスが損傷します)。
USB 連接 / 請參考主機板使用手冊找出主機板上的USB連接孔位
音效連接 / 請根據下面的音源接頭圖示與主機板使用手冊來連接音效裝置,請確認主機板上的音效裝置是支援AC' 97
音效或是HD音效(Azalia),裝置錯誤可能會導致主機板音效裝置的毀損,某些主機板的音效裝置不會與下方的圖示完
全相同,請參酌主機板使用手冊以得到正確的安裝資訊
PORT1 L
RED
PORT1 R
BROWN
PORT2 R
YELLOW
SENSE_SEND
PORT2 L
BLACK
AUD GND
PORT1 L
BLACK
PRESENCE#
PORT1 R
BROWN
PORT2 R
YELLOW
ORANGE SENSE1_RETURN
PURPLE
SENSE_SEND
KEY
BLUE
GREEN
SENSE2_RETURN
PORT2 L
AUDIO AZALIA Function
Front Microphone
MIC IN
RED
input Signal
Front Microphone
MIC POWER BROWN
Power
Front Right Channel
R-OUT YELLOW
Audio Signal
NC
Front Left Channel
Audio Signal
17
PRESENCE#
KEY
BLUE
NC
L-RET
AUD GND
BLACK
ORANGE SENSE1_RETURN
PURPLE
Front Microphone
MIC IN
RED
input Signal
Front Microphone
BROWN
MIC
POWER
Power
Front Right Channel
R-OUT YELLOW
Audio Signal
KEY
BLUE
BLACK
AUDIO AZALIA Function
Front
Audio Ground
NC
NC
Front Left Channel
Audio Signal
GROUND
RED
L-OUT
BLUE
BLACK
GROUND
Rear Right Channel
Audio Signal
Front Microphone
MIC IN
RED
input Signal
Front Microphone
MIC POWER BROWN
Power
Front Right Channel
R-OUT YELLOW
Audio Signal
NC
KEY
BLUE
AUDIO AC'97 Function
L-RET
BLACK
AUD GND
BLACK
PRESENCE#
ORANGE SENSE1_RETURN
PURPLE
KEY
BLUE
GREEN
SENSE2_RETURN
AUDIO AZALIA Function
Front
Audio Ground
NC
YELLOW R-RET
RED
Rear Left Channel
Audio Signal
Front Left Channel
Audio Signal
L-OUT
BLUE
BLACK
GROUND
Front
Audio Ground
NC
YELLOW R-RET
Rear Right Channel
Audio Signal
KEY
BLUE
AUDIO AC'97 Function
L-RET
Rear Left Channel
Audio Signal
18
Русский
Указания по прокладке кабелей
Подключение индикаторов корпуса / В передней части корпуса расположены индикаторы и провода
выключателей. Перед подсоединением этих проводов к монтажной колодке панели на материнской
плате изучите руководство пользователя производителя материнской платы.
Подключение USB 2.0 / См. раздел «Подключение USB» в руководстве материнской платы.
Подключение аудиоразъема / См. следующую иллюстрацию аудиоразъема и руководство пользователя
материнской платы. Выберите материнскую плату, в которой используется кодек AC'97 или HD Audio (Azalia)
(убедитесь, что звуковая плата поддерживает кодек AC'97 или HD Audio (Azalia)). В противном случае можно
повредить устройства.
PORT1 L
RED
PORT1 R
BROWN
PORT2 R
YELLOW
SENSE_SEND
PORT2 L
BLACK
AUD GND
BLACK
PRESENCE#
ORANGE SENSE1_RETURN
PURPLE
KEY
BLUE
GREEN
SENSE2_RETURN
AUDIO AZALIA Function
Front Microphone
MIC IN
RED
input Signal
Front Microphone
BROWN
MIC
POWER
Power
Front Right Channel
R-OUT YELLOW
Audio Signal
BLACK
YELLOW R-RET
NC
Front Left Channel
Audio Signal
L-OUT
GROUND
Front
Audio Ground
NC
Rear Right Channel
Audio Signal
KEY
BLUE
BLUE
L-RET
Rear Left Channel
Audio Signal
AUDIO AC'97 Function
Türkçe
Ara Kablo Kurulum Kılavuzu
Kasa ışık bağlantısı / Kasanın ön kısmında bazı ışıklar ve anahtar ara kabloları görebilirsiniz. Lütfen anakart
üreticinizin sağladığı kullanım kılavuzuna bakın ve daha sonra, bu ara kabloları, anakart üzerindeki panel bağlantı
noktalarına bağlayın.
USB 2.0 bağlantısı / Lütfen anakart kılavuzunuzun “USB bağlantısı” bölümüne bakın.
Ses Bağlantısı / Lütfen aşağıdaki Ses konektörü resmine ve anakartınızın kullanım kılavuzuna bakın. Lütfen AC’97
veya HD Audio(Azalia) spesifikasyonunu kullanan bir anakart seçin (ses sisteminizin AC’97 veya HD Audio (Azalia)
spesifikasyonunu desteklediğini unutmayın); aksi takdirde, aygıt(lar)ınız zarar görür.
PORT1 L
RED
PORT1 R
BROWN
PORT2 R
YELLOW
SENSE_SEND
PORT2 L
BLACK
AUD GND
BLACK
PRESENCE#
Toughpower / Purepower /
TR2 power supply series (optional)
The Thermaltake Power Supply series specification meets latest Intel &
AMD dual & Quad core processors and NVIDIA & AMD high performance
graphic cards; it offers plenty of functions, which mainly include:
1. Automatic Fan Speed Control: All power supply can detect the inside
heat and automatically adjust the fan speed to provide adequate airflow.
2. Ultra Silent: Ball bearing fans with high reliability 140mm or 120mm
cooling fan and super low acoustic noise under all load condition.
3. Modularized Cable Management: To eliminate clutter and improve
airflow inside the case.
4. Dedicated Graphic Card Power: reduce the loading on current PSU and
no need to upgrade current PSU while running multi graphic cards mode.
The functions can assure all Thermaltake Power Supply meets the balance
in noise control and heat exhausted. All power supply provides complete
protection function as follow:
1. Over power protection.
2. Short circuit protection on all output.
3. Over voltage protection / Under voltage protection.
4. Over current protection.
5. Over temperature protection.
Besides, Thermaltake enables the quality assurance of all power supply:
100% Hi-POT and ATE Function Test, 100% Burn-In and AC Input cycled
on/off under high temperature condition. Furthermore, it has been approved
by UL, CUL, TUV, CB, FCC, CE, and BSMI.
ORANGE SENSE1_RETURN
PURPLE
KEY
BLUE
GREEN
SENSE2_RETURN
AUDIO AZALIA Function
Front Microphone
MIC IN
RED
input Signal
Front Microphone
MIC POWER BROWN
Power
Front Right Channel
R-OUT YELLOW
Audio Signal
NC
Front Left Channel
Audio Signal
19
L-OUT
BLUE
BLACK
GROUND
Front
Audio Ground
NC
YELLOW R-RET
Rear Right Channel
Audio Signal
AUDIO AC'97 Function
Purepower RX) and TR2 (include TR2 RX) series.
Please refer to
KEY
BLUE
There are three main products line of Thermaltake PSU
which divided into Toughpower, Purepower (include
L-RET
Rear Left Channel
Audio Signal
http://www.thermaltake.com/product/Power/power_index.asp
20
21
22