1
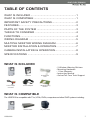
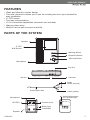
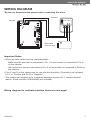
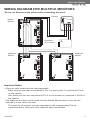
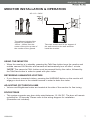
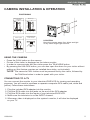
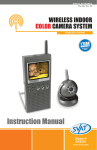
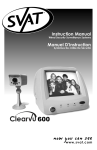
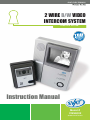
SVAT ELECTRONICS
Now You Can See
2 WIRE B/W VIDEO
INTERCOM SYSTEM
COMPLETE SYSTEM
Instruction Manual
Model #
VISS6002
www.svat.com
SVAT ELECTRONICS
Now You Can See
PRODUCT WARRANTY & REGISTRATION
Please visit our website at www.svat.com to apply for your
products warranty registration.
The warranty registration for is located under the support tab on the SVAT website.
We take quality very seriously. This is why all of our products come with a one year warranty from the
original purchase date against defects in workmanship and materials.
If you have warranty or support issues please contact us using any of the following methods:
SVAT Electronics USA
2315 Whirlpool St., Unit 333
NIagara Falls, New York
USA 14305
SVAT Electronics Canada
4080 Montrose Road
Niagara Falls, ON
Canada L2H 1J9
Phone: 866.946.7828
Fax: 888.771.1701
Email: [email protected]
Website: www.svat.com
Warranty Terms
1. SVAT products are guaranteed for a period of one year from the date of purchase against defects in
workmanship and materials. This warranty is limited to the repair, replacement or refund of the purchase price
at SVAT's option.
2. When service is required, the warranty is validated by the submission of a fully completed warranty card.
3. This warranty becomes void if the product shows evidence of having been misused, mishandled or tampered
with contrary to the applicable instruction manual.
4. Routine cleaning, normal cosmetic and mechanical wear and tear are not covered under the terms of this
warranty.
5. The warranty expressly provided for herein is the sole warranty provided in connection with the product itself
and no other warranty, expressed or implied is provided. SVAT assumes no responsibilities for any other
claims not specifically mentioned in this warranty.
6. This warranty does not cover the shipping cost, insurance or any other incidental charges.
7. You MUST call SVAT before sending any product back for repair. You will be given a Return Authorization
number. When returning the product for warranty service, please pack it carefully in the original box with all
supplied accessories, and enclose your original receipt or copy, and a brief explanation of the problem
(include RA #).
8. This warranty is valid only in Canada and the U.S.A.
9. This warranty card cannot be re-issued.
CAUTION
RISK OF ELECTRIC SHOCK, DO NOT OPEN
TO REDUCE THE RISK OF ELECTRIC SHOCK, DO NOT REMOVE THE COVER (BACK).
NO USER SERVICEABLE PARTS INSIDE. REFER SERVICING TO
QUALIFIED SERVICE PERSONNEL.
Graphic Symbol Explanation:
The lightning flash with arrowhead symbol, within an equilateral triangle, is intended to
alert the user to the presence of uninsulated “dangerous voltage” within the product’s
enclosure that may be of sufficient magnitude to constitute a risk of electric shock to
persons.
The exclamation point within an equilateral triangle is intended to alert the user to the
presence of important operating maintenance (servicing) instructions in the literature
accompanying the appliance.
WARNING: TO PREVENT FIRE OR SHOCK HAZARDS, DO NOT EXPOSE THIS UNIT
TO RAIN OR MOISTURE
VISS6002
www.svat.com
SVAT ELECTRONICS
Now You Can See
TABLE OF CONTENTS
WHAT IS INCLUDED ............................................................1
WHAT IS COMPATIBLE ........................................................1
IMPORTANT SAFETY PRECAUTIONS................................2
FEATURES............................................................................3
PARTS OF THE SYSTEM ....................................................3
THINGS TO CONSIDER ......................................................4
FUNCTIONS..........................................................................4
WIRING DIAGRAM ..............................................................5
MULTIPLE MONITOR WIRING DIAGRAM ..........................6
MONITOR INSTALLATION & OPERATION ..........................7
CAMERA INSTALLATION & OPERATION............................8
SPECIFICATIONS ................................................................9
WHAT IS INCLUDED
1 Monitor
1 Camera
60’ Extension
Wire
1 RCA Output
Converter
1 Power Adapter
1 Metal Mounting
Bracket
-
2 Window Warning Stickers
Mounting Hardware
1 Year Warranty
Instruction Manual
Online/Toll Free Tech Support
WHAT IS COMPATIBLE
The VISS7500 is compatible with TVs, VCRs, DVRs, computers and other SVAT systems including:
VISS7500M
VISS6002
ClearVu DVRs
Any TV or VCR
1
SVAT ELECTRONICS
Now You Can See
IMPORTANT SAFETY PRECAUTIONS
PLEASE READ BEFORE INSTALLING
• Keep the camera, monitor and AC/DC adapter cords out of reach of children.
• Do not place the camera, monitor and AC/DC adapter cords in a crib or playpen.
• Do not use the camera near water or damp and wet environments, such as a bathtub,
laundry tub, kitchen sink, or wet basements.
• Locate the camera, monitor and AC/DC adapters where there is adequate ventilation.
Do not locate the camera in direct sunlight.
• Do not locate the camera, monitor and AC/DC adapters near heat sources
such as heat registers, radiators, ovens, furnaces or other appliances with high
operating temperatures.
• Do not use with extension cords. Use only the AC/DC adapters provided with this
system. ***Note: Use of other adapters may damage the units and void your warranty.
• Only plug components into standard household voltage outlets (110VAC, or 60Hz).
• Do not place cords from the AC/DC adapters, camera or monitor where they can be
pinched or stepped on. Protect the cords by keeping them out of the way of children,
pets and routine household traffic. Do not place heavy objects on power cords or cover
cords with rugs or carpet.
• When cleaning, use a DRY, lint-free cloth. Unplug the camera, monitor and AC/DC
adapters before cleaning. NEVER immerse any components in water and do not
spray cleaners or solvents on the units. Doing so may damage the units or cause
electrical shock.
• Unplug the AC/DC adapters from the wall outlet when the system is not in use.
• Mishandling, alterations or modifications not approved by the manufacturer will void
the warranty.
CAUTION!
• Connect this unit ONLY to other compatible units. Do not connect it to any other type
of alarm or auxiliary device. Connecting anything else to this unit may damage it or
prevent it from operating properly.
• Do not paint over the camera.
IMPORTANT!
ACCESSORIES- Do not place video monitor or equipment on an unstable cart, stand or
table. The video monitor or equipment may fall causing serious injury to a child or adult,
and serious damage to the equipment. Wall mounting should follow the manufacturer's
instruction, and should use a mounting kit approved by the manufacturer.
VENTILATION
Slots and openings in the monitor and the back or bottom are provided for ventilation and
to ensure reliable operation of the video monitor or equipment and to protect if from
overheating. These openings must not be blocked or covered. The openings should
never be blocked by placing the video monitor on a bed, sofa, rug, or other similar
surface. Video monitor should never be placed near or over a radiator or heat register.
Video monitor should not be placed in a built-in installation such as a bookcase unless
proper ventilation is provided.
VISS6002
2
SVAT ELECTRONICS
Now You Can See
FEATURES
• Sleek and ultra thin monitor design
• Two wire connection allows you to use the existing wire from your doorbell for
easy installation
• 4" CRT screen
• Two way communication
• 12-14V doorstrike capabilities (doorstrike not included)
• Warning alarm siren
• Monitor can be wall mounted or laid flat
PARTS OF THE SYSTEM
Speaker
4” CRT
B/W Screen
Warning Button
Doorstrike Button
Talk/View Button
Microphone
A/V Out
Volume
Contrast
Audio
(white and red)
Audio/Video Wire
Vertical Adjustment
for Camera Angle
Microphone
IR LED’s
Video (yellow)
Camera Lens
Back Light
Call Button
Speaker
VISS6002
3
SVAT ELECTRONICS
Now You Can See
THINGS TO CONSIDER BEFORE INSTALLATION
• Do not place the intercom system near strong magnetic fields, such as televisions
and video recorders.
• Turn off the video intercom system power if not in use for long periods of time.
• Do not place the video intercom system in direct sunlight.
• Do not disassemble this device freely, there are high voltage flows inside the system
that can cause bodily harm.
FUNCTIONS
VIDEO INTERCOM
• The device provides audio/video communication between the indoor monitor and the
outdoor camera. The picture of the visitor can be seen clearly through the indoor
monitor. It is artistically designed and an ideal choice for the modern family.
HIGH RESOLUTION PICTURE
•The high resolution camera and 4" CRT screen will provide clear images.
NIGHT OPERATION
• The IR LEDs on the camera allows you to view your visitors at night in total darkness.
AUTOMATIC IMAGE DISPLAY
• When the visitor presses the call button, the built-in bell in the monitor will ring and the
picture of the visitor will automatically display. To engage in a conversation with the
visitor simply press the Talk/View button.
UNLOCK BUTTON
• With a simple press of a button you are able to open the door from the monitor without
going to the door directly. (Door strike not included)
SIMPLE INSTALLATION
• The connection between the camera and the monitor is a simple 2 wire connection
without polarity (wires can be reversed)
VISS6002
4
SVAT ELECTRONICS
Now You Can See
WIRING DIAGRAM
*Be sure to disconnect the power before connecting the wires*
Camera
Monitor
Doorstrike
(Not Included)
Important Notes
• Wires are color coded and are interchangeable.
Make sure the wire that is connected to Pin 1 on the monitor is connected to Pin A
on the camera.
Also make sure the wire connected to Pin 3 on the monitor is connected to Pin B on
the camera.
• Pins C and D on the camera are for use with the doorstirke. (Doorstrike not included)
Pin C is “Positive and Pin D is “Negative”
• This system can support up to 3 separate separate monitors for 1 camera doorbell
station. (Extra monitors (VISS6002M) not included)
Wiring diagram for multiple monitors found on next page!
VISS6002
5
SVAT ELECTRONICS
Now You Can See
WIRING DIAGRAM FOR MULTIPLE MONITORS
*Be sure to disconnect the power before connecting the wires*
Camera
Master
Monitor
Doorstrike
(Not Included)
Additional
Monitor
Additional
Monitor
Important Notes
• Wires are color coded and are interchangeable.
Make sure the wire that is connected to Pin 1 on the monitor is connected to Pin A
on the camera.
Also make sure the wire connected to Pin 3 on the monitor is connected to Pin B on
the camera.
• The additional monitors can be wired from the Master Monitor itself or they can be
wired back to the camera as well.
The wires for all monitors must be connected to the corresponding Pins as
mentioned above. Wires are color coded for easy identification.
VISS6002
6
SVAT ELECTRONICS
Now You Can See
MONITOR INSTALLATION & OPERATION
145cm ~ 160cm
AC: 110 ~ 240V
The optimum height of the
monitor for installation is
145cm ~160cm from the
center of the pick-up tube of
the monitor to the ground.
Take two screws and fix the support of
the wall-mount on the wall and then
install the monitor.
USING THE MONITOR
• When the monitor is in standby, pressing the Talk/View button turns the monitor and
outside camera ON. Monitor and camera will automatically turn off after 1 minute.
*NOTE* The camera’s CALL button must be pressed first by the visitor, followed by
the Talk/View button in order to speak with your visitor.
DETERRING UNWANTED VISITORS
• If you discover unwanted visitors, pressing the WARNING button on the monitor will
engage a loud siren in the outside camera in order to deter the visitor.
ADJUSTING PICTURE/VOLUME
• Volume and Brightness knobs are located at the side of the monitor for fine tuning.
DOORSTRIKE
• This system supports any door strike rated between 12-14V DC. The door will remain
unlocked for 10 seconds. Please refer to the wiring diagram for installation.
(Doorstrike not included)
VISS6002
7
SVAT ELECTRONICS
Now You Can See
CAMERA INSTALLATION & OPERATION
POSITIONING
Standard Height
of Camera
Move it up
43o
145cm ~ 160cm
145cm ~ 160cm
66o
Move it down
Horizontal angle
of the camera
145cm ~ 160cm
23o
53o
LOCATION
Keep the camera away from direct sunlight
or any other bright light sources.
USING THE CAMERA
•
•
•
•
Press the CALL button on the camera
Picture of the visitor is displayed on the indoor monitor
In order to communicate with the visitor press the TALK/VIEW button.
By pressing the UNLOCK button, you can also open the doors for your visitor without
getting up (this feature requires an installed door strike, not included).
*NOTE* The camera’s CALL button must be pressed first by the visitor, followed by
the Talk/View button in order to speak with your visitor.
CONNECTING TO A TV
You can connect the monitor to your television/DVR/VCR for viewing and recording
purposes. You will need to purchase a separate composite RCA cable (red, white and
yellow). Follow these instructions:
1.
2.
3.
4.
5.
Plug the included RCA adapter into the monitor
Plug the RCA cable into the jacks on the end of the RCA adapter.
Plug the RCA cable into the inputs of your television/DVR/VCR.
Make sure the television is on the INPUT channel.
Whenever video is displayed on the system's monitor, it will also be displayed
on your TV.
VISS6002
8
SVAT ELECTRONICS
Now You Can See
SPECIFICATIONS
INDOOR MONITOR
Power Supply ..................................DC16V
Power Consumption ........................10W in operation, 1W standby
Operation Temperature ....................5oF ~ 122oF
Conversation System ......................Bi-directional through receiver
Calling Tone ....................................“Ding Dong” chime
Conversation Time ..........................Automatic cut off after 1 minute
Scanning Frequency ........................Horizontal: 15.625KHz Vertical: 50Hz
External dimension ..........................8.9" x 6.7" x 2"
Max Wiring Distance ........................300ft (Monitor to the Camera)
Door Strike Voltage ..........................12 Volts for 5 seconds
CAMERA
Power Supply ..................................DC12V, 0.25A (supplied by monitor)
Power Consumption ........................2W in operation
Operation Temperature ....................5oF ~ 122oF
Picture Sensor ................................1/4" lens
Imagery Angle ..................................Diagonal: 53
Min. Lighting ....................................0.1 lux at 30cm
Infrared LED’s ..................................6
External Dimension..........................4.7" x 3.4" x 1.3"
Max Wiring Distance ........................300ft (Camera to the Monitor)
Camera Sensor................................1/4" CMOS Lens
Resolution ........................................380 TV Lines
VISS6002
9
SVAT ELECTRONICS
Now You Can See
w w w. s v a t . c o m
Disclaimer
S VAT d o e s n o t e n d o r s e a n y o f S VAT p r o d u c ts f o r a n y i l l e g a l
a c t i v i t i e s . S VAT i s n o t r e s p o n s i b l e o r l i a b l e i n a n y w a y
s h a p e o r f o r m f o r a n y d a m a g e , v a n d a l i s m , t h e ft o r a n y
o t h e r a c t i o n t h a t m a y o c c u r w h i l e a S VAT p r o d u c t i s i n u s e
b y t h e p u r c h a s e r.
Model #
VISS6002
www.svat.com