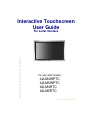
1
Interactive Touchscreen
User Guide
Interactive Touchscreen User Guide
For serial Interface
For use with models:
42LM4WPTC
42LM5WPTC
42LM4RTC
42LM5RTC
Version 1.3 September 2007
2
TABLE OF CONTENTS
ABOUT THIS MANUAL........................................................................................................................ 4
CONTACT INFORMATION .................................................................................................................. 4
SHIPPING DAMAGE/UNPACKING ..................................................................................................... 4
CARE AND CLEANING OF THE TOUCHSCREEN ............................................................................. 4
INTRODUCTION ................................................................................................................................. 5
COMPATIBILITY .................................................................................................................................. 5
INSTALLATION ................................................................................................................................... 6
LOADING THE TOUCH DRIVER SOFTWARE ONTO PC .................................................................. 6
STARTING THE DRIVER CONTROL PROGRAM............................................................................... 7
CONFIGURING THE COMMUNICATIONS PORT .............................................................................. 7
EXPLANATION OF THE STATUS SECTION ...................................................................................... 8
ADJUSTING THE TOUCH SENSITIVITY LEVEL .............................................................................. 10
CALIBRATION ................................................................................................................................... 12
SETTING THE TOUCH OUTPUT TO SUIT THE APPLICATION PROGRAM ................................... 13
DIAGNOSTICS AND FREQUENTLY ASKED QUESTIONS .............................................................. 15
MONITOR MODE .............................................................................................................................. 16
USING EDGE ENHANCEMENT ........................................................................................................ 17
DELAYED STARTING OF THE DRIVER OUTPUT ........................................................................... 17
FAULT FINDING GUIDE .................................................................................................................... 18
DRIVER DOES NOT SEE THE TOUCHSCREEN ............................................................................. 18
TOUCHSCREEN PERFORMS BADLY NEAR THE EDGES OF THE DISPLAY ............................... 18
FALSE TOUCHES ............................................................................................................................. 18
FAILURE TO SEE TOUCH EFFECT ................................................................................................. 18
MOUSE MOVEMENT IS NOT SMOOTH ........................................................................................... 18
CHANGES TO THE DRIVER ARE NOT BEING SAVED ................................................................... 18
MOUSE CURSOR MOVES RANDOMLY OR SEEMS STUCK .......................................................... 18
PROBLEMS WITH WINDOWS™ AUTOMATICALLY RUNNING THE DRIVER FROM START-UP .. 18
SLOW TOUCH SCREEN RESPONSE WHEN USING POWER HUNGRY APPLICATIONS............. 18
CHECK OR CHANGE THE VIRTUAL MEMORY SETTINGS ............................................................ 19
DRIVER PRIORITY CHANGE ........................................................................................................... 19
3
ABOUT THIS MANUAL
This manual is intended as a reference guide for the Interactive Touchscreen running under
Windows XP™ or Windows Vista™.
This User Manual provides the information needed to set up the touchscreen. In addition, this
manual describes basic technical information about the touchscreen and troubleshooting.
CONTACT INFORMATION
If you have any questions or issues, please contact your original equipment supplier
SHIPPING DAMAGE/UNPACKING
Every precaution is taken in testing and packing this monitor prior to shipment.
On delivery of the monitor, check the shipping carton for damage. If any damage is seen that
could have caused damage to the contents, keep all packing materials for later inspection by
the carrier who are responsible for any shipping damage.
CARE AND CLEANING OF THE TOUCHSCREEN
Thorough cleaning of the touch screen should be performed regularly in order to assure
optimum performance.
The touch screen surface should be kept free of dust, dirt, fingerprints and other foreign
material as contamination of the screen can affect its optical properties such as brightness and
clarity of image.
Use a soft, clean, slightly damp cloth with any commercially available window cleaner for
cleaning the glass surface of the touch screen. Avoid applying the cleaner directly onto the
screen but apply it to the cloth instead.
4
INTRODUCTION
This manual will explain the workings and setup of the touchscreen fitted to your display. An
explanation of the monitor and its workings is covered in the Monitor Manual that came with this
product. The following pages will tell you how to install the software needed by the touchscreen to
function and go through the adjustments that user’s can change to enable the screen to perform
effectively in many different environments.
The Ma7 Driver software has been written to interface between the Interactive Touchscreen
and a computer running the Windows XP™ operating system.
Limited testing has been carried out using Windows Vista™ with no noticeable issues. Further
testing is ongoing.
Contact your supplier for more information on other operating systems.
The software comes in three executable files:
The Driver (Ma7_Driver.exe) controls the mouse pointer and activates the mouse left button in
various modes when a user touches the touchscreen.
The Control Program (Ma7_Control_En.exe) is used to set up the driver.
The Setup Program (Ma7_Setup_En.exe) is used to set up the calibration and sensitivity of the
driver from the touchscreen without using the mouse.
The configuration of the touchscreen is stored in a file called Ma7.ini, this file is saved in the
same directory as the Ma7_Driver.exe file. Once set up, only these files are required to run the
driver.
COMPATIBILITY
This program is compatible with Windows XP™.
Limited Windows Vista™ testing has not shown up any issues with running the touch software but
has shown up an issue with one of the program element; Ma7_Setup_En.exe. Further tests are
ongoing. In the mean time see the installation instructions listed for Windows Vista™.
The default settings for the touchscreen driver disable the mouse cursor
movement of the touchscreen. The user must enable this in the later stages
of the touchscreen driver setup. You must save the configuration before
closing the Ma7_Control.En.exe program after the following setup
procedure.
5
INSTALLATION
LOADING THE TOUCH DRIVER SOFTWARE ONTO PC
1. Switch on monitor
Do not plug the touchscreen interface cable into your computer.
2. Insert the ‘Information & Touch Software installation CD’ into the PC and follow the
automatic installation instructions.
If the installation does not start automatically;
1. Click START on the Windows™ Taskbar; then click RUN.
2. Type d:\Autorun.exe where d is the letter of your CD-ROM drive. Click OK
3. Select the ‘Touch software’ button from the on-screen menu.
The software will create a subdirectory call TouchScreen on your PC in the ‘Program Files’
sub directory and copy all the relevant files necessary to run the touchscreen into it. Once
completed, ‘launch the application’ will finish the installation. Please follow the instructions in
the next section to complete the installation and the setting up of your touch screen.
For Windows Vista™ users; When the installation has finished and the
dialogue box asks if you want to launch the application, un-tick the box. Instead, Select
‘Start’, ‘All Programs’, ‘Touchscreen’ and select Ma7_Control_En.exe to continue.
6
STARTING THE DRIVER CONTROL PROGRAM
Connect the touchscreen cable to a free serial port of the.
1. If the Touchscreen control panel is not already running, start the driver by clicking the icon on
the desktop or select the Windows™ START button and RUN "Ma7_Control_En.exe" with the
necessary path or double click Ma7_Control_En.exe from ‘Windows Explorer™’ or click the
short cut placed on the desktop.
When the program is started it displays the following window (Fig 1):
Fig 1
CONFIGURING THE COMMUNICATIONS PORT
When the program has loaded:
1. Select the Comms tab.
2. Select the comm port the Touchscreen is connected to.
3. Make sure the driver box called 'Present' is red and select the appropriate port that the
touchscreen is connected to.
4. Select a Baud rate of 19,200.
5. Tick the 'Open' box in the Status section.
6. When the driver recognizes the screen, the Open, Active and Valid boxes will go red (fig 2).
7. The button called Reset will reset the touchscreen driver when pressed.
7
Fig 2
EXPLANATION OF THE STATUS SECTION
1. The following explanation of the Status section assumes that the touchscreen is physically
attached to a serial port of the PC:
Open - will go red and remain red only when the driver is present, the correct port is chosen and
the Baud rate is set correctly.
If the Open box does not go red then the driver is not loaded or another driver has taken the
port.
If the Open box goes on and off repeatedly then the driver is loaded but another piece of
hardware is on that port or the Baud rate is set incorrectly.
Active - will go red and remain red only when the driver is present, the correct port is chosen
and set to the correct Baud rate and when Open is red.
Active - will flash on and off to indicate there is activity on the port but it is some other hardware
device.
Valid - will only go red and remain in this state when both Open and Active are red and the
Baud rate is set correctly.
Only when Open, Active and Valid boxes have all changed to red and remain red is the
touchscreen ready for the next stage of driver setup.
When communications exist between the driver and the touchscreen, the three boxes Size, Lost,
Rate, will display data. These indicate the following information:
Size - number of wires in the touch sensor.
Lost - how many data scans have not been captured by the driver.
Rate - how many scans of the touchscreen per 1 second.
Reasons why the driver does not see the touchscreen are usually:
•
•
•
Touchscreen is on a different port to the one selected
The Baud rate is incorrect
Another device, driver or program is using the port
8
The mouse pointer will not respond to a touch until it has been enabled in the
Output section of the Control Program. Details of this will follow later in this manual.
The Reset button loads fresh data from the touchscreen. This is used as a reference for detecting
any new touches. This may be necessary if the touchscreen environment has been changed; for
example, the touchscreen has been moved.
9
ADJUSTING THE TOUCH SENSITIVITY LEVEL
Automatic Setup
When you receive your unit, the sensitivity settings will have been optimised when the unit was
manufactured. These settings should only be altered if you are experiencing problems such as
an electrically noisy environment. Contact your supplier if you need further explanation.
1. To select the sensitivity setup click on the Sense tab.
Fig 3
2. First set the Course Sensitivity to approximately two thirds by dragging the bar with your
mouse.
3. Set the Press Threshold to approximately one third by dragging the bar with your mouse.
4. Click on Start Auto Threshold. The following image appears:
Fig 4
5. Place your finger over the centre red circle (Fig4.) and follow it with your finger until it turns
green, then remove your finger. The automatic adjustment of sensitivity is now complete and
the screen returns to Fig 3.
Manual Sensitivity Setup
6. The Coarse Sensitivity slider is used to set the sensitivity of the touchscreen. If the slider is
set to the right, the touchscreen is more sensitive to detecting a touch. More or less
sensitivity may be required, dependent upon glass thickness or if the system is to be used
with gloved hands.
10
7. The moving indicator under Finger Pressure shows the strength of touchscreens signal.
Nominally the Coarse Sensitivity slider is adjusted so the Finger Pressure indicator moves
about a third of the way along in response to a light touch.
8. The Press Threshold slider is used to adjust the sensitivity of the touch to simulate a mouse
button press. The driver recognises a touch when the Finger Pressure indicator exceeds the
position of the Press Threshold slider. As default this is the same sensitivity level as
required for mouse movement.
9. To make certain that the touch is sensitive enough all over the display area, move a finger
around the touchscreen and make certain that the Finger Pressure indicator always exceeds
the Press Threshold slider position.
11
CALIBRATION
1. Select the Calib tab as shown below (Fig 5), click the 'Start Calibration' box.
Fig 5
2. You will see the following screen (Fig 6); there are three targets to touch in total, like the one
shown below:
Fig 6
3. When each of these targets is displayed, touch and hold your finger on the centre of the
circular target. You must touch all three targets in turn.
4. The red circle in the target slowly moves towards the centre of the target.
5. Remove your finger only when the next target appears and touch that one.
If the touch calibration is not correct after this procedure, please run the process
again and adjust your finger position on the targets to compensate for the misalignment.
12
SETTING THE TOUCH OUTPUT TO SUIT THE APPLICATION PROGRAM
1. Select the Output tab.
Fig 7
2. Select the mouse control required for your application (Fig 7).
To enable the touch function on the screen, tick the Enable check box.
3. No action selects no mouse pointer movement or button pressing when touching the
touchscreen.
4. Move mouse only enables mouse pointer movement but no button movement when
touching the screen.
5. Click on press enables mouse pointer movement and left button click when touching the
screen.
6. Click on release enables mouse pointer movement when touching the screen and left
button click when the finger moves away from the touchscreen. This can be used in
applications where the user needs confirmation the correct target has been selected before
being activated with a button click by removing the finger.
7. Select/Move/Release (Previously Drag and Drop) enables the mouse pointer movement
and left button down when the screen is touched. The left button stays down as the finger is
moved around the screen and left button click up does not occur until the finger is removed
from the screen. The item selected is dragged around the screen following the mouse cursor
movement and it is released only when the finger is removed from the screen.
8. Select/Hold/Release enables the mouse pointer movement and left button down when
the screen is touched. The left button stays down as the finger is moved around the screen
and left button up does not occur until the finger is removed from the screen. The item
selected remains selected but remains in its original position, it stays selected until the finger
is removed from the screen.
This mode is useful for Web pages where scroll bars can be manipulated by touching the
end buttons but text cannot be highlighted. If the user selects a target and then moves away
from target when removing the finger, the target selection is still valid.
13
You must now save the settings
Fig 8
1. (Fig 8) Click on file.
2. Click on save to save the current settings.
When the touchscreen driver has been set up and there is no requirement to
change it.
14
DIAGNOSTICS AND FREQUENTLY ASKED QUESTIONS
Testing the Hardware with ‘Graph’
1. Select the Graph tab.
Fig 9
2. Run a finger around the sensor, the effect of the finger on nearby wires can be seen by a
visible movement on the indicators (Fig 9), each representing one wire. The algorithm in the
driver interpolates the response curve to generate an accurate co-ordinate for the finger
position.
The following hardware checks can now be made:
Wire Integrity Test
3. Run a finger in both horizontal and vertical directions slowly and check that each wire
indicator moves in a similar manner to the others. This test will identify touchscreen hardware
and communication problems, which must be resolved before continuing with the driver
setup. Contact your supplier for more information.
Signal to Noise Check
4. There will always be some noise pickup on the touchscreen; this can be seen by slight
movement of the 64 indicators. The system can cope with this providing the noise is not
excessive. Compare the signal strength of a finger against the noise. The touchscreen should
function acceptably providing the peak noise is no more than one-third worst-case signal
strength.
5. If the system is very noisy then the source of the noise must be investigated. The most likely
source is high voltage switching near the touchscreen from nearby electronics. Try solving
problems by earthing metalwork or moving the display further away. If the problem persists,
contact your supplier.
Inter-Wire Linearity
6. Checking the shape of the waveform in response to a touch may assist in setting up the
Inter-Wire Linearity described in the Monitor section.
15
MONITOR MODE
Fig 10
1. This section is used to check the output of the touchscreen over the whole display area
represented by the white box in the centre. It is useful in checking for any dead areas on the
touchscreen and the performance of the touchscreen being able to follow the finger
accurately and responsibly (Fig 10).
2. When using this feature make sure that the touchscreen output is disabled by un-ticking the
Enable Selection Control in the output section. When the finger is removed for a few
seconds the display will automatically clear for more testing.
3. When the Advanced box is ticked the Inter-Wire Linearity can be adjusted if necessary.
This allows the driver to handle different response curves caused by different sizes of
touchscreen and different glass thickness.
4. The linearity can be adjusted for correct positioning between the wires. The default setting is
centre, which should be satisfactory for most applications (Fig 11/12).
5. If the touch sensor is large and there is a large gap between the wires or the signal is very
strong the slider may need to be moved to the right. This is because the peak is very strong
and involves very few wires and the algorithm to select touch position needs to change.
Fig 11
Fig 12
Inter-Wire Linearity set correctly
Inter-Wire Linearity set incorrectly
16
USING EDGE ENHANCEMENT
1. To allow easy access to the sliders and buttons at the edge of the display, the cursor can be
positioned nearer the edge of the screen. The amount of enhancement can be adjusted via
the screen shown.
Fig 13
2. Each of the sliders represents one edge of the sensor; the default position is as illustrated
above (Fig 13).
3. Edge Gain can also be used to counteract the effects of nearby metalwork that surrounds the
display area.
4. The further the sliders are away from the centre, the greater enhancement is given to the
appropriate edge.
Too much edge enhancement will force the cursor to the edge of the display
where it may not have the desired effect.
DELAYED STARTING OF THE DRIVER OUTPUT
1. When starting a touchscreen computer system, it is sometime desirable to be able to prevent
users from interfering with the start-up procedures from the touchscreen. Delaying the action
from the touchscreen driver to the application can do this.
2. This can be done by editing the MA7.ini file. This is found in the same directory as the
MA7_Control_En and MA7_Driver_En programs. There is a line, StartDelayInt1=0.
By changing the 0 to a number between 1 and 120 adds a delay of up to 120 seconds
between the time when the driver is loaded and when it can be used to control an application
program.
17
FAULT FINDING GUIDE
The following are some possible reasons why the touch screen might not work. If they do not
solve your problem or you have a situation not covered please contact your supplier.
DRIVER DOES NOT SEE THE TOUCHSCREEN
Touchscreen on a different comm port than the one selected.
The Baud rate is incorrect.
Another device, driver or program is using the port.
TOUCHSCREEN PERFORMS BADLY NEAR THE EDGES OF THE DISPLAY
Metal framework near to the touchscreen may interfere with the touchscreens performance. This
effect can be diminished by increasing the distance between metalwork and the touch sensor or
by coating the metalwork with an insulating paint or plastic coating. The driver can compensate
by utilising the Edge Enhancement feature described in this document. The effects of the
framework can be stabilised if it is grounded.
FALSE TOUCHES
If the noise on the system is great, then the Finger Pressure indicator may move by small
amounts without the presence of a finger. If the Press Threshold is set too low, then the noise
on the system could trigger false touches. This can be remedied by adjusting Coarse Sensitivity
to a lower level, thus making the system less sensitive.
FAILURE TO SEE TOUCH EFFECT
The default settings for the touchscreen driver are set so that the mouse cursor movement is
disabled during setup. The user must enable this output option by following Setting the Output
Mode for the Driver.
If the selected option is enabled and touches are still not being registered, then adjustment to the
Press Threshold is required to ensure the setting is to the left of the Finger Pressure indicator,
all over the display area, when a finger is present.
MOUSE MOVEMENT IS NOT SMOOTH
Refer to Monitor Mode and the effects of Inter-Wire Linearity. Adjustment to the Press
Threshold may be required to ensure the setting is to the left of the Finger Pressure indicator,
all over the display area, when a finger is present.
CHANGES TO THE DRIVER ARE NOT BEING SAVED
Make sure that after making changes to the setup program that the Save command is used, in
the File pull down menu. Make sure no other versions of Ma7.ini files exist on the system, this
problem normally occurs when an old Ma7 files exists in a Windows™ main directory.
MOUSE CURSOR MOVES RANDOMLY OR SEEMS STUCK
For the touchscreen to work properly and effectively, it must be provided with a steady
environment, therefore if the monitor is moved, this will upset the system. The driver should reset
itself. However, a reset can be forced. Alternatively, by pressing CTRL+ALT+DELETE, the driver
can be stopped from running and restarted by selecting File and Run Ma7 to restart.
PROBLEMS WITH WINDOWS™ AUTOMATICALLY RUNNING THE DRIVER FROM STARTUP
If it is required to start the driver every time Windows™ is started then a short-cut to
Ma7_Driver.exe can be put in the Start-Up folder. The program itself must NOT be put into the
Start-Up menu. If this is done then the driver will place a copy of the Ma7.ini into the start-up
menu and Notepad will open and display the Ma7.ini file information. To correct this problem the
machine must be returned to pre-MA7 driver installation condition. ALL MA7 related files must be
removed from the machine including the Start-up Menu and the driver re-installed.
SLOW TOUCH SCREEN RESPONSE WHEN USING POWER HUNGRY APPLICATIONS
18
There are several ways to improve system performance.
Optimise the Background performance against the Applications, to do this follow the simple
instructions below:
Select the Windows™ START Button; go into Settings and Control Panel.
Open the System folder and select the Advance tab.
Press the Performance Options button.
Change the selection from Optimise Performance for Applications to Optimise Performance
for Background Services.
CHECK OR CHANGE THE VIRTUAL MEMORY SETTINGS
In the System folder under Advanced change the size of the page file. The rule of thumb is that
the page size should be 1½ times bigger then the installed Ram. Therefore if the system has
256MB of ram the page size should be 384MB. If Page size is less than the above rule change it.
If this rule has been followed then increase the size by say 3 times. Check the system
performance each time the size has been increased.
DRIVER PRIORITY CHANGE
All Programs and Applications are given a priority in windows™. Increasing the priority given to it
by Windows™ can boost the performance of an application. The user can do this as follows: Run
Task Manager by pressing CTRL, ALT and DELETE in that order and all at the same time.
Select Task Manager followed by Processes.
Scroll down the list of running processes until the MA7 driver is found and right-click it.
Highlight the Set Priority and the following list should appear:
LOW, BELOW NORMAL, NORMAL, ABOVE NORMAL, HIGH and REALTIME
The driver should be running in NORMAL, change this to ABOVE NORMAL.
Test the response of the touch screen, the highest recommended setting is HIGH.
Do not select REALTIME as this would set the driver priority to be the same as the
operating system itself; this can make the Windows™ operating system unstable.
A priority change is only valid on the Windows™ session that it was performed in.
Hence when Windows™ is restarted or the machine is powered off then the changes are
lost, the driver will be set back to a NORMAL priority level.
To set the priority settings permanently when the system restarts:
Create a touch priority batch file called touchp.bat in
C:\Documents and Settings\All users\Start Menu\Programs\Startup
containing the following lines.
@echo off
start /high c:\program files\TouchScreen\MA7_Driver.exe
Where c:\progam files\TouchScreen is the directory where the MA7_Driver.exe exists on your
system.
A copy of touchp.bat will have been loaded into your startup group when the
software was installed.
19