1
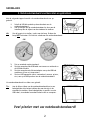
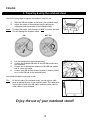
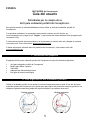
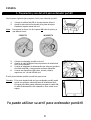
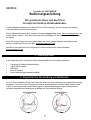
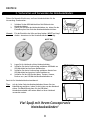
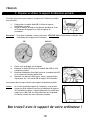
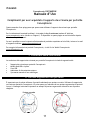
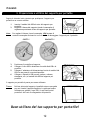
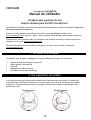
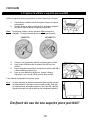
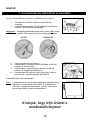
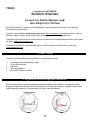
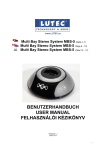
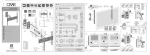
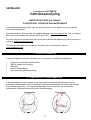
NEDERLANDS
Conceptronic CNSTANDDSK
Gebruiksaanwijzing
Gefeliciteerd met uw nieuwe
Conceptronic notebook bureaustandaard
In deze gebruiksaanwijzing vindt u stap-voor-stap instructies voor het gebruik van de Conceptronic
notebook buraustandaard.
Bij problemen kunt u het beste naar onze support-site gaan (www.conceptronic.net - klik op ‘Support’).
Daar vindt u een database met veel gestelde vragen (FAQ).
Als u een vraag over dit product heeft die niet op onze website wordt beantwoord, kunt u ons gerust emailen op [email protected].
Ga voor meer informatie over Conceptronic producten naar de Conceptronic website:
www.conceptronic.net.
1. Inhoud verpakking
U vindt de volgende items in de verpakking van de Conceptronic notebook buraustandaard:
•
•
•
•
•
Conceptronic notebook bureaustandaard
USB-hub module met 4 poorten
USB-kabel
Externe lichtnetadapter
Deze meertalige gebruiksaanwijzing
2. Ergonomisch notebookgebruik
Tijdens het gebruik van een notebook is een ergonomische lichaamshouding belangrijk voor uw
gezondheid. Gebruikmaken van de Conceptronic notebook buraustandaard is de eerste stap naar een
ergonomische werkpositie. In de volgende afbeeldingen ziet u voorbeelden van een optimale
ergonomische lichaamshouding en een slechte lichaamshouding.
Goede houding
Foute houding
1
NEDERLANDS
3. Notebookstandaard voorbereiden en gebruiken
Met de volgende stappen bereidt u de notebookstandaard voor op
gebruik.
1.
2.
NB:
Schuif de USB-hub module op de achterkant van de
notebookstandaard.
Stel de hoogte van de notebookstandaard in door aan de
instelknop aan de zijkant van de standaard te trekken.
Om de hoogte in te stellen, trekt u aan de knop. Probeer de
knop NIET te draaien. Dit leidt tot schade aan de notebookstandaard.
OK!
3.
4.
5.
6.
NIET OK!
Zet uw notebook op de standaard.
Sluit de meegeleverde USB-kabel aan tussen uw notebook en
de USB-hub module.
Sluit de meegeleverde lichtnetadapter aan op de USB-hub
module en op een vrij stopcontact.
Sluit uw USB-apparaten (muis, toetsenbord, camera, printer,
etc.) aan op de USB-poorten van de notebookstandaard.
Uw notebookstandaard is nu klaar voor gebruik.
Tip:
Aan de linker zijkant van de notebookstandaard kunt u een
kabelgeleider naar buiten trekken door aan de strip in de
standaard te trekken. Deze kabelgeleider is geschikt voor de
USB-kabel, stroomkabel en andere kabels naar uw computer.
Veel plezier met uw notebookstandaard!
2
ENGLISH
Conceptronic CNSTANDDSK
User Guide
Congratulations on the purchase of your
Conceptronic Desktop Notebook Stand.
This User Guide gives you a step-by-step explanation of how to use the Conceptronic Desktop Notebook
Stand.
When problems occur, we advise you to go to our support-site (go to www.conceptronic.net and click
‘Support’. Here you will find the Frequently Asked Questions Database.
When you have other questions about your product and you cannot find it at our website, then contact us
by e-mail: [email protected]
For more information about Conceptronic products, please visit the Conceptronic Web Site:
www.conceptronic.net
1. Package contents
The following items are present in the package of the Conceptronic Desktop Notebook Stand:
•
•
•
•
•
Conceptronic Desktop Notebook Stand
4 Ports USB Hub module
USB Cable
External power adapter
This Multilanguage User Guide
2. Ergonomic notebook usage
Using your notebook in an ergonomic position is important for your health. Using the Conceptronic Desktop
Notebook Stand is the first step to an ergonomic working position. The images below show an example of
an optimal ergonomic position and a bad position.
Correct position
Incorrect position
3
ENGLISH
3. Preparing & using the notebook stand
Use the following steps to prepare the Notebook Stand for use.
1.
2.
Slide the USB Hub module on the back o the notebook stand.
Adjust the height of the notebook stand by pulling the
adjustment knob on the side of the notebook stand.
Note : To adjust the height, pull the knob. Do NOT try to turn the knob.
This will damage the notebook stand.
OK !
3.
4.
5.
6.
NOT OK !
Put your notebook on the notebook stand.
Connect the included USB cable to the USB Hub module and
your notebook.
Connect the included power adapter to the USB Hub module
and to a free wall outlet.
Connect your USB devices (mouse, keyboard, camera, printer,
etc.) to the USB hub of the notebook stand.
Your notebook stand is now ready to use.
Tip :
On the left side of the notebook stand, you can eject a cable
guide by pulling the strip in the notebook stand. This cable guide
can be used to guide your USB cable, notebook power cable or
other cables to your notebook.
Enjoy the use of your notebook stand!
4
ESPAÑOL
CNSTANDDSK de Conceptronic
Guía del usuario
Felicidades por la compra de su
Atril para ordenador portátil de Conceptronic.
Esta guía del usuario le indica detalladamente cómo utilizar el Atril para ordenador portátil de
Conceptronic.
Si se producen problemas, le aconsejamos que consulte a nuestro servicio técnico (en
www.conceptronic.net y haga clic en “Support”). Aquí encontrará la base de datos de las preguntas más
frecuentes o FAQ.
Si tiene otras preguntas sobre su producto y no las encuentra en nuestro sitio web, póngase en contacto
con nosotros por correo electrónico: [email protected].
Si desea información adicional sobre los productos de Conceptronic, visite nuestro sitio web:
www.conceptronic.net.
1. Contenido del paquete
El paquete del Atril para ordenador portátil de Conceptronic incluye los elementos siguientes:
•
•
•
•
•
Atril para ordenador portátil de Conceptronic
Módulo hub USB de 4 puertos
Cable USB
Adaptador de alimentación externa
Esta guía del usuario multilingüe
2. Uso ergonómico del ordenador portátil
Utilizar el ordenador portátil en una postura correcta es importante para su salud. El uso del Atril para
ordenador portátil de Conceptronic es el primer paso para lograr una postura de trabajo ergonómica. Las
imágenes siguientes muestran ejemplos de la postura óptima y una postura incorrecta.
Postura correcta
Postura incorrecta
5
ESPAÑOL
3. Preparación y uso del atril para ordenador portátil
Siga los pasos siguientes para preparar el atril para ordenador portátil:
1.
2.
Nota:
Coloque el módulo hub USB en la parte trasera del atril.
Ajuste la altura del atril estirando de la pieza de ajuste
situada en la parte lateral del atril.
Para ajustar la altura, tire de la pieza. NO trate de girarla, ya
que dañaría el atril.
CORRECTO
3.
4.
5.
6.
INCORRECTO
Coloque su ordenador portátil en el atril.
Conecte el cable USB que incluye el producto al módulo hub
USB y a su ordenador.
Conecte el adaptador de alimentación que incluye el producto
al módulo hub USB y a una toma de corriente disponible.
Conecte sus dispositivos USB (ratón, teclado, cámara,
impresora, etc.) al hub USB del atril.
El atril para ordenador portátil ya está listo para su uso.
Consejo:
En la parte izquierda del atril para ordenador portátil puede
retirar una guía para cable estirando de la banda del atril.
Esta guía para cable puede utilizarse para guiar el cable USB,
el cable de alimentación del ordenador u otros cables de su
equipo.
Ya puede utilizar su atril para ordenador portátil
6
DEUTSCH
Conceptronic CNSTANDDSK
Bedienungsanleitung
Wir gratulieren Ihnen zum Kauf Ihres
Conceptronic Desktop-Notebookständers.
In dieser Bedienungsanleitung wird Ihnen Schritt für Schritt gezeigt, wie der Conceptronic DesktopNotebookständer verwendet werden muss.
Wenn Probleme auftreten sollten, besuchen Sie unsere Support-Seite (unter www.conceptronic.net) und
klicken Sie auf ‚Support’. Dort steht Ihnen unsere FAQ-Datenbank mit den häufig gestellten Fragen zur
Verfügung.
Wenn Sie weitere Fragen zu Ihrem Produkt haben, die Sie auf unserer Webseite nicht beantworten
können, kontaktieren Sie uns per E-Mail: [email protected].
Detaillierte Informationen über Conceptronic Produkte finden Sie auf unserer Webseite:
www.conceptronic.net
1. Packungsinhalt
In der Verpackung des Conceptronic Desktop-Notebookständers ist Folgendes enthalten:
•
•
•
•
•
Conceptronic Desktop-Notebookständer
4-Port-USB-Hub-Modul
USB-Kabel
Externes Netzteil
Dieses mehrsprachige Benutzerhandbuch
2. Ergonomische Verwendung von Notebooks
Es ist für Ihre Gesundheit wichtig, dass Sie bei der Arbeit mit Ihrem Notebook eine ergonomische Haltung
einnehmen. Wenn Sie mit dem Conceptronic Desktop-Notebookständer arbeiten, haben Sie den ersten
Schritt für eine ergonomische Arbeitshaltung getan. Folgende Abbildungen zeigen ein Beispiel einer
optimalen ergonomischen Haltung und ein Beispiel für eine schlechte Haltung.
Korrekte Haltung
Falsche Haltung
7
DEUTSCH
3. Vorbereiten und Verwenden des Notebookständers
Führen Sie folgende Schritte aus, um Ihren Notebookständer für die
Verwendung vorzubereiten.
1.
Schieben Sie das USB-Hub-Modul auf die Rückseite des
Notebookständers.
Stellen Sie die Höhe des Notebookständers ein, indem Sie den
Einstellknopf auf der Seite des Notebookständers drücken.
2.
Hinweis:
Für das Einstellen der Höhe am Knopf ziehen. NICHT am Knopf
drehen. Ansonsten wird der Notebookständer beschädigt.
OK!
3.
4.
5.
6.
NICHT OK!
Legen Sie Ihr Notebook auf den Notebookständer.
Schließen Sie das im Lieferumfang enthaltene USB-Kabel am
USB-Hub-Modul und an Ihrem Notebook an.
Schließen Sie das im Lieferumfang enthaltene Netzteil am
USB-Hub-Modul und an einer freien Steckdose an.
Schließen Sie Ihre USB-Geräte (Maus, Tastatur, Kamera,
Drucker usw.) am USB-Hub des Notebookständers an.
Damit ist Ihr Notebookständer einsatzbereit.
Tipp:
Auf der linken Seite des Notebookständers können Sie eine
Kabelführung ausfahren, indem Sie die Leiste aus dem Notebook
ziehen. Die Kabelführung kann für das USB-Kabel,
Notebookstromkabel oder andere Kabel zu Ihrem Notebook
verwendet werden.
Viel Spaß mit Ihrem Conceptronic
Notebookständer!
8
FRANÇAIS
CNSTANDDSK de Conceptronic
Guide d'Utilisation
Nous vous félicitons d'avoir acheté votre
Support d'Ordinateur Portable pour Bureau de Conceptronic
Vous trouverez dans ce Manuel d'Utilisateur une explication détaillée de l'installation du Support
d'Ordinateur Portable pour Bureau de Conceptronic.
En cas de problème, nous vous conseillons de vous rendre sur notre site de support technique (rendezvous sur le site de www.conceptronic.net et cliquez sur « Support ». Vous y trouverez la Base de données
de la Foire aux Questions).
En cas de questions concernant votre produit et si vous n’obtenez pas de réponse sur notre site web,
n’hésitez pas à nous contacter par e-mail : [email protected]
Pour plus d'informations concernant les produits Conceptronic, veuillez consulter notre site Web :
www.conceptronic.net
1. Contenu du Coffret
Les éléments suivants sont fournis dans le paquet avec le Support d'Ordinateur Portable pour Bureau de
Conceptronic.
•
•
•
•
•
Support d'Ordinateur Portable pour Bureau de Conceptronic
Module Hub USB à 4 Ports
Câble USB
Adaptateur électrique externe
Ce Guide d'Utilisateur en Plusieurs Langues
2. Utilisation ergonomique de l'ordinateur portable
Il est important pour votre santé d'utiliser votre ordinateur portable dans une position ergonomique.
Utiliser le Support d'Ordinateur Portable pour Bureau de Conceptronic est la première étape pour obtenir
une position de travail ergonomique. Les images ci-après illustrent ce qu'est une position ergonomique
optimale et une mauvaise position.
Position correcte
Position incorrecte
9
FRANÇAIS
3. Préparer et utiliser le support d'ordinateur portable
Procédez comme suite pour préparer le Support de l'Ordinateur portable
pour travailler.
1.
2.
Faites glisser le module Hub USB à l'arrière du support
d'ordinateur portable.
Réglez la hauteur du support d'ordinateur portable en tirant
sur le bouton de réglage sur le côté du support de
l'ordinateur.
Remarque :
Pour régler la hauteur, tirez sur le bouton. N'ESSAYEZ PAS de faire tourner le bouton. Vous
endommageriez le support de l'ordinateur
OK !
3.
4.
5.
6.
PAS OK !
Placez votre ordinateur sur le support.
Branchez le câble USB fourni sur le module Hub USB et votre
ordinateur portable.
Branchez l'adaptateur électrique fourni sur le module Hub USB
et sur une prise (femelle) murale libre.
Branchez vos dispositifs USB (souris, clavier, appareil photo,
imprimante, etc.) sur le hub USB du support de l'ordinateur.
Vous pouvez dès à présent utiliser votre support d'ordinateur portable.
Astuce :
Sur le côté gauche du support de l'ordinateur, vous pouvez
éjecter un guide-câble en tirant sur la bandelette du support
de l'ordinateur portable. Ce guide-câble peut être utilisé pour
guider votre câble USB, le cordon électrique de l'ordinateur
ou d'autres cordons sur votre ordinateur portable.
Bon travail avec le support de votre ordinateur !
10
ITALIANO
Conceptronic CNSTANDDSK
Manuale d’Uso
Complimenti per aver acquistato il supporto da scrivania per portatile
Conceptronic.
Questo manuale d’uso spiega passo per passo come utilizzare il supporto da scrivania per portatile
Conceptronic.
Per la risoluzione di eventuali problemi, si rimanda al sito di assistenza (andare all’indirizzo
www.conceptronic.net e cliccare su ‘Support’). È disponibile in questa pagina un archivio delle risposte
alle domande più frequenti.
Se non è possibile trovare la risposta alle domande sul prodotto acquistato nel sito Web, inviare un’e-mail
al seguente indirizzo: [email protected]
Per maggiori informazioni sui prodotti Conceptronic, si visiti il sito Web di Conceptronic:
www.conceptronic.net
1. Contenuto della confezione
La confezione del supporto da scriviania per portatile Conceptronic include le seguenti unità:
•
•
•
•
•
Supporto da scrivania per portatile Conceptronic
Modulo Hub USB a 4 porte
Cavo USB
Adattatore di alimentazione esterno
Il presente manuale d’uso multilingue
2. Utilizzo ergonomico del portatile
È importante per la salute utilizzare il portatile adottando una postura corretta. Utilizzare il supporto da
scrivania per portatile Conceptronic è il primo passo per l'adozione di una postura ergonomica sul posto di
lavoro. Le immagini sottostanti ripostano un esempio di postura ergonomica ottimale e uno di postura
sbagliata.
Postura corretta
Postura sbagliata
11
ITALIANO
3. Preparazione e utilizzo del supporto per portatile
Seguire le istruzioni sotto riportate per predisporre il supporto per
portatile a un corretto utilizzo.
1.
2.
Nota :
Inserire il modulo Hub USB sul retro del supporto per
portatile.
Regolare l’altezza del supporto tirando la manopola di
regolazione posizionata a lato del supporto per portatile.
Per regolare l'altezza, tirare la manopola. NON tentare di
ruotare la manopola altrimenti si corre il rischio di danneggiare il supporto per il portatile.
GIUSTO !
3.
4.
5.
6.
SBAGLIATO !
Posizionare il portatile sul supporto.
Collegare il cavo USB in dotazione al modulo Hub USB e al
portatile.
Collegare l’adattatore di alimentazione fornito al modulo Hub
USB e a una presa di corrente disponibile.
Collegare i dispositivi USB (mouse, tastiera, webcam,
stampante, etc.) al modulo Hub USB del supporto per
portatile.
Il supporto per portatile è pronto per essere utilizzato.
Trucco:
Dal lato sinistro del supporto è possibile estrarre una guida
per cavi tirando l’apposita linguetta. La guida può essere
utilizzata per guidare il cavo USB, il cavo elettrico del
portatile o altri cavi di collegamento del portatile.
Buon utilizzo del tuo supporto per portatile!
12
PORTUGUÊS
Conceptronic CNSTANDDSK
Manual do Utilizador
Parabéns pela aquisição do seu
Suporte de Mesa para Portátil Conceptronic.
Este Manual do Utilizador oferece-lhe uma explicação detalhada sobre o modo de utilização do Suporte de
Mesa para Portátil da Conceptronic.
Quando ocorrem problemas, aconselhamo-lo a visitar o nosso site de apoio (aceder ao site
www.conceptronic.net e clique em “Apoio”. Aqui encontrará a Base de Dados das Perguntas Frequentes.
Quando possuir outras questões sobre o seu produto e não conseguir encontrar a resposta no nosso site,
contacte-nos via e-mail: [email protected]
Para mais informações sobre os produtos Conceptronic, por favor visite o site da Conceptronic:
www.conceptronic.net
1. Conteúdo da embalagem
Os seguintes itens integram a embalagem do Suporte de Mesa para Portátil da Conceptronic:
•
•
•
•
•
Suporte de Mesa para Portátil Conceptronic
Módulo Hub de 4 entradas USB
Cabo USB
Adaptador de potência externa
Este Manual do Utilizador Multilingue
2. Uso ergonómico do portátil
A utilização do seu portátil numa posição ergonómica é importante para a sua saúde. A utilização do
Suporte de Mesa para Portátil Conceptronic é o primeiro passo para alcançar uma posição de trabalho
ergonómica. As imagens abaixo indicam um exemplo de uma posição ergonómica optimizada e uma
posição incorrecta.
Posição correcta
Posição incorrecta
13
PORTUGUÊS
3. Preparar & utilizar o suporte para portátil
Utilize os seguintes passos para preparar o uso do Suporte para Portátil.
1.
2.
Nota:
Faça deslizar o módulo Hub USB na parte traseira do suporte
para portátil.
Ajuste a altura do suporte para portátil, puxando o manípulo
de ajuste na parte lateral do suporte para portátil.
Para ajustar a altura, puxe o manípulo. NÃO tente girar o
manípulo. Tal acção causará danos no suporte para portátil.
CORRECTO !
3.
4.
5.
6.
INCORRECTO !
Coloque o seu computador portátil no suporte para portátil.
Ligue o cabo USB fornecido ao módulo Hub USB e ao seu
portátil.
Ligue o adaptador de potência fornecido ao módulo Hub USB e
a uma tomada que esteja livre.
Ligue os seus dispositivos USB (rato, teclado, câmara,
impressora, etc.) ao hub USB do suporte para portátil.
O seu suporte para portátil está pronto a usar.
Dica:
No lado esquerdo do suporte para portátil pode ejectar um guia
de cabos puxando a fita para o suporte para portátil. Este guia
de cabos pode ser utilizado para guiar o seu cabo USB, cabo de
ligação do portátil ou outros cabos ao seu computador portátil.
Desfrute do uso do seu suporte para portátil!
14
MAGYAR
Conceptronic CNSTANDDSK
Használati utasítás
Köszönjük, hogy a Conceptronic asztali notebookállványát választotta
Ez a használati utasítás lépésről lépésre elmagyarázza, miként kell a Conceptronic asztali
notebookállványát használni.
Ha probléma jelentkezne, azt tanácsoljuk, hogy keresse fel terméktámogatást nyújtó webhelyünket
(látogasson el a www.conceptronic.net honlapra, majd kattintson a „Support”-ra). Ott található ugyanis a
gyakran ismétlődő kérdések (GYIK) adatbázisa.
Ha a termékkel kapcsolatban további kérdése volna, és arra választ webhelyünkön nem talál, fordulhat
hozzánk e-mailben is: [email protected]
A Conceptronic termékekkel kapcsolatos további tájékozódás végett keresse fel a Conceptronic
webhelyét: www.conceptronic.net
1. A csomag tartalma
A Conceptronic asztali notebookállványt tartalmazó csomagban az alábbiak találhatók:
•
•
•
•
•
Conceptronic asztali notebookállvány
4 portos USB-hub modul
USB-kábel
Külső hálózati adapter
Ez a többnyelvű használati utasítás
2. A notebook ergonómikus használata
Egészsége szempontjából fontos, hogy a notebookot ergonómiai szempontból megfelelő testhelyzetben
használja. A Conceptronic asztali notebookállvány használata az első lépés a munka közbeni ergonómikus
testhelyzet kialakításában. Az alább látható képek egy-egy példát mutatnak be az ergonómiai szempontból
optimális testhelyzetre, illetve a rossz testhelyzetre.
Megfelelő testhelyzet
Nem megfelelő testhelyet
15
MAGYAR
3. A notebookállvány előkészítése és használata
Amikor a notebookállványt előkészíti, az alábbiak szerint járjon el.
1.
2.
Csúsztassa rá az USB-hub modult a notebookállvány
hátlapjára.
A notebookállvány oldalán lévő állítógombnak a kihúzásával
állítsa be a notebookállvány magasságát.
Megjegyzés: A magasság beállításához húzza meg a gombot. NE forgassa
a gombot. Ezzel ugyanis kárt tesz a notebookállványban.
HELYES!
3.
4.
5.
6.
NEM HELYES!
Tegye rá notebookját az állványra.
Csatlakoztassa a tartozékot képező USB-kábelt az USB-hub
modulhoz és a notebookhoz.
Csatlakoztassa a tartozék hálózati adaptert az USB-hub
modulhoz és szabad falicsatlakozóhoz.
Csatlakoztassa USB-eszközeit (egér, billentyűzet, kamera,
nyomtató stb.) a notebookállvány USB-hubjához.
Notebookállványa ezzel használatkész.
Ötlet:
A notebookállványon lévő zsineg meghúzásával előugratható egy
kábeltartó a notebookállvány bal oldalán. Ez a kábeltartó az
USB-kábel, a notebook hálózati kábele, illetve a notebookhoz
tartozó egyéb kábelek vezetésére használható.
Kívánjuk, hogy lelje örömét a
notebookállványban!
16
TÜRKÇE
Conceptronic CNSTANDDSK
Kullanıcı Kılavuzu
Conceptronic Dizüstü Bilgisayar Ayağı
Satın Aldığınız İçin Tebrikler
Bu Kullanıcı Kılavuzu, Conceptronic Dizüstü Bilgisayar Ayağı kullanımının adım adım nasıl yapılacağı
konusunda bilgi içermektedir.
Problem ortaya çıktığında, destek sitemize gitmenizi (www.conceptronic.net adresine gidin ve ‘Support’
bölümüne tıklayın) tavsiye ederiz. Burada Sıkça Sorulan Sorular Veritabanını bulacaksınız.
Ürününüzle ilgili başka sorularınız varsa ve bunların yanıtlarını web sitemizde bulamıyorsanız, bize e-posta
ile ulaşın: [email protected]
Conceptronic ürünleri ile ilgili daha fazla bilgi için, lütfen Conceptronic Web Sitesini ziyaret edin:
www.conceptronic.net
1. Paket içeriği
Conceptronic Dizüstü Bilgisayar Ayağı paketinin içeriği aşağıdaki gibidir:
•
•
•
•
•
Conceptronic Masaüstü Bilgisayar Ayağı
4 Port USB Hub modül
USB Kablo
Harici güç adaptörü
Bu Çok Dilli Kullanıcı Kılavuzu
2. Ergonomik dizüstü bilgisayar kullanımı
Dizüstü bilgisayarınızın ergonomik pozisyonda kullanımı sağlığınız için önemlidir. Conceptronic Dizüstü
Bilgisayar Ayağı kullanmak ergonomik çalışma pozisyonu için atılacak ilk adımdır. Aşağıdaki resimlerde en
uygun ergonomik pozisyon ve yanlış pozisyon için birer örnek gösterilmiştir.
Doğru pozisyon
Yanlış pozisyon
17
TÜRKÇE
3. Dizüstü bilgisayar ayağının hazırlanması ve kullanımı
Dizüstü bilgisayar ayağını kullanıma hazırlamak için aşağıdaki adımları
izleyin.
1.
2.
Not:
USB Hub modülünü dizüstü bilgisayar ayağının arkasına
kaydırarak takın.
Dizüstü bilgisayar ayağının yan tarafında bulunan ayar
düğmesini çekerek ayak yüksekliğini ayarlayın.
Yüksekliği ayarlamak için düğmeyi çekin. Düğmeyi çevirmeye
ÇALIŞMAYIN. Aksi halde dizüstü bilgisayar ayağı zarar görebilir.
DOĞRU !
3.
4.
5.
6.
YANLIŞ !
Dizüstü bilgisayarınızı ayağa yerleştirin.
Birlikte verilen USB kabloyu USB Hub modülüne ve
bilgisayarınıza takın.
Birlikte verilen güç adaptörünü USB Hub modülüne ve boş bir
duvar prizine takın.
USB aygıtlarınızı (fare, klavye, kamera, yazıcı vb.) dizüstü
bilgisayar ayağının USB hub’ına takın.
Disüztü bilgisayar ayağınız artık kullanıma hazırdır.
İpucu: Dizüstü bilgisayar ayağının sol tarafında bulunan şeridi, dışarıya
doğru çektikten sonra kablo kılavuzu olarak kullanabilirsiniz. Bu
kablo kılavuzu dizüstü bilgisayarınızda bağlanan USB kablo, güç
kablosu ya da diğer kabloları yönlendirmek için kullanılabilir.
Dizüstü bilgisayar ayağını kullanmanın keyfini
çıkarın!
18