1
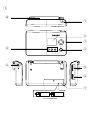
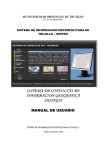
Pocket Radio
AE1850
Register your product and get support at
www.philips.com/welcome
User manual
Manuel d'utilisation
Manual de usuario
Benutzerhandbuch
Gebruikershandleiding
Manuale dell'utente
Manual do usuário
Brugervejledning
1
0
1
2
TIMER
FM
3
MW
SET TIMER
LIGHT
9
SET TIME
HOUR
MIN
4
POCKET RADIO AE1850
TUNING
5
VOL E
8
6
7
2 x 1.5V AA/R06/UM3
English
Congratulations on your purchase and welcome to Philips!
To fully benefit from the support that Philips offers, register
your product at www.philips.com/welcome.
Controls (see 1)
12
– switches the system on or to standby mode.
2 Display
– shows clock/alarm time and status of the set.
3 TIMER – activates/deactivates the timer.
FM/MW – selects the waveband: FM or MW.
SET TIMER – sets the timer.
4 LIGHT
– adjusts the brightness of the display.
5 TUNING
– tunes to radio stations.
6 VOL F
– adjusts the sound level.
7 Battery compartment
8;
– 3.5 mm stereo headphone socket.
9 SET TIME – sets the clock time.
HOUR – adjusts the hour for the clock/alarm time.
MIN – adjusts the minutes for the clock/alarm time.
0 Telescopic antenna
– improves FM reception.
POWER SUPPLY
Batteries (not included)
Open the battery door and insert two alkaline batteries, type AA, R06 or
UM3, as indicated in the battery compartment.
• Incorrect use of batteries can cause electrolyte leakage and will corrode
the compartment or cause the batteries to burst.
• Do not mix battery types: e.g. alkaline with carbon zinc. Only use batteries of the same type for the set.
• When inserting new batteries, do not try to mix old batteries with the
new ones.
• Remove the batteries if the set is not to be used for a long time.
Batteries contain chemical substances, so they should be disposed
of properly.
This set complies with the radio interference requirements of the
European Union.
General information
Antennas
• For FM, extend, incline and turn the telescopic antenna for best reception. Reduce its length if the signal is too strong.
• For MW, the set uses a built-in antenna. Direct this antenna for best
reception by turning the whole set.
Connecting headphones
• You can connect headphones to the headphone socket.
➜ The loudspeakers will then be switched off.
RADIO RECEPTION
1
2
3
4
5
Press 2 to switch on the radio.
Press FM/MW to select your desired waveband.
Select your station using the TUNING control.
Adjust the sound with the VOL F control.
To switch off the radio, press 2.
Setting the clock/timer
1 In standby mode, hold down SET TIME / SET TIMER.
2 Press HOUR or MIN repeatedly, or hold down HOUR or MIN to
adjust minute and/or hour.
3 Release SET TIME / SET TIMER and HOUR or MIN when you
reach the correct setting.
➜ The set clock time will show on the display and start to run.
Activating/deactivating the timer
• Press TIMER once or more to activate/deactivate the timer.
➜ The radio will automatically switch on at the set time after the timer is
activated.
Adjusting the brightness of the display
• To change the brightness of the display, press LIGHT.
SAFETY & MAINTENANCE
• Do not expose the set, batteries to humidity, rain, sand or excessive
heat caused by heating equipment or direct sunlight.
• The apparatus shall not be exposed to dripping or splashing.
• To clean the set, use a dry cloth. Do not use any cleaning agents containing alcohol, ammonia, benzene or abrasives as these may harm the
housing.
• Battery shall not be exposed to excessive heat such as sunshine, fire or
the like.
Troubleshooting
If a fault occurs, first check the points listed below before taking the set
for repair.
If you are unable to remedy a problem by following these hints, consult
your dealer or service centre.
WARNING: Do not open the set as there is a risk of electric shock. Under
no circumstances should you try to repair the set yourself, as this will invalidate
the guarantee.
Problem
– Possible cause
• Remedy
No sound /power
– Volume not adjusted
• Adjust the VOLUME.
– Batteries dead/ incorrectly inserted
• Insert (fresh) batteries correctly
– Headphones connected to the set
• Disconnect headphones.
Poor radio reception
– Weak radio signal
• For FM, extend, incline and turn the telescopic antenna for best reception. Reduce its length if the signal is too strong.
• For MW, the set uses a built-in antenna. Direct this antenna for best
reception by turning the whole set.
Hearing Safety
Listen at a moderate volume.
• Using headphones at a high volume can impair your hearing. This
product can produce sounds in decibel ranges that may cause hearing
loss for a normal person, even for exposure less than a minute. The
higher decibel ranges are offered for those that may have already
experienced some hearing loss.
• Sound can be deceiving. Over time your hearing "comfort level"
adapts to higher volumes of sound. So after prolonged listening, what
sounds "normal" can actually be loud and harmful to your hearing. To
guard against this, set your volume to a safe level before your hearing
adapts and leave it there.
To establish a safe volume level:
• Set your volume control at a low setting.
• Slowly increase the sound until you can hear it comfortably and clearly,
without distortion.
Listen for reasonable periods of time:
• Prolonged exposure to sound, even at normally "safe" levels, can also
cause hearing loss.
• Be sure to use your equipment reasonably and take appropriate breaks.
•
•
•
•
•
Be sure to observe the following guidelines when using your
headphones.
Listen at reasonable volumes for reasonable periods of time.
Be careful not to adjust the volume as your hearing adapts.
Do not turn up the volume so high that you can't hear what's around
you.
You should use caution or temporarily discontinue use in potentially
hazardous situations.
Do not use headphones while operating a motorized vehicle, cycling,
skateboarding, etc.; it may create a traffic hazard and is illegal in many
areas.
Environmental information
All unnecessary packaging material has been omitted.The packaging can
be easily separated into three materials: cardboard, polystyrene and plastic.
Your set consists of materials which can be recycled if disassembled by a specialized company. Please observe the local
regulations regarding the disposal of packaging, dead batteries and old equipment.
Disposal of your old product
Your product is designed and manufactured with high
quality materials and components, which can be recycled and reused.
When this crossed-out wheeled bin symbol is attached to
a product it means the product is covered by the
European Directive 2002/96/EC.
Please inform yourself about the local separate collection system for electrical and electronic products.
Please act according to your local rules and do not dispose of
your old products with your normal household waste.The correct disposal of your old product will help prevent potential
negative consequences for the environment and human health.
En México Importado por: Philips Mexicana, S.A. de C.V.
Av. La Palma No. 6 Col. San Fernando La Herradura, Huixquilucan.
Edo. de México, C.P. 52784 Tel. 52 69 90 00
GARANTIA INCLUIDA EN EL INSTRUCTIVO DE USO
En Peru Importado por: Philips Peruana S.A.
Av. Larco 1301 Piso 4 Lima – Peru
RUC 20100102090
En Chile Importado por : Philips Chilena S.A.
Av. Sta. Maria, 0760 - Providencia - Santiago, RUT 90.761.000-4
En Panama Importado por: Philips Caribbean Panama
Edificio Evergreen (Piso 9), Av. 5TA B Sur y Calle 78 Este
P.O. BOX 87-3941, Panama 7, Rep. de Panama
En Argentina Importado y Distribuido por:
Philips Argentina S.A.
Vedia 3892 (C1430 DAL)
Ciudad de Buenos Aires
No Brasil Importado por: Philips do Brasil Ltda.
Av. Engenheiro Tasso Pinheiro, 1.111 - Galpão 1
Jundiaí – SP CNPJ: 61086336/0021-57
Fones: 11 2121.0203 (São Paulo) 08007010203 (Brasil)
Meet Philips at the Internet
http://www.philips.com
Printed in China
AE1850_00_UM_V2.0