1
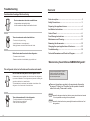
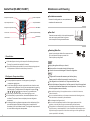
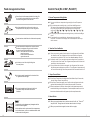
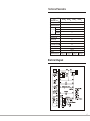
INSTRUCTIONS MANUAL
RL34EG*
RL34EC*
RL34SC*
RL34SG*
Before operating the appliance, please read this manual carefully and keep
it properly for future reference.
Follow the instructions and the related safety precaution in this manual
before your proper operation.
Our products are improved constantly and it will be subject to change
without notice.
Please join in our product registration in the following website.
www.samsung.com/global/register
ENGLISH
MODEL
Troubleshooting
Contents
Condensation/Leakage, Moisture/Icing
There is condensate on the exterior or middle frame.
-It happens when the humidity is high.
-It is not a malfunction. Wipe the moist with soft cloth.
Parts description ............................................................. 2
Safety Precautions........................................................... 3
Preparing the appliance for use ........................................4
Installation Instructions....................................................5
Control Panel....................................................................6
There is condensate on the fresh fruit box.
-The door is left open too long;
Food Storage Instructions...............................................10
Maintenance and Cleaning...............................................11
-Liquid foods are not covered properly.
Removing the Accessories...............................................12
-Many high water-contented foods are stored inside.
Changing the opening directions of the doors..................13
Troubleshooting..............................................................15
Melted frost water flows inside the refrigerator:
Technical Parameters and Electrical Diagram..................17
-The water outlet is blocked
-Please smooth the outlet with drain plug or similar tool.
Welcome to buy the world famous SAMSUNG Refrigerator!
The refrigerator is hot on both sides and has abnormal smells.
The front frame and side panels of the refrigerator are hot.
-Condensate pipes are installed in the front frame of the refrigerator
to prevent condensation. The refrigerator may become hot during the
operation, and that is not a malfunction.
-The heat radiators (condensers) are installed on both sides of the
refrigerator. It is normal to be hot on both sides.
There is abnormal smell in the refrigerator.
-The foods with smells shall be packed tightly.
-Check if there is any rotten food.
-Clean the internal refrigerator.
16
This manual includes RL34EG*, RL34EC*,
RL34SC* and RL34SG*. As these four
models have similar structure, RL34EG* is
the main descriptive subject.
Please use the appliance according to the requirements after reading
this manual. "Warning" and "Precaution"are the important information
related to the safety. Please read it carefully.
Warning means the dangerous situations that may cause potential serious hazards
if it is not operated according to the requirements.
Caution
means the situations that may cause slight hazards or malfunctions if not
being avoided.
1
Parts Description
Troubleshooting
Features
Not cold, not very cold and too cold
Indirect refrigerating and Frost-free: The refrigerator is indirect refrigerating and frost-free
with its automatic de-frost function and even distributed temperature in the compartments.
Dual-loop: the temperatures in the refrigerator and freezer can be displayed and controlled
separately.
Left/right door opening: The direction of the door opening can be adjusted according to the
user's habit.
Structure introduction
The refrigerator does not work or refrigerate..
-The plug is not plugged properly.
-The power is not connected and power socekt has fault.
The power is disconnected during the operation and
reconnected within less than 5 minutes after power
disconnection.
The refrigerator is not very cold.
-The doors are not closed properly.
-The temperature is set too high.
-Door seal is damaged or deformed. The sealing is not tight.
-The refrigerator has heat resources or around or is exposed
to the direct sunlights.
-The external ventilation is poor.
Egg tray
Lamp cover
Air ventilation cover
Egg guard
After the appliance has been running for a long
period of time:
Ice tray
Preservation cabinet shelf
-The doors are opened frequently or not closed properly.
-The external ventilation is poor. The refrigerator has slow
heat radiation.
Can guard
Fruit box cover
Fruit box
Temperature sensor
The fridge is too cold and the foods are frozen.
-The temperature is set too low; The user is suggested to
raise the set temperature in the fridge.
Upper drawer
Large bottle guard
Middle drawer
Lower drawer
The refrigerator has abnormal sounds.
Accessories
MODEL
RL34EC*
RL34SC*
RL34SG*
Preservation cabinet shelf
3
3
3
3
Fruit box cover
1
1
1
1
Fruit box
1
1
1
1
upper drawer
1
1
1
1
middle drawer
1
1
1
1
lower drawer
1
1
1
1
Egg guard
1
1
1
1
Can guard
2
2
2
2
large bottle guard
1
1
1
1
Egg tray
1
1
1
1
Ice tray
1
1
1
1
1
1
1
1
NAME
Interior accessories
Door set accessories
Printed
User's Manual
documents
2
RL34EG*
The temperature in the refrigerator is reduced by the running of the compressor and the
circulation of the refrigerant etc to ensure the freshness and nutrition of the foods in the
refrigerator. During the running of the refrigerator, you can hear some slight sounds. It is
normal and please take ease to use it.
The refrigerator is not positioned in level.
Slight Buzzing Sounds
If the refrigerator is positioned slightly
When the compressor is running, the
not level, the running sound will be
sound is slightly high during the startup.
increased. Its levelness can be adjusted
The high-efficient refrigerator has quite
by turning the adjustment leg on the
higher sound when the compressor is
bottom of the body.
working strongly. When you hear the low
Clicking and Bubbling Sounds.
motor sounds, it is the sound caused by
When the refrigerator is stopped, the
the freezing fan to keep the temperature
electrical components such as main control
regular. It is not a fault.
panel, startup relay and heat protector will
Air Flow or Babbling Sound
have clicking or bubbling sounds suddenly
The temperature in the refrigerator can
due to their connection or disconnection.
drop rapidly only by the circulation of
Cracking Sounds
refrigerant in the pipeline. The
When the refrigerator is running, due o
refrigerant can be gas or liquid. The low
the variation of temperature differences,
sound may be heard during the circulation.
the foods are broken or the evaporator
and pipes have cracking sounds because
of their contraction and expansion.
15
Changing the direction of the door opening(RL34SC*)
COVER TOP FRONT
CAP SPACER DOOR
HINGE UPP
CAP SCREW CABI
SCREW F
COVER DOOR UPP
CAP HINGE HOLE
Safety Precautions
If the appliance is disconnected from the power supply, you
should wait for at least five minutes before reconnecting the
power to avoid damaging the compressor.
CAUTION : If the flexible power cord is damaged, it must be
repaired by special tools. Thus, it must be replaced
by the repair store appointed by the manufacturer.
Do not use inflammable aerosols such as spray paint and
dope near the freezer/refrigerator. Otherwise, there will be
A risk of explosion.
SCREW A
HAFT HINGE
CAP HINGE HOLE
CAP SCREW CABI
SCREW F
MID HINGE
STOPPER DOOR
Do not let children hang on the doors or climb the refrigerator to avoid damaging the refrigerator and injuring the
Children.
SCREW G
SCREW E
REINF
HINGE LOW
Do not store corrosive, inflammable and explosive, strong
acid or alkali substances such as butane, ether, vitriol,
benzene, and alcohol. Bottles containing liquid foods also
shall not be stored in the freezer; otherwise the bottles may
Be broken.
STOPPER HINGE LOW
SCREW HEX
(SCREW D)
FIXER HINGE LOW
SHAFT HINGE
FOOT
STOPPER DOOR
SCREW HEX
SCREW D
SCREW G
FOOT
Simply Type:
If the refrigerator can not work normally or is damaged, do
not continue using it. Pull out the power plug and contact the
local service center immediately. If the power cord is
damaged, to avoid any accident, it must be replaced by
Service agent of the manufacturer or a qualified staff.
1. Take down HIGNE UPP and SHAFT-HINGE and install them at the opposite side of the
HING-UPP. Take down COVER DOOR UPP and fridge door.
2. Take down SCREW A, SCREW E and MID HINGE, and then the refrigerator door. Take down
CAP HINGE HOLE, CAP SCREW CABI and SCREW F. Then fix them at right.
3. Gently incline the appliance in less than 45 degree, remove the right side FOOT, and unfasten
the SCREW D. Take down HINGE LOW, FIXER HINGE LOW ,SHIFT HINGE and
STOPPER HINGE LOW. Reverse and fix STOPPER HINGE LOW with FIXER HINGE LOW to
the left of HINGE LOW and SHIFT HINGE.
4. Take down left FOOT and unfasten SCREW D. Take down and fix REINF to the right. Then install
FOOT.
5. Take down SCREW G and STOPPER DOOR in the fridge and freezer doors and install them at
the left of the doors. Take down CAP HOLE DOOR and CAP SPACER DOOR and fix them at
the left of the doors,
6. Fix MID HINGE with SCREW A and SCREW E, and install the freezer door. Fix left HINGELOW and install FOOT. Put the refrigerator stable and install the fridge and freezer doors. Fix
HINGE UPP with SCREW A.
14
Do not splash water on the top or back of the refrigerator to
avoid reducing the insulation effects of the appliance.
If you wish to dispose of the freezer/refrigerator, please first
remove the door seals.
When the appliance is disposed of, it shall be handled by
professional staff instead of being discarded casually;
otherwise it may cause hazards or other dangers to the
Environment.
3
Safety Precautions
Changing the direction of the door opening(RL34EG*)
Caution
COVER TOP FRONT
When comparing the appliance with other refrigerators, please refer to the model and
number;
Before the appliance is connected to the power, verify if voltage rating of the refrigerator is
same to the power voltage. The voltage can be variable from 187V to 240V; if the power
voltage can not meet the requirements, an automatic transformer with a minimum output of
500W shall be used.
If the appliance is disconnected from the power, you should wait for at least five minutes
before reconnection; otherwise there may be a hazard to the compressor.
Do not store food close to the temperature sensor; otherwise it may display wrong
temperatures.
Do not open and close the door too frequently or for a long time during hot weather;
otherwise it may affect the efficiency of the entire unit and burden the appliance with
excessive load.
Do not leave the refrigerator upside down or horizontal or keep inclined over 45 degree to
the ground if necessary;
Do not pull or push the appliance by holding the door handles or exert too much upward/
downward forces on the door handle;
If a lot of hot foods are stored at the same time or the door is opened frequently or kept open
for a long period of time, the internal temperature will rise and the temperature display may
flash. It will be recovered normal after a period of stable operation;
The refrigerator must be located with an easy access to the power supply.
Alert
The cooling effects originates from refrigerant that is filled through
special process. Please ensure the pipes in the rear are intact.
This appliance adopts R600a refrigerant which is combustible.
During transportation and installation, please handle the appliance carefully
to protect the cooling system from damage.
The refrigarant leaked from the pipe may catch fire or hurt your eyes. If refrigerant leakage occurs,
please keep away the fire or potential fire source, and keep the room aired for several minutes.
- To avoid the combustible gas composed of the refrigerant leaked from the cooling circuit and the air,
please select the room size to accommodate t he appliance according to the refrigerant quantity.
The room size shall be calculated as per the criterion of 8g R600a per square metres.
For details of the refrigerant quantity, please refer to the manual.
- Do not start the appliance that has any damage. If any problems, please contact the dealer or
service centre.
Preparing the appliance for use
1.Remove all the packing materials of the components,
and do remove the foam pad under the refrigerator
during the operation;
2.Clean the interior and exterior of the refrigerator with
wet warm cloth (add little neutral detergent in the warm
water).
3.the power plug can be connected around one hour after the
refrigerator is positioned stable,please make the approciate
operations with careful reference to the page of control panel
introduction.
COVER TOP UPP
SCREW B
CAP HOLE TOP
CAP SPACER DOOR
COVER HINGE UPP L
HINGE UPP R
SHAFT-HINGE
SCREW F
CAP SCREW CABI
CAP HINGE HOLE
COVER HINGE UPP R
SCREW A
CAP SCREW HANDLE
SCREW F
SCREW C
CAP SCREW CABI
CAP HOLE DOOR
CAP HINGE HOLE
SCREW A
STOPPER DOOR
MID HINGE
SCREW E
CAP HANDLE
SCREW G
REINF
SCREW D
CAP HOLE DOOR
FOOT
HINGE LOW
SCREW C
FIXER HINGE LOW
SCREW D
STOPPER HINGE LOW
SHAFT HINGE
FOOT
CAP SCREW HANDLE
Advance Type:
1 .Take down the SCREW B which is fixing the COVER TOP
FRONT and then COVER TOP FRONT. Pull out the wire inserts.
Take down COVER HINGE UPP R and fridge door. Take downd and fix
SHAFT-HINGE to the opposite side of HINGE UPP. Take down
CAP HOLE TOP at COVER TOP FRONT and install it
on the right of COVER TOP FRONT.
STOPPER DOOR
SCREW G
2. Take down SCREW A, SCREW E and MID HINGE of the fixing hinge and then freezer door. Take
down CAP HINGE HOLE, CAP SCREW CABI and SCREW F at left and install them at right.
3. Gently incline the appliance in less than 45 degree, remove the right FOOT and unfasten SCREW
D. Take down right HINGE LOW. Then take down FIX HINGE LOW,SHIFT HINGE and STOPPER
HINGE LOW. Reverse STOPPER HINGE LOW and fix it to the left of HINGE LOW with
FIXER HINGE LOW and SHIFT HINGE.
4. Take down the left FOOT and unfasten SCREW D. Take down and fix REINF to the right. Then fix
FOOT.
5.Take off the SCREW G and STOPPERDOOR in the freezer door and install them at the left of the
door. Take off CAP HOLEDOOR, CAP SCREW HANDLE, SCREW C, HANDLE UPP, HANDLE BAR,
HANDLE LOW, CAP HANDLE, and CAP SPACER DOOR, and install them at the right of the door.
Install CAP HOLEDOOR on the left of the door.
6.Install the freezer's door, and fix MID HINGE with SCREW A and SCREW E. Fix the refrigerator's
door with SCREW A and HINGE UP L.
7.Fix the wire inserts properly. Install COVER HINGE UPP L and cover it with COVER DOOR UPP.
8.Install COVER TOP FRONT and finally fasten SCREW B.
4
13
Removing the Accessories
The use of the Accessories
Referagerator shelf
Lift the back of the shelf up to take it out.
(Its location can be changed as per the heights
of the containers)
Installation Instructions
Your refrigerator should be put in a solid and level place.
The adjusting leg on the bottom of the refrigerator shall be
turned to adjust its horizontal location if not level. (lifting it
up counterclockwise)
Fruit box cover
Lift the back of the fresh fruit drawer cover up to take
it out.
The distance between the wall and rear or sides of the
refrigerator should not be less than 55 cm and the top
clearance shall not be less than 55cm.
Freezer Drawer
Pull it out till the edge and then lift it up to remove it;
If it contains heavy articles, you need to lift it up
slightly to put it back;
Keep the appliance away from any heat sources and avoid
the direct sunlight.
Egg Tray and Large Bottle Guard
Lift them up to take them out.
Replacing the lamp bulb
Pull out the power plug.
The appliance should not be put in a humid environment to
avoid that its metal parts become rusty or their insulation
effects get reduced. In case of any natural disasters (i.e.
storm, accident), if the refrigerator has been soaked in
water, you should go to the appointed local SAMSUNG
service centre for repair. You can use it again only when
you make sure if there is no problem.
Insert the (+ )screw driver into the lamp cover from
the gap and lift the cover up to take it out.
For the safety concerns, the refrigerator must be earthed
correctly and shall not be earthed through telephone wire
or gas pipe.
Turn the bulb counterclockwise to take it out.
Turn the new bulb clockwise.
Put the lamp cover back into the slot. Fasten the
screw back at the back of the lamp cover.
Do not have the power cord pressed by any object.
Parameter of the lamp bulb: 220V/240V, 30W E14.
12
5
Control Panel (RL34EG*, RL34EC*)
Maintenance and Cleaning
Refrigerator Temperature
Freezer Temperature
Super Refrigeration Mode
Super Freeze Mode
For interior accessories:
Remove all the shelf, guards, box, covers, and drawer, and
clean them with a wet warm cloth.
Alarm Button
Refrigerator Temperature Setting
Freezer Temperature Setting
Power On/Off
Alarm On/Off
Vacation Mode
Door Seal:
Clean the door seal carefully; the chopstick wrapped with
cotton wool may be used to clean the grooves.
It shall be wiped off if being cleaned with water.
Super Freeze
Receiving Water Pan:
1. Power Button
1-1.While the refrigerator is running, all the lamps will be off and the appliance stops
Running if you press the button and hold for 3 seconds;
1-2.If you press the button again and hold for 3 seconds, it will start running again and
the temperatures will be set at the levels before you turned it off.
Loosen the screw in the middle of the compressor cover.
Pull out a little and lift the pan up to take it out.
Clean it up before putting it back.
Caution
Unplug the appliance before you clean it;
Make sure there is no water entering the lamp cover;
It is better to use neutral detergent to clean the refrigerator.
Warning
2. Refrigerator Temperature Setting
2-1. You may adjust the temperature in the refrigerator by pressing the
temperature setting button;
2-2. You will hear a Ding sound when you press the button, then the current
temperature will be displayed. You may set a new temperature by pressing
the button again. The temperature will be changed in a sequence of 3 ,
2 , 1 , 7 , 6 , 5 , 4 ,3 , every time once you press the button;
2-3. Every time you press the button, you will hear a Ding sound;
2-4. 5 seconds after you press the button, the selected temperature will be
confirmed. The screen will recover to display the current refrigerator
temperature;
2-5. In Vacation Mode, the refrigerator temperature will not be displayed. If you
press the Refrigerator Temperature Setting button, the appliance will
automatically quit from the Vacation mode. The refrigerator temperature will
be controlled according to the set temperature.
6
The glass shelf is a removable accessory and relatively heavy.
Please prevent the children from moving it to avoid any injury.
If the refrigerator is not installed level, it may cause abnormal noise;
For the initial startup of the appliance, it will take a period of time for the machine to
cool down from the ambient temperature to a set temperature. It is usually 3 hours
before the appliance can work normally.
Keep ventilation openings, in the appliance enclosure or in the build-in structure,
clear of obstruction.
Do not use mechanical devices or other means to accelerate the defrosting process,
other than those recommended by the manufacturer.
Do not damage the refrigerant circuit.
Do not use electrical appliances inside the food storage compartments of the
appliance, unless they are of the type recommended by the manufacturer.
This appliance is not intended for use by persons (including children) with reduced
physical, sensory or mental capabilities, or lack of experience and knowledge, unless
they have been given supervision or instruction concerning use of the appliance by a
person responsible for their safety.
11
Food storage instructions
Stored food should be wrapped with the fresh bag, film
or put in the food containers with covers to avoid the
foods from being dried or smell affected.
Hot foods and drinks should be cooled to the room
temperature before they are put into the refrigerator.
Cooked and uncooked foods should be stored separately.
Stored foods should not be placed too compact to ensure
that there is enough space for good cool air circulation.
Air vent at the rear should not be blocked.
Caution: 1. Do not place the food close to the
temperature sensor;
2. Food or container should not be
against the rear wall.
It is better to store the food by dividing them
into small pieces.
It is better to wash the washable foods such as fruits
or vegetables before storage.
Fruits and vegetables shall be stored in the fresh
fruit drawer to keep their water contents and
freshness.
Control Panel (RL 34 EG*, RL 34EC*)
3. Freezer Temperature Setting Button
3-1.You can set the freezer temperature by pressing the freezer Temperature
button.
3-2.Press the temperature setting button, you will hear the Ding sound.
The freezer setting temperature will display the current set temperature.
Every time you press the button, the temperature will be changed in a
sequence of-20 , -21 , -22 , -23 , -24 , -25 , -14 , -15 , -16 , -17 ,
-18 , -19 , -20 .
3-3.Every time you press the temperature setting button you will hear the Ding
sound.
3-4.5 seconds after you press the button, the temperature you set will be
confirmed. The screen will then display the current temperature before you
set the new one.
4. Vacation Function Button
4-1.Once you press the vacation function button, the refrigerator will be shifted to
the vacation mode. The refrigerator will be turned off and the refrigerator
temperature lamp will also be off. You will see Vacation lamp turned on.
4-2.In vacation mode, if you press the temperature setting button, the appliance
will quit from the current mode. The refrigerator temperature will be controlled
according to the set temperature.
4-3.If you press vacation function button again, the refrigerator will be turned on
and the temperature display lamp will be on. The refrigerator's temperature will
be Controlled according to the set temperature before the vacation mode is off.
5. Super Freeze Button
5-1.Press Super Freeze button, the refrigerator will be shifted to Super Freeze mode,
then the Super Freeze lamp will be on;
5-2.Press Super Freeze button again, you will quit from the super freeze mode or the
appliance will automatically quit from the super freeze mode 2.5 hours later;
5-3.When the appliance is in the super freeze mode, the refrigerator temperature is
controlled according to its set temperature. Freezer temperature can be set, but its
Actual control shall start after the refrigerator quits from super freeze mode.
6. Alarm Button
6-1. When you press the alarm button, the door alarm will be off, the
Tropical fruits such as bananas and pineapples shall not
be stored in the refrigerator;
Alarm On
lamp will be off. The appliance will not alarm when the door is left open;
6-2. When you press the button again, the alarm will be on again;
Articles that have strict requirements for the temperatures
such as blood serum, vaccine,or academicmaterials shall
not be stored in the refrigerator.
10
7
Control Panel (RL34EG*, RL34EC*)
Control Panel (RL34SC*,RL34SG*)
7. Malfunction Alarm Function
1.Temperature Setting
8. Door Open Alarm function
8-1.In the Door Open Alarm function, if you open the door for a long period of time,
the refrigerator will give off DeeDee sound at intervals to Remind you of
closing the door.
Temp.Control
1-1.Press Cooling Power button to set the temperatures;
1-2. Press the Cooling Power button and the refrigerator will flash to display the current
set temperatures. If you press the button again, the new temperature will be set.
There are five temperatures as options. The set temperatures will be circulation
displayed according to some sequences when pressing the buttons.The more the
lamps are on, the cooler the Temperature will be;
1-3. The set value will be confirmed five seconds after stop pressing the button, the
currently selected temperature will be confirmed and be displayed.
2.Power Button Power
2-1. During the operation of the refrigerator, if the button is pressed for 3
First Power-on and Temperature Adjustment
seconds,all the lamps will be off and the refrigerator will stop running.
2-2. If the button is pressed for another 3 seconds, the refrigerator will start
running again.
3.Malfunction Alarm Function
3-1. If the following problems occur, please notify the specialized staff to repair
the refrigerator.
3-2. If the indicating lamp is flashing, it means the refrigerator has problem.
If you want to clean the refrigerator,do pull out the power plug.
When the appliance is connected with the power for the first time , all the displays will be on
for 2 seconds. The refrigerator temperature will be automatically set at 3 while the freezer
temperature will be set at -20 . The door opening alarm is on while the refrigerator and
freezer temperatures are displayed.
The First Power Connection and Temperature Adjustment
You may set the inside temperatures according to your actual requirements.
Temp.Control
Power
Colder
Coldest
Control Panel (RL34SC*,RL34SG*)
The panel is on the upper frame.
Temp.Control
Power
Colder
Coldest
When the appliance is connected with the power, all displays will be on for 2
seconds, and then the refrigerator will enter the set operation mode
automatically. (3 lamps on)
The inside temperature is usually set under the default setting mode
(3 lamps on) or is adjusted according to the actual requirements of the user.
Power Button
8
Temperature Setting Button
9
Technical Parameters
MODEL
DESCRIPTION
RL34EG
RL34EC
RL34SC
RL34SG
SN-T
Climate Type
I
Electrical Shock Protection Class
Total Effective Capacity
286
Effective Capacity Refrigerator
(L)
Freezer
ÀäÊ
¶Ò
³
201
Rated volgage/ Frequency/Current
220V-240V/50Hz/0.45A
85
Total Input Power (W)
100
Defrost Power (W)
250
Max. Power of Lamp(W)
Power Consumption kWh/24h(25 )
30
0.945
Freezing Capacity kg/24h
10
Refrigerant and Fill-in Amount(g)
R-600a,55g
Weight(kg)
Overall Size (W*D*H)(mm)
71
595 685 1775
595 646 1775
595 646 1775
595 685 1775
Electrical Diagram
17