1
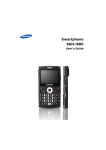
Smartphone
SGH-i620
User’s Guide
Table of contents
CHAPTER 1
Getting started
What’s in the box? . . . . . . . .
Getting to know your device .
Installing the SIM card . . . . .
Installing the battery. . . . . . .
Charging your device . . . . . .
Turning your device on or off .
CHAPTER 2
CHAPTER 3
CHAPTER 4
.
.
.
.
.
.
.
.
.
.
.
.
.
.
.
.
.
.
.
.
.
.
.
.
.
.
.
.
.
.
.
.
.
.
.
.
.
.
.
.
.
.
.
.
.
.
.
.
.
.
.
.
.
.
.
.
.
.
.
.
.
.
.
.
.
.
.
.
.
.
.
.
.
.
.
.
.
.
.
.
.
.
.
.
.
.
.
.
.
.
.
.
.
.
.
.
.
.
.
.
.
.
.
.
.
.
.
.
.
.
.
.
.
.
.
.
.
.
.
.
. 8
. 9
12
14
15
17
Using the Home screen . . . . . .
Start menu screen . . . . . . . . .
Entering text . . . . . . . . . . . . .
Customising your device . . . . .
Searching for items. . . . . . . . .
Locking the touch keys . . . . . .
Using an optional memory card
Adding and removing programs
Managing certificates . . . . . . .
Resetting your device . . . . . . .
Using online help . . . . . . . . . .
.
.
.
.
.
.
.
.
.
.
.
.
.
.
.
.
.
.
.
.
.
.
.
.
.
.
.
.
.
.
.
.
.
.
.
.
.
.
.
.
.
.
.
.
.
.
.
.
.
.
.
.
.
.
.
.
.
.
.
.
.
.
.
.
.
.
.
.
.
.
.
.
.
.
.
.
.
.
.
.
.
.
.
.
.
.
.
.
.
.
.
.
.
.
.
.
.
.
.
.
.
.
.
.
.
.
.
.
.
.
.
.
.
.
.
.
.
.
.
.
.
.
.
.
.
.
.
.
.
.
.
.
.
.
.
.
.
.
.
.
.
.
.
.
.
.
.
.
.
.
.
.
.
.
.
.
.
.
.
.
.
.
.
.
.
.
.
.
.
.
.
.
.
.
.
.
.
.
.
.
.
.
.
.
.
.
.
.
.
.
.
.
.
.
.
.
.
.
.
.
.
.
.
.
.
.
.
.
.
18
22
23
24
37
39
39
41
44
45
46
Installing ActiveSync . . . . . . . . . . . . .
Customising connection settings . . . . .
Connecting your device to a computer.
Synchronising information . . . . . . . . .
Customising synchronisation settings .
.
.
.
.
.
.
.
.
.
.
.
.
.
.
.
.
.
.
.
.
.
.
.
.
.
.
.
.
.
.
.
.
.
.
.
.
.
.
.
.
.
.
.
.
.
.
.
.
.
.
.
.
.
.
.
.
.
.
.
.
.
.
.
.
.
.
.
.
.
.
48
49
49
51
52
The basics
Synchronisation
Call functions
Turning the phone functions on and off . . . . . . . . . . . . . . 55
Table of contents
Using the Dialling screen . . . . . . .
Making a call . . . . . . . . . . . . . . .
Advanced calling features . . . . . .
Answering or ignoring a call . . . . .
Options during a call . . . . . . . . . .
Call-related features . . . . . . . . . .
Customising your phone functions
CHAPTER 5
.
.
.
.
.
.
.
.
.
.
.
.
.
.
.
.
.
.
.
.
.
.
.
.
.
.
.
.
.
.
.
.
.
.
.
.
.
.
.
.
.
.
.
.
.
.
.
.
.
.
.
.
.
.
.
.
.
.
.
.
.
.
.
.
.
.
.
.
.
.
.
.
.
.
.
.
.
.
.
.
.
.
.
.
.
.
.
.
.
.
.
.
.
.
.
.
.
.
.
.
.
.
.
.
.
.
.
.
.
.
.
.
56
56
57
60
60
63
66
72
86
90
90
90
94
Messaging, Internet, and
Messenger
Messaging . . . . . . . . . . .
Opera Browser . . . . . . . .
Internet Explorer . . . . . .
Windows Live . . . . . . . . .
Windows Live Messenger .
RSS Reader . . . . . . . . . .
CHAPTER 6
.
.
.
.
.
.
.
.
.
.
.
.
.
.
.
.
.
.
.
.
.
.
.
.
.
.
.
.
.
.
.
.
.
.
.
.
.
.
.
.
.
.
.
.
.
.
.
.
.
.
.
.
.
.
.
.
.
.
.
.
.
.
.
.
.
.
.
.
.
.
.
.
.
.
.
.
.
.
.
.
.
.
.
.
.
.
.
.
.
.
.
.
.
.
.
.
.
.
.
.
.
.
.
.
.
.
.
.
.
.
.
.
.
.
.
.
.
.
.
.
.
.
.
.
.
.
.
.
.
.
.
.
.
.
.
.
.
.
.
.
.
.
.
.
.
.
.
.
.
.
.
.
.
.
.
.
.
.
.
.
.
.
.
.
.
.
.
.
.
.
.
.
.
.
.
.
.
.
.
.
.
.
.
.
.
.
.
.
.
.
.
.
.
.
.
.
.
.
.
.
.
.
.
.
.
.
.
.
.
.
.
.
.
.
.
.
.
.
.
.
.
.
.
.
.
.
.
.
.
.
.
.
.
.
.
.
.
.
.
.
.
.
.
.
.
.
.
.
.
.
.
.
.
.
.
.
.
.
.
.
.
.
.
.
.
.
.
.
.
.
.
.
.
.
.
.
.
.
.
.
.
.
.
.
.
.
.
.
.
.
.
.
.
.
.
.
.
.
.
. 97
103
104
108
109
111
112
Organiser
Contacts . .
Alarms . . .
Calendar . .
D-Day . . . .
Tasks . . . .
Voice Notes
World Clock
.
.
.
.
.
.
.
.
.
.
.
.
.
.
.
.
.
.
.
.
.
.
.
.
.
.
.
.
.
.
.
.
.
.
.
.
.
.
.
.
.
.
.
.
.
.
.
.
.
.
.
.
.
.
.
.
.
.
.
.
.
.
.
.
.
.
.
.
.
.
3
Table of contents
CHAPTER 7
Multimedia
Camera . . . . . . . . . . .
Windows Media Player .
Podcast . . . . . . . . . . .
Adobe Flash Lite . . . . .
My Files . . . . . . . . . . .
CHAPTER 8
.
.
.
.
.
.
.
.
.
.
.
.
.
.
.
.
.
.
.
.
.
.
.
.
.
.
.
.
.
.
.
.
.
.
.
.
.
.
.
.
.
.
.
.
.
.
.
.
.
.
.
.
.
.
.
.
.
.
.
.
.
.
.
.
.
.
.
.
.
.
.
.
.
.
.
.
.
.
.
.
.
.
.
.
.
.
.
.
.
.
.
.
.
.
.
.
.
.
.
.
.
.
.
.
.
.
.
.
.
.
.
.
.
.
.
.
.
.
.
.
114
120
128
130
131
.
.
.
.
.
.
.
.
.
.
.
.
.
.
.
.
.
.
.
.
.
.
.
.
.
.
.
.
.
.
.
.
.
.
.
.
.
.
.
.
.
.
.
.
.
.
.
.
.
.
.
.
.
.
.
.
.
.
.
.
.
.
.
.
.
.
.
.
.
.
.
.
.
.
.
.
.
.
.
.
.
.
.
.
.
.
.
.
.
.
.
.
.
.
.
.
.
.
.
.
.
.
.
.
.
.
.
.
.
.
.
.
.
.
.
.
.
.
.
.
.
.
.
.
.
.
.
.
.
.
.
.
.
.
.
.
.
.
.
.
.
.
.
.
.
.
.
.
.
.
.
.
.
.
.
.
.
.
.
.
.
.
.
.
.
.
.
.
.
.
.
.
.
.
.
.
.
.
.
.
.
.
.
.
.
.
.
.
.
.
.
.
.
.
.
.
.
.
.
.
.
.
.
.
.
.
.
.
.
.
.
.
.
.
.
.
136
138
139
140
140
142
143
145
146
Beaming with Bluetooth. . . . . . . . . . . . . . .
Connecting to a computer via USB . . . . . . .
Internet Sharing . . . . . . . . . . . . . . . . . . . .
Connecting to the Internet or your network .
.
.
.
.
.
.
.
.
.
.
.
.
.
.
.
.
.
.
.
.
.
.
.
.
.
.
.
.
.
.
.
.
.
.
.
.
147
151
152
153
Extra programs
Games . . . . . . . . . . .
Calculator . . . . . . . . .
Smart Converter. . . . .
Stopwatch . . . . . . . . .
Document viewers . . .
File Manager . . . . . . .
Task Manager. . . . . . .
SIM Manager . . . . . . .
SIM Application Toolkit
CHAPTER 9
CHAPTER 10
Getting connected
Troubleshooting
General problems . . . . . . . . . . . . . . . . . . . . . . . . . . . . 158
4
Table of contents
Call problems . . . . . . . . . . . . . . . . . . . . . . . . . . . . . . . 161
Power and charging problems . . . . . . . . . . . . . . . . . . . 162
Program problems . . . . . . . . . . . . . . . . . . . . . . . . . . . 164
CHAPTER 11
Regulatory notices
SAR certification information . . . . . . . . .
European Union notice . . . . . . . . . . . . .
Important safety information . . . . . . . . .
Safety precautions for power supply unit .
Care and maintenance . . . . . . . . . . . . .
Microsoft End User License Agreement . .
DESCRIPTION OF OTHER RIGHTS
AND LIMITATIONS. . . . . . . . . . . . . . . . .
.
.
.
.
.
.
.
.
.
.
.
.
.
.
.
.
.
.
.
.
.
.
.
.
.
.
.
.
.
.
.
.
.
.
.
.
.
.
.
.
.
.
.
.
.
.
.
.
.
.
.
.
.
.
.
.
.
.
.
.
.
.
.
.
.
.
169
170
171
173
173
175
. . . . . . . . . . . 177
5
Important safety precautions
Read these guidelines before using your wireless device.
Failure to comply with them may be dangerous or illegal.
Drive safely at all times
Do not use a hand-held device while driving. Park the
vehicle first.
Switch off the device when refuelling
Do not use the device at a refuelling point (service station)
or near fuels or chemicals.
Switch off in an aircraft
Wireless devices can cause interference. Using them in an
aircraft is both illegal and dangerous.
Switch off the device near all medical equipment
Hospitals or health care facilities may be using equipment
that could be sensitive to external radio frequency energy.
Follow any regulations or rules in force.
Interference
All wireless devices may be subject to interference, which
could affect their performance.
Be aware of special regulations
Meet any special regulations in force in any area and
always switch off your device whenever it is forbidden to
use it, or when it may cause interference or danger.
Water resistance
Your device is not water-resistant. Keep it dry.
6
Sensible use
Use only in the normal position (held to the ear). Avoid
unnecessary contact with the antenna when the device is
switched on.
Emergency calls
Key in the emergency number for your present location,
then press
.
Keep your device away from small children
Keep the device and all its parts, including accessories, out
of the reach of small children.
Accessories and batteries
Use only Samsung-approved batteries and accessories,
such as headsets and PC data cables. Use of any
unauthorised accessories could damage you and your
device and may be dangerous.
CAUTION:
• The device could explode if the battery is replaced with an
incorrect type.
• Dispose of used batteries according to the manufacturer’s
instructions.
At very high volumes, prolonged listening to a
headset can damage your hearing.
Qualified service
Only qualified service personnel may install or repair your
device. Failure to do so may invalidate the warranty.
For more detailed safety information, see “Important safety
information” on page 171.
7
1
Getting started
Congratulations on the purchase of your new Smartphone!
This chapter helps you set up your device, charge the
device’s batteries, and familiarise yourself with the different
components of your device.
What’s in the box?
Your package contains the following items:
• Device
• PC data cable
• Battery
• Travel adapter
• CD-ROM1
• Quick Reference Guide
In addition, you can obtain the following accessories for
your device from your local Samsung dealer:
• Car charger or adapter
• Standard battery
• Travel adapter
• Straight headset
• PC data cable
• Bluetooth USB dongle kit
• Bluetooth hands-free car
kit
• Ear microphone
• Bluetooth mono &
stereo headset
Note: The items supplied with your device and the accessories
available at your Samsung dealer may vary, depending
on your country or service provider.
1. It contains Microsoft ActiveSync software, Add-on software and
programs.
8
Getting started
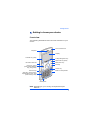
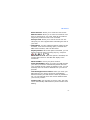
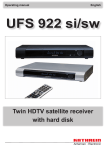
Getting to know your device
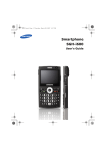
Front view
The following illustrations show the main elements of your
device:
Front camera lens
Earpiece
Display
Left soft key (LSK)
4-Way Navigation key
Right soft key (RSK)
Back/Clear key
microSD™card slot
End key
Home key (short
press)/Task Manager
key (long press)
Centre key
Volume keys
Built in Full keyboard
Send key (short press)/
Speakerphone key (long
press during a call)
Mouthpiece
Note: Depending on your country, the keyboard may be
different.
9
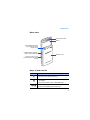
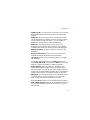
Getting started
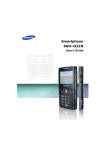
Rear view
Rear camera lens
Mirror
Power ON/OFF button
(long press)/Key lock
(short press)
Headset/Power adapter/
USB or data cable jack
Battery cover
Quick List key (short
press)/Camera key (long
press)
Keys of your device
Key
Description
• Press and hold to turn the device on or off.
• Press to lock the touch keys.
• Press to switch to the Home screen from a
program.
• Press and hold to open Task Manager.
Press to perform the command shown on the
screen immediately above the key.
10
Getting started
Key
Description
• Press to close the current menu and return
to the previous menu or screen.
• Press to delete characters in a text input
field.
• Press to scroll through a list.
• Press to move the cursor in a text input
field.
Press to confirm your selection or input.
• Press to open the Dialling screen.
• Press to make or answer a call.
• Press and hold to activate the
speakerphone feature during a call.
• Press to end a call.
• Press to close the current menu.
~
Press to enter numbers, characters, and
symbols.
Press to delete characters.
Press to use characters on the upper half of
the keys in a text input field for once.
• Press to confirm your selection or input.
• Press to start a new line in a text input field.
Press to change case in a text input field.
Press to switch the text input mode to 123
mode and then back to the previous mode.
Press to change the text input mode.
11
Getting started
Key
Description
• Press to enter a space between characters.
• Press and hold to insert an international call
prefix.
Press and hold to activate or deactivate the
Silent profile from the Home screen.
Press to open the Messaging program.
• Press to adjust the audio volume.
• Press to mute the call ringer as a call comes
in. Press and hold to reject a call.
• Press to open the Quick List screen.
• Press and hold to open a specified program.
Installing the SIM card
When you subscribe to a cellular network, you are provided
with a plug-in SIM card loaded with your subscription
details, such as your PIN, any optional services available,
and many other details. For 3G services, you can purchase
a USIM (Universal Subscriber Identity Module) card.
• Keep all miniature SIM cards out of the reach of small
children.
• The SIM card and its contacts can be easily damaged by
scratches or bending, so be careful when handling the
card.
• When installing the SIM card, always make sure that the
device is switched off before you remove the battery.
12
Getting started
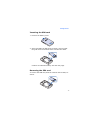
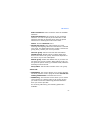
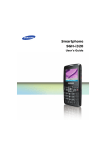
Inserting the SIM card
1. Remove the battery cover.
2. Insert and slide the SIM card, as shown, ensuring that
the gold-coloured contacts of the card are face down.
Continue to install the battery. See the next page.
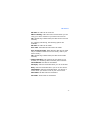
Removing the SIM card
To remove the SIM card, slide the card out of the holder, as
shown.
13
Getting started
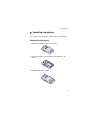
Installing the battery
Your device is powered by a rechargeable Li-Ion battery.
Installing the battery
1. Remove the battery cover, if necessary.
2. Insert the battery into the battery compartment, as
shown.
3. Reattach the battery cover.
14
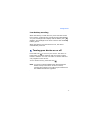
Getting started
Removing the battery
1. If necessary, press and hold
(located at the top-right
of your device) until the power-off image displays.
2. Remove the battery cover.
3. Lift the battery away from the device.
Charging your device
Your device is powered by a rechargeable Li-ion battery.
Use the travel adapter to charge the battery, and use only
Samsung approved batteries and chargers. Use of the
wrong adaptor could damage your device and void your
warranty.
Note: You must fully charge the battery before using your
device for the first time. A discharged battery recharges
fully in approximately 150 minutes. You can use the
device while the battery is charging, but this causes the
device to charge more slowly.
1. Plug the connector of the travel adapter into the jack on
the right side of the device.
15
Getting started
Note: The following illustration shows the correct and
incorrect method for connecting the adapter. Verify
the arrow on the adapter is showing and pointing to
the device for a correct connection. If it is not,
damage to the accessory port will occur therefore
voiding the device’s warranty.
2. Plug the travel adapter into a standard AC power outlet.
When charging is finished, unplug the adapter from the
power outlet.
3. Remove the travel adapter from the device.
Note: Do not remove the battery while charging. It may cause
malfunctions and may damage the device.
16
Getting started
Low battery warning
When the battery is weak and only a few minutes of talk
time remain, a warning tone sounds and the “Main Battery
very low” message on the display and the battery icon ( )
displays. The backlight turns off to conserve the remaining
battery power.
When the battery level becomes too low, the device
automatically turns off.
Turning your device on or off
Press and hold
to turn on your device. The device is
logged into your home network and receives the signal
from the network. You can now make or answer calls and
use programs on the device.
To turn off the device, press and hold
.
Note: Your device supports HSDPA (High-Speed Downlink
Packet Access) connections. In some countries,
incoming and outgoing voice calls may be limited until
the HSDPA networks are upgraded.
17
2
The basics
This chapter explains basic information about using your
device, such as customising your device and using online
help.
Using the Home screen
When you turn on your device, the Home screen, the
device’s idle screen, appears. You can also access this
screen by pressing
from any program.
Status bar
On the top line of the screen, the status bar displays icons
to show your device’s current status. Followings are some
of the status icons you may see:
Icon
Description
Shows the strength of the signal.
You can also view the following service status:
•
: You are out of your service area.
•
: The phone functions are turned off.
Appears when a call is in progress.
Appears when a data call is in progress.
Appears when the current call is on hold.
Appears when a GPRS connection is available in
the network. When a GPRS connection is active,
appears.
18
The basics
Icon
Description
Appears when you are roaming out of your home
service area and logged onto a different GPRS
network.
Appears when a 3G (UMTS) connection is
available in the network.
Shows the level of your battery power. The more
bars you see, the more power you have
remaining.
When the battery level is very low,
appears.
Appears when the ring type has been set to
Silent in the current profile or the ring tone has
been set to None in Sounds. For details, see
page 27.
Appears when the ring type has been set to
Vibrate in the current profile or the ring tone has
been set to Vibrate in Sounds. For details, see
page 27.
Indicates that you can make calls using phone
line 1 or 2 (network service).
Appears when you are roaming outside of your
home area and logged onto a different network.
Appears when Bluetooth is activated. For details,
see page 147.
Appears when a Bluetooth headset is connected
to the device.
Appears when an error occurs during
synchronisation.
19
The basics
Icon
Description
Appears when a text (SMS) or multimedia (MMS)
message has been received.
Appears when an instant message has been
received.
Appears when a new voicemail has been
received.
•
: A new voicemail from line 1.
•
: A new voicemail from line 2.
•
: A new voicemail from both lines.
Appears when there is a call you have missed.
Appears when you have set incoming calls to be
diverted to another destination.
Accessing information from the Home
screen
From the Home screen, you can:
• check the service status and the current time and date
• view missed calls or unread messages
• view upcoming appointments
• play music files
To access information from the Home screen:
1. From the Home screen, scroll to the item you want by
pressing the Navigation keys and press
.
20
The basics
2. Access items in the selected program by pressing the
Navigation keys or sliding the thumbwheel.
For more information on these items, see the
appropriate instructions for each task in this guide.
3. Press
or
to return to the Home screen.
Customising the Home screen
You can customise the Home screen according to your
preferences.
1. On the Home screen, press the Start soft key.
2. Select Settings → Display → Home Screen.
3. Press the Up or Down Navigation key to scroll to an
option, and press the Left or Right Navigation key to
change the setting.
The following options are available:
• Home screen layout: Select the layout to be used for
the Home screen.
Note: The Samsung Living World layout is easy to know
the current time, signal strength, and country
because of its graphical screen.
• Colour scheme: Select the colour scheme to be used
for the Home screen.
• Background image: Select an image to use as a
background image on the Home screen.
• Time out: Specify the length of time the device waits
before returning the display to the Home screen if the
device is not used.
21
The basics
4. When you have finished, press the Done soft key.
Start menu screen
On the Start menu, you can access all of the programs in
your device. On the Home screen, press the Start soft key
to open the Start menu screen.
You can change the start menu type. Press the Start soft
key, and select Settings → Display → Start Menu Style.
Then select the option you want.
Opening programs or folders
Scroll to a program or a folder by pressing the Navigation
keys or sliding the thumbwheel, and press
to open it.
Switching between programs
Your device is a multi-tasking device. You can run multiple
programs at the same time and switch from one program
to another. From any program, press
or
to switch
to the Home screen.
Note: Your device supports multiple PDP so that you can
activate multiple data connections at the same time.
For example, you can use the MMS service while
browsing the Internet. However, if a network does not
support multiple PDP, you must end the current data
connection in order to make a new data connection.
22
The basics
Closing programs
Using Task Manager, you can end the programs which are
currently open.
1. On the Home screen, press and hold
.
2. Scroll to a program, press the Stop soft key. To close all
of the running programs, press the Menu soft key and
select Stop All.
Entering text
Your device is equipped with a Full keyboard to support
easy and quick text input. You can enter text as you would
when using a computer’s keyboard.
The keys are labelled with alphabet on the lower half and
numbers and symbols on the upper half. Press the key
corresponding to the character you want to enter. To switch
between using the upper case characters and lower case
characters, press .
You can move the cursor by pressing the Navigation keys.
To delete a character, press
.
In addition, you can use the following function keys:
•
: deletes characters.
•
: starts a new line.
•
: changes the text input mode to Upper case mode or
Lower case mode.
•
: switches to 123 mode.
23
The basics
•
: allows you to change the text input mode. You can
switch between ABC mode and T9 mode in which
displays the word choices for your key presses. 123
mode and Symbol mode are also available for
entering numbers and symbols. Using the
Languages option, you can change the language for
T9 mode.
•
: press and hold to switch to Symbol mode.(Or press
to switch to Symbol mode.)
Customising your device
You can customise the device settings to suit the way you
work.
Regional settings
You can change number, currency, and time and date
formats appropriate to the countries in question.
1. On the Home screen, press the Start soft key.
2. Select Settings → More... → More... → Regional
Settings.
3. Select the option you want in each field.
4. When you have finished, press the Done soft key.
5. If you changed the Language or Locale option, press
the OK soft key.
Then you need to turn the device off and then back on
to make your changes take effect.
24
The basics
Time and date settings
The Date and Time setting enables you to set the date,
time, and time zone.
1. On the Home screen, press the Start soft key.
2. Select Settings → Date and Time.
3. Select your time zone and set the current date and time.
4. If necessary, select a mode for updating the current
time and date in the Time zone updating field:
Manual only: you can set the time and date manually.
Prompt first: the device will ask you if you want to
update time information.
Note: When you set the device to automatically update
time information, the time zone on the device may
appear to be different from the time zone you are in.
Automatic: your device will receive time information
from the network and automatically update the current
time. This option is available only if supported by your
network.
5. When you have finished, press the Done soft key.
Note: You can change the time and date format to be
displayed in Regional Settings.
25
The basics
Power settings
You can conserve battery power by adjusting the time-out
settings for the display.
1. On the Home screen, press the Start soft key.
2. Select Settings → More... → Power management.
3. Select the power settings:
• Battery: You can check the remaining battery power.
• Backlight time out: You can select the length of time
the display backlight stays on when you do not use the
device.
• Display time out: You can select the length of time
the display stays on. During standby, the device goes
to Sleep mode after a specified period of time, so very
little power is being consumed.
• Display brightness: You can adjust the brightness
for the display.
• Keypad backligt time out: you can select the length
of the keypad backlight stays on when you do not use
the device.
• Keypad backlight on: Choose from Any time or
Custom time. If you have chosen Custom time,
enter the starting time and ending time for the keypad
to work.
4. When you have finished, press the Done soft key.
26
The basics
Accessibility settings
You can configure the options to increase the accessibility
to your device’s functions.
1. On the Home screen, press the Start soft key.
2. Select Settings → More... → More... → Accessibility.
3. Select the options you want.
• System font size: You can set the size of the font on
your screen.
• Confirmation time out: You can set the delay before
an unconfirmed action times out.
• In-call alert volume: You can set the volume of the
alert tone that sounds when you are on a call.
4. When you have finished, press the Done soft key.
Sound settings
You can customise sound settings for various events on the
device.
Setting sounds and notifications
Your device reminds you in various ways when you have
something to do, receive a message, or press the keys on
the device. For example, if you have set up an
appointment, you are notified in any of the following ways:
• A sound, which you can specify, plays.
• Your device vibrates.
27
The basics
You can change device sounds by choosing types or sounds
for each event.
To choose a ringtone for the call ringer:
1. On the Home screen, press the Start soft key.
2. Select Settings → Sounds → Ring Tone.
3. Select the ringtone you want.
4. Press the Done soft key.
To choose a message notification:
1. On the Home screen, press the Start soft key.
2. Select Settings → Sounds → Notification.
3. Select a notification for each message type.
4. Press the Done soft key.
To choose reminder types and sounds:
1. On the Home screen, press the Start soft key.
2. Select Settings → Sounds → System Sound.
3. Select the event for which to specify a sound.
4. Select the reminder type or ringtone.
5. When you have finished, press the Done soft key.
28
The basics
To choose a keypad tone:
1. On the Home screen, press the Start soft key.
2. Select Settings → Sounds → Keypad Tone.
3. Select a keypad tone.
4. Press the Done soft key.
Notes:
• You can connect to the Internet and then download ringtones
that are in a .wav or .mid format.
• To use an .mp3 or .wma file as your call ringtone, it must be
saved in a Storage or Storage Card folder.
Changing the sound profile
Using Profiles, you can adjust and customise the device
tones for different events or environments and then apply
the settings as a group. The currently selected profile
displays on the Home screen.
To change profiles:
1. On the Home screen, press the Start soft key.
2. Select Settings → Profiles. The list of profiles opens.
3. Select the profile you want.
Notes:
• You can quickly change the profile. Press
and select the
profile you want from the Quick List.
• Press and hold
from the Home screen to quickly activate
or deactivate the Silent profile.
29
The basics
To customise profiles:
1. On the Profiles screen, scroll to the profile you want.
2. Press the Menu soft key and select Edit.
3. Change the settings in each field. Available options may
differ depending on the selected profile.
4. When you have finished, press the Done soft key.
Note: To change all profile settings to their factory default,
press the Menu soft key from the profile list and select
Reset to default.
Owner information setting
Owner Information identifies the owner or user of the
device. Set your contact information in case you have lost
the device.
1. On the Home screen, press the Start soft key.
2. Select Settings → More... → More... → Owner
Information.
3. Fill in each input field.
4. When you have finished, press the Done soft key.
Error reporting setting
Your device has the Error Reporting function which informs
you of errors in a program that can give a crash to the
device system. You can enable or disable this function.
30
The basics
1. On the Home screen, press the Start soft key.
2. Select Settings → More... → More... → More... → Error
Reporting.
3. Select Enable or Disable and press the Done soft key.
Security settings
With options in Security, you can protect your device and
SIM card from unauthorised use.
Locking the device
You can protect your device using the Device Lock feature.
Once the feature is enabled, your device is automatically
locked after the specified period of inactivity.
Note: Even if the device is locked, you will be able to receive
calls.
To lock the device:
1. On the Home screen, press the Start soft key.
2. Select Settings → More... → Security → Device Lock.
3. Select Prompt if device unused for and select a
length of time the device waits for before locking itself
when it is not in use.
4. Scroll to the Password type field and select a password
type.
• Simple PIN: Use a numeric password. A password
must be more than 4 characters.
31
The basics
• Strong alphanumeric: Use an alphanumeric
password. A password must be more than 7 characters
and contain at least 3 of uppercase and lowercase
letters, numbers, or punctuation marks.
5. Enter a password in the Password field.
6. Re-enter the same password in the Confirm password
field for confirmation.
7. Press the Done soft key.
8. Press the Yes soft key.
To unlock your device:
1. On the Home screen, press the Unlock soft key.
2. Enter the password and press the Unlock soft key.
Activating the SIM PIN
When SIM PIN is enabled, you must enter your PIN
supplied with your device each time you turn the device on
or insert the current SIM card into another device.
Consequently, any person who does not have your PIN
cannot use your device without your approval.
1. On the Home screen, press the Start soft key.
2. Select Settings → More... → Security → Enable SIM
PIN.
3. Enter the PIN and press the Done soft key.
32
The basics
Locking the SIM card
When SIM Lock is enabled, your device works only with the
current SIM card. To use another SIM card, you must enter
the SIM lock password.
1. On the Home screen, press the Start soft key.
2. Select Settings → More... → Security → Enable SIM
Lock.
3. Enter a password for your SIM card and press the Done
soft key.
4. Re-enter the password for confirmation and press the
Done soft key.
Changing PIN2
A PIN2 is used for certain functions supported by the SIM
card. You can change the PIN2 supplied with your SIM card
to a new one.
1. On the Home screen, press the Start soft key.
2. Select Settings → More... → Security → Change
PIN2.
3. Enter the current PIN2 in the Old PIN field, then a new
PIN in the New PIN field, and re-enter the new PIN in
the Confirm new PIN field.
4. Press the Done soft key.
33
The basics
Changing the call barring Password
You can change the default call barring password supplied
by your service provider.
1. On the Home screen, press the Start soft key.
2. Select Settings → More... → Security → Change
Barring Password.
3. Enter the old password, then a new password, and
re-enter the new one for confirmation.
4. Press the Done soft key.
Encryption
Mobile Encryption uses a symmetric-key algorithm for
encryption and descryption. This means that only one key
is used for both processes. The key is created when the
device is hard reset, and is accessible by Priviledged
application only. If the key is ever corrupted or lost(the
device is hard reset), then you will not be able to decrypt
any of the encrypted files, and you will have lost your
sensitive information.
1. On the Home screen, press the Start soft key.
2. Select Settings → More... → Security → More... →
Encryption.
34
The basics
Side key setting
You can change the program assigned to the user-defined
function key, , to your favourite program.
1. On the Home screen, press the Start soft key.
2. Select Settings → Key Settings → Side Key Settings.
3. Select the program you want.
4. Press the Done soft key.
Menu shortcut settings
If you have set the Start menu style to List, then number
keys can be used as shortcut keys to directly access
specific programs that exist in the Start menu.
Note: You can also assign phone numbers, email addresses,
or web pages in Contacts to the number keys as speed
dial entries. For details about setting the speed dial list,
see page 63.
35
The basics
Assigning a shortcut to a key
1. On the Home screen, press the Start soft key.
2. Scroll to the program you want to assign to a key.
3. Press the Menu soft key and select Add Speed Dial.
4. If necessary, enter the name you want in the Name
field.
5. Select a location in the Keypad assignment field and
press the Done soft key.
Accessing a menu using its shortcut
On the Home screen, use one of the following ways:
• For one-digit shortcut key, press and hold the number
key.
• For two-digit shortcut keys, press the first number key
and then press and hold the last number key.
36
The basics
Searching for items
Your device provides a search program, Smart Search, to
allow you to easily search for data or media files in your
device and quickly access them.
Searching for an item
1. On the Home screen, press the Start soft key.
2. Select Applications → Accessories → Smart Search.
3. Enter the first few letters of an item name in the Find
field and select an item type in the Type field.
4. Select Match case and/or Match whole word to allow
the device to search for the matching items more
quickly.
5. Press the Go soft key. The device searches its file
directory or programs and lists all matching items.
6. Scroll to the one you want and press the Open soft key.
37
The basics
Setting up the search options
You can change the search options for each item type to
provide the device with more specific information to narrow
the search items.
1. From the Smart Search screen, press the Menu soft key
and select Options.
2. Select the item type you want and set each option.
• Contact: Select the types of contact information you
want to include in your search.
• Appointment: Select whether to include notes, or set
a date for the device to search for appointments.
• Task: Select whether to include notes in your search.
• SMS/MMS: Select the types of message information
you want to include in your search, or set a date for
the device to search for text messages.
• E-mail: Select the types of email information you
want to include in your search, or set a date for the
device to search for email messages.
• Phone call: Select the types of calls you want to
include in your search.
• File name: Select the storage locations you want to
include in your search.
3. When you have finished, press the Done soft key.
38
The basics
Locking the touch keys
You can lock the touch keys on the device to keep any
accidental key presses from causing a program’s launch or
device switch on or off.
• To lock the keypad, press
.
• To unlock the touch keys, press any key except for touch
keys and then press
.
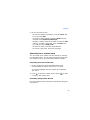
Using an optional memory card
Your device has an expansion slot compatible with microSD
memory cards, which are primarily used to back up or
transfer files and data.
Note: Use only compatible memory cards with your device.
Using incompatible memory cards, such as Secure
Digital (SD) cards, may damage the card, as well as the
device, and data stored on the card.
39
The basics
Inserting the memory card
Push the memory card into the slot with the label side face
down until it clicks into place. The card is secure when it is
not protruding from the device.
Removing the memory card
Push the memory card in and release so that it is
disengaged from the slot. Then remove the card from the
device.
40
The basics
Formatting the memory card
1. On the Home screen, press the Start soft key.
2. Select Settings → More... → More... → Memory
Information.
3. Press the Menu soft key and select Format Storage
Card.
4. Press the Yes soft key to confirm the formatting.
Adding and removing programs
You can install any program created for your device, as
long as the device has enough memory. The most popular
place to find software for your device is on the Microsoft
web site.
Adding programs using ActiveSync
You can install programs downloaded from the Internet or
included on the supplied software CD-ROM by performing
synchronisation between your device and your computer.
First you need to determine what your device and
processor type is so that you know which version of the
software to install.
41
The basics
1. On the Home screen, press the Start soft key and select
Settings → More... → More... → About. Check the
version of your device.
2. Download a program to your computer from the
Internet or insert the CD-ROM that contains the
program into your computer.
Be sure to select the program designed for your device
and the device’s processor type.
3. Read any installation instructions, Read Me files, or
documentation that comes with the program.
4. Connect your device to your computer and make sure
that the ActiveSync is running.
For more information on ActiveSync, see page 47.
5. Double-click the *.exe file on the computer.
If the file is an installer, the installation wizard will
begin. Follow the instructions on the screen. Once the
software has been installed, the installer will
automatically transfer the software to your device.
If the file is not an installer, you will see an error
message. You need to move this file to your device by
using ActiveSync Explore to copy the program file to the
Windows\Start Menu folder on your device.
Once installation is completed, you can view and open
the program by accessing the Start menu.
42
The basics
Adding a program directly from the
Internet
First you need to determine what your device and
processor type is so that you know which version of the
software to install.
1. On the Home screen, press the Start soft key and select
Settings → More... → More... → About. Check the
version of your device.
2. Download the program to your device straight from the
Internet using opera browser.
Be sure to select the program designed for your device
and the device’s processor type.
3. Read any installation instructions, Read Me files, or
documentation that comes with the program.
4. Select the file, such as a *.xip or *.exe file. The
installation wizard will begin.
5. Follow the directions on the screen.
Once installation is completed, you can view and open the
program by accessing the Start menu.
Removing programs
1. On the Home screen, press the Start soft key.
2. Select Settings → More... → Remove Programs.
3. Scroll to the program you want to delete.
4. Press the Menu soft key and select Remove.
5. Press the Yes soft key to confirm the deletion.
6. When you have finished, press the Ok soft key.
43
The basics
Managing certificates
On your device you can add and delete public key
certificates. You can store the following two types of
certificates on your device.
• Personal: help to establish your identity, when you log
on to a secured network, such as a corporate network.
• Root: help to establish the identity of servers with which
you connect. This helps to prevent unauthorised users
from accessing your device and information.
Viewing certificates
1. On the Home screen, press the Start soft key.
2. Select Settings → More... → Security → Certificates
→ a certificate type.
3. Select the certificate to view more details.
Deleting a certificate
1. Scroll to the certificate you want on the list.
2. Press the Menu soft key and select Delete.
3. Press the Yes soft key to confirm the deletion.
44
The basics
Resetting your device
You can reset your device’s settings and clear all added
data from memory.
Resetting the device
1. On the Home screen, press the Start soft key.
2. Select Settings → More... → Security → More... →
Reset.
3. Enter the reset password and press the Done soft key.
The default password is “1234.”
4. Press the Yes soft key to confirm the reset.
5. Press the Yes soft key to confirm deleting DRM files.
The device resets and reboots itself.
45
The basics
Changing the reset password
You can change the reset password to prevent the device
from being reset by unauthorised people.
1. On the Home screen, press the Start soft key.
2. Select Settings → More... → Security → More... →
Change Reset Password.
3. Enter the old password, then a new password, and
re-enter the new one for confirmation.
4. Press the Done soft key.
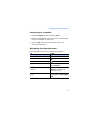
Using online help
Your device is supported by additional information available
online, or on the CD-ROM that came with your device.
For information on:
see:
additional programs
that can be installed on
your device,
the supplied CD-ROM.
connecting to and
synchronising with a
PC,
Chapter 3 in this User’s Guide
or ActiveSync Help on your PC.
To view the ActiveSync help,
click the ActiveSync icon on the
Windows task bar.
46
3
Synchronisation
Using Microsoft® ActiveSync®, you can synchronise data on
your desktop computer with the data on your device.
Synchronisation compares the data on your device with
your desktop computer and updates both your device and
computer with the latest data.
With ActiveSync, you can:
• Keep Contacts, Calendar, Tasks, or Inbox data up-to-date
by synchronising your device with Microsoft Outlook data
on your desktop computer.
• Copy (rather than synchronise) files between your device
and desktop computer.
• Control the moment when synchronisation occurs by
selecting a synchronisation mode.
• Select data types to be synchronised and control the
amount of synchronised data.
WARNING!
• ActiveSync synchronises two devices using the latest data.
Therefore, if you delete some specific data from the device
after synchronisation, and then perform a synchronisation
again, the corresponding data on the computer will be
deleted. Be careful not to lose important data.
• If you turn off the device after copying files to any folders,
except for the Storage folder, using ActiveSync, all files in
those folders will be deleted. Store important files in the
Storage folder to prevent from being deleted.
47
Synchronisation
Installing ActiveSync
Before beginning synchronisation, you must install
ActiveSync on your desktop computer using the supplied
CD-ROM. You can also download the latest version of
ActiveSync from the Microsoft web site.
1. Insert the CD-ROM into the CD-ROM drive of your
desktop computer. Alternatively, double-click the
downloaded ActiveSync installer.
2. Follow the instructions on the screen for installing
Microsoft ActiveSync.
When installation is completed, the Synchronisation
Setup Wizard helps you to connect your device to your
desktop computer, to set up a partnership.
3. Follow the instructions on the screen.
Note: See page 49 for more information on connecting the
device and a computer.
Your first synchronisation process will automatically begin
when your device is connected to the computer. After the
first synchronisation, take a look at Contacts, Calendar, and
Tasks on your device. You will notice that your information
has been copied to the device.
48
Synchronisation
Customising connection settings
To establish a connection between your computer and the
device, you must enable the connections you want to use in
the ActiveSync program. By default, all connections are
enabled.
1. From the ActiveSync window on your computer, select
File → Connection Settings...
2. Change the connection settings.
3. Click OK.
Connecting your device to a
computer
To connect the device to your computer, you can choose
one of the following ways:
• Using a PC data cable
• Using a Bluetooth connection
Connecting with a PC data cable
Connect one end of the PC data cable to the jack on the
right side of the device and the other end to the USB port
on your computer.
Note: USB mode of your device must be set for ActiveSync.
Press the Start soft key and select Settings →
More... → Connections → USB. Then select
ActiveSync.
49
Synchronisation
The connection is established and the Microsoft ActiveSync
window appears. The synchronisation automatically begins.
Notes:
• When an error occurs with a USB connection, activate the
DHCP Client service, or deactivate the firewall or VPN
environment.
• USB hubs and laptop docking stations have not exhibited
consistent stability with Windows Mobile-powered devices
and ActiveSync. You can connect the device to the PC USB
ports if you experience connection drops or an inability to
connect through a USB hub or docking station.
Connecting via Bluetooth
1. On the Home screen, press the Start soft key.
2. Select Applications → ActiveSync.
3. Press the Menu soft key and select Connect via
Bluetooth.
4. Press the Yes soft key, if you are connecting to a
computer via Bluetooth for the first time.
5. Select Add new device... to search for a new
Bluetooth-compatible devices.
6. Select your Bluetooth-compatible computer to pair the
device with the computer.
7. Enter a Bluetooth passcode and press the Next soft key.
This passcode is used just once and you do not need to
memorise it.
50
Synchronisation
When you enter the same passcode on your computer,
paring is finished.
8. Enter a display name for the computer and press the
Next soft key.
9. Check the services you want to use and press the Done
soft key.
Note: ActiveSync must be checked on the service list. If
Serial is available, instead, on the list, select it and
make sure that a correct Bluetooth COM port is
selected from the Connection Settings on the PC
ActiveSync. The Bluetooth software on the PC
should have the correct settings.
10.Press the Done soft key.
Synchronising information
To begin synchronisation, connect your device to your
computer. For more information on connecting the device
and the computer, see page 49. The Microsoft ActiveSync
window on your computer automatically appears and
synchronisation starts.
Once the synchronisation is completed, the device stays
connected to the computer. If any change is made,
ActiveSync automatically will begin synchronisation. To
begin synchronisation, press the Sync soft key in
ActiveSync on your device.
You can open the device’s file directory by clicking Explore
from the Microsoft ActiveSync window. You can then copy
files quickly and easily from the device to the computer, or
vice versa.
51
Synchronisation
Note: To synchronise Bluetooth devices with a compatible
computer, the computer must have the Bluetooth stack
for Windows XP Service Pack 2.
Customising synchronisation
settings
You can customise various setting options for
synchronisation with a computer and a server, and set the
synchronisation schedule.
First, you must terminate the connection between your
device and computer. Disconnect the PC data cable or
remove the device from the Bluetooth range.
Changing PC settings
1. In ActiveSync on your device, press the Menu soft key
and select Options.
2. Press the Menu soft key and select Settings.
3. Change the computer name, set how to handle a data
conflict between your device and computer, and set an
event logging type.
4. Press the Done soft key.
5. Select the data types to be synchronised.
6. Press the Done soft key.
52
Synchronisation
Note: For more information on the conditions that must be
met on the computer and how to change
synchronisation options, see ActiveSync Help.
Setting server synchronisation
You can synchronise information automatically as items
arrive only if your company runs Microsoft Exchange Server
with Exchange ActiveSync.
Configuring an Exchange Server connection
1. In ActiveSync on your device, press the Menu soft key
and select Add Server Source.
2. Enter the server address and select This server
requires an encrypted (SSL) connection to use an
SSL protocol for server access.
3. Press the Next soft key.
4. Enter your Microsoft Exchange user name, password,
and domain name.
To save the password for subsequent accesses, select
Save password.
5. Press the Next soft key.
6. Select data types to be synchronised.
7. Press the Menu soft key to access the following options:
• Settings: You can set the options for handling data
for each data type.
53
Synchronisation
• Advanced: You can set how to handle a data conflict
between your device and computer, and set an event
logging type.
• Back: You can return to the previous step.
8. When you have finished, press the Finish soft key.
Changing the synchronisation schedule
You can schedule synchronisation with the Microsoft
Exchange Server on two separate times. Use the peak time
schedule to synchronise during working hours or other
times when you experience higher mail volumes. Use the
off-peak time schedule to synchronise during times when
you experience lower mail volumes.
1. In ActiveSync on your device, press the Menu soft key
and select Schedule.
2. Set each option:
• To synchronise periodically during peak times, select a
frequency of synchronisation in the Peak times field.
• To synchronise periodically during off-peak times,
select a frequency of synchronisation in the Off-peak
times field.
• To use the peak time and off-peak time setting while
roaming, select Use above settings when roaming.
• To set the days and hours for peak times, press the
Menu soft key and select Peak Times.
3. When you have finished, press the Done soft key.
54
4
Call functions
This chapter explains all of the call functions provided by
your device.
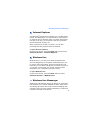
Turning the phone functions on and
off
You can choose to turn off the phone functions and just use
the PDA functions at any time and then turn it back on
when you want.
Note: In many countries, you may be required by law to turn
off the phone functions while on a flight. Turning off the
display of your device does not actually turn off the
phone functions; you must turn off your wireless
connection to your operator’s network.
To turn off the phone functions, press
and select
Wireless Manager. Then select Phone to set it to Off.
appears on the top right corner of the screen.
To turn back on the phone functions, select Phone to set it
to On from the Wireless Manager screen.
Note: You can also access the Wireless Manager screen by
pressing the Start soft key and selecting Settings →
More... → Connections → Wireless Manager.
55
Call functions
Using the Dialling screen
When you press
, the Dialling screen opens. You can
view the most recent calls you have dialled, received, and
missed on the screen.
When you enter a digit, the Dialling screen lists all of the
numbers containing the entered digit in Contacts and Call
History, as well as the phone number assigned to the
corresponding speed dial key.
Making a call
You can make a phone call using the number keypad. As
well as normal voice calls, you can make video conference
calls in a 3G (UMTS) network.
To make a voice call:
1. On the Home screen, enter a number including an area
code.
Note: If you press , , ,
, , , , or , the
device will display the contact names containing the
corresponding alphabet.
2. Press
to make a call.
When a call is connected, the call duration displays.
During a call, you can use several call options. For
details, see page 60.
To adjust the audio volume during a call, press
to increase or decrease the volume level.
3. Press
or
to end the call.
56
Call functions
To make a video call:
1. On the Home screen, enter a number including an area
code.
2. Press the Menu soft key and select Video call.
Advanced calling features
You can make a call from Contacts, Speed Dial, and Call
History.
Making a call from Contacts
1. You can also press the Start soft key and select
Contacts.
2. Select a contact card from the contact list.
3. Scroll to the number you want.
4. Press
for a voice call, or press the Menu soft key
and select Video Call for a video call.
Making a call from Speed Dial
Speed Dial is a list you can create of often-dialled numbers.
Information on adding a number to Speed Dial is detailed
on page 63.
By memorising the position on the Speed Dial list, you can
dial the number simply by entering that number of the
Speed Dial key. The phone number assigned to the key
appears on the Dialling screen.
57
Call functions
Alternatively, if you do not remember the position of a
number, access the Speed Dial list:
1. On the Home screen, press the Start soft key.
2. Select Applications → Accessories → Speed Dial.
3. Scroll to the number you want.
4. Press
for a voice call, or press the Menu soft key
and select Video Call for a video call.
Making a call from Call History
1. On the Home screen, press the Start soft key.
2. Select Call History. The recent call list appears.
Note:
is for incoming voice calls,
is for outgoing
voice calls,
is for missed voice calls,
is for
incoming video calls,
is for outgoing video calls,
and
is for missed video calls.
To view the calls categorised by call type, press the
Menu soft key, select Filter, and select a category from
the pop-up list.
3. Scroll to the number you want.
4. Press
for a voice call, or press the Menu soft key
and select Video Call for a video call.
58
Call functions
Making an international call
1. Press and hold
until the + sign appears. The +
replaces the international access code.
2. Enter the full phone number you want to dial. It includes
the country code, the area code (without the leading
zero), and the phone number.
3. Press
for a voice call, or press the Menu soft key
and select Video Call for a video call.
Note: You can set the country or dialling code to be added
before the number when dialling. See page 67.
Making an emergency call
Your device provides the emergency number 112. This
number can normally be used to make an emergency call in
any country, with or without a SIM card inserted, if you are
within a mobile phone network’s service area.
Enter the emergency number 112 and press
.
Notes:
• Some service providers may require a SIM card to be
inserted, and in some cases the PIN to be entered as well.
• In some cases, other emergency numbers may also be
accessed. Your service provider may save additional local
emergency numbers on the SIM card.
59
Call functions
Answering or ignoring a call
When a call comes in and the device rings or vibrates,
depending on the ringer setting:
• Press the Answer soft key or
to answer the call.
to reject the call.
• Press the Ignore soft key or press
You can also press and hold
or
to reject the call.
Note: If you reject a call, the busy tone is sent out.
Depending on your service provider, the caller may
be guided to your voicemail server.
• Press
or
to mute the ringer.
Options during a call
Your device provides a number of control functions that you
can use while a call is in progress.
Answering a second call
If a person is trying to call you when you are talking on the
device, a notification window will pop out.
1. Press the Answer soft key or
call and put the first on hold.
to answer the second
2. To switch back and forth between the two callers, press
the Swap soft key.
3. To end the second call and go back to the first, press
.
60
Call functions
Using In-call options
During a call, you can access various options by pressing
the Menu soft key.
For a voice call, the following options are available:
• Hold: places the current call on hold.
• Whisper mode On/Off: turn on or off Whisper mode.
Whisper mode automatically increase the mouthpiece’s
sensitivity to allow the other person to hear your voice
even though you may be whispering.
• Swap: switches back and forth between the two callers.
• Mute/Unmute: turns off the mouthpiece so that the
person with whom you are speaking cannot hear you, or
turns it back on.
• Speakerphone On/Off: turns on the speakerphone
mode to talk and listen with the device a short distance
away.
• Conference: makes a conference call when you have an
active call and a call on hold. You can have a
conversation with up to 5 people at the same time.
• Private: allows you to have a private conversation with
the selected conference call participant.
• Turn handsfree On/Off: switches the current call to
the connected bluetooth hands-free car kit or headset, or
switches it back to the device.
• Save to Contacts: saves the phone number of the
person with whom you are speaking.
• Contacts: opens the contact details, if the dialled
number is stored in Contact.
• View Calendar: opens the calendar.
• Call History: opens the call history list.
61
Call functions
• Send DTMF: send DTMF (Dual tone multi-frequency)
tones of a specific number as a group. This option is
helpful for entering a password or an account number
when you call an automated system, like a banking
service.
• Mute keys: turn the key tones off or on.
• Transfer: transfer the currently active call to a caller on
hold. The two callers can talk to each other, but you are
disconnected from the call.
• End All Calls: disconnect all calls.
For a video call, the following options are available:
• Mute/Unmute: turns off the mouthpiece, or turns it
back on.
• Speakerphone off/on: turns off or on the
speakerphone mode.
• Switch to BT headset/Switch to phone: switches the
current call to the connected Bluetooth headset, or
switches it back to the device. For details about Bluetooth
connections, see page 149.
• Save to Contacts: saves the phone number of the
person with whom you are speaking.
• Display: allows you to change the effect or quality of the
camera image.
• Advanced: allows you to send the DTMF tones of
numbers or a image to the person with whom you are
speaking.
• Switch to voice call: turns off the camera and switches
the call to a voice call.
• Options: allows you to change the options for video
calls. For details, see page 71.
62
Call functions
Call-related features
Checking your voicemail
The first speed dial location is assigned to your voicemail
box by default. When you insert your SIM card into the
device, it automatically detects and sets as default the
voicemail centre number of your mobile service provider.
To check your voicemail, press and hold
Dialling screen.
from the
Note: You can check and change the voicemail centre number.
See page 67.
Managing the Speed Dial list
You can assign frequently-used phone numbers, email
addresses, or web pages in Contacts to the speed dial
location 2 through 99. The location 0 and 1 on the Speed
Dial list are preset for the international call prefix and the
voicemail centre number, respectively.
Adding a contact to the Speed Dial list
1. You can press the Start soft key and select Contacts.
2. Select a contact card from the list.
3. Scroll to a number, email address, or web page address.
4. Press the Menu soft key and select Add to Speed Dial.
5. If necessary, enter the name you want.
63
Call functions
6. In the Keypad assignment field, select a location.
7. Press the Done soft key.
Deleting Speed Dial assignments
1. On the Home screen, press the Start soft key.
2. Select Applications → Accessories → Speed Dial.
3. On the Speed Dial list, scroll to an entry.
4. Press the Menu soft key and select Delete.
5. Press the Yes soft key to confirm the deletion.
Managing your Call History
Call History details all incoming, outgoing, and missed
calls, and also provides a summary of total calls. It can also
tell you when a call was initiated and how long it lasted.
To open Call History:
On the Home screen, press the Start soft key and select
Call History. A list of all calls appears.
If necessary, select the category of the call history to be
displayed by pressing the Menu soft key and selecting
Filter.
64
Call functions
Viewing details of calls
• To view the duration of a call, and time and date you
received or made it, scroll to the call you want to view
and press
.
• To save the phone number of a call to Contacts, scroll to
the call you want and press the Save soft key.
• To view contact information, press the Menu soft key and
select Find Contact.
• To send an SMS message, press the Menu soft key and
select Send Text Message.
• To send an email message, press the Menu soft key and
select Email.
• To delete an individual call, press the Menu soft key and
then select Delete. To delete all calls, select Delete List.
• To send an MMS message, press the Menu soft key and
select Send MMS.
Viewing call timers
In Call History, you can view the duration of your calls. This
option is convenient for estimating your usage.
1. On the Call History screen, press the Menu soft key and
select View Timers.
You can view the total call time, the last call time, the
time of calls you received or made, including roaming
calls and data calls, and a lifetime counter. You can also
view the time you reset the call time.
2. Press the Done soft key.
To erase the call time records, except for Lifetime calls,
press the Menu soft key, select Reset Timers, and press
the Yes soft key.
65
Call functions
Customising your phone functions
You can personalise the settings of the phone functions, the
services you have, and the network to which you have
connected.
Accessing the Phone setting options
1. On the Home screen, press the Start soft key.
2. Select Settings → Phone.
3. Select a setting menu, and then set each option.
4. When you have finished, press the Done soft key.
Available setting options
All Calls
• Band Selection: This option allows you to select the
network band in which your device will operate.
• Call Cost: This network feature lets you view the cost of
calls. Viewing call cost may not be available, depending
on particular SIM cards. For more information, contact
your service provider.
Last Call Cost: shows the cost of the last call you made.
Total Cost: shows the total cost of all calls made since
the cost counter was last reset. If the total cost exceeds
the maximum cost set in the Edit Cost Limit option, you
can no longer make any calls until you reset the counter.
Cost Limit: shows the maximum cost set in the Edit
Cost Limit option.
66
Call functions
Reset Call Cost: allows you to reset the cost counter.
Edit Cost Limit: allows you to enter the maximum cost
that you authorise for your calls. Calls can be made as
long as the preset max cost is not exceeded.
Price per unit: allows you to set the cost of one unit.
This price per unit is applied when calculating the cost of
your calls.
• Call Options: You can customise settings related to call
functions, such as an answering option, voicemail and
SMS access numbers, and auto dial codes.
Any key answer: When this option is activated, you can
answer incoming calls by pressing any key, except for
,
,
, ,
and .
Show SIM contacts: When this option is activated, the
contact cards stored on the SIM card display in the
contact list.
Phone number: Check your phone number.
Voice mail number: When you insert your SIM card into
your device, the device automatically detects and sets
your voicemail access number by default. If not, you can
manually enter the number obtained from your service
provider.
Text messages service centre: When you insert your
SIM card into your device, the device automatically
detects and sets your SMS access number by default. If
not, you can manually enter the number obtained from
your service provider.
Country code: You can enter a country code. The code
will be automatically added before a phone number when
dialling.
67
Call functions
Dialling code: You can enter an area code. The code will
be automatically added before a phone number when
dialling.
• Caller ID: When you place a call, your phone number
can be displayed to or hidden from the person to whom
you are calling. Using this option, you can enable or
disable the display of your caller identification.
• Channels: This option allows you to set the cell
broadcast (CB) message receipt and set up broadcast
channels from which you want to receive CB messages.
Enable channels: Select to enable the receipt of CB
messages.
Receive channel list: Select to receive a list of all
available broadcast channels from the network.
Language: Select your preferred languages to display
CB messages.
To edit the channel list, press the Menu soft key and
select Edit Channels. Then press the Menu soft key and
select the options for adding or editing channels.
• Fixed Dialling: When this option is activated, your
device allows outgoing calls only to the limited set of
phone numbers. You can call only those numbers that are
included in the Fixed Dialling Number list or which begin
with the same digit(s) as a phone number on the list.
• Networks: You can set the device to automatically select
a network when you are roaming out of your service
area, or find and select the network you want.
Press the Menu soft key to access the following options:
Find a New Network: Search for all available networks.
You can start searching when the device is out of your
service area.
68
Call functions
Select a Network: Select a network from the available
networks.
Preferred Networks: Set up a list of your preferred
networks. You can set priority of the networks or add
networks manually by selecting them from the preset
network list or entering their service ID codes.
Cancel: Exit the Networks menu.
• Closed User Group: This option allows you to set
incoming and outgoing calls to be restricted to a selected
user group. For details about how to create a closed user
group (CUG), contact your service provider.
Use user group: Select to activate the CUG feature.
Outside access: Enable calls to numbers other than
those in the closed user group. This feature depends on
the nature of your CUG subscription.
Default group: Enable the default CUG, if you have set
one with your service provider. When making a call, you
are given the option of using your default CUG, instead of
selecting one from the list.
Group index: Set the index number of the user group.
Voice Call
• Call Waiting: This service allows you to receive another
call while you have a call in progress. Select Provide call
waiting notifications to activate this service.
• Call Barring: This network service allows you to restrict
your incoming or outgoing calls. To set up this service,
you need to enter the call barring password obtained
from your service provider.
For incoming call barring, the following options are
available:
69
Call functions
All calls: No calls can be received.
When roaming: Calls cannot be received when you are
using your device outside of your home service area.
Off: Call barring is deactivated; all calls can be received
normally.
For outgoing call barring, the following options are
available:
All calls: No calls can be made.
Int'l calls: International calls cannot be made.
Int'l except to home: When abroad, calls can be made
only to numbers within the current country and to your
home country.
Off: Call barring is deactivated; all calls can be made
normally.
• Call Forwarding: This network service allows you to
forward your incoming calls to another phone number.
Unconditional: All calls are forwarded.
No Reply: Calls are forwarded when you do not answer.
Busy: Calls are forwarded when you are on the device.
Unavailable: Calls are forwarded when your device is
turned off or your device is out of your service area.
Data Calls: All data calls are forwarded.
Fax Calls: All fax calls are forwarded.
70
Call functions
Video Call
• Outgoing Image: You can set whether the device shows
the camera view to the person with whom you are
speaking, or select an image to be shown instead of the
camera view.
Incoming Video Call: set to show you via the front
camera.
Hide Me Options: select a screen to be shown on the
other’s phone.
My Image: set an image to be shown on the other’s
phone if you select My Image in the Hide Me Options
field.
• Call Fail Options: Select how to retry a video call when
it fails.
• Call Barring: This network service allows you to restrict
your incoming or outgoing calls. For details, see page 69.
• Call Forwarding: This network service allows you to
forward your incoming calls to another phone number.
For details, see page 70.
71
5
Messaging, Internet, and
Messenger
Messaging
In Messaging, you can create, send, receive, view, edit, and
organise:
• Text messages (SMS)
• Multimedia message (MMS)
• Email messages
To open Messaging:
On the Home screen, press the Start soft key and select
Messaging.
Working with SMS or MMS messages
You can write an SMS message of up to 160 characters.
When you enter more than 160 characters, your device
handles the message as a multi-part message.
You can also send or receive multimedia messages (MMS).
In addition to the familiar text content of text messages,
multimedia messages can contain images, video clips,
audio clips, and combinations of these things in more than
one page.
MMS also supports email addressing, so that messages can
be sent from device to email and vice versa.
72
Messaging, Internet, and Messenger
Creating and sending an SMS message
Note: You can select your preferred network type for sending
SMS messages. Press the Start soft key and select
Settings → More... → More... → Sending SMS
Options. Then select the option you want.
1. On the Messaging screen, select SMS/MMS.
2. Press the Menu soft key and select New → SMS.
3. In the To field, enter the recipients’ phone numbers,
separating them with a semicolon.
You can retrieve numbers from the contact list by
pressing the Menu soft key and selecting Add
Recipient.
4. Press the Down Navigation key and enter the message
text.
To enter preset sentences, press the Menu soft key and
select My Text → a sentence.
5. When you have finished composing the message, press
the Send soft key.
Note: To know if your message is delivered to the recipient(s),
on the Messaging screen, press the Menu soft key and
select Settings → Request delivery notifications.
73
Messaging, Internet, and Messenger
Creating and sending an MMS message
1. On the Messaging screen, select SMS/MMS.
2. Press the Menu soft key and select New → MMS.
3. In the To, Cc, or Bcc field, enter the recipients’
numbers or addresses, separating them with a
semicolon.
Note: The Cc and Bcc fields are above the To field.
You can also retrieve numbers or the addresses from the
contact list or the messages you have sent by pressing
the Menu soft key and selecting Add Recipients.
4. Press the Down Navigation key to move to the Subject
field and enter the message subject.
5. Press the Down Navigation key and enter the message
text.
6. Press the Menu soft key to access the following options
for composing a message:
• Preview: shows the multimedia message you
created.
• Add Recipients: allows you to add recipients’
numbers or addresses.
• Edit Item: allows you to edit the selected item.
• Add: allows you to add a media file.
• Attach: allows you to attach a contact card or
calendar item as a digital file format, or a media file.
• Edit Page: allows you to add or delete pages, change
the text style, or set the page order or duration.
74
Messaging, Internet, and Messenger
• Save to: allows you to save the message as a draft or
as an MMS template.
• Cancel Message: cancels sending the message.
• Sending Options: allows you to change the options
for sending MMS messages. See page 78.
7. When you have finished composing the message, press
the Send soft key.
Viewing SMS or MMS messages
When you receive a new SMS or MMS message, the New
Message icon ( ) displays on the top line of the screen.
You can also view messages you received, sent, composed
but not sent by accessing the message folders.
To open the message folders:
On the SMS/MMS screen, press the Menu soft key and
select Folders. The following default folders display:
• Deleted Items: contains messages that have been
deleted from each folder.
• Drafts: stores draft messages that have not been sent.
• Inbox: contains received messages. Received push
message and broadcast messages are also stored in this
folder.
• Outbox: stores the messages waiting to be sent.
• Sent Items: stores the messages that have been sent.
75
Messaging, Internet, and Messenger
To view a message:
1. Open the message folder you want.
The icons on the message list tell you the message type.
•
: SMS message
•
: MMS message
Note: You can change the default settings for viewing a
message. From any message folder, press the Menu
soft key and select Tools → Options → Display.
2. Select the message you want to view.
If you open a push message from a WAP server, press
the Proceed soft key to access the URL specified in the
message.
3. Press the Left or Right Navigation key to view other
messages.
To access message options:
From any message folder, you can access the following
options by pressing the Menu soft key; depending on the
selected folder, available options may vary:
• New: allows you to compose a new SMS or MMS
message.
• Reply: sends a reply to the sender and/or all other
recipients, or forwards the message to other people.
• Mark as Unread/Mark as Read: allows you to mark the
message as unread or read. Unread messages are
boldfaced on the message list.
• Folders: allows you to access other folders.
76
Messaging, Internet, and Messenger
• Move: allows you to move the message to other folders.
• Copy to SIM/Copy to Phone: copies the message to
the SIM card or the device’s memory. This option is only
available for SMS messages.
• Tools: allows you to switch to another message account,
delete all of the deleted messages, or change the options
for Messaging.
• Send/Receive: sends or receives messages.
• MMS Options: allows you to change the options for MMS
messages. See page 78.
Viewing messages on the SIM card
Sometimes, text messages may be stored on the SIM card,
depending on their specifications.
1. From the Home screen, press the Start soft key.
2. Select Applications → Accessories → SIM Manager.
3. Press the Menu soft key and select SMS Tool.
4. Scroll to the number you want to view message, and
press the Menu soft key and select View SMS.
77
Messaging, Internet, and Messenger
Configuring MMS settings
You can change the default MMS settings. From any
message folder, press the Menu soft key and select MMS
Options. The following options are available:
• Sending Options: allows you to change the settings for
sending MMS messages.
Priority: You can select the priority level of your
messages.
Expiry: You can select the length of time your messages
are stored in the message centre after they are sent.
Delivery Time: You can select the time delay before
messages are sent.
Hide address: You can set your caller ID to be hidden
from outgoing messages.
Request delivery report: When this option is activated,
the network informs you whether or not your message
has been delivered.
Request read report: When this option is activated,
your device sends a request for a read reply along with
your message to the recipient.
Keep a copy: You can leave copies of your messages in
the Sent Items folder after sending.
Message Class: You can select the maximum message
size.
Creation Mode: You can set whether or not the device
allows the MMS creation using unsupported files.
Depending on your country, this option may be
unavailable.
78
Messaging, Internet, and Messenger
• Receiving Options: allows you to change the settings
for receiving MMS messages.
Home network: Set how to retrieve new messages from
the server while in your home network.
Network when abroad: Set how to retrieve new
messages from the server while roaming around another
network.
Send delivery receipt: When this option is activated,
the network informs the sender whether or not the
message has been delivered.
Send read receipt: When this option is activated, your
phone replays to the read reply that came along the
message.
Reject Unknown Sender: Reject messages from
unknown senders.
Advertisement Allowed: Accept advertisements.
Information Allowed: Accept information messages.
• Profiles: allows you to set up and activate MMS profiles
which are sets of MMS parameters required to send or
receive MMS messages. To activate a profile, select it
from the profile list.
To edit a profile, press the Menu soft key and select
View/Edit. You can change the following options:
Profile Name: Enter the profile name.
MMSC URL: Enter the URL address of the MMS centre.
Proxy Settings: Activate or deactivate the proxy server.
When this option is activated, the IP Address and Port
options are activated.
IP Address: Enter the IP address of the gateway.
Port: Enter the port number of the gateway.
79
Messaging, Internet, and Messenger
Connects to: Select a network type.
• Default Style: allows you to change the text style, text
colour, background colour, and page duration.
• About: shows version and copyright information.
Working with email messages
You can send and receive email messages in one of these
ways:
• Synchronise email messages with Microsoft Exchange or
Microsoft Outlook on your PC.
• Send and receive email messages by connecting directly
to an email server through an Internet Service Provider
(ISP) or a network.
Synchronising email messages
Use the Outlook Email account to send and receive email
messages by synchronising email messages with Microsoft
Exchange or Microsoft Outlook on your PC. You will need to
enable Inbox synchronisation in ActiveSync.
During synchronisation:
• Messages are copied from the mail folders of Exchange or
Outlook on your PC to the Outlook Email folders on your
device.
• Email messages in Outlook Email on your device are
transferred to Exchange or Outlook, and then sent from
those programs.
80
Messaging, Internet, and Messenger
Connecting directly to an email server
You can send and receive email messages by connecting to
an email server. You’ll need to set up a remote connection
to a network or an ISP, and a connection to your email
server.
When you connect to the email server, new messages are
downloaded to the device’s Inbox folder. Also, messages in
the device’s Outbox folder are sent and messages that
have been deleted on the email server are removed from
the device’s message folders.
Folder behavior with a direct connection to an email
server
The behavior of the folders you create depends on whether
you are using POP3 or IMAP4.
• If you use POP3 and you move email messages to a
folder you created, the link is broken between the
messages on the device and their copies on the mail
server. The next time you connect, the mail server will
see that the messages are missing from the device and
delete them. This prevents you from having duplicate
copies of a message, but it also means that you will no
longer have access to messages that you move to folders
created from anywhere except the device.
• If you use IMAP4, the folders you created and the email
messages you moved are mirrored on the server.
Therefore, messages are available to you anytime you
connect to your mail server. This synchronisation of
folders occurs whenever you connect to your mail server;
create new folders or rename/delete folders when
connected.
Creating an email account
You need to create a new account to be used for retrieving
and sending email messages.
81
Messaging, Internet, and Messenger
Note: You can set a new account using Email Wizard. On the
Home screen, press the Start → Applications →
Accessories → Email Wizard.
To make a new account:
1. From the Messaging screen, select New Email
Account.
2. Enter your display email address and press the Next
soft key.
If you want to set up your account automatically from
the Internet, select Try to get email settings
automatically from the Internet.
3. Select your email service provider. To add Internet email
accounts, select Internet email and press the Next
soft key.
4. Enter your name and account display name, and press
the Next soft key.
5. Enter your incoming mail server, select the account type
(POP3 or IMAP4), and press the Next soft key.
6. Enter your name and password, and the press the Next
soft key.
7. Enter your outgoing(SMTP) mail server and press the
Next soft key.
To configure advanced settings, such as SSL or Internet
connection settings, select Advanced Server Settings.
8. Select how often your device automatically connects to
the server and checks for incoming emails, and press
the Finish soft key.
82
Messaging, Internet, and Messenger
To edit an account:
1. From the Messaging screen, scroll to the account you
want.
2. Press the Menu soft key and select Settings.
3. Change the account settings as you would when
creating it.
Creating and sending an email message
1. On the Messaging screen, select the email account with
which you want to send.
2. Press the Menu soft key and select New.
3. In the To, Cc, or Bcc field, enter the recipient’s email
addresses, separating them with a semicolon.
Note: The Cc and Bcc fields are above the To field.
You can retrieve addresses from the contact list by
pressing the Menu soft key and selecting Add
Recipient.
4. Press the Down Navigation key to move to the Subject
field and enter the email subject.
5. Press the Down Navigation key and enter the email text.
To enter preset sentences, press the Menu soft key and
select My Text → a sentence.
You can add a picture or voice note as an attachment by
pressing the Menu soft key and selecting Insert → an
item type.
83
Messaging, Internet, and Messenger
6. When you have finished composing the message, press
the Send soft key.
7. Press the Menu soft key and select Send/Receive to
connect to the network and send the message.
Viewing email messages
You can also view messages you received, sent, composed
but not sent by accessing the message folders.
To open the message folders:
On the Messaging screen, access the email account you
want, press the Menu soft key, and select Folders.
The following default folders display:
• Deleted Items: contains messages that have been
deleted on your device.
• Drafts: stores draft messages that have not been sent.
• Inbox: contains received messages.
• Outbox: is a temporary storage place for messages
waiting to be sent.
• Sent Items: stores the messages that have been sent.
To view an email message:
1. On the Messaging screen, select the email account from
which you want to receive email messages.
2. Press the Menu soft key and select Send/Receive.
The device connects to your email server and receives
incoming email messages or sends email messages in
Outbox.
3. Select the message you want to view.
84
Messaging, Internet, and Messenger
To access message options:
From any message folder, you can access the following
options by pressing the Menu soft key:
• New: allows you to compose a new email message.
• Reply: sends a reply to the sender and/or all other
recipients, or forwards the message to other people.
• Mark as Unread/Mark as Read: allows you to mark the
message as unread or read. Unread messages are
boldfaced on the message list.
• Move: allows you to move the message to other folders.
• Folders: allows you to access other folders.
• Tools: allows you to switch to another message account,
delete all of the deleted messages, or change the options
for email.
• Send/Receive: sends or receives email messages.
Setting downloading options
You can specify your downloading preferences when you
set up the account or select your synchronisation options.
• Change options for Inbox synchronisation using
ActiveSync on your computer. For more information, see
“ActiveSync Help.”
• Change options for direct email server connections in
Inbox on your device. Press the Menu soft key and select
Settings. Then change the settings for the selected
account.
Viewing email attachments
To download an attachment, select Get entire message
and any attachments in an open message, or press the
Menu soft key and select Download Message. It will be
85
Messaging, Internet, and Messenger
downloaded the next time you synchonise or connect to
your email server. To view an attachment, select the
attachment in an open message.
Inserting signatures into messages
You can specify a signature to be automatically inserted
into SMS, MMS or email messages that you send.
To specify a signature:
1. From any message folder, press the Menu soft key and
select Tools → Options → Signatures.
2. Select the account for which you want to specify from
the Select an account field.
3. Select Use signature with this account.
4. To insert a signature in every messages, including when
you reply or forward the message, select Include when
replying and forwarding.
5. Enter a signature to be inserted and press the Done soft
key.
Opera Browser
Use Opera MobileTM to view all your favourite web pages on
your device.
To open Opera Browser:
On the Home screen, press the Start soft key and select
Internet Services → Opera Browser.
86
Messaging, Internet, and Messenger
Connecting to a website
1. Press the Action soft key and select Go to.
2. Enter the web address you want to visit or select a page
from the bookmark or history list.
3. Press the Ok soft key on the browser to open the
associated web page.
Navigating the Opera Browser
From web pages, you can use the following options:
To
Press
scroll through browser items the Navigation keys.
select a browser item
.
return to the previous page
.
refresh the connection
the Action soft key and
select Reload.
To change the display
options
the Menu soft key, select
Display, and select the
option you want.
view information on the web
page
the Menu soft key and
select Tools → View page
info.
87
Messaging, Internet, and Messenger
Using the Favourites list
You can store your favourite links while using the Opera
Browser and then access them easily at a later time.
Categorising them enables you to find them more quickly.
Adding a web page to the Favourites list
1. Go to the page you want to add, press the Action soft
key, and select Bookmark this page.
2. Change the name for the favourite link, if necessary.
3. Select a category under which you want to save the
favourite link from the Folder field.
You can also create a new category. See “Managing
Favorites categories.”
4. Press the Ok soft key.
Opening a link through the Favorites list
1. On the Opera Browser screen, press the Menu soft key
and select Tools → Manage bookmarks.
2. Scroll to the link you want to access.
If the link you want is in a certain folder, open the folder
and scroll to the link.
3. Press the Open soft key.
Managing Favorites categories
You can create a new category for saving favourite web
pages, and rename or delete the created categories.
88
Messaging, Internet, and Messenger
To add a category:
1. On the Opera Browser screen, press the Menu soft key
and select Tools → Manage bookmarks.
2. Press the Menu soft key and select Create folder.
3. Enter a category name and press the Ok soft key.
To edit the categories:
Scroll to the category you want, press the Menu soft key,
and select Edit or Delete to rename or delete the selected
category.
Changing Opera Browser options
You can customise web browsing options, change the
connection settings, and clear memory. On the Opera
Browser screen, press the Menu soft key and select Tools
→ Settings.
The following options are available:
• General: You can set the homepage of the Opera
Browser and block the pop-up windows. You can also
select a minimum font size.
• History: You can delete the history of accessed web
pages and clear the cache. You can also delete cookies.
• Network: You can select security protocols.
• Connections: You can select a network to connect to
Opera Brower. If you select Automatically detect
settings, your device automatically detects network
settings from your service provider.
• Misc.: You can set additional settings to use the Opera
Browser.
89
Messaging, Internet, and Messenger
Internet Explorer
Use Microsoft® Pocket Internet Explorer to view Web HTML,
cHTML, and WAP pages. You can browse by connecting to
an Internet Service Provider (ISP) or network and browse
the Web. To do this, you’ll need to create the connection
first as described on page 153.
When connected to an ISP or network, you can also
download files and programs from the Internet.
To open Internet Explorer:
On the Home screen, press the Start soft key and select
Internet Services → Internet Explorer.
Windows Live
Windows Live™‚ is a new set of Internet software and
services designed to work together seamlessly to put you
in control of the information, personal connections, and
interests you care about. Windows Live makes it easier for
you to stay in touch with your friends, and to find the
information you need quickly and more safely.
To open Windows Live:
On the Home screen, press the Start soft key. Select
Internet Services → Windows Live.
Windows Live Messenger
Windows Live Messenger delivers an always-on experience
that enables you to remain available to other online users
and always up to date with email, instant messaging (IM)
and other online services without maintaining a continuous
network connection to the device.
90
Messaging, Internet, and Messenger
The connection will be restored when a new message
arrives or when you need the service. In addition,
subscribers will receive only updates or changes to their
contacts and Inbox rather than receiving entire lists
when they connect to the service.
You will have one-click access to MSN Hotmail® and
Windows Live Messenger.
In addition to always-on services, you can access, compose
and answer Hotmail messages offline, maximising their
time when mobile connections are not available.
To access Windows Live Messenger:
On the Home screen, press the Start soft key and select
Internet Services → Windows Live Messenger.
Signing In
To use the Windows Live Messenger service, you must have
a Microsoft Passport™ account or Hotmail account, or a
Microsoft Exchange email account. If you have a Hotmail®
or MSN account, you already have a Passport. Once you
have obtained either a Microsoft Passport or a Microsoft
Exchange account, you are ready to set up your account.
Note: Sign up for a Microsoft Passport account at
http://www.passport.com. Get a free Microsoft Hotmail
email address at http://www.hotmail.com.
To sign into the Windows Live Messenger service:
1. On the Windows Live Messenger screen, press the Sign
in soft key.
2. Enter the email address and the password of your
Microsoft Passport and Hotmail account.
91
Messaging, Internet, and Messenger
3. Press the Next soft key.
Using Windows Live Messenger
Windows Live Messenger on your device is an instant
messaging program that lets you:
• see who is online.
• send and receive instant messages.
• have instant message conversations with groups of
contacts.
Working with contacts
The Windows Live Messenger screen shows all of your
messenger contacts at a glance, divided into the Online
and Offline categories. From this view, while connected,
you can start a chat.
• To add a contact, press the Menu soft key and select
Add new contact.
• To delete a contact, press the Menu soft key and select
Contact options → Remove contact.
• To view the properties of a contact, press the Menu soft
key and select Contact options → View contact’s info.
• To block a contact from chatting with you, press the
Menu soft key and select Contact options → Block
contact.
Chatting with contacts
1. To open a chat window, scroll to the contact with whom
you want to chat.
2. Press the Send IM soft key.
92
Messaging, Internet, and Messenger
3. Enter your message in the text entry area at the bottom
of the screen, or press the Menu soft key and select
Add emoticon to add an emoticon.
4. Press the Send soft key to send the message.
5. Repeat steps 3 and 4 to chat with the contact.
During a chat:
• To send a media file, press the Menu soft key and
select Send → a type → a media file.
• To invite another contact to a multi user chat, press
the Menu soft key, select Options → Add
participant, and select the contact you want to invite.
• To switch back to the main window, press the
Navigation key. To revert back to your chat window,
press the Navigation key and select the person whom
you were chatting with.
• To view the participants of the current chat, press the
Menu soft key and select Options → View
participants.
• To record and send a voice clip, press the Voice clip
soft key.
6. To end the chat, press the Menu soft key and select
End conversation.
Customising Windows Live Messenger settings
To change the settings for the Windows Live Messenger,
press the Menu soft key and select Change appearance.
You can change your display name or picture.
Using the Hotmail service
You can send and read email messages on the device via
the Microsoft Hotmail service.
93
Messaging, Internet, and Messenger
Composing and sending an email
1. Scroll to the contact you want to send an email
message.
2. Press the Send e-mail soft key.
3. Compose an email message as you would in the
Messaging program.
Viewing email message
While viewing the email message list, select the email you
want to view.
RSS Reader
RSS Reader allows quick and easy access to real-time
news, headlines, and more. It will collect news from
various websites and provides it to you in a simple form.
To do this, you’ll need to create the connection first as
described on page 153.
To open RSS Reader:
On the Home screen, press the Start soft key and select
Internet Services → RSS Reader.
Reading the latest news
1. From the news feed list, press the Update soft key. The
device connects to the network and updates the news
Feed list with the latest news.
2. Press the Done soft key to return to the feed list.
3. Select a different feed.
94
Messaging, Internet, and Messenger
4. Select a headline which interests you. The Internet
Explorer launches and you can access the corresponding
news website.
Searching for news reports
You can search for news reports by entering a keyword for
the subjects in which you have a interest.
1. Press the Menu soft key and select Feed search.
2. Enter a keyword and press the Search soft key. Your
device searches for related reports on the Internet and
displays the results.
3. Select the headline you want.
Exporting or importing feeds
You can export a feed as an OPML (Offline Processor
Markup Language) file format or import OPML files from
other sources.
To export a feed:
1. Scroll to a feed from the list.
2. Press the Menu soft key and select OPML → Export.
3. Select the file folder in which you want to save the file.
4. Enter a file name and press the OK soft key.
5. Press the OK soft key.
To import a feed:
1. Scroll to the folder to which you want to import a feed.
2. Press the Menu soft key and select OPML → Import. 95
Messaging, Internet, and Messenger
3. Choose Select OPML file to import a feed from an
OPML file, or Enter OPML URL to import a feed from a
web site.
4. Select the file to import or enter a URL address and
press the OK soft key.
Changing RSS reader settings
Press the Menu soft key and select Options to access the
following options:
• Folder/Feed update setting: You can change the
settings for folder or feed.
• All update setting: You can change the settings for
updates for all elements of RSS Reader.
• Page option: You can select the option for deleting
expired pages, and set the maximum number of expired
pages to be stored. If the number of the pages reaches
the limit, the oldest pages will be automatically deleted.
• Proxy: You can set the address and port number of the
proxy server for retrieving RSS content from the
network.
• About: You can view version and copyright information.
96
6
Organiser
This chapter explains how to use Personal Information
Management (PIM) programs to keep track of contacts and
appointments and make a list of tasks you need to do.
Contacts
Contacts maintains a list of your friends and colleagues so
that you can easily find the information you are looking for,
whether you are at home or on the road.
To open Contacts:
You can press the Start soft key and select Contacts. You
can view the list of contact cards that you have created.
Creating a contact card
You can save a new contact card in the device’s memory or
on the SIM card.
Creating a contact card in the device’s memory
1. On the contact list, press the New soft key and select
Outlook Contact.
2. Enter a name and other contact information.
You can add a personal ringtone to a contact card. Scroll
to the Custom ring tone field and select the ring
melody you want.
97
Organiser
Select the Picture field to add an image for the caller ID
image. To remove the added image, press the Menu
soft key and select Remove Picture.
To assign the contact card to a category, scroll to the
Categories field and select a category.
3. When you have finished, press the Done soft key.
Creating a contact card on the SIM card
1. On the contact list, press the New soft key and select
SIM Contact.
2. Enter the name of the person you want to add.
3. Enter the number you want to store.
4. Press the Done soft key.
Creating a contact card from the Dialling screen
1. On the Home screen, enter the phone number and press
the Save soft key.
2. Select <New Contact> to create a new contact card.
To add the phone number to an existing contact card,
select the contact card from the list.
3. Select a type.
4. Fill in the other fields and press the Save soft key.
98
Organiser
Viewing and editing a contact card
When you access Contacts, the contact list displays the
names of your contacts alphabetically, along with an
abbreviation for the primary contact number or email
address, such as the person’s work phone number (w) or
mobile phone number (m).
The following table shows possible abbreviations that might
be displayed on the contact list and their meanings:
Abbreviation
Meaning
w/w2
work phone/work2 phone
h/h2
home phone/home2 phone
m
mobile phone
co
company phone
pgr
pager
car
car phone
ast
assistant phone
rdo
radio phone
e/e2/e3
im/im2/im3
web
email/email2/email3
IM/IM2/IM3
web page
To open a contact card:
1. On the contact list, select the contact card you want to
view.
99
Organiser
2. On the summary screen:
• To edit the contact information, press the Menu soft
key and select Edit.
• To send an SMS message, press the Menu soft key
and then select Send Text Message.
• To dial a number, select the number or press the Call
soft key. To make a video call, press the Menu soft
key and then select Video Call.
• To send an email, select the email address.
• To access a web page, select the web page.
Searching for a contact card
You can search for a contact card in Contacts by entering
its associated name. You can start searching directly from
the contact list or by using the Smart Search program.
Searching from the contact list
1. On the contact list, press the alphanumeric keys
corresponding the letters of the name you want.
The device highlights the first contact card matching
your input.
2. Press
to open the contact card or press
number in the contact card.
to dial a
Searching using Smart Search
For further details about using the Smart Search program,
see page 37.
100
Organiser
Adding a number or address to the Speed
Dial list
You can assign a shortcut number to a phone number for
speed dialling or to an email or URL address for quick
access.
1. On the contact list, select the contact card you want.
2. Scroll to the number or address you want.
3. Press the Menu soft key and select Add to Speed Dial.
4. If necessary, change the name and select a keypad
location.
5. Press the Done soft key.
Copying entries between the SIM card and
Contacts
You can copy the contact card or all of contact entries in a
specific category to the SIM card or vice versa.
Copying from Contacts to the SIM card
1. On the contact list, select the contact card stored in the
the device’s memory.
2. Scroll to the phone number to be copied.
3. Press the Menu soft key and select Save to SIM.
4. If necessary, change the contact name.
5. Press the Done soft key.
101
Organiser
Copying from the SIM card to Contacts
1. On the contact list, select the contact card stored on the
SIM card.
2. Press the Menu soft key and select Save to Contacts.
3. If necessary, change the contact name.
4. Fill in the other fields and press the Done soft key to
save the changes.
Copying all contacts
To copy all contacts between the device’s memory and the
SIM card, on the contact list, press the Menu soft key and
select Copy all → a copy type.
Sending a contact card
You can send a contact card in Contacts to another device
via SMS, MMS, or an active Bluetooth connection.
On the contact list or on the summary screen, press the
Menu soft key.
• To send via SMS, select Send Contact → SMS/MMS. For
details, see page 73.
• To send via Bluetooth, select Send Contact → Beam.
For details, see page 150.
102
Organiser
Deleting a contact card
1. On the contact list, select a contact card.
2. Press the Menu soft key and select Delete Contact or
Delete SIM Contact.
3. Press the Yes soft key to permanently delete the
contact card.
Alarms
You can use the alarm clock to set a wake-up alarm or set
an alarm to remind you of an appointment.
To open Alarms:
On the Home screen, press the Start soft key and select
Applications → Organizer → Alarms.
Setting a wake-up alarm
1. On the Alarm screen, select Wake up alarm.
2. Check a box, enter the time for the wake-up alarm to
sound, and select the days when the wake-up alarm
rings in the week viewer.
Use the Navigation keys to move through each field. You
can set the wake-up alarm at 3 different times.
3. Select a melody for the alarm in the Tone field.
4. Select a time interval to resume the alarm in the
Snooze field.
5. Press the Done soft key.
103
Organiser
Setting an alarm
1. On the Alarm screen, select one of Alarm 1 to Alarm 6.
2. Set each alarm option.
3. Press the Done soft key.
Stopping an alarm
• When an alarm rings, press the Dismiss soft key to stop
it, or press the Snooze soft key to set the alarm to ring
again after the specified snooze interval.
• To deactivate an alarm, select the one you want from the
Alarm screen, select Off on the Alarm activation line.
Calendar
Use Calendar to schedule appointments, including
meetings and other events. You can check your
appointments in one of several views (Agenda, Week, and
Month).
To open Calendar:
On the Home screen, press the Start soft key and select
Applications → Calendar. You can view the lists of
appointments that you have created for the current day.
Creating an appointment
1. Press the Menu soft key and select New Appointment.
104
Organiser
2. Fill in each field.
From the Reminder field, you can set a reminder to
alert you to the appointment at the specified interval.
From the Sensitivity field, you can set a sensitivity
class by which Microsoft Exchange Server handles the
appointment.
3. When you have finished, press the Done soft key.
Viewing and editing an appointment
On the Calendar screen, you can view and edit your
appointments using the different views: Agenda, Week, or
Month. By default, the calendar first appears in the agenda
view, which provides the most detailed information about
your appointment.
Switching the view mode
You can change the view mode of the calendar to cycle
through the agenda, week, and month view. In each view,
press the Week, Month, or Agenda soft key.
• Agenda View: shows you the appointments for the
selected day.
• Week View: shows the week calendar of your
appointments.
Time cells having scheduled items are indicated by
colours (Navy blue: Busy, Purple: Out of office, White:
Free, Sky blue: Tentative).
• Month View: allows you to keep track of your monthly
schedule and shows which days have appointments
scheduled ( : Morning appointment, : Afternoon
appointment, : Morning/Afternoon appointment, : All
day appointment).
105
Organiser
Viewing an appointment
1. Select the calendar view by pressing the Week, Month,
or Agenda soft key.
2. In each view, select the date you want. In Agenda view,
you can access other dates by pressing the Left or Right
Navigation key.
To go to today’s date, press the Menu soft key and
select Go to Today.
To go to a certain date, press the Menu soft key and
select Go to Date. Enter the date and press the Done
soft key.
3. Select the appointment you want to view.
Editing an appointment
1. From any view mode, select the appointment you want
to view.
2. Press the Menu soft key and select Edit.
3. Edit the appointment information and press the Done
soft key to save the changes to the appointment.
106
Organiser
Sending an appointment
You can send an appointment item as a Calendar file to
another device via an active Bluetooth connection.
To send via Bluetooth, open the appointment you want,
press the Menu soft key, and select Beam Appointment.
For details, see page 150.
Deleting an appointment
1. On the calendar screen, open the appointment to delete.
2. Press the Menu soft key and select Delete.
3. Press the Yes soft key to permanently delete the
appointment.
Changing calendar setting options
From any view, press the Menu soft key and select Tools
→ Options. The following options are available:
• Start in: You can select which mode the calendar starts
with.
• First day of week: You can select which day the
calendar starts with.
• Week view: You can select a week view type.
• Month view: You can set the month view to show the
current week number.
• Set reminders: You can select the default schedule
alarm time.
• Respond to meetings via: You can select the mailing
service to respond to the attendee who makes
appointment.
107
Organiser
D-Day
In D-Day, you can calculate how many days are left before
or have passed since a specific event.
To open D-Day:
On the Home screen, press the Start soft key and select
Applications → Organizer → D-Day.
Note: Depending on the language setting, your device may
not display some texts.
Creating a D-Day counter
1. Press the New soft key.
2. Set options in each field.
3. When you have finished, press the Done soft key.
The counter is added to the list and shows how many
days are left or have passed.
108
Organiser
Editing D-Day categories
You can change the names and icons of D-Day categories.
1. From the counter list, press the Menu soft key and
select Edit category.
2. Scroll to the category you want.
3. Press the Menu soft key and select Rename.
4. Enter a new name and press the Done soft key.
5. Press the Left or Right Navigation key to change the
category icon.
6. Press the Done soft key to save changes.
Deleting a D-Day counter
1. Scroll to the counter you want.
2. Press the Menu soft key and select Delete.
3. Press the Yes soft key to confirm the deletion.
Tasks
Tasks is a convenient place to create task reminders. You
can mark a task as completed or delete a task.
To open Tasks:
On the Home screen, press the Start soft key and select
Applications → Tasks.
109
Organiser
Creating a task note
1. Press the Up Navigation key.
2. Enter your task information in the Enter new task
here field.
3. When you have finished, press
.
Completing a task
When a task is complete, mark it to indicate that the task is
done. To mark, scroll to the completed task and press the
Complete soft key.
To unmark, press the Activate soft key.
Beaming a task note
You can send a task note to another device via an active
Bluetooth connection.
On the task list, scroll to the task you want. Press the
Menu soft key and select Beam Task. For details, see
page 150.
Deleting a task
1. On the task list, scroll to the task.
2. Press the Menu soft key and select Delete Task.
3. Press the Yes soft key to confirm the deletion.
110
Organiser
Voice Notes
In any program where you can write on the screen, you can
also quickly capture thoughts, reminders, and phone
numbers by recording a message. Using Voice Notes, you
can create a recording.
To open Voice Notes:
On the Home screen, press the Start soft key and select
Applications → Organizer → Voice Notes.
Recording a voice note
1. Hold your device’s mouthpiece near your mouth or other
source of sound.
2. Press the Record soft key to make your recording.
3. Press the Stop soft key to stop recording.
Reviewing a voice note
On the voice note list, select the note you want to review.
Recording plays. During playback, you can adjust the
sound volume by pressing
or .
Setting a voice note as the ringtone
1. On the voice note list, scroll to a voice note.
2. Press the Menu soft key and select Set As Ringtone.
3. Press the OK soft key.
111
Organiser
Deleting a voice note
1. On the voice note list, scroll to a voice note.
2. Press the Menu soft key and select Delete.
3. Press the Yes soft key to confirm the deletion.
World Clock
You can set up the world clock with the time zones you
want, and then check the current time of the city you need
at any time.
1. On the Home screen, press the Start soft key.
2. Select Applications → Organizer → World Clock.
To view in the world map view, press World map.
3. Scroll to the clock you want.
4. Press the Menu soft key and select Assign.
Select the country and city you want.
5. Press the Done soft key to save the selected time zone.
112
Organiser
On the World Clock screen, press the Menu soft key. The
following options are available:
• Clear: allows you to remove an assigned time zone.
• Assign: assigns a new time zone.
• View: allows you to change a clock type.
• Set as current time: allows you to set the time zone as
your current date and time.
113
7
Multimedia
Camera
With the built-in camera of your device, you can take
photos or record videos of people or events while on the
move. Your device produces JPEG photos and 3GP videos.
To open Camera:
From the Home screen, press the Start soft key and select
Entertainment → Camera, or press and hold .
Taking photos
When you access Camera mode, the display is activated as
a viewfinder.
1. Adjust the image to be captured.
• Press the Up or Down Navigation key to zoom in or
out.
• Press the Left or Right Navigation key to adjust the
brightness of the image.
• Press the Menu soft key to access the camera options.
See page 115.
• Use the number keypad to adjust the image quickly.
See page 116.
2. Press
or
to take a photo.
3. Press the Save soft key,
, or
to save the photo.
The photo is saved in the location specified in the
Default Storage option. After saving the photo, the
camera automatically returns to Photo Preview mode.
Note: The number of photos available may change depending
on the subject you try to take.
114
Multimedia
Setting camera options
You can customise the camera settings. Once you change
the camera settings, the corresponding icons display at the
top of the photo preview screen.
On the camera preview screen, press the Menu soft key.
• Camcorder: switches to Camcorder mode.
• Shooting Mode: changes the camera shooting mode.
Single Shot: takes a normal single shot.
Multi Shot: takes a series of stills. You can select the
default number of photos the camera will take in the
Camera menu in Options.
Mosaic Shot: takes a series of stills and saves them in
one frame. You can select the default layout in the
Camera menu in Options.
• Size: allows you to select an image size.
• Quality: allows you to select an image quality setting.
• White Balance: allows you to select a white balance
mode to adjust the colour balance of photos.
• Timer: selects the length of time for the camera to delay
before taking a photo.
• Effect: changes the colour tone for photos or applies a
special effect to photos.
• Frame: selects a decorative frame.
• Night Shot On/Night Shot Off: When the lighting is
dim and the camera needs a longer exposure time for the
picture to be of good quality, you can activate or deactive
Night mode.
• Options: allows you to change the default settings for
Camera. See page 119.
115
Multimedia
Using the keypad shortcuts
You can use the keypad to customise your camera settings
when you are in the photo preview screen.
•
,
: switches to Camcorder mode.
•
,
: changes the shooting mode by changing the
number of photos or the layout.
•
,
: changes the image size.
•
,
: changes the image quality.
•
,
: changes the white balance.
•
,
: selects the length of time delay before taking a
photo.
•
,
: allows you to change the colour tone or applies a
special effect.
•
,
: allows you to add a decorative frame to the
photo.
•
: accesses camera setting options.
Viewing photos
To view photos you have taken, press the Album soft key
in Camera mode. The list of the photos in the currently
selected memory appears. For further details, see
page 131.
Recording video clips
1. From Camera mode, press
Camcorder mode.
or
to switch to
2. Adjust the image to be recorded.
116
Multimedia
• Press the Up or Down Navigation key to zoom in or out
on your subject.
• Press the Left or Right Navigation key to adjust the
brightness of the image.
• Press the Menu soft key to access the camcorder
options. See page 117.
• Use the number keypad to adjust the image quickly.
See page 118.
3. Press
or
to start recording. The timer on the top
left of the screen shows you the elapsed time.
Press the Pause or Resume soft key to pause and
resume recording.
4. Press
or
to stop recording.
5. Press the Save soft key to save the video clip.
The video clip is saved in the location specified in the
Default Storage option. After saving the video, the
camcorder automatically returns to Video Preview
mode.
Setting camcorder options
You can customise the camcorder settings. Once you
change the video settings, the corresponding icons display
at the top of the video preview screen.
On the video preview screen, press the Menu soft key.
• Camera: switches to Camera mode.
• Recording Mode: select a video recording mode. Select
Limit for MMS to record a video suitable for an MMS or
email message. Select Normal to record a video within
the limit of the currently available memory.
• Size: allows you to select a video frame size.
117
Multimedia
• Quality: allows you to select an image quality setting.
• White Balance: allows you to select a white balance
mode to adjust the colour balance of videos.
• Timer: selects the length of time for the device to delay
before recording a video.
• Effect: changes the colour tone for videos or applies a
special effect to videos.
• Audio Record Off/Audio Record On: selects whether
or not you record a video with audio.
• Options: allows you to change the default settings for
Camera. See page 119.
Using the keypad shortcuts
You can use the keypad to customise your video settings
when you are on the video preview screen.
•
,
: switches to Camera mode.
•
,
: changes the recording mode.
•
,
: changes the frame size.
•
,
: changes the image quality.
•
,
: changes the white balance.
•
,
: selects the length of time delay before starting
recording a video.
•
,
: allows you to change the colour tone or applies a
special effect.
•
,
: mutes or unmutes audio.
•
: accesses camera setting options.
118
Multimedia
Playing video clips
To view the video clips you have recorded, press the
Album soft key in Camcorder mode. The list of the video
clips in the currently selected memory appears. For further
details, see page 131.
Changing the default camera settings
To customise the default camera settings, press the Menu
soft key and select Options.
The following options are available:
• General: You can customise the general settings for the
Camera program.
Viewfinder: allows you to set the camera to display
icons on the preview screen.
Auto Save: allows you to set the camera to save a photo
or video after capturing.
Default Storage: allows you to select where you want
to store your photos or video clips.
• Camera: You can customise the settings for Camera
mode.
Multi Shot: allows you to set the number of photos.
Mosaic Shot: allows you to select the layout and shutter
release mode.
Default Prefix: allows you to change the default prefix
of photo names.
Sound: allows you to select sounds for the shutter
release, zooming, and brightness adjustment.
119
Multimedia
• Camcorder: You can customise the settings for
Camcorder mode.
Default Prefix: allows you to change the default prefix
of video names.
Sound: allows you to turn on or off the sound effect
when recording begins or ends.
• Shortcuts: You can check view the functions assigned to
the keys in Camera mode or Camcorder mode.
Windows Media Player
Your device is equipped with Microsoft Windows Media
Player 10. With Windows Media Player, you can play
Windows Media Audio, Windows Media Video, and MP3
audio files that are stored on your device, on a memory
card, or on the Web.
To open Windows Media Player:
On the Home screen, press the Start soft key and select
Entertainment → Windows Media.
Preparing media files
You can copy media files from your desktop computer to
the device using the Windows Media Player or ActiveSync.
You can also copy media files using a memory card.
120
Multimedia
Note: If you have stored too many files in memory, the
operation speed of the system slows down. Using an
optional memory card helps you clear up this problem
and lets you enjoy more music files.
About DRM, licences, and protected files
Some digital media files, such as songs downloaded from
online stores, are encrypted to prevent the files from being
unlawfully distributed or shared. Content providers use a
technology called Digital Rights Management (DRM), to
encrypt the files. During the encryption process, the
content provider creates a licence which specifies how and
when the file can be used.
For example, a content provider could create a licence that
allows you to play a certain file on your computer, but not
on your device. Or, a licence that allows you to play a
certain file on your device, but only for a month, or perhaps
only a certain number of times. Files that have licences
associated with them are called protected files.
Copying media files using ActiveSync
1. Connect your device to a computer and start
synchronisation by referring to page 47.
2. Open the file directory on the device by clicking Explore
from the Microsoft ActiveSync window.
3. Drag the media files you want to copy and drop them
into a folder.
121
Multimedia
Windows Media Player automatically retrieves the media
files from the folder where the files are copied and you
can search them from the library screen. If the media
files do not appear in the library, update the library by
pressing the Menu soft key and selecting Update
Library.
Copying media files using the Windows Media
Player program on your computer
You can use the desktop Windows Media Player to copy
media files. Using the desktop Windows Media Player
ensures that licences are copied with protected files.
Make sure that you have Windows Media Player 10 or later
versions on your desktop computer. Depending on the
version of your Windows Media Player, the procedure to
copy files may vary.
1. Connect your device to the desktop computer and start
synchronisation.
2. Open Windows Media Player on the computer.
3. Click the Sync tab.
4. Click Edit Playlist.
5. Select the media files you want to synchronise from the
left pane of the window.
6. Click OK.
7. Select the saving location from the right pane of the
Windows Media Player window.
8. Click
OK.
to select the quality level you want and click
122
Multimedia
9. Click Start Sync.
The selected files are converted and copied to the
location you selected in step 7.
Using libraries
A library is a file list provided by Windows Media Player to
retrieve media files in the device’s memory. To access
libraries, press the Menu soft key from the player screen
and select Library.
The library screen contains categories, such as My Music,
My Videos, My TV, My playlists, and Now playing. From the
library screen, you can sort your content by criteria, such
as artist name, album title, or genre.
On the library screen, you can use the following options by
pressing the Menu soft key:
• Queue Up: adds the selected file to the end of the
current playlist.
• Delete from Library: deletes the selected file from the
library.
• Now Playing: opens the current playlist.
• Library: allows you to select the library that you want to
view; for example, the library of files stored in your
device or on a memory card.
• Update Library: adds new files to the library by
searching your device or a memory card.
• Open File: allows you to find and play files that are
stored on your device or a memory card, but those are
not in the library.
123
Multimedia
• Open URL: allows you to specify a URL address for a
streaming service.
• Properties: displays information about the selected file.
• Player: closes the library screen and displays the player
screen.
Playing music and video files
If you have copied media files to your device’s memory or
memory card, you can play them from Windows Media
Player.
Note: If you play media files using the Bluetooth stereo
headset, a break may occur when you access to the
other menu functions.
Playing media files from a library
1. On the library screen, if necessary, press the Menu soft
key, select Library, and select the memory from which
you want to retrieve files.
2. Press the Menu soft key and select Update Library.
3. When libraries have been updated, press the Done soft
key.
4. Select a category.
5. Scroll to the library you want to play and press the Play
soft key.
The player screen appears and the selected file plays.
124
Multimedia
Use the following options during playback:
• To adjust the Windows Media volume, press the Up or
Down Navigation key. You can view the volume level on
the screen.
• To adjust the audio volume, press
or
.
• To move backward in a file, press and hold the Left
Navigation key.
• To move forward in a file, press and hold the Right
Navigation key.
• To access the next file, press the Right Navigation key.
• To access the previous file, press the Left Navigation key.
• To pause or resume playback, press
or
.
• To play the files on the playlist randomly or repeatedly,
press the Menu soft key and select Shuffle/Repeat →
an option.
• To view the video on a full screen, press the Menu soft
key and select Full Screen.
• To stop playback, press the Menu soft key and select
Stop.
Playing media files on a network
1. On the library screen, press the Menu soft key and
select Open URL.
2. Enter a URL address in the URL field, or scroll to one of
the URL address that you have used from the History
field.
3. Press the OK soft key.
125
Multimedia
Note: To play streaming media, you must be connected to a
network. For more information on creating a remote
connection between your device and a network, see
page 153.
Setting up a playlist
You can add media files on the library screen to a
temporary playlist. It lists the currently playing file, as well
as any files that have been queued up to play next.
Creating a playlist
1. On the library screen, select the category you want and
scroll to the file you want to play.
If the file does not appear on the list, press the Menu
soft key and select Update Library.
2. Press the Menu soft key and select Queue Up to add
the file to the playlist.
3. Repeat steps 1 and 2 to add more files.
4. Press
, or Menu soft key and select Player to return
to the player screen.
5. Press
or
to start playing the files.
6. To save the playlist, press the Now Playing soft key
and then the Menu soft key, and select Save Playlist.
7. Enter the list name and press the Done soft key. The list
is saved in the My Playlists library.
126
Multimedia
Opening the playlist
On the player screen, press the Now Playing soft key. You
can use various options by pressing the Menu soft key.
Editing the playlist
• To change the play order, press the Menu soft key and
select Move Up or Move Down.
• To delete the selected files, press the Menu soft key and
select Delete from Playlist.
• To clear the playlist, press the Menu soft key and select
Clear Now Playing.
Changing the Window Media Player
settings
You can customise the appearance and functionality of
Windows Media Player. On the player screen, press the
Menu soft key and select Options.
You can use the following options:
• Playback: Select the options for playback. You can
select the way time is displayed on the player screen, or
whether or not to pause playback when you launch
another program, and resume playback after a phone
call.
• Video: Select the viewing options for playing videos on a
full screen.
Note: If there is a problem while playing MP4 files,
deselect the Shrink to fit window option. The
problem occurs because the file has been resized.
127
Multimedia
• Network: Change the connection speed and protocol for
playing music and streaming video.
• Library: Select whether the player screen or the library
screen is displayed when you open Windows Media
Player.
• Skins: Change the appearance of the player screen by
selecting a new skin.
• Buttons: Assign Windows Media Player functions to the
keys on your device to quickly control playback without
having to use the menus.
Podcast
In Podcast, you can access and enjoy online audio and
video services and create your own playlists.
To do this, you’ll need to create the connection first as
described on page page 153.
To open Podcast:
On the Home screen, press the Start soft key and select
Internet Services → Podcast.
Subscribing to the Podcast service
From the Podcast screen, scroll to Podcasts, press the
Menu soft key and select Subscribe to Podcast. When
you are connected to the corresponding website, follow the
onscreen instructions to complete the subscription process.
128
Multimedia
Accessing audio and video services
From the Podcast screen, select Podcasts. You will be
connected to the corresponding website which allows you
to choose the online services that you enjoy.
To update the audio and video library, and playlists with
new files, press the Menu soft key and select Update
Library.
Creating a playlist
You can create your own playlists with your favourite audio
or video files or playlist wizard filtering audio or video files
according to your preferences.
1. Press the Menu soft key and select New → New
Playlist or New Playlist Wizard.
2. Enter a title for the playlist.
For a playlist wizard, press the Menu soft key and add
rules or limit to filter audio or video files.
3. Press the Ok or Done soft key.
4. Add files, if necessary.
Changing Podcast settings
To change the properties of Podcast, press the Menu soft
key and select Options or Properties. You can specify
information to be displayed on the playlists, or display and
update properties of the playlists in Podcast.
129
Multimedia
Adobe Flash Lite
Adobe Flash Lite is the Flash technology specially
developed for mobile phones.
You can view flash files using this program.
To open Adobe Flash Lite:
On the Home screen, press the Start soft key and select
Applications → Accessories → Adobe Flash Lite.
Viewing a flash file
From the file folder list, select the file you want to view.
While viewing a file, you can use the following options:
• To view the file on a full screen, press the Menu soft key
and select Full Screen.
• To pause playback, press the Menu soft key and select
Pause.
• To resume playback, press the Menu soft key and select
Resume.
• To rewind the file, press the Menu soft key and select
Rewind.
• To stop playback, press the Menu soft key and select
Stop.
• To play the file repeatedly, press the Menu soft key and
select Looping → On.
• To exit the screen, press the Quit soft key.
130
Multimedia
Note: Adobe Flash Lite 2.1 supports contents developed for
flash 7. Depending on the file size, and memory
capacity, some of the flash files may not be opened on
your device.
My Files
This program allows you to access all of your pictures,
sound clips, and video clips stored in your device's
directory or from a memory card.
To open My Files:
On the Home screen, press the Start soft key and select
My Files. The file folders display.
Viewing a picture
1. From the file folder list, select My Pictures.
2. Select the picture you want.
3. Press the Left or Right Navigation key to view other
pictures.
While viewing a picture, you can use the following options:
• To zoom in or out, press
to switch to Zoom mode, and
then press the + or - soft key.
• To edit the picture, press the Menu soft key and select
Edit Image. You can then access the editing tool options
by pressing the Menu soft key.
131
Multimedia
• To set the picture as wallpaper for the Home screen or
caller ID image for a contact card, press the Menu soft
key and select Set as → an option.
Viewing pictures as a slide show
You can view all of your pictures as a slide show, a
sequential presentation of each image in the current
album.
Press the Menu soft key and select Play Slide Show. The
slide show begins on a full screen.
• To pause or resume the slide show, press
.
• To manually scroll through the pictures, press the Left or
Right Navigation key.
• To stop the slide show and return to the previous screen,
press
.
Playing a sound or video clip
1. From the file folder list, select Notes, My Sounds, or
My Videos. In Notes, you can access your voice
recordings.
2. Select the sound or video clips you want. The file plays
in Windows Media.
Searching for a file
You can quickly search for a file by entering its name.
1. From the file folder list, select a folder.
2. Press the Menu soft key and select Search.
132
Multimedia
3. Enter the file name and select the file type and location.
4. Press the Search soft key. The device searches the file
folders and lists all matching files.
5. Press the Open soft key to access the file.
Sending a file
You can send a file to another device via MMS, or an active
Bluetooth connection.
Open a folder, if necessary, and scroll to the file you want.
• To send via MMS, press the Menu soft key and select
Send → as MMS. For details, see page 74.
• To send via Bluetooth, press the Menu soft key and
select Send → via Bluetooth. For details, see page 150.
You can send only one file per attempt.
Printing a file
You can print files via a Bluetooth connection.
1. Activate the Bluetooth feature and connect to a
Bluetooth printer. See page 149.
2. From the file folder list, open the folder you want and
select the file you want.
3. Press the Menu soft key and select Print via
Bluetooth.
4. Set the printing options.
5. Press the Print soft key to print the file.
133
Multimedia
Copying or moving a file
1. From the file folder list, open the folder you want and
scroll to the file you want.
2. Press the Menu soft key and select Edit → Copy/Move.
3. Select the folder to which you want to copy or move the
file.
Deleting a file
1. From the file folder list, open the folder you want and
scroll to the file you want.
2. Press the Menu soft key and select Delete.
3. Press the Yes soft key to confirm the deletion.
Making a zip file
You can convert a file to a zip file to compact the size. This
is helpful when you send files via Bluetooth or attach them
to an MMS message.
1. Open the folder you want and scroll to the file you want.
2. Press the Menu soft key and select Edit → Zip.
3. Enter a file name and select the location to save the file.
4. Press the Zip soft key.
134
Multimedia
Customising My Files settings
From the file list, press the Menu soft key and select
Options to access the following options:
• Views: allows you to select a view mode of files.
• Slide Show: allows you to set up properties of a slide
show.
• Shortcuts: shows shortcut keys available in My Files.
• About: shows copyright information.
135
8
Extra programs
Games
Your device includes fun games, such as Bubble Breaker
and Solitaire, in Games. You can download and play new
Java games in Java folder.
To open Games:
On the Home screen, press the Start soft key and select
Entertainment.
Bubble Breaker
The object of Bubble Breaker is to clear out all the balls.
The rule is that you may only clear out adjacent samecoloured balls. The score depends on clear out every balls.
Playing a game
1. On the Game screen, select Bubble Breaker.
2. Navigate to the ball you want to clear and press
.
The group will be outline and the score for that selection
will be shown.
3. Press
to accept that selection. The selected balls are
cleared out.
Press the Menu soft key and select Statistics to view
statistics or information about the game.
136
Extra programs
You can customise the game options such as play sounds,
game style, or ball colour by pressing the Menu soft key
and selecting Options.
Solitaire
The object of Solitaire is to use all the cards in the deck to
build up the four suit stacks in ascending order, beginning
with aces.
Playing a game
1. On the Game screen, select Solitaire.
2. Move any aces on the seven stacks to the four card
spaces on the left of the screen and then make any
other available plays.
To move cards, press the number or character of the
card to move and then press the number or character of
the stack to which you want to move the card.
3. When you have made all available plays, press the
Draw soft key to turn over cards.
137
Extra programs
Calculator
The calculator allows you to perform general mathematical
functions, such as addition, subtraction, multiplication, and
division.
Performing a calculation
1. On the Home screen, press the Start soft key.
2. Select Applications → Accessories → Calculator.
3. Enter the numbers and operations (+, -, /, or
).
To use advanced operations, such as percentage (%),
square (Xn), and square root (√), press the Menu soft
key and select an option.
4. Press
to execute the calculation.
You can use the calculation result for subsequent
calculations by pressing the Menu soft key and selecting
Copy result. To insert the copied value into the input field,
press the Menu soft key and select Paste result.
Changing the calculator settings
Press the Menu soft key and select Options to access the
following options:
• Show digit grouping symbol: Set whether the
calculator shows a symbol of digit grouping for numbers.
• Keep calculation log: Set whether the calculation
remains on the screen for further calculations.
138
Extra programs
Smart Converter
In Smart Converter, you can perform unit conversions.
1. On the Home screen, press the Start soft key.
2. Select Applications → Accessories → Smart
Converter.
3. Select a converter type.
4. Select an original unit and enter the value to be
converted in the upper unit field.
Press
to add a decimal point. Your device only can
display up to 6 digits after the decimal point.
In the temperature converter, press
temperature to below zero.
to change the
5. Select a target unit from the lower unit field. The
equivalent value appears.
Notes:
• To reverse the unit fields for continuous conversions, press
the Menu soft key and select Reverse.
• For the currency converter, you may need to change
currency rates. Press the Menu soft key and View rates.
139
Extra programs
Stopwatch
You can measure elapsed time interval.
1. On the Home screen, press the Start soft key.
2. Select Applications → Accessories → Stopwatch.
3. Press the Start soft key to start the timer.
4. Press the Record soft key to check an interval.
5. Press the Stop soft key to stop the stopwatch.
Document viewers
Your device provides you with various viewer programs
allowing you to open documents on the device without any
file-conversion or loss of content.
To open a Document
On the Home screen, press the Start soft key and Select
Applications → Document Viewer and select ClearVue
PDF, ClearVue Presentation, ClearVue Worksheet.
In each program, the following file formats are supported:
• ClearVue Document: .doc, .rtf
• ClearVue PDF: .pdf
• ClearVue Presentation: .ppt (created in Microsoft
PowerPoint 97, 2000, 2002(XP), and 2003)
• ClearVue Worksheet: .xls (created in Excel 97, 2000,
2002(XP), and 2003)
140
Extra programs
Viewing a document
1. After opening the viewer program for the document you
want to open, press the File soft key and select Open.
2. Select the document.
Using options in a document view
From a document view, you can use the following features.
Depending on the current viewer, available features may
different:
• To zoom in or out, press the Zoom soft key and select an
option, or press the View soft key and select Scale → an
option.
• To move between pages or slides, press the Left or Right
Navigation keys.
• To view a slide show in CV Presentation, press the View
soft key and select View Show. You can change the slide
show properties by select the Set Up Show or Custom
Show.
• To adjust the size of the main window in CV Presentation,
press the View soft key and select Resize Windows.
Then press the Up or Down Navigation key to adjust the
window.
141
Extra programs
File Manager
The File Manager program allows you to open an explorer
window similar to a desktop Windows based system. The
explorer window allows you to navigate through your
device to locate the desired folders and files. You can also
quickly manage, delete, copy, or edit any files and folders
on your device. From the file directory, press the QWERTY
key to search for a folder or file quickly.
Note: If you turn off the device after storing some files in any
folders, except for the Storage folder, using ActiveSync,
all of the files in those folders will be deleted. Store
important files in the Storage folder to prevent them
from being deleted.
Accessing files
1. On the Home screen, press the Start soft key.
2. Select Applications → File Manager. The list of the
folders in the device’s memory displays.
3. Scroll to the folder that you want to view.
Press
to return to the previous directory level.
4. Scroll to an item and press
to open it.
142
Extra programs
Using file management options
From the file directory, press the Menu soft key to access
the following options:
• Search: Search for a file by entering its name.
• Favorites: Add the select file or folder to the Favorites
List folder.
• Send: Send a file via MMS or Bluetooth.
• View: Change the view mode or change the sort order of
the File Manager.
• Scroll: Scroll to the file or folder.
• Selection: Select the file or all files.
• About: Show version and copyright information.
• Exit: Exit the File Manager.
From the file directory, press the Edit soft key to access
the file editing options, such as Cut, Copy, Paste, and
Delete. You can also use Rename, New Folder,
Property, and Zip.
Task Manager
Your device is a multi-tasking device. It can run more than
one program at the same time. However, multi-tasking
may cause hang-ups, freezing, memory problems, and
additional power consumption. To avoid these problems,
end unnecessary programs using Task Manager.
To open Task Manager:
On the Home screen, press and hold
. You can also
press the Start soft key and select Applications →
Accessories → Task Manager. The list of all the programs
currently running on your device appears.
143
Extra programs
Managing running programs
• To activate a program, press the Menu soft key and
select Activate.
• To close a program, press the Stop soft key. To close all
programs, press the Menu soft key and select Stop All.
• To refresh the program list, press the Menu soft key and
select Refresh.
Checking the battery status
You can check the remaining battery power level. Press the
Menu soft key and select Battery.
Checking the storage memory
You can check the memory in use for storing files and
running programs in your device or on a memory card.
Press the Menu soft key and select Memory Info.
144
Extra programs
SIM Manager
The SIM Manager application enables you to create or view
the contacts stored on the SIM card.
Using SIM contacts
You can access the contacts stored on the SIM card and
copy or move them to the contact list on your device’s
memory.
Creating a SIM contact
1. On the Home screen, press the Start soft key.
2. Select Applications → Accessories → SIM Manager.
3. Press the New soft key.
4. Enter contact information and press the Done soft key.
Editing SIM contacts
1. On the SIM Manager screen, scroll to the contact you
want.
2. Press the Menu soft key, and select SIM Tool → Edit.
3. Edit contact information and press the Done soft key.
145
Extra programs
Viewing your own number
You can store your phone numbers with separate
descriptive names. Changes made with this option do not
affect the actual subscriber number of your SIM card.
On the SIM Manager screen, press the Menu soft key and
select Own Number.
SIM Application Toolkit
This is available if you use a SIM AT card that provides the
SIM Application Toolkit menus and additional services, such
as news, weather, sports, entertainment, and location
services. Available services may vary, depending on your
service provider’s plans.
For details, see your SIM card instructions or contact your
service provider.
146
9
Getting connected
You can use your device to exchange information with other
mobile devices as well as your desktop computer, a
network, or the Internet. You have the following connection
options:
• Exchange information between devices with Bluetooth
capabilities without a physical connection.
• Connect the device to your computer using a USB
connection to use the device as a modem, data sync
device or external memory disk.
• Connect to your Internet service provider (ISP) or the
network at your company. Once connected, you can send
or receive email and instant messages, and browse the
Internet or intranet.
Beaming with Bluetooth
Bluetooth is a short-range wireless communications
technology. Devices with Bluetooth capabilities can
exchange data over a distance of about 10 metres without
requiring a physical connection.
You do not need to line up the device with another device to
beam information with Bluetooth.
Activating Bluetooth mode
1. On the Home screen, press the Start soft key.
2. Select Settings → More... → Connections →
Wireless Manager.
147
Getting connected
3. Press
to activate the Bluetooth feature.
4. Press the Done soft key.
Setting Bluetooth profiles
You can change the settings for each Bluetooth profile
available on your device.
On the Home screen, press the Start soft key, and select
Settings → More... → Connections → Bluetooth. The
following options are available:
• Headset: Connect or disconnect to a hands-free car kit
or headset.
• BPP: Connect to a Bluetooth printer. Press the Menu soft
key and select Set as default print to connect.
• OBEX: Change the settings for a profile for connecting to
a Bluetooth file server.
Bluetooth authentication: determine whether or not
the device asks you to permit connection when other
devices try to connect to your device.
able to write: determine whether or not other devices
write to your device.
Download folder: select the download folder.
• My Information: Set the display name for your device,
and check the address information.
148
Getting connected
Searching for and pairing with a Bluetooth
device
1. On the Home screen, press the Start soft key.
2. Select Settings → More... → Connections →
Bluetooth → General.
3. To search for a new device, select Add new device...
4. Wait for the device to search for Bluetooth devices.
5. Select a device to connect to the device.
6. Enter a Bluetooth passcode and press the Next soft key.
This passcode is used just once and you do not need to
memorise it.
When the owner of the other device enters the same
passcode, paring is finished.
Note: Some devices, especially headsets or hands-free car
kits, may have a fixed Bluetooth passcode, such as
0000. If the other device has one, you must enter
the code.
7. Press the OK soft key when the connection is
established.
8. Enter a display name for the other device and press the
Next soft key.
9. Check the services you want and press the Done soft
key.
149
Getting connected
Using the device options
When you press the Menu soft key from the device list,
you can access the following options:
• Edit: allows you to change the name of the connectable
device.
• Delete: allows you to delete the device.
• Turn On/Off Bluetooth: allows you to deactivate or
activate the Bluetooth feature.
• Turn On/Off Visibility: allows other devices to detect
your device.
• COM Ports: allows you to select a COM port for sending
or receiving data.
Sending data with Bluetooth
1. Locate an item in a program that you want to send, such
as Calendar, Contacts, Tasks, File Manager, or Content
Manager.
2. Scroll to the item you want to send.
You can send only one item per attempt.
3. Press the Menu soft key and select a Bluetooth sending
option, depending on the program you accessed.
150
Getting connected
4. Search for and pair with the device.
The device searches for devices within range and
displays a list of available devices.
If there are many devices on the list, you may not be
allowed to search for more devices. Press the Menu soft
key and select Delete to delete the device from the list.
5. Select a device you want to start sending data to.
6. Press the OK soft key when sending has been
completed.
Connecting to a computer via USB
You can select how the device functions when connected to
a computer via the USB port.
1. On the Home screen, press the Start soft key.
2. Select Settings → More... → Connections → USB.
3. Select one of the following functions for USB
connections:
• Mass Storage: The device is perceived as an external
memory device. You must insert a memory card into
the device.
• ActiveSync: The device communicates with a
computer via ActiveSync.
4. Press the Done soft key.
151
Getting connected
Internet Sharing
Using Internet Sharing, you can set your device to be used
as an external modem for another device or computer
when connected via the USB port or Bluetooth.
Note: If you have an active GPRS connection, for example a
WAP connection, you must first terminate the
connection before attempting Internet access via
Internet Sharing.
1. For a USB connection, plug the PC data cable into the
device and the USB port on your computer.
2. On the Home screen, press the Start soft key.
3. Select Applications → Accessories → Internet
Sharing.
4. Select the PC connection and network connection types.
5. Press the Connect soft key to activate Internet Sharing.
6. For a Bluetooth PAN connection, search for a compatible
computer and connect the device to the computer.
Notes:
• When Internet Sharing is activated, you cannot use
ActiveSync.
• When Windows Service Pack 2 is used, Internet access using
Internet Sharing is more stable.
• To use a Bluetooth PAN connection, the device or computer
connected to your device should support the PAN profile.
• If you use a WAP connection for Internet Sharing, configure
your desktop browser to use the proxy settings provided by
your service provider.
152
Getting connected
Connecting to the Internet or your
network
You can use the Connections settings to create GPRS,
proxy, and Virtual Private Network (VPN) connections so
that you can connect to the Internet or your corporate
network. By using a data connection, you can browse the
Internet, download emails, chat by using MSN® Messenger,
or synchronise remotely with an Exchange Server. Check
with your service provider to see if a data connection has
already been set up for you, and if over-the-air
configuration is supported.
After using the 3G and HSDPA connection, you must end
the data connection to save the battery power. To end the
data connection, Press
and select Wireless Manager
from the Quick List. Press the Menu soft key and select
Disconnect Cellular Data.
Creating a GPRS connection
If you subscribe to General Packet Radio Services (GPRS),
you can set up a GPRS connection to gain access to your
corporate network or the Internet.
You can also use your device as a GPRS modem for a
desktop computer.
1. On the Home screen, press the Start soft key.
2. Select Settings → More... → Connections → GPRS.
3. Press the Menu soft key and select Add.
4. Enter the requested information.
153
Getting connected
• Description: Enter a name for the connection.
• Connects to: Select a network type for which the
connection will be used.
• Access point: Enter the information provided by your
system administrator.
• User name: Enter your user name for the GPRS
network.
• Password: Enter your password.
• Authentication Type: Select an authentication type.
• Primary DNS: Enter the primary domain naming
system (DNS) address.
• Secondary DNS: Enter the secondary DNS address.
• IP address: Enter the Internet Protocol (IP) address.
Note: If you are not sure about the information to enter,
ask your service provider.
5. When you have finished, press the Done soft key.
Creating a proxy connection
You can use a proxy connection to gain access to the
Internet over an existing connection to your corporate
network.
1. On the Home screen, press the Start soft key.
2. Select Settings → More... → Connections → Proxy.
3. Press the Menu soft key and select Add.
4. Enter the requested information.
• Description: Enter a name for the connection.
154
Getting connected
• Connects from: Select the type of network from
which you will connect.
• Connects to: Select the type of network to which you
will connect.
• Proxy (name:port): Enter the proxy server name
and port number in the form.
• Type: Select a network type for which the proxy
connection will be used.
• User name: Enter your user name for the network to
which you will connect.
• Password: Enter your password.
Note: If you are not sure about the information to enter,
ask your service provider.
5. When you have finished, press the Done soft key.
Creating a VPN connection
If your company has set up a virtual private network
(VPN), you can create a VPN connection to gain access to
your corporate network over an Internet connection.
1. On the Home screen, press the Start soft key.
2. Select Settings → More... → Connections → VPN.
3. Press the Menu soft key and select Add.
4. Enter the requested information.
• Description: Enter a name for the connection.
• VPN type: Select the type of VPN.
• Server: Enter the VPN server name.
155
Getting connected
• Connects from: Select the type of network from
which you will connect to VPN (typically The
Internet).
• Connects to: Select the type of network to which you
will connect (typically Work).
• User name: Enter your user name for the VPN.
• Password: Enter your password.
• Domain: Enter the domain name, if required.
• IPSec authentication: If you selected IPSec/L2TP
for VPN type, select the type of authentication.
• IPSec Pre-shared key: If you selected Pre-Shared
Key for IPSec authentication, enter the shared key.
Note: If you are not sure about the information to enter, ask
your service provider.
5. When you have finished, press the Done soft key.
Setting up data connections
After creating connection profiles, you can assign a profile
to each network type.
1. On the Connections screen, press the Menu soft key
and select Advanced.
2. Select a connection profile in each network.
3. Press the Done soft key.
156
Getting connected
Adding a URL exception
Some URL addresses for web pages on your company
intranet may use periods, for example:
intranet.companyname.com. To view these pages in
Internet Explorer, you must create a URL exception.
Note: You do not need to create URL exceptions for Internet
URL addresses.
1. On the Connections screen, press the Menu soft key
and select Advanced.
2. Press the Menu soft key and select Work URL
Exceptions.
3. Press the Menu soft key and select Add.
4. Enter the URL pattern and press the Done soft key.
Separate multiple URL patterns with a semicolon.
Changing the data connection options
On the Advanced screen, press the Menu soft key and
select Options to access the following options:
• Redial attempts: Select the redial attempt to connect
the Internet or your network after an unsuccessful
connection.
• My desktop connects to: Select the type of network to
which your desktop computer will connect.
157
10
Troubleshooting
General problems
Problem
Description & Solution
“The SIM card is
missing or is not
valid. You can still
make emergency
calls if your
service provider
supports it.”
displays
Check that the SIM card has been
correctly installed.
“No network
coverage,” “Error
unable to
connect. No
network
coverage.” or
“Your text
message cannot
be sent.” displays
• The network connection has been
lost. You may be in a weak signal
area (in a tunnel or surrounded by
buildings). Move and try again.
• You are trying to access an option
for which you have not taken out a
subscription with your service
provider. Contact the service
provider for further details.
158
Troubleshooting
Problem
Description & Solution
The bars next to
disappear
• If you have just turned on your
device, wait for about 2 minutes,
until your device finds the network
and receives a signal from the
network.
• If you are in a tunnel or in an
elevator, the device may not be
able to receive the network signal
properly. Move to an open place.
• This may appear when you move
between different service areas. It
is normal.
The display is not
clear
In direct sunlight, you may not be
able to see the display clearly. Moving
to a place with different lighting
should solve this problem.
White lines
appear on the
display
This may happen if you turn on the
device after a long period of disuse,
or after removing the battery without
turning off the device. This is not
related to the device’s life or
performance. The display should
correct itself shortly.
159
Troubleshooting
Problem
Description & Solution
“PIN code”
appears
• You are using your device for the
first time. You must enter the
Personal Identification Number
(PIN) supplied with the SIM card.
• The PIN check feature has been
enabled. Each time the device is
switched on, the PIN has to be
entered. To disable this feature,
press the Start soft key, select
Settings → More... → Security →
Disable SIM PIN, and enter the
PIN.
“PUK Required”
appears
The PIN code was entered incorrectly
three times and the SIM card is now
blocked. Enter the PUK supplied by
your service provider.
I forgot the
password, PIN,
reset password,
or PUK codes
If you forget or lose the device
password, contact your device dealer.
If you forget or lose a PIN or PUK
code, or if you have not received such
a code, contact your network
provider. For information about
passwords, contact your access point
provider, for example, a commercial
Internet Service Provider (ISP),
service provider, or network operator.
160
Troubleshooting
Call problems
Problem
Description & Solution
I have entered a
number but it
was not dialled
• Be sure that you have pressed
.
• Check if your wireless connection to
your mobile service provider is
switched on and the signal from the
network is unobstructed.
• You may have set an outgoing call
barring option.
My
correspondent
cannot reach me
• Be sure that your device is switched
on (
pressed for more than one
second).
• Check if your wireless connection to
your mobile service provider is
switched on and the signal from the
network is unobstructed.
• You may have set an incoming call
barring option.
My
correspondent
cannot hear me
speaking
• Be sure that you have switched on
the mouthpiece.
• Make sure that the device is close
enough to your mouth. The
mouthpiece is located at the bottom
of the device.
161
Troubleshooting
Problem
Description & Solution
The audio quality • Adjust the voice volume by pressing
of the call is poor
or .
• Check the signal strength indicator
on the display ( ); the number of
bars indicates the signal strength,
from strong to weak.
• Try moving the device slightly or
moving closer to a window if you are
in a building.
Calls to and from
the device are
not connected
properly, and are
easily
disconnected
• Signals from the network are weak.
Move to another area.
• Touching the antenna area on the
top of the device may lower the call
quality. Be careful not to touch the
antenna area while using the device.
Power and charging problems
Problem
Description & Solution
The device
Remove the battery and then replace
malfunctions or
it. Turn on the device. If the problem
does not function persists, contact a Samsung service
representative.
162
Troubleshooting
Problem
Description & Solution
The battery’s
standby time is
shorter than
expected
• Batteries are subject to wear and
tear. Standby time may grow
shorter as time passes.
• Leaving a fully charged battery in a
cold or hot place for a long period of
time may reduce battery life.
• Standby time depends on where you
use the device. The actual time may
vary from the battery’s
specifications.
Is it OK if I leave
the device
connected to the
power outlet
after it is fully
charged
We recommend that you disconnect
the device from the adapter or unplug
the adapter from the power outlet.
The device
becomes hot
This may happen when you are on the
device or when you use programs,
such as games, the Internet, media
player, or the camera, for a long time
because the device needs more power
at those times. Stop using those
programs until the device cool down.
The battery level
seems sufficient,
but the device
does not turn on
• Remove the battery from the device
and reinstall it. Then turn on the
device.
• Clean the metal contacts both on the
battery and on the device. Reinstall
the battery and turn on the device.
163
Troubleshooting
Problem
Description & Solution
The device turns
off when the
adapter is
connected
Dust on the contacts may cause
unexpected power-off or charging
problems. Clean the metal contacts
both on the battery and on the device.
Program problems
Problem
Description & Solution
“Not enough
memory to
perform
operation. Delete
some data first.”
or “Memory low.
Delete some
data.” displays
To view what kind of data you have
and how much memory the different
data groups consume, press the Start
soft key and select Applications →
Accessories → Task Manager. Press
the Menu soft key and select
Memory Info. Delete old items from
programs. If necessary, make a
backup copy of your data using
ActiveSync or the memory card.
Opera Browser
“Could not
establish
network
connection.
Please check
your connection
settings.”
displays
Insert proper browser settings.
Contact your service provider for
instructions.
164
Troubleshooting
Problem
Description & Solution
Internet Explorer
“Your Internet
connection is not
configured
properly. Please
verify your
settings in
Connections.”
displays
Insert proper browser settings.
Contact your service provider for
instructions.
The device is
unable to
connect to the
Internet
• Check if you have set up and are
connected to an Internet service
provider.
• Check if your wireless connection to
your mobile service provider is
switched on and the signal from the
GPRS network is not obstructed.
• Verify with your service provider
that your user name and password
are correct.
• Verify with your Internet service
provider that the network you are
trying to connect is available, or try
to connect it from another PC.
Camera
Images seem
smudged
Check if the camera lens protection
window is clean.
Contacts
No number is
dialled when you
recall a contact
card
• Check if a number has been stored
in the contact card.
• Re-store the number, if necessary.
165
Troubleshooting
Problem
Description & Solution
Bluetooth
I cannot end a
Bluetooth
connection
If another device is connected to your
device, you can end the connection by
deactivating Bluetooth. Go to
Wireless Manager and deselect
Bluetooth.
I cannot find my
friend’s
Bluetoothenabled device
• Be sure that both have activated
Bluetooth.
• Be sure that the distance between
the two devices is not over 10
metres or that there are no walls or
other obstructions between the
devices.
• Be sure that the other device is in
the discoverable mode.
• Be sure that both devices are
compatible.
I cannot discover
the remote
Bluetooth stereo
headset
• Be sure that the Bluetooth
functionality on the device is turned
on.
• Be sure that the remote Bluetooth
stereo headset is in the discoverable
mode.
• Be sure that the remote Bluetooth
device has the capability to act as a
stereo headset.
166
Troubleshooting
Problem
Description & Solution
I cannot connect
to the remote
Bluetooth stereo
headset
Ensure that the correct passkey was
entered on the device during the
connection with the headset. Most
Bluetooth headsets have a fixed
passkey that would be mentioned in
their user’s guide. You would need to
enter the passkey when establishing a
connection with the headset.
I cannot listen to
music on the
remote
Bluetooth stereo
headset
• Ensure that you are connected to
the Bluetooth stereo headset.
• Ensure that the song that you are
playing is one of the supported
formats.
• Check the battery levels on the
Bluetooth stereo headset.
• Ensure that the device and headset
are within range of each other. The
maximum distance between the two
should not be more than 10 metres.
There are breaks
in the music
being played on
the remote
Bluetooth stereo
headset
You may observe breaks if there are
walls that separate the device and the
Bluetooth stereo headset.
I cannot make a
call using the
Bluetooth stereo
headset while
listening to
music.
End a Bluetooth connection and
re-connect to the headset using the
hands-free profile.
167
Troubleshooting
Problem
Description & Solution
Call History
The call history
appears empty
You may have activated a filter, and
no communication events fitting that
filter have been logged. To see all
events, press the Start soft key and
select Call History. Press the Menu
soft key and select Filter → No Filter.
Messaging
I cannot select a
contact card
when creating a
message
If the contact card does not have a
phone number or email address, you
cannot select it. Add the missing
information to the contact card in
Contacts.
PC connectivity
Problems occur
when connecting
the device to a
PC
Make sure that ActiveSync is installed
and running on your PC. See the
user’s guide for ActiveSync on the CDROM. For further information on
ActiveSync, see the help function on
ActiveSync or visit
www.microsoft.com.
If the above guidelines do not help you to solve the
problem, take note of:
• the model and serial numbers of your device
• your warranty details
• a clear description of the problem
Then contact your local dealer or Samsung after-sales
service.
168
11
Regulatory notices
SAR certification information
This phone meets European Union (EU) requirements
concerning exposure to radio waves.
Your mobile phone is a radio transmitter and receiver. It is
designed and manufactured so as not to exceed the limits
for exposure to radio-frequency (RF) energy, as
recommended by the EU Council. These limits are part of
comprehensive guidelines and establish permitted levels of
RF energy for the general population. The guidelines were
developed by independent scientific organisations through
the periodic and thorough evaluation of scientific studies.
The limits include a substantial safety margin designed to
ensure the safety of all persons, regardless of age and
health.
The exposure standard for mobile phones employs a unit of
measurement known as SAR (Specific Absorption Rate).
The SAR limit recommended by the EU Council is
2.0 W/Kg.1
The highest SAR value for this model phone was
0.383 W/Kg.
1. The SAR limit for mobile phones used by the public is 2.0 watts/kilogram
(W/kg) averaged over ten grams of body tissue. The limit incorporates a
substantial margin of safety to give additional protection for the public and to
account for any variations in measurements. The SAR values may vary
depending on national reporting requirements and the network band.
169
Regulatory notices
SAR tests are conducted using standard operating positions
with the phone transmitting at its highest certified power
level in all tested frequency bands. Although the SAR is
determined at the highest certified power level, the actual
SAR level of the phone while operating can be well below
the maximum value. This is because the phone is designed
to operate at multiple power levels so as to use only the
power required to reach the network. In general, the closer
you are to a base station, the lower the power output of the
phone.
Before a new model phone is made available for sale to the
public, compliance with the European R&TTE Directive must
be shown. This directive includes as one of its essential
requirements the protection of the health and safety of the
user and any other person.
European Union notice
Products with CE marking comply with the R&TTE Directive
(99/5/EC), the EMC Directive (89/336/EEC) and the Low
Voltage Directive (73/23/EEC) issued by the Commission of
the European Community.
Compliance with these directives implies conformity to the
following European Norms (in brackets are the equivalent
international standards):
• EN 60950 (IEC 60950) - Safety of Information
Technology Equipment
• ETS 300 342-1 (June 1997) - Electromagnetic
compatibility and Radio spectrum Matters (ERM);
ElectroMagnetic Compatibility (EMC) for European digital
cellular telecommunications system (GSM 900 MHz, GSM
1800 MHz, and GSM 1900 MHz); Part 1: Mobile and
portable radio and ancillary equipment
170
Regulatory notices
• GSM11.10
• ANSI/IEEE C.95.1-1992- specific absorption rate in
mobile phone emission condition for body health
• FCC part 15 and part 24
• prENV50166-2, 1995 for SAR
• SAR: 0.383 W/kg
Important safety information
Retain and follow all product safety and operating
instructions. Observe all warnings on the product and in
the operating instructions.
To reduce the risk of bodily injury, electric shock, fire, and/
or damage to the equipment, observe the following
precautions:
General precautions
Heed service markings: Except as explained elsewhere
in the Operating or Service documentation, do not service
any product yourself. Service needed on components inside
these compartments should be done by an authorised
service technician or provider.
Damage requiring service: Unplug the product from the
electrical outlet and refer servicing to an authorised service
technician or provider under the following conditions:
• Liquid has been spilled or an object has fallen into the
product.
• The product has been exposed to rain or water.
• The product has been dropped or damaged.
171
Regulatory notices
• There are noticeable signs of overheating.
• The product does not operate normally when you follow
the operating instructions.
Avoid hot areas: The product should be placed away from
heat sources such as radiators, heat registers, stoves, or
other products (including amplifiers) that produce heat.
Avoid wet areas: Never use the product in a wet location.
Avoid pushing objects into product: Never push objects
of any kind into cabinet slots or other openings in the
product. Slots and openings are provided for ventilation.
These openings must not be blocked or covered.
Mounting Accessories: Do not use the product on an
unstable table, cart, stand, tripod, or bracket. Any
mounting of the product should follow the manufacturer’s
instructions, and should use a mounting accessory
recommended by the manufacturer.
Avoid unstable mounting: Do not place the product with
an unstable base.
Use product with approved equipment: This product
should be used only with personal computers and options
identified as suitable for use with your equipment.
Adjust the volume: Turn down the volume before using
headphones or other audio devices.
Cleaning: Unplug the product from the wall outlet before
cleaning. Do not use liquid cleaners or aerosol cleaners.
Use a damp cloth for cleaning, but NEVER use water to
clean an LCD screen.
172
Regulatory notices
Safety precautions for power supply
unit
Use the correct external power source: A product should be
operated only from the type of power source indicated on
the electrical ratings label. If you are not sure of the type of
power source required, consult your authorised service
provider or local power company. For a product that
operates from battery power or other sources, refer to the
operating instructions that are included with the product.
Handle battery packs carefully: This product contains a
Lithium Polymer battery.
There is a risk of fire and burns if the battery pack is
handled improperly. Do not attempt to open or service the
battery pack. Do not disassemble, crush, puncture, short
external contacts or circuits, dispose of in fire or water, or
expose a battery pack to temperatures of higher than
60° C (140° F).
Note: Danger of explosion if battery is incorrectly replaced.
Replace only with specified batteries. Dispose of used
batteries according to the local regulations or reference
guide supplied with your product.
Care and maintenance
Your phone is a product of superior design and
craftsmanship and should be treated with care. The
suggestions below will help you fulfill any warranty
obligations and allow you to enjoy this product for many
years.
173
Regulatory notices
• Keep the phone and all its parts and accessories out of
the reach of small children and pets. They may
inadvertently damage these things or choke on small
parts.
• Keep the phone dry. Precipitation, humidity and liquids
contain minerals that corrode electronic circuits.
• Do not use the phone with a wet hand. Doing so may
cause an electric shock to you or damage to the phone.
• Do not use or store the phone in dusty, dirty areas, as its
moving parts may be damaged.
• Do not store the phone in hot areas. High temperatures
can shorten the life of electronic devices, damage
batteries, and warp or melt certain plastics.
• Do not store the phone in cold areas. When the phone
warms up to its normal operating temperature, moisture
can form inside the phone, which may damage the
phone’s electronic circuit boards.
• Do not drop, knock or shake the phone. Rough handling
can break internal circuit boards.
• Do not use harsh chemicals, cleaning solvents or strong
detergents to clean the phone. Wipe it with a soft cloth.
• Do not paint the phone. Paint can clog the device’s
moving parts and prevent proper operation.
• Do not put the phone in or on heating devices, such as a
microwave oven, a stove or a radiator. The phone may
explode when overheated.
• When the phone or battery gets wet, the label indicating
water damage inside the phone changes colour. In this
case, phone repairs are no longer guaranteed by the
manufacturer's warranty, even if the warranty for your
phone has not expired.
174
Regulatory notices
• If your phone has a flash or light, do not use it too close
to the eyes of people or animals. This may cause damage
to their eyes.
• Use only the supplied or an approved replacement
antenna. Unauthorised antennas or modified accessories
may damage the phone and violate regulations governing
radio devices.
• If the phone, battery, charger or any accessory is not
working properly, take it to your nearest qualified service
facility. The personnel there will assist you, and if
necessary, arrange for service.
Microsoft End User License
Agreement
• You have acquired a device(“DEVICE”) that includes
software licensed by Samsung Electronics Co., Ltd. from
an affiliate of Microsoft Corporation (“MS”). Those
installed software products of MS origin, as well as
associated media, printed materials, and “online” or
electronic documentation (“SOFTWARE”) are protected
by international intellectual property laws and treaties.
The SOFTWARE is licensed, not sold. All rights reserved.
• IF YOU DO NOT AGREE TO THIS END USER LICENSE
AGREEMENT (“EULA”), DO NOT USE THE DEVICE OR
COPY THE SOFTWARE. INSTEAD, PROMPTLY CONTACT
Samsung Electronics Co., Ltd. FOR INSTRUCTIONS ON
RETURN OF THE UNUSED DEVICE(S) FOR A REFUND.
ANY USE OF THE SOFTWARE, INCLUDING BUT NOT
LIMITED TO USE ON THE DEVICE, WILL
CONSTITUTE YOUR AGREEMENT TO THIS EULA (OR
RATIFICATION OF ANY PREVIOUS CONSENT).
175
Regulatory notices
• SOFTWARE includes software already installed on the
DEVICE (“DEVICE Software”) and MS software contained
on the CD-ROM disk (“Companion CD”).
GRANT OF SOFTWARE LICENSE.
This EULA grants you the following license:
DEVICE Software. You may use the DEVICE Software as
installed on the DEVICE.
Companion CD. A Companion CD is included with your
DEVICE, and you may install and use the Microsoft®
ActiveSync® component on one (1) or more personal
computers to exchange information with one (1) or more
computing devices that contain a compatible version of the
Microsoft® Windows MobileTM Version 5.0 operating system.
For other software component(s) contained on the
Companion CD, you may install and use such components
only in accordance with the terms of the printed or online
end user license agreement(s) provided with such
component(s). In the absence of an end user license
agreement for particular component(s) of the Companion
CD, you may install and use only one (1) copy of such
components) on the DEVICE or a single personal computer
with which you use the DEVICE.
Phone Functionality. If the DEVICE Software includes
phone functionality, all or certain portions of the DEVICE
Software may be inoperable if you do not have and
maintain a service account with an appropriate wireless
telecommunication carrier to whom Samsung Electronice
Co., Ltd. may distribute its DEVICES (“Mobile Operator”),
or if the Mobile Operator’s network facilities are not
operating or configured to operate with the DEVICE.
176
Regulatory notices
Microsoft® Outlook®. If Microsoft Outlook is included
with your Device, the following terms apply to your use of
Microsoft Outlook: (i) regardless of the information
contained in the “Software Installation and Use” section of
the online EULA you may install one (1) copy of Microsoft
Outlook on one (1) personal computer to use, exchange
data, share data, access and interact with the DEVICE, and
(ii) the EULA for Microsoft Outlook is between Samsung
Electronics Co., Ltd. and the end user-not between the PC
manufacturer and end user.
DESCRIPTION OF OTHER RIGHTS
AND LIMITATIONS.
• Speech/Handwriting Recognition. If the DEVICE
Software includes speech and/or handwriting recognition
component(s), you should understand that speech and
handwriting recognition are inherently statistical
processes and that errors can occur in the component’s
recognition of your handwriting, and the final conversion
into text. Neither Samsung Electronics Co., Ltd. nor its
suppliers shall be liable for any damages arising out of
errors in the speech and handwriting recognition process.
• Limitations on Reverse Engineering, Decompilation
and Disassembly. You may not reverse engineer,
decompile, or disassemble the SOFTWARE, except and
only to the extent that such activity is expressly
permitted by applicable law notwithstanding this
limitation.
• Single EULA. The package for the DEVICE may contain
multiple versions of this EULA, such as multiple
translations and/or multiple media versions (e.g., in the
user documentation and in the software). Even if you
receive multiple versions of the EULA, you are licensed to
use only one (1) copy of the DEVICE Software.
177
Regulatory notices
• NOTICE REGARDING THE MPEG-4 VISUAL
STANDARD. The DEVICE Software may include MPEG-4
visual decoding technology. MPEG LA, L.L.C. requires the
following notice:
USE OF THIS SOFTWARE IN ANY MANNER THAT
COMPLIES WITH THE MPEG-4 VISUAL STANDARD IS
PROHIBITED, EXCEPT FOR USE DIRECTLY RELATED TO
(A) DATA OR INFORMATION (i) GENERATED BY AND
OBTAINED WITHOUT CHARGE FROM A CONSUMER NOT
THEREBY ENGAGED IN A BUSINESS ENTERPRISE, AND
(ii) FOR PERSONAL USE ONLY; AND (B) OTHER USES
SPECIFICALLY AND SEPARATELY LICENSED BY MPEG LA,
L.L.C.
If you have questions regarding this Notice, please
contact MPEG LA, L.L.C., 250 Steele Street, Suite 300,
Denver, Colorade 80206; Telephone 303 331.1880; FAX
303 331.1879
• No Rental/Commercial Hosting. You may not rent,
lease or lend or provide commercial hosting services with
the SOFTWARE to others.
• SOFTWARE as Component of the Device-Software
Transfer. The DEVICE Software installed in read only
memory (“ROM”) of the DEVICE may only be used as
part of the DEVICE. Its component parts may not be
separated for use on more than on Device, unless
expressly permitted by this EULA. You may permanently
transfer all of your rights under this EULA only as part of
a sale or transfer of the DEVICE, provided you retain no
copies, you transfer all of the SOFTWARE (including all
component parts, the media and printed materials, any
upgrades, this EULA and, if applicable, the Certificate(s)
of Authenticity), and the recipient agrees to the terms of
this EULA. If the SOFTWARE is an upgrade, any transfer
must include all prior versions of the SOFTWARE.
178
Regulatory notices
If the DEVICE Software includes phone functionality, you
may not permanently transfer any of your rights under
this EULA with regard to the DEVICE Software of
Companion CD, except as permitted by the applicable
Mobile Operator. In the event that the Mobile Operator
permits such transfer, you may permanently transfer all
of your rights under this EULA only as part of a sale or
transfer of the DEVICE, provided you retain no copies,
you transfer all of the SOFTWARE (includig all component
parts, the media and printed materials, any upgrades,
this EULA and, if applicable, the Certificate(s) of
Authenticity), and the recipient agrees to the terms of
this EULA. If the SOFTWARE is an upgrade, any transfer
must include all prior versions of the SOFTWARE.
• Termination. Without prejudice to any other rights,
Samsung Electronics Co., Ltd. or MS may terminate this
EULA if you fail to comply with the terms and conditions
of this EULA. In such event, you must destroy all copies
of the SOFTWARE and all of its component parts.
• Security Updates/Digital Rights Management.
Content providers are using the digital rights
management technology (“DRM”) contained in your
DEVICE to protect the integrity of their content (“Secure
Content”) so that their intellectual property, including
copyright, in such content is not misappropriated.
Portions of the DEVICE Software and third party
applications such as media players use DRM to play
Secure Content (“DRM Software”). If the DRM Software’s
security has been compromised, owners of Secure
Content (“Secure Content Owners”) may request that MS
block the ability of DRM license servers and personal
computers to deliver new licenses that enable an affected
DEVICE to play Secure Content. This action does not alter
the DRM Software’s ability to play unprotected content.
179
Regulatory notices
A list of revoked DRM Software is sent to your DEVICE
whenever you download a license for Secure Content
from the Internet or from your personal computer. You
therefore agree that MS may, in conjuction with such
license, also download revocation lists onto your DEVICE
on behalf of Secure Content Owners. MS will not retrieve
any personally identifiable information, or any other
information, from your DEVICE by downloading such
revocation lists.
• Consent to Use of Data. You agree that MS, Microsoft
Corporation, their affiliates and/or their designated agent
may collect and use technical information gathered in
any manner as part of product support services related to
the SOFTWARE. MS, Microsoft Corporation, their affiliates
and/or their designated agent may use this information
solely to improve their products or to provide customized
services or technologies to you. MS, Microsoft
Corporation, their affiliates and/or their designated agent
may disclose this information to others, but not in a form
that personally identifies you.
• Internet Gaming/Updage Features. If the DEVICE
Software provides, and you choose to utilize, the Internet
gaming or update features within the DEVICE Software, it
is necessary to use certain computer system, hardware,
and software information to implement the features. By
using these features, you explicitly authorize MS,
Microsoft Corporation and/or their designated agent to
use this information solely to improve their prodects or to
provide customized services or technologies to you. MS
or Microsoft Corporation may disclose this information to
others, but not in a form that personally identifies you.
180
Regulatory notices
• Internet-Based Services Components. The DEVICE
Software may contain components that enable and
facilitate the use of certain Internet-based services. You
acknowledge and agree that MS, Microsoft Corporation,
their affiliates and/or their designated agent may
automatically check the version of the DEVICE Software
and/or its components that you are utilizing and may
provide upgrades or supplements to the DEVICE
Software that may be automatically downloaded to your
DEVICE.
• Additional Software/Services. The DEVICE Software
may permit Samsung Electronics Co., Ltd., MS, Microsoft
Corporation, their affiliates and/or their designated agent
to provide or make available to you SOFTWARE updates,
supplements, add-on components, or Internet-based
services components of the SOFTWARE after the date
you obtain your initial copy of the SOFTWARE
("Supplemental Components").
• If Samsung Electronics Co., Ltd. provides or makes
available to you Supplemental Components and no other
EULA terms are provided along with the Supplemental
Components, then the terms of this EULA shall apply.
• If MS, Microsoft Corporation, their affiliates and/or their
designated agent make available Supplemental
Components, and no other EULA terms are provided,
then the terms of this EULA shall apply, except that the
MS, Microsoft Corporation or affiliate entity providing the
Supplemental Component(s) shall be the licensor of the
Supplemental Component(s).
• Samsung Electronics Co., Ltd., MS, Microsoft Corporation,
their affiliates and/or their designated agent reserve the
right to discontinue any Internet-based services provided
to you or made available to you through the use of the
DEVICE Software.
181
Regulatory notices
• Links to Third Party Sites. The DEVICE Software may
provide you with the ability to link to third party sites
through the use of the DEVICE Software. The third party
sites are not under the control of MS, Microsoft
Corporation, their affiliates and/or their designated
agent. Neither MS nor Microsoft Corporation nor their
affiliates nor their designated agents are responsible for
(i) the contents of any third party sites, any links
contained in third party sites, or any changes or updates
to third party sites, nor (ii) webcasting or any other form
of transmission received from any third party sites. If the
DEVICE Software provides links to third party sites, those
links are provided to you only as a convenience, and the
inclusion of any link does not imply an endorsement of
the third party site by MS, Microsoft Corporation, their
affiliates and/or their designated agents.
UPGRADES AND RECOVERY MEDIA.
• DEVICE Software. If the DEVICE Software is provided
by Samsung Electronics Co., Ltd. separate from the
DEVICE on media such as a ROM chip, CD ROM disk(s) or
via web download or other means, and is labeled “For
Upgrade Purposes Only” you may install one (1) copy of
such DEVICE Software onto the DEVICE as a replacement
copy for the existing DEVICE Software, and use it in
accordance with this EULA, including any additional EULA
terms accompanying the upgrade DEVICE Software.
• CONPANION CD. If any software component(s) is
provided by Samsung Electronics Co., Ltd. separate from
the DEVICE on CD ROM disk(s) or via web download or
other means, and labeled “For Upgrade Purposes Only”,
you may (i) install and use one (1) copy of such
component(s) on the computer(s) you use to exchange
data with the DEVICE as a replacement copy for the
existing Companion CD component(s).
182
Regulatory notices
• RECOVERY MEDIA. If SOFTWARE is provided by
Samsung Electronics Co., Ltd. on separate media labeled
“Recovery Media” you may use the Recovery Media solely
to restore or reinstall the SOFTWARE originally installed
on your DEVICE.
INTELLECTUAL PROPERTY RIGHTS.
All title and intellecual property rights in and to the
SOFTWARE (including but not limited to any image,
photographs, animations, video, audio, music, text and
“applets,” incorporated into the SOFTWARE), the
accompanying printed materials, and any copies of the
SOFTWARE, are owned by MS or its suppliers (including
Microsoft Corporation). The SOFTWARE is licensed, not
sold. You may not copy the printed materials
accompanying the SOFTWARE. All title and intellectual
property rights in and to the content which may be
accessed through use of the SOFTWARE is the property of
the respective content owner and may be protected by
applicable copyright or other intellecual property laws and
treaties. This EULA grants you no rights to use such
content. All rights not specifically granted under this EULA
are reserved by MS and its suppliers (including Mircosoft
Corporation). Use of any on-line services which may be
accessed through the SOFTWARE may be governed by the
respective terms of use relating to such services. If this
SOFTWARE contains documentation that is provided only in
electronic form, you may print one copy of such electronic
documentation.
TRADEMARKS. This EULA does not grant you any rights in
connection with any trademarks or service marks of
Samsung Electronics Co., Ltd., MS, Microsoft Corporation,
their affiliates or suppliers.
183
Regulatory notices
EXPORT RESTRICTIONS. You acknowledge that the
SOFTWARE is subject to U.S. and European Union export
jurisdiction. You agree to comply with all applicable
international and national laws that apply to the
SOFTWARE, including the U.S.
Export Administration Regulations, as well as end-user,
end-use and destination restrictions issued by U.S. and
other governments. For additional information, see http://
www.microsoft.com/exporting/.
PRODUCT SUPPORT. Product support for the SOFTWARE
is not provided by MS, Microsoft Corporation, or their
affiliates. For product support, please refer to Samsung
Electronics Co., Ltd. support number provided in the
documentation for the DEVICE. Should you have any
questions concerning this EULA, or if you desire to contact
Samsung Electronics Co., Ltd. for any other reason, please
refer to the address provided in the documentation for the
DEVICE.
RESTRICTED USE. The SOFTWARE is not desinged or
intended for use or resale in hazardous environments
requiring fail-safe performance, such as in the operation of
nuclear facilities, aircraft navigation or communication
systems, air traffic control, or other devices or systems in
which a malfunction of the SOFTWARE would result in
foreseeable risk of injury or death to the operator of the
device or system, or to others.
NO LIABILITY FOR CERTAIN DAMAGES. EXCEPT AS
PROHIBITED BY LAW, MS, MICROSOFT CORPORATION AND
THEIR AFFILIATES SHALL HAVE NO LIABILITY FOR ANY
INDIRECT, SPECIAL, CONSEQUENTIAL OR INCIDENTAL
DAMAGES ARISING FROM OR IN CONNECTION WITH THE
184
Regulatory notices
USE OR PERFORMANCE OF THE SOFTWARE. THIS
LIMITATION SHALL APPLY EVEN IF ANY REMEDY FAILS OF
ITS ESSENTIAL PURPOSE. IN NO EVENT SHALL MS BE
LIABLE FOR ANY AMOUNT IN EXCESS OF TWO
HUNDRED FIFTY U.S. DOLLARS (U.S $250)
FOR APPLICABLE LIMITED WARRANTIES (IF ANY)
AND SPECIAL PROVISIONS PERTAINING TO YOUR
PARTICULAR JURISDICTION, PLEASE REFER TO
YOUR WARRANTY BOOKLET (IF ANY) INCLUDED
WITH THIS PACKAGE OR PROVIDED WITH THE
SOFTWARE PRINTED MATERIALS OR
ELECTRONICALLY.
THE SOFTWARE IS PROVIDED “AS IS” AND WITH ALL
FAULTS. THE ENTIRE RISK AS TO SATISFACTORY
QUALITY, PERFORMANCE, ACCURACY, AND EFFORT
(INCLUDING LACK OF NEGLIGENCE) IS WITH YOU.
THERE ARE NO WARRANTIES OR CONDITIONS,
EITHER EXPRESS, IMPLIED OR STATUTORY,
INCLUDING, BUT NOT LIMITED TO, ANY (IF ANY)
IMPLIED WARRANTIES OR CONDITIONS OF
MERCHANTABILITY, FITNESS FOR A PARTICULAR
PURPOSE, LACK OF VIRUSES OR NONINFRINGEMENT, OR WARRANTY AGAINST
INTERFERENCE WITH YOUR ENJOYMENT OF THE
SOFTWARE, ANY AND ALL OF WIHCH ARE HEREBY
EXPRESSLY DISCLAIMED. IF YOU HAVE RECEIVED
ANY WARRANTIES REGARDING THE DEVICE OR THE
SOFTWARE IN A WARRANTY BOOKLET OR
OTHERWISE, THOSE WARRANTIES DO NOT
ORIGINATE FROM, AND ARE NOT BINDING ON, MS,
MICROSOFT CORPORATION OR THEIR AFFILIATES.
185
Declaration of Conformity (R&TTE)
For the following product:
GSM900/GSM1800/GSM1900 with Bluetooth
Portable Cellular Telephone
(Product description)
SGH-i620
(Model name)
Manufactured at:
- Samsung Electronics Co., Ltd, 94-1 Imsoo-Dong, Gumi City, Kyung Buk, Korea 730-350*
(factory name, address)
to which this declaration relates, is in conformity with the following standards and/or other normative
documents.
Safety
: EN 60950-1:2001 +A11:2004
EMC
: EN 301 489-01 v1.5.1 (11-2004)
EN 301 489-07 v1.2.1 (08-2002)
EN 301 489-17 v1.2.1 (08-2002)
EN 301 489-24 v1.2.1 (11-2002)
SAR
: EN 50360:2001
Network
: EN 301 511 v9.0.2 (03-2003)
EN 50361:2001
EN 300 328 v1.6.1 (11-2004)
EN 301 908-1 v2.2.1 (10-2003)
EN 301 908-2 v2.2.1 (10-2003)
We hereby declare that [all essential radio test suites have been carried out and that] the above named
product is in conformity to all the essential requirements of Directive 1999/5/EC.
The conformity assessment procedure referred to in Article 10 and detailed in Annex[IV] of Directive 1999/5/
EC has been followed with the involvement of the following Notified Body(ies):
BABT, Balfour House, Churchfield Road,
Walton-on-Thames, Surrey, KT12 2TD, UK
Identification mark: 0168
The technical documentation kept at:
Samsung Electronics QA Lab.
which will be made available upon request.
(Representative in the EU)
Samsung Electronics Euro QA Lab.
Blackbushe Business Park, Saxony Way,
Yateley, Hampshire, GU46 6GG, UK
2007. 06. 12
(place and date of issue)
Yong-Sang Park / S. Manager
(name and signature of authorised person)
* It is not the address of the Samsung Service Centre. For the address or the phone number of Samsung Service Centre, see the
warranty card or contact the retailer where you purchased your phone.
* Depending on the software installed or your service provider or country, some of the
descriptions in this guide may not match your phone exactly.
* Depending on your country, your phone and accessories may appear different from the
illustrations in this guide.
* Bluetooth QD ID: B012693
English. 09/2007. Rev. 1.0