1
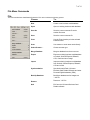
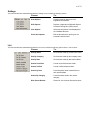
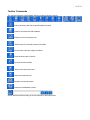
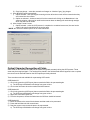
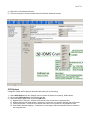
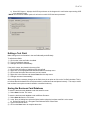
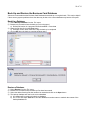
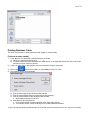
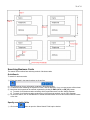
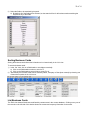
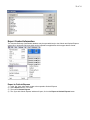
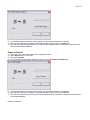
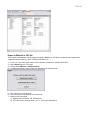
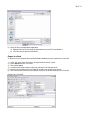
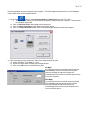
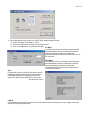
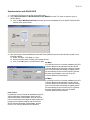
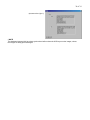
1 of 34
CardReader 100 Scanner
© Copyright 2003 Visioneer, Inc. Visioneer and Visioneer logo are registered trademarks of Visioneer, Inc. All rights reserved.
2 of 34
Using Online Help.................................................................................................................... 3
What is the Visioneer Business Card Reader Software? ..................................................... 3
Getting More Information........................................................................................................ 3
Installing the Visioneer Business Card Reader Software and the CardReader 100
Scanner .................................................................................................................................... 4
Uninstalling the Visioneer Business Card Reader Software and the CardReader 100
Scanner .................................................................................................................................... 4
Calibrating and Cleaning the CardReader 100 Scanner....................................................... 5
What is Optical Character Recognition (OCR)?.................................................................... 5
File Menu Commands.............................................................................................................. 7
Toolbar Commands ............................................................................................................... 11
Open an Existing Database of Business Cards .................................................................. 12
Creating a New Contact ........................................................................................................ 12
Scanning a Business Card ................................................................................................... 12
Scan Options ..................................................................................................................................................... 12
Optical Character Recognition of Fields ............................................................................. 13
OCR Options...................................................................................................................................................... 14
Editing a Text Field................................................................................................................ 15
Saving the Business Card Database.................................................................................... 15
Deleting Business Card(s) .................................................................................................... 17
Back-Up and Restore the Business Card Database ........................................................... 18
Back-Up a Database.......................................................................................................................................... 18
Restore a Database ........................................................................................................................................... 18
Printing Business Cards ....................................................................................................... 19
Print one or more card(s) ................................................................................................................................. 19
Print Label Patterns .......................................................................................................................................... 20
Searching Business Cards ................................................................................................... 21
QuickSearch ...................................................................................................................................................... 21
Specify searchable fields ................................................................................................................................. 21
Sorting Business Cards ........................................................................................................ 22
List Business Cards .............................................................................................................. 22
List View Options .............................................................................................................................................. 23
Classifying Business Cards ................................................................................................. 24
Change options available in Classification .................................................................................................... 24
Export Contact Information .................................................................................................. 25
Export to Outlook Express ............................................................................................................................... 25
Export to Outlook .............................................................................................................................................. 26
Export to DBaseIII or CSV file .......................................................................................................................... 27
Export to vCard ................................................................................................................................................. 28
Export Image...................................................................................................................................................... 29
Emailing Contacts ................................................................................................................. 29
Synchronization..................................................................................................................... 29
Synchronization with Palm Device.................................................................................................................. 29
Synchronization with WinCE Device............................................................................................................... 31
Synchronization with WinCE BCR................................................................................................................... 33
3 of 34
Using Online Help
Online Help is the most complete source of information about the Visioneer Business Card Reader software
and the CardReader 100 Scanner. Open Help by choosing Contents from the Help menu.
1) To start Help:
a. Select Help on the file menu bar and select Contents.
2) To read the contents of a Help topic:
a. Select the desired topic in the left frame to display the corresponding information on the right.
3) To navigate the Help topics already viewed:
a. On the Help toolbar, click Back to display the last Help topic viewed.
b. On the Help toolbar, click Forward to display the previous Help topic viewed.
What is the Visioneer Business Card Reader Software?
The Visioneer Business Card Reader software is a user-friendly electronic organizer which helps keep track of
information from business cards. The software automatically saves and organizes data with a simple scan of a
business card. It is able to organize contact information to meet a variety of business and personal needs.
The Visioneer Business Card Reader Software includes the following features:
" Scan and recognize English Language business cards
" Scan both sides of a business card
" Retrieve and browse business card information easily
" Click and Post business card information from the card image to the designated field
" Find any contact using QuickSearch
" Sort business card information by any field or creation time
" Add additional information in the memo field
" Categorize business cards
" Print business cards as an address book or print card images
" Import and Export an address book between the Business Card Reader Software and Outlook/Outlook
Express
" Export a contact list to a DBaseIII or CSV file format which can then be imported into applications such as
ACT!, Goldmine, and MS-Excel
" Directly email contacts from the Business Card Software with vCard and/or business card image attached
" Direct synchronization with Palm and WinCE devices, Visioneer Business Card Software and other PDAs
Getting More Information
The Help system provides step-by-step instructions for using the Visioneer Business Card Reader software
with your CardReader 100 Scanner.
You may obtain other sources of information from:
Visioneer Business Card Reader Software User Manual
This printed guide provides detailed information about all of the Visioneer Business Card Reader software
features.
4 of 34
Visioneer Web Site
Visit our website http:// www.visioneer.com for the latest on products, technical support and more information
on other Visioneer products.
Registering the CardReader 100 Scanner
Register the CardReader 100 scanner during the scanner installation process, or at the Visioneer web site
http://www.visioneer.com.
Installing the Visioneer Business Card Reader Software and the
CardReader 100 Scanner
Warning: Do not plug the CardReader 100 USB cable into the computer until prompted to by the scanner driver
installation wizard.
1) Insert the Visioneer Business Card Reader Software CD into the CD-ROM/DVD-ROM drive of the
computer.
2) When the installation screen opens up, click on Visioneer Business Card Software.
3) The installation wizard will begin, accept all default locations and options, the installation will complete the
install and return to the main install screen.
4) Now click on CardReader 100 Driver to start the driver installation wizard.
5) Plug the CardReader 100 USB cable into a USB port on the computer when prompted to by the install
wizard.
6) Click on Finish to complete the driver install.
7) Click on Exit to close the CD installation screen.
Uninstalling the Visioneer Business Card Reader Software and the
CardReader 100 Scanner
To uninstall Visioneer Business Card Reader software from the system, use the Windows Control Panel to
remove the application and all system files associated with it.
Warning : Following this procedure, will permanently remove the Visioneer Business Card Reader software from
the computer’s hard drive.
To uninstall the Visioneer Business Card Software from your system:
1) From the start menu, select Settings and then click on Control Panel to open the Control Panel window.
2) Double-click on the Add/Remove Programs icon.
3) Select VisioneerBCR 1.5 and click on the Add/Remove button.
4) Click Yes and Windows will remove the Visioneer Business Card Reader software application and all
associated files from the computer’s hard drive.
5 of 34
To uninstall the CardReader 100 Scanner from your system:
1) From the start menu, select Settings and then click on Control Panel to open the Control Panel window.
2) Double-click on the Add/Remove Programs icon.
3) Select CardReader 100 and click on the Add/Remove button.
4) Click Yes and Windows will remove the CardReader 100 scanner and all associated files from the
computer’s hard drive.
Calibrating and Cleaning the CardReader 100 Scanner
The Visioneer Business CardReader 100 scanner must be calibrated before using the first time. Calibration and
cleaning may need to be performed from time-to-time to maintain/improve the quality of the scanned images.
To calibrate the scanner:
1) Select Scan from the ‘File’ menu or click on the
button to open the scanning utility.
2) Click on the Calibrate button.
3) Insert the calibration page into the scanner, or use a white piece of paper cut to the width of the card slot.
4) Click on the OK button after calibration has completed.
To clean the scanner:
1) Select Scan from the ‘File’ menu or click on the
button to open the scanning utility.
2) Insert the cleaning sheet provided with the scanner; the CardReader 100 will automatically pull the
cleaning sheet through as with a regular business card scan.
3) Discard any image file created after the cleaning sheet has been fed through.
What is Optical Character Recognition (OCR)?
Simply stated, Optical Character Recognition (OCR) looks at the scanned image and “recognizes” text. The
software will process the text for the purpose of modifying it in text editing programs (e.g. MS-Word, MS-Excel,
WordPerfect, etc…)
The Visioneer Business Card Reader Software recognizes the text on a business card and inserts the results into
editable fields. The software recognizes the type of information being processed and inserts it into the most likely
text field (e.g. Name, Telephone Number, Address, Company, etc…)
To optimize the OCR results, make sure the image of the business card is horizontal and readable left-to-right.
Be aware that business cards which are colored, or have graphic images, are probably not going to be recognized
accurately the first time. Don’t worry, the Visioneer Business Card Reader software allows selection of a specific
area on the business card to re-process and insert into the selected field.
6 of 34
Scanner Updates
All updates can be found on our website http://www.visioneer.com
Getting Technical Support
If you cannot diagnose your problem using the topics in this Help system, contact Visioneer Technical Support at:
http://www.visioneer.com
7 of 34
File Menu Commands
File
The Visioneer Business Card Reader Software's ‘File’ menu includes the following options:
Choose:
To:
New
Create a new business card database
Open
Open an existing business card database
Save As
Save the current contacts file under
another file name
Save
Save the current contacts file
Print
Use the Print wizard to print the selected
business cards
Scan
Use scanner to scan name cards directly
Select Scanner…
Choose scanner type
Merge Database
Merge a database into the current one
Export
Export an existing business card database
to Outlook, Outlook Express, DBaseIII,
CSV, vCard and as an image
Import
Import an existing business card database
from Outlook, Outlook Express, DBaseIII,
CSV and vCard
Synchronization
Synchronize with Palm, Visioneer
Business Card Reader Software and other
Personal Digital Assistants (PDA)
BackUp Database
BackUp a database and its images to a
“*.db” file
Restore
Restore a “*.db” file
Quit
Exit from the Visioneer Business Card
Reader software
8 of 34
Edit
The Visioneer Business Card Reader Software's ‘Edit’ menu includes the following options:
Choose:
To:
Select All
Select all the business cards in the current
database
Deselect All
Undo selection of all business cards in the
current database
New Business Card
Creates an empty business card in the
existing database
Delete Business Card(s)
Delete the selected business card(s)
Edit Category
Edit, add, delete or modify existing
categories for scanned business cards
Edit Shortcuts
Edit the strings of existing shortcuts or add
new shortcut strings
Email
Email the contents, or an image, of the
scanned business cards
View
The Visioneer Business Card Reader Software's ‘View’ menu includes the following options:
Choose:
To:
View by Thumbnail
View all business car images
View by Details
View information of business cards in a list
format
Display in Uppercase
Display all the information of the business
card in uppercase letters
Enlarge Window Size
Enlarge window size
Reduce Window Size
Reduce window size
9 of 34
Settings
The Visioneer Business Card Reader Software’s ‘Settings’ menu includes the following options:
Choose:
To:
Scan Options
Change scanning options such as
brightness and contrast
OCR Options
Replace or append text fields with Optical
Character Recognition (OCR) results
View Options
Select the field names to be displayed for
the ‘Database Browser’
Print Label Options
Edit the dimensions for printing out the
scanned business cards
List
The Visioneer Business Card Reader Software’s ‘List’ menu includes the following options when in the List View:
Choose:
To:
Sort By Name
Sort business cards by contact’s first name
Sort By Company
Sort business cards by the company name
Sort By Date
Sort business cards by last date modified
Search Unverified
Lists all unverified business cards
Search Verified
Lists all verified business cards
Search by Date
List all business cards created before or
after specified date
Search By Category
List all business cards in the chosen
category
Hide Search Results
Return list view to show all business cards
10 of 34
Card
The Visioneer Business Card Reader Software's ‘Card’ menu includes the following options when viewing the
card image and details:
Choose:
To:
Rotate Left
Flip business card to the left
Rotate 180
Rotate business card upside down
Rotate Right
Flip business card to the right
Add to Category
Create a new category to organize the
business cards
Recognize (OCR)
Process the business card image to fill in
the text fields
Dictionary
The Visioneer Business Card Reader Software's ‘Dictionary’ menu includes the following options:
Choose:
To:
Last Name
Search and list by common last name
City
Search and list by common cities
State
Search and list by contacts’ state
Title
Search for all contacts by specified title
Department
Search for all contacts in a specific
department
Others
Search for all contacts by salutation
Help
The Visioneer Business Card Reader Software’s ‘Help’ menu includes the following options:
Choose:
To:
About
Provides basic information about the
Business Card Reader software
Contents
Provides a Help menu for the Visioneer
Card Reader
11 of 34
Toolbar Commands
The Visioneer Business Card Software toolbar includes the following options:
Scans a business card with the specified default scanner
Creates a new business card Database
Deletes the current business card
Send Email to the selected business card holder
Print business card lists, images and labels
Export business card to Outlook
Synchronize Palm Address
Select previous business card
Select next business card
Business card image browser
Business card database browser
Search business cards according to the first character of their name fields
12 of 34
Open an Existing Database of Business Cards
The most recently edited database will be opened when accessing the Visioneer Business Card Reader
software. To open a previously saved database of business cards:
1) Select Open from the ‘File’ menu.
2) In the 'Open the data File' window select the file.
3) Click OK.
Creating a New Contact
The ‘New’ option allows for manual entry of the details of a business card without scanning.
1)
2)
3)
4)
Click on the
button on the toolbar, or select New Business Card from the 'Edit' menu.
A blank business card view will be displayed.
Enter the details of the business card.
The business card will be saved automatically.
Note: Any changes to an existing database are saved automatically on close of software.
Scanning a Business Card
To scan business cards:
1) Select Scan Options from the ‘Settings’ menu to set the default scanning options prior to start of business
card scan.
2) Click on the
button or select Scan from the ‘File’ menu.
3) Insert business card face down and flush to the side of the paper feed slot on the scanner.
4) After the business card has been scanned the following options are available:
a) Scan opposite side – if the business card has information on both sides, select this option to begin scan
of second side.
b) Discard – if the image is not clear, click on the ‘Discard’ button to delete the image and scan again.
c) Process – clicking on the ‘Process’ button will begin the OCR process, when it completes, the contact
information text fields will be filled in with the results.
5) If the business card has been scanned in upside down, or if the business card view should be vertical
instead of horizontal, rotate the card image then reprocess (OCR) the card.
a) Click Card on the File menu bar.
b) Select a rotate option form the drop menu.
i) Rotate Left, Rotate 180, or Rotate Right
ii) The business card image will rotate according to the option selected.
Scan Options
Change the default scan settings for business card scans prior to scanning:
1) Select Scan Options from the ‘Settings’ menu to access the options for scanning, OCR and lists.
2) Click on the Scan Options tab if not already selected.
3) Modify the options as desired then click on the OK button.
a) Adjust:
i) Brightness – changes the brightness of the image as it is being scanned in.
ii) Contrast – sharpens the contrast between light and dark for clearer images.
b) Save Image Format:
i) Black/White Tiff Image – saves the scanned card images as black/white tiff images.
ii) Gray Tiff Image – saves the scanned card images as “shades of gray” tiff images.
13 of 34
iii) Gray Jpeg Image – saves the scanned card images as “shades of gray” jpeg images.
c) Scan Business Cards Automatically:
i) Option selected – after opening the scanning window all business cards will be scanned when they
are inserted into the scanner.
ii) Option not selected – business cards will not be scanned until clicking on the Scan button in the
scanning window – this may be useful as the scanner does not always pull cards through straight,
which can affect OCR results.
d) Allow Image Format Convert:
i) Option selected – when the OCR process is completed on a selected name card, the card can be
saved in the new format defined in the option page.
**NOTE: this will set the default options for all cards scanned in.
Optical Character Recognition of Fields
Some fields on the business card may not have been recognized accurately during the OCR process. These
areas may be recognized again. The results will be placed in the field selected and will append, insert or replace
the current text in that field based on the OCR options previously selected.
There are three methods available for reprocessing OCR results.
OCR Method #1:
1) Click in the green box (OCR layout) that surrounds the field to be processed again.
a) The OCR layout field border will change from green to blue.
2) Click on the field name where the results should be inserted.
OCR Method #2:
1) Click in the green box (OCR layout) that surrounds the field to be processed again.
a) The OCR layout field border will change from green to blue.
2) Right-click in the OCR layout box.
3) From the drop menu, choose the field where the OCR text should be inserted.
OCR Method #3:
1) Move the mouse to the area of the business card that needs to be processed.
2) Press and hold down the left mouse button.
3) Drag the mouse cursor across the area to be reprocessed.
a) The OCR layout field border will change from green to blue.
14 of 34
4) Right-click on the selected text area.
5) From the drop menu, choose the field where the OCR text should be inserted.
OCR Options
Change the default OCR settings for business card scans prior to processing:
1) Select OCR Options from the ‘Settings’ menu to access the options for scanning, OCR and lists.
2) Click on the OCR Options tab if not already selected.
3) Select the desired options then click on the OK button.
a) Append OCR to field text – adds the OCR results to the current text in a particular field.
b) Replace field text with OCR results – replaces the current text in a particular field with the OCR results.
c) Insert OCR results – inserts the OCR results where the cursor is placed in a designated text field.
d) Auto-Rotate Scanned Image(s) – if selected, the card image will be automatically rotated if scanned in
the wrong direction.
15 of 34
e) Show OCR Layout – displays the OCR layout boxes on the image and is useful when reprocessing OCR
on a particular image.
**NOTE: this will set the default options for all cards on which OCR has been processed.
Editing a Text Field
Make changes to the information in the text fields easily and efficiently.
To edit the text fields:
1) Click on the in the text field to be edited.
2) Type in the desired changes.
3) Changes are saved automatically.
If the text is correct, but placed in the wrong field:
1) Click on the field name to highlight all text in that field.
2) Right-click on the highlighted text and select Cut from the drop menu.
3) Click on the field name where the text is to be inserted.
4) Right-click in the field text and choose Paste from the drop menu.
5) Changes are saved automatically.
After making all the necessary changes to the fields, there is an option to click on the 'Verified' checkbox. This is
to indicate that all the details of the business card are verified accurate and placed correctly. This may be useful
later as there is an option to search verified or unverified cards only.
Saving the Business Card Database
To save the business card database under the same file name:
1) Select Save from the ‘File’ menu.
To save the business card database under a different file name:
1) Select Save As from the ‘File’ menu.
2) In the ‘Save As’ dialog box, select the folder location where the business card file is to be saved.
a) Default file location is: c:\Program Files\Visioneer BCR1.5\User Data
3) Type in the new file name.
4) Click on the Save button to complete the action.
16 of 34
17 of 34
Deleting Business Card(s)
The ‘Delete’ option allows deletion of one or more business cards at the same time.
There are two methods for selecting business card(s) to be deleted:
1) In the 'List' view, click on the checkbox next to the business cards to be deleted.
OR
2) In the 'Browser' view, left-click to select the business card(s) to be deleted. To select multiple business cards
press the CTRL button on the keyboard and left-click the mouse at the same time on each card to be
deleted.
button on the toolbar, or select Delete selected name card(s) from the ‘Edit’ menu.
3) Click on the
4) The following window will open:
5) Click on the OK button to confirm deletion of the business cards selected.
18 of 34
Back-Up and Restore the Business Card Database
Visioneer recommends that the Business Card Database be backed-up on a regular basis. This may be helpful
if there are any system problems where the data may be lost or the current database may become corrupted.
Back-Up a Database
1) Select BackUp Database from the ‘File’ menu
2) Browse to the location where the back-up file is to be saved
a) Default file location is c:\program files\VisioneerBCR 1.5\user data
3) Name the file then click on the Save button
a) Example: the file name could be the day the back-up is completed
4) Click on OK when the back-up complete window opens
Restore a Database
1)
2)
3)
4)
Select Restore from the ‘File’ menu
Browse to the location where the back-up files have been saved
Select the desired back-up file that needs to be restored and click on the Open button
The backup database will now be the current database
a) All changes will be made to this back-up database
b) Go to ‘File’ and select Save As to save the database as another name to maintain the content of the
backup database file
19 of 34
Printing Business Cards
The ‘Print’ option allows for printing business card images or contact details.
Print one or more card(s)
1) In the ‘Browse’ view select the business card(s) to be printed.
a) Left-click to select the business card
b) To select multiple business cards press the CTRL button on the keyboard and left-click the mouse at the
same time on each card to be printed.
2) In the 'List' view, click on the checkbox next to the business card(s) to be printed.
3) Click on the
button on the toolbar, or select Print from the ‘File’ menu.
4) The following options will be available:
a) Print the front image of each business card selected.
b) Print the front and back image of each business card selected.
c) Print the contact details of each business card selected.
i) All the fields as shown in 'List' view.
d) Print labels for all cards selected.
i) Prints contact details in pattern specified under ‘Print Label Options’.
ii) The following section covers modifying the print label patterns dimensions.
To print only specific fields, the fields that are not to printed must be removed from the ‘List’ view prior to printing.
20 of 34
Please look at the section ‘List of Name Cards’ for instructions on how to add & remove fields from the ‘List’
view. Note: the business card fields will print in the same order as seen in the ‘List’ view.
Print Label Patterns
Add, edit and select a print label pattern.
1) Select Print Label Options from the ‘Settings’ menu.
2) The label dimensions window will open.
3) Click the pattern name on the left to modify a current pattern.
4) Click on the Add button and input a name for the new pattern.
Note: all values are measured in 1/10mm
Pattern name:
Input any name to represent pattern dimensions
StartX and StartY:
Horizontal(x) and vertical(y) distances between labels sticks
and labels papers.
These values must be adjusted for different printers
OffsetX and OffsetY:
Horizontal(x) and vertical(y) distances between neighboring
label sticks.
Width and Height:
Horizontal and vertical dimensions of label sticks.
Rows and Columns:
The number of business cards to print in horizontal and
vertical direction.
Fields Gap:
The Fields vertical distance in a label stick.
(Height of each field will change according to font size. The
address field is 3 times of any other field, like name. Adjust
fields gap to tune the space between fields.)
RefX and RefY:
Horizontal and vertical distance between fields bounding
rectangles and fields text.
Font Size:
Fields text printed font size.
Print Text Rectangle:
Will print borders around fields.
Pattern items: (all values measured in 1/10 mm)
Fractional Inch Decimal Inch
Millimeters
1/10 Millimeter
1/8
0.125000
3.1750
31.75
1/4
0.250000
6.3500
63.5
1/3
0.333333
8.4667
84.667
1/2
0.500000
12.7001
127.001
2/3
0.666666
16.9334
169.334
3/4
0.750000
19.0501
190.501
1
1.000000
25.4001
254.001
21 of 34
Searching Business Cards
The search function allows fast and easy retrieval of business cards.
QuickSearch
To search for business cards:
1) Enter a keyword in the search textbox on the tool bar
2) The keyword can be any information contained in the business card.
3) If a business card containing the keyword is found, it will be displayed. If not, an empty screen will be shown.
4) More than one keyword can be entered, separated by clicking on AND (AND&) or OR (OR|) button.
a) To search for all business cards containing all the keywords entered, use the 'AND&' separator.
b) To search for all business cards containing any of the keywords entered, use the 'OR|' separator.
5) To cancel a search, click on the All button to cancel searched results and view all business cards in browse
or list view.
Specify searchable fields
1) Click on the
button to open the ‘Select Search Fields’ option window.
22 of 34
2) Select the fields to be searched by keyword.
a) By default, all of the fields will be selected, so the search will be for all business cards containing the
keyword in any of the fields.
Sorting Business Cards
Sorting the business cards allows the information to be viewed easily in the ‘List’ view.
To sort the business cards:
1) In the ‘List’ view, click on a field header to sort alpha-numerically.
a) Click on the field header one time to sort A to Z.
b) Click on the field header a second time to re-sort Z to A.
2) Alternatively the business cards can be sorted by Name, Company or Date (time created) by choosing one
of these three options in the ‘List’ menu.
List Business Cards
The ‘Edit’ view shows all business cards listed by contact name in the current database. Clicking on any one of
the records on the left side of the window shows the contact and company information for that card.
23 of 34
List View Options
Change the default List view settings:
1) Select List Options from the ‘Settings’ menu to access the options for scanning, OCR and lists.
2) Click on the List Options tab if not already selected.
3) Select the desired options then click on the OK button.
a) Available columns – all possible fields in the database to be viewed in the ‘List’ view.
b) Show the following in current order – shows the selected fields in the ‘List’ view in the order of the fields
top to bottom.
i) Add>>> button – moves the selected fields from the ‘Available Columns’ list to the ‘Show the
following in current order’ list.
ii) <<<Remove button – moves the selected fields from the ‘Show the following in current order’ list to
the ‘Available Columns’ list.
iii) × (up) button – moves the selected field up the list under ‘Show the following in current order’.
iv) Ø (down) button – moves the selected field down the list under ‘Show the following in current order’.
c) Other Options
i) Automatic resize columns in to fit window in the ‘List’ view – if selected, the columns will be resized
so that all may be viewed in the window without scrolling left-to-right.
ii) Show Names on images – if selected, displays the name of the contact person below the business
card in the ‘Browser’ view.
iii) Do not show names – if selected, does not display the name of the contact person below the
business card image in the ‘Browser’ view.
24 of 34
Classifying Business Cards
To classify a business card:
1) Select the business card(s) to be classified.
2) Click Add to Category from the ‘Card’ menu.
a) This will open a category options window.
3) Select the desired categories to associate with the business card(s).
4) Click on the OK button.
Change options available in Classification
1) Select Edit Category from the ‘Edit’ menu.
2) From the ‘Edit Category’ window categories can be added, modified and deleted.
25 of 34
Export Contact Information
The Visioneer Business Card Reader database may be exported directly to the Outlook and Outlook Express
contact list or as specific file types which can be imported into applications which support that file format.
Export to Outlook Express
1)
2)
3)
4)
In the ‘List’ view, select each contact to be exported to Outlook Express
Select Export from the ‘File’ menu
Then select Outlook Express
The ‘Sync with Outlook Express’ window will open, click on the Export to Outlook Express button
26 of 34
5) A verification window will request to either export only the selected contacts or all contacts
6) After the export has been completed a notification window will open, click on the OK button
7) The next time Outlook Express opens the contact list will be updated with the information exported from the
Business Card Reader database
Export to Outlook
1)
2)
3)
4)
In the ‘List’ view, select each contact to be exported to Outlook
Select Export from the ‘File’ menu
Then select Outlook
The ‘Sync with Outlook Express’ window will open, click on the Export to Outlook button
5) A verification window will request to either export only the selected contacts or all contacts
6) After the export has been completed a notification window will open, click on the OK button
7) The next time Outlook opens the contact list will be updated with the information exported from the Business
Card Reader database
Example contact list:
27 of 34
Export to DBaseIII or CSV file
The business card database can be exported as either a DBaseIII or CSV file then imported into programs that
support those file formats (e.g. ACT!, Goldmine, MS-Excel, etc…)
1)
2)
3)
4)
In the ‘List’ view, select each contact to be exported to a DbaseIII or CSV(Excel/Text) file
Select Export from the ‘File’ menu
Choose either DBaseIII or CSV(Excel/Text)
A window will prompt to either export only selected or all business cards
5) The ‘Save File’ screen will open
6) Select a location on the hard drive to save the file
7) Name the file to be saved
a) DBaseIII files will have a ‘.dbf’ file extension
b) CSV files can be saved as either ‘.csv’ or ‘.xls’ file type (extensions)
28 of 34
8) Open the file in the appropriate application
a) DBaseIII files can be imported into applications such as ACT! and Goldmine
b) CSV files can be opened in MS-Excel
Export to vCard
A contact from the Visioneer Business Card Reader database may be exported to a vCard file.
1)
2)
3)
4)
5)
6)
In the ‘List’ view, select a contact to be exported as a vCard (.vcf) file
Select Export from the ‘File’ menu
Then select vCard
A window will prompt to either export only selected or all business cards
Browse to the location where the vCard file should be saved and name the file
The vCard for that contact may be opened at any time by double-clicking on the vCard file
Example of a vCard file:
29 of 34
Export Image
The original image file can be exported to a specific location. The image file type will be the original file type
from the business card software (either .tiff or .jpeg)
1) In the ‘List’ view, select each contact to be exported
2) Select Export from the ‘File’ menu
3) Then select Image
4) A window will prompt to either export only selected or all business cards
5) Browse to the location where the file images are to be saved
Emailing Contacts
Email messages can be initiated from within the Visioneer Business Card Reader software.
1) In either the ‘Browse’ or ‘List’ view, select the contacts’ business card(s) to send the email message to.
a) In the ‘Browse’ view, press and hold the CTRL key on the keyboard and click on each card to be
included in the email.
b) In the ‘List’ view, click on each checkbox next to the name of each contact to be included in the email.
2) Click on the
button or select Email from the ‘Edit’ menu.
3) An option window will open that allows attachment of vCard or Image file to the email message.
a) Select vCard and/or Image to attach them to the email message.
b) After making selection, or if no attachment is needed, click on the OK button.
4) A blank email message will open with the “To:” field filled in with each person’s email address from the
selected business cards.
Synchronization
The Visioneer Business Card Reader software can synchronize contact information directly to the Palm and
WinCE PDA devices.
Synchronization with Palm Device
Before using the Synchronization with Palm Device function, the Palm Desktop software must be installed and
30 of 34
the Palm handheld must be connected to the computer. The Palm Desktop software will be on the installation
CD provided with the Palm handheld device.
1) Click on the
button or select Synchronization to Palm Device from the ‘File’ menu.
i) There may be a warning “Palm conduit just registered, please restart you computer.” Please reboot
the computer at that time.
b) Click on Export to PDA to export data to the Palm device.
c) Click on Import from PDA to import data from the Palm device.
d) Click on the Sync with PDA button to set a match percentage between device and computer.
2) After initializing the sync function the ‘Palm Sync’ dialog window will open.
a) Select ‘PC Major’, ‘PDA Major’ or ‘Sync’.
b) Set the minimum match (similarity) percentage desired.
c) Click on the OK button to synchronize the data.
PC Major
If a particular record is in both the computer and the
Palm database and both records have a minimal
match percentage as stated, the system will
automatically set the record on the Palm device to the
one on the computer.
PDA Major
If a particular record is in both the computer and the
Palm database and both records have a minimal
match percentage as stated, the system will
automatically set the record on the computer to the
one on the Palm device.
31 of 34
Sync
If a particular record is in both the PC and the Palm
database and both records have the minimal match
percentage as stated, the application will request
selection of which device should be the sync major.
(as seen to the right ¾)
3) After selecting either ‘PC Major’, ‘PDA Major’ or ‘Sync (PDA or PC)’ the Palm Sync Status window will
open.
**NOTE
The database images which have been synchronized will not show the OCR layout on the images, unless the
images are being processed again.
Synchronization with WinCE Device
1) Connect the WinCE device to the PC via the serial cable.
2) Select Synchronization to WinCE Contacts from the ‘File’ menu to open the Sync to WinCE options.
a) Click on Export to PDA to export data to the WinCE device.
b) Click on Import from PDA to import data from the WinCE device.
a) Click on the Sync with PDA button to set a match percentage between device and computer.
32 of 34
3) After initializing the sync function the ‘WinCE Sync’ dialog window will open.
a) Select ‘PC Major’, ‘PDA Major’ or ‘Sync’.
b) Set the minimum match (similarity) percentage desired.
c) Click on the OK button to synchronize the data.
PC Major
If a particular record is in both the computer and the
WinCE database and both records have a minimal
match percentage as stated, the system will
automatically set the record on the PDA to the one on
the computer.
PDA Major
If a particular record is in both the computer and the
WinCE database and both records have a minimal
match percentage as stated, the system will
automatically set the record on the computer to the
one on the PDA device.
Sync
If a particular record is in both the PC and the WinCE
database and both records have the minimal match
percentage as stated, the application will request
selection of which device should be the sync major.
(as seen to the right ¾)
**NOTE
The database images which have been synchronized will not show the OCR layout on the images, unless the
images are being processed again.
33 of 34
Synchronization with WinCE BCR
1) Connect the PDA device to the PC via the serial cable.
2) Select Synchronization to WinCE BizCard Finder (WINCE) from the ‘File’ menu to open the Sync to
WinCE options.
a) Click on Sync With BizCard Finder to browse and select a database file in the WinCE Visioneer BCR
software to be synchronized.
3) After selecting the desired database the BizCard Finder (WINCE) options window will open (similar to the
following window).
a) Select ‘PC Major’, ‘PDA Major’ or ‘Sync’.
b) Set the minimum match (similarity) percentage desired.
c) Click on the OK button to synchronize the data.
PC Major
If a particular record is in both the databases of the PC
Visioneer Business Card Software and the WinCE
Visioneer Business Card Software, and both records
have a minimal match percentage as stated, system
will automatically set the record on WinCE Visioneer
Business Card Software to the one on the PC
Visioneer Business Card Software.
CE Major
If a particular record is in both the databases of the PC
Visioneer Business Card Software and the WinCE
Visioneer Business Card Software, and both records
have a minimal match percentage as stated, system
will automatically set the record on the PC Visioneer
Business Card Software to the one on WinCE
Visioneer Business Card Software.
User Control
If a particular record is in both the databases of the PC
Visioneer Business Card Software and the WinCE
Visioneer Business Card Software, and both records
has a minimal match percentage as stated, system will
prompt out the following window, with the record in
WinCE Visioneer Business Card Software, and the
record in PC Visioneer Business Card Software.
34 of 34
(as seen to the right ¾)
**NOTE
The database images which have been synchronized will not show the OCR layout on the images, unless
the images are being processed again.