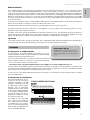
1
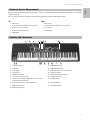
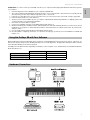
Introduction
Congratulations on your purchase of the M-Audio ProKeys 88, the complete all-purpose live stage piano, with additional MIDI
control. We strongly recommend that you read through this manual to learn about proper installation, operation and advanced
functionality before using this product.
What’s in the Box
Besides the product itself, the ProKeys 88 package will include the following items:
<
<
<
<
<
Software Driver CD (drivers and applications)
USB cable
Printed User Manual
Power supply (12V DC)
Sustain Pedal
If any of these items are missing, please contact the retail outlet at which you purchased this product.
ProKeys 88 Overview
The ProKeys 88 is a stage piano with 14 high-quality onboard sounds. M-Audio’s unique hammer-action keyboard design makes
for a realistic grand piano feel. It also functions as a useful MIDI controller for your sequencer or sound module.
We have designed the ProKeys 88 with live performance in mind. As such, the control interface is simplified, with all of the main
features accessible via a single button press. Advanced features such as digital effects and MIDI control messages can be edited
“on-the-fly.”
All connectors are 1/4” jack inserts allowing easy connection into a PA amplifier, mixer or other live sound setup.
The ProKeys 88 is able to start and stop playback from an external MIDI sequencer, as well as controlling sequence tempo. These
features have dedicated buttons giving you real-time control of a MIDI sequencer in a live situation
Before you start reading about the various features of your ProKeys 88, you should first familiarize yourself with some of the
terminology that is commonly used when describing these features.
Terminology
Edit Mode - Edit Mode describes the 3-second period after a function button has been pressed during which the parameters of
that function can be altered. The numeric keypad can be used to alter a parameter during this time. The LED display will flash
to show you that the displayed parameter can be edited. If an Edit Function Button has been pressed in error, you can press a
different Edit Function Button and re-trigger a new three-second time out period.
Normal Mode - Normal Mode describes the state of the device when no function buttons have been pressed. In normal mode,
the LED will display the program number that was last entered.
Function Buttons – These are the buttons to the left of the LED display. When any of these MIDI buttons or digital effects buttons
are pressed, your ProKeys 88 will enter Edit Mode.
Instrument – The ProKeys 88 comes with 14 built-in sounds that represent various instruments such as pianos, strings and bass.
The term “instrument” refers to one of the 14 internal sound programs. Different instruments are selected by pressing one of the
14 instrument buttons to the right of the LED display.
Split Mode – When the Split Button is pressed, your ProKeys 88 will enter Split Mode. In this mode, the keyboard is split into two
adjacent, non-overlapping zones. Each zone can have a different instrument assigned to it. Notes to the left of the Split Point will
control one instrument, and those notes to the right of the Split Point continue to control the previously selected instrument.
Layer Mode – When the Layer Button is pressed the device enters Layer Mode. In this mode, two instrument sounds can be
assigned across the entire keyboard range: the Main Instrument and the Layer Instrument. If Split Mode is also active, only the
keys to the right of the Split Point will have a Layered Instrument.
Main Instrument – This is the instrument that is selected when neither Split Mode nor Layer Mode is engaged.
Split Instrument – This refers to the instrument controlled by the keys to the left of the Split Point when Split Mode is active.
Layer Instrument – This refers to the second instrument that is controlled when Layer Mode is active.
3
English
Pro Keys 88 • User Guide
Performance Tips
The ProKeys 88 is capable of some very expressive and flexible sound
combinations. Through layering and splitting the instrument sounds
(which are described on pages 10-11 of this manual), and also transposing
and adjusting volumes and applying effects, you can create some very
unique performances. 10 examples are provided throughout this manual
that refer to the instrument names themselves to get you started exploring
and experimenting.
Performance Tip #1
The Jazz Trio – Select Piano 1 and then create a split
assigning the A. Bass program to the left side of the
keyboard. Layer the Bass with the Ride Cymbal and you
have a nice jazzy trio performance. Also, try substituting
Organ 1, E. Piano, Vibes, or FM Piano 1 or 2 for Piano 1.
Try substituting the E. Bass for the A. Bass as well.
Feature List:
Controls
<
<
<
<
<
<
<
<
<
32 buttons for various functions, modes and instrument access
12-key numerical data entry keypad
3 volume sliders for individual control of the split, layer and main instrument volume levels
2 rotary pots to control EQ for bass and treble
LED display
88-key hammer-action keyboard
Pitch Bend Wheel
Modulation Wheel
Selection of 3 velocity curves and 1 fixed velocity
MIDI Functions
<
<
<
<
<
<
<
<
<
Program Change
Bank LSB
Bank MSB
Channel (the channel can be set for the current main, left hand and layered instruments separately allowing these features
to be used with a MIDI synthesizer, module, or sequencer
MIDI Out from USB
Local On/Off
MIDI clock Start/Stop
Tempo Control for MIDI Clock Rate, with Tap Tempo
SPP (Song Position Pointer)
Audio Effects
< Reverb
< Chorus
Onboard Sounds
< 14 buttons for directly selecting any of the 14 instruments
< Split Function allows 2 simultaneous instruments on non-overlapping regions breaking at a Split Point
< Layer Function allows all keys to the right of a Split Point (if Split Mode is active) to play two instruments simultaneously across
the same keyboard region
< The Grand Piano Button will always select the default grand piano sound and cancel both Split and Layer Modes
< The Jazz Ride Button layers a ride cymbal sound over sounds 13 or 14 if they are active
< Independent volume and octave/transpose control of split and layer instruments
4
Minimum System Requirements
The ProKeys 88 is a stand-alone premium stage piano, which is also capable of being used as a MIDI controller with your compatible
computer software.I
If you are using your ProKeys 88 with a computer the following minimum system requirements apply:
PC:
Mac:
< USB 1.0 port
< USB 1.0 port
< 16-bit onboard sound chip or PCI sound card
< 16-bit onboard sound chip or PCI sound card
< Pentium processor or better
< G3 or better
< Windows 98, ME, 2000 or XP
< 256MB RAM
< 64MB RAM
Controls and Connectors
1
Instrument Buttons
11
MIDI Bank LSB Button
2
Split Button
12
MIDI Bank MSB Button
3
Layer Button
13
MIDI Clock Sequencer Control Buttons
4
Demo Button
14
Transpose Buttons
5
Digital Effect Buttons
15
Numerical Data Entry Keypad
6
Velocity Curve Select Button
16
Grand Piano Button
7
Volume Control Faders (Independent control of Main,
Split and Layer Instruments)
17
Jazz Ride Button
8
EQ Control Rotary Pots – Bass and Treble
18
Pitch Bend Wheel
9
MIDI Channel Button
19
Modulation Wheel
10
MIDI Program Button
5
English
Pro Keys 88 • User Guide
1
2
3
4
5
6
7
8
9
Power Switch (On/Off)
DC Power Supply Connector Plug – accepts a 12V DC power supply, center positive, 500mA
USB 1.0 Port – accepts a standard USB cable
MIDI Out Port – accepts a standard 5-pin DIN type MIDI cable
MIDI In Port – accepts a standard 5-pin DIN type MIDI cable
2 Foot Switch Inserts – accept standard switch-type pedals with 1⁄4” TS jack leads
Expression Pedal Insert – accepts a standard Expression Pedal with a 1⁄4” TRS jack
Stereo Audio Outputs – both the L and R inserts accept standard 1⁄4” TS jack leads. L output provides a MONO signal output.
Headphone Insert (under the 2 wheels) – accepts 1⁄4” TRS jack headphone plug
Before You Connect Your ProKeys 88...
The ProKeys 88 is a stand-alone digital piano and does not require a computer for operation. If you wish to use the MIDI controller
functions of the ProKeys 88 with your computer, please check the installation documentation below first.
Important: Do not connect the USB cable to a computer until instructed to do so in the installation instructions on page 7.
Your computer must have a USB port. The wide flat end of the included USB cable (A) connects to the USB port at the back or on the
side of your computer. Plug the square end of the cable (B) into the back of the keyboard.
This ProKeys 88 cannot use the USB cable to provide the keyboard with its power. You must power your ProKeys 88 using the
external power supply provided. If you wish to use an alternate power supply, ensure you choose one that meets the required
specifications.
The required power supply specifications are:
< 12V DC
< center positive
< 500mA
Driver Installation Procedure
Basic Installation
Because it is a class-compliant device, installing the ProKeys 88 on your Windows XP
or Mac OS X computer is simple and straightforward:
Use the supplied USB cable to connect the ProKeys 88 to a USB port on your
computer and you’ll be ready to go! You can do this while the computer is on or off,
and no driver installation is necessary.
Installing the Windows Multi-Client Driver
While class-compliancy offers easy setup and connection of the ProKeys 88, the
Windows class driver is deficient in that only one MIDI application, or program, can
use the ProKeys 88 at any given time. For many users, this is perfectly acceptable,
as they will only be using the ProKeys 88 to communicate with their host MIDI/audio
application.
Performance Tip #2
Dual Manual Organ – Select Organ 1
and then create a split assigning the Organ
2 Program to the left side of the keyboard.
Transpose Organ 1 down one octave and
Organ 2 up two octaves. Adjust their
volumes to taste and you have a great
split manual organ combination. Also
for a great, screaming organ patch, try
layering both organs and adding chorus
to Organ 1 only.
However, if you use multiple applications at once, including applications “ReWired” together (such as Ableton Live as a host and
Propellerhead Reason as a slave), you’ll need to install the Windows ProKeys 88 MIDI driver so both the host and ReWired application
can both be controlled from the ProKeys 88 simultaneously.
6
Pro Keys 88 • User Guide
1
2
Insert the Stage Piano Series CD-ROM into your computer’s CD-ROM drive.
The computer will automatically display the interactive menu. If your computer fails to launch the menu, manually start the
menu by clicking on Start > My Computer Stage Piano Series > autorun.exe.
3 Follow the on-screen directions to choose your product. Once you select your product, click “Install ” to begin copying files.
4 Follow the driver installer’s on-screen directions.
5 At various points in this installation process, you may be notified that the driver being installed is not digitally signed. Click
“Continue Anyway” to proceed with the installation.
6 Click “Finish” once the installer is complete.
7 Connect your new MIDI controller to an available USB port and switch it on.
8 Windows will identify the new MIDI controller and will display a “Found New Hardware Wizard.” If you have Service Pack 2
installed on your computer, you will be asked if you’d like to search the Internet for a driver. Please select “No, not this time”
and press “Next>.”
9 Choose “Install software automatically (recommended)” and click “Next.”
10 Once the wizard is completed, click “Finish.” You will see a message pop up that says “Your new hardware is installed and
ready to use.”
Using the ProKeys 88 with Your Software
When installed, the ProKeys 88 will appear in the computer as a simple MIDI device with one input port and one output port. You
will select the ProKeys 88 input port as the MIDI input device in your audio application. The application will then be able to read any
of the data transmitted by you from the ProKeys 88.
The MIDI ports have different names depending on whether you are using Mac or PC, and whether you’ve installed the Windows
Multi-client driver or not:
Input Port
Output Port
Mac OS X
USB ProKeys 88 Port 1
USB ProKeys 88 Port 1
Windows Class Driver
USB Audio Device
USB Audio Device
Windows Multi-Client Driver
USB ProKeys 88 In
USB ProKeys 88 Out
Hardware Connections
7
English
PLEASE NOTE: You cannot connect your new MIDI controller to your computer until the appropriate driver files have been copied to
your computer.
MIDI Connections
The MIDI connections allow you to connect external MIDI equipment such as synthesizers, tone modules and sequencers. The MIDI
In jack can be used to connect a secondary MIDI device to a computer, with your ProKeys 88 effectively acting as a USB-to-MIDI
interface. To use this feature, the ProKeys 88 must be connected to a computer using the USB port. The MIDI Out jack can be used
to connect your ProKeys 88 to a sequencer or an external synthesizer, allowing the ProKeys 88 to trigger the various sounds of the
synth or tone module.
The diagram below shows the internal MIDI connection:
Note: It is NOT possible to transfer MIDI information directly from the MIDI In port to the MIDI Out port.
Stereo Audio Outputs
These connections are used to send Left and Right audio signals from your ProKeys 88 to an external monitoring system. It is
designed for connection to a PA system or mixer in a live setup. If a MONO audio signal is required, use the Left output connection.
Note that Left Output-only connection will also cause the Headphone Output to be in MONO
Headphone Output
This allows easy connection of a pair of headphones.
The signal from this socket is the same signal as the stereo audio outputs.. Note that Left Output-only connection will also cause
the Headphone Output to be in MONO.
Note that the headphone output does not have a dedicated control for volume level, so the Master Volume fader should
be used.
USB Connection
The USB port allows your ProKeys 88 to be connected to a computer. Connection to a computer allows the keyboard to work with
software-based sequencers, synthesizers and modules. It also allows a secondary MIDI device connected to the MIDI In plug to
use the software-based applications on the computer.
How to Make Use of the Controls
Foot Switch Connections
(Only one foot switch is included with the product.)
These allow connection of two switch-type foot pedals. One such pedal is included with
your ProKeys 88. The pedals are used to control sustain and sostenuto effects. The Sustain
Pedal is used to hold a sound until it decays naturally, or until the pedal is released, while the
Sostenuto Pedal will only hold the sound from the keys that were depressed when the pedal
was engaged.
Performance Tip #3
New Age Setup 1 – Select FM
Piano 1 and layer it with the
Warm Pad. Split the keyboard
and assign the E. Bass on the left
side of the keyboard. Transpose
the FM Piano down one octave.
Add effects to your personal
taste. This is a great combination
for trance music.
On power up, the pedal is off. If the pedal is held down at power up, the pedal will work in reverse. This allows your ProKeys 88
to work with pedals of either polarity.
Note that not all of the instruments on the ProKeys 88 will respond to messages from the two footswitch Pedals.
If you are using the ProKeys 88 as a MIDI controller, the pedals also send MIDI controller messages when pressed. This enables
them to be used with a synthesizer that supports these messages. The sustain pedal will send controller number 64, while the
sostenuto pedal sends controller 66.
8
Pro Keys 88 • User Guide
Expression Pedal Connection
The Expression Pedal plug allows connection of a continuous controllertype pedal. Normally, these pedals are referred to as ‘Expression Pedals’
or ‘Volume Pedals.’ This pedal can be used to vary the overall volume of
Instruments that support this feature.
Note that all of the internal instrument sounds will respond to the
Expression Pedal.
If you are using the ProKeys 88 as a MIDI controller, the Expression Pedal
also causes MIDI Controller 11 Messages to be sent out. External MIDI devices
may not respond to controller 11 messages. Check the MIDI implementation
charts provided with your other MIDI equipment.
Performance Tip #4
English
(An Expression Pedal is not included with the product).
New Age Setup 2 – Select E.Bass and transpose it up
two octaves. Layer it with the E. Piano 1. Split the
keyboard and also assign the E. Bass on the left side of
the keyboard as well. Add effects to suit your taste. The
bell-like tones in the right hand offer a very ethereal
and unique tone. Add effects to suit your taste here as
well. Try substituting the FM Piano 1, or the Wurly
program (E. Piano 2) for the E. Piano 1 program for
some interesting variations.
Pitch Bend Wheel
The Pitch Bend Wheel is used to bend the pitch of a note up or down. The range of the Pitch Bend is not assignable. It will always
increase or decrease the sound by two whole steps (2 semitones).
Note that all of the internal instruments will respond to the Pitch Bend Wheel, except for the Ride Cymbal, which is not
affected by the Pitch Bend Wheel.
If you are using the ProKeys 88 as a MIDI controller, the Pitch Bend Wheel transmits MIDI Pitch Bend Messages as it is moved.
External MIDI devices may not respond to pitch bend messages. Check the MIDI implementation charts provided with your other
MIDI equipment.
Modulation Wheel
The Modulation Wheel controls either a vibrato or tremolo effect assigned to the instrument you are currently playing.
Note that not all of the internal instruments will respond to the Modulation Wheel. Piano 1 & 2, Clav, Strings, Warm Pad,
Basses, and Ride Cymbal will not respond to the Modulation Wheel.
If you are using the ProKeys 88 as a MIDI controller, the Modulation Wheel transmits MIDI Controller Message 1 as it is moved.
External MIDI devices may not respond to Controller 1 Messages. Check the MIDI implementation charts provided with your other
MIDI equipment.
Volume Faders
There are three Volume Faders – Master, Split, and Layer. The Master volume fader controls the overall volume of the ProKeys 88.
The Split fader controls the volume of the split instrument and the Layer fader controls the volume of the layer instrument. Split and
layer faders transmit MIDI controller 7 messages and the Master volume fader transmits a master volume sysex message
Equalizer Rotary Knobs
The Equalizer Knobs allow EQ control of the treble and bass of the main audio output separately. The treble and bass can be
cut by -12dB or boosted by +6dB (a total range of 18dB is provided) by turning the pot to the left or right of its center detent point,
respectively. Note that EQ control changes are not sent via MIDI.
The Treble Knob will control the high frequencies of the overall sound from your ProKeys 88. Increasing or decreasing the high
frequencies will make the overall sound more ‘tinny’ or ‘dull.’
The Bass Knob will control the low frequencies of the overall sound from your ProKeys 88. Increasing or decreasing the low
frequencies will make the overall sound ‘boomier’ or ‘less full.’
Instrument Buttons
These are 14 buttons that give direct access to the 14 instruments. When pressed, the LED will light to indicate that instrument is
selected and the keyboard is playing that instrument.
It is possible to alter the instrument’s octave, transpose setting, and MIDI channel by holding down the instrument’s button and
pressing the relevant function buttons accordingly. Octave and Transpose Functions are described in more detail on page 11.
If you are using the ProKeys 88 as a MIDI controller, when an Instrument Button is pressed a MIDI Program Change with Bank LSB
and MSB Messages will be sent out.
This Program Change defaults to Bank MSB 0, LSB 0 and Program Change 0, 1, 2, 4, 5, 7, 8, 11, 16, 17, 32, 33, 48, 89, and 119,
respectively. However, you can alter the assignment of what Bank and Program Changes are transmitted out over MIDI by pressing
the two MIDI buttons (Bank LSB and Bank MSB) together (labeled “STORE”). Store is described on page 12.
The 14 instrument programs have been assigned to the appropriate GM program numbers to comply with GM level 1.
9
Split Button
The Split Button will split the keyboard to allow 2 different instruments to be assigned to
two non-overlapping adjacent regions and played at the same time. When this button is
pressed, the LED above it will light up. The default left hand instrument will be Acoustic Bass
(Sound 13). When Split Mode is engaged, the LED above the A Bass Sound button will flash
for three seconds to indicate that it is the Split Instrument, and the LED above the Instrument
Button that is the Main instrument will remain lit, but will not flash.
Once the three-second time-out period has passed, the Split Instrument’s sound button will
stop flashing, and you will see that two Instrument Buttons have their LEDs lit, representing
the active instruments.
Performance Tip #5
Octave Synth Harpsichord – Layer
the Clav with itself and transpose
one of the parts up one octave and
add effects if you like. Try this
with other instruments such as
Pianos or Strings.
Pressing a subsequent Instrument Button will select that instrument as the Split Instrument and leave the Main Instrument
unchanged.
While Split Mode is engaged, it is not possible to edit the Main Instrument. To change the Main Instrument it is necessary to disable
Split Mode, by pressing the Split Button again. Once Split Mode is re-enabled, the last instrument selected for the Split Instrument
is recalled.
How to Change the Split Point - It is possible to alter the Split Point by holding down the Split Button. The LED will then flash
to indicate the current Split Point. The user can then alter the Split Point by pressing the desired key on the keyboard. The Split
Instrument keyboard region will include the note pressed when setting the Split Point.
Layer Button
The Layer Button engages Layer Mode. It works in the same way as the Split Button, in that the keyboard controls two Instruments
that reside across the entire keyboard region if Layer Mode is active. All keys across the keyboard will now control both the Main
Instrument and the Layer Instrument.
It is possible to have both Layer and Split Mode active at the same time. The Split Instrument will be assigned from the bottom left
key to and including the Split Point, and the layered programs (Layer and Main Instruments) will be assigned across the rest of the
keyboard starting from the key to the right of the Split Point.
Grand Piano Button
The Grand Piano Button will override any splits and layers that may be present and selects the default Grand Piano (Piano 1)
Program.
It is possible to assign and store reverb and chorus parameters to the Grand Piano button the same way as with any of the
Instruments. Effect settings are remembered across power cycles. This feature allows you to set up your ultimate piano sound and
always be able to access it with a single button press.
If you are using your ProKeys 88 as a MIDI controller, Program 0, Bank LSB 0 and Bank MSB 0 are sent out when this button is
pressed. This would access Grand Piano on any GM-compatible synth or module.
Demo Button
When the demo button is pressed, the LEDs above all the sound buttons will flash to indicate that the user should select a sound.
Once selected, the demo will play for that instrument.
For example, there are 14 demos in total. Pressing DEMO followed by Sound button 3 will trigger demo 3 with the sound that is
selected by Sound button 3.
You must manually press the demo button again after hearing the demo you’ve selected to exit the demo mode or the next demo
will begin approximately 4 seconds later. The demos will continue to play consecutively until all 14 demos have played through
once.
Jazz Ride Button
The Jazz Ride Button will add a Ride Cymbal Layer over the top of Sounds 13 and 14 if they are active. This adds a jazzy feel to the
overall sound. Effectively, this is a 15th instrument. However, this instrument is “dry” in that no effects can be assigned to it.
Velocity Curve Button
There are four velocity curves – Hard, Medium, Soft, and Fixed. This button toggles between the four types. Unlike the digital effect
buttons there is no ‘off.’ The Fixed Velocity setting will have a constant velocity of 100 when a key is pressed.
The default curve selected is Medium.
10
Pro Keys 88 • User Guide
Octave/Transpose/Master Tuning
Performance Tip #6
English
When pressed separately, these two Octave/Transpose buttons are used to
transpose the keyboard by a semi-tone with a maximum of 12 notes up or down
from 0. If pressed together, they will alter the octave range of the keyboard (skips
12 notes per press). The maximum Octave Shift is three up or down from zero. This
parameter does not wrap around. You will need to use either of the transpose + or
- buttons to return to zero. To adjust the Master Tuning, first press and hold the 0
button on the numeric keypad for about a second until three dots appear. Continue
to hold the 0 button and use the Octave/Transpose buttons to adjust the Master
Tuning up or down. The maximum tuning range is +/- 99 cents (+/- 1 semi-tone).
Adjusting the Master Tuning will affect all instruments and will be remembered
across power cycles. The Master Tuning can be adjusted whether the keyboard is
in single, split, or layered modes using the same procedure.
Classic Pop Ballad – Select E. Piano 1
and layer it with Strings. Turn the String
volume down about one third. Split the
keyboard and assign the same E. Piano 1
program to the left side of the keyboard.
You have created a combination that has
the E. Piano across the entire keyboard
range with chorus only on part of the
keyboard, and a layer of Strings that
doesnʼt interfere with the bass notes. Try
substituting Piano 1, or any of the FM
Pianos. You can also try substituting the
Warm Pad for the Strings. While youʼre at
it, try transposing the Strings up an octave
as well.
What About When Split and Layer Mode are Active? - The Octave and Transpose
if
Features affects ALL of the active instruments at the same time. This means that
the Split or Layer Modes are active, all 3 of the active instruments will be affected
by the Octave Shift or Transpose. However, it is possible to alter the Octave or
Transpose of any instrument independently by holding down the instrument’s button respectively, and pressing the Transpose +
and - Buttons as appropriate. If editing an Instrument’s octave in this way, the maximum octave shift is 10 octaves either way.
If you have already reached the bottom-most or top-most note, subsequent octave shifts will have no effect, as this parameter
does not wrap either. You will need to use the Transpose + or - Buttons to return to 0.
Note that the maximum transpose shift is always 12 notes in either direction.
If you are using the ProKeys 88 as a MIDI controller, these buttons will also affect the note on that is sent out of the MIDI out
ports.
Digital Effects Buttons
Pressing either of these buttons allows selection of the type of the corresponding effect (Reverb-type or Chorus-type, respectively).
< Effect Type
When you press one of these buttons, the effect will turn on, and the currently assigned effect number is displayed on the LED
display. The selected effect type can be altered using the numeric keypad and ‘+’ or ‘-‘ buttons.
The available effect types are:
Chorus:
Reverb:
Pressing either Effect Button again turns the effect off.
Slow
Stage
Fast
Hall
If you turn an effect on, the effect is always applied across the entire keyboard to all active
instruments, but all instruments will maintain their separate send levels into each effect.
Church
< Effect Depth (amount)
When a digital effect button is pressed and held, the LED will display the current send setting for that effect. The send level defines
the amount of wet signal heard. A value of 64 is an equal level for the wet and dry signals. This is the default or “midway” setting
for any unedited effect send level. A value of 127 is fully wet (no dry signal), while a value of 0 is fully dry (no effect at all).
The default depth has been set for each program, and will vary with each program.
< Storing Effect Settings for Each Individual Instrument
It is possible to store the digital effect set up for each of the 14 Instruments. The effect’s type, depth and state (on/off) for both
reverb and chorus can be stored. This is achieved as follows:
• Ensure Layer and Split Mode are both OFF.
• Press the instrument button to select the instrument effect setting you want to edit. The instrument is therefore now selected
as the Main Instrument.
• Any digital effect settings you make are automatically stored and will be recalled next time you press that Instrument
button.
These settings remain assigned even when the ProKeys 88 is powered down so you need only set up the effects for each
instrument once.
With Split and/or Layer mode active, if you edit the Digital Effect settings, the changes you make will affect the Main Instruments.
It is only the settings of the main instrument that will appear updated. When you then recall that instrument again as the main
instrument, the appropriate effects settings are recalled. The Layer or Split instrument’s effect settings will not be changed.
The ProKeys 88 can receive MIDI controller messages for the Reverb and Chorus effects.
11
The numbers are as follows:
91 – Reverb Level
92- Reverb Type Select (0,1, 2)
93 – Chorus Level
94 – Chorus Type Select (0, 1)
Digital effects are sent out over MIDI, using controller messages 91 for reverb, and 93 for chorus Because ProKeys always sends
the current effect values, it can be used to control the reverb/chorus amount in any midi device that can receive these controllers.
Programs will maintain their correct effects when responding to incoming MIDI information as the settings are stored with the
programs.
MIDI Control Section
The buttons in this section only have relevance if you are using your
ProKeys 88 as a MIDI controller.
Program Button
Performance Tip #7
Supreme Pad – Try layering the Strings and Warm Pad
for a lush, full pad. Try transposing the Strings or Synth
Pad up or down an octave and adjusting the volumes of
each to change the timbre.
When the Program Button is pressed, the LED display will flash the
currently assigned program number. The default number is 000, which
will select a Grand Piano sound in GM-compatible MIDI equipment.
After pressing the program button, pressing the (+) or (-) button will send the program change immediately.
For more information on Program Changes, please see page 14.
Bank LSB/MSB Buttons
These buttons have an identical use to the Program Button except that they send Bank LSB or Bank MSB Messages respectively.
These messages are used to select different banks of programs in your MIDI device. As with the Program Button, Bank Messages
are sent immediately.
Channel Button
This alters the transmit channel of the keyboard. The channel is not updated until a valid entry has been made and normal mode
resumes. When the Channel Button is pressed, note- off messages for all notes are sent out to prevent a “stuck-note” situation
where a note off is sent to a new channel for a note on sent on the previous channel (which causes a hanging note that never ends
until you power down).
If the Layer or Split Button is held down when the Channel button is pressed the channel entered will also become the transmit
channel of the Layer or Split Instruments accordingly.
Default channels are: Main on 1, Split on 2 and Layer on 3. The Ride is always transmitted on channel 10.
If you are using the Layer and Split Buttons to control three instruments at the same time in your MIDI device, you must always
ensure the channel assignment for each of the Layer, Split and Main Instruments differ.
Local On/Off Dual Buttons
Pressing the Channel and Program Buttons at the same time toggles the Local Mode on and off. When these buttons are pressed
at the same time, the LED will display ‘on’ or ‘off’ accordingly. The default setting is ‘on.’
If Local is turned off, the keyboard will no longer play the internal audio instrument sounds, but can still be used to play the sounds
of external MIDI synthesizers. However, the internal audio continues to be accessible via external MIDI messages from external
sequencers.
MIDI Out from USB Dual Buttons
Pressing the Program and Bank LSB Buttons at the same time toggles MIDI Out from USB Mode on and off. If this mode is active,
the MIDI Out port transmits MIDI data received at the USB port instead of MIDI data that is generated internally by the device . As
with the local buttons, the LED will display ‘on’ or ‘off’ as these buttons are pressed at the same time.
Store
Pressing the Bank LSB and Bank MSB Buttons at the same time allows you to store the current Program, Bank LSB, and Bank MSB
Messages to an Instrument Button. This means that when that Instrument Button is pressed it will send out these MIDI messages.
When the Store Buttons are pressed, the device enters Edit Mode, and the LED’s above the 14 Instrument Buttons will flash to indicate
that you should select one for storage. Once an Instrument Button is pressed, normal mode resumes. If no Instrument Button is
pressed once the edit mode period of three seconds has expired, Normal Mode resumes with no change to any of the Instrument’s
currently assigned Program and Bank values.
Note: Although the Program, Bank LSB and Bank MSB Messages that are transmitted when these buttons are pressed can be
altered, this does NOT affect the Program Change required to access the 14 internal sounds from an external MIDI device.
12
Pro Keys 88 • User Guide
The four MIDI Clock Buttons (from left to right respectively) are Start, Stop and the two Tempo buttons, ‘-’ and ‘+.’ These buttons allow
you to control any MIDI-connected external MIDI sequencer. For this to be possible, you need to set your external sequencer to
“slave mode” to synchronize to incoming MIDI Clock Messages. Different hardware and software MIDI applications have different
methods of setting up synchronization. Please consult the user documentation for your MIDI applications to determine exactly how
MIDI Clock synchronization is achieved. It is not possible to transmit MIDI Time Code (MTC) data from the ProKeys 88, only MIDI
Clock (MC). Please note that if you want to use the ProKeys 88 to control your MIDI application, the application must support MIDI
Clock synchronization.
The ProKeys 88 is not able to respond to external MIDI Clock Messages sent from a different device. In other words, the ProKeys 88
always acts as the “master” clock device to which other devices will “slave” for sync.
Pressing Start Button will cause the external sequencer to begin playback from the current song position.
Pressing the Stop Button will cause a sequencer to cease playback. It is also possible to reset the sequencer back to a ”zero”
playback position by pressing this button twice.
The Tempo Control varies the rate at which MIDI Clock Messages should be sent out. This determines the tempo at which your
sequencer plays back. When either button is pressed, the new tempo in BPM (beats per minute) will be displayed on the LED
display. The default tempo is 120BPM. For more information on MIDI Clock commands, please see page 14.
Tap Tempo
It is possible to tap in a tempo using the Sustain Pedal. This is achieved by holding down both the Tempo Buttons and tapping on
the Sustain Pedal. The rate at which the timing clock messages are sent will be updated every four taps.
Examples
The ProKeys 88 as a MIDI Controller
First and foremost, the ProKeys 88 MIDI controls allow you to access
sounds and banks of sounds on an external synth and control the starting,
stopping and speed of an external sequencer.
Performance Tip #8
Hybrid E. Piano – Try layering the Wurly (E. Piano 2)
with the Clav for a unique timbre. Turn down the Clav
volume one third and add chorus to give the sound more
animation.
Since the 14 Instrument Buttons can have a Program value and Bank
number assigned to them, it is possible to set up the Instrument Buttons
to access your favorite sounds on an external synth.
Note that the range of Program and Bank Message values is 000-127. The range of MIDI channels is 1-16.
It is also possible to set the MIDI channel that any instrument is transmitting on. When you press the Split Button or Layer Button, the
second instrument is assigned a different channel from the main instrument. This allows you to control up to three MIDI instruments
at the same time. These assignments are remembered across power cycles.
In order for you to control different MIDI instruments at the same time, you must always ensure the instruments are not assigned
to the same MIDI channel.
The ProKeys 88 as a Synthesizer
The 14 internal instruments of your
ProKeys 88 can be accessed by
sending a ‘Bank MSB 1 or 0’ MIDI
message to any MIDI In port, and
an appropriate Program Change
Message, with an appropriate
Program number as seen on page
18. This will not change, regardless
of the Program and Bank number
that the user assigns to be sent out
by any of the sound buttons used to
access the internal sounds.
For example to access the Grand
Piano sound on the ProKeys 88
from a MIDI keyboard connected
to the MIDI In port of your ProKeys
88, you should send Program 000,
Bank LSB 000, Bank MSB 001 from
the connected MIDI keyboard.
13
English
MIDI Clock Buttons
Program/Bank Changes Explained
The original GM or “General MIDI” specification allowed for only 128 voices,
numbered from 0-127. It is possible to access any of these different voices
by sending a Program Change Message.
Performance Tip #9
Edgy Bass – Try layering the Clav and E. Bass. Add
chorus to animate the sound. This combination is great
for grooving. Try layering the A. Bass and the Clav and
reducing the A. Bass volume by one third for a cool full
keyboard comping sound.
In order to expand on the GM set of voices, Bank Changes were devised.
Each bank contains 128 patches, which can be accessed using a Program
Change. There are 16,384 banks available, each accessible by sending a
14-bit Bank Change Message. The first 7 bits of this message are sent in a
single byte known as the Bank LSB. The last 7 bits are specified by another byte known as the Bank MSB. The Bank LSB is the most
commonly used This allows for 128 Bank Changes, and often there is no need to send a Bank MSB.
You will find almost all MIDI devices respond to Program Change Messages, but some that do not conform to the GM set of voices
might use the Program Change Message for another purpose. Many VST or software-emulated instruments have adopted this
approach, allowing you to send a Program Change in order to change an instrument patch. The FM7 software synth by Native
Instruments is a good example of this
Bank Changes are more rarely used, although they do exist. Bank Changes are useful in many manufacturer’s built-in extensions
to the MIDI specification, such as Roland’s GS or Yamaha’s XG specifications. Both of these require you to specify a Bank Change, in
order to access the extra voices and effects that these specifications provide.
Sending Program, Bank LSB and Bank MSB data is made simple using the ProKeys 88. Simply press the Program, Data LSB or Data
MSB button and enter the Program or Bank Change you wish to send.
MIDI Clock Explained
As described above, the ProKeys 88 is able to control playback of a
sequencer when the sequencer is connected to one of the MIDI out ports.
This is achieved using MIDI Clock.
This method of synchronization is part of the GM specification.
The system real-time messages described below can be sent at any time.
They are assigned a high priority in the MIDI data stream to ensure timing
is maintained as accurately as possible.
Performance Tip #10
Spacey Split – Select the FM E. Piano 2 program and
layer it with the Vibes. Transpose both of them down one
octave. Split the keyboard at B3 and assign the Warm Pad
to the left side of the program. Transpose the Warm Pad
up three octaves. Play pad chords with your left hand and
leads with your right. Try substituting the FM Piano 2
with other keyboard programs. Also, try substituting the
Warm Pad with the Strings program.
Timing Clock Byte (F8h)
The Timing Clock Byte (F8h) is sent at a rate of 96 per note. So, if your ProKeys 88 has a tempo setting of 120 BPM, the timing clock
should be sent 192 times per second (2 X 96). For a tempo setting of 100 BPM, the Timing Clock Byte should be sent 160 times per
second.
Continue Byte (FBh)
When the Start Button on your ProKeys 88 is pressed, a Continue Byte (FBh) is sent, followed by a regular stream of MIDI timing
clocks (F8h). The rate at which these timing clock messages are sent is determined by tempo setting. The timing clock messages
will continue until the Stop Button is pressed.
Stop Byte (FCh)
When the Stop Button is pressed, your ProKeys 88 sends a Stop Message (FCh). If the Stop Button is pressed twice in close
succession, a SPP (Song Position Pointer) Message of 0 is sent, to reset the sequencer back to the beginning. This is achieved by
sending the SPP (F2h) followed by 0 (00h).
Troubleshooting
The ProKeys 88 has been designed to give you high performance and professional quality audio. It has been tested under a wide
range of systems and operating conditions. However, there are a virtually limitless number of operating scenarios, any of which
may affect your system’s performance. Though this section cannot cover all possible issues you may encounter, we would like to
offer you some suggestions for dealing with common problems.
We recommend that you avoid connecting too many devices to your computer at the same time. The more devices you have
connected to the computer, the greater the load on the computer’s CPU. Although it is possible in theory to chain multiple USB
devices, doing so may degrade your system’s performance.
14
If you are experiencing clipping or distortion:
• Turn the volume faders down. You may be overloading the device you have connected the ProKeys 88 to.
• If you are recording the audio from your ProKeys 88 on a computer, the distortion may be due to the audio settings of your
computer’s sound card. This can be corrected by increasing the audio buffer size on your soundcard.
My M-Audio hardware suddenly stopped working after having performed fine since installation.
• Switch off the unit and leave for 10 seconds. Then restart your computer and try again. If the problem persists, you may have
to re-install drivers for the unit. The latest drivers are available at http://www.m-audio.com.
I have plugged in a Sustain Pedal to my M-Audio keyboard, but it works the wrong way.
• The polarity of the Sustain Pedal is determined by the keyboard when it is powered up. On power up, the Sustain Pedal is
assumed to be in the OFF position. So, if you want the Sustain Pedal to be off when it is not pressed, make sure the pedal is
not pressed when you power up.
When I press a key, there is a delay before I hear any sound.
• This delay is known as latency. Latency with MIDI signals is due to the soft-synth you are using. MIDI data is simply control
data. The MIDI is read by the soft-synth. The soft-synth then completes a large number of complex calculations in order to
produce the sound you hear. All this takes time. If you already have an adequate sound card, try re-installing the latest
drivers for the sound card, or try reducing the buffer sizes of the audio drivers.
• If you feel that you may need a new or upgraded soundcard, please visit http://www.m-audio.com.
Contact
If you have any questions, comments or suggestions about this or any M-Audio product, we invite you to contact us by using the
following information:
M-AUDIO U.S. 5795 Martin Road, Irwindale, CA 91706-6211, U.S.A.
M-AUDIO Deutschland (Germany) Kuhallmand 34, D-74613 Ohringen, Germany
Sales Information: . . . . . . . . . . . . . . . . . . . . . . . . . . . . . . . . . . . . . . . . . . .626-633-9050
Sales Information: . . . . . . . . . . . . . . . . . . . . . . . . . . . . . . . . . . . . . . +49 (0)7941 987000
Sales (fax): . . . . . . . . . . . . . . . . . . . . . . . . . . . . . . . . . . . . . . . . . . . . . . . . . . 626-633-9070
Sales Information (email): . . . . . . . . . . . . . . . . . . . . . . . . . . . . . . . . . [email protected]
Sales Information (email): . . . . . . . . . . . . . . . . . . . . . . . . . . . . . . . [email protected]
Technical Support: . . . . . . . . . . . . . . . . . . . . . . . . . . . . . . . . . . . . . +49 (0)7941 9870030
Tech Support (email):. . . . . . . . . . . . . . . . . . . . . . . . . . . . . . . . [email protected]
Technical Support (email): . . . . . . . . . . . . . . . . . . . . . . . . . . . . . [email protected]
Tech Support (fax): . . . . . . . . . . . . . . . . . . . . . . . . . . . . . . . . . . . . . . . . . .626-633-9060
Technical Support (fax): . . . . . . . . . . . . . . . . . . . . . . . . . . . . . . . . +49 (0)7941 98 70070
Internet Home Page: . . . . . . . . . . . . . . . . . . . . . . . . . . . . . .http://www.m-audio.com
Internet Home Page: . . . . . . . . . . . . . . . . . . . . . . . . . . . . . . . . http://www.m-audio.de
M-AUDIO U.K. Floor 6, Gresham House, 53 Clarendon Road, Watford, WD17 1LA, United Kingdom
M-AUDIO Canada 1400 St-Jean Baptiste Ave. #150, Quebec City, Quebec G2E 5 B7, Canada
Sales Information (phone): . . . . . . . . . . . . . . . . . . . . . . . . . . . . . . . 44 (0) 1923 204010
Technical Support (e-mail): . . . . . . . . . . . . . . . . . . . . . . . . [email protected]
Sales Information (fax): . . . . . . . . . . . . . . . . . . . . . . . . . . . . . . . . . .44 (0) 1923 204039
Technical Support (PC): . . . . . . . . . . . . . . . . . . . . . . . . . . . . . . . . . . . . . . (418) 872-0444
Sales Information (email): . . . . . . . . . . . . . . . . . . . . . . . . . . . . . . . [email protected]
Technical Support (Mac): . . . . . . . . . . . . . . . . . . . . . . . . . . . . . . . . . . . . 1-800-638-2120
Technical Support (PC): . . . . . . . . . . . . . . . . . . . . . . . . . . . . . . . . . . .44 (0) 1309 671301
Technical Support (fax): . . . . . . . . . . . . . . . . . . . . . . . . . . . . . . . . . . . . . . (418) 872-0034
Technical Support (Mac): . . . . . . . . . . . . . . . . . . . . . . . . . . . . . . . . . 44 (0) 1765 650072
Sales (e-mail): . . . . . . . . . . . . . . . . . . . . . . . . . . . . . . . . . . . [email protected]
Technical Support (email): . . . . . . . . . . . . . . . . . . . . . . . . . . . [email protected]
Sales (phone): . . . . . . . . . . . . . . . . . . . . . . . . . . . . . . . . . . . . . . . . . . . . . . (866) 872-0444
Internet Home Page: . . . . . . . . . . . . . . . . . . . . . . . . . . . . . .http://www.maudio.co.uk
Sales (fax): . . . . . . . . . . . . . . . . . . . . . . . . . . . . . . . . . . . . . . . . . . . . . . . . . . (514) 396-7102
Internet Home Page . . . . . . . . . . . . . . . . . . . . . . . . . . . . . . . . . http://www.m-audio.ca
M-AUDIO France Floor 6, Gresham House, 53 Clarendon Road, Watford, WD17 1LA, United Kingdom
M-AUDIO Japan (株式会社エムオーディオジャパン)460-0002 愛知県名古屋市中区丸の内 2-18-10
テクニカルサポート : . . . . . . . . . . . . . . . . . . . . . . . . . . . . . . . . .052-218-0859
テクニカルサポート
(Macintosh): . . . . . . . . . . . . . . . . . . . . . . . . [email protected]
テクニカルサポート
(Windows): . . . . . . . . . . . . . . . . . . . . . . . . . . [email protected]
Fax: . . . . . . . . . . . . . . . . . . . . . . . . . . . . . . . . . . . . . . . . . . . .052-218-0875
ホームページ : . . . . . . . . . . . . . . . . . . . . . . . . . http://www.m-audio.co.jp
15
English
Pro Keys 88 • User Guide
Technical Info
Caution: Electro Static Discharge, Electrical Fast Transient and Conducted RF interference may cause the unit malfunctioning. In
such case, unplug the unit and plug it in again to restore normal operation.
Note: Your M-Audio ProKeys 88 has been tested to comply with FCC Standards FOR HOME OR OFFICE USE. Modifications not
authorized by the manufacturer may void users authority to operate this device.
Note: This equipment has been tested and found to comply with the limits for a Class B digital device, pursuant to Part 15 of the
FCC Rules. These limits are designed to provide reasonable protection against harmful interference in a residential installation.
This equipment generates, uses and can radiate radio frequency energy and, if not installed and used in accordance with the
instructions, may cause harmful interference to radio communications. However, there is no guarantee that interference will not
occur in a particular installation. If this equipment does cause harmful interference to radio or television reception, which can be
determined by turning the equipment off and on, the user is encouraged to try to correct the interference by one or more of the
following measures:
<
<
<
<
Re-orient or relocate the receiving antenna.
Increase the separation between the equipment and receiver.
Connect the equipment to an outlet on a circuit different from that to which the receiver is connected.
Consult the dealer or an experienced radio/ TV technician for help.
ASIO is a trademark of Steinberg Soft– und Hardware GmbH.
VST is a trademark of Steinberg Soft– und Hardware GmbH
ESD and Fast Transient may cause the unit to temporarily malfunction. Switch off and on again to restore normal operation.
ProKeys 88
Tested to comply with
FCC standards
FOR HOME OR STUDIO USE
Specifications
������� �� ��������� ��������������
�������
������ ����
�����
��� ������ ������������
��������������� �����
������� �����
��� � �
��������� ��������
���������
�������
������� ����������
������ ����������
������ �������� ���� � ������
���������� ���� �� �����
���� ����
��� ������
������ ���������
������� ���������
������� ���� �� ����
�� ����
�� �� ��� ����
���� �������
��������� ����
16
Pro Keys 88 • User Guide
English
Appendices
Appendix A
MIDI Implementation Chart for the ProKeys 88
��������
�����������
��������
Basic :Default
Channel:Changed
1-16
1-16
0
:Default
Mode :Messages
:Altered
--------X
*********
0
Note
Number:True Voice
0-127
*********
0
Velocity: Note ON
: Note OFF
0
X
0
After : Keys
Touch :Ch’s
X
X
X
Pitch Bend
0
0
0
0
0
0
0-127
*********
0
System Exclusive
X
X
Song Position
Common:Song Select
0
X
X
System :Clock
Exclusive:Commands
0
X
X
Aux
Messages
0
X
X
X
X
0 = YES
X=NO
Control
Change
0-119
120-127
Program
Change:True Number
Notes:
:Local ON/OFF
:All Notes OFF
:Active Sense
:Reset
�������
17
Appendix B
GM Program Numbers in Bank 0
�����
����
����
����� �������
� �������� ����� �����
� ������ �������� �����
� �������� ����� �����
� ����� ���� �����
� �������� ����� �
� �������� ����� �
� �����������
� ��������
�� �������� ����
�� �������� ��������
����
�� �������� ������ ����
�� �������� ����
�� ���� ���� �
�� ���� ���� �
�� ��� ���� �
�� ��� ���� �
�� ������� ���
�� ���� ���
�� ����� ���
�� �������� ���
�� ����
�� ������� ����
�� �������
�� ��������
�� ��� ����
�� ��� ����������
�� ��� �������
�� ��� ����������
��� ��� ����������
��� ��� �������
��� ��� ������
��� ��� ������
��������� ����������
�����������������
����
������
� �������
� ������������
�� ����� ���
�� ����������
�� �������
�� ���������
�� ������� �����
�� ��������
�� ������
�� �����
�� �����
�� ����������
�� ������� �������
�� ��������� �������
�� ���������� ����
�� �������
�� �������
�� �����
�� ��������
�� ��� �����
�� ������ ����
�� ����������
�� �������
�� �������
��� �����
��� �����
��� ��������
��� ����
��� �������
��� ��� ����
��� ������
��� ������
�����
��������
����� ����
����������
�� ������� �����
�� ���������� �����
�� ���� �����
�� ������ �����
�� ���� �����
�� ���������
�� ���������
�� ����� ���������
�� ������ �������� �
�� ������ �������� �
������
�� ��� ������� �
�� ��� ������� �
�� ����� ����
�� ����� ����
�� ��� �����
�� ���������� ���
�� ��� ������ ����
�� ��� �������� ����
�� ��� ��������
�� ��� �����
�� ��� �������
�� ��� �����
�� ��� ������ ��������
����
�� ��� ����� � ����
��� ������ ����
��� �����
��� ����� �����
��� ���������
��� ����� ����
��� ������� ���
��� ��� ����
��� ������� ������
������
�����
����� ���
����� �������
�� ����� ��������
�� ����� ��������
�� ���� ��������
�� ����� ��������
�� ����� ��������
�� ���������
�� ���������
�� ���������
�� �������
�� ��������
�� ����
�� ����� �������
�� ������ ����
�� ����� �������
�� ��� ����� �
�� ��� ����� �
�� ��� ��� ��� ���
�� ���� ��� ���
�� ��������� ��� ���
�� ����� ��� ���
�� ����� ��� ���
�� ����� ��� ���
�� ���� ��� ���
�� ����� ��� ���
��� ������ ���� �����
��� ������ �����
��� ��������
��� ���� �����
��� ��������� ����
��� ����������
��� ��������
��� ��� ����
Warranty
Warranty Terms
M-Audio warrants products to be free from defects in materials and workmanship, under normal use and provided that the product
is owned by the original, registered user. Visit www.m-audio.com/warranty for terms and limitations applying to your specific
product.
Warranty Registration
Thank you for registering your new M-Audio product. Doing so immediately both entitles you to full warranty coverage and helps
M-Audio develop and manufacture the finest quality products available. Register online at www.m-audio.com/register to receive
FREE product updates and for the chance to win FREE M-Audio gear.
050523_PK88_UG_EN01
18