1
User Manual
DVR5100
DVR7100
English
HIGH DEFINITION DIGITAL VIDEO RECORDER
AUSTRALIA
- Philips Manufacturers Warranty for Australia only
These Warranty conditions are valid for the following consumer electronics products: Colour Televisions,
Projection TV, Plasma & LCD TV, DVD Players, DVD Recorders, DVD Recorders with HDD, Personal Video
Recorders, Audio Systems, Home Theatre systems, Digital Set Top Box, Digital Photo Display, MP3 players &
Portable Audio products.
The benefits given to the purchaser by this warranty are in addition to all other rights and remedies, which the
purchaser has in respect of the product under the Trade Practices Act or other Commonwealth or State Law.
Philips Consumer Electronics warrants its products to the purchaser
as follows and subject to the stated conditions.
This warranty does not
cover:
U
1 Year Free Repair Service – at Philips ASC
U
Colour Television, Plasma Television, LCD Television, Projection Television
DVDR/VCR Combo, DVD Recorder with Hard Drive, Personal Video Recorder,
LCD Projector, Wireless Audio System, Audio System, Home Theatre System &
Digital Photo Display (Photo Frame) & Digital Set-Top-Box.
a)
Mileage or travel outside the
normal service area covered by
selected Authorised Service
Centre.
1 Year Free Replacement – at your Retailer
b)
Service costs arising from failure
to correctly adjust the controls of
the product or to observe the
instructions, or inspections that
reveal that the product is in
normal working order.
c)
Product failures caused by
misuse, neglect, accidental
breakage, transit damage,
inexpert repairs or modification
by un-authorised persons,
external fires, lightning strikes,
floods, vermin infestation or
liquid spillage.
U
Portable Audio, MP3 players, DVD Players, DVD/VCR Combo Players,
DVD Recorders without HDD & Portable DVD/LCD players.
Conditions of Repair Warranty
U
1.
All claims for warranty service should be made to your nearest Philips Authorised
Service Centre or the Philips Technology Care Centre. Reasonable evidence of
date of purchase must be provided.
2.
This warranty extends only to defects in material or workmanship occurring under
normal use of the product when operated in accordance with the instructions.
3.
If a replacement product is supplied under the repair policy, it is warranted for the
remainder of the warranty period of the original purchased product only.
4.
Home service is provided only within the normal service area of one of our
recommended Authorised Service Centres (ASC). It will be provided for television
receivers only with a screen size of 67cms or above (product includes CRT,
LCD TV, PTV, and Plasma TV). Televisions with screen sizes less than 67 cms
and all other product types are to be taken or sent by the consumer to the
workshop of your nearest Authorised Service Centre, at the Consumer’s
expense.
d)
Cleaning of video or audio
heads.
e)
Inadequate receiving antennae.
f)
Replacement of worn or used
batteries or other consumables.
5.
This Manufacturers Warranty is limited to 3 months for the above listed Consumer
Electronics Products if used in commercial applications.
g)
6.
Philips may, at its discretion choose to replace rather than repair any product
covered by this warranty.
Consumer products used in
commercial applications (This
warranty is limited to 3 months
only)
7.
Product accessories are covered by the same warranty period. Please contact the
Philips Technology Care Centre for free replacement of faulty accessories.
h)
Second hand products.
8. This Manufacturers Warranty is neither transferable nor valid in countries other
than Australia.
The conditions contained in this warranty card replace and override the provision of the Philips World-Wide Guarantee for
products purchased in Australia and used in Australia.
Version 9: 1 February 2007
2
Warranty valid for all new products purchased after 1st January 2007
1
ABN 24 008 445 743,
English
Philips Consumer Electronics a division of Philips Electronics Australia Limited
Level 1, 65 Epping Road NORTH RYDE NSW 2113.
Service is provided through more than 100 accredited Authorised Service Centres throughout Australia.
For direct contact with the nearest recommended Authorised Service Centre in capital & regional cities/towns
Authorised Service Centre Network
Customer support is provided in Australia by our trained call centre staff
For assistance with product features and specifications, please call
Technology Care Centre
Please record the following information for your records and keep in a safe place.
We recommend retaining your purchase receipt to assist with any warranty claim
Model number
: ………………………………………………………..
Serial number
: ………………………………………………………..
Date of purchase
: ………………………………………………………..
Retailer
: ………………………………………………………..
Version 9: 1 February 2007
Warranty valid for all new products purchased after 1st January 2007
2
3
‘CONSUMERS SHOULD NOTE THAT NOT ALL HIGH
DEFINITION TELEVISION SETS ARE FULLY
COMPATIBLE WITH THIS PRODUCT AND MAY CAUSE
ARTIFACTS TO BE DISPLAYED IN THE PICTURE. IN
CASE OF 525 OR 625 PROGRESSIVE SCAN PICTURE
PROBLEMS, IT IS RECOMMENDED THAT THE USER
SWITCH THE CONNECTION TO THE ‘STANDARD
DEFINITION’ OUTPUT. IF THERE ARE QUESTIONS
REGARDING OUR TV SET COMPATIBILITY WITH THIS
MODEL 525p AND 625p DVD PLAYER, PLEASE
CONTACT OUR CUSTOMER SERVICE CENTER.’
Manufactured under license from Dolby
Laboratories. “Dolby” and the double-D
symbol are trademarks of Dolby
Laboratories.
Trade mark of the DVB Digital Video
Broadcasting Project (1991 to 1996)
HDMI, and HDMI logo and High-Definition
Multimedia Interface are trademarks or
registered trademarks of HDMI licensing
LLC.
4
5
English
Table of contents
English
General
General Information ........................................................................................................ 8
Setup precautions.................................................................................................................................................8
Accessories supplied ...........................................................................................................................................8
About recycling .....................................................................................................................................................8
Product Overview
Main Unit ........................................................................................................................... 9
Remote Control ......................................................................................................... 10-11
Using the remote control ................................................................................................................................12
Connections
Basic Connections .....................................................................................................13-16
Step 1 : Connecting the antenna cables .......................................................................................................13
Step 2 : Connecting the video cable .............................................................................................................14
Option 1: Using the Video (CVBS) socket ..........................................................................................14
Option 2: Using the S-Video socket ......................................................................................................14
Option 3: Using the COMPONENT Y PB PR sockets .......................................................................14
Option 4: Connecting to a HDMI compatible TV .............................................................................15
Step 3 : Connecting the audio cables............................................................................................................15
Option 1: Using the analogue audio sockets ......................................................................................15
Option 2: Using the digital audio socket (COAXIAL or OPTICAL) ...........................................16
Step 4 : Connecting the mains lead ...............................................................................................................16
Basic Setup
Getting Started ......................................................................................................... 17-19
Guide to Displays ...............................................................................................................................................17
Main menu .....................................................................................................................................................17
Sub-menu.......................................................................................................................................................17
Initial Setup .........................................................................................................................................................18
Quick Setup ..................................................................................................................................................18
Operations
Watching TV ............................................................................................................. 20-24
Selecting a channel from the Channel List ................................................................................................. 20
Selecting a channel from the Favourite List ............................................................................................... 20
Making your own Favourite List............................................................................................................. 20
View your Favourite List .......................................................................................................................... 20
Additional Viewing Methods ...........................................................................................................................21
Checking programme information .........................................................................................................21
Watching digital text programme (TELETEXT) ................................................................................21
Pausing a TV broadcast (Pause Live TV) ..............................................................................................21
About temporary HDD storage (Time Shift Buffer) ....................................................................... 22
Watching another programme in the sub-picture (Picture-in-Picture) ..................................... 22
Guide (Electronic Programme Guide) Overview......................................................................................23
Watching a programme from the Guide ..............................................................................................23
Recording from the Guide ........................................................................................................................24
Recording ................................................................................................................... 25-27
Recording the Programme You are Watching .......................................................................................... 25
Extending the current recording (Quick Timer)............................................................................... 25
Setting the Timer ...............................................................................................................................................26
Checking/changing/canceling timer settings (Timer List) ................................................................26
About simultaneous two-channel recording and priorities ............................................................27
Recording Time ...................................................................................................................................................27
6
Playback ..................................................................................................................... 28-30
Playing a Recorded Programme (HDD) ..................................................................................................... 28
To check playback information ...............................................................................................................29
Playing from the beginning of the programme you are recording (Chasing Playback) ........... 30
Playing a previous recording while making another (Simultaneous Rec and Play)................... 30
Labelling a Title (Entering Characters) .......................................................................................................31
Protecting a Title ...............................................................................................................................................31
Freeing up space on the HDD ........................................................................................................................31
Erasing a title ................................................................................................................................................31
Erasing all titles (Format Hard Disk) ....................................................................................................32
Setup Options
Setting and Adjustment.......................................................................................... 33-38
Accessing the setup menu................................................................................................................................33
Operation Setting (Installation) .................................................................................................................... 34
Digital TV settings (Channel) ................................................................................................................. 34-35
Video/Audio Setting (Video/Audio)........................................................................................................ 36-37
HDD Setting ........................................................................................................................................................37
System Setting (General) .......................................................................................................................... 37-38
Others
Troubleshooting ........................................................................................................ 39-40
Glossary............................................................................................................................ 41
Index ................................................................................................................................. 42
Specifications .................................................................................................................. 43
7
English
Table of contents
General Information
English
WARNING!
This unit does not contain any userserviceable parts. Please leave all
maintenance work to qualified
personnel.
Avoid high temperature, moisture,
water and dust
– This unit must not be exposed to
dripping or splashing.
– Never place any object or items that
can damage this unit (e.g., liquid filled
objects, lighted candles).
Setup precautions
Finding a suitable location
– Place this unit on a flat, hard and
stable surface. Never place the unit on a
carpet.
– Never place this unit on top of other
equipment that might heat it up (e.g.,
receiver or amplifier).
– Never put anything under this unit
(e.g., CDs, magazines).
– Install this unit near the AC outlet
where the AC power plug can be easily
reached.
– For MAINS powered apparatus and
for apparatus producing internal voltages
greater than 35 V (peak) a.c. or d.c.,
having no protection against splashing
water, the apparatus shall not be exposed
to dripping or splashing and no objects
filled with liquids, such as vases, shall be
placed on the apparatus.
– With regard to devices for
disconnection from the MAINS, where
the MAINS plug or an appliance coupler
is used as the disconnect device, the
disconnect device shall remain readily
operable.
– The appliance coupler is used as the
disconnect device, the disconnect device
shall remain readily operable.
Space for ventilation
– Place this unit in a location with
adequate ventilation to prevent internal
heat build up. Allow at least 10 cm (4”)
clearance from the rear and the top of
this unit and 5 cm (2”) from the left and
right to prevent overheating.
8
Accessories supplied
–
–
–
–
–
–
–
1 audio/video cable
1 component video cable
1 remote control with batteries
1 RF antenna cable
1 antenna interconnected cable
1 power cable
Quick Start Guide
About recycling
These operating instructions have been
printed on non-polluting paper. The
electronic equipment contains a large
number of materials that can be recycled.
If you are disposing of an old machine,
please take it to a recycling centre.
Please observe the local regulations
regarding disposal of packaging materials,
exhausted batteries and old equipment.
English
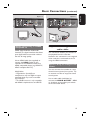
Main Unit
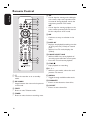
a STANDBY-ON
e MENU
– Turns the recorder on or to standby
mode.
– Enters or exits the recorder’s system
menu.
b Display panel
f bB:
– Shows information about the current
status of the recorder.
– Cursor keys for moving to the left/right
in the menu.
– skips to the previous/next 10 seconds
during playback; moves the sub-picture
position in PIP mode.
vV:
– Cursor keys for moving up/down in the
menu.
– selects previous/next TV channel for the
sub-picture in PIP mode.
c PLAY/PAUSE u
– Starts playback of the selected title.
– Pauses the playback or recording.
d RECORD
– Starts recording the current TV
programme.
g OK
– Confirms an entry or selection in the
menu.
9
Remote Control
English
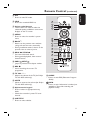
e bB:
1
2
3
4
– Cursor keys for moving to the left/right
in the menu; skips to the previous/next
10 seconds during playback; moves the
sub-picture position in PIP mode.
vV:
– Cursor keys for moving up/down in the
menu; selects previous/next TV channel
for the sub-picture in PIP mode.
5
6
7
8
9
10
f OK
– Confirms an entry or selection in the
menu.
g DISPLAY
– Displays the playback/recording time bar
on first press and {1-Plate} on second
press.
– While in Live TV mode, displays the
{I-Plate}.
h PAUSE LIVE TV u
11
12
13
– While in HDD List, starts playback of
currently active title from resume point.
– Pause live TV and resume playback.
i STOP x
– Stops playback or recording.
j P +– While in tuner mode, selects the next/
previous TV channel.
a2
– Turns the recorder on or to standby
mode.
b PIP SWAP
– Swaps between the main and sub-pictures
in PIP mode.
c TEXT
– Enters or exits Teletext mode.
d TIMER
– Enters or exits the timer recording menu.
10
k AUDIO
– Toggles through available audio tracks.
l FAVORITE
– Enters or exits favourite channel list.
m CH LIST
– Enters or exits channel list.
Remote Control (continued)
English
n PIP
– Enters or exits PIP mode.
o HDD
– Enters the recorded HDD List.
14
15
p Colour coded buttons
16
– These buttons are used to select the
coloured options available in some menu
displays on the TV screen.
17
q MENU
– Enters or exits the recorder’s system
menu.
r BACK
– Returns to the previous menu without
saving and exits the menu eventually.
– During installation wizard, returns to the
previous item or exits any menu.
s REW m, FFW M
– Fast reverse/forward search.
– During paused playback, slow reverse/
forward search.
t PREV
, NEXT
– Jumps to previous/next chapter marker.
18
19
20
21
22
23
24
25
26
27
u REC z
– Starts recording the current TV
programme.
v TV VOL +– Adjusts the volume of the TV (for Philips
TV with RC5 code only).
w MUTE
– Mutes or restores the volume (for Philips
TV with RC5 code only).
x Alphanumeric keypad
z GUIDE
– Enters or exits EPG (Electronic Program
Guide).
INFO
– Enters or exits ‘Information’ window (not
available in Time-shift recording and
playback mode).
– Enters numbers in appropriate entry
fields.
– Selects the recorder’s preset TV tuner
channel.
y SUBTITLE
– Enters or exits subtitles.
11
Remote Control (continued)
English
Using the remote control
Using the alphanumeric keypad to
enter the characters
– Press a number button repeatedly until
the required character or the number
appears.
A Open the battery compartment.
B Insert two batteries type R03 or AAA,
following the indications (+-) inside
the compartment.
C Close the cover.
D Point the remote control directly at the
remote sensor (iR) on the front panel.
E Then select the desired function (for
example
12
,
).
– To enter a space, press button {0}.
CAUTION!
– Remove batteries if they are
exhausted or if the remote control
is not to be used for a long time.
– Never mix batteries (old and new
or carbon and alkaline, etc.).
– Batteries contain chemical
substances, they should be disposed
of properly.
English
Basic Connections
2
DIGITAL ANTENNA
4
RF IN
VI D EO O U TPU T
AUDIO OUTPUT
RF IN
PCM / DOLBY DIGITAL
CVBS
COMPONENT Y
COAXIAL
LO
OP
TH
RO
Pb
UG
H
S-VIDEO
1
Pr
TO TV
L
L
Manufactured under license from
Dobly Laboratories. “Dolby” and
the double-D symbol are
trademarks of Dolby Laboratories.
ANALOG
RS-232
2
R
R
RF OUT
HDMI
OPTICAL
3
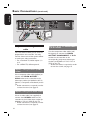
Set up for integrated Digital TV only
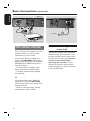
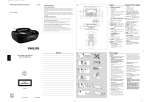
Step 1: Connecting the
antenna cables
These connections enable you to watch
and record TV programmes using this
recorder.
A Unplug the antenna cable that is currently
connected to your TV.
B Plug in the antenna cable into the
DIGITAL ANTENNA INPUT socket
on the recorder.
C Use the supplied RF antenna cable to
connect the TO TV ANTENNA
socket on this recorder to the Antenna
In socket on the TV.
Helpful Hints :
Use the best quality AV connectors (CVBS/
S-Video/Component Video/HDMI), not the
RF connections from this recorder to the
television, to achieve the best video quality.
D Use the supplied antenna interconnected
cable to loop through between RF IN
and RF OUT.
13
Basic Connections (continued)
English
DIGITAL ANTENNA
RF IN
VI D EO O U TPU T
AU D I O O U TPU T
RF IN
PCM / DOLBY DIGITAL
CVBS
COMPONENT Y
COAXIAL
LO
OP
TH
RO
UG
H
Pb
S-VIDEO
1
Pr
TO TV
L
L
ANALOG
Manufactured under license from
Dobly Laboratories. “Dolby” and
the double-D symbol are
trademarks of Dolby Laboratories.
RS-232
2
R
R
RF OUT
HDMI
OPTICAL
Option 2
Option 3
Option 1
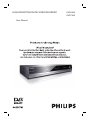
Step 2: Connecting the video
cable
Option 3: Using the COMPONENT
Y PB PR sockets
This connection enables you to view the
playback from this recorder. You only
need to choose one of the options below
to make your video connection.
– For a standard TV, follow option 1, 2
or 3.
– For a HDMI TV, follow option 4.
Use the component video cables (red/
blue/green) to connect the VIDEO
OUTPUT-COMPONENT - Y PB PR
sockets on the recorder to the
corresponding component video input
sockets (or labelled as Y Pb/Cb Pr/Cr or
YUV) on the TV.
– Audio connection is required in order
to hear the sound, see page 15.
Option 1: Using the Video (CVBS)
socket
Use a composite video cable (yellow) to
connect the VIDEO OUTPUT CVBS socket on the recorder to the
video input socket (or labelled as A/V In,
Video In, Composite or Baseband) on the
TV.
– Audio connection is required in order
to hear the sound, see page 15.
Option 2: Using the S-Video socket
Use an S-video cable (not supplied) to
connect the S-VIDEO socket on the
recorder to the S-Video input socket (or
labelled as Y/C or S-VHS) on the TV.
– Audio connection is required in order
to hear the sound, see page 15.
14
Option 4
DIGITAL ANTENNA
RF IN
VI D EO O U TPU T
AU D I O O U TPU T
RF IN
COAXIAL
OP
TH
RO
UG
H
Pb
S-VIDEO
L
1
Pr
TO TV
RF IN
PCM / DOLBY DIGITAL
CVBS
COMPONENT Y
LO
L
ANALOG
Option 1
DIGITAL ANTENNA
RF IN
PCM / DOLBY DIGITAL
OP
TH
RO
Pb
UG
H
S-VIDEO
TO TV
OPTICAL
Option 4: Connecting to a HDMI
compatible TV
HDMI (High Definition Multimedia
Interface) is a digital interface that allows
pure digital video transmission without
the loss of image quality.
Use an HDMI cable (not supplied) to
connect the HDMI socket on this
recorder to the HDMI IN socket on a
HDMI compatible device (e.g. HDMI TV,
HDCP compliant DVI TV).
Helpful Hints:
– Digital devices from different
manufacturers may have different output
standards which may result in unreliable
signal transfers.
– The HDMI connector is only compatible
with HDMI compliant devices and DVI-TV.
L
1
Pr
R
HDMI
CVBS
COAXIAL
LO
RS-232
RF OUT
A U D IO O U T P U T
COMPONENT Y
Manufactured under license from
Dobly Laboratories. “Dolby” and
the double-D symbol are
trademarks of Dolby Laboratories.
2
R
V ID E O O U T P U T
L
Manufactured under license from
Dobly Laboratories. “Dolby” and
the double-D symbol are
trademarks of Dolby Laboratories.
ANALOG
RS-232
2
R
R
RF OUT
HDMI
OPTICAL
Step 3: Connecting the
audio cables
This connection enables you to listen to
the playback from this recorder.
However, this connection is not required
if this recorder is connected to the TV
using the HDMI connectors.
Option 1: Using the analogue audio
sockets
You can connect the recorder to a two
channel stereo system (mini system, TV)
or receiver in order to enjoy the stereo
sound system.
Use an audio cable (red/white) to
connect the AUDIO OUTPUT - L/R 1
or 2 sockets to the audio input sockets
of the connected device.
15
English
Basic Connections (continued)
Basic Connections (continued)
English
Option 2
D IO OUT P UT
CM / DOLBY DIGITAL
COAXIAL
Manufactured under license from
Dobly Laboratories. “Dolby” and
the double-D symbol are
trademarks of Dolby Laboratories.
ANALOG
HDMI
RS-232
OPTICAL
OR
1
to AC IN
2
to mains
AV amplifier/receiver
Option 2: Using the digital audio
socket (COAXIAL or OPTICAL)
You can connect the recorder to an AV
amplifier/receiver in order to enjoy
multichannel surround sound.
Use a coaxial cable (not supplied) to
connect the COAXIAL socket to the
digital coaxial input socket (or labelled as
COAXIAL IN or DIGITAL IN) of the
connected device.
– an A/V receiver or amplifier with a
digital multi-channel sound decoder.
– a receiver with two-channel digital
stereo (PCM).
OR
Use an optical fibre-optic cable (not
supplied) to connect the OPTICAL
socket to the optical input socket of the
connected device.
– Make sure that both plugs are fully
inserted (until a click is heard).
16
Step 4: Connecting the
mains lead
Connect the supplied mains lead to the
AC IN terminal of the recorder. Then
plug the recorder into the mains. After
you connect the mains lead, you must
wait for a short while before
operating the recorder. You can
operate the recorder once the front
panel display lights up and the recorder
enters standby mode.
Getting Started
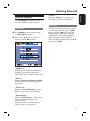
{ Setup }
Displays { Setup } for setting up the
recorder to suit your preferences.
English
Guide to Displays
The { Main Menu } provides entries to
all of the recorder’s main functions.
Sub-menu
Main Menu
A Press MENU on the remote control.
> { Main Menu } appears.
B Press cursor v V keys to select an
option and press OK to enter.
The sub-menu appears when you select
an item from a list menu (e.g., { HDD
List }), and press OK. The sub-menu
displays options applicable only to the
selected item. (The displayed options
differ depending on the situation.)
Select an option by pressing cursor v V
keys and press OK.
{ HDD List }
Displays the list of the recorded titles,
including the recording information,
which allows you to select a title to play.
{ Guide }
Displays { Electronic Program Guide },
which allows you to watch or record a
programme.
{ Timer List }
Displays { Timer Recording }, which
allows you to set the timer manually.
{ Quick Setup }
Displays { Quick Setup }, which allows
you to make initial settings in the
following order:
Setting time zone Channel search
mode City Scan channel
17
Getting Started (continued)
English
Initial Setup
The basic installation menu will appear
the very first time you turn on the
recorder. Make the basic adjustment to
start using the recorder.
C Select { YES }, and press OK.
The setup display for selecting the
time zone appears.
Quick Setup
{ Quick Setup } allows you to set the
time zone and preset the channels
automatically.
A Press 1 to turn on the recorder.
B Turn on the TV and switch the input
selector so that the signal from the
recorder appears on the TV screen.
{ Quick Setup } menu appears.
If { Quick Setup } does not appear,
press MENU, then select { Quick
Setup } and press OK to enter the
setup screen.
D Select the time zone for your area, and
press OK.
The setup display for tuner setting
appears.
Quick Setup
Select channel search mode.
Quick Channel Search
Auto Channel Search
EXIT
18
Follow the guide to make initial
Back
Select
ENTER
OK
E Select the tuning method, and press OK.
If you select { Quick Channel Search },
select your city and press OK.
The recorder automatically starts
searching for all of the receivable
channels and presets them.
To return to the previous step
Press BACK.
To select the picture size according
to your TV
Set { TV Shape } in { Video/Audio }
menu (page 36).
To select the type of video signals
output from the HDMI OUT or
COMPONENT VIDEO OUT
sockets
Set { Video Format } in { Video/
Audio } menu (page 36).
To select the audio output method
from the DIGITAL AUDIO OUT
socket
Set { Digital Audio Output } in { Video/
Audio } menu (page 37).
Other option:
{ Auto Channel Search }
Presets all receivable channels. For
details, see page 34.
F Press OK when { Finish } appears.
{ Quick Setup } is completed.
Helpful Hint:
− If you want to run { Quick Setup } again,
press MENU, then select { Quick Setup }
and press OK.
Note about the clock setting:
This recorder automatically adjusts its
clock according to the time signals from
the broadcaster in the area selected in
step 4 above, or { Time Zone } in the
{ Installation } menu. You do not need
to, (and cannot manually) adjust the clock
for Day Light Savings Time, and these are
the ONLY settings that affect the clock.
Since the clock entirely depends on the
broadcaster sending the correct time
signals, if { Time Zone } in
{ Installation } menu Setup is correct
and yet the clock is wrong, it is not a
malfunction.
19
English
Getting Started (continued)
Watching TV
English
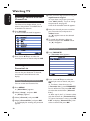
Selecting a channel from the
Channel List
The Channel List display allows you to
select a channel from a scrollable list of
all available TV channels.
A Press CH LIST.
The scrollable channel list appears.
Program List
No.
Channel Name
0020
ABC HDTV
0021
ABC2
0022
ABC TV
0200
ABC DIG Radio
0201
ABC DIG Jazz
0007
7 Digital
0070
7 HD Digital
Select
E Enter your four-digit password using the
alphanumeric keypad.
If you have not yet set a password,
enter ‘0000’ (default). To set or change
the password, see page 35.
A list of all receivable channels appears.
F Select the channel you want to add to
your Favourite List, and press the
Yellow button.
{ y } appears next to the selected
channel.
G To cancel the selection, select the
channel and press the Yellow button.
{ y } disappears.
View your Favourite List
ENTER
OK
A Press FAVORITE.
{ Favourite List } appears.
B Press cursor v V keys to select the
channel you want to watch and press OK.
Selecting a channel from the
Favourite List
You can list your favourite TV channel,
and select the channel from the list
display.
B Press cursor v V keys to select the
Making your own Favourite List
You can create one Favourite List.
A Press MENU.
{ Main Menu } appears.
B Select { Setup }, and press OK.
{ Setup } appears.
C Select { Channel } and press OK.
D Select { Channel Edit } and press OK.
The display for entering the password
appears.
20
channel you want to watch, and press
OK.
To select a channel not on the
{ Favourite List }, press FAVORITE
to turn off the list, and press CH LIST
to select the channel from { Channel
List }.
After step 2, the P +/– buttons select
only the channels on { Favourite List }.
To return the button’s status, press CH
LIST to display { Channel List }, then
select a channel and press OK.
Additional Viewing Methods
Checking programme information
Press INFO while watching TV.
The programme information of currently
playing and next will display.
0009
FRESH COOKING WITH THE AUSTRALIAN WOME
NINE DIGITAL
09:30
10:00
576i Dolby Digital MPEG En
F R E S H C O O K I N G W I T H AU S T R A L I A N WO M E N S
W E E K LY
Au ck l a n d c h e f G o o f t Ja n e a n d Au s t ra l i a n wo m e n ’s
we e k l y fo o d d i r e c t o r S y d n ey M i ke p r e s e n t f r e s h
Next
Press INFO or BACK to turn off the
display.
Watching digital text programme
(TELETEXT)
This recorder can access to a dedicated
text channels which are transmitted by
the broadcasters.
Note:
The appearance, content, and navigation
methods of all digital text services are
decided by the broadcaster.
Pausing a TV broadcast (Pause Live
TV)
You can pause a live TV programme and
resume playback at the scene it was
interrupted at a later time.
A While watching a TV programme by using
this recorder, press PAUSE LIVE TV
u.
You can pause the picture for up to
available HDD capacity.
B Press PAUSE LIVE TV u again to
resume watching the paused programme.
C Press STOP x during Pause Live TV.
A confirmation message appears to
save time shift.
Notes:
– Paused titles are not saved to the
HDD, once Pause Live TV is cancelled.
– This function may be cancelled when:
– any buttons other than PAUSE
LIVE TV u, / , or m/M is
pressed.
– the recorder is turned off.
– It may take a few seconds to resume
playback of the paused programme.
– Even if you fast forward the paused
programme, there will always be a time
difference of about ten seconds or more
between the paused programme and the
current TV broadcast.
A Press TEXT.
The digital teletext display appears.
B Follow the on-screen instructions to
obtain your required selection.
On some pages the TV programme
may also be displayed on the text screen.
On-screen instructions will guide you
how to change the displayed programme.
C Press TEXT again to turn off the text
page display.
21
English
Watching TV (continued)
Watching TV (continued)
English
About temporary HDD storage
(Time Shift Buffer)
As soon as you switch on this recorder,
the currently selected TV program will
be storaged in a temporary hard disk
storage called ‘TSB’ (Time Shift Buffer)
Watching another programme in
the sub-picture (Picture-in-Picture)
You can view a current TV broadcast in
the sub-picture while watching another
TV programme.
A Press PIP during recording or while
In tuner mode, by pressing the
DISPLAY key Time Shift video bar will
appear on the screen, it indicates the
status and timing of the TV programs
stored in the temporary HDD storage.
You can choose to options or remove
the video bar by pressing again the
DISPLAY key on the remote control.
a
watching TV.
A sub-picture appears in the corner
with another TV programme being
broadcast.
b
The Time Shift video bar consists of the
following information :
a Icon which shows the status of the
time shift buffer.
– playback of content stored in the
time shift buffer.
– marks the beginning of content
recording.
– the current screen has been
paused from playback. (this will not
pause recording.)
b The elapsed time of the time shift
buffer.
During Picture-in-Picture mode;
– Press cursor v V keys to change TV
channel of sub-picture.
– Press PIP SWAP to switch the main
and sub-pictures.
– Press cursor b B keys to move the
sub-picture position.
B Press PIP again to turn off the subpicture.
A Press PAUSE LIVE TV u again to
resume watching the paused programme.
Playback will start from point of
pausing.
B Press STOP x during Pause Live TV.
Confirmation screen appears.
You can save the temporary HDD
storage permanently in the hard disk.
WARNING!
The Pause Live TV will pause, when there
is not enough hard disk space.
22
Helpful Hint:
− You can record a TV programme in the
sub-picture. Press PIP SWAP to switch the
main and sub-pictures, and press REC z.
− You can also view a TV programme while
playing back a recorded title (page 29).
Notes:
− You can only change channel in the
sub-picture. For other operations, the
picture has to be switched to the main
picture.
− Only main picture audio is output.
Watching TV (continued)
Watching a programme from the
Guide
English
Guide (Electronic
Programme Guide) Overview
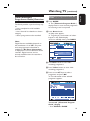
A Press GUIDE.
The Guide provides a quick and easy way
to:
– view a complete list of all available
channels.
– view a channel list related to a chosen
category.
– select a programme to be recorded.
Note:
Digital Services availability depends on
the broadcaster. As of 2007, only now
and next programme information is
available. If { No Event Information }
is displayed, it is not a malfunction of the
recorder. Digital services are not
instantly available when the recorder is
first turned on.
The { Electronic Program Guide }
display shows a seven channel programme
list covering a two hour period.
B Press Green button.
Help menu appears.
To guide you, the functions of colour
buttons in the Guide display.
To turn off Help menu, press BACK.
Electronic Program Guide
13.12 Tue
10:30
2005 13.12 Tue
11:00
TV Sydney
ABC
11:30
10:33
HELP
12:00
12:30
ABC-HDTV ABC TV
ABC 2
Seven
Nine
Ten
SBS
Help
Record
OK
BACK
ABC
-24 Hour
: Program Info
: EXIT
+24 Hour
TV Sydney
C Press Blue button to view +24hr
recording programme.
D Press Yellow button, to view - 24hr
recording programme.
E Press cursor v V keys to select a
programme and press OK.
The information of the selected
programme appears.
To turn off { Electronic Program
Guide } display
– Press GUIDE or BACK.
23
Watching TV (continued)
English
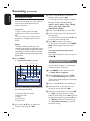
Recording from the Guide
A Press GUIDE to display { Electronic
Program Guide }.
The Guide feature simplifies recording or
setting of the timer. Simply select the
programme you want to record in the
{ Electronic Program Guide } display.
Electronic Program Guide
13.12 Tue
10:30
2005 13.12 Tue
11:00
TV Sydney
ABC
11:30
10:33
HELP
12:00
12:30
ABC-HDTV ABC TV
ABC 2
Seven
Nine
Helpful Hint:
− Timer recordings will be made regardless
whether or not the recorder is turned on. You
can turn off the recorder without affecting
the recording even after recording starts.
− You can record or set the timer for two TV
programmes at the same time. Note that a
third timer setting overlapping two other
settings cannot be made.
− To record or set the timer for a
programme that does not appear in
{ Electronic Program Guide }, see
“Recording” for details (page 25).
– Check that recorder has enough available
disk space for the recording (page 36).
– If any digital teletext is operated while
recording, its contents will be recorded on the
HDD including closed captioning (Supertext).
– To display subtitles press SUBTITLE,
this selects p801 as used for closed
captioning.
24
Ten
SBS
Help
Record
OK
BACK
ABC
-24 Hour
: Program Info
: EXIT
+24 Hour
TV Sydney
B Select a current TV broadcast or a future
programme you want to record, and
press the RED button.
– When you select a programme
currently broadcast, recording starts.
{ â } appears on { Electronic
Program Guide }, indicating the
programme is being recorded. The
recording continues until the programme
finishes.
Recording
A Press P +/– to select the channel you
want to record.
For details about selecting channels, see
page 20.
To check recording information
Press DISPLAY during recording.
Each time you press the button, the
display changes as follows:
{ Recording Time Bar }
{ Display off }.
English
Recording the Programme
You are Watching
{ 1-Plate }
The display differs depending on the
recording status.
B Press REC z.
Recording starts and will stop
automatically at the end of the
programme.
To stop recording
Select the programme being recorded
and press STOP x.
To watch another TV channel while
recording
Press P +/– to select the channel you
want to watch.
Helpful Hint:
− You can also record the current TV
broadcast using the { Electronic Program
Guide } display (page 23).
− While recording two programmes, two
REC indicators are lit on the recorder.
Notes:
– After pressing REC z, it may take a
short moment to start recording.
– If there is a power failure, the
programme you are recording may be
erased.
– While recording two programmes, you
can select only the channels in the same
transport stream of the recording
channels.
Extending the current recording
(Quick Timer)
You can extend the current recording in
30 minute increments.
Press REC z repeatedly to set the
duration.
Each press advances the time in 30minute increments. The maximum
duration is 6 hours.
End of programme
0:30
1:00
5:30
6:00
The time counter decreases minute by
minute to 0:00, then the recorder stops
recording (power does not turn off).
Even if you turn off the recorder during
recording, the recorder continues to
record until the time counter runs out.
Helpful Hint:
You can set the Quick Timer for two
programmes at the same time. After setting
the Quick Timer for one programme, select
another channel to record and press REC z
repeatedly to set the duration in the same
way.
Note:
If the programme has no Guide
information, the recorder automatically
stops recording after six hours rather
than until the end of the programme.
25
Recording (continued)
English
Setting the Timer
You can set the date, time, and channel
name of up to 40 programmes one
month in advance.
Helpful Hints:
− Timer recording still can be made
regardless the recorder is turned ON or
OFF.
− You can set the timer only for two TV
programmes overlapping the same time
period.
Notes:
– Before recording, make sure the
recorder had enough available disk space.
– If any digital teletext is operated while
recording, its contents will be recorded
on the HDD including closed captioning
(Supertext).
C Press cursor v V keys to select the
Repeat mode and press OK.
The Repeat mode changes as follows:
Example: Today is 30.10 (Monday)
{Once}, {Sun}, {Mon}, {Tue}, {Wed},
{Thu}, {Fri}, {Sat}, {Mon-Fri},
{Weekend}, {Daily},
D Press cursor v V keys to set the date.
E Press number keys to set the start time
and stop time.
You can also use the cursor v V keys
to set the start and stop time.
F Press OK to confirm the setting.
The Timer List appears. The TIMER
REC indicator lights up on the front
panel.
To stop recording during timer
recording
Select the recording TV channel and press
STOP x.
A Press TIMER
{ Timer Recording } appears.
a
b
Checking /changing /canceling
timer settings (Timer List)
c d e
You can check, change, or cancel timer
settings using the Timer List.
A Press MENU on the remote control.
{ Main Menu } appears.
B Select { Timer List }, and press OK.
{ Timer Recording List } appears.
Timer information displays the recording
date, time, etc.
C Press cursor v V keys to scroll the list.
The Timer Recording screen consists of
the following information :
a Channel selection mode.
b Repeat mode.
c Date.
d Start Time.
e Stop Time.
B Press cursor v V keys to select the
channel mode and press OK.
26
D Select the timer setting you want to
change or cancel, and press OK.
E Select one of the options, and press OK.
{ Edit } Changes the timer setting.
Select an item using cursor b B keys and
change the setting using cursor v V keys.
{ Delete } Erases the timer setting.
{ Stop Timer Setting } To cancel
the timer setting.
Recording (continued)
G Press Yellow button.
{ Timer Recording } appears.
You can set the new timer setting
while in the Timer Recording List screen.
Press Green button to display the
help menu.
To change or cancel the other settings,
repeat steps 2 and 3.
When the end time of one
recording and the start time of
another are the same
While recording two programmes (A, B),
the recording (C) may be delayed after
finishing the previous recording (B).
7:00
9:00
10:00
A
About simultaneous two-channel
recording and priorities
English
F Press OK to confirm the selection.
– You cannot use the live TV pause
function while recording two channels.
– You cannot perform Timer Recording
while doing two recording.
The function will start as soon as possible
when recording stops.
– You cannot tuning, other than
recorded channels, when two tuners are
occupied in recording.
When three recordings overlap
The recording that starts earlier has
priority.
When the start time is the same, manual
recording has priority over a timer
recording.
Recording Time
B
C
To turn off the Timer List
Press TIMER or BACK.
Helpful Hint:
While recording, you cannot modify the timer
setting for the current recording.
Recording time differs depending on
whether the recorded programme is HD
(High Definition) or SD (Standard
Definition) signal. Note that the
recording times in the following table are
approximate and that actual times may
differ.
Note also that the maximum continuous
recording time for a single title is six
hours. Contents beyond this time will not
be recorded.
Recording time (hours)
DVR7100
DVR5100
HD only
(15 Mbps)
36 hours
(Approx.)
23 hours
(Approx.)
SD only
(8 Mbps)
69 hours
(Approx.)
44 hours
(Approx.)
The above recording time is approximate,
and may be different depending on the
amount of data of the programme.
27
¥
Playback
English
B Press the cursor v V keys to select title
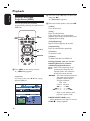
Playing a Recorded
Programme (HDD)
and press OK.
{ Sub menu } appears.
You can play back the recorded
programme by selecting the title from the
HDD List.
PIP
HDD
PIP
SWAP
C Select one of the options, and press OK.
{ Close }
Turn off the menu.
{ Play }
Plays the selected title.
If you select after you stop playback,
playback starts from the point where you
stopped (Resume Play).
{ Play Beginning }
Plays from the beginning of the title.
C # W 7,
OK
DISPLAY
A Press HDD on the remote control.
{ HDD List } appears.
Helpful Hint:
You can press the cursor b B keys to page
up/down HDD List.
{ Repeat Play }
Plays the selected title repeatedly.
{ Protect }
To protects a title.
{ Delete }
To delete the title from HDD List.
During playback, you can use the
following buttons to perform
additional playback features
/ − Goes to the beginning of the
previous/next chapter point.
Chapter points are marked in
about five minute intervals.
m/ M − Fast reverse/fast forward the
disk when pressed during
playback. Search speed
changes as follows:
Fast Fast
reverse forward
N 15 U 1.
N 255 UU 2.
N3555 UUU 3.
− Plays in slow motion when
pressed in pause mode.
01/02
PAUSE LIVE TV u (pause)
− Pauses playback. Press again to resume.
STOP x − Stops playback.
28
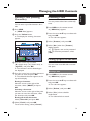
To change the title order (Sort)
Press the Blue button and use cursor
v V keys to select an item and press OK.
To watch TV in the sub-picture
(Picture-in-Picture)
Order
Sorted
You can view a current TV broadcast in
the sub-picture during playback.
By Date
In order of when the
titles were recorded. The
title that is recorded
most recently is listed at
the top.
Press PIP during playback.
A sub-picture appears in the corner with
a TV programme being broadcast.
By Program In alphabetical order.
Name
By Viewed
Program
By protect
On order of whether the
title was played back or
not. The title that is not
played back and recorded
most recently is listed at
the top.
on order of protected
title is listed at the top.
Press cursor v V keys to change channel
of sub-picture.
Press cursor b B keys to move the subpicture position.
Press PIP again to turn off the subpicture.
Notes:
− You cannot switch the main picture
and the sub-picture.
− You can only change channels for the
picture appearing in the sub-picture.
Helpful Hint:
– You can also select { HDD List } from
the { Main Menu }.
– The sub-menu displays options applicable
only to selected item. The displayed options
differ depending on the situation.
To check playback information
Press Display
Each time you press the button, the
display changes as follows:
{ Playback information }
{ 1-Plate } { Display off }.
The displays differ depending on the
playing status.
Helpful Hint:
– You can also check playback information
on the front panel display.
29
English
Playback (continued)
Playback (continued)
English
Playing from the beginning of the
programme you are recording
(FlexTime)
Playing a previous recording while
making another (Simultaneous Rec
and Play)
“FlexTime” allows you to view the
recorded part of a programme while the
recording is being made. You do not
need to wait until the recording finishes.
“Simultaneous Rec and Play” allows you
to view a previously recorded
programme while recording programmes.
Playback continues even if a timer
recording starts.
A Press HDD while recording.
B Select the title currently being recorded
(appears with { z }), and press the OK
button.
C Select { Play } from the sub-menu and
press OK.
Playback starts from the beginning of
the programme you are recording.
FlexTime pauses when you fast forward
to the point that you are recording.
Notes:
− FlexTime does not start immediately
after recording starts.
− Even if you fast forward the recorded
programme, there will always be a time
difference of about ten seconds or more
between the recorded programme and
the current TV broadcast.
30
A Press HDD while recording.
B Select the title you want to play, and
press the OK button.
C Select { Play } from the sub-menu, and
press OK.
Playback starts.
Labelling a Title (Entering
Characters)
You can enter up to 38 characters for a
title.
A Press HDD.
Protecting a Title
You can protect titles from accidentally
erase.
A Press HDD on the remote control.
{ HDD List } appears.
{ HDD List } appears.
B Press the Yellow button.
The display for entering characters
appears.
B Press the cursor v V keys to select title
and press OK.
The sub-menu appears.
C Select { Protect } and press OK.
D Select { On } when the { Protect }
display appears.
{ @} appears next to the protected
title. To cancel the protection, select
{ Off }.
Freeing up space on the HDD
C Press the cursor keys to select
{ A } (upper-case), { a } (lower-case), or
{ Symbol }, and press OK.
The characters of the selected type
are displayed.
D Press the cursor keys to select characters
you want to enter and press OK.
The selected character appears at the
top of the display.
Erasing a character
Move the cursor to the right of the
character, select { BACK } and press
OK.
Inserting a character
Move the cursor to the right of the point
you want to insert the character, select
the character and press OK.
Erasing all of the characters
Select { Clear All } and press OK.
You can erase recorded titles to create
disk space.
Erasing a title
A Press HDD on the remote control.
{ HDD List } appears.
B Press the cursor v V keys to select title
and press OK.
The sub-menu appears.
C Select { Delete } and press OK.
D Select { Yes } when asked for
confirmation.
The selected title is erased.
E Select { Finish } and press OK.
To cancel the setting, select { Cancel }.
31
English
Managing the HDD Contents
Managing the HDD Contents (continued)
English
Erasing all titles (Format Hard
Disk)
You can erase all the titles in the HDD at
once.
A Press MENU while the recorder is in
stop mode.
B Select { Setup }, and press OK.
C Select { HDD setting }, and press OK.
D Select { Delete HDD }, and press OK.
The display for entering the password
appears.
E Enter your four-digit password using the
alphanumeric keypad.
If you have not yet set a password,
enter “0000” (default). To set or change
the password, see page 35.
The display asks for confirmation
F Select { YES } and press OK.
All titles in the HDD are erased.The
recorder automatically turns off.
Notes:
− Any protected title, including the timer
settings, will also be erased.
− To set or change the password, see
page 35.
32
Accessing the setup menu
see page 34
The system setup enables you to
customize the recorder to suit your
preferences.
see pages
34~35
MENU
C # W 7,
OK
see pages
36~37
A In stop mode, press MENU.
B Select { Setup }, and press OK.
The setup menu appears.
C Press cursor v V keys to select a set up
menu option ({Installation}, {Channel},
{Video/Audio}, {HDD Setting} or
{General}).
see page 37
D Press cursor B key to select a sub menu
and press OK to access.
E Select the setting you wish to change and
press OK to confirm.
Instructions and explanations of the
options are provided in the following
pages.
If the option in the menu is greyed
out, that means the setting is not
available or cannot be changed in the
current state.
see pages
37~38
F To exit, press MENU.
33
English
Setting and Adjustments
Setting and Adjustments (continued)
English
Operation Setting (Installation)
Quick Channel Search
Quickly presets all receivable channels in your area.
A Select the city you live in, and press OK.
B When the display asks for confirmation, select
{ Yes }, and press OK.
− All receivable channels are preset.
− Press OK when { Finish } appears.
Auto Channel Search
Presets all receivable channels.
If some channels cannot be preset after performing
{ Quick Channel Search }, try this.
Manual Channel Search
Time Zone
Use to store your channels manually.
Select the channel you want to preset and press OK.
Repeat this step to preset another channel.
{ NSW/ACT / VIC / QLD / SA / WA / TAS / NT } Selects the time zone of your area for clock setting.
Digital TV settings (Channel)
Channel Edit
34
Enter your four-digit password using the alphanumeric
keypad and press OK.
− If you have not yet set a password, enter ‘0000’
(default). To set or change the password, see page 35.
{ Lock } − To lock certain unsuitable channels for
children. Select the TV channel you want to
lock, then press the Green button.
{ @ } appears next to the locked TV channel.
− To unlock the TV channel, press the Green
button again.
{ Favorite } − Sets the channels as favourites in
Favourite Lists. See ‘Making your own
Favourite List’ (page 20).
{ Hide Channel } − Disable unused or unwanted
channels manually.
Select the TV channel you want to
hide, then press the Blue button.
− { X } appears next to the disabled
TV channel.
To cancel the setting, press the
Blue button again.
Parental Setting
You can set a rate so that any programme classed that
rate by the broadcaster is restricted.
Enter your four-digit password using the alphanumeric
keypad.
{ Block All } − Requires password for all programmes.
{ Block G and above } − Locks ‘General’ and above
programmes.
{ Block PG and above } − Locks ‘Parental Guidance’
and above programmes.
{ Block M and above } − Locks ‘Mature’ and above
programmes.
{ Block MA and above } − Locks ‘Mature Adult’ and
above programmes.
{ Block AV and above } − Locks ‘Adult/Violence’ and
above programmes.
{ Block R and above } - Locks ‘Restricted’ and above
programmes.
{ No Block } - No restriction.
Password
This feature enables you to set or change the password
for certain operations.
A Enter your current password using the
alphanumeric keypad.
B If you have not yet set a password, enter ‘0000’
(default).
C Enter your new password using the alphanumeric
keypad and press OK.
D If you forget your password, enter ‘0000’ (default).
35
English
Setting and Adjustments (continued)
Setting and Adjustments (continued)
English
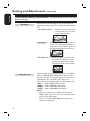
Video/Audio Setting (Video/Audio) (shadow options are the factory
default settings)
TV Shape
Select picture size according to type of connected TV
(wide-screen/wide mode TV or conventional 4:3 screen
TV).
{ 16:9 wide-screen } − Select this when connecting to
a wide-screen TV or TV with
a wide mode function.
{ 4:3 crop } − Select this when connecting to a 4:3
screen TV. Automatically displays a
wide picture on the entire screen and
cuts off the portions that do not fit.
{ 4:3 letter box } − Select this when connecting to a
4:3 screen TV. Displays a wide
picture with bands on the upper
and lower portions of the screen.
Video Format
36
Select the type of video signals output from the HDMI
OUT or COMPONENT VIDEO OUT sockets. If the
picture is not clear, try another option that suits your
TV/projector, etc. For details, refer also to the
instruction manual supplied with the TV/projector, etc.
{ PAL } − Sends 720x576i video signals.
{ 576p } − Sends 720x576p video signals.
{ 720p } − Sends 1280x720p video signals.
{ 1080i } − Sends 1920x1080i video signals.
Notes:
− When you connect the S VIDEO OUT socket or
VIDEO OUT socket to the TV, the recorder always
outputs 576i video signals.
− If your TV accepts 720p/1080i format signals, this
setting must be made.
Digital Audio Output
Switch the method for outputting audio signals when you
connect the DIGITAL AUDIO OUT socket to a
component such as an AV amplifier (receiver). For
connection details, see ‘Step 3: Connecting the audio
cords’ on page 15.
If you connect a component that does not accept the
selected audio signal, a loud noise (or no sound) will
come out from the speakers, and may affect your ears or
cause speaker damage.
{ Dolby Digital } − Select this when the recorder is
connected to an audio component
with a built-in Dolby Digital decoder.
{ PCM } − Select this when the recorder is connected
to an audio component without a built-in
Dolby Digital decoder.
HDD Setting
HDD Space
Displays the remaining HDD space.
Delete HDD
Erases all the recorded titles in the HDD at once.
Note that protected titles are also erased.
Press OK to confirm and press BACK to exit.
System Setting (General) (shadow options are the factory default
settings)
Display Brightness
Select the brightness of the recorder display panel.
{ Normal } – Normal brightness.
{ Dimmed } – Medium brightness.
{ Off } – Turns off the display.
ECO Standby Mode
This is an energy saving mode.
{ On } − When you switch the recorder to standby
mode, the display panel will turn blank to save
power.
{ Off } − Clock will display on the recorder’s display
panel when switching off to standby mode.
Info Timeout
{ Off / 5 Sec / 10 Sec / 15 Sec / 20 Sec / 30 Sec / 60 Sec }
– Select the display duration for a programme
information box.
37
English
Setting and Adjustments (continued)
Setting and Adjustments (continued)
English
Firmware Update
This is for possible future updates. Enter your four-digit
password using the alphanumeric keypad.
− If you have not yet set a password, enter ‘0000’
(default). To set or change the password, see page 35.
Software update screen will appear. Select { Yes } and
press OK.
The set will go to Standby mode, once successfully
update the firmware.
Periodically,Philips will issue upgrades for the firmware
that was initially installed in your recorder as the
firmware is continuously refined for greater stability and
compatibility of the recorder.
Caution! Power supply must not be interrupted during
upgrade!
Visit Philips website at ‘www.philips.com/support’ to
check for the availability of the latest firmware upgrade.
Note: When checking for the latest firmware
upgrade,please also check for any accompanying
instructions on installing the firmware.
38
Product Version
Information
Displays the information of product hardware, software,
version and release date.
Restore Default
This feature enables you to return the setup settings to
their defaults without affecting the recorded titles in the
HDD.
Select { Yes }, and press OK.
The setup settings return to their defaults, and the
recorder automatically turns off.
WARNING
Under no circumstances should you try to repair this unit yourself, as this will
invalidate the warranty. Do not open this unit as there is a risk of electric shock.
If a fault occurs, first check the points listed below before taking this unit for repair. If
you are unable to solve a problem by following these instructions, consult your dealer or
Philips for help.
Problem (General)
Solution
No power.
– Press STANDBY-ON on the unit to turn on the
power.
No picture.
– Refer to your TVs manual for correct Video In
channel selection. Change the TV channel until you
see the blue DVD screen.
Completely distorted picture
or black/white picture.
– Check the video connection.
– Sometimes a small amount of picture distortion may
appear. This is not a malfunction.
No sound or distorted sound.
– Adjust the volume.
– Check the speaker connections and settings.
– Make sure that the audio cables are correctly
connected.
The remote control does not
function properly.
– Reduce the distance between the remote control and
this unit.
– Batteries are weak, replace the batteries.
Problem (Playback)
The unit does not start
playback.
Solution
– Moisture may have condensed inside this unit. Leave
this unit turned on for about an hour. Make sure the
hard disc is not scratched.
The aspect ratio of the screen – Depending on the TV, it may not be possible to
cannot be changed even though
change the aspect ratio.
you have set the TV display.
TV reception is poor.
– If the signal is too weak, adjust the antenna or
connect an external antenna for better reception.
– Tune in to the correct digital broadcasting signal.
– Place the antenna further away from any equipment
that may be causing the interference.
The unit does not work.
– Disconnect the power cord from the power outlet
for a few minutes. Reconnect the power cord and try
to operate again as usual.
39
English
Troubleshooting
Troubleshooting (continued)
English
Problem (HDMI)
Solution
No video output from HDMI
connection.
– HDMI connection can only be made to HDMIequipped devices with HDCP (High Bandwidth Digital
Content Protection). If you wish to connect to a DVI
connector (equipped with HDCP), you will need a
separate adaptor (DVI to HDMI).
– Make sure the resolution of this unit matches the
device you have connected using the HDMI. See
‘Video/Audio Setting - { Video/Audio - Video Format }’
for details.
No audio output from the
unit.
– Make sure the connection to amplifier is correct.
– If the audio signal does not come through the
DIGITAL AUDIO OUT (OPTICAL or COAXIAL)
jacks, you have to check the setting. See ‘Digital Audio
Output’ for details.
Problem (Recording)
Solution
Cannot recording even
though timer setting was
correct.
– Power failure during recording.
– There is not enough hard disk space.
– The programmes you are trying to record contains
copy protection signal that restrict copying.
Recording does not stop
immediately after press
STOP x
– It will take a few seconds for the recorder to store
the data before it can stop.
Problem (other)
Mechanical sound is heard
when the recorder is off.
40
Solution
– While the recorder is updating the clock information,
operational noises (such as the internal fan) may be
heard, even when the power is off. This is not a
malfunction.
Analogue audio: Sound that has not been
turned into numbers. Analogue sound is
available when you use the AUDIO LEFT/
RIGHT. These red and white sockets send
audio through two channels, the left and
right.
Aspect ratio: Aspect ratio refers to the
length to height ratio of TV screens. The
ratio of a standard TV is 4:3, while the ratio
of a high-definition or wide TV is 16:9. The
letter box allows you to enjoy a picture with
a wider perspective on a standard 4:3 screen.
AUDIO OUT sockets: Red and white
sockets on the back of the unit that send
audio to another system (TV, Stereo, etc.).
Digital: Sound that has been converted into
numerical values. Digital sound is available
when you use the DIGITAL AUDIO OUT
COAXIAL or OPTICAL sockets. These
sockets send audio through multiple
channels, instead of just two channels as
analogue does.
Dolby Digital: A surround sound system
developed by Dolby Laboratories containing
up to six channels of digital audio (front left
and right, surround left and right, centre and
subwoofer).
HDMI: High-Definition Multimedia
Interface (HDMI) is a high-speed digital
interface that can transmit uncompressed
high definition video and digital multichannel
audio. It delivers perfect picture and sound
quality, completely free from noise. HDMI is
fully backward-compatible with DVI.
As required by the HDMI standard,
connecting to HDMI or DVI products
without HDCP (High-bandwidth Digital
Content Protection) will result in no Video
or Audio output.
HDD (Hard disk drive): This is a mass
data storage device used in computers, etc.
Disks are flat, circular, rigid plates coated
with a thin magnetic media. Magnetic heads
record data on the rapidly spinning disks.
This facilitates the reading and writing of
large amounts of data at high speed.
S-Video: Produces a clear picture by
sending separate signals for the luminance
and the colour. You can use S-Video only if
your TV has an S-Video In socket.
VIDEO OUT socket: Yellow socket on
the back of the system that sends the DVD
picture video to a TV.
GUIDE (EPG): The GUIDE (Electronic
Programme Guide) is a guide showing
programmes which can be displayed on a
conventional television (via the Digital
Terrestrial Television tuner included in this
recorder) as the now and next programmes
or the television schedule for a day or more
at a time.
Parental control: Limits disc play
according to the age of the users or the
limitation level in each country. The
limitation varies from disc to disc; when it is
activated, playback will be prohibited if the
software’s level is higher than the user-set
level.
PCM: Pulse Code Modulation. A digital
audio encoding system.
Component Video Out Jacks: Jacks on
the back of the DVD System that send highquality video to a TV that has Component
Video In jacks (R/G/B,Y/Pb/Pr, etc.)
41
English
Glossary
Index
English
Numerics
H
S
16:9 35
4:3 Letter Box 35
4:3 Pan Scan 35
HDD List 27
HDMI 14,40
HDMI OUT 18,35
Hide Channel 35
“Lock Channels” 33
S VIDEO 13
Searching
fast reverse/fast forward 27
locating the beginning of the
chapter 27
“Set Parental Rating” 34
Simultaneous Rec and Play 29
Slow-motion play 27
Sort 26
Sub-menu 16
M
T
Mains Lead 15
Main Menu 16
Main Unit 8
“Manual Channel Serach” 33
“Time Zone” 16,17,18,33
TIMER 25
Timer recording
check/change/cancel 25,26
Troubleshooting 38
TV Pause 20
A
Antenna 12
Audio 18
Audio cord 14
I
i Plate 28
L
B
Batteries 11
C
Channel List 19
Checking/changing/
cancelling timer settings
(Timer List) 25
Component video input 13
COMPONENT VIDEO OUT
13
Connecting 10
the antenna cable 12
the video cable 13
the audio cables 14
Controlling TVs with the
remote 9,10
D
“Digital Audio Output” 36
Digital Services
Digital Text viewing 20
EPG 21
Favourites 19
Dolby Digital 40
E
Enter characters 30
EPG
recording 23
Viewing a list of available
channels 22
“Erase” 30,31,36
F
“Favourite” 33
Favourite List 19
Firmware Update 37
FlexTime 29
“Format Hard Disk” 36
G
GUIDE 22
General 36,37
42
O
On-screen display
Sub-menu 16
Main Menu 16
P
“Parental Setting” 34
“Password” 34
Picture-in-Picture 21,28
“Play Beginning” 27
Playback 27,28,29
fast forward 27
fast reverse 27
instant advance 27
instant replay 27
resume play 27
slow-motion play 27
Product Version Setup 37
“Protect” 27
Q
Quick Timer 24
“Quick Setup” 16,17
R
REC 24
Recording 24
EPG 22
recording time 26
while watching another
programme 26
Remote 9,10
“Rename” 30
“Repeat Play” 27
Restore Default 37
Resume Play 27
V
Video cable 13
“Video Format” 35
“Video” 35
Video input 13
Specifications
English
System
Tuners: Two digital HD tuners (to receive digital
transmission, see Basic Connection page 12-15)
Transmission standards: DVB-T
Channel coverage: 51 - 858 MHz
The above channel coverage merely ensures the
channel reception within these ranges. It does not
guarantee the ability to receive signals in all
circumstances.
Aerial out: 75-ohm asymmetrical aerial socket
Video format: MP@ML, MP@HL
Audio format: Dolby Digital, MPEG (I and II)
Outputs
AUDIO OUT: RCA jacks (2 each)/2 Vrms/
10 kilo ohms
VIDEO OUT: RCA jack/1.0 Vp-p/75 ohms
S VIDEO OUT: 4-pin mini DIN/Y:1.0 Vp-p,
C: 0.3 Vp-p (PAL)/75 ohms
DIGITAL AUDIO OUT (OPTICAL): Optical
output jack/–18 dBm (wave length: 660 nm)
DIGITAL AUDIO OUT (COAXIAL): RCA
jack/0.5 Vp-p/75 ohms
COMPONENT VIDEO OUT
(Y, PB/CB, PR/CR):
RCA jack/Y: 1.0 Vp-p, PB/CB: 0.7 Vp-p,
PR/CR: 0.7 Vp-p/75 ohms
HDMI OUT:
Type A (19-pin)
General
Power requirements: 220-240 V AC, 50 Hz
Power consumption:
DVR 7100 : 30 W
DVR 5100 : 29 W
Dimensions (approx.): 430 × 80 × 290 mm
(width/height/depth) incl. projecting parts
Hard disk drive capacity:
DVR 7100 : 250GB
DVR 5100 : 160GB
Mass (approx.): 4.0 kg
Operating temperature: 5ºC to 40ºC
Storage temperature: -40ºC to +65ºC
43