1
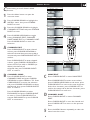
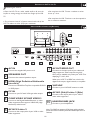
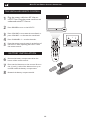
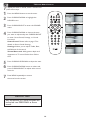
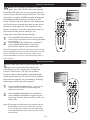
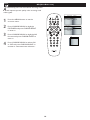
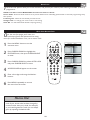
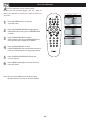
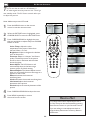
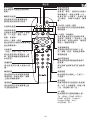
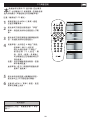
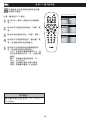
37TA1800
42TA1800
Arabic
中文
English
LCD TV
User`s Manual
Model No.:
Serial No.:
P41TN003813 1A
RETURN YOUR PRODUCT REGISTRATION CARD TODAY
TO GET THE VERY MOST FROM YOUR PURCHASE.
Registering your model with PHILIPS makes you eligible for all of the valuable benefits listed
below, so don’t miss out. Complete and return your Product Registration Card at once to ensure:
*Proof of
Purchase
Returning the enclosed card
guarantees that your date of purchase
will be on file, so no additional paperwork will be required from you to
obtain warranty service.
*Additional Benefits of
Product Ownership
*Product Safety
Notification
By registering your product, you’ll
receive notification - directly from the
manufacturer - in the rare case of a
product recall or safety defect.
Registering your product guarantees
that you’ll receive all of the privileges to
which you’re entitled, including special
money-saving offers.
Know these safety symbols
Congratulations on your purchase,
and welcome to the “family!”
Dear PHILIPS product owner:
Thank you for your confidence in PHILIPS.You’ve selected
one of the best-built, best-backed products available today.
We’ll do everything in our power to keep you happy with
your purchase for many years to come.
This “bolt of lightning” indicates
uninsulated material within your unit
may cause an electrical shock. For the
safety of everyone in your household, please do
not remove product covering.
The “exclamation point” calls attention
to features for which you should read
the enclosed literature closely to
prevent operating and maintenance problems.
WARNING: To reduce the risk of fire or
electric shock, this apparatus should not be
exposed to rain or moisture and objects filled
with liquids, such as vases, should not be placed
on this apparatus.
CAUTION: To prevent electric shock, match
wide blade of plug to wide slot, fully insert.
For Customer Use
Enter below the Serial No. which is located
on the rear of the cabinet. Retain this
information for future reference.
Model No._______________________
Serial No. _______________________
Visit our World Wide Web Site at http://www.usasupport.philips.com
2
IMPORTANT SAFETY INSTRUCTIONS
READ BEFORE OPERATING EQUIPMENT
1.
2.
3.
4.
5.
6.
7.
8.
9.
10.
11.
12
13.
14.
Read these instructions.
Keep these instructions.
Heed all warnings.
Follow all instructions.
Do not use this apparatus near water.
Clean only with a dry cloth.
Do not block any of the ventilation openings.
Install in accordance with the manufacturers instructions.
Do not install near any heat sources such as radiators,
heat registers, stoves, or other apparatus (including
amplifiers) that produce heat.
Do not defeat the safety purpose of the polarized or
grounding-type plug. A polarized plug has two blades with
one wider than the other. A grounding type plug has two
blades and third grounding prong. The wide blade or third
prong are provided for your safety. When the provided
plug does not fit into your outlet, consult an electrician
for replacement of the obsolete outlet.
Protect the power cord from being walked on or pinched
particularly at plugs, convenience receptacles, and the
point where they exit from the apparatus.
Only use attachments/accessories specified by the
manufacturer.
Use only with a cart, stand, tripod, bracket, or
table specified by the manufacturer, or sold with
the apparatus. When a cart is used, use caution
when moving the cart/apparatus combination to avoid
injury from tip-over.
Unplug this apparatus during lightning storms or when
unused for long periods of time.
Refer all servicing to qualified service personnel. Servicing
is required when the apparatus has been damaged in any
way, such as power-supply cord or plug is damaged, liquid
has been spilled or objects have fallen into apparatus, the
apparatus has been exposed to rain or moisture, does not
operate normally, or has been dropped.
15. Damage Requiring Service - The appliance should be
serviced by qualified service personnel when:
A. The power supply cord or the plug has been damaged;
B. Objects have fallen, or liquid has been spilled into the
appliance;
C. The appliance has been exposed to rain
D. The appliance does not appear to operate normally or
exhibits a marked change in performance;
E. The appliance has been dropped, or the enclosure
damaged.
16. Tilt/Stability - All televisions must comply with
recommended international global safety standards for tilt
and stability properties of its cabinet design.
• Do not compromise these design standards by applying
excessive pull force to the front, or top, of the cabinet
which could ultimately overturn the product.
• Also, do not endanger yourself, or children, by placing
electronic equipment/toys on the top of the cabinet. Such
items could unsuspectingly fall from the top of the set and
cause product damage and/or personal injury.
17. Wall or Ceiling Mounting - The appliance should be
mounted to a wall or ceiling only as recommended by the
manufacturer.
18. Power Lines - An outdoor antenna should be located
away from power lines.
19. Outdoor Antenna Grounding - If an outside antenna is
connected to the receiver, be sure the antenna system is
grounded so as to provide some protection against voltage
surges and built up static charges.
20. Object and Liquid Entry - Care should be taken so
that objects do not fall and liquids are not spilled into the
enclosure through openings.
21. Battery Usage CAUTION - To prevent battery leakage
that may result in bodily injury, property damage, or
damage to the unit:
• Install all batteries correctly, with + and - aligned as
marked on the unit.
• Do not mix batteries (old and new or carbon and
alkaline, etc.).
• Remove batteries when the unit is not used for a long
time.
3
PRECAUTION
ADDITIONAL SAFETY PRECAUTIONS
• ENSURE that LCD TV stand is tightened properly to the set (See Quick Guide on the right way of tightening of the
screw of the stand to the set. Improper tightening of screw may render the set unsafe.
• If LCD TV is installed on the wall, installation should be carried out by qualified servicemen. Improperor incorrect
installation may render the set unsafe.
• Disconnect main plug when :
— cleaning the TV screen, never use abrasive cleaning agents.
— there is a lightning storm.
— the set is left unattended for a prolonged period of time.
• Do not shift or move the LCD TV around when it is powered on.
• Do not touch, push or rub the surface of the LCD screen with any sharp or hard objects.
• When the surface of the LCD screen becomes dusty, wipe it gently with an absorbent cotton cloth or other soft
material like chamois. DO NOT USE acetone, toluene or alcohol to clean the surface of the screen. These chemicals
will cause damage to the surface.
• Wipe off water or saliva as soon as possible. These liquids can cause deformation and color fading of the LCD
screen when left exposed for some time.
• Be careful of condensation when temperature changes occur. Condensation can cause damage to the LCD screen
and electrically parts. After condensation fades, spots or blemishes will be present on the LCD screen.
• CAUTION information is located on the inside of the VESA cover (see diagram below). To read information, open
the VESA cover.
POSITIONING THE LCD TELEVISON
• Place the LCD TV on a solid, sturdy base or stand. Be sure the stand is strong enough to handle the weight of the
LCD TV.
• Try to leave at least 6” of space around each side of the LCD TV cabinet to allow for proper ventilation.
• Do not place the LCD TV near a radiator or other sources of heat.
• Do not place the LCD TV where it can be exposed to rain or excessive moisture.
RECYCLING PROCEDURE/END OF LIFE DISPOSAL
• To minimize harm to the environment, the batteries supplied with the LCD TV do not contain mercury or nickel
cadmium. If possible, when disposing of batteries, use recycling means available in your area.
• The LCD TV uses materials that can be recycled. To minimize the amount of waste in the environment, check your
area for companies that will recover used televisions for dismantling and collection of reusable materials, or contact
your dealer for TV recycling tips.
• Please dispose of the carton and packing material through the proper waste disposal management in your area.
4
CONTENTS
Introduction
Welcome/Registration of Your TV . . . . . . . . . . . . . . . . . . .2
IMPORTANT SAFETY INSTRUCTIONS . . . . . . . . . . . . 3
PRECAUTIONS . . . . . . . . . . . . . . . . . . . . . . . . . . . . . . . . . . 4
Table of Contents . . . . . . . . . . . . . . . . . . . . . . . . . . . . . . . . . .5
Here are a few of the special features of your new LCD
TV.
Audio/Video In Jacks: Use to quickly connect other
equipment to your LCD TV.
Automatic Channel Storing (Auto Store):
Quick and easy setup of available channels.
On-screen Menus: Helpful messages (in English or
Simplified Chinese) for setting TV controls.
Remote Control: Works your LCD TV features.
Sleep Timer: Turns off the LCD TV within an amount
of time you specify (0-180 minutes from the current
time).
AutoLock: Lets you block viewing of certain TV
channels if you do not want your children viewing
inappropriate material.
Standard broadcast (VHF/UHF) or Cable TV
channel capability.
Stereo capability: Includes a built-in amplifier and
twin-speaker system, allowing reception of TV programs
broadcast in stereo.
Treble, Bass, and Balance: Enhance the LCD TV’s
sound.
Installation
Language Settings . . . . . . . . . . . . . . . . . . . . . . . . . . . 6
Auto Store (Setting Up Channels) . . . . . . . . . . . . . . . . . . . 7
Manual Store of TV Channel . . . . . . . . . . . . . . . . . . . . . . . . 8
Channel Setting . . . . . . . . . . . . . . . . . . . . . . . . . . . . . . . . . . . .9
Factory Reset . . . . . . . . . . . . . . . . . . . . . . . . . . . . . . . . . . . . 10
Presentation of the LCD TV . . . . . . . . . . . . . . . . . . . . . . . 11
Basic TV and Remote Control Operations . . . . . . . . . . . 12
Remote Control . . . . . . . . . . . . . . . . . . . . . . . . . . . . . . . . . 13
Timer Menu Controls. . . . . . . . . . . . . . . . . . . . . . . . . . . . . .14
Picture Menu
TV Picture Menu Controls . . . . . . . . . . . . . . . . . . 15
Sound Menu
TV Sound Menu Controls . . . . . . . . . . . . . . . . . . . 16
Features Menu
Smart Picture Control . . . . . . . . . . . . . . . . . . . . . 17
Smart Sound Control . . . . . . . . . . . . . . . . . . . . . . . . . . . . . .17
NR (Noise Reduction) . . . . . . . . . . . . . . . . . . . . . . . . . . . . .18
Auto Lock . . . . . . . . . . . . . . . . . . . . . . . . . . . . . . . . . . . . . . .19
Auto Lock Access Code . . . . . . . . . . . . . . . . . . . . . . . . . . . 19
Auto Lock Program . . . . . . . . . . . . . . . . . . . . . . . . . . . . . . 20
Using The Picture Format . . . . . . . . . . . . . . . . . . . . . . . . 21
PC Mode
PC Picture Controls . . . . . . . . . . . . . . . . . . . . . . . .22
PC Audio Controls . . . . . . . . . . . . . . . . . . . . . . . . . . . . . . 23
Using PC PIP (Picture In Picture) Feature . . . . . . . . . . . . .24
Setting Up The PC Mode . . . . . . . . . . . . . . . . . . . . . . . . . . 25
NOTE:This manual covers different versions
and models. Not all features described in this
manual will match those of your LCD TV. This
is normal and does not require you contacting
your dealer or requesting service.
General Information
Trouble Shooting Tips . . . . . . . . . . . . . . . . . . . . . 26
Care And Cleaning . . . . . . . . . . . . . . . . . . . . . . . . . . . . . . . .27
Index . . . . . . . . . . . . . . . . . . . . . . . . . . . . . . . . . . . . . . . . . . . 28
END-OF-LIFE DISPOSAL
Your new LCD TV and its packaging contain materials
that can be recycled and reused. Specialized companies
can recycle your product to increase the amount of
reusable materials and minimize the amounts that need
to be properly disposed.
Your product also uses batteries that should not be
thrown away when depleted, but should be handed in
and disposed off as small chemical waste.
When you replace your existing equipment, please find
out about the local regulations regarding disposal of your
old television, batteries, and packing materials.
5
LANGUAGE SETTINGS
F
or English, Simplified Chinese -speaking TV
owners, an onscreen LANGUAGE option is
present. The LANGUAGE control enables you to set
the TV’s onscreen menu to be shown in English or
Simplified Chinese.
A/CH
Main Controls
Install
Picture
Sound
Features
Install
Language
Auto store
Manual store
Channel setting
Factory reset
Main Controls
1
Press the MENU button on the remote control
to open the onscreen menu.
2
Press CURSOR DOWN to highlight the
INSTALL menu.
3
Press CURSOR RIGHT to highlight
LANGUAGE.
4
Press CURSOR RIGHT to enter LANGUAGE.
Press CURSOR DOWN to select English or
), then press CURSOR
Simplified Chinese (
RIGHT to confirm.
5
i+
Press the MENU button repeatedly to clear the
menu from the screen.
HELPFUL HINT
Remember, the LANGUAGE control makes
only the TV’s onscreen MENU items
appear in English or Simplified Chinese text.
It does not change the other onscreen text
features.
6
AV
Install
Language
Language
Auto store
Manual store
Channel setting
Factory reset
English
中文
AUTO STORE (SETTING UP CHANNELS)
Y
our LCD TV can automatically set itself for local
area (or cable TV) channels. This makes it easy
for you to select only the TV stations in your area by
pressing the CH (+) or CH (-) button.
1
2
3
4
5
Press the MENU button on the remote
control to show the onscreen menu.
6
Press the MENU button repeatedly to
clear the menu from the screen, after
AUTO STORE has finished.
A/CH
Main Controls
Install
Picture
Sound
Features
Install
Language
Auto store
Manual store
Channel setting
Factory reset
Press CURSOR DOWN to highlight the
INSTALL menu.
Main Controls
Install
Press CURSOR RIGHT to enter the
INSTALL menu.
Language
Auto store
Manual store
Channel setting
Factory reset
Press CURSOR DOWN to highlight the
AUTO STORE control.
Press CURSOR RIGHT to enter AUTO
STORE, then press CURSOR RIGHT to
start scanning of channels.
Auto store
Start?
Auto store
Please wait
Prog. found
Frequency
i+
AV
HELPFUL HINT
• Immediately after unpacking and plugging in your new television, run the auto
store function to set up the TV for the broadcast or cable channels available in
your area. If you do not run the auto store function to set up the channels ,
your television may not operate properly.
• After you’ve run Auto Store, check out the results. Press the CH (+) or the CH (-)
button and see which channels you can select.
• Remember, an antenna or cable TV signal must first be connected to your LCD TV.
7
0
MHz
MANUAL STORE OF TV CHANNEL
Y
ou can also choose to tune your TV channels.
Manual tuning allows you to store each
programme manually.
1
Press the MENU button on the remote
control to show the onscreen menu.
2
Press CURSOR DOWN to highlight the
INSTALL menu, then press CURSOR RIGHT
to enter.
3
Select the MANUAL STORE, then press
CURSOR RIGHT to enter it and press
CURSOR RIGHT to activate auto search
channel frequence or press number buttons
to show your desired channel frequence, then
press CURSOR RIGHT to start searching.
Main Controls
Install
Picture
Sound
Features
Install
Language
Auto store
Manual store
Channel setting
Factory reset
A/CH
Main Controls
4
5
6
7
8
Install
Manual store
Language
Auto store
Manual store
Channel setting
Factory reset
Manual store
Prog. no
Finetune
Store
Main Controls I Install
Manual store
Manual store
Prog. no
Finetune
Store
Manual store
xxx.xx MHz
Start?
Main Controls I Install
Manual store
i+
After the channel frequence is confirmed,
select PROG. NO by pressing CURSOR
DOWN and press CURSOR RIGHT to enter.
AV
Manual store
Prog. no
Finetune
Store
Prog. no
2
Main Controls I Install
Manual store
Finetune
Manual store
Prog. no
50
Finetune
Store
Press CURSOR UP/DOWN to adjust the
channel number and press CURSOR RIGHT/
LEFT to confirm the channel.
Main Controls I Install
If the channel reception is not satisfactory,
press CURSOR DOWN to highlight the
FINETUNE and press CURSOR RIGHT to
enter it, then press CURSOR UP/DOWN
to adjust, press CURSOR RIGHT/LEFT to
confirm.
Note: If the channel reception is satisfactory,
please go to step 7.
Press CURSOR DOWN to highlight STORE
function and press CURSOR RIGHT to enter.
Press CURSOR RIGHT to confirm stored.
Press the MENU button repeatedly to
clear the menu from the screen.
8
Manual store
Store
Manual store
Prog. no
Finetune
Store
Store?
CHANNEL SETTING
C
1
2
3
4
A
hannel setting to set all channel related
functions.
Press the Menu button to open the
onscreen menu.
Install
Picture
Sound
Features
Install
Language
Auto store
Manual store
Channel setting
Factory reset
Main Controls
Press CURSOR DOWN to highlight the
INSTALL menu, then press CURSOR
RIGHT to enter.
A
Press the CURSOR DOWN to highlight
CHANNEL SETTING and press CURSOR
RIGHT to enter.
Press CURSOR UP/DOWN to toggle
among CHANNEL EDIT, CHANNEL
SWAP, NAME EDIT, or CHANNEL SORT.
Press CURSOR RIGHT to enter the
selection.
Install
Channel setting
Language
Auto store
Manual store
Channel setting
Factory reset
Channel edit
Channel swap
Name edit
Channel sort
B
Main Controls I Install
Main Controls I Install
Channel setting
Channel edit
Channel setting
Channel swap
Channel edit
Channel swap
Name edit
Channel sort
Channel
Skipped
Channel edit
Channel swap
Name edit
Channel sort
From
To
Exchange
Main Controls I Install I Channel setting
Channel edit
Channel
Channel
Skipped
2
A/CH
Main Controls I Install I Channel setting
CHANNEL EDIT
Press CURSOR RIGHT to enter channel
column, press CURSOR UP/DOWN to
select the channel that you want to add or
remove and press CURSOR RIGHT/LEFT to
confirm.
CHANNEL SWAP
Press CURSOR RIGHT to enter
CHANNEL SWAP and press CURSOR
UP/DOWN to select FROM or TO. Press
CURSOR RIGHT to enter the selection
and press CURSOR UP/DOWN to adjust
the channel, then press CURSOR RIGHT/
LEFT to confi rm.
Press CURSOR DOWN to select
EXCHANGE and press CURSOR RIGHT
to enter it. Press CURSOR RIGHT to
activate EXCHANGE or press CURSOR
LEFT to inactivate it.
Channel edit
Skipped
Channel
Skipped
Active
Skipped
i+
Press CURSOR RIGHT to enter skipped
column, press CURSOR UP/DOWN to
select ACTIVE (to add) or SKIPPED (to
delect) the channel you
selected, then press CURSOR RIGHT/
LEFT to confi rm.
B
Main Controls
C
C
AV
D
Main Controls I Install
Main Controls I Install
Channel setting
Name edit
Channel edit
Channel swap
Name edit
Channel sort
Channel
......
0
Channel setting
Channel sort
Channel edit
Channel swap
Name edit
Channel sort
Sort?
NAME EDIT
Press CURSOR RIGHT to enter NAME EDIT.
Press CURSOR RIGHT to enter name column,
press CURSOR UP/DOWN to edit name, press
CURSOR RIGHT to move to the next character.
At the fi rst character, press CURSOR LEFT to
confi rm the name and at the last character, press
CURSOR RIGHT to confi rm it.
D
CHANNEL SORT
Press CURSOR RIGHT to enter CHANNEL
SORT.
Press CURSOR RIGHT to sort the channel and
press CURSOR LEFT to return to the previous
manu.
5
9
Press the MENU button repeatedly to clear the
menu from the screen.
FACTORY RESET
Y
our TV can be reset to the original
factory settings by performing the
following steps.
1
A/CH
Press the MENU button on the
remote control to see the onscreen
menu.
Main Controls
Install
Picture
Sound
Features
Install
Language
Auto store
Manual store
Channel setting
Factory reset
Main Controls
2
3
4
5
Press CURSOR DOWN to highlight the
INSTALL menu, then press CURSOR
RIGHT to enter.
Press CURSOR DOWN repeatedly to
highlight the FACTORY RESET control, then
press CURSOR RIGHT to enter.
Press CURSOR DOWN to highlight YES
and press CURSOR RIGHT to enter it for
resetting the original factory settings.
i+
Press the MENU button repeatedly to clear
the menu from the screen.
HELPFUL HINT
If you reset the TV to the factory settings,
all your present setting on picture, sound,
and other feature settings will be erased
and replaced by the manufacture’s default
settings. However, your AutoLock access
code will not be erased. Please refer to page
18 for details.
10
AV
Install
Factory reset
Language
Auto store
Manual store
Channel setting
Factory reset
No
Yes
P.
PRESENTATION OF THE LCD TV
ositioning the LCD TV.
.
.
Do not place the LCD TV near a radiator or other
source of heat.
Place the LCD TV on a solid, stable surface. Be sure the
surface is strong enough to handle the weight of the LCD
TV.
.
Do not place the LCD TV where it can be exposed to
rain or excessive moisture.
Try to leave at least 6” of space around each side of the
LCD TV cabinet to allow for proper ventilation.
IDENTIFYING ALL CONNECTOR (BACKSIDE)
10
9
1
2
3
4
1
AC IN
2
SPEAKERS OUT
3
HDMI (High Definition Multimedia
Interface)
5
Connect the supplied AC power cord.
4
PC IN
5
COMP VIDEO 1/COMP VIDEO 2
6
Connect to your PC with VGA type video output.
7
8
7
AV OUT/SPDIF OUT
8
VHF/UHF
9
AV IN 2 (Side)/S-video 2 (Side)
Connet to the external speakers output.
Connect to HDMI Set-Top-Box compatible DVD-R
or DVD player.
6
Connects to the input jacks of your video and
audio equipment. Video output through AV
OUT jacks is available only when your LCD TV is
displaying TV, AV1, AV2.
When your LCD TV is SPDIF out, which is for
digital audio output, digital receiver, or amplifier.
Connect to your VHF/UHF antenna or cable.
Connect to the output jacks of your VCR or
other video equipment.
Connect to the Digital Satellite Receiver or other
video equipments that supports YPbPr HD (High
Definition) video format.
10
AV IN 1/ S-video 1
Note: The SPDIF out supports PCM (pluse width modulate)
format and stereo mode only when the HDMI input source is
selected.
Connect to the output jacks of your VCR or other
video equipment.
11
HEADPHONES JACK
Connect to your headphones.
BASIC TV AND REMOTE CONTROL OPERATIONS
TELEVISION AND REMOTE CONTROL
1
2
3
4
5
Plug the power cable into AC inlet on
LCD TV set. Plug the power cord into an
outlet and switch TV set on.
-
+
Vo l u m e
Menu
Press POWER to turn on the LCD TV.
Press VOLUME + to increase the sound level, or
press VOLUME – to decrease the sound level.
Press CHANNEL +/– to select channels.
A/CH
Point the remote control toward on the front of
the LCD TV when operating the LCD TV with
the remote control.
BATTERY INSTALLATION
i+
6
7
8
Remove the battery compartment lid on the
button of the remote control.
Place two AA batteries in the remote. Be sure
the (+) and (-) ends of the batteries line up as
marked inside the battery compartment.
Reattach the battery compartment lid.
12
AV
-
Channel
+
REMOTE CONTROL
A/CH button
Press to go to previously selected
channel.
Unused key
Picture Format button
Press the FORMAT button repeatedly
to toggle among the six screen format
sizes;
Super zoom, 4:3, Movie expand 14:9,
Movie expand 16:9, 16:9 subtitle, or
Widescreen.
Sleep button
Press to set the LCD TV to turn
itself off within a certain time.
A/CH
Unused key
Power button
Press to turn the LCD TV on or off.
Smart Sound button
Press repeatedly to select among
the 5 settings; Personal, Speech,
Music, Movie, or Multimedia.
I-II button / Sound mode
Press repeatedly to select Mono,
Stereo, Dual I, Dual II, Nicam Mono,
Nicam Stereo, Nicam Dual I, Nicam
Dual II.
Menu button
Press to activate onscreen menu or
press to exit the onscreen menu.
Smart Picture button
Press repeatedly to select either
Personal, Rich, Nature, Soft, or
Multimedia of picture setting.
Cursor Buttons
(Left, Right, Up, Down)
Press these buttons to highlight,
select, return, and adjust items on
the TV’s on screen menu.
Volume button
Press to increase or decrease the
sound level.
i+
AV
Virtual Surround button
Adds greater depth and dimension to
TV sound.
Select from Virtual Surround ON or
Virtual Surround OFF.
Channel button
Press to adjust the channel up or down.
Mute button
Press to eliminate or restore the
LCD TV sound. Mute will appear
on the screen when the sound is
muted.
Number buttons
Press the number buttons for direct
access to the TV channels. For a 2 digit
channel, enter the 2nd digit after enter
1st digit.
Information Button
Press to see the current channel
number on the TV screen.
AV button
Press to select the video input source:
TV, HDMI, COMP VIDEO 1, COMP
VIDEO 2, S-video1, S-video 2(Side) ,
AV1, AV2 (Side), PC.
13
TIMER MENU CONTROLS
1
2
Press the SLEEP button on the remote control
to show the onscreen menu.
A/CH
0
Press the SLEEP button or CURSOR UP
repeatedly to increase your requiring sleep timing
and press CURSOR DOWN to decrease.
HELPFUL HINT
IMPORTANT
For the Timer to function, the set must not be
turned off. Once the set is turned off, the Timer
is disabled.
i+
AV
TIMER MENU CONTROLS ON THE SCREEN
1
2
3
Press the Menu button to see the onscreen menu.
Press CURSOR DOWN to highlight FEATURES and
press CURSOR RIGHT to enter it.
A/CH
Press CURSOR DOWN to choose the item you
want to adjust and press CURSOR RIGHT to enter
CLOCK, START TIME, STOP TIME, and SLEEP
TIMER.
Features
Picture
Sound
Features
Install
Timer
NR
Auto lock
Source list
Main Controls
Clock: Allow you to set the time.
Start Time: Allow you to set the time for
turning on the TV automatically.
Features
Timer
Timer
NR
Auto lock
Source list
Clock
Start time
Stop time
Sleep timer
Main Controls I Features
Timer
Clock
Start time
Stop time
Sleep timer
Stop Time: Allow you to set the time for
turning off the TV automatically.
Sleep Timer: Allow you to set the time period,
after which the TV will turn to standby mode
automatically.
This list will have values from 0 to 180.
4
Main Controls
In the timer column, press CURSOR UP/DOWN to
adjust the time, press CURSOR RIGHT to move to
the next character, then press CURSOR RIGHT to
confirm.
14
i+
AV
Clock
00 : 00
AM
TV PICTURE MENU CONTROLS
T
1
2
3
o adjust your LCD TV picture, select
a channel and follow these steps.
Main Controls
Press the MENU button to see the
onscreen menu.
When PICTURE menu is highlighted,
press CURSOR RIGHT to enter the
PICTURE menu.
6
Picture
Picture
Sound
Features
Install
Smart picture
Contrast
Brightness
Color
Sharpness
Tint
Color temp
Picture format
Press CURSOR DOWN to choose the
item you want to adjust and press
CURSOR RIGHT to enter
Smart Picture, Contrast, Brightness,
Color, Sharpness, Tint, Color temp, and
Picture format.
Smart picture
Smart picture
Contrast
Brightness
Color
Sharpness
Tint
Color temp
Picture format
Personal
Rich
Nature
Soft
Multimedia
Main Controls
Picture
Contrast
Smart picture
Contrast
72
Brightness
Color
Sharpness
Tint
Color temp
Picture format
Main Controls
Picture
A/CH
Brightness
Smart picture
Contrast
Brightness 38
Color
Sharpness
Tint
Color temp
Picture format
Main Controls
Smart Picture: Please refer to page
17, for details on Auto Picture Settings.
Contrast: Adjust to “sharpen” the
Picture quality. The black portions of
the picture become richer in darkness
and the white become brighter.
Brightness: Adjust to brighten the
dark parts of the picture. This appears
to add white to the color.
Color: Adjust to add or reduce color.
Sharpness: Adjust to improve detail.
Tint: Adjust to tinge the picture’s color
mix or hue.
Color temp: Adjust to increace or
decrease the color tempature. Select
from Normal, Warm, or Cool.
Picture format: Adjust to change
the screen format to match the type of
program you are watching. Please refer
to page 20 for detail.
4
5
Main Controls
Picture
Picture
Color
Smart picture
Contrast
Brightness
80
Color
Sharpness
Tint
Color temp
Picture format
Main Controls
Picture
Sharpness
Smart picture
Contrast
Brightness
Color
Sharpness 50
Tint
Color temp
Picture format
i+
AV
Main Controls
Picture
Tint
Smart picture
Contrast
Brightness
Color
Sharpness
Tint
0
Color temp
Picture format
Main Controls
Press CURSOR UP/DOWN to adjust
the item.
Picture
Color temp
Smart picture
Contrast
Brightness
Color
Sharpness
Tint
Color temp
Picture format
Normal
Warm
Cool
Main Controls
Press CURSOR DOWN to select and
press CURSOR RIGHT to adjust other
picture controls.
Press MENU repeatedly to remove
the menu from the screen.
HELPFUL HINT
Any adjustment of Brightness, Color,
Contrast or Sharpness will be stored into
PERSONAL at Smart Picture section.
15
Picture
Picture format
Smart picture
Contrast
Brightness
Color
Sharpness
Tint
Color temp
Picture format
Super zoom
4:3
Movie expand 14:9
Movie expand 16:9
16:9 subtitle
Widescreen
T
1
2
3
4
5
6
7
TV SOUND MENU CONTROLS
o adjust your LCD TV Sound, select a channel and
follow these steps.
Press the MENU button to see the menu.
A/CH
Press CURSOR DOWN to highlight the
SOUND menu.
Main Controls
Sound
Picture
Sound
Features
Install
Smart sound
Settings
Virtual surround
Main Controls
Sound
Press CURSOR RIGHT to enter the SOUND
menu.
Smart sound
Settings
Virtual surround
Press CURSOR DOWN to choose the item
you want to adjust and press CURSOR RIGHT
to enter: Smart Sound, Settings, or Virtual
Surround.
Smart Sound: Please refer to page 17 for
details on Smart Sound Settings.
Settings: Allows you to adjust Treble, Bass,
and Balance of the sound.
Virtual Surround: Adds greater depth and
dimension to TV sound. Select from ON or
OFF.
Main Controls
Sound
Smart sound
Settings
Virtual surround
i+
AV
Main Controls
Sound
Smart sound
Settings
Virtual surround
Press CURSOR UP/DOWN to adjust the item.
Press CURSOR DOWN button to select and
press CURSOR RIGHT to adjust other sound
controls.
Press MENU repeatedly to remove
the menu from the screen.
HELPFUL HINT
Any adjustment of Treble and Bass will
be stored into PERSONAL at Smart
sound.
16
Smart sound
Personal
Speech
Music
Movie
Multimedia
Settings
Treble
Bass
Balance
Virtual surround
On
Off
W
SMART PICTURE CONTROL
hether you’re watching a movie or a video
game, your LCD TV has video control preset
that will match with your current program source or
content. Smart Picture quickly resets your TV’s video
controls for a number of different types of programs
and viewing conditions that you may have in your
home. The Personal, Rich, Nature, Soft, Multimedia,
and Smart Picture controls have been preset at the
factory to easily adjust the TV’s brightness, color,
picture, sharpness, and color temperature levels. In
the Personal smart picture mode you can
create your own preferred video settings.
1
2
Smart picture
Personal
Rich
Nature
Soft
Multimedia
A/CH
Press the SMART PICTURE button on the remote
control. The current Smart Picture setting will appear
on the screen.
Press the SMART PICTURE button repeatedly or
press CURSOR UP/DOWN to select either
Personal, Rich, Nature, Soft, or Multimedia.
i+
AV
Note:The settings of the Personal smart picture mode
can be adjusted in picture options within the onscreen
menu. The Personal mode is the only mode which
can be adjusted by the user via the onscreen picture
control menu.
SMART SOUND CONTROL
S
mart Sound allows you to select from four user
presets and a personal mode that you set
according to your own preferences through the
onscreen Sound menu. The five user presets (
Personal, Speech, Music, Movie, and Multimedia)
enable you to tailor the TV sound so as to enhance
the particular program you are watching. Following
these steps to select any of the options.
1
2
Smart sound
Personal
Speech
Music
Movie
Multimedia
A/CH
Press the SMART SOUND button on the remote
control. The current Smart Sound setting will
appears on the screen.
Press the SMART SOUND button repeatedly or
press CURSOR UP/DOWN to toggle among the
five setting: Personal, Speech, Music, Movie, and
Multimedia.
i+
Note: The settings of the Personal smart sound mode can
be adjusted in sound control within the onscreen
menu. The Personal mode is the only mode which
can be adjusted by the user via the onscreen sound
control menu.
17
AV
NR (NOISE REDUCTION)
A
utomatically filters out and reduces the image noise
and improves picture quality when receiving weak
video signals.
A/CH
1
2
3
4
Press the MENU button to see the
onscreen menu.
Main Controls
Features
Picture
Sound
Features
Install
Timer
NR
Auto lock
Source list
Main Controls
Press CURSOR DOWN to highlight
FEATURES and press CURSOR RIGHT
to enter it.
Press CURSOR DOWN to highlight NR
function and press CURSOR RIGHT to
enter it.
Features
NR
Timer
NR
Auto lock
Source list
On
Off
NR
On
Off
Press CURSOR DOWN to select ON
or OFF and press CURSOR RIGHT to
activate or inactivate noise reduction .
i+
18
AV
T
AUTO LOCK
he AUTO Lock feature allow you to lock channels, and prevent your children from watching unsuitable content of
programmes.
AUTO Lock offers various BLOCKING controls from which to choose:
Access Code - An Access Code must be set to prevent children from unblocking questionable or censored programming set by
their parents.
Lock Program - Select the TV channel you want to lock.
Change Code - To change your access code or overwriting.
Clear All - To unlock all locked channels and programming.
AUTO LOCK ACCESS CODE
O
ver the next few pages you’ll learn how
to block programs and understand the rating
terms for certain broadcasts. First, set an access code.
1
2
3
4
5
6
Press the MENU button to see the
onscreen menu.
A/CH
Press CURSOR DOWN to highlight the
FEATURES menu, then press CURSOR RIGHT
to enter.
Main Controls
Features
Picture
Sound
Features
Install
Timer
NR
Auto lock
Source list
Main Controls
Press CURSOR DOWN to select AUTO LOCK
and press CURSOR RIGHT to enter.
Features
Auto lock
Timer
NR
Auto lock
Source list
Lock program
Change code
Clear all
Main Controls
ACCESS CODE will appear on the screen.
i+
Enter a four-digit code using the Number
buttons.
Press MENU repeatedly to remove
the menu from the screen.
HELPFUL HINT
Remember that 0711 is the default AutoLock
code. If your access code has been changed by
someone other than you (a child, for example)
or you have forgotten the code, you can always
get in by inputting the default code.
19
AV
Features
Auto lock
Timer
NR
Auto lock
Source list
Access code
AUTO LOCK PROGRAM
A
fter your personal access code has been
set (see the previous page), you are ready to
select the channels or inputs you want to block out
or censor.
A/CH
1
Press the MENU button to see the
onscreen menu.
2
Press the CURSOR DOWN to highlight the
FEATURES menu, then press CURSOR RIGHT
to enter.
3
Press CURSOR DOWN to select
AUTO LOCK, then press CURSOR RIGHT to
enter (please refer to page 19 for detail).
Main Controls
Features
Picture
Sound
Features
Install
Timer
NR
Auto lock
Source list
Main Controls
Features
Auto lock
Timer
NR
Auto lock
Source list
Lock program
Change code
Clear all
Main Controls I Features
4
5
6
i+
Press CURSOR RIGHT to enter
LOCK PROGRAM. Use the Number buttons to
enter the channel which you are going to block.
Press CURSOR UP/DOWN to block the
current channel.
Press MENU repeatedly to remove the menu
from the screen.
Note:You can block additional channels by using
Number buttons to jump to another channel.
20
AV
Auto lock
Lock program
Lock program
Change code
Clear all
18
USING THE PICTURE FORMAT
Y
ou can change the picture format size to match
the type of program you are watching. Select the
normal Super zoom, 4:3, Movie expand 14:9, Movie
expand 16:9, 16:9 subtitle, or Widescreen aspect
ratios.
1
Super zoom
Press the MENU button to see the
onscreen menu.
Picture
Picture
Sound
Features
Install
Smart picture
Contrast
Brightness
Color
Sharpness
Tint
Color temp
Picture format
Main Controls
4:3
2
3
4
Main Controls
When PICTURE menu is highlighted, press
CURSOR RIGHT to enter.
Press CURSOR DOWN to highlight PICTURE
FORMAT and press CURSOR RIGHT to enter.
Picture
Picture format
Smart picture
Contrast
Brightness
Color
Sharpness
Tint
Color temp
Picture format
Super zoom
4:3
Movie expand 14:9
Movie expand 16:9
16:9 subtitle
Widescreen
Movie expand 14:9
A/CH
Press CURSOR UP/DOWN to toggle among
Super zoom, 4:3, Movie expand 14:9,
Movie expand 16:9, 16:9 subtitle, or Widescreen
formats, then press CURSOR RIGHT to enter.
Movie expand 16:9
Note: Press the FORMAT button repeatedly
to toggle among the six screen format
sizes; Super zoom, 4:3, Movie expand 14:9,
Movie expand 16:9, 16:9 subtitle, or
Widescreen.
5
i+
16:9 subtitle
Press MENU repeatedly to
remove the menu from the screen.
Widescreen
HELPFUL HINT
1. For 720p/1080i, the default picture format will
be WIDESCREEN at HD and DVI modes. And
the picture format function will not be
accessible.
2. For 576i/576p, the picture format function is
accessible at HD and DVI modes.
3. For PC mode, the default picture format will
be FULLSCREEN and picture format function
can be accessible.
21
AV
PC PICTURE CONTROLS
T
his TV can also be used as a PC Monitor. A
PC video signal must be present or the TV will go
into standby mode. The PC Picture controls allow you
to adjust the picture.
Note: Make sure you are in PC mode.
Main Controls
1
2
3
Press the MENU button on the remote
control to see the onscreen menu.
Main Controls
Picture
Picture
Color temp
Picture
Sound
Features
Install
Color temp
Brightness
Contrast
Auto adjust
Manual adjust
Color temp
Brightness
Contrast
Auto adjust
Manual adjust
Normal
Warm
Cool
When the PICTURE menu is highlighted, press
CURSOR RIGHT to enter the PICTURE menu.
Main Controls
Picture
Press CURSOR DOWN to highlight the item
that you would like to adjust and press CURSOR
RIGHT to enter.
A/CH
Main Controls
Picture
Contrast
Color temp
Brightness
Contrast
72
Auto adjust
Manual adjust
Color Temp: Adjust the color
temperature of the picture. Select from
Normal, Warm, or Cool.
Brightness: Adjust to brighten the darkest
parts of the picture.
Contrast: Adjust to “sharpen” the Picture
quality. The black portions of the picture
become richer in darkness and the white
become brighter.
Auto Adjust: The LCD Monitor will
automatically adjust to the best image
position, phase, and clock setting.
Manual Adjust: The Manual Adjust control
allow you to manually fine tune the image as it
appears on the screen.
Phase-eliminates the horizontal
interfering lines.
Clock-eliminates the vertical interfering lines.
Horizontal-adjust the horizontal
placement of the picture.
Vertical-adjust the vertical placement of the
picture.
4
5
Brightness
Color temp
Brightness 38
Contrast
Auto adjust
Manual adjust
Main Controls
Picture
Auto adjust
Color temp
Brightness
Contrast
Auto adjust
Manual adjust
Yes
Main Controls
i+
AV
Picture
Manual adjust
Color temp
Brightness
Contrast
Auto adjust
Manual adjust
Phase
Clock
Horizontal
Vertical
Press CURSOR UP/DOWN to adjust the item.
Press MENU repeatedly to remove
the menu from the screen.
HELPFUL HINT
1. To adjust other items repeat steps 3 and 4.
2. Color Temp can also be activated by pressing
Smart Picture button on your Remote Control.
If you are willing to reset adjustment back to
original value, please enter to Factory Reset in
Install menu.
22
PC AUDIO CONTROLS
T
his TV can also be used as a PC Monitor. A PC
video signal must be present or the TV will go
into standby mode. The AUDIO controls allow you
to adjust the sound.
Note: Make sure you are in PC mode.
1
2
3
4
Press the MENU button on the
remote control to show the
onscreen menu.
A/CH
Press CURSOR DOWN to highlight the
SOUND menu, then press CURSOR RIGHT
to enter.
Smart sound
Settings
Virtual surround
Smart sound
Settings
Virtual surround
Press CURSOR DOWN to highlight the
item that you would like to adjust and press
CURSOR RIGHT to enter selection.
Smart Sound: Allows you to select from 4
factory-set controls and a personal control.
The 5 factory-set controls (Personal,
Speech, Music, Movie, and Multimedia)
enhance the particular program you are
watching.
Main Controls
Sound
Smart sound
Settings
Virtual surround
i+
AV
Main Controls
Sound
Smart sound
Settings
Virtual surround
Virtual Sound: Adds greater depth and
dimension to PC sound.
6
Sound
Picture
Sound
Features
Install
Main Controls
Sound
Settings: Allows you to adjust Treble, Bass,
and Balance of the Sound.
5
Main Controls
Press CURSOR RIGHT to enter the item
you would like to adjust.
Press CURSOR UP/DOWN to adjust.
Press MENU repeatedly to remove the
menu from the screen.
HELPFUL HINT
To adjust other items repeat steps 4 and 5.
23
Smart sound
Personal
Speech
Music
Movie
Multimedia
Settings
Treble
Bass
Balance
Virtual surround
On
Off
USING PC PIP (PICTURE IN PICTURE) FEATURE
P
IP (Picture-in-Picture) feature allows you to call
up a subscreen when you are using your TV as a
monitor.
Note: Make sure you are in PC mode.
1
2
3
4
5
Press the MENU button to see the
onscreen menu.
A/CH
Press CURSOR DOWN to highlight the
FEATURES menu.
Main Controls
Features
Picture
Sound
Features
Install
Picture format
PIP
Main Controls
Press CURSOR RIGHT to enter the FEATURES
menu.
Press CURSOR DOWN to highlight PIP and
press CURSOR RIGHT to enter.
Features
Picture format
Picture format
PIP
Full screen
4:3
Main Controls
Press CURSOR DOWN to highlight the item
that you would like to adjust.
SIZE: Turn off and set the size of PIP. You
can choose your preferred size of small,
large, or PBP (Picture Beside Picture).
Input: Select video source of PIP from TV,
AV1, AV2(Side).
Position: Select which corner of the
position of PIP.
Sound: Select audio source of PIP or PC.
i+
HELPFUL HINT
PIP feature only supports TV, AV1, and AV2(Side).
24
AV
Features
PIP
Picture format
PIP
Size
Input
Position
Sound
SETTING UP THE PC MODE (PERSONAL COMPUTER MONITOR)
37TA1800/42TA1800 (37”/42” LCD TV)
No
Resolution
1
640 x 480
2
3
800 x 600
Mode
V. Frequency (Hz)
H. Frequency (kHz)
VGA VESA 60
59.940
31.469
SVGA VESA 56
56.250
35.156
SVGA VESA 60
60.317
37.897
4
1024 x 768
XGA VESA 60
60.004
48.363
5
1280 x 720
VESA CVT
59.855
44.772
*6
1280 x 768
VESA CVT
60.000
47.700
* Recommended Resolution
25
TROUBLE SHOOTING TIPS
S-VHS Color Becomes Faint
No Power
• Unplug socket for S-Video connection. Reconnect
the S-Video socket of the TV carefully to the VCR
socket.
• Check the TV power cord. Unplug the TV, wait 10
seconds, then reinsert the plug into the outlet and
push the POWER button again.
• Check that the outlet is not on a wall switch.
• Be sure the fuse is not blown on the AC power
strip, if one is being used.
TV Only Produces MONO Sound
No Picture
• Check antenna/cable connections. Are they properly
secured to the TV’s ANT75Ω plug?
• Try running the Auto Store feature to find all
available channels.
• Press the AV button on the remote to make
sure the correct signal source is selected.
• If using an accessory device, be sure that it is
functioning properly.
• If in PC Mode, a video signal MUST BE present or
the TV will turn off.
No Sound
• Check the VOLUME buttons.
• Check the MUTE button on the remote control.
• If you’re attempting to hook up auxiliary
equipment, check the audio jack connections.
No AV Signal
• Check whether AV and S-Video sockets connected
simultaneously.
• If using a cable box with RF only type connections,
the signal coming from the cable box will be
produced in MONO only.
• Check Sound control setting. Change setting to
Stereo.
Remote Does Not Work
• Check the batteries. Place lithium cell in the
remote. Be sure the (+) and (-) ends of the batteries
line up as marked inside the battery compartment.
• Clean the remote control and the remote control
sensor window on the TV.
• Check the TV power cord. Unplug the TV, wait 10
seconds,then reinsert the plug into the outlet and
push the POWER button again.
• Be sure the fuse is not blown on the AC power
strip, if one is being used.
• Check to be sure the TV outlet is not on a wall
switch.
• Be sure that the remote is in the correct operating
mode.
• Be sure the remote is pointed at the Remote
Sensor Window on the TV. See page 2 of the Quick
Use Guidefor details.
TV Displays Wrong Channel or No Channels
Above 13
• Repeat channel selection.
• Add the desired channel numbers (using the
CHANNEL EDIT control) into the TV’s memory.
• Run the Auto Store feature to find all available
channels.
26
CARE AND CLEANING
WARNING concerning stationary images on the TV
Screen: Do not leave fixed images on the screen for extended periods of time. This can cause uneven aging of the LCD
panel. Normal use of the TV should involve viewing of programs that have constantly moving or changing images. Do
not leave still images on screen for extended periods of time. Do not display the same images too frequently; if you do,
subtle “ghost” images can be left on the LCD screen. Sources of stationary images may be Laser discs, video games,
Compact Discs Interactive (CD-i), or paused Digital Video Discs (DVDs) or video tapes.
Here are some common examples of stationary images:
• DVD menus list DVD content.
• Letterbox black bars appear at the top and bottom of the TV screen when a wide screen (16:9) movie is viewed on a
TV with standard (4:3) aspect ratio. This is available with some DVDs.
• Video game images and scoreboards
• Television station logos cause a problem if they are bright and stationary. Moving or low-contrast graphics are
less likely to damage the picture tube.
• Stock market tickers may appear at the bottom of the TV screen if the TV programming covers this news.
• Shopping channel logos, pricing displays may be bright and may appear constantly during the show.
These are usually in the same location on the TV screen.
TV Location
• To avoid cabinet warping, cabinet color changes, and an increased chance of TV failure, do not place the TV
where temperatures can become excessively hot (for example, in direct sunlight or near a heating appliance).
• Allow a free flow of air around the TV.
Cleaning
• To avoid possible shock hazard, remove the TV’s power cord from the electrical outlet before cleaning.
• Regularly dust the TV with a dry, non-scratching duster.
• When cleaning the TV, take care not to scratch or damage the screen surface. Avoid wearing jewelry or using
anything abrasive. Do not use household cleaners. Wipe the screen with a clean cloth dampened with water.
Use even, easy, vertical strokes when cleaning.
• Occasionally vacuum the vents on the rear of the TV.
• Never use thinners, insecticide sprays, or other chemicals on or near the cabinet. They may blemish the cabinet
permanently.
27
INDEX
A
Auto Store . . . . . . . . . . . . . . . . . . . . . . . . . . . . . . . . . . . 7, 25
B
Balance . . . . . . . . . . . . . . . . . . . . . . . . . . . . . . . . . . . . 16, 23
Bass . . . . . . . . . . . . . . . . . . . . . . . . . . . . . . . . . . . . . . . . 16, 23
Batteries . . . . . . . . . . . . . . . . . . . . . . . . . . . . . . . . . 3, 12, 26
Brightness . . . . . . . . . . . . . . . . . . . . . . . . . . . . . . . .15, 17, 22
C
Care and Cleaning . . . . . . . . . . . . . . . . . . . . . . . . . . . . .. . 27
Channel Setting . . . . . . . . . . . . . . . . . . . . . . . . . . . . . . . . . . 9
Color . . . . . . . . . . . . . . . . . . . . . . . . . . . . . . . . .15, 17, 22, 27
F
Factory Reset . . . . . . . . . . . . . . . . . . . . . . . . . . . . . . . . . . . 10
I
Index . . . . . . . . . . . . . . . . . . . . . . . . . . . . . . . . . . . . . . . . . . 28
L
Language . . . . . . . . . . . . . . . . . . . . . . . . . . . . . . . . . . . . . . . . 6
M
Mono . . . . . . . . . . . . . . . . . . . . . . . . . . . . . . . . . . . .13, 16, 26
Manual Store . . . . . . . . . . . . . . . . . . . . . . . . . . . . . . . . . . . . .8
S
Sound . . . . . . . . . . . . . . . . . . . . . . . . . . . . . 12, 13, 17, 23, 26
Sound Mode . . . . . . . . . . . . . . . . . . . . . . . . . . . . . . . . . 13, 17
Stereo . . . . . . . . . . . . . . . . . . . . . . . . . . . . . . . . . . . 13, 16, 26
T
Table of Contents . . . . . . . . . . . . . . . . . . . . . . . . . . . . . . . . 5
Tint . . . . . . . . . . . . . . . . . . . . . . . . . . . . . . . . . . . . . . . . .15, 17
Treble . . . . . . . . . . . . . . . . . . . . . . . . . . . . . . . . . . . . .5,16, 24
Troubleshooting . . . . . . . . . . . . . . . . . . . . . . . . . . . . . . . . .26
TV Operation (Basic) . . . . . . . . . . . . . . . . . . . . . . . . . . . .12
W
Welcome . . . . . . . . . . . . . . . . . . . . . . . . . . . . . . . . . . . . . . . .2
28
37TA1800
42TA1800
Arabic
中文
English
液晶電視
用戶手冊
型號:
系列號:
盡快提交您的產品注冊卡
盡享更多好處
向 PHILIPS 注冊您的型號后,將有資格獲得下面列出的所有好處,千万不要錯過!請盡快填寫和返
回您的“產品注冊卡”
,以确保:
*購買凭證
*產品安全通知
返回附帶的卡后,即證明您的購
買日期正确有效,也就是說,无
需提供其它書面材料即可獲得保
修服務。
注冊產品后,万一產品存在安全缺
陷或者需要召回,您將直接收到來
自制造商的通知。
*擁有產品即獲得更多好
處
注冊產品后,您將享受應得的所有
好處,包括特殊优惠等。
了解這些安全符號
小心
切勿打開以免触電
感謝您購買本產品,
歡迎您加入“大家庭”!
小心:為降低触電危險,請勿卸下机蓋(或后蓋)。
本產品內部沒有用戶可以維修的部件。委托專業維修
人員進行維修。
尊敬的 PHILIPS 產品所有者:
感謝您對 PHILIPS 的信任。您選擇了當今制造最精良
服務最完善的一款產品。我們將盡全力保證您愉快地
使用本產品。
這种“閃電”圖示表示產品內部的非絕
緣材料可能導致触電。為保證家中所有
成員的安全,請不要卸下產品机盖。
這种“惊嘆號”圖示表示您需要加以注
意的功能,應仔細閱讀附帶的說明資料
以防止操作和維護問題。
警告:為降低火灾或電擊風險,不要讓本產品遭
受雨淋或受潮,也不要在本產品上面放置盛滿
液体的物品,如花瓶等。
小心:為防止電擊,應將寬片插頭插入寬插座
中,并确保完全插入到位。
供客戶使用
在下面填入系列號(位于机壳背面)。保留此信
息以備將來參考。
型號:_________________________
系列號:_______________________
訪問全球網站 http://www.usasupport.philips.com
2
重要安全事項
在使用本產品前請務必閱讀
1.
2.
3.
4.
5.
6.
7.
8.
9.
10.
11.
12
13.
14.
閱讀這些注意事項。
妥善保存這些注意事項。
遵循所有警告。
遵循所有指導說明。
不要在靠近水的地方使用本產品。
僅使用干布進行清洁。
不要擋住任何通風口。
按照制造商指導說明進行安裝。
不要將本產品安裝在熱源旁邊,如散熱器、調溫
器、火爐或其它產生熱量的設備(包括放大器)。
不要損坏极性或接地型插頭的安全設計。极性插
頭有一寬一窄兩个插片。接地型插頭有兩个插片和
一个接地插片。寬插片或接地插片用于安全目的。
當提供的插頭無法插入插座時,請与電工聯系以換
成合适的插座。
不要踩踏電源線,不要在插頭、便利插座、与本產
品連接的部位等處卡住電源線。
僅使用制造商指定的連接件/附件。
僅使用制造商指定的或隨本產品一起銷售
的推車、平台、三腳架、支架或桌子等。使
用推車移動本產品時,應小心謹慎以避免
因翻倒而受傷。
在雷電天气条件下或者長時間不使用時,拔掉本產
品的電源線。
委托專業維修人員進行維修。當本產品由于任何原
因而損坏時,如電源線或插頭損坏、液体濺入或物
品掉入本產品內部、遭受雨淋或受潮、工作不正常、
或掉落等,應維修本產品。
15. 損坏時進行維修 – 在下列情况下,應由專業維修
16.
17.
18.
19.
20.
21.
3
人員維修本產品:
A. 電源線或插頭損坏
B. 物品掉入或液体濺入產品內部
C. 本產品遭受雨淋
D. 本產品工作不正常或者性能發生明顯變化
E. 本產品掉落,或者机壳損坏
傾斜╱穩定性 – 所有電視的机壳設計的傾斜和穩
定性属性均必須符合建議的相關国際標准。
• 不要在机壳前部或頂部施加過多的拉力而破坏這
些設計標准,否則最終可能會導致本產品翻倒。
‧ 此外,不要在机壳頂部放置電子設備╱玩具等,
以避免對您或幼儿帶來危險。這些物品一旦从頂部
意外掉落,可能導致本產品損坏和/或人員傷害。
壁挂或吊頂安裝 – 以壁挂或吊頂方式安裝本產品
時,必須遵循制造商的建議。
電力線 – 室外天線應遠离電力線。
室外天線接地 – 接收器連接外部天線時,務必將
天線系統接地,以便對電壓突變和靜電積聚提供一
定程序的防護。
物品和液体進入 – 應避免物品或液体通過机壳上
的開口掉入或濺入本產品內部。
電池使用注意事項 – 為防止因電池泄漏而導致人
身傷害、財產損坏、或本產品損坏:
• 正确安裝電池,按照本產品上的標記放置 + 和
– 极。
• 不要混合使用電池(新舊電池或者碳性和碱性電
池等)。
• 長時間不使用本產品時,應取出電池。
預防措施
其它安全預防措施
• 將底座螺絲以正确方式擰入電視,确保液晶電視底座与電視牢固地固定在一起(參見快速指南)。否則可
能導致電視不安全。
• 如果以壁挂方式安裝液晶電視,應由專業安裝人員進行安裝。安裝不正确可能導致電視不安全。
• 在下列情况下拔掉主電源插頭:
— 清洁電視屏幕,切勿使用研磨性清洁劑。
— 在雷電天气条件下。
— 長期無人看管電視。
• 液晶電視開机后,不要四處移動。
• 不要用尖利或堅硬物品接触、按壓或刮擦液晶屏幕表面。
• 當液晶屏幕表面落有灰塵時,使用脫脂棉布或其它柔軟物品輕輕擦拭。不要使用丙酮、甲苯或酒精等清洁
屏幕表面。這些化學制品會損坏屏幕表面。
• 盡快擦干水或唾液等。這些液体停留一段時間后,容易導致液晶屏幕變形和褪色。
• 溫度發生變化時,小心凝露現象。凝露可能導致液晶屏幕和電子元件損坏。凝露消退后,液晶屏幕上會留
下斑点或污点。
• VESA 盖內側標注有“小心”信息(參見下圖)。為閱讀該信息,請打開 VESA 盖。
放置液晶
•
•
•
•
將液晶電視放在穩固的底座或台架上。确保台架足以支稱液晶電視的重量。
确保液晶電視机身四周至少留出 15.24厘米的空間以确保通風良好。
不要將液晶電視放在散熱器或其它電源旁边。
不要將液晶電視放在容易遭受雨淋或過分潮濕的地方。
回收程序/廢棄��
• 為盡可能減少對環境的危害,液晶電視附帶的電池不含有汞或鎘鎳。如果可能,在廢棄電池時使用您所在
地區實施的回收方式。
• 本液晶電視使用可回收的材料。為盡可能減少環境中的廢棄物,請与您所在地區能夠回收廢舊電視以分解
和收集可再利用材料的公司聯系,或者与經銷商聯系以了解電視回收方式。
• 請按照您所在地區正确的廢棄物管理方式廢棄包裝箱和包裝材料。
4
目錄
簡介
此處介紹這款新液晶電視的一些特殊功能。
歡迎使用/注冊您的電視 . . . . . . . . . . . . . . . . . . . . . . . . . 2
重要安全事項 . . . . . . . . . . . . . . . . . . . . . . . . . . . . . . . . . . 3
預防措施 . . . . . . . . . . . . . . . . . . . . . . . . . . . . . . . . . . . . . . . . 4
目錄 . . . . . . . . . . . . . . . . . . . . . . . . . . . . . . . . . . . . . . . . . . . . 5
聲音/視頻輸入插孔:用于快速將其它設備連接到本
液晶電視。
自動搜尋頻道(自動搜尋):方便快捷地設置可用
的頻道。
設定
語言設置 . . . . . . . . . . . . . . . . . . . . . . . . . . . . . . . . . 6
自動搜尋(設置頻道). . . . . . . . . . . . . . . . . . . . . 7
人工儲存電視頻道 . . . . . . . . . . . . . . . . . . . . . . . . . . . . . . . 8
頻道設置. . . . . . . . . . . . . . . . . . . . . . . . . . . . . . . . . . . . . . . . 9
复原設定 . . . . . . . . . . . . . . . . . . . . . . . . . . . . . . . . . . . . . . . 10
液晶電視概覽 . . . . . . . . . . . . . . . . . . . . . . . . . . . . . . . . . . 11
基本電視和遙控器操作 . . . . . . . . . . . . . . . . . . . . . . . . . . 12
遙控器 . . . . . . . . . . . . . . . . . . . . . . . . . . . . . . . . . . . . . . . . . 13
定時菜單控制 . . . . . . . . . . . . . . . . . . . . . . . . . . . . . . . . . . .14
屏幕菜單:与設置電視控制有關的帮助性信息(英
語或中文)。
遙控器:控制液晶電視的功能。
睡眠定時:在您指定的時間內關閉液晶電視(从當
前時間算起 0-180 分鐘)。
圖像菜單
儿童鎖:如果不希望儿童觀看不适宜的節目,可以
禁止觀看特定電視頻道。
電視圖像菜單控制 . . . . . . . . . . . . . . . . . . . . . . . . 15
聲音菜單
電視聲音菜單控制 . . . . . . . . . . . . . . . . . . . . . . . . 16
標准广播 (VHF/UHF) 或有線電視頻道能力。
功能菜單
立体聲能力:內置功率放大器和双揚聲器系統,能
夠接收以立体聲广播的電視節目。
靈智圖像控制 . . . . . . . . . . . . . . . . . . . . . . . . . . . . 17
靈智聲音控制. . . . . . . . . . . . . . . . . . . . . . . . . . . . . . . . . . . . 17
降噪 . . . . . . . . . . . . . . . . . . . . . . . . . . . . . . . . . . . . .18
儿童鎖 . . . . . . . . . . . . . . . . . . . . . . . . . . . . . . . . . . . . . . . . . .19
儿童鎖進入密碼 . . . . . . . . . . . . . . . . . . . . . . . . . . . . . . . . . 19
自動鎖定節目 . . . . . . . . . . . . . . . . . . . . . . . . . . . . . . . . . . . 20
使用屏幕格式 . . . . . . . . . . . . . . . . . . . . . . . . . . . . . . . . . . . 21
高音、低音和平衡:增強液晶電視的聲音效果。
PC 模式
PC 圖像控制 . . . . . . . . . . . . . . . . . . . . . . . . .22
PC聲音控 . . . . . . . . . . . . . . . . . . . . . . . . . . . . . . . . . 23
使用 PC 画中画功能. . . . . . . . . . . . . . . . . . . . . . . . . 24
設置 PC 模式 . . . . . . . . . . . . . . . . . . . . . . . . . . . . . . 25
注意: 本手冊适用于多个版本和型號。您液晶電
視的功能不一定与本手冊介紹的所有功能完全相
同。這是正常現象,不需要与經銷商聯系或請求維
修。
一般信息
故障排除技巧 . . . . . . . . . . . . . . . . . . . . . . . . . . . .26
保養和清洁 . . . . . . . . . . . . . . . . . . . . . . . . . . . . . . . . . . . . . 27
索引 . . . . . . . . . . . . . . . . . . . . . . . . . . . . . . . . . . . . . . . . . . . . 28
廢棄
這台新液晶電視及其包裝材料中包含可回收和再利
用的材料。專業性公司可以回收您的產品以提取可
再利用的材料,从而減少需要正确處理的廢棄物。
本產品中還包含電池,電量耗盡后不要隨意丟棄它
們,而應交給相關回收站作為小型化學廢棄物進行
處理。
更換現有電器時,請查閱當地管理机构關于處理廢
棄電視、電池和包裝材料的規定。
5
語言設置
對于英語或中文的電視用戶,屏幕上顯示
“語言”選項。利用“語言”控制,您可以
設置電視的屏幕菜單,使其以英語或中文顯
示。
1
2
3
4
5
按遙控器上的 MENU(菜單)按鈕以打開屏
幕菜單。
A/CH
主控
設定
圖像
聲音
功能
設定
語言
自動搜尋
人工搜尋
頻道設置
復原設定
按光標向下按鈕以高亮顯示“設定”菜單。
主控
按光標向右按鈕以高亮顯示“語言”。
按光標向右按鈕以進入“語言”。按光標向
下按鈕以選擇 English(英語)或 Simplified
Chinese(中文),然后按光標向右按鈕進
行确認。
反复按 MENU(菜單)按鈕,直至菜單从屏
幕上消失。
i+
有用提示
請記住,“語言”控制只是讓電視屏幕
菜單項目以英語或中文文字顯示。它并
不改變其它屏幕文字功能。
6
AV
設定
語言
語言
自動搜尋
人工搜尋
頻道設置
復原設定
English
中文
自動搜尋(設置頻道)
本液晶電視可以自動設置當地(或有線電視)
的頻道。這樣,您就可以方便地按 CH (+) 或
CH (-) 按鈕選擇您所在區域的電視台。
1
2
3
4
5
按遙控器上的 MENU(菜單)按鈕以顯
示屏幕菜單。
A/CH
設定
圖像
聲音
功能
設定
語言
自動搜尋
人工搜尋
頻道設置
復原設定
按光標向下按鈕以高亮顯示“設定”菜
單。
主控
設定
自動搜尋
語言
自動搜尋
人工搜尋
頻道設置
復原設定
按光標向右按鈕以進入“設定”菜單。
按光標向下按鈕以高亮顯示“自動搜
尋”控制。
開始?
自動搜尋
請等待
節目找到
頻率
按光標向右按鈕進入“自動搜尋”,然
後再按光標向右按鈕啟動“自動搜尋”
以搜索頻道。
i+
6
主控
AV
“自動搜尋”完成后,反复按 MENU
(菜單)按鈕,直至菜單从屏幕上消
失。
有用提示
• 在打開包裝并接通這台新電視的電源后,立即進行自動搜尋功能
設置電視,使其記憶您所在地區可用的天線或有線電視頻道。如
果不進行自動搜尋功能設置頻道,電視可能無法正常工作。
‧ 進行自動搜尋功能后,檢查搜尋結果。按 CH (+) 或 CH (-) 按
鈕,看看您能選擇哪些頻道。
‧ 請記住,必須首先將天線或有線電視信號連接至您的液晶電視。
7
0
MHz
人工搜尋電視頻道
您
也可以選擇手工調出電視頻道。利用
手工調台,您可以人工搜尋每个頻
道。
1
按遙控器上的 MENU(菜單)按鈕以
顯示屏幕菜單。
主控
設定
圖像
聲音
功能
設定
語言
自動搜尋
人工搜尋
頻道設置
復原設定
主控
2
設定
A/CH
按光標向下按鈕以高亮顯示“設定”
菜單,然后按光標向右按鈕進入子菜
單。
語言
自動搜尋
人工搜尋
頻道設置
復原設定
人工搜尋
人工搜尋
節目號碼
微調
儲存
主控 I 設定
3
4
5
6
7
8
人工搜尋
人工搜尋
節目號碼
微調
儲存
選擇“人工搜尋”,然后按光標向右
按鈕進入“人工搜尋”功能,再按一
次光標向右按鈕啟動人工搜尋頻道頻
率,或者按數字按鈕以顯示所需的頻
道頻率,最後再按一次光標向右按鈕
啟動搜尋。
人工搜尋
xxx.xx MHz
開始?
主控 I 設定
人工搜尋
人工搜尋
節目號碼
微調
儲存
i+
确認頻道頻率后,按光標向下按鈕選
擇“節目號碼”,然后按光標向右按
鈕進入節目號碼”。
AV
節目號碼
2
主控 I 設定
人工搜尋
微調
人工搜尋
節目號碼
微調
儲存
主控 I 設定
按光標向上/向下按鈕指定頻道號碼,
然后按光標向右/向左按鈕確認頻道。
人工搜尋
人工搜尋
節目號碼
微調
儲存
如果頻道接收效果不佳,可以按光標
向下按鈕高亮顯示“微調”,然后按
光標向右按鈕進進入“微調”功能。
按光標向上/向下按鈕進行調整,按光
標向右/向左按鈕確認。
注意:如果頻道接收效果良好,請轉
到步驟 7。
按光標向下按鈕高亮顯示“儲存”功
能,按光標向右按鈕進入,然后按光
標向右按鈕确認儲存。
反复按 MENU(菜單)按鈕,直至菜
單从屏幕上消失。
8
儲存
儲存?
頻道設置
頻
1
2
3
4
A
B
道設置用于設置与頻道有關的所有
功能。
按 Menu(菜單)按鈕以打開屏幕菜
單。
主控
設定
圖像
聲音
功能
設定
語言
自動搜尋
人工搜尋
頻道設置
復原設定
主控
設定
語言
自動搜尋
人工搜尋
頻道設置
復原設定
按光標向下按鈕以高亮顯示“設定”
菜單,然后按光標向右按鈕進入子菜
單。
B
A
主控
主控
頻道設置
頻道編輯
頻道互換
名稱編輯
頻道排序
按光標向下按鈕高亮顯示“頻道設
置”菜單,然后按光標向右按鈕進入
子菜單。
頻道編輯
按光標向上/向下按鈕選擇“頻道編
輯”、“頻道互換”、“名稱編輯”
或“頻道排序”,按光標向右按鈕進
入。
頻道互換
按光標向右按鈕進入“頻道互換”功
能,按光標向上/向下按鈕選擇“自”
或“到”,按光標向右按鈕進入。按
光標向上/向下按鈕選擇頻道,然後按
光標向右/向左按鈕確認。
按光標向下按鈕高亮顯示“交換”功
能,按光標向右按鈕進入子菜單。按
光標向右按鈕激活“交換”,按光標
向左按鈕不激活。
頻道編輯
頻道
跳躍
頻道設置
頻道互換
自
到
交換
頻道編輯
頻道互換
名稱編輯
頻道排序
主控
頻道
跳躍
頻道編輯
按光標向右按鈕進入“頻道”列中,
按光標向上/向下按鈕選擇要添加或
刪除的頻道,按光標向右/向左按鈕確
認。
按光標向右按鈕進入“跳躍”列中,
按光標向上/向下按鈕選擇“活動的”
(添加)或“跳躍”(刪除)所選的
頻道,然後按光標向右/向左按鈕確
認。
頻道設置
頻道編輯
頻道互換
名稱編輯
頻道排序
頻道
2
A/CH
主控
頻道編輯
頻道
跳躍
頻道
活動的
跳躍
i+
D
C
主控
主控
頻道設置
頻道編輯
頻道互換
名稱編輯
頻道排序
C
AV
名稱編輯
頻道
名稱
頻道設置
頻道編輯
頻道互換
名稱編輯
頻道排序
編輯排序
排序?
名稱編輯
按光標向右按鈕進行名稱編輯。
按光標向上/向下按鈕編輯頻道名稱,按光標向
右按鈕可移到下一位字母。
在第一位字母時,按光標向左按鈕確認名稱。
在最後一位母時,按光標向右按鈕確認名稱。
D
頻道排序
按光標向右按鈕進入頻道排序功能。
按光標向右按鈕啟動頻道排序,按光標向左按
鈕回到上一層菜單。
5
反复按 MENU(菜單)按鈕,直至菜單从屏幕
上消失。
9
复原設定
通
1
2
3
4
5
過執行下列步驟,可以將電視恢复至原始
出厂設置。
按遙控器上的 MENU(菜單)按鈕
以顯示屏幕菜單。
A/CH
按光標向下按鈕以高亮顯示“設
定”菜單,然后按光標向右按鈕進
入子菜單。
主控
設定
圖像
聲音
功能
設定
語言
自動搜尋
人工搜尋
頻道設置
復原設定
設定
復原設定
語言
自動搜尋
人工搜尋
頻道設置
復原設定
是
否
主控
反复按光標向下按鈕以高亮顯示
“复原設定”控制,然后按光標向
右按鈕進入子菜單。
按光標向下按鈕選擇“是”,然后
按光標向右按鈕以恢复至原始出厂
設置。
i+
反复按 MENU(菜單)按鈕,直至
菜單从屏幕上消失。
有用提示
如果將電視恢复至出厂設置,目前
的所有圖像、聲音和其它功能等設
置都將被消除,然后恢复至制造商
的默認設置。不過,儿童鎖進入密
碼不會消除。有關的詳細信息,請
參見第 18 頁。
10
AV
液晶電視概覽
放置液晶電視
• 將液晶電視放在堅固平穩的表面上。确保
• 不要將液晶電視放在散熱器或其它熱源旁
該表面足以支撐液晶電視的重量。
• 确保液晶電視机身四周至少留出 15.24厘米
的空間以确保通風良好。
邊。
• 不要將液晶電視放在容易遭受雨淋或過分潮
濕的地方。
熟悉各个接口(背面)
10
9
1
1
2
3
4
AC IN
連接裝机提供的交流電源線。
2
SPEAKERS OUT
3
HDMI(高清晰家庭影院)
與HDMI機頂盒兼容DVD-R或DVD播放
機的連接。
PC IN
5
COMP VIDEO1/COMP VIDEO2
7
8
AV OUT/SPDIF OUT
8
VHF/UHF
9
AV IN2/S-video 2 (Side)
連接到帶有 VGA 型視頻輸出的 PC。
連接到數字衛星接收器或其它支持
YPbPr HD(高清晰度)視頻格式的視
頻設備。
6
7
連接外掛式喇叭輸出。
4
6
5
10
連接到視頻和音頻設備的輸入插孔。
當LCD TV顯示TV、AV1、AV2時,AV
OUT 可作為視頻輸出口。當LCD TV為
SPDIF輸出時,該口可用於音頻輸出,並
可將信號輸出至數位接收機或放大器。
連接到VHF/UHF天線或有線電視電纜。
連接到 VCR 或其它視頻設備的輸出插
孔。
HEADPHONES JACK
耳机插孔連接到耳机。
注意:當HDMI輸入源被選定時,SPDIF輸
AV IN 1/S-video 1
出僅支援PCM格式以及立體聲模式。
連接到 VCR 或其它視頻設備的輸出插
孔。
11
基本電視和遙控器操作
電視和遙控器
1
2
3
4
5
將電源線插入液晶電視上的交流電源插
口。將電源線插入電源插座,然后打開
電視的電源。
-
+
Vo l u m e
Menu
按 POWER(電源)打開液晶電視的電
源。
按 VOLUME +(增大音量)以提高音
量,或者按 VOLUME –(減小音量)
以降低音量。
A/CH
按 CHANNEL +/– 選擇頻道。
使用遙控器操作液晶電視時,使遙控器
對着液晶電視前方。
安裝電池
6
7
8
i+
卸下遙控器底部的電池倉盖。
將2个AA電池放入遙控器中。确保電池
(+) 和 (-) 兩端与電池倉內側標記的方向
一致。
重新裝上電池倉盖。
12
AV
-
Channel
+
遙控器
A/CH 按鈕
未使用的按鈕
屏幕格式按鈕
反复按“格式”按鈕可以切換六
种屏幕格式:超放大屏幕、4:3、
電影擴展14:9模式、電影擴展
16:9模式、字幕16:9模式、闊屏
幕。
按此按鈕可以返回此前選擇的
頻道。
睡眠定時按鈕
按此按鈕可以設置液晶電視,
使其在特定時間自行關閉。
A/CH
POWER(電源)按鈕
按此按鈕可以打開或關閉液晶電
視的電源。
未使用的按鈕
靈智聲音按鈕
反复按此按鈕可以選擇 5 种設
置:个人設定、演講、音樂、
電影、多媒體。
I-II 按鈕╱聲音模式
反复按此按鈕可以選擇單聲道、
立体聲、双聲道 I、双聲道 II、麗
音單聲道、麗音立体聲、麗音双
聲道 I、麗音双聲道 II。
MENU(菜單)按鈕
按此按鈕可以激活屏幕菜單或
退出屏幕菜單。
靈智圖像按鈕
反复按此按鈕可以選擇个人設
定、鮮艷、自然、柔和或多媒体
等圖像設置。
光標按鈕
(向左、向右、向上、向下)
按這些按鈕可以高亮顯示、選
擇、返回和調整電視屏幕菜單
中的項目。
音量按鈕
按此按鈕可以增大或減小音
量。
i+
AV
虛擬環繞按鈕
使電視聲音具有更強的深度和广
度效果。
可以選擇"虛擬環繞開"或"虛擬環
繞關"
頻道按鈕
按此按鈕可以選擇上一个或下一
个頻道。
靜音按鈕
按此按鈕可以關閉或恢复液晶
電視聲音。聲音關閉時,屏幕
上會出現靜音圖標。
數字按鈕
按數字按鈕可以直接進入電視頻
道。對于 2 位數頻道,先輸入第
1 位,然后輸入第 2 位。
信息按鈕
按此按鈕可以在電視屏幕上顯
示當前頻道號碼。
AV 按鈕
按此按鈕可以選擇視頻輸入源:
TV、HDMI、COMP VIDEO1、
COMP VIDEO2、S-video1、
S-video 2(Side)、AV1、
AV2(Side)、PC。
13
定時菜單控制
1
2
按遙控器上的“睡眠定時”按鈕以顯示
屏幕菜單。
A/CH
0
反复按“睡眠定時”按鈕或光標向上/向
下按鈕以增加或減少所需的睡眠定時。
有用提示
重要事項
為使睡眠定時功能起作用,切勿關閉電
視。一旦關閉電視,睡眠定時將失效。
i+
AV
屏幕菜單中的定時控制
1
2
3
4
按遙控器上的 MENU(菜單)按鈕
以顯示屏幕菜單。
A/CH
按光標向下按鈕以高亮顯示“功
能”菜單,然后按光標向右按鈕進
入子菜單。
主控
功能
圖像
聲音
功能
設定
定時
降噪
兒童鎖
輸入源列表
功能
定時
定時
降噪
兒童鎖
輸入源列表
時鐘
開始時間
停止時間
睡眠定時
主控
按光標向下按鈕選擇要調整的項
目,然后按光標向右按鈕進入時
鐘、開始時間、停止時間、睡眠定
時。
時鐘:允許您設定時間。
開始時間:允許您設定時間,使
液晶電視在特定時間自行開啟。
停止時間:允許您設定時間,使
液晶電視在特定時間自行關閉。
睡眠時間: 允許您設定時間,使
液晶電視在特定時間轉換至待機
模式。
指定時間可從0到180分鐘。
主控 I 功能
定時
時鐘
開始時間
停止時間
睡眠定時
i+
在定時列中,按光標向上/向下按鈕
進行調整時間,按光標向右按鈕可
移到下一位字母,然後按光標向右
按鈕確認。
14
AV
時鐘
00 : 00
AM
電視圖像菜單控制
要
1
2
3
4
5
6
調整液晶電視的圖像,請選擇一个頻道,然
后執行下列步驟。
按 MENU(菜單)按鈕以打開屏幕
菜單。
主控
主控
圖像
圖像
靈智圖像
圖像
聲音
功能
設定
靈智圖像
對比度
亮度
色彩
清晰度
色調
色溫
屏幕格式
靈智圖像
對比度
亮度
色彩
清晰度
色調
色溫
屏幕格式
個人設定
鮮豔
自然
柔和
多媒體
高亮顯示“圖像”菜單,然后按光
標向右按鈕進入“圖像”菜單。
按光標向下按鈕選擇要調整的項
目,然后按光標向右按鈕進入:靈
智圖像、對比度、亮度、色彩、清
晰度、色調、色溫、屏幕格式。
靈智圖像:有關靈智圖像設置的
詳細信息,請參閱第 17 頁。
對比度:調整圖像質量的銳利效
果。圖像黑色部分的暗色變丰
富,而白色變亮。
亮度:使圖像的暗色部分變亮,
看起來就如同在色彩中增加白
色。
色彩:增加或減少色彩。
清晰度:提高細節部分的質量。
色調:調整圖像色彩
色溫:調整圖像的色溫。可以選
擇正常、冷色或暖色。
屏幕格式:改變屏幕格式,使之與
所觀看的節目類型相匹配。詳情
請參閱第20頁。
主控
圖像
靈智圖像
對比度
亮度
色彩
清晰度
色調
色溫
屏幕格式
A/CH
對比度
72
主控
圖像
靈智圖像
對比度
亮度
色彩
清晰度
色調
色溫
屏幕格式
亮度
38
主控
圖像
靈智圖像
對比度
亮度
色彩
清晰度
色調
色溫
屏幕格式
色彩
80
主控
圖像
i+
靈智圖像
對比度
亮度
色彩
清晰度
色調
色溫
屏幕格式
AV
清晰度
50
主控
圖像
靈智圖像
對比度
亮度
色彩
清晰度
色調
色溫
屏幕格式
色調
0
主控
按光標向上/向下按鈕調整項目。
圖像
色溫
靈智圖像
對比度
亮度
色彩
清晰度
色調
色溫
屏幕格式
正常
冷色
暖色
圖像
屏幕格式
靈智圖像
對比度
亮度
色彩
清晰度
色調
色溫
屏幕格式
超放大屏幕
4:3
電影擴展14:9模式
電影擴展16:9模式
字幕16:9模式
闊屏幕
主控
按光標向下/向右按鈕選擇和調整
其它圖像控制。
反复按 MENU(菜單)按鈕,直至
有用提示
對亮度、色彩、對比度或清晰度所作
的任何調整均會保存到靈智圖像部分
的“个人設定”中。
15
電視聲音菜單控制
要
1
2
3
4
調整液晶電視的聲音,請選擇一个頻道,
然后執行下列步驟。
按 MENU(菜單)按鈕以打開菜單。
A/CH
按光標向下按鈕以高亮顯示“聲音”菜
單。
7
聲音
圖像
聲音
功能
設定
靈智聲音
設置
虛擬環繞
聲音
靈智聲音
靈智聲音
設置
虛你環繞
個人設定
演講
音樂
電影
多媒體
聲音
設置
靈智聲音
設置
虛你環繞
高音
低音
平衡
聲音
虛擬環繞
靈智聲音
設置
虛你環繞
開
關
主控
按光標向右按鈕以進入“聲音”菜單。
按光標向下按鈕選擇要調整的項
目,然后按光標向右按鈕進入:
靈智聲音、設置、虛擬環繞。
主控
靈智聲音:有關靈智聲音設置的詳細
信息,請參閱第 17 頁。
設置:允許您調整聲音的高音、低音
和平衡等設置。
虛擬環繞:使電視聲音具有更強的深
度和广度效果。可以選擇“開”或“
關”。
5
6
主控
主控
i+
按光標向上/向下按鈕調整項目。
按光標向下/向右按鈕選擇和調整其它
聲音控制。
反复按 MENU(菜單)按鈕,直至菜單
从屏幕上消失。
有用提示
‧對高音和低音所作的任何調整均會保
存到靈智聲音的“个人設定”中。
16
AV
靈智圖像控制
無
論您是在觀看影片還是玩視頻游戲,本液晶
電視都可以根据當前節目來源或內容使用
合适的視頻控制預設模式。靈智圖像可以根据家
庭中的各种不同節目類型和觀看条件快速复原電
視視頻控制的設置。本產品在出厂時已經預設了
个人設定、鮮艷、自然、柔和、多媒体和靈智圖
像等控制。可以方便地調整電視的亮度、色彩、
圖像、清晰度、以及色溫等。在个人設定靈智圖
像模式下,您可以建立自己喜好的視頻設置。
1
2
靈智圖像
個人設定
鮮豔
自然
柔和
多媒體
A/CH
按遙控器上的“靈智圖像”按鈕。當前的靈
智圖像設置在屏幕上顯示出來。
反复按“靈智圖像”按鈕或光標向上/向下
按鈕以選擇个人設定、鮮艷、自然、柔和、
多媒体等設置。
i+
AV
注意:个人設定靈智圖像模式的設置可以在
屏幕菜單的圖像選項中進行調整。个人設定
模式是唯一一个用戶可以通過屏幕菜單圖像
控制進行調整的模式。
靈智聲音控制
靈
智聲音允許您選擇四种用戶預設控制之
一,或者選擇您根据自己喜好通過屏幕上
的聲音菜單設置的个人設定模式。五种用戶預設
控制(个人設定、演講、音樂、電影、和多媒
體)允許您調整電視聲音,从而增強您正在觀看
的特定節目的效果。按照下列步驟選擇其中一
个選項。
1
2
靈智聲音
個人設定
演講
音樂
電影
多媒體
A/CH
按遙控器上的“靈智聲音”按鈕。當前的靈
智聲音設置在屏幕上顯示出來。
反复按“靈智聲音”按鈕或光標向上/向下
按鈕以切換五种設置:个人設定、演講、音
樂、電影、或多媒體。
i+
注意:个人設定靈智圖像模式的設置可以在
屏幕菜單的圖像選項中進行調整。个人設定
模式是唯一一个用戶可以通過屏幕菜單圖像
控制進行調整的模式。
17
AV
降噪
在
1
2
3
4
接收弱視頻信號時,可對圖像進行自動過
濾,降低像噪,從而提高畫面質量。
按 MENU(菜單)按鈕以打開屏幕菜
單。
A/CH
按光標向下按鈕以高亮顯示“功能”菜
單,然后按光標向右按鈕進入子菜單。
主控
功能
圖像
聲音
功能
設定
定時
降噪
兒童鎖
輸入源列表
功能
定時
降噪
兒童鎖
輸入源列表
降噪
主控
按光標向下按鈕以高亮顯示“降噪”,
然后按光標向右按鈕進入。
開
關
降噪
開
關
按光標向下按鈕選取“開”或“關”,
按光標向右按鈕,開啟或關閉降噪功
能。
i+
18
AV
儿童鎖
儿
童鎖功能允許您鎖定頻道,防止家中小孩觀看不适宜的節目內容。
儿童鎖提供多种鎖定控制供您選擇:
進入密碼 – 必須設置進入密碼,以防止儿童觀看家長設置的不适宜的節目。
鎖定節目 – 選擇要鎖定的電視頻道。
更換密碼 – 更換或覆盖進入密碼。
全部清除 – 解鎖所有鎖定的頻道和節目。
儿童鎖進入密碼
在
后面几頁中,您將了解如何鎖定節目
并理解特定广播節目的分級術語。首
先,設置進入密碼。
1
2
3
4
5
6
按 MENU(菜單)按鈕以打開屏幕菜
單。
A/CH
按光標向下按鈕以高亮顯示“功能”菜
單,然后按光標向右按鈕進入子菜單。
主控
功能
圖像
聲音
功能
設定
定時
降噪
兒童鎖
輸入源列表
功能
兒童鎖
定時
降噪
兒童鎖
輸入源列表
上鎖程序
更換密碼
全部清除
功能
兒童鎖
定時
降噪
兒童鎖
輸入源列表
進入密碼
主控
按光標向下按鈕選擇“儿童鎖”,然后
按光標向右按鈕進入。
主控
屏幕上會顯示“更換密碼”。
使用數字按鈕輸入四位密碼。
i+
反复按 MENU(菜單)按鈕,直至菜單
从屏幕上消失。
有用提示
請記住,0711 是默認的儿
童鎖密碼。如果他人(如小
孩)更改了您的進入密碼或
者您忘記了密碼,可以輸入
默認密碼。
19
AV
自動鎖定節目
置了您个人的進入密碼后(參見上一頁),
就可以選擇需要鎖定或審查的頻道或輸
入源了。
設
1
按 MENU(菜單)按鈕以打開屏幕菜
單。
2
按光標向下按鈕以高亮顯示“功能”菜
單,然后按光標向右按鈕進入子菜單。
3
4
5
6
A/CH
主控
功能
圖像
聲音
功能
設定
定時
降噪
兒童鎖
輸入源列表
功能
兒童鎖
定時
降噪
兒童鎖
輸入源列表
上鎖程序
更換密碼
全部清除
兒童鎖
上鎖程序
上鎖程序
更換密碼
全部清除
18
主控
按光標向下按鈕選擇“儿童鎖”,然后
按光標向右按鈕進入子菜單。(詳細信
息,請參閱第 17 頁)。
主控
按光標向右按鈕進入“上鎖程序”,使
用數字按鈕輸入您要鎖定的頻道。
i+
按光標向上╱向下按鈕以鎖定當前選擇
的頻道。
反复按 MENU(菜單)按鈕,直至菜單
注意:您可以使用數字按鈕跳轉到另一个頻
道,从而鎖定其它頻道。
20
AV
使用屏幕格式
可以根据正在觀看的節目類型改變屏
您
幕格式尺寸。可以選擇超放大屏幕、
4:3、電影擴展14:9模式、電影擴展16:9模
式、字幕16:9模式、或闊屏幕。
1
2
3
按 MENU(菜單)按鈕以打開屏幕菜
單。
主控
圖像
圖像
聲音
功能
設定
靈智圖像
對比度
亮度
色彩
清晰度
色調
色溫
屏幕格式
圖像
屏幕格式
靈智圖像
對比度
亮度
色彩
清晰度
色調
色溫
屏幕格式
超放大屏幕
4:3
電影擴展14:9模式
電影擴展16:9模式
字幕16:9模式
闊屏幕
超放大屏幕
主控
當“圖像”菜單高亮顯示時,按光標向
右按鈕進入子菜單。
4:3
按光標向下按鈕高亮顯示“屏幕格
式”,然后按光標向右按鈕進入。
電影擴展14:9模式
4
按光標向上/向下按鈕選擇所須屏幕格
式: 超放大屏幕、4:3、電影擴展14:9模
式、電影擴展16:9模式、字幕16:9模
式、或闊屏幕,然后按光標向右按鈕确
認您的選擇。
電影擴展16:9模式
注意:反复按“格式”按鈕可以切換六
种屏幕格式尺寸:超放大屏幕、4:3、電
影擴展14:9模式、電影擴展16:9模式、
字幕16:9模式、或闊屏幕。
5
A/CH
i+
字幕16:9模式
闊屏幕
反复按 MENU(菜單)按鈕,直至菜單
从屏幕上消失。
有用提示
1. 如果是 720p/1080i,則在 HD 和 DVI
模式下默認屏幕格式將為闊屏幕。
并且不能使用屏幕格式功能。
2. 如果是 576i/576p,則在 HD 和 DVI
模式下可以使用屏幕格式功能。
3. 如果是 PC 模式,則屏幕格式將可在
全屏幕和4:3之間切換,并且不能使用
其它屏幕格式功能。
21
AV
PC圖像控制
電視也可以用作 PC 顯示器。在此情况下,
必須提供 PC 視頻信號,否則電視將進入待
机模式。您可以利用 PC 圖像控制來調整圖像。
本
注意:确保處于 PC 模式。
1
2
3
4
5
主控
按遙控器上的 MENU(菜單)按鈕以顯
示屏幕菜單。
主控
圖像
圖像
色溫
圖像
聲音
功能
設定
色溫
亮度
對比度
自動調節
手動調節
色溫
亮度
對比度
自動調節
手動調節
正常
暖色
冷色
主控
圖像
高亮顯示“圖像”菜單,然后按光標向
右按鈕進入“圖像”菜單。
色溫
亮度
對比度
自動調節
手動調節
A/CH
按光標向下按鈕高亮顯示要調整的項
目,然后按光標向右按鈕進入:
色溫:調整圖像的色溫。可以選擇正
常、冷色或暖色。
亮度:使圖像的暗色部分變亮。
對比度:調整圖像質量的銳利效果。
圖像黑色部分的暗色變鮮艷,而白色
變亮。
自動調節:液晶顯示器將自動調整至
最佳圖像位置、相位和時脉設置。
手動調節:手動調節控制允許您手工
微調屏幕上顯示的圖像。
相位-消除水平干扰線条。
時脉-消除垂直干扰線条。
水平 - 調整圖像的水平位置。
垂直- 調整圖像的垂直位置。
亮度
38
主控
圖像
色溫
亮度
對比度
自動調節
手動調節
對比度
72
主控
圖像
自動調節
色溫
亮度
對比度
自動調節
手動調節
是
圖像
手動調節
色溫
亮度
對比度
自動調節
手動調節
相位
時脉
水平
垂直
主控
i+
AV
按光標向上╱向下按鈕調整項目。
反复按 MENU(菜單)按鈕,直至菜單
从屏幕上消失。
有用提示
1. 要調整其它項目,請重复步驟 3 和步
驟 4。
2. 按遙控器上的靈智圖像按鈕也可以激
活色溫。
如果希望將所作的調整恢复至原始值,
請使用“設定”菜單中的“复原設
定”。
22
PC聲音控制
電視也可以用作 PC 顯示器。在此情况
下,必須提供 PC 視頻信號,否則電視將
進入待机模式。聲音控制允許您調整聲音。
本
注意:确保處于 PC 模式。
1
2
3
4
5
6
按遙控器上的 MENU(菜單)按鈕
以顯示屏幕菜單。
A/CH
按光標向下按鈕以高亮顯示“聲音”
菜單,然后按光標向右按鈕進入子菜
單。
主控
聲音
圖像
聲音
功能
設定
靈智聲音
設置
虛擬環繞
聲音
靈智聲音
靈智聲音
設置
虛你環繞
個人設定
演講
音樂
電影
多媒體
聲音
設置
靈智聲音
設置
虛你環繞
高音
低音
平衡
聲音
虛擬環繞
靈智聲音
設置
虛你環繞
開
關
主控
按光標向下按鈕高亮顯示要調整的項
目,然后按光標向右按鈕進入:
主控
靈智聲音:允許您在 4 种出厂預設
控制和 1 种个人設定控
制之中進行選擇。5 种出厂
預設控制(个人設定、演
講、音樂、電影、多媒體)
可以增強您正在觀看的特定節
目的效果。
設置:允許您調整聲音的高音、低音
和平衡等設置。
虛擬環繞:使 PC 聲音具有更強的深
度和广度效果。
i+
按光標向右按鈕進入要調整的項目。
按光標向上/向下按鈕進行調整。
反复按 MENU(菜單)按鈕,直至
菜單从屏幕上消失。
有用提示
要調整其它項目,請重复步驟 4 和步
驟 5。
23
主控
AV
使用 PC 画中画功能
画
中画功能允許您在將電視用作顯示器
時調用子画面。
注意:确保處于 PC 模式。
1
2
3
4
5
A/CH
主控
功能
圖像
聲音
功能
設定
屏幕格式
畫中畫
功能
屏幕格式
屏幕格式
畫中畫
全屏幕
4:3
功能
屏幕格式
屏幕格式
畫中畫
尺寸
輸入
位置
聲音
按 MENU(菜單)按鈕以打開屏幕菜
單。
主控
按光標向下按鈕以高亮顯示“功能”菜
單。
主控
按光標向右按鈕以進入“功能”菜單。
按光標向下按鈕高亮顯示“画中画”菜
單,然后按光標向右按鈕進入。
i+
按光標向下按鈕高亮顯示要調整的項
目,然后按光標向右按鈕進入。
尺寸:關閉和設置画中画的尺寸。您
可以選擇首選的尺寸:小、大或分隔
画面。
輸入:選擇画中画的視頻源:TV、
AV1、AV2(Side)。
位置:選擇画中画位于哪个角落。
聲音:選擇画中画或 PC 的音源。
有用提示
画中画功能只能支持
AV2(Side)。
TV、AV1、
24
AV
設置 PC 模式(个人計算机顯示器)
37TA1800/42TA1800 (37”/42” 液晶電視)
編號
分辨率
1
640 x 480
2
3
800 x 600
垂直頻率 (Hz)
水平頻率 (kHz)
VGA VESA 60
59.940
31.469
SVGA VESA 56
56.250
35.156
SVGA VESA 60
60.317
37.897
模式
4
1024 x 768
XGA VESA 60
60.004
48.363
5
1280 x 720
VESA CVT
59.855
44.772
*6
1280 x 768
VESA CVT
60.000
47.700
* 推薦
25
故障排除技巧
S-VHS 色彩變淡
不通電
• 檢查電視的電源線。拔掉電視電源線,等待
10秒鐘,然后重新將插頭插入電源插座,再按
POWER(電源)按鈕。
• 檢查電源插座是否位于牆壁開關上。
• 如果使用的是交流電源接線板,确保保險
絲沒有燒斷。
沒有画面
• 檢查天線/有線連接。它們是否正确連接到電
視的 ANT75Ω 插頭?
• 試着進行自動搜尋功能以掃描所有可用的頻
道。
• 按遙控器上的 AV 按鈕以确保選擇的信號源
正确無誤。
• 如果使用的是附属設備,确保其工作正常。
• 如果處于 PC 模式,必須提供視頻信號,否則
電視將關閉。
沒有聲音
• 檢查音量按鈕。
• 檢查遙控器上的靜音按鈕。
• 如果正在試圖連接附属設備,請檢查聲音插孔
的連接情况。
無AV 信號
• 檢查是否同時連接了 AV 和 S-Video 兩个插
• 拔掉 S-Video 插口的連接。將電視的 SVideo 插口重新連接到 VCR 插口。
電視只發出單聲道聲音
• 如果使用的是僅支持 RF 型連接的分線
盒,則來自分線盒的信號只能產生單聲道
效果。
• 檢查聲音控制設置。將該設置改成立体
聲。
遙控器不起作用
• 檢查電池。將鋰電池放入遙控器中。确保
電池的 (+) 和 (-) 兩端与電池倉內側標記
的方向一致。
• 清洁遙控器和電視上的遙控傳感器窗口。
• 檢查電視的電源線。拔掉電視電源線,等
待 10 秒鐘,然后重新將插頭插入電源插
座,再按 POWER(電源)按鈕。
• 如果使用的是交流電源接線板,确保保險
絲沒有燒斷。
• 檢查以确保電視的插座沒有位于牆壁開關
上。
• 确保遙控器處于正确的操作模式。
• 确保遙控器指向電視上的遙控傳感器窗
口。有關的詳細信息,請參閱快速使用指
南的第 2 頁。
口。
電視沒有 13 以上的頻道或顯示錯誤的
頻道
• 重复頻道選擇過程。
• 向電視存儲器中添加所需的頻道號碼(使
用頻道編輯控制)。
• 進行自動搜尋功能以掃描所有可用的頻
道。
26
保養和清洁
警告 關于電視屏幕上的固定圖像:不要在屏幕上長時間顯示固定不變的圖像。否則可能導致液
晶面板的老化程度不均衡。在正常使用電視的情况下,應觀看圖像不斷移動或變化的節目。不要
在屏幕上長時間顯示靜態圖像。不要頻繁顯示相同的圖像,否則液晶屏幕上會留下細微的殘留圖
像。固定圖像的來源包括光盤、視頻游戲、互動光盤 (CD-i)、或者暫停的 DVD 或錄像帶等。
下面是一些常見的固定圖像的示例:
‧ 列出 DVD 內容的 DVD 菜單。
‧ 在標准 (4:3) 寬高比的電視上觀看寬螢幕 (16:9) 影片時,電視屏幕頂部和底部出現的黑色橫
条。一些 DVD 會出現這种情况。
‧ 視頻游戲圖像和記分牌
‧ 如果電視台標志明亮且固定不動,也可能導致問題。移動的或低對比度的圖片不容易損坏顯像
管。
‧ 如果電視節目中包含股市新聞,電視屏幕底部可能會顯示股市行情。
‧ 購物頻道標志和价格信息可能比較明亮,而且經常會在節目中出現。
這些信息通常出現在電視屏幕上的同一位置。
電視位置
‧ 為避免机壳變形、机壳變色、電視故障增多,不要將電視放在溫度可能非常高的位置,如強光
直接照射的地方或熱設備旁。
‧ 保持電視四周通風良好。
清洁
‧ 為避免可能的触電危險,應在清洁之前从插座上拔掉電視的電源線。
‧ 定期用干燥的非刮擦式除塵器除去電視上的灰塵。
‧ 清洁電視時,注意不要刮擦或損坏屏幕表面。不要戴着首飾或使用研磨性物質。不要使用家用
清洁器。使用略微蘸水的洁淨布擦拭屏幕。
清洁時沿垂直方向平緩擦拭。
‧ 不定期地用真空吸塵器吸掉電視背面開口上的灰塵。
‧ 切勿在机壳上或机壳附近使用稀釋劑、噴霧殺虫劑、或其它化學制品。否則,它們可能在机壳
上留下永久性污点。
27
索引
A
W
Auto Store (自動搜尋) . . . . . . . . . . . . . . . . . . . . 7, 25
Welcome(歡迎) . . . . . . . . . . . . . . . . . . . . . . . . . . . . . . 2
B
Balance (平衡). . . . . . . . . . . . . . . . . . . . . . . . . . . . 16, 23
Bass (低音). . . . . . . . . . . . . . . . . . . . . . . . . . . . . . .16, 23
Batteries (電池). . . . . . . . . . . . . . . . . . . . . . . . .3, 12, 26
Brightness (亮度). . . . . . . . . . . . . . . . . . . . . . .16, 17, 22
C
Care and Cleaning (保養和清洁). . . . . . . . . . . . . . 27
Channel Setting(頻道設置). . . . . . . . . . . . . . . . . . . . . 9
Color (色彩). . . . . . . . . . . . . . . . . . . . . . . .15, 17, 22, 27
F
Factory Reset (复原設定). . . . . . . . . . . . . . . . . . . . . 10
I
Index (索引). . . . . . . . . . . . . . . . . . . . . . . . . . . . . . . . . 28
L
Language (語言) . . . . . . . . . . . . . . . . . . . . . . . . . . . . . . 6
M
Mono (單聲道) . . . . . . . . . . . . . . . . . . . . . . . 13, 16, 26
Manual Store (人工儲存) . . . . . . . . . . . . . . . . . . . . . . 8
S
Sound (聲音). . . . . . . . . . . . . . . . . . . . 12, 13, 17, 23, 26
Sound Mode(聲音模式). . . . . . . . . . . . . . . . . . . . 13, 17
Stereo(立体聲). . . . . . . . . . . . . . . . . . . . . . . . . 13, 16, 26
T
Table of Contents (目錄). . . . . . . . . . . . . . . . . . . . . . . 5
Tint(色調). . . . . . . . . . . . . . . . . . . . . . . . . . . . . . . . .15, 17
Treble(高音). . . . . . . . . . . . . . . . . . . . . . . . . . . . 5, 16, 24
Troubleshooting(故障排除). . . . . . . . . . . . . . . . . . . .26
TV Operation (Basic)(基本電視操作). . . . . . . . . . 12
28