1
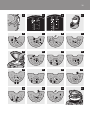
HD4754, HD4750
1
English 6
HD4754, HD4750
简体中文 17
English
Introduction
Congratulations on your purchase and welcome to Philips! To fully benefit from the support that
Philips offers, register your product at www.philips.com/welcome.
General description (Fig. 1)
A
B
C
D
E
F
G
H
I
J
K
L
M
N
O
P
Q
R
S
Outer lid
Detachable inner lid
Steam vent
Rice cooker handle
Mounting bracket of scoop holder
Scoop holder
Heating element
Mains cord
Soup ladle
Rice scoop
Measuring cup
Inner pot
Water level indication
Steam tray
Main body
Control panel
Release lever
Mains cord connection
S. Detachable steam vent cap
Important
Read these instructions for use carefully before using the appliance and save them for future
reference.
-
-
Danger
Never immerse the housing of the rice cooker in water, nor rinse it under the tap.
Warning
Check if the voltage indicated on the appliance corresponds to the local mains voltage before
you connect the appliance.
Only connect the appliance to an earthed wall socket. Always make sure that the plug is
inserted firmly into the wall socket.
Do not use the appliance if the plug, the mains cord or the appliance itself is damaged.
If the mains cord is damaged, you must have it replaced by Philips, a service centre authorised by
Philips or similarly qualified persons in order to avoid a hazard.
This appliance is not intended for use by persons (including children) with reduced physical,
sensory or mental capabilities, or lack of experience and knowledge, unless they have been given
supervision or instruction concerning use of the appliance by a person responsible for their
safety.
Children should be supervised to ensure that they do not play with the appliance.
Keep the mains cord out of the reach of children. Do not let the mains cord hang over the edge
of the table or worktop on which the appliance stands.
Make sure that the heating element, the magnetic switch and the outside of the inner pot are
clean and dry before you put the plug in the wall socket.
Do not cover the steam vent and the lid while the rice cooker is operating.
Do not plug in the appliance or operate the control panel with wet hands.
English
-
-
Caution
Never use any accessories or parts from other manufacturers or that Philips does not
specifically recommend. If you use such accessories or parts, your guarantee becomes invalid.
Only use the rice scoop provided. Avoid using sharp utensils.
Do not expose the rice cooker to high temperatures, nor place it on a working or still hot stove
or cooker.
Always insert the inner pot before you put the plug in the wall socket.
Always press the KEEP-WARM/OFF button once before you unplug the rice cooker.
Always unplug the rice cooker and let it cool down before you clean it.
Do not place the inner pot directly over an open fire to cook rice.
This appliance is intended for household use only. If the appliance is used improperly or for
professional or semi-professional purposes or if it is not used according to the instructions in
this user manual, the guarantee becomes invalid and Philips refuses liability for any damage
caused.
Place the rice cooker on a stable, horizontal and level surface.
The accessible surfaces may become hot when the appliance is operating.
Beware of the hot steam that comes out of the steam vent during cooking or out of the rice
cooker when you open the lid.
Always unplug the appliance after use.
Do not lift and move the rice cooker by its handle while it is operating.
Electromagnetic fields (EMF)
This Philips appliance complies with all standards regarding electromagnetic fields (EMF). If handled
properly and according to the instructions in this user manual, the appliance is safe to use based on
scientific evidence available today.
Before first use
Remove the sheet between the inner pot and the heating element.
1 Clean the parts of the rice cooker thoroughly before using the appliance for the first time
(see chapter ‘Cleaning’). Make sure all parts are completely dry before you start using the
appliance.
2 Attach the scoop holder to the body of the rice cooker (Fig. 2).
Using the appliance
Cooking rice
1 Measure the rice using the measuring cup provided.
Each cup of uncooked rice normally gives 2 bowls of cooked rice. Do not exceed the quantities
indicated on the inside of the inner pot. 1 cup of rice is approx. 180ml.
- HD4750: 1-5.5 cups of rice
- HD4754: 2-10 cups of rice
Rice quantity for cooking rice
Menu
Volume/L
Quantity of rice
(cups)
Volume/L
Quanrity of rice
(cups)
Fragrant rice, see
mew rice, Northeast rice
1.0
1-1.5
1.8
2-10
Other rice
1.0
1-1.5
1.8
2-10
English
Menu
Volume/L
Quantity of rice
(cups)
Volume/L
Quanrity of rice
(cups)
Glutinous rice
1.0
1-4
1.8
2-8
Casserole
1.0
1-3
1.8
2-5
Congee
1.0
0.25-0.75
1.8
0.5-1.5
Small amount**
1.0
1-3
1.8
2-3
**Note: To get an optimal result, we advise you to cook not more than 3 cups of rice.
2 Wash the rice thoroughly.
3 Put the pre-washed rice in the inner pot.
4 Add water to the level indicated on the scale inside the inner pot that corresponds to the
number of cups of rice used. Then smooth the rice surface.
For instance, if you cook 4 cups of rice, add water up to the 4-cup level indicated on the scale.
, HD4750 (Fig. 3)
, HD4754 (Fig. 4)
Note:The level marked inside the inner pot is just an indication; you can always adjust the water level for
different types of rice and your own preference.
5 Press the release lever to open the lid
6 Put the inner pot in the rice cooker. Check if the inner pot is in proper contact with the
heating element (Fig. 5).
Make sure that the outside of the inner pot is dry and clean and that there is no foreign residue on
the heating element or the magnetic switch.
7 Close the lid of the rice cooker, put the plug in the wall socket and switch on the mains.
You will hear a beep.
8 Press the MENU button until the desired cooking function is displayed (Fig. 6).
The cook/reheat light starts to blink.
, Then press the RICE SELECTION button to select the type of rice to be cooked (Fig. 7).
, When the cooking process is finished, you will hear a beep. The cook/reheat light goes out
and the keep-warm light starts to burn continuously to indicate that the rice cooker has
automatically switched to the keep-warm mode (Fig. 8).
, In the cake baking mode and the steaming mode, the process ends when the rice cooker
beeps. The keep-warm light blinks to indicate that the process has ended. In these modes the
rice cooker does not switch to the keep-warm mode.
9 Press the COOK/REHEAT button to start the cooking process (Fig. 9).
The cook/reheat light goes on and the cooking process starts.
The display counts down in minutes (10, 9, 8 etc.) during the last 10 minutes of the cooking process.
The table below shows the approximate cooking time in each mode. The actual cooking time may
vary depending on voltage, room temperature, humidity and amount of water used.
Function
Approximate cooking time
(minutes)
Countdown time until ready
(minutes)
Regular
40-50
10
Quick
30-40
10
English
Function
Approximate cooking time
(minutes)
Countdown time until ready
(minutes)
Small amount
40-50
10
Steam*
10-60
n.a. (not applicable)
Cake
40-50
n.a.
Casserole*
45-60
n.a.
Soup*
30-240
n.a.
Congee*
30-240
n.a.
Reheat
23
n.a.
* Note: To view the countdown time, press the COOKING TIME button.
10Open the lid and stir the rice to loosen it (Fig. 10).
For the best results, do this just after the rice cooker has switched to keep-warm mode. Then close
the lid firmly. Stirring the rice allows excess steam to escape. This will give fluffier rice.
11Press the KEEP-WARM/OFF button once to cancel a cooking process, preset setting or
when it is in keep-warm mode (Fig. 11).
The cook/reheat light starts to blink.
The rice cooker has a backup memory that retains the last selected mode, function and settings in
case of a power failure. The cooking process or the timer function will resume within 2 hours after
the power supply is restored.
Always press the KEEP-WARM/OFF button once before unplugging the rice cooker, as otherwise
the last selected mode, function and settings will resume when the rice cooker is plugged in again.
12Unplug the rice cooker to switch it off.
Cooking congee
1 Follow steps 1 to 7 in section ‘Cooking rice’.
Do not exceed the volume indicated in the table for congee cooking, as this may cause the rice
cooker to overflow.
2 Press the MENU button to select the congee cooking mode (Fig. 12).
3 Press the COOKING TIME button to set the desired cooking time (Fig. 13).
, The default cooking time of 1 hour is displayed.
, To view the preset cooking time, press the COOKING TIME button.
, Press the HR and/or MIN buttons to set the desired time.You can set any time between 30
minutes and 4 hours (Fig. 14).
, If you fail to set a cooking time, the default cooking time of 1 hour will apply.
4 Press the COOK/REHEAT button to start the congee cooking process.
, The cook/reheat light goes on and the cooking process starts.
, When the cooking process starts, the display switches from preset time to current time.
When the cooking process is finished, you will hear a beep. The cook/reheat light goes out and the
keep-warm light starts to burn continuously to indicate that the rice cooker has automatically
switched to the keep-warm mode.
5 Press the KEEP-WARM/OFF button once to cancel a cooking process, preset setting or
when it is in keep-warm mode.
6 Unplug the rice cooker to switch it off.
10
English
Cooking soup
1 Put the ingredients for the soup and the water in the inner pot.
Do not exceed the maximum water level indicated inside the inner pot on the scale for congee
cooking.
2 Follow steps 6 to 7 in section ‘Cooking rice’.
3 Press the MENU button to select the soup cooking mode (Fig. 15).
4 Press the COOKING TIME button to set the desired cooking time.
Press the HR and/or MIN buttons to set the desired time. You can set any time between 30 minutes
and 4 hours.
, To view the preset cooking time, press the COOKING TIME button.
5 Press the COOK/REHEAT button to start the soup cooking process.
, The cook/reheat light goes on and the cooking process starts.
, When the cooking process starts, the display switches from preset time to current time.
When the cooking process is finished, you will hear a beep. The cook/reheat light goes out and the
keep-warm light starts to burn continuously to indicate that the rice cooker has automatically
switched to the keep-warm mode.
6 Press the KEEP-WARM/OFF button once to cancel a cooking process, preset setting or
when it is in keep-warm mode.
7 Unplug the rice cooker to switch it off.
Baking cake
1 Press the MENU button to select the cake baking mode (Fig. 16).
2 Press the COOK/REHEAT button to start the cake baking process (Fig. 17).
, The cook/reheat light goes on and the cake baking process starts.
, When the cake baking process is finished, the rice cooker beeps and the keep-warm light
blinks to indicate that the process has ended.
3 Press the KEEP-WARM/OFF button once and remove the plug from the wall socket to
switch the rice cooker off.
Cake recipe
Ingredients: ready-made cake mix 250g; butter 65g; water or milk 100ml; 1 large egg.
Note: Mix the cake mix, water or milk, butter and egg in a large bowl.Whisk with an electric mixer at low
speed for 1 minute, and then at medium speed for another 3 minutes.
Note: Coat the inner pot with some butter and then pour the cake mixture into it.
Note: Press the MENU button to select the cake baking mode.
Note:When the rice cooker beeps to indicate the end of the baking process, press the KEEP-WARM/OFF
button once and lift the inner pot out of the cooker.
Note: Allow the cake to cool, then turn the inner pot upside down to let the cake slip out of the inner pot
onto a plate.
Cooking casserole
You can use the casserole mode to make traditional claypot rice recipes. A slight crispy crust will
form at the bottom of the rice.
1 Put the washed rice into the inner pot and add the appropriate amount of water.
Stick to the rice quantities mentioned in the table in section ‘Cooking rice’.
Add the corresponding amount of water mentioned in the table in section ‘Cooking rice’.
English 11
2 Follow steps 6 to 7 in section ‘Cooking rice’.
3 Press the MENU button to select the casserole cooking mode (Fig. 18).
4 Press the COOK/REHEAT button to start the casserole cooking process (Fig. 19).
The cook/reheat light goes on and the cooking process starts.
5 When the rice is ready, the rice cooker beeps for 2 minutes and the cook/reheat light starts
to blink (Fig. 20).
6 Add the ingredients for the casserole by placing them on top of the rice. Close the lid and
press the COOK/REHEAT button again to resume the cooking process.
, If you do not press the COOK/REHEAT button, the rice cooker will automatically resume
the casserole cooking process.
, When the cooking process is finished, you will hear a beep. The cook/reheat light goes out
and the keep-warm light starts to burn continuously to indicate that the rice cooker has
automatically switched to the keep-warm mode.
7 Press the KEEP-WARM/OFF button once to cancel a cooking process, preset setting or
when it is in keep-warm mode.
8 Unplug the rice cooker to switch it off.
Recipe: Chicken & Chinese sausage claypot rice
Ingredients: 3 cups rice; 300g chicken pieces; 200g Chinese sausage, sliced; 1-inch ginger, sliced; 1 tbsp
of oil; salt and sugar.
Note: Marinade the chicken with some salt and sugar.
Note: Put the washed rice in the inner pot and fill it with water up to the 3-cup level indicator. Press the
MENU button to select the casserole cooking mode and press the COOK/REHEAT button to cook.
Note:When the rice cooker beeps to indicate that the rice is ready, put the ingredients in the inner pot
and spread them evenly over the rice.
Note:When the casserole cooking process is finished, sprinkle some chopped spring onions on top and
serve the casserole hot.
Steaming
1 Measure 3 cups of water with the measuring cup and pour it into the inner pot.
The amount of water varies according to the quantity of food being steamed.
It will take approx. 8 minutes for 3 cups of water to come to the boil.
2 Put the food to be steamed on a plate or in the steam tray.
To ensure even steaming, the food should be spread out evenly and should not be piled up.
3 Put the steam tray on top of the inner pot (Fig. 21).
4 If you are using a separate plate, put it in the steam tray.
5 Close the lid firmly.
6 Press the MENU button to select the steaming mode (Fig. 22).
7 Press the COOKING TIME button to set the desired steaming time (Fig. 23).
The default steaming time of 15 minutes is displayed.
8 Press the HR and/or MIN buttons to set the desired time (Fig. 24).
You can set any time between 10 minutes and 1 hour.
If you fail to set the cooking time, the default steaming time of 15 minutes will apply.
9 Press the COOK/REHEAT button to start the steaming process. See points 10 and 12 of
‘Cooking rice’.
12
,
,
English
The cook/reheat light goes on and the steaming process starts.
When the steaming process is finished, the rice cooker beeps to indicate that the process
has ended.
10Open the lid and carefully remove the steamed food from the plate or steam tray. Use a
kitchen glove or a cloth, as the plate and steam tray will be very hot.
Beware of the hot steam.
11Press the KEEP-WARM/OFF button once to cancel a cooking process, preset setting or
when it is in keep-warm mode.
12Unplug the rice cooker to switch it off.
Reheating
You can use the reheating mode to warm up rice that has cooled down. Fill the inner pot to not
more than half its capacity to ensure that the rice is heated up properly.
1 Loosen the cooled rice and evenly distribute it in the inner pot.
2 Pour some water onto the rice to prevent it from becoming too dry. The amount of water to
be added depends on the amount of rice being reheated.
If the rice starts scorching, add more water.
3 Press the COOK/REHEAT button twice to start the reheating process.
, The cook/reheat light goes on and the reheating process starts.
, When the reheating process is finished, you will hear a beep. The cook/reheat light goes out
and the keep-warm light starts to burn continuously to indicate that the rice cooker has
automatically switched to keep-warm mode.
, Mix the rice thoroughly before serving.
, The default reheat time is 23 minutes.
, Cooled rice should not be reheated more than once.
4 Press the KEEP-WARM/OFF button once to cancel a cooking process, preset setting or
when it is in keep-warm mode.
5 Unplug the rice cooker to switch it off.
Keeping warm
This mode allows you to keep your rice warm for a longer period of time.
Press the KEEP-WARM/OFF button twice to activate the keep-warm mode.
Note:The keep-warm light starts to burn continuously.
We advise you to keep rice warm for not more than 12 hours so as to preserve its taste.
During the keep-warm process, the display shows the time in hours from 0 to 11 (0HR, 1HR
...11HR). After 12 hours, the display will switch to the current time.
After 12 hours, the keep-warm mode will end and the cook/reheat light will blink.
Press the KEEP-WARM/OFF button once and remove the plug from the wall socket to switch the
rice cooker off.
Timer
You can use the timer for the rice cooking functions and the steaming, soup cooking and congee
cooking modes.
Press the TIMER button to set the time when you want the food to be ready to eat.
You can set a time from 0 minute up to 23 hours.
Setting the rice ready time for the rice cooking functions:
1 Press the MENU button to select the desired rice cooking function. (Fig. 25)
English 13
2 To set the rice ready time, press the TIMER button once and then use the HR and/or MIN
buttons to set the time.
, You can for example use the TIMER button to set the rice ready time at 18:30 hours (Fig. 26).
3 Press the COOK/REHEAT button to start the timer and cooking process. (Fig. 27)
The cook/reheat light blinks and timer light burns continuously. The display shows the current time.
To view the preset time, press the TIMER button once.
When the cooking process starts, the cook/reheat light starts to burn continuously and the timer
light goes out.
If the preset time is shorter than the required total cooking time of the selected cooking function,
the rice cooker will start the cooking process immediately.
Setting the ready time of congee, soup or steamed dishes:
1 Press the MENU button to select the congee cooking, soup cooking or steaming
mode. (Fig. 28)
2 Press the COOKING TIME button to set the desired cooking time. For cooking times see
section ‘Cooking congee’, ‘Cooking soup’ or ‘Steaming’ (Fig. 29).
3 Follow steps 2 to 3 under the heading ‘Setting the rice ready time’ above.
Clock
To set the current time:
1 Plug in the rice cooker.
2 Press the HR and MIN buttons to set the time.
The time on the display starts to blink.
You can put the time forward quickly by holding down the HR or MIN button.
The time cannot be adjusted during the cooking or keep-warm process.
3 To confirm the time, do not press any key for 5 seconds after setting the time. The time has
been confirmed when the time indicated on the display stops blinking.
Cleaning
Unplug the rice cooker before starting to clean it.
Wait until the rice cooker has cooled down sufficiently before cleaning it.
To protect the non-stick coating of the inner pot, do not:
- use the inner pot for washing dishes;
- put vinegar into the pot.
1 Take the steam tray and the inner pot out of the body of the appliance.
2 Detach the inner lid from the outer lid by pressing the lid release tabs and pulling the inner
lid outward and downwards. (Fig. 30)
To reattach the inner lid, slot the top end of the inner lid into the outer lid and push the release tabs
firmly home (‘click’).
3 Detach the steam vent cap from the outer lid by pulling it upwards (Fig. 31).
, To remove the bottom cover of the steam vent cap, slide the locking tab to ‘open’ and detach
the cover from its hinge (Fig. 32).
, To reattach the bottom cover of the steam vent cap, slot the cover at the hinge, slide the
locking tab to ‘close’ and push the bottom cover against the cap (‘click’) (Fig. 33).
, To put the steam vent cap back into the vent hole of the outer lid, insert it into the hole and
push it down firmly (Fig. 34).
14
English
4 Clean the inner lid, inner pot, steam tray, rice scoop and steam vent cap with a sponge or a
cloth in hot water with some washing-up liquid.
Do not use abrasive cleaning agents, scourers or metal utensils to clean the inner pot as these
will damage the non-stick coating.
5 Use only a damp cloth to wipe the outside and inside of the body of the rice cooker.
Never immerse the body of the rice cooker in water, nor rinse it under the tap. Wipe the heating
element with a dry cloth.
Environment
,
Do not throw the appliance away with the normal household waste at the end of its life, but
hand it in at an official collection point for recycling. By doing this you will help to preserve
the environment (Fig. 35).
Guarantee & service
If you need service or information or if you have a problem, please visit the Philips website at
www.philips.com or contact the Philips Consumer Care Centre in your country (you find its phone
number in the worldwide guarantee leaflet). If there is no Consumer Care Centre in your country,
go to your local Philips dealer.
English 15
Troubleshooting
If your rice cooker does not function properly or if the cooking quality is insufficient, consult the
table below. If you are unable to solve the problem, please contact the Philips Consumer Care
Centre in your country.
Problem
Cause
Solution
The cook/reheat
light does not go
on.
There is a connection
problem.
Check if the rice cooker is connected to the mains
and if the plug is inserted firmly into the wall socket.
The light is defective.
Take the appliance to your Philips dealer or a
service centre authorised by Philips.
The light is defective.
Take the appliance to your Philips dealer or a
service centre authorised by Philips.
The keep-warm
light does not go
on when the
cooking process is
finished.
LCD shows E1, E2, Electronic parts
E3, E4
malfunction
Sensor problem.Take the appliance to your Philips
dealer or a service centre authorized by Philips.
LCD shows E5
Press OFF button once. The appliance will resume
to normal
Water spills out of Water spills out of the
the appliance
appliance during rice
during rice
cooking.
cooking.
Make sure that you add water to the level indicated
on the scale inside the inner pot that corresponds
to the number of cups of rice used. Make sure the
water does not exceed the next level on the scale
as this may cause overflow during cooking.
The rice is not
cooked.
The timer light
does not go on
when the timer is
set.
Not enough water has Add water according to the scale on the inside of
been added.
the inner pot (see chapter ‘Using the appliance’).
The cooking process
has not started.
You have failed to press the RICE SELECTION
button or the COOKING TIME button and the
COOK/REHEAT button.
The inner pot is not
properly in contact
with the heating
element.
Make sure that there is no foreign residue on the
heating element.
The heating element
is damaged.
Take the appliance to your Philips dealer or a
service centre authorised by Philips.
The light is defective.
Take the appliance to your Philips dealer or a
service centre authorised by Philips.
The cake does not The quantity of
bake properly.
ingredients was too
large.
Check the quantities mentioned in the recipe in the
section ‘Baking cake’.
16
English
Problem
Cause
The rice is cooked Not enough water
too hard.
was used for cooking
rice.
The incorrect menu
has been selected.
The rice is cooked Too much water was
too soft.
used for cooking rice.
Solution
Add slightly more water to the level indicated on
the cale inside the inner pot that corresponds to
the number of cups of rice used. Make sure the
water does not exceed the next level on the scale
as this may cause overflow during cooking.
See chapter ‘Using the appliance’.
Make sure you add water according to the scale on
the inside of the inner pot (see chapter ‘Using the
appliance’).
The incorrect menu
has been selected.
See chapter ‘Using the appliance’.
The rice is
scorched.
The rice has not been
rinsed well.
Rinse the rice until water runs clear.
The rice cooker
does not
automatically
switch to keepwarm mode.
The temperature
control is defective.
Take the appliance to your Philips dealer or a
service centre authorised by Philips.
简体中文 17
产品简介
感谢您的惠顾,欢迎光临飞利浦!为了您能充分享受飞利浦提供的支持,请注册您的产
品,网址为 www.philips.com/welcome。
一般说明 (图 1)
A
B
C
D
E
F
G
H
I
J
K
L
M
N
O
P
Q
R
S
外盖
可拆除内盖
蒸汽孔
电饭煲把手
饭勺支架的安装托架
饭勺支架
加热元件
电源线
汤勺
饭勺
量杯
内胆
水位标记
蒸气盘
煲身
控制面板
释放杆
电源线连接
S. 可分离式蒸汽孔帽
注意事项
使用本产品前,请仔细阅读本使用说明书,并妥善保管以备日后参
考。
危险
- 切勿将电饭煲主体浸入水中,也不能在自来水龙头下冲洗。
警告
- 在将产品连接电源之前,请先检查产品所标电压与当地的供电电
压是否相符。
- 产品必须插入有接地的插座,且务必确保其已稳固插入。
- 如果插头、电源线或产品本身受损,请勿使用本产品。
- 如果电源软线损坏,为避免危险,必须由制造厂或其维修部或类
似的专职人员来更换。
- 本产品不打算由肢体不健全、感觉或精神上有障碍或缺乏相关经
验和知识的人(包括儿童)使用,除非有负责他们安全的人对他
们使用本产品进行监督或指导。
- 应照看好儿童,确保他们不玩耍这些产品。
- 不要让儿童接触到电源线。切勿将电源线悬挂在放置本产品的桌
子或工作台的边上。
18
简体中文
- 将插头接入电源插座之前,应确保加热元件、限温器和内锅外侧
洁净、干燥。
- 电饭煲正在工作时,不要盖住其蒸汽孔和锅盖。
- 切勿用浸湿的手插入产品插头或操作控制面板。
注意
- 切勿使用其它制造商生产的或未经飞利浦特别推荐的附件或部
件。如果您使用了此类附件或部件,则本产品的保修将会失效。
- 仅使用附送的饭勺。不要使用尖锐的器具。
- 切勿将电饭煲暴露在高温之下,也不要将电饭煲放在正在工作或
仍然发热的炉具或炊具上。
- 将插头插入插座之前,始终应确保已接插了内锅。
- 拔下电饭煲电源之前,应始终按一次 KEEP-WARM/OFF 按钮。
- 清洁电饭煲之前,必须先将插头拔掉,并待其冷却。
- 不要将内锅直接放在火上煮饭。
- 本产品仅限于家用。如果本产品使用不当、用于专业或半专业用
途或未按本用户手册中的说明进行操作,则本产品的保修将会失
效,并且对于因此而造成的损失,飞利浦拒绝承担任何责任。
- 将电饭煲放在稳固、平整且水平的表面上。
- 产品在使用时,表面会变得很热。
- 小心煮饭期间从蒸汽孔排出的热蒸汽或在打开盖子时从电饭煲中
冒出的热蒸汽。
- 使用后务必拔下产品的插头。
- 煮饭期间,切勿提起及移动电饭煲。
电磁场 (EMF)
本飞利浦产品符合关于电磁场 (EMF) 的所有相关标准。据目前的科学证明,如果正确使用
并按照本用户手册中的说明进行操作,本产品是安全的。
初次使用之前
取出内锅和加热元件之间的隔板。
1首次使用本产品之前,请彻底清洁电饭煲的所有部件(见“清洁”一章)。使用本产
品之前,确保所有部件都已完全干燥。
2将附带的饭勺支架固定在电饭煲机身上。 (图 2)
使用本产品
煮饭
1使用附带的量杯量米。
每杯生米大约相当于煮熟后的 2 碗米饭。不要超过内锅里指定的量。1 杯米大约为 180 毫
升。
- HD4750:1-5.5 杯米
- HD4754:2-10 杯米
简体中文 19
煮饭时的用米量
菜单
体积/升
用米量(杯)
体积/升
用米量(杯)
香米、丝苗米和东北
米
1.0
1-1.5
1.8
2-10
其它大米
1.0
1-1.5
1.8
2-10
糯米
1.0
1-4
1.8
2-8
煲仔饭
1.0
1-3
1.8
2-5
粥
1.0
0.25-0.75
1.8
0.5-1.5
Small amount(少
量)**
1.0
1-3
1.8
2-3
**注:为获得最佳效果,我们建议您不要一次煮超过 3 杯米。
2将米彻底淘洗干净。
3将淘好的米倒入内锅。
4按所倒入白米杯数,依照刻在内锅上的相应水位标记加入适量的水,然后将米抚平。
例如,煮 4 杯米,就应将水加至水位标记上 4 杯的位置。
, HD4750 (图 3)
, HD4754 (图 4)
注意: 内锅的水位标记只是一个参考,您可以根据米的品种及您的个人喜好调整水位。
5按释放杆,打开盖子。
6将内锅放入电饭煲。检查内锅是否已经正确接触加热元件。 (图 5)
请确保内锅的外表面是洁净且干燥的,并且没有其他杂物黏附在加热元件及限温器上。
7合上电饭煲的盖子,将插头插入插座并打开电源。
您将听到一声哔声。
8按 MENU(菜单)按钮,直到显示了所需烹饪功能。 (图 6)
烹饪/再加热指示灯开始闪烁。
, 然后按 RICE SELECTION(米饭选择)按钮,选择要煮的米饭品种。 (图 7)
, 当烹饪过程结束时,您将听到一声哔声。烹饪/再加热指示灯熄灭,并且保温指示灯开
始持续亮起,表示电饭煲已自动切换到保温模式。 (图 8)
, 如果为烤蛋糕模式和蒸食品模式,则在电饭煲发出哔声时表示过程结束。保温指示灯
闪烁,表示过程已结束。在这些模式下,电饭煲不会切换到保温模式。
9按 COOK/REHEAT(烹饪/再加热)按钮,开始烹饪过程。 (图 9)
烹饪/再加热指示灯亮起,并且烹饪过程开始。
在烹饪过程的最后 10 分钟,显示屏以分钟为单位进行倒计时(10、9、8 等)。
后文中的表格显示了各种模式的近似烹饪时间。实际烹饪时间视电压、室温、湿度和用水
量的不同而有所不同。
功能
近似烹饪时间(分钟)
煮好前倒计时(分钟)
普通
40-50
10
快速
30-40
10
少量
40-50
10
20
简体中文
功能
近似烹饪时间(分钟)
煮好前倒计时(分钟)
蒸汽*
10-60
不适用
蛋糕
40-50
不适用
煲仔饭*
45-60
不适用
汤*
30-240
不适用
粥*
30-240
不适用
再加热
23
不适用
* 注:要查看倒计时,请按 COOKING TIME 按钮。
10 打开盖子,翻松米饭。 (图 10)
为获得最佳效果,在电饭煲切换到保温模式后翻动米饭。然后将盖子盖牢。翻动米饭会使
过多的蒸汽散失,这将使米饭更加蓬松。
11 按一次 KEEP-WARM/OFF 按钮取消烹饪过程、预定设置或保温模式。 (图 11)
烹饪/再加热指示灯开始闪烁。
电饭煲具有备份存储器,在出现电源故障时能够保留上次选择的模式、功能和设置。烹饪
过程或定时器功能可在电源恢复后两小时内恢复。
在断开电饭煲电源之前,请务必按一次 KEEP-WARM/OFF 按钮,否则电饭煲在重新通电
后将恢复上次选择的模式、功能和设置。
12 拔下电饭煲电源插头,切断电源。
煮粥
1遵循“煮饭”部分的步骤 1 至 7。
不要超过表中针对煮粥时所示的量,否则可能导致电饭煲溢出。
2按 MENU(菜单)按钮,选择 congee cooking(煮粥)模式。 (图 12)
3按 COOKING TIME(烹饪时间)按钮,设置所需的烹饪时间。 (图 13)
, 显示默认的烹饪时间 1 小时。
, 要查看预设的烹饪时间,请按一次 COOKING TIME(烹饪时间)按钮。
, 按 HR(小时)和/或 MIN(分钟)按钮,设置需要的时间。您可以设置 30 分钟至 4
小时内的任意时间。 (图 14)
, 如果设置烹饪时间失败,则采用默认的烹饪时间 1 小时。
4按 COOK/REHEAT(烹饪/再加热)按钮,开始烹粥过程。
, 烹饪/再加热指示灯亮起,并且烹饪过程开始。
, 烹饪过程开始后,显示屏上的预设时间便会切换成当前时间。
当烹饪过程结束时,您将听到一声哔声。烹饪/再加热指示灯熄灭,并且保温指示灯开始持
续亮起,表示电饭煲已自动切换到保温模式。
5按一次 KEEP-WARM/OFF 按钮取消烹饪过程、预定设置或保温模式。
6拔下电饭煲电源插头,切断电源。
煮汤
1将汤料和水放入内锅。
不要超过内锅中针对煮粥的最大水位标度。
2遵循“煮饭”部分的步骤 6 至 7。
3按 MENU(菜单)按钮,选择 soup cooking(煮汤)模式。 (图 15)
简体中文 21
4按 COOKING TIME(烹饪时间)按钮,设置所需的烹饪时间。
按 HR(小时)和/或 MIN(分钟)按钮,设置需要的时间。您可以设置 30 分钟至 4 小时
内的任意时间。
, 要查看预设的烹饪时间,请按一次 COOKING TIME(烹饪时间)按钮。
5按 COOK/REHEAT(烹饪/再加热)按钮,开始煮汤过程。
, 烹饪/再加热指示灯亮起,并且烹饪过程开始。
, 烹饪过程开始后,显示屏上的预设时间便会切换成当前时间。
当烹饪过程结束时,您将听到一声哔声。烹饪/再加热指示灯熄灭,并且保温指示灯开始持
续亮起,表示电饭煲已自动切换到保温模式。
6按一次 KEEP-WARM/OFF 按钮取消烹饪过程、预定设置或保温模式。
7拔下电饭煲电源插头,切断电源。
烤蛋糕
1按 MENU(菜单)按钮,选择 cake baking(烤蛋糕)模式。 (图 16)
2按 COOK/REHEAT(烹饪/再加热)按钮,开始烤蛋糕过程。 (图 17)
, 烹饪/再加热指示灯亮起,并且烤蛋糕过程开始。
, 烤蛋糕过程结束时,电饭煲发出哔声,并且保温指示灯闪烁,表示过程已结束。
3按一次 KEEP-WARM/OFF 按钮,从插座拔下插头,切断电饭煲电源。
蛋糕食谱
配料:蛋糕预拌粉 250 克;黄油 65 克;水或牛奶 100 毫升;大鸡蛋 1 个。
注意: 在一个大碗中混合蛋糕预拌粉、水或牛奶、黄油和鸡蛋。用一个电搅拌器低速搅拌
1 分钟,然后以中速再搅拌 3 分钟。
注意: 在内锅上涂上一些黄油,然后将蛋糕预拌粉倒入内锅。
注意: 按 MENU(菜单)按钮,选择 cake baking(烤蛋糕)模式。
注意: 当电饭煲发出哔声,表示烘烤过程结束时,按一次 KEEP-WARM/OFF 按钮并将内
锅从电饭煲中取出。
注意: 让蛋糕冷却,然后翻转内锅,使蛋糕从内锅滑出到盘子中。
煲仔饭
您可以使用煲仔饭模式制作传统的砂窝煲饭。米饭底部会形成一薄层松脆的锅巴。
1将淘洗过的米倒入内锅,并加入适量的水。
请遵照“煮饭”部分的表格中所标示的米量。
根据“煮饭”部分的表格中所标示的水量添加适量的水。
2遵循“煮饭”部分的步骤 6 至 7。
3按 MENU(菜单)按钮,选择 casserole cooking(煲仔饭)模式。 (图 18)
4按 COOK/REHEAT(烹饪/再加热)按钮,开始煲仔饭烹饪过程。 (图 19)
烹饪/再加热指示灯亮起,并且烹饪过程开始。
5米饭煮好后,电饭煲将持续发出哔声 2 分钟,并且烹饪/再加热指示灯开始闪
烁。 (图 20)
6将菜肴配料放在米饭的顶部。合上盖子,再按一次 COOK/REHEAT(烹饪/加热)按
钮,恢复烹饪过程。
, 如果不按 COOK/REHEAT(烹饪/再加热)按钮,电饭煲将自动恢复煲仔饭烹饪过
程。
, 当烹饪过程结束时,您将听到一声哔声。烹饪/再加热指示灯熄灭,并且保温指示灯开
始持续亮起,表示电饭煲已自动切换到保温模式。
22
简体中文
7按一次 KEEP-WARM/OFF 按钮取消烹饪过程、预定设置或保温模式。
8拔下电饭煲电源插头,切断电源。
菜谱:鸡肉腊肠砂锅饭
配料:3 杯米;300 克鸡肉片;200 克腊肠(切片);1 英寸 生姜(切片);1 汤匙油;
盐和糖。
注意: 用一些盐和糖腌泡鸡肉。
注意: 将淘洗过的米倒入内锅并加水,不超过 3 杯米水位指示。按 MENU(菜单)按钮
选择 casserole cooking(煲仔饭)模式,并按 COOK/REHEAT(烹饪/再加热)按钮开始
烹饪。
注意: 当电饭煲发出哔声,表示米饭已煮好时,将配料倒入内锅并均匀地铺在米饭上。
注意: 当菜肴烹饪过程结束后,将切好的葱花撒在面上并趁热食用。
蒸食品
1用量杯量 3 杯水,并倒入内锅。
用水量根据要蒸的食品数量而定。
3 杯水沸腾约需 8 分钟的时间。
2将要蒸的食品放在盘子上或放在蒸架上。
为确保食品均匀受热,应将食品均匀摆放,不要使食品堆积。
3将蒸架放入内锅上。 (图 21)
4如果使用了盘子,将其放到蒸架上。
5盖紧盖子。
6按 MENU(菜单)按钮,选择 steaming(蒸食品)模式。 (图 22)
7按 COOKING TIME(烹饪时间)按钮,设置所需的蒸煮时间。 (图 23)
显示默认的蒸煮时间 15 分钟。
8按 HR(小时)和/或 MIN(分钟)按钮,设置所需的时间。 (图 24)
您可以设置 10 分钟至 1 小时内的任意时间。
如果设置烹饪时间失败,则采用默认的蒸煮时间 15 分钟。
9按 COOK/REHEAT(烹饪/再加热)按钮,开始蒸食品过程。请参阅“煮饭”部分的
步骤 10 和步骤 12。
, 烹饪/再加热指示灯亮起,并且蒸食品过程开始。
, 蒸食品过程结束时,电饭煲发出哔声,表示过程已结束。
10 打开盖子,小心地从盘子或蒸架上取出食品。由于盘子或蒸架会很烫,请戴一双厨房
用手套或垫一块布。
当心热蒸汽。
11 按一次 KEEP-WARM/OFF 按钮取消烹饪过程、预定设置或保温模式。
12 拔下电饭煲电源插头,切断电源。
再加热
您可以用再加热模式来加热冷饭。加入内锅的量不能超过其容量的一半,以确保米饭能得
到适当加热。
1翻松冷饭并将其均匀地分布在内锅中。
2在饭中倒入一些水以避免饭太干。添加的水量视要再加热的米饭量而定。
如果米饭开始变焦,则多添加一些水。
简体中文 23
3按两次 COOK/REHEAT(烹饪/再加热)按钮,开始再加热过程。
, 烹饪/再加热指示灯亮起,并且再加热过程开始。
, 当再加热过程结束时,您将听到一声哔声。烹饪/再加热指示灯熄灭,并且保温指示灯
开始持续亮起,表示电饭煲已自动切换到保温模式。
, 在食用前彻底搅拌米饭。
, 默认再加热时间为 23 分钟。
, 冷饭再加热的次数不能超过一次。
4按一次 KEEP-WARM/OFF 按钮取消烹饪过程、预定设置或保温模式。
5拔下电饭煲电源插头,切断电源。
保温
此模式使您可以在较长的时间内保持米饭是热的。
按两次 KEEP-WARM/OFF 按钮激活保温模式。
注意: 保温指示灯开始持续亮起。
建议不要让米饭的保温时间超过 12 个小时以保持其口感。
在保温期间,显示屏以小时为单位显示 0 至 11 小时内的时间(0HR、1HR ...11HR)。
12 小时后,显示屏将切换到当前时间。
12 小时后,保温模式将结束,并且烹饪/再加热指示灯开始闪烁。
按一次 KEEP-WARM/OFF 按钮,从插座拔下插头,切断电饭煲电源。
计时器
您可以将定时器用于煮饭功能及蒸食品、煮汤和煮粥模式。
按 TIMER(定时器)按钮设置食品可以食用的时间。
可以将时间设置为 0 分钟至 23 小时。
设置煮饭功能的米饭煮好时间:
1按 MENU(菜单)按钮,选择所需的煮饭功能。 (图 25)
2要设置米饭煮好时间,请按一次 TIMER(定时器)按钮,然后用 HR(小时)和/或
MIN(分钟)按钮设置时间。
, 例如,您可以用 TIMER(定时器)按钮将米饭煮好时间设置在 18:30。 (图 26)
3按 COOK/REHEAT(烹饪/再加热)按钮,启动定时器并开始烹饪过程。 (图 27)
烹饪/再加热指示灯闪烁,并且定时器指示灯持续亮起。显示屏显示当前时间。要查看预设
时间,请按一次 TIMER(定时器)按钮。
当烹饪过程开始时,烹饪/再加热指示灯开始持续亮起,并且定时器指示灯熄灭。
如果预设的时间比所选烹饪功能需要的总烹饪时间短,电饭煲将立即开始烹饪过程。
设置粥、汤或蒸品的煮好时间:
1按 MENU(菜单)按钮,选择煮粥、煮汤或蒸食品模式。 (图 28)
2按 COOKING TIME(烹饪时间)按钮,设置所需的烹饪时间。有关烹饪时间的详细说
明,请参阅“煮粥”、“煮汤”或“蒸食品”部分。 (图 29)
3遵循以上“设置米饭煮好时间”部分的步骤 2 至 3。
时钟
要设置当前时间:
1接通电饭煲的电源。
2按 HR(小时)和 MIN(分钟)按钮设置时间。
显示屏上的时间开始闪烁。
按住 HR(小时)或 MIN(分钟)按钮即可快速增加时间。
24
简体中文
在烹饪或保温过程中不能调整时间。
3要确认时间,在设置时间后 5 秒钟内不按任何键即可。当显示屏上显示的时间停止闪
烁时,即表示已经确认时间。
清洁
在开始清洗电饭煲之前,请拔掉电饭煲的电源线。
等到电饭煲完全冷却后再开始清洗。
要保护内锅的不粘涂层,请勿:
- 用内锅洗盘子;
- 将醋倒入内锅。
1将蒸架和内锅从产品的机身中取出。
2按盖子释放钮然后向外并向下拉内盖,将内盖从外盖中取下。 (图 30)
要重新安装内盖,将内盖的顶端插入外盖,并将释放钮按入到位(听到喀哒的一声)。
3向上拉蒸汽孔帽,从外盖上拆下蒸汽孔帽。 (图 31)
, 要卸下蒸汽孔帽的底盖,将锁定卡舌滑动到“开”位置,并从其铰链上拆下盖
子。 (图 32)
, 要重新安装蒸汽孔帽的底盖,在铰链处安装上盖子,将锁定卡舌滑动到“关”位置,
并朝蒸汽孔帽方向推底盖(听到喀哒一声)。 (图 33)
, 要将蒸汽孔帽装回外盖的蒸汽孔,将蒸汽孔帽插入蒸汽孔并向下按紧。 (图 34)
4在热水中加入清洁剂,用海绵或布清洁内盖,内锅,蒸架,饭勺和蒸汽孔帽。
不要用任何研磨性清洗剂,材料或金属网绒清洁内锅,以免损坏不
粘涂层。
5只能用湿布擦拭电饭煲主机身的内部和外部。
不可将电饭煲主机身浸入水中,也不能在水龙头下冲洗。用干布擦
拭加热元件。
环境
,
弃置产品时,请不要将其与一般生活垃圾堆放在一起;应将其交给官方指定的回收中
心。这样做有利于环保。 (图 35)
保修与服务
如果您需要服务或信息,或如果您有任何疑问,请访问飞利浦网站:www.philips.com。
也可与您所在地的飞利浦顾客服务中心联系(可从全球保修卡中找到电话号码)。如果您
的所在地没有飞利浦客户服务中心,可与当地的飞利浦经销商联系。
简体中文 25
故障种类和处理方法
如果您的电饭煲不能工作正常,或烹饪质量有缺陷,请查询以下表格。如果仍不能解决问
题,则请联系您所在国家/地区的飞利浦客户服务中心。
问题
原因
解决方法
烹饪/再加热指示灯
不亮。
接触不良。
检查电饭煲是否与电源连接,插头是否插牢。
指示灯有故障。 请将本产品送往当地的飞利浦经销商,或经飞利
浦授权的客户服务中心。
烹饪过程结束后,
保温指示灯不亮。
指示灯有故障。 请将本产品送往当地的飞利浦经销商,或经飞利
浦授权的客户服务中心。
LCD 显示屏显示
E1、E2、E3、E4
电子部件故障
LCD 显示屏显示
E5
传感器问题。请将本产品送往当地的飞利浦经销
商,或经飞利浦授权的服务中心。
按一次 OFF 按钮。产品将恢复正常
煮饭时,产品中有
水溢出。
煮饭时,产品
中有水溢出。
确保根据所倒入的白米杯数,依照刻在内锅上的
相应水位标记加入适量的水。确保水位没有超过
水位标记上的下一标度,否则可能导致煮饭时溢
水。
饭没煮好。
加水不足。
将水加到内锅的相应水位标志(见“使用本产
品”一章)。
煮饭过程未启
动。
没有按 RICE SELECTION(米饭选择)按钮或
COOKING TIME(烹饪时间)按钮和 COOK/
REHEAT(烹饪/再加热)按钮。
内锅与加热元
件接触不良。
确保加热元件上没有黏附其他杂物。
加热元件已损
坏。
请将本产品送往当地的飞利浦经销商,或经飞利
浦授权的客户服务中心。
在设置了定时器的
情况下,定时器指
示灯不亮。
指示灯有故障。 请将本产品送往当地的飞利浦经销商,或经飞利
浦授权的客户服务中心。
没有正确烘烤蛋
糕。
配料的数量太
多。
米饭煮得太硬。
煮饭用水不足。 根据所倒入的白米杯数,依照刻在内锅上的相应
水位标记稍微多加一些水。确保水位没有超过水
位标记上的下一标度,否则可能导致煮饭时溢
水。
选择了不正确
的菜单。
米饭煮得太软。
核对“烤蛋糕”一节中提及的数量。
见“使用产品”一章。
煮饭用水太多。 确保将水加到内锅的相应水位标志(见“使用产
品”一章)。
选择了不正确
的菜单。
见“使用产品”一章。
26
简体中文
问题
原因
饭煮焦了。
米没有洗干净。 将米洗干净。
电饭煲没有自动切
换到保温模式。
温度控制有故
障。
2008/08/21
解决方法
请将本产品送往当地的飞利浦经销商,或经飞利
浦授权的客户服务中心。
27
28
29
30
2
3
4
5
6
7
8
9
10
11
12
13
14
15
16
17
18
19
20
21
0,75
5,5
4
2
1
0,50
0,25
31
22
23
24
25
26
27
28
29
30
31
32
33
34
35
4222.001.9896.6