1
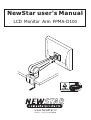
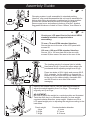
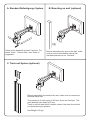
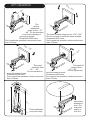
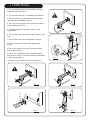
LCD Monitor Arm
Before starting Assembly
Please spend a short time reading this
manual then follow the simple step by step
guide to assembly. Some panels are viewed
differently from the exploded drawing below,
this is for extra clarity.
Do not discard any of the packaging until you
have checked all the parts and the pack of
fittings. If you are missing any of the parts,
contact store where you purchased.
04
Parts Check-List
Qty
Code
Component
01
Arm
1
02
Clamp
1
03
Cable Cover
1
04
Connector Plate
1
05
Rubber Cap
1
06
Base Cover
1pair
07
Clamp Pad
1
03
01
05
06-L
06-R
02
07
Fitting Check-List
Code
Description
08
Screw
8
09
Bolt
4
Qty
Tools Check-List
Allen Key
Caution:
Regular cleaning with a clean dry cloth is usually sufficient, but for stubborn
marks, wipe over gently with a clean damp cloth. Never use strong detergents or
abrasive cleaners as these may damage the surface finish of your furniture. There
are many small components used in the construction of this unit. These loose
items should be kept away from young children while assembling your unit.
NewStar user's Manual
LCD Monitor Arm FPMA-D100
www.NewStar.nl
Phone: + 31 (0) 23 547 88 88
Assembly Guide
09
Clamping system is well assembled in standard packing.
However, user could disassemble this unit and re-assemble for
thicker desk fitting by adjusting cranking bar & clamp position.
At least two screws should be used for clamping system.
Remove pad cover and adhere to bottom of larger L bracket.
Suggested thickness of desk is 15mm-100mm, over 30mm is
01
07
x4
02
08
x8
Check your LCD panel first to find which VESA
standard interface it supports before
assembling.
75 mm x 75 mm VESA standard interface
Secure the arm to the rear of the LCD panel with
screws 08
04
06-R
100 mm x 100 mm VESA standard interface
Secure 100 x 100 mm plate 04 to the arm with
screws 08,then secure the arm to the rear of the
The loading weight of universal joint is initially
fixed below 6 kgs. Consult the store where you
purchased about adjusting weight over 6 kgs.
03
06-L
Press two sides of 06-L lightly and remove 06-R ,
06-L outwards. Let the cables run through the
bottom of the arm and then press cable cover 03
to the arm to fix cables steady. Assemble 06-L
and 06-R back to arm after finish cable
managing.
Remove the rubber cap 05, use the Allen key provided to
adjust the weight capacity from 3 to 8 kgs. The weight is
originally set up at 3 kgs.
ADJUSTMENT:
Be sure to adjust the weight in a vertical position as illustrated.
Twist the Allen key in a clockwise direction for less weight;
counterclockwise direction, more weight. Make sure of the
LCD panel weight prior to adjusting the weight according to the
instruction.
max
05
min
Panel weight
4 kgs
5-6 kgs
7-8 kgs
Counterclockwise direction
4 turns
5-7 turns
8-10 turns
A. Standard Befestigungs System
Clamp to the desk with at least 2 screws. For
desks 15mm - 102mm thick, over 30mm is
suggested.
B. Mounting on wall (optional)
Before assembling the arm to the wall, make
sure to remove the desktop clamp first.
Hardware(screws) is not included.
C. Track-set System (optional)
Before assembling the track to the arm, make sure to remove the
desktop clamp first.
The maximum of track cycle is 600 mm, there are 24 stops. The
pitch between two stops is 25 mm.
Track is not included and if needed, contact the store from which
you purchased your product.
Net Weight: 8.5 kgs
Arm Operation
Ma
x:
0
00
x
Ma
27
00
:1
The
vertical
adjustment
0
range is from -10
0
~90 . Do not overwork,
to avoid the damage of
gas-spring system.
Guarantee:10000 turns.
Don't repeat the operation continuously more
than 10 times .
0
0
The panel rotation range is from -135 ~135 .
Do not overwork to avoid the case to break.
Guarantee:6000 turns.
Don't repeat the operation continuously more
than 10 times.
ax
M
0
80
:1
0
80
x
Ma
The panel tilt
range is from 0
0
90 ~90
Do not overwork to
The panel
swivels is from
0
0
-90 ~ 90
Do not overwork to
avoid the case to break.
Guarantee:6000 turns .
Don't repeat the operation continuously more
than 10 times .
M
ax
:R
41
0
m
m
avoid the case to break.
Guarantee:6000 turns .
Don't repeat the operation continuously more
than 10 times .
:1
52
mm
41
mm
m
8m
47
29
0m
m
95
mm
Pitches between
every two stops.
Movement
distance of
Arm: The
maximum
radius is
410 mm.
11 Safty Notes:
1. Do not rotate the arm over the edge of desk to
avoid the arm falls.(Fig.1)
2. Do not place the arm in a shaking environment .
3. Do not remove any part except handle, rubber
cap and bolt as illustrated.(Fig.2)
4. Do not put your fingers in the space of knobs to
avoid getting hurt.(Fig.3)
5. Please maintain all operation under room
temperature.
Fig . 1
6. Do not place the other stuff on the surface of the
arm.
7. Do not place the panel weighted over 8 kgs.
8. Do not adjust the monitor with single hand.
(Fig.4)
9. Be sure to secure the arm to the panel with 4
screws tightly.(Fig.5)
10. Be sure to adjust the arm in a vertical status
after the job done to avoid the resiliency exhaustion
of gas cylinder.(Fig.6)
Fig . 2
11.Cable cover is restricted to hold two 8mm &
Fig . 3
Fig. 4
Fig . 5
Fig . 6