1
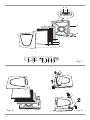
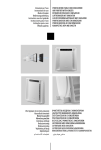
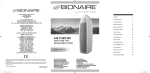
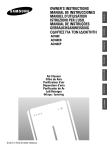
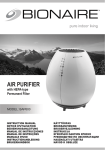
Air Purifier with Ionizer
Épurateur d’air avec ionisateur
Luftreiniger mit Ionisator
Purificatore d’aria con ionizzatore
Luchtzuiveringsapparaat met Ionisator
Purificador de Aire con Ionizador
Purificador de Ar com Ionizador
πÔÓÈÛÙ‹˜ ·¤Ú·
Luftrenser med ioniseringsanordning
Luftrenare med jonisator
Ilmanpuhdistaja - ionisoja
Luftrenser med ioniseringsanordning
Instructions for use
Mode d’emploi
Gebrauchsanweisung
Istruzioni per l’uso
Gebruiksaanwijzing
Instrucciones para el uso
Instruções para o uso
√‰ËÁ›Â˜ ¯Ú‹Û˘
Bruksanvisning
Bruksanvisning
Käyttöohje
1
Table des matières
Avertissement
Caractéristiques techniques
Description de l’appareil
Mode d’emploi
Nettoyage de l’appareil
Maintenance et changement du filtre
F
D
Indice
Avvertenze
Caratteristiche tecniche
Descrizione dell’apparecchio
Istruzioni per l’uso
Pulizia dell’apparecchio
Manutenzione e sostituzione del filtro
I
Inhoudsopgave
NL
Waarschuwingen
Technische kenmerken
Beschrijving van het apparaat
Gebruiksaanwijzing
Reinigen van het apparaat
Onderhoud en vervanging van het filter
Índice
Advertencias
Características técnicas
Descripción del aparato
Instrucciones para el uso
Limpieza del aparato
Mantenimiento y reemplazo del filtro
E
GB
Contents
General instructions
Features
Description of appliance
Instructions for use
Cleaning the appliance
Maintenance and filter replacement
Inhalt
Wichtige Hinweise
Technische Angaben
Gerätebbeschreibung
Inbetriebsetzung
Pflege und Reinigung des Gerätes
Instandhaltung und Filterwechsel
Índice
Advertências
Características técnicas
Descrição do aparelho
Instruções para o uso
Limpeza do aparelho
Manutenção e substituição do filtro
Innholdsfortegnelse
Advarsler
Tekniske specifikationer
Beskrivelse af apparatet
Brugsanvisninger
Rengøring af apparatet
Vedligeholdelse og udskiftning
Kiftning af filtrene
DK
Innholdsfortegnelse
Generelle instruksjoner
Teknisk informasjon
Beskrivelse av apparatet
Instruksjon for bruk
Rensing av apparatet
Vedlikehold og skifting av filter
N
2
Periecovm ena
GR
Proeidopoihvsei"
Tecnikav carakthristikav
Perigrafhv th" suskeuhv"
Odhgive" crhvsh"
Kaqarismov" th" suskeuhv"
Sunthvrhsh kai antikatavstash tou fivltrou
P
Innehållsförteckningts
Allmänna instruktioner
Teknisk information
Beskrivning av apparaten
Instruktioner för användning
Rengöring av apparaten
Underhåll och byte av filter
Sisällysluettelo
Yleiset ohjeet
Tekniset tiedot
Laitteen kuvaus
Käyttöohjeet
Laitteen puhdistaminen
Huolto ja suodattimien vaihto
2
S
SF
E
F
G
H
D
C
B
A
I
L
M
N O P Q
Fig.1
1
2
Fig. 2
3
Fig. 3
3
READ THIS BOOKLET CAREFULLY BEFORE USING THE APPLIANCE.
THIS IS THE ONLY WAY TO ENSURE BEST RESULTS AND
MAXIMUM SAFETY.
GB
GENERAL INSTRUCTIONS
- This appliance must be used exclusively for the purpose for which it was expressly
conceived, namely as a domestic air purifier.Any other use is considered improper and
thus dangerous. Improper, incorrect or irresponsible use and/or repairs performed by
unqualified personnel absolve the manufacturer from all liability for resulting damage.
- After unpacking, make sure the appliance is complete and undamaged. If in doubt,
do not use and consult a qualified electrician.
- The plastic bag containing the appliance must not be left within reach of children
as it could represent a hazard.
- Before plugging the appliance into the mains electricity supply, make sure the
mains voltage corresponds to the voltage indicated on the rating plate.
- If the plug fitted to the appliance does not match the power socket, have the
socket replaced with a suitable type by a qualified professional.
- If the supply cord is damaged, it must be replaced by the manufacturer, its service
agent or similarly qualified persons in order to avoid a hazard.
- Children or infirm persons should not be allowed to use this product unsupervised
- Children should not be allowed to play with this appliance
- Never immerse the appliance in water.
- When the appliance is plugged into the mains, always respect the following
fundamental safety rules:
- never touch the appliance with damp or wet hands;
- do not use the appliance with bare or damp feet;
- do not pull the power cable or appliance itself to unplug from the mains;
- keep the appliance out of reach of children;
- do not insert foreign bodies into the appliance;
- protect the appliance from atmospheric agents and do not use out of doors;
- do not obstruct the air intake and outlet grills;
- If the power cable is damaged, it must be replaced at once by specialist personnel
authorised by the manufacturer only.
- If the appliance is to be disposed of definitively, after unplugging from the mains
socket, you are recommended to remove the power cable to make it unusable.
- Before cleaning or maintenance of any sort, always unplug the appliance from the
mains socket.
- In the event of breakdown and/or malfunction, turn the appliance off. Do not
attempt to repair it.
- For all repairs, contact professional service centres only and insist on the use of
original spare parts and accessories.
- Before use, always check that the power cable is undamaged.
KEEP THESE INSTRUCTIONS IN A SAFE PLACE FOR FUTURE REFERENCE
4
FEATURES
1. De'Longhi air purifiers incorporate the latest technology in domestic air filtration;
2. A powerful silent fan motor draws in the air from the front panel;
3.The contaminated air passes through a washable prefilter which removes the
larger impurities such as dust and pollen. The partially filtered air is then passed
through a long-lasting HEPA filter with a large filtering surface. This is easily
recognisable as it is made with special folded paper. This HEPA (High Efficiency
Particulate Air) filter removes impurities down to 0.1 micron in size, filtering all
types of particles and even bacteria.
4.The air then passes through an activated carbon filter which removes odours. The
filter is dark grey and is easily distinguished by its highly porous appearance;
IONIZER
IONIZER
PRE-FILTER
ACTIVATED CARBON
FILTER
HEPA FILTER
SUPER HEPA FILTER
5.Purified air is then returned to the room through the top mounted grill. The
upward movement of filtered air promotes efficient circulation without causing
unpleasant drafts;
6.When switched on, an independently controlled ionizer releases a cloud of
negative ions into the outgoing filtered air;
7.When coming into contact with the negative ions, small airborne particles become
negatively charged. These can then combine with positively charged particles to
form larger particles which are subsequently filtered by the purifier; otherwise, the
negative particles will be attracted to positively charged surfaces such as walls or
floors;
8.The negative ions help create a better balance of ions in the room as, generally, there
is a predominance of positive ions over negative ones. So ionizing helps reduce the
static electricity created by rugs, carpets, televisions and computer screens.
GENERAL FEATURES
Voltage
Frequency
Absorbed power
Suitable for rooms of up to
Number of fans
Fan speed
Ioniser control
see rating label
30 m3
1
3
•
5
DESCRIPTION OF APPLIANCE
A)
B)
C)
D)
E)
F)
G)
H)
Front panel
Washable prefilter
HEPA filter
Anti-odour activated carbon filter
Filtered air outlet grill
Handle
Power cable
Plug
I)
L)
M)
N)
O)
P)
Q)
Timer light
Timer button
Ionising button
Silent light
Standard light
Turbo light
ON/OFF/fan speed button
INSTRUCTIONS FOR USE
1. Unpack the air purifier and place it on a flat, stable surface so that the air inlet
(front grill) and air outlet (top grill) are not blocked A good place to position the
appliance could be at least a metre away from a wall.
2. Remove the front grill (A). Inside you will find the filters packed in plastic bags;
3. Remove the filter packaging. Position the filters in the order shown in the
diagram: activated carbon filter (black), resting directly against the inside of the
purifier so that it stays there, then the HEPA filter, resting against the activated
carbon filter and finally the prefilter.
4.Replace the front panel;
5.Check that the voltage in your home corresponds to that indicated on the
appliance, then plug the appliance into the mains socket.
6.Turn the appliance on by pressing the ON-OFF/fan speed button (Q), then press
the button again to select the required fan speed (quiet, standard, turbo).
Quiet mode: use this mode when you want the purifier to work silently.
Standard mode: use this mode when you want the purifier to work at medium
speed.
Turbo mode: use this mode when you want the purifier to work at maximum
speed in smoky or particularly dusty atmospheres.
The light corresponding to the mode selected comes on.
7.To release negative ions into the room with the purified air, press the ioniser
button. The light on the button comes on.
8.Programme mode:
To activate programme mode, with the appliance on, press the timer button. The
appliance goes off after three hours.
CLEANING THE APPLIANCE
Clean the outside of the air purifier with a soft, clean, damp cloth to remove dust,
grime and fingerprints.
The front grill and prefilter within it can be removed and washed separately in warm,
soapy water (NOT in a dishwasher). Dry the components carefully before replacing.
The top air emission grill can be cleaned with a small, soft brush.
WARNING: Never immerse the appliance in water to clean the purifier.
6
MAINTENANCE AND FILTER REPLACEMENT
1. Remember that the efficiency of your purifier depends largely on the condition of
the filters. These should therefore be checked regularly.
2.Remove the front panel. Inspect the prefilter. If a considerable amount of dust and
other dirt has accumulated, remove the filter from the grill and wash it by hand in
warm soapy water. Dry well before replacing;
3.The life of the HEPA and activated carbon filters depends on the conditions of use.
In general, with continuous 24-hour operation at medium speed in conditions with
normal amounts of dust/smoke in the air, the HEPA filters last about 12-18
months and the activated carbon filters about 6-12 months.
To change the activated carbon filter, first remove the HEPA filter, then remove the
activated carbon filter and replace with a new one. Before replacing the front
panel, check that the prefilter is clean. Frequent cleaning of the prefilter will help
prolong the life of the HEPA filter;
4.When the white filter becomes dark grey or brown, it needs replacing.
Do not wash the activated carbon or HEPA filters. Once exhausted, these filters
can no longer be used.
5.De'Longhi replacement filters are available from our service centres and home
appliance retailers.
IMPORTANT INFORMATION FOR CORRECT DISPOSAL OF THE PRODUCT IN ACCORDANCE WITH EC DIRECTIVE 2002/96/EC.
At the end of its working life, the product must not be disposed of as urban waste.
It must be taken to a special local authority differentiated waste collection centre or to a dealer providing this service.
Disposing of a household appliance separately avoids possible negative consequences for the environment and health deriving from inappropriate disposal and enables the constituent materials to be recovered to obtain significant savings in energy and resources.As a reminder of the need to dispose of household appliances separately, the
product is marked with a crossed-out wheeled dustbin.
ELECTRICAL CONNECTION (UK ONLY)
A) If your appliance comes fitted with a plug, it will
incorporate a 13 Amp fuse. If it does not fit your socket,
the plug should be cut off from the mains lead, and an
appropriate plug fitted, as below.
WARNING: Very carefully dispose of the cut off plug after
removing the fuse: do not insert in a 13 Amp socket
elsewhere in the house as this could cause a shock hazard.
With alternative plugs not incorporating a fuse, the circuit
must be protected by a 15 Amp fuse.
If the plug is a moulded-on type, the fuse cover must be
re-fitted when changing the fuse using a 13 Amp Asta
approved fuse to BS 1362. In the event of losing the fuse
cover, the plug must NOT be used until a replacement
fuse cover can be obtained from your nearest electrical
dealer. The colour of the correct replacement fuse cover
is that as marked on the base of the plug.
B) If your appliance is not fitted with a plug, please follow
the instructions provided below:
WARNING - THIS APPLIANCE MUST BE EARTHED
IMPORTANT
The wires in the mains lead are coloured in accordance with
the following code:
Green and yellow:
Earth
Blue:
Neutral
Brown: Live
As the colours of the wires in the mains lead may not
correspond with the coloured markings identifying the terminals
in your plug, proceed as follows:
The green and yellow wire must be connected to the terminal
in the plug marked with the letter E or the earth symbol
or coloured green or green and yellow.
The blue wire must be connected to the terminal marked
with the letter N or coloured black.
The brown wire must be connected to the terminal marked
with the letter L or coloured red.
7