1
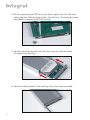
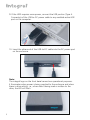
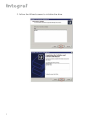
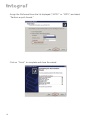
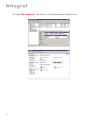
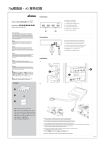
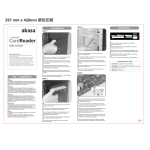
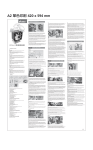
english
AKASA Company notices
The information contained in this document is subject to change without
notice.
All rights reserved. Reproduction, adaptation, or translation of this material
is prohibited without prior written permission of AKASA, except as allowed
under copyright laws.
The only warranties for AKASA products and services are set forth in the
express warranty statements accompanying such products and services.
Nothing herein should be construed as constituting an additional warranty.
AKASA shall not be liable for technical or editorial errors or omissions
contained herein.
Acknowledgements
Microsoft, Windows, Windows NT and Windows XP are registered
trademarks of MicrosoftCorporation.
Adobe and Acrobat are trademarks of Adobe Systems Incorporated.
Copyright 00 AKASA ASIA Corporation.
General Notice: Other product names used herein are for identification
purposes only and may be trademarks of their respective owners. AKASA
disclaims any and all rights in those marks.
Getting Started
To install your new Enclosure you will need:
• Hard Disk Drive (HDD) (not included)
• Micro Philips-head screwdriver (not included)
• Mounting screws (included)
• USB .0 Data Cable (included)
• USB to DC Power Cable (included)
Installation
. Undo the securing screws from the housing unit and open the back of
the enclosure by sliding the tray out of the aluminum housing.
Note the IDE connector for the ." HDD.
IDE Connector
. Place the HDD on top of the tray and line-up the IDE connectors with
the drive
Tray IDE
Connector
HDD IDE
Connector
. Gently insert the HDD into the tray’s IDE connector until the
connection is secure
. While supporting the HDD with your hand, gently turn the tray over
and locate the HDD mounting holes. Use the four () mounting screws
(provided) to secure the HDD to the tray.
. Gently insert the tray back into the housing until the back panel
fits against the housing.
. Secure the back panel to the housing using the screws provided.
. Plug the small, flat end of the USB cable(Mini B connector) into the back
of the enclosure.
. Insert the other end of the USB cable (Type A Connector) into any available
active USB port on the computer.
Note:
The ." enclosure can draw power from the USB bus, the cable carries
both: data and power. In some cases the enclosure may require additional
DC current for operation. The additional USB-to-DC power converter cable
is provided.
. If the HDD requires more power, connect the USB portion (Type A
Connector) of the USB-to-DC power cable to any available active USB
port on the computer.
0. Insert the other end of the USB-to-DC cable into the DC power port
on the enclosure.
Note:
The integral logo on the front bezel serves two operational purposes.
It illuminates when power is being supplied to the enclosure and when
there is drive activity, i.e., when data is being read or written to the
drive, the LED will flash.
System Setup
Setup instructions are outlined for each type of enclosure based on the computer’s
operating system, i.e. Windows® XP, Windows® or Mac® OS.
Windows® XP
. Windows® XP will auto-detect the new device and automatically load an
embedded USB driver. The following notification will appear in the bottom,
right-hand corner of the screen.
Found New Hardware
USB .0 Storage Device USB Device
Found New Hardware
Your new hardware is installed and ready to use
. If the installed hard drive has not already been formatted, in order for the
computer to recognize the drive, it must be initialized, partitioned and formatted.
Click on Start and open the Control Panel.
Select Administrative Tools and open Computer Management.
Select Disk Management to launch the “New Disk Wizard.”
. Follow the Wizard screens to initialize the drive.
. The new device can now be viewed in Disk Management. To launch
the New Partition Wizard, right-button click in the Disk area and select
“New Partition.”
. Follow the wizard screens to complete the partitioning and formatting.
Select “Primary Partition.”
Set for maximum size.
Assign letter or path for drive.
Assign the file format from the list displayed (“FAT” or “NTFS”) and select
“Perform a quick format.”
Click on “Finish” to complete and close the wizard.
10
. Open My Computer. The drive is now displayed and ready for use.
11
Windows® 98
When installing large capacity hard disk drives into the enclosure and in use
with Win, the Win OS may not properly recognize the full capacity of
the HDD. In order to remedy this situation, Win may automatically ask to
format the drive to its default capacity and / or you may need to use a rd
party application.
Mac® OS 9.0 or later
The Mac® OS will auto-detect the new device. Once the Integral is installed
on the computer via the USB, an icon for the device will be displayed on the
desktop.
If using the CD recording software Toast, the extension driver for USB .0
must be installed.
Mac® OS 8.6
For USB port installations on Mac® OS ., the USB Mass Storage Support
.. application must be installed. Downloads of this software are available
from the Apple Software Updates section at www.apple.com
FCC Compliance Statement
This Device complies with part of the FCC Rules. Operation is subiect
to the following two conditions:
●
●
12
This device may not cause harmful interference.
This device must accept any interference received,including
interference that may cause undesired operation.