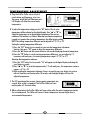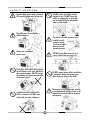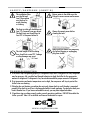
1
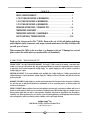
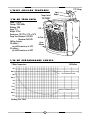
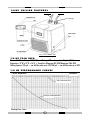
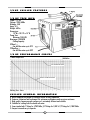
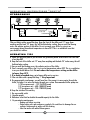
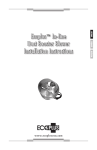
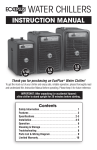
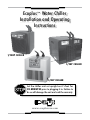
Ecoplus™ Water Chiller Installation and Operating Instructions 1/10HP Chiller 1/2HP Chiller 1/4HP Chiller Let the chiller unit set upright on it’s feet for 20 minutes prior to plugging it in. Failure to do so will damage the unit and void the warranty. www.ecoplususa.com Your Eco Plus™ Chiller from Sunlight Supply®, Inc. is covered for one (1) full year against manufacturer defects. This warranty information must be filled out and mailed back with a copy of the purchase receipt for warranty to be in effect. Abuse or neglect of the product will void the warranty. Select power: n 1/10 HP n 1/4 HP n 1/2 HP Eco Plus™ Chiller / / ________________________________________________________________ PRoduct name SERIAL NUMBER DATE OF PURCHASE ________________________________________________________________ name ________________________________________________________________ address ________________________________________________________________ citystate zip (________________________________________________________________ ) phone numberemail Where you purchased this product: ________________________________________________________________ STORE NAME Please mail this warranty page within 15 days of purchase in a stamped envelope to: Sunlight Supply, Inc. Eco Plus Warranty Dept 5408 NE 88th Street - Bldg A Vancouver WA 98665 USA PHOTOCOPY OR CUT ALONG DOTTED LINE RRANT Y A W INDEX INDEX / LIMITED WARRANTY ....................................................................... 1 1/10 HP CHILLER FEATURES & INFORMATION...............................................2 1/4 HP CHILLER FEATURES & INFORMATION.................................................3 1/2 HP CHILLER FEATURES & INFORMATION.................................................4 OPERATING INSTRUCTIONS / OPERATING TIPS ...........................................5-6 TEMPERATURE ADJUSTMENT ....................................................................... 7 TEMPERATURE GUIDELINES / MAINTENANCE ............................................... 8 SAFETY/CAUTIONS/ TROUBLESHOOTING.................................................. 9-10 T hank you for choosing an Eco Plus™ Chiller. Because this unit is built with leading technology and the highest quality components, with proper care and maintenance, this chiller should provide you with years of service. Please examine the Chiller to be sure there is no damage to the unit. If damage has occurred please contact the retailer where you purchased the unit immediately. L I M I T E D WA R R A N T Y Sunlight Supply,® Inc. One-Year Limited Warranty. The Ecoplus™ Chiller covered in this manual, is warranted under normal use for one year after purchase date. Any part determined defective in material or workmanship can be returned to an authorized service location designated by Sunlight Supply,® Inc., prepaid shipping costs, will be repaired or replaced at Sunlight Supply, Inc.’s option. Limitation of liability. To the extent allowable under applicable law, Sunlight Supply, Inc.’s liability consequential and incidental damages is expressly disclaimed. Sunlight Supply, Inc.’s liability in all events is limited to and shall not exceed the purchase price paid. WARRANTY DISCLAIMER. Sunlight Supply, Inc. provides product information in this literature for the sole purpose of identification, and does state or imply that the products are merchantable, or fit for a particular purpose, or that the products will conform to the descriptions. PRODUCT SUITABILITY. Many jurisdictions have codes and regulations governing sales, construction, installation and/or use of products for certain purposes, which may vary from those in neighboring areas. While Sunlight Supply, Inc. attempts to assure that its products comply with such codes, it cannot guarantee compliance, and cannot be responsible for how the product is installed or used. Before purchase and use of a product, review the product applications, and all applicable national and local codes and regulations, and be sure that the product, installation, and use will comply with them. Sunlight Supply,® Inc. 5408 NE 88th St. Bldg A, Vancouver, WA 98665 U.S.A. © 2006 Sunlight Supply ®, Inc. 1 1/10 H P C H I L L E R F E A T U R E S 1/10 H P T E C H I N F O Temp Control “UP/DOWN” Power: 1/10 HP Voltage: 120V/60Hz Wattage: 280 LCD Amps: 2.3 Weight: 31 lbs. Dimensions: 10.5”W x 12”D x 14”H Pump Size: Minimum 132 GPH Air Vent Maximum 264 GPH Chilling Capacity: Cover 93 gallons— Release can chill the water up to 10ºF 35 gallons— can chill the water up to 30ºF 1/2” Fittings Input Output Fuse 1/10 H P P E R F O R M A N C E C U R V E S ºF Water Temperature 100 Gallons 93 89.5 86 AIR TEMPERATURE 82.5 79 75 71.5 68 WATER TEMPERATURE 64.5 61 Working Time - Hours 2 1/4 H P C H I L L E R F E A T U R E S water outlet water inlet 3/4” Fittings auxillary power outlet for heater 1/4 H P T E C H I N F O Power: 1/4 HP • Voltage: 120V/60Hz • Wattage: 480 • Amps: 4 • Weight: 48.5 lbs. Dimensions: 13”W x 15”D x 16”H • Pump Size: Minimum 633 GPH/Maximum 1056 GPH Chilling Capacity: 170 gal.— can chill the water up to 10ºF, 100 gal.— can chill the water up to 30ºF 1/4 H P P E R F O R M A N C E C U R V E S ºF Water Temperature 100 Gallons AIR TEMPERATURE WATER TEMPERATURE Working Time - Hours 3 1/2 H P C H I L L E R F E A T U R E S 1” Fittings 1/2 H P T E C H I N F O Power: 1/2 HP Voltage: 120V/60Hz Wattage: 540 Amps: 4.5 Weight: 68 lbs. Dimensions: 15”W x 18.5”D x 15”H Pump Size: Minimum 750 GPH Maximum 1200 GPH Chilling Capacity: 320 gal.— can chill the water up to 10ºF 220 gallons— can chill the water up to 30ºF 1/2 H P P E R F O R M A N C E C U R V E S ºF Water Temperature 100 Gallons AIR TEMPERATURE WATER TEMPERATURE Working Time - Hours C H I L L E R G E N E R A L I N F O R M AT I O N A. Micro computer with digital LCD display allows for easy operation. B. Features a titanium heat exchanger for optimum performance and corrosion resistance. C. High quality Japanese-made compressor is extremely efficient and reliable. D. Suitable for cooling both fresh and salt water. E. C omes standard with 1” fittings for 1/2HP Chiller, 3/4” fittings for 1/4HP & 1/2” fittings for 1/10HP Chiller. F. Compact size and easy to operate. 4 O P E R AT I N G I N S T R U C T I O N S WAT E R I N L E T & O U T L E T I N S TA L L AT I O N A. Take out water inlet & outlet accessories. B. Assembling water inlet & outlet. C. Attaching water inlet & outlet to the unit. D. Connecting the external flexible hose. E C O P L U S ™ C H I L L E R I N S TA L L AT I O N Before using the machine, please check: A. Make sure the water inlet, outlet and hose are connected firmly: check for any leakage. B. Make sure routine circulation runs normally without any blockage. C. Make sure power voltage and frequency are in accordance with data on back of machine. D. Make sure the air inlet is at least 12” distance from other objects, and keep the heat exhaust window no less than 24” away from any object. Do not block or cover air inlet or outlet. AQUARIUM If the EcoPlus Chiller is put in an aquarium cabinet, the cabinet should have proper ventilation in front of the heat exhaust window, or be equipped with a small exhaust fan. The heat must be exhausted from the cabinet. Use an exhaust fan as necessary. 5 O P E R AT I N G I N S T R U C T I O N S ( C O N T ’ D ) HYDROPONICS PUMP PUMP 12" 24" FILTER BAG FAN Filter out debris with a pump filter bag. Keep the front of the chiller unit 12” away from anything and the back 24” away; this will facilitate better cooling. Have a small fan blowing across the radiator portion of the chiller. Do not overwork your chiller by using in an environment where the ambient temperature is above 90ºF. This is a ventilation issue that you should first address. O P E R AT I N G T I P S A. Find a cool and close place to put the chiller unit; preferably within several feet of the room that is less than 80ºF. B. Keep the front of the chiller unit 12” away from anything and the back 24” inches away; this will facilitate better cooling. C. Have a small fan blowing across the radiator portion of the chiller. D. Don’t overwork your chillers; don’t try to use at temperatures above 90ºF. This is a ventilation issue you should address first. Do not reduce the temperature setting on the chiller to lower than 40ºF. E. If in doubt of needed size– get a bigger chiller unit or use two. F. Filter out debris with a pump filter bag — Very Important! G. Use appropriately sized pumps; you will need two. One pump is to move water through the chiller; the other is to move the water through your system. Recommended chiller pump size: 1/10 horsepower unit ~ 132-264 GPH pump 1/4 horsepower unit ~ 600 -1000 GPH pump 1/2 horsepower unit ~ 750 -1200 GPH pump H. Keep the outside of the unit dry. I. Use a grounded outlet. J. Operate upright. K. Dedicate a circuit that has double the needed capacity for the chiller. L. Do preventative maintenance: ~ Unplug unit before servicing. ~ Clean cooling coils and compressor regularly. Be careful not to damage fins on radiator. Compressed air works well for cleaning. ~ Lube fan motor with white lithium grease. XX 6 temperature A D J U S T M E N T A. Plug the EcoPlus Chiller into a socket of rated voltage and frequency, turn it on. The power switch light will illuminate and LCD display will show the current water temperature. B. To adjust the temperature setting press the " SET " button. The set water temperature will be indicated on the digital display. Press "p" or "q" to adjust the temperature to set desired water temperature. The start-up condition of the machine is as follows: When the actual water temperature is equal to or greater than set water temperature, the chiller begins working. NOTE: The starting temperature difference can be adjusted to 2°F, 3°F or 4°F. Setting the starting temperature difference: 1 ) Press the “SET” button for ten seconds to enter into the temperature adjustment function, then press “SET” again to adjust the temperature difference. 2) Press the "p" button and the system will exit in ten seconds displaying the water temperature. 3) Press the "q" button to set the starting temperature difference, you can adjust by 1°F increments with each press, the starting temperature range is 2°F, 3°F or 4°F. Resetting the temperature tolerance: 1) Press the “SET” button for ten seconds. “CA” will appear on the digital display indicating the reset function is ready. 2) Press "p" or "q" to reset the temperature by 1°F with each press, the temperature variance range is +4°F to -4°F 3) After resetting the temperature tolerance, there is no need to press any button, the system will exit from the reset function after 10 seconds, and the digital display will show the adjusted temperature. C. The LCD operating plate resumes showing water temperature two seconds after set-up is completed. The EcoPlus Chiller will start working after a 2-3 minute delay. D. When refrigerating, the EcoPlus Chiller will stop cooling after the water temperature reaches the set temperature. The Chiller will restart if water temperature becomes higher due to environmental temperature. 7 XX T E M P E R AT U R E G U I D E L I N E S W H AT I S T H E O P T I M A L T E M P E R AT U R E ? AQUARIUM Corals come from a variety of ocean environments, the temperature range would be from the low 70s - low 90s. If you have a variety of corals from different environments, a temperature range of 75 - 80 is a safe choice; if in doubt consult your aquarium dealer. HYDROPONICS Whether your hydroponic garden is an Ebb and Flow, Top-Feed Drip, Aeroponic, NFT or Deep Water Culture system; your plants will benefit by maintaining a consistent temperature of 60-70ºF. Nutrient solutions maintained at 60-70ºF hold much more oxygen than a 75ºF solution. Maintaining a temperature of 60-70ºF will help control transpiration rates and ensure proper nutrient uptake. Never let your solution climb above 85ºF. Hot roots attract pests and diseases, as well as significantly reducing oxygen levels and nutrient uptake. MAINTENANCE C L E A N I N G T H E A I R F I LT E R A. IMPORTANT! Disconnect the power. B. Pull down air inlet grill from the top and take out filter. Air inlet grill Air filter C. The air filter needs cleaning at least once every month. The EcoPLus Chiller becomes dirty after being used for extended periods of time. Accumulated dirt makes the chiller’s exhaustion of heat less effective. Simply clean by washing the filter in clean water, or remove the dirt with a vacuum cleaner. STORING THE ECOPLUS CHILLER A. W hen chiller is not in use, discharge remaining water in pipes. Store chiller in safe place. FUSE REPLACEMENT A. Unscrew fuse cover. Replace old 15A-250V fuse with a new one (one replacement fuse is included with each unit). Screw fuse and fuse cover back into place. XX 8 SAFETY/CAUTIONS The cable plug, power switch, socket and LCD operating plate must be kept dry. DO NOT expose the chiller to direct sunlight or rain. DO NOT locate the chiller on a damp floor or area that can be easily flooded or splashed by water or other liquids. The chiller must be installed by a skilled technician. The socket and cable connector must be able to safely sustain a current 4 to 5 times higher than the normal operating current. Always use a grounded power source. DO NOT locate chiller near any heat source, like a boiler, gas stove, etc. The EcoPlus Chiller MUST NOT be placed up-side-down or on a slant, which may damage the machine. DO NOT turn on the machine until twenty minutes after it has been leveled. DO NOT connect power before installation is completed. Always disconnect power when doing any work on the chiller. The amount of circulating water must be in compliance with the data shown in the technical information table for properly refrigeration. A dedicated socket to the EcoPLus Chiller is necessary. DO NOT share socket with any other appliances. 9 XX SAFETY/CAUTIONS (CONT'D) The installation floor must be flat and level. The machine must be level to avoid vibrating or shaking. Return water to the chiller must be filtered to ensure proper performance. The front air inlet grill should have at least 12" clearance from any objects. The back heat vent should have at least 24" of clearance behind it. 12 Always disconnect power before cleaning the tank. s he inc 24 es h inc The total length of the circulating hose should not exceed 25', leakage or other damage may occur. Make sure your hands are completely dry before plugging or unplugging plug from socket. 25 feet TROUBLESHOOTING A. If the chiller stops refrigerating properly or refrigeration stops after a long period of time, refrigerant may be necessary. Ask a certified and licensed technician to check the chiller for the appropriate amount of refrigerant. If refrigerant is low, have technician add the proper amount of refrigerant. B. If air temperature and water temperature are too high, the compressor will stop to protect the chiller from over-heating. C. If display does not function or machine does not work, please check to see if the plug is connected properly. Also check to see if fuse is broken and whether it needs replacing. You may also check your home’s breaker box. If you have overloaded the circuit, you may have tripped a breaker. D. If machine stops working properly under normal operating conditions. DO NOT dissemble the chiller yourself. Take it to a certified and licensed technician for repair. www.ecoplususa.com