1
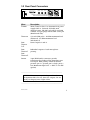
Symetrix
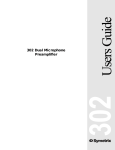
SX202
Dual Mic Preamp
Owner’s Manual
Symetrix Inc.
14926 35th Avenue West
Lynnwood, Washington 98037
Voice: (425) 787-3222, (800) 288-8855
Fax:
(425) 787-3211
Copyright 1988, 1994 Symetrix Inc.
All rights reserved.
Subject to change without notice.
Batteries not included.
This manual will not play in reverse.
Revision: 2.1, 8/8/97
Part Number: 530102
Production Information
This document was written using Microsoft Word for Windows V2.0 and
6.0. The drawings and graphs in this manual were prepared using Corel
Draw V2.0, Autocad V12, and Autoscript V5, then imported into Word
for Windows via encapsulated PostScript files. All page makeup occurred
within Word for Windows.
Body text is set in Bookman 10pt and Section Heads are set in various
sizes of Helvetica Bold. Helvetica-Narrow was used for Figure and Table
captions.
This manual was printed directly from PostScript files generated by
Word for Windows on a Xerox Docutech printer. This unique device is
actually a laser printer, capable of 600 dpi resolution, with a page
throughput that rivals a high-speed photocopier. As a result, every page
is a first-generation image.
Ain’t technology grand?
Table of Contents
___________________________________________________
1. Introduction............................................................. 1
2. Using the SX202 ..................................................... 2
2.1 The Preamplifiers ...........................................................2
2.2 Gain Controls, Clip LEDs, Pads .....................................2
2.3 Polarity Switch................................................................3
2.4 Powering for Condenser Microphones ...........................3
3. Connections, Controls and Switches ................... 6
3.1 Block Diagram ................................................................6
3.2 Rear Panel Connectors ..................................................7
3.3 Front Panel Controls and Switches ................................8
4. Troubleshooting ..................................................... 9
5. Specifications ......................................................... 10
6. Repair Information.................................................. 11
6.1 Return Authorization.......................................................11
6.2 In-Warranty Repairs .......................................................11
6.3 Out-of-Warranty Repairs ................................................11
7. SX202 LIMITED WARRANTY ................................ 12
i
This page is mostly blank.
ii
1.
Introduction
The Model SX202 Dual Microphone Preamplifier is an ultra clean
two channel stereo/mono preamp, intended for use in the most
critical digital and analog recording situations. The SX202
delivers exceptional sonic performance even with extremely high
input levels, making it the ideal mate to the latest generation of
transformerless condenser microphones. Outputs provided are
left, right, and left + right.
Built around the same chip used in a well known recording
console widely acclaimed for its exceptional sound quality, the
SX202 makes world-class performance affordable. In place of
older preamp designs, the SX202 offers substantial sonic
improvements with its solid stereo imaging (less than 10o phase
shift at 20kHz), excellent transient handling (its positive and
negative slew rates are symmetrical), very low noise (approaching
the theoretical limit), and almost unmeasurable distortion
(.007%).
Variable gain inputs, with 15dB pads, allow the SX202 to handle
any input level up to +14dBV. 48 volt phantom power is available
at both inputs. In addition, channel 1 includes a polarity switch,
to correct for improperly wired cables or unresolvable mic
placement problems.
Balanced low-Z line drivers are on 3-conductor 1/4" (TRS)
connectors, and are capable of +24dBm maximum output. The
output stage can also drive unbalanced lines (+18 dBm
maximum output).
Rev 2.0, 8/1/94
1
2.
Using the SX202
________________________________________________________
CAUTION: Do not use any AC adapter other than the Symetrix
PS-2, or an exact equivalent supply rated at 16V ac, 10va.
________________________________________________________
2.1 The Preamplifiers
The SX202's ultra low noise, low distortion mic preamps provide
direct-coupled balanced low-Z inputs, for optimum transient
response and phase coherency. The positive going and negative
going slew rates are symmetrical, ensuring sonic intergrity.
2.2 Gain Controls, Clip LEDs, Pads
The SX202 offers 40dB overall gain variation, from 20dB to
60dB, when used without the pad. Including the 15dB pad, the
total range is 75dB, with a minimum overall gain of 5dB.
Any input level, from the -60dBV to -80dBV levels common with
ribbon mics, to the near line level often experienced with
transformerless condenser mics, is easy to match with the
SX202's stepless gain control. Input signals as high as +14dBV
can be handled by the SX202. The front panel clip LEDs fire at
+10dBV output.
The SX202's gain controls set how much the signals are actually
amplified by the preamp circuitry. On the SX202, the gain
controls operate like the "trim" controls found on most mixers.
On a mixer, the "trim" controls set the initial amount of
amplification for each mic input, then the "faders" govern how
much of the amplified signal is allowed to pass into the rest of
the system. With the SX202, the assumption is that somewhere
downstream (at the input of your tape recorder, or perhaps at
the aux input on your board) there will be a volume control that
functions much the same as the "fader" on a mixing console. It's
important to note that the controls on the SX202 set the amount
of amplification (gain).
Both source level and preamp gain are directly related to the
noise floor, as well as to headroom at the output. The key to
using the SX202 at its optimum is A) use the maximum
allowable source level B) use only as much gain as necessary.
The combination of the highest possible input levels with the
least possible gain always results in minimum noise and
maximum headroom.
2
Rev 2.0, 8/1/94
The pad switch on the SX202 reduces the input level by 15dB.
When a very high output mic is used, or for any reason the
incoming signal is so hot that the clip indicator is lighted with
the gain control at minimum, use the pad. As previously
mentioned, the SX202 uses gain controls, not volume controls or
faders. It is not necessary to use the pads to reduce input levels
to get the gain controls to operate in some theoretical "best"
position. The only "best" operating position for a gain control is
the minimum gain that delivers the required output level.
In addition to its more common use in reducing input signal
strength, the pads can also give the user a wider gain control
adjustment range, for a more accurate channel-to-channel level
matching. For very close level matching, the resolution of the
gain controls at the very lowest end of their range may be too
coarse. There is a trade-off here, however - when using pads the
apparent noise floor is higher.
2.3 Polarity Switch
Channel 1 includes a polarity switch. In the normal "out"
position, signal source polarity is maintained to the output(s). In
the 180o ("in") position, the wiring from the Channel 1 XLR
connector Pins 2 and 3 is reversed. This allows for correction of
mis-wired cables, and for polarity matching of various
manufacturers' mics.
2.4 Powering for Condenser Microphones
All condenser microphones require some kind of electrical power.
This power may be supplied by internal batteries, an external
power supply that's connected to the microphone by a special
multi-wire cable, or through a standard microphone cable by
phantom or "T" System powering. Phantom powering and T
system powering are incompatible systems.
The front panel phantom power switch applies +48V phantom
power via pins 2 and 3 of the mic input XLR connectors.
Phantom power is so named because it is "invisible" to audio
signals, even though the microphone cable carries both phantom
power (as direct current), and audio signals (as alternating
current). Specifically, the term phantom power means a positive
DC voltage sent to the microphone on both audio leads, through
current limiting resistors which also serve to isolate the audio
leads from one another.
The phantom power technique uses the two signal conductors in
a standard mic cable to deliver the power required by the
Rev 2.0, 8/1/94
3
microphone, eliminating the need for external power supplies or
internal batteries. Because the voltage is applied equally to both
sides of a floating balanced circuit, no current flows through the
microphone's transformer, or through the microphone element
itself.
It is often said that the sound of some dynamic microphones is
affected by phantom power, and that ribbon mics cannot be
plugged into an input that is phantom powered. For the most
part these are myths that grew out of difficulties that occured as
a result of some other problem in the mic circuit:
1. When XLR connectors are mated there is no guarantee that
both pins 2 and 3 will make contact at exactly the same time.
It is possible that a damaging current could flow through the
mic for a brief moment under these conditions. However,
this is a connector problem, not a problem with the mic itself,
or phantom power in general.
2. In the past, it was common practice to ground the center tap
of the mic’s output transformer. This is a NO-NO in phantom
powered systems. The solution: locate the center tap and cut
the connection between it and pin 1 of the XLR connector.
3. If the mic's output transformer has developed leakage, the
microphone may become noisy when phantom power is
turned on. Crackling, sputtering or even humming noises
may occur. The leakage, not the power, is the problem. The
solutions are:
A. Turn off the phantom power
B. Put a 1:1 transformer between the mic and the input.
C. Get the mic repaired.
The dominant remote powering system in use today is the
phantom power system which is compatible with both
condenser and non-condenser microphones (dynamics, ribbons,
etc.). If your microphone's data sheet says that it is phantom
powered, the SX202 can power it1.
The technical requirements for operation and/or compatibility
are:
1
The DIN specification (DIN 45 596) covering phantom
powering specifies the phantom powering voltage as an
open-circuit measurement. If you attempt to measure the
phantom voltage, make sure that you do so with the
microphone disconnected.
4
Rev 2.0, 8/1/94
The microphone must have a balanced, low-impedance
output.
The balanced output must be floating with respect to
ground. If there is a center tap, it must not be grounded. (In
the past, it was common to ground the center tap of the
microphone’s output transformer. This was especially true of
ribbon microphones.)
In a nutshell, here are the do's and don’ts of phantom powering.
Do
Don't
Verify that your microphone
can be phantom powered
(only if it is a condenser
mic).
Plug in an A-B powered
Ensure that your
microphone's output is low
impedance, balanced and
floating. This is especially
important for ribbon mics
like the RCA 77DX and
44BX.
Worry about your dynamic or
ribbon microphones, as long as
they are wired so that the
output is balanced and floating.
Turn the phantom power off
when connecting vintage
ribbon microphones.
Use the microphone input
Mute your monitor
Use the microphone input with
unbalanced sources. Use a
direct box to feed an unbalanced
source into the microphone
input.
Mute your monitor
Worry about your tube
condenser mics. They're
compatible (although they can't
be phantom powered).
speakers or headphones
when turning the phantom
power on or off. If you don't,
there will be a loud, nasty
POP.
speakers or headphones
whenever you plug or unplug
a phantom powered
microphone. If you don’t,
there will be a loud, nasty
POP.
Rev 2.0, 8/1/94
microphone without a suitable
adapter.
for line-level sources, especially
those that are transformerless.
5
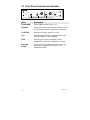
6
MICROPHONE
INPUT 2
MICROPHONE
INPUT 1
PRESS
P RE S S
GAIN
+48V
POLARITY
REVERSE
180°/0°
GAIN
PEAK
DETECT
ALL SWITCHES SHOWN IN OUT POSITION.
15dB
PAD
IN/OUT
PHANTOM
POWER
IN/OUT
15dB
PAD
IN/OUT
CLIP
MIX
PEAK
DETECT
CLIP
BALANCED/
UNBALANCED
OUTPUT 2
BALANCED/
UNBALANCED
OUTPUT 1+2
BALANCED/
UNBALANCED
OUTPUT 1
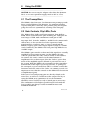
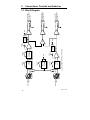
3.
Connections, Controls and Switches
3.1 Block Diagram
Rev 2.0, 8/1/94
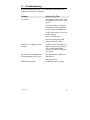
3.2 Rear Panel Connectors
SX202 DUAL MIC PREAMP
MANUFACTURED IN THE USA BY
BALANCED/
UNBALANCED
LINE OUTPUT 1+2
BALANCED/
UNBALANCED
LINE OUTPUT 2
BALANCED/
UNBALANCED
LINE OUTPUT 1
P RE S S
P RE S S
POWER
16VAC
S/N
THIS PRODUCT CONTAINS NO
USER SERVICABLE PARTS.
FABRIQUÉ AUX E.-U. PAR SYMETRIX INC., SEATTLE, WASHINGTON.
RÉFÉREZ TOUTE RÉPARATION À UN TECHNICIEN QUALIFIÉ. MICROPHONE INPUT 2
MICROPHONE INPUT 1
What
POWER
Description
OUTPUTS
1/4 inch TRS jack, + 24 dBm maximum level
(balanced), +18 dBm maximum level
(unbalanced)
LINE
OUTPUT
1+2
Sum of inputs 1 and 2.
LINE
OUTPUT 1
LINE
OUTPUT 2
Individual outputs of each microphone
preamp.
INPUTS
3-pin XLR female connectors provide
transformerless balanced low-impedance mic
level input. With polarity switch in Normal
position, pin 1 = ground, pin 2 = high, pin 3 =
low. Maximum input level: -1 dBV or +14 dBV
(pad in).
5mm coaxial socket. Use Symetrix PS-2 power
supply (16V ac, 500 mA), included with
domestic units. The PS-2 is both UL and CSA
certified. Accepts plugs with 2.5mm center pin
(Switchcraft 760).
_______________________________________________________
CAUTION: Do not use any AC adapter other than
the Symetrix PS-2. Do not short the outputs. Do not
stick your finger(s) into a light socket.
_______________________________________________________
Rev 2.0, 8/1/94
7
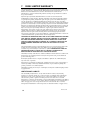
3.3 Front Panel Controls and Switches
MICROPHONE 1
MICROPHONE 2
40
POLARITY
40
15dB PAD
POWER
15dB PAD
CLIP
20
180
0
IN
OUT
PHANTOM POWER
CLIP
60
GAIN
+48V
20
IN
OUT
60
GAIN
SX202 DUAL MIC PREAMP
What
POWER LED
Description
Yellow LED indicates power “on”.
POLARITY
Allows the polarity of mic input Channel 1 to be
inverted with respect to mic input Channel 2.
15 dB PAD
Reduces the input signal by 15 dB.
CLIP
Red LED lights when any individual preamp
output is within 4 dB of clipping.
GAIN
Sets the gain of the preamplifier from a
minimum of 20 dB to a maximum of 60 dB.
PHANTOM
POWER
Turns on/off 48V phantom powering at both
microphone inputs. See Section 2.4 for
additional details.
8
Rev 2.0, 8/1/94
4.
Troubleshooting
Use the following guide in case of difficulty; preferably before
calling the factory for assistance.
Problem
Check or Try This
No output
Is the PS-2 connected to both
the SX202 and a source of AC
power?
If you are using a condenser
microphone, is the phantom
power switch (and LED) on?
Is the GAIN control set too low
for the signal?
Are your cables OK?
Are the output plugs fully
inserted into the jacks?
Distortion or Clipping at the
Output.
If either of the CLIP LEDs are
lighted, reduce the setting of
the corresponding GAIN
control. Use the 15 dB pad if
necessary.
Sputtering or crackling noise
when phantom power is on
Try substituting a different
microphone.
See Section 2.4.
Schematic diagram
Rev 2.0, 8/1/94
Available from the factory.
9
5.
Specifications
Item
Specification
Inputs
Type
low-Z balanced, transformerless
Input Impedance
greater than 3k
Maximum Input
Level
+13dBV (pad in)
Connector
XLR-3
Clip Indicators
red LEDs, fire 4dB below clipping
Frequency
Response
20Hz to 20kHz, +0, - 1dB
THD
.007% (1kHz, 0dBm, 600, balanced out)
.01% (kHz, +24dBm, 600, balanced out)
Signal to Noise
Ratio
97dB (-50dBV input, +4dBV output, peak
clip to noise floor, 22kHz bandwidth)
EIN
-127dBV, 150 source, 22kHz
bandwidth, balanced output
Maximum Gain
66dB balanced input to balanced output
Minimum Gain
26dB, balanced input to balanced output,
pad out
Input Pad
15dB
Outputs
Type
low-Z
Source
Impedance
50 unbalanced
100 balanced
Minimum Load
Impedance
600, balanced or unbalanced
Maximum Output
Level
+24dBm, balanced output, 600
Connectors
1/4” TRS balanced/unbalanced
Power
Requirements
10
16VAC, 200ma (Symetrix PS-2, included)
Rev 2.0, 8/1/94
6.
Repair Information
Should you decide to return your SX202 to Symetrix for service,
please follow the following instructions.
6.1 Return Authorization
Symetrix will service any of its products for a period of five years
from the date of manufacture. However, no goods will be
accepted without a Return Authorization number.
Before sending anything to Symetrix, call us for an RA
number. just ask, we'll gladly give you one! call (206) 7873222, weekdays, 8am to 4:30 pm pacific time.
6.2 In-Warranty Repairs
To get your unit repaired under the terms of the warranty:
1.
2.
3.
4.
5.
Call us for an RA number.
Pack the unit in its original packaging materials.
Include your name, address, etc. and a brief statement of
the problem. Your daytime telephone number is very useful
if we can't duplicate your problem.
Put the RA number on the outside of the box.
Ship the unit to Symetrix, freight prepaid.
Just do those five things, and repairs made in-warranty will cost
you only the one-way freight fee. We'll pay the return freight.
If you choose to send us your product in some sort of flimsy,
non-Symetrix packaging, we'll have to charge you for proper
shipping materials. We won't return the unit in anything but
original Symetrix packaging. Of course, if the problem turns out
to be operator inflicted, you'll have to pay for both parts and
labor. In any event, if there are charges for the repair costs, you
will pay for return freight. All charges will be COD unless you
have made other arrangements (prepaid, Visa or Mastercard).
6.3 Out-of-Warranty Repairs
If the warranty period has passed, you'll be billed for all
necessary parts, labor, packaging materials, and any applicable
freight charges.
Remember, you must call for an RA number before you send the
unit to Symetrix.
Rev 2.0, 8/1/94
11
7.
SX202 LIMITED WARRANTY
The Symetrix SX202 is designed and manufactured for use in professional and studio audio
systems. Symetrix, Inc., warrants that the SX202 manufactured by Symetrix, when properly
installed, used and maintained in accordance with instructions contained in the
manufacturer's operator's manual, will perform according to the specifications set forth in
the operator's manual.
Symetrix expressly warrants that SX202 will be free from defects in material and
workmanship for ninety (90) days. Symetrix' obligations under this warranty will be limited
to repairing and replacing, at Symetrix' option, the part or parts of the SX202 which prove
defective in material or workmanship within ninety (90) days from the date of purchase,
provided that the Buyer gives Symetrix prompt notice of any defect or failure and satisfactory
proof thereof. Products may be returned by Buyer only after a Return Authorization number
(RA) has been obtained from Symetrix and Buyer will prepay all freight charges to return any
products to the Symetrix factory. Symetrix reserves the right to inspect any products which
may be the subject of any warranty claim before repair or replacement is carried out.
Symetrix may, at its option, require proof of the original date of purchase (dated copy of
original retail dealer's invoice). Final determination of warranty coverage lies solely with
Symetrix. Products repaired under warranty will be returned freight prepaid via United
Parcel Service by Symetrix, to any location within the Continental United States. Outside the
Continental United States, products will be returned freight collect.
THE FOREGOING WARRANTIES ARE IN LIEU OF ALL OTHER WARRANTIES, WHETHER
ORAL, WRITTEN, EXPRESS, IMPLIED OR STATUTORY. SYMETRIX, INC. EXPRESSLY
DISCLAIMS ANY IMPLIED WARRANTIES, INCLUDING FITNESS FOR A PARTICULAR
PURPOSE OR MERCHANTABILITY. SYMETRIX, INC.'S WARRANTY OBLIGATION AND
BUYER'S REMEDIES HEREUNDER ARE SOLELY AND EXCLUSIVELY AS STATED
HEREIN.
The Symetrix SX202 is designed and manufactured for use in professional and studio audio
systems and is not intended for other usage. With respect to products purchased by
consumers for personal, family or household use, Symetrix EXPRESSLY DISCLAIMS ALL
IMPLIED WARRANTIES, INCLUDING BUT NOT LIMITED TO WARRANTIES OF
MERCHANTABILITY AND FITNESS FOR A PARTICULAR PURPOSE.
This limited warranty, with all terms, conditions, limitations and disclaimers set forth herein,
shall extend to the original purchaser and anyone who purchases the product within the
specified warranty period.
Warranty Registration must be completed and mailed to Symetrix, Inc. within thirty (30)
days of the date of purchase.
Symetrix does not authorize any third party, including any dealer or sales representative, to
assume any liability or make any additional warranties or representation regarding this
product performance on behalf of Symetrix.
This limited warranty gives the buyer certain rights. You may have additional rights provided
by applicable law.
LIMITATION OF LIABILITY
The total liability of Symetrix, Inc. on any claim, whether in contract, tort (including
negligence) or otherwise arising out of, connected with, or resulting from the manufacture,
sale delivery, resale, repair, replacement or use of any product will not exceed the price
allocable to the product or part thereof which gives rise to the claim. In no event will
Symetrix, Inc. be liable for any incidental or consequential damages including but not limited
to damage for loss of revenue, cost of capital, claims of customers for service interruptions or
failure to supply, and costs and expenses incurred in connection with labor, overhead,
transportation, installation or removal of products or substitute facilities or supply sources.
12
Rev 2.0, 8/1/94