1
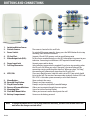
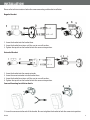
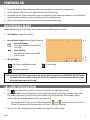
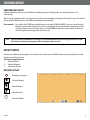
SVAT ELECTRONICS
now you can see
SVAT ELECTRONICS
now you can see
COVERT
DVR
Covert
DVR
w/ Integrated Color Camera
w/ Integrated Color Camera
COMPLETE SYSTEM
INSTRUCTION
MANUAL
Instruction
Manual
MODEL##
Model
PI1000
PI1000
www.svat.com
WWW.SVAT.COM
PRODUCT WARRANTY INFORMATION
Please visit our website at www.SVAT.com
for information about your product’s warranty.
We take quality very seriously. That is why all of our products come with a one year warranty from the original purchase date
against defects in workmanship and materials. If you have warranty or support issues please contact us using any of the following
methods:
SVAT USA
60 Industrial Parkway #Z64
Cheektowaga, NY
USA 14227 Phone: 1.866.946.7828
Fax: 1.888.771.1701
Email: [email protected]
Website: www.SVAT.com
SVAT CANADA
4080 Montrose Road
Niagara Falls, ON
Canada L2H 1J9
Warranty Terms
1.
SVAT products are guaranteed for a period of one year from the date of purchase against defects in workmanship
and materials. This warranty is limited to the repair, replacement or refund of the purchase price at SVAT’s option.
2.
This warranty becomes void if the product shows evidence of having been misused, mishandled or tampered with contrary
to the applicable instruction manual.
3.
Routine cleaning, normal cosmetic and mechanical wear and tear are not covered under the terms of this warranty.
4.
The warranty expressly provided for herein is the sole warranty provided in connection with the product itself and no other
warranty, expressed or implied is provided. SVAT assumes no responsibilities for any other claims not specifically
mentioned in this warranty.
5.
This warranty does not cover shipping costs, insurance, or any other incidental charges.
6.
You MUST call SVAT before sending any product back for repair. You will be sent a Return Authorization number with return instructions. When returning the product for warranty service, please pack it carefully in the original box with all supplied accessories, and enclose your original receipt or copy, and a brief explanation of the problem (include RA #).
7.
This warranty is valid only in Canada and the continental U.S.
8.
This warranty cannot be re-issued.
CAUTION
RISK OF ELECTRIC SHOCK, DO NOT OPEN MONITOR
TO REDUCE THE RISK OF ELECTRIC SHOCK, DO NOT REMOVE THE COVER (BACK).
NO USER SERVICEABLE PARTS INSIDE. REFER SERVICING TO QUALIFIED SERVICE PERSONNEL.
TABLE OF CONTENTS
WHAT IS INCLUDED....................................................................................................................1
INTRODUCTION.........................................................................................................................2
FEATURES.................................................................................................................................2
NAME & FUNCTION OF EACH PART................................................................................................3
INSTALLATION...........................................................................................................................4
FUNCTION DESCRIPTIONS...........................................................................................................5
POWERING ON...........................................................................................................................6
MONITORING MODE...................................................................................................................6
SD CARD INFORMATION..............................................................................................................6
RECORD MODE...........................................................................................................................7
PLAYBACK MODE.......................................................................................................................9
SYSTEM SETUP..........................................................................................................................11
Main Menu................................................................................................................10
Time/Date.................................................................................................................12
Motion Detection.......................................................................................................12
Manual and Schedule Record......................................................................................13
SD Card Options..........................................................................................................15
System Status............................................................................................................15
Factory Default..........................................................................................................16
DVR SPECIFICATIONS..................................................................................................................16
CAMERA SPECIFICATIONS............................................................................................................17
NOTES......................................................................................................................................18
WHAT IS INCLUDED
Covert DVR
Mounting Bracket
Power Adapter
• Mounting Hardware
• 1 Year Warranty
• Instruction Manual
• 24/7 Lifetime Live Customer Support
RCA to RCA
(Male) Wire
PI1000
1GB SD Card
1
INTRODUCTION
Congratulations on your purchase of the PI1000! The PI1000 is a Digital Video Recorder (DVR) hidden inside a motion
sensor with a built-in high quality pinhole camera. This device allows you to record video footage discreetly using 3
different recording modes: Manual, Scheduled, and Motion Detection. Record footage directly to the included SD card
and view your captured video by connecting to a TV, computer or laptop (SD card reader required). The PI1000 can be
table mounted or wall mounted which allows you to place it in many various locations. You can also power this device
using four AA batteries (not included) or the AC adapter (DC12V).
FEATURES
Covert System
The PI1000 is a complete recording system hidden inside a motion sensor. Mount it virtually anywhere and record
video to the built-in SD card. The unit’s conventional appearance allows you to watch over your business, employees or
valuables completely undetected.
Record up to 12 Days of Recording
Capture high quality digital video and record directly onto the included 1GB SD card. Upgrade to a 32GB card (not
included) and get up to 2 years worth of recording.
Battery Operable Wireless Monitoring
Now you can record wirelessly by powering the camera with 4 AA batteries. Monitor for up to 17 hours in standby
mode or 12 hours when continuously recording (lithium batteries recommended and not included). An AC power
adapter is included for more permanent use. Motion Activated Recording
Motion activated recording settings let you choose to only capture important video footage and record only when
necessary. Simply set the sensitivity to your desired level. It will save you time and conserve SD memory so you can
monitor for longer time periods.
Easily Review and Transfer Video
The PI1000 offers a live-view mode. You can view video footage by connecting to your TV, or remove the SD card to
view or archive all recorded video on your computer. This is also useful for submitting to law enforcement or security
professionals if your video footage is needed.
24 Hour Scheduled Recording
Setup your preferred scheduled recording time throughout a 24 hour day. You are able to record video footage using
three different types of recording modes: manual, scheduled, and motion activation.
Date and Time Stamp
Capture the date and time of recorded video footage in all recording modes so that it is always clear when you
recorded specific events.
High Quality MPEG-4 Compression
Record MPEG-4 compressed video to the built-in SD card. This allows for hours of recording without any sacrifice in
quality. MPEG-4 is a video format that is familiar to most computers so you can review, back up and archive on your PC easily.
24/7 Lifetime Live Customer Support
Assistance is available for you whenever you need it. Our customer support team can be reached by phone 24/7, or by
email and live web chat services so that you will always have access to an expert.
PI1000
2
BUTTONS AND CONNECTIONS
8 9 10
1
3
4
5
7
11
6
14
13
12
15
2
1. Imitation Motion Sensor
2. Pinhole Camera:
3. Power Switch: 4. SD Card Slot:
5. Video Output Jack (RCA): 6. Power Input Jack:
7. Full Stop/Overwrite: 8. NTSC/PAL:
9. Menu Button:
10. Record & Stop Button:
11. Play & Pause button
12. Reverse & Forward Buttons:
13. Mounting Hole :
14. Flush Wall Mount Holes:
15. Battery Compartment:
The camera is located in this small hole
To switch off the power correctly, always press the MENU button first to stop
recording, then switch off the device
Supports SD and SDHC memory cards to record footage onto
To view live or recorded footage, use the RCA video output to connect to your
television. Connecting to a television is NOT required to record footage.
Connect power cord to device
Select whether to overwrite the recorded SD card or to stop recording when
the SD card is full. When you select “Overwrite”, the stored video will be
overwritten starting with the oldest data first. When you select “Full Stop”,
the recording will automatically stop when the SD card is full
If you are in North America, keep the switch set to NTSC (top switch should
be set to the left).The two most common video standards used are NTSC and
PAL. NTSC is the video system commonly used in North America
Opens and exits the menu
Prompts and stops recording
Prompts and pauses playback of recorded footage
Allows you to navigate through the menu options
Screws on to the mounting bracket
Allows you to mount camera directly onto the wall
Camera can be battery powered
Note: If changes are made to NTSC/PAL or Stop/Overwrite functions, you must shut off and restart the
unit before the changes can take effect.
PI1000
3
INSTALLATION
Please refer to the instructions below for camera mounting and bracket installation:
Regular Bracket
1. Screw the bracket into the bracket base.
2. Screw the bracket base into a wall, be sure to use wall anchors.
3. Tighten the top tab on the bracket to lock the camera into position.
Extended Bracket
1. Screw the bracket into the mount extender.
2. Screw the mount extender into the bracket base.
3. Screw the bracket base into a wall, be sure to use wall anchors.
4. Tighten the top tab on the bracket to lock the camera into position.
Camera Mounting Installation Guide
1. Screw the camera onto the end of the bracket. Be sure to tighten the bracket to lock the camera into position.
PI1000
4
INSTALLATION
Video Output and Power Adapter Connection
Connect video cable to video output on television and connect power cable to a power source.
FUNCTION DESCRIPTIONS
There are 5 main buttons to control the DVR. Depending on if the menu is open or the footage is paused the different
buttons have different purposes.
The buttons and different purposes are as follows:
PI1000
Menu:
Pressing this button opens up the main menu. When the a menu is open this
button allows you to exit the current menu.
Record and Stop:
Pressing this button starts and stops recording. The recording will start based
on your recording schedule. When the menu is open this button allows you to
navigate the cursor up. If there is footage playing, pressing this button stops
the footage from playing back and switches to live view mode.
Play and Pause:
Pressing this button prompts the DVR to play previously recorded footage.
When footage is being played back, pressing this button pauses the playback
footage. When the menu is accessed this button allows you to navigate the
cursor down.
Jump Backwards:
When the footage is paused, pressing this button causes the footage to step
back and remain paused. If the footage is playing, pressing this button prompts
the footage to rewind normally. The more times you press this button, the
faster the footage will rewind. When accessing the main menu, this button
works to decrease adjustable values, or as a “go back” button.
Jump Forwards:
When the footage is paused, pressing this button causes the footage to step
forward and remain paused. If the footage is playing, pressing this button
prompts the footage to fast forward normally. The more times you press this
button, the faster the footage will fast forward. When accessing the main
menu, this button works as a selection or ‘enter’ button. This button also
increases adjustable values.
5
POWERING ON
1. To turn the device on, connect the power cable or insert batteries into the battery compartment.
2. Slide the power switch located on the top of the device to the On position.
3. After power on, the system automatically enters live monitoring. If the system was previously set to scheduled or motion activated recording, it will automatically resume the recording mode.
4. After a power outage, the system auto-returns to the previous recording state.
MONITORING MODE
Immediately after boot up, live monitoring mode is displayed, with the following status indicators:
1. Time Display: System Date and Time
1
2. Record Status Display: Manual Record Parameter
Record Resolution
Please refer to Record Setup for VIDEO SIZE setup.
Record Quality
Please refer to Record Setup or VIDEO
QUALITY setup. 3. SD Card Status:
:No card or a malfunctioning card :Functioning normally 2
3
:SD card testing
NOTE: Each time the PI1000 is powered on, the system auto-detects the SD card. When the REC LED flashes,
it indicates that the system is testing the SD card. If a video file error has been detected, the system
will initiate auto repair on the card.
SD CARD INFORMATION
1. The icon shown on the status line, indicates that the SD card is operating normally.
2. If there is a problem/error with the SD card, the Record or Playback LEDs will not light up when the Record or Play buttons are pressed. Instead, the Play, Menu, and Rec LEDs will flash quickly. If this happens, please re-format the SD card before proceeding (all video will be lost).
•
To quickly format the SD card, turn the DVR off. Then hold the
and buttons and switch the DVR on. A
“Format OK” message will be displayed when the SD card is successfully formatted
3. When the SD card is writing data during recording, the record LED will flash slowly.
PI1000
6
RECORDING MODES
THREE RECORDING MODES
• Manual Record
Set recording for anytime and turn off manually. Press the button to enter manual recording mode
(start recording). This will prompt record with the manual record settings
• Scheduled Motion Detection Record
Set a time period to record only when movement is detected. Motion detection uses scheduled recording, but
it will only start recording when the movement exceeds a certain preset level, called the MD Threshold (See
Motion Detection Setup Pg. 12)
• Scheduled Continuous Record
Schedule a start and stop time, and the DVR will record during this time period. This is beneficial for constant
or motion recording being done during set hours of the day
STOP RECORD
• Pressing the button while recording in schedule mode will interrupt the recording and switch to manual record settings
• Pressing the
button again while in manual mode will return you to schedule mode (if schedule is set)
Resuming/Stopping Recording for Each Recording Mode:
Manual Record
To start a recording using the manual record settings press the button. Pressing the
button again will
stop manual record and resume to the scheduled mode. To completely cease recording, you must shut the schedule
record off.
Motion Detection Record
Every time you exit the menu or playback mode the DVR will check your recording schedule and if it is on and set to
motion detection mode the DVR will start recording using the motion detection record settings. To completely cease
recording, you must shut the schedule record off.
Continuous Record
Every time you exit the menu or playback mode, the DVR will check your recording schedule and if it is on and set to
continuous mode the DVR will start recording using the continuous record settings. To completely cease recording, you
must shut the schedule record off.
Note: For more information see the Record Setup section of the manual. Pg 13
PI1000
7
RECORD MODE
PERSONALIZED SETUP
Different recording modes may have different recording settings including video size, recording frames and video quality.
When specific recording modes are triggered, the system starts recording according to that specific setup. This kind of
design provides flexibility to ensure efficient recording time and quality.
For example: To schedule the PI1000 to record while you are at work (9:00AM-5:00PM), you can set up Schedule
Record to record at low video quality with less recording frames to extend the recording time. Then
during the hours you are at home, you can set the PI1000 to record only when motion is detected
with the highest recording quality and frame rate.
Note: Do not shut off the PI1000 while recording. Press the menu button to stop recording, then turn the system
off. Power loss during recording may result in incomplete videos or errors.
EVENT STATUS
If there are multiple recording modes set to record at the same time, the DVR will record using one particular mode
based on level of importance.
The order of importance is:
1. Manual Record
2. Motion Detection
3. Continuous Record
RECORD DISPLAY
- Recording in Progress
- Schedule Record
- Manual Record
- Motion Record
- Overwrite Mode
PI1000
8
PLAYBACK MODE
There are two selectable playback modes:
•
Normal Playback mode: •
Search and Play: on the back of the DVR, plays
Accessed by pressing the play button
back all footage starting with oldest footage and moving to newest recorded footage
Accessed through the menu, allows you to search and play footage from
a particular date and time, organized by the type of recording (manual,
continuous or motion)
NORMAL PLAYBACK
• To start normal playback mode, press the play and pause button
and the previously recorded footage
will begin to play, starting with the oldest footage first and moving to the newest footage
•
During normal playback, press the rewind
x2/ x4/ x8/ x16/ x32)
•
Press the play and pause button
or fast forward
button to fast forward or rewind (Speed:
to return to normal playback
• To pause normal playback footage, press the play and pause button
again
• To stop normal playback footage, press the record button
and you should resume to live view mode. If
your schedule is set to record at that time (motion or continuous), the scheduled recording will resume in its
scheduled mode
PI1000
9