1
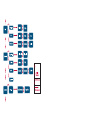
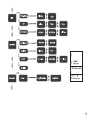
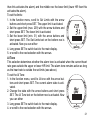
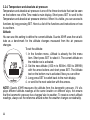
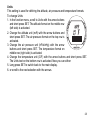
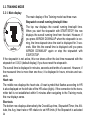
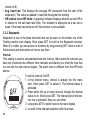
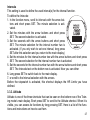
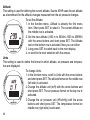
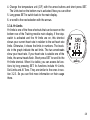
INSTRUCTION MANUAL
EN
CUSTOMER SERVICE CONTACTS
Suunto Oy
Phone +358 9 875870
Suunto USA
Phone 1 (800) 543-9124
Fax
Canada
+358 9 87587301
Phone 1 (800) 776-7770
European Call Center Phone +358 2 284 11 60
Suunto Website
www.suunto.com
1
1. INTRODUCTION .......................................................................................... 4
1.1. HOW TO START TRAINING .......................................................................4
1.2. CARE AND MAINTENANCE .......................................................................5
1.2.1. Care of the Suunto X3HR ..................................................................5
1.2.2. Care of the Transmitter Belt ..............................................................5
1.3. WATER RESISTANCE ................................................................................5
1.4. BATTERY REPLACEMENT ........................................................................6
1.5. BATTERY REPLACEMENT OF THE TRANSMITTER BELT ......................8
2. HOW TO USE YOUR SUUNTO X3HR ........................................................ 9
2.1. DISPLAY ......................................................................................................9
2.1.1. Function symbols ..............................................................................9
2.2. BUTTONS ..................................................................................................10
2.2.1. Short and long press .......................................................................10
2.2.2. START/STOP button .......................................................................10
2.2.3. SET button ......................................................................................10
2.2.4. ARROW UP/LIGHT button ..............................................................11
2.2.5. ARROW DOWN/LAP button ...........................................................11
2.3. NAVIGATING IN THE FUNCTIONS ..........................................................12
2.4. HEART RATE MONITOR AND TRANSMITTER BELT .............................14
2.4.1. Activating the heart rate monitor .....................................................14
2.4.2. Electromagnetic interference ...........................................................14
2.4.3. Warnings .........................................................................................14
2.4.4. The Suunto X3HR and transmitter belt usage in water ...................15
2
3. MODES ...................................................................................................... 16
3.1. GENERAL INFORMATION ....................................................................... 16
3.2. TIME MODE .............................................................................................. 16
3.2.1. Main display .................................................................................... 16
3.2.2. Day ................................................................................................. 17
3.2.3. Heart rate ........................................................................................ 20
3.2.4. Temperature and absolute air pressure .......................................... 22
3.3. TRAINING MODE ..................................................................................... 24
3.3.1. Main display .................................................................................... 24
3.3.2. Stopwatch ....................................................................................... 26
3.3.3. Altitude ............................................................................................ 27
3.3.4. Hr Limits .......................................................................................... 29
3.4. MEMORY MODE ...................................................................................... 30
3.4.1. Main display .................................................................................... 30
3.5. SUUNTOSPORTS.COM ........................................................................... 32
4. SUUNTO X3HR SELF-TEST PROCEDURE ............................................. 33
5. TECHNICAL SPECIFICATIONS ................................................................ 34
6. TERMS AND CONDITIONS ....................................................................... 36
6.1 COPYRIGHT .............................................................................................. 36
6.2 TRADEMARKS .......................................................................................... 36
6.3 CE COMPLIANCE ...................................................................................... 36
6.4 ISO 9001 COMPLIANCE ........................................................................... 36
7. LIMITS OF LIABILITY ................................................................................. 37
3
1. INTRODUCTION
The Suunto X3HR Wristop Computer is a reliable high precision electronic instrument
that is intended for recreational use. Outdoor enthusiasts and endurance athletes
who enjoy sports such as hiking, running and biking can rely on the Suunto X3HR's
accuracy.
The Suunto X3HR features three main modes: TIME, TRAINING and MEMORY.
Each mode provides several sub-functions further enhancing the usefulness to its
owner. If you do not perform any actions on any setting/selecting states in five hours,
Suunto X3HR automatically returns to the main display of the current mode. All key
features and modes are discussed in detail in chapter 3.
NOTE: The Suunto X3HR should not be substituted for obtaining measurements that
require professional or industrial precision and should not be used to obtain altitude
or barometric measurements in extreme sports such as skydiving, hang gliding,
paragliding and gyrocopter riding.
1.1. HOW TO START TRAINING
1. Place the transmitter belt firmly around your chest.
2. Wet the electrodes against your skin.
3. Scroll to training mode with the UP or DOWN button of your Suunto X3HR.
4. Check that you see your heart rate.
5. Press START to start the stopwatch and memory recording.
6. Go training. If you are unsure, read the manual and disclaimers first.
7. Take lap times with DOWN/LAP button.
8. Change training information on the bottom row with SET button.
9. When finished, press START/STOP to stop recording.
10.Read this manual to see what else you can do with your new Suunto X3HR.
4
1.2. CARE AND MAINTENANCE
1.2.1. Care of the Suunto X3HR
Only perform the procedures described in this manual. Never attempt to disassemble
or service your Suunto X3HR. Protect your Suunto X3HR from shocks, extreme heat
and prolonged exposure to direct sunlight. Avoid rubbing the Suunto X3HR against
rough surfaces as this may scratch the face. If not in use, your Suunto X3HR should
be stored in a clean, dry environment at room temperature.
The Suunto X3HR can be wiped clean with a lightly moistened (warm water) cloth. If
there are stubborn stains or marks, you can apply mild soap to the area. Do not
expose the Suunto X3HR to strong chemicals such as gasoline, cleaning solvents,
acetone, alcohol, insect repellents, adhesives and paint, as they will damage the
unit's seals, case and finish. Make sure the area around the sensor is kept free of dirt
and sand. Never insert any objects into the sensor opening.
1.2.2. Care of the Transmitter Belt
Wash the transmitter regularly with mild soap and water after each use. Rinse with
pure water; dry thoroughly and carefully.
Store in a cool dry place. Never store the transmitter wet. Moisture keeps the electrodes wet and transmitter activated thereby shortening the battery life.
Do not bend or stretch the transmitter; this may damage the electrodes.
1.3. WATER RESISTANCE
Suunto X3HR and the transmitter belt are tested with ISO (International Organization
for standardization) standard 2281 (www.iso.ch). This means that the product is
water-resistant. In addition to the term ‘water-resistant’ Suunto X3HR is marked with
an indication of a test overpressure given as a depth in meters (30m/100ft) and trans5
mitter belt (20m / 66 ft). This indication, however, does not correspond to a diving
depth but refers to the pressure at which the water overpressure test was conducted.
This means that you cannot dive to a depth of 30m/100ft with your Suunto X3HR
wristop computer or 20m / 66 ft with the transmitter belt.
Rain, shower, swimming and other normal exposure to water will not affect its operation but the buttons shall not be pressed if exposed to water in any circumstances.
NOTE: X3HR wristop computers and transmitter belts must not be used for diving.
1.4. BATTERY REPLACEMENT
Suunto X3HR operates on a 3-Volt lithium cell, type: CR 2032. The life expectancy is
approximately 12 months in the Time mode.
A low-battery warning indicator is activated on the display when approximately 5–15
percent of the battery capacity is still available. When this occurs, you should replace
the battery. However, extremely cold weather may activate the low battery warning
indicator even though the battery is still fully operational. If the battery warning indicator is activated in temperatures above 10°C (50°F), replace the battery.
NOTE: Heavy use of the backlight, altimeter, compass and heart rate monitor will significantly reduce battery life.
You can replace the batteries yourself as long as you do it properly to avoid any leakage of water into the battery compartment or computer. Always use original battery
replacement kits. (They include a new battery, battery lid and O-ring.) You can purchase the battery kits from official Suunto retailers.
NOTE: When replacing the battery, also replace the battery lid and O-ring. Never use
the old ones.
NOTE: Change the battery at your own risk. Suunto recommends you to have the
batteries changed in official Suunto services.
6
To replace the battery:
1. Insert a coin into the slot located on the battery compartment cover on the backside
of your Suunto X3HR.
2. Turn the coin counterclockwise until it is aligned with the open position marker.
3. Remove the battery compartment cover and the O-ring, and discard them. Ensure
that all surfaces are clean and dry.
4. Remove the old battery carefully.
5. Place the new battery into the battery compartment under the metal contact clip,
with the positive side facing up.
6. With the O-ring in the correct position, replace the battery compartment cover and
turn it with the coin clockwise until it is aligned with the closed position marker. Do
not press onto the battery compartment cover while turning it with a coin.
NOTE: Perform battery replacement with extreme care to ensure that your Suunto
X3HR remains water resistant. Careless battery replacement may void warranty.
WARNING: This Suunto product contains a Lithium cell battery. To reduce risk of fire
or burns, do not disassemble, crush, puncture, short external contacts, charge or dispose of in fire or water. Replace only with manufacturer specified batteries. Recycle
or dispose of used batteries properly.
7
1.5. BATTERY REPLACEMENT OF THE TRANSMITTER BELT
The transmitter belt operates on a 3-Volt lithium cell, type: CR 2032.
The transmitter belt’s average expected battery life is 300 hours of use in ideal operating temperatures.When the Suunto X3HR is not receiving a signal but the transmitter belt is active, a change of battery might be necessary. Refer to section 2.4.2 for
other factors that can interfere with a correct signal.
To change the battery
1. Insert a coin into the slot located on the battery compartment cover on the backside
of the transmitter belt.
2. Turn the coin counterclockwise until it is aligned with the open position marker, or
even slightly further for easy opening.
3. Remove the battery compartment cover. Ensure that the O ring and all surfaces are
clean and dry. Do not stretch the O ring.
4. Remove the old battery carefully.
5. Place the new battery into the battery compartment with the positive side facing up.
6. With the O ring in the correct position, replace the battery compartment cover and
turn it with the coin clockwise until it is aligned with the close position marker.
NOTE: You should change the battery cover and the O ring simultaneously with the
battery to ensure that the transmitter remains clean and water resistant. Replacement
covers are available from Suunto as accessories.
8
2. HOW TO USE YOUR SUUNTO X3HR
2.1. DISPLAY
When your Suunto X3HR leaves the factory, it displays the
rows of the Time mode’s main display—date, time and weekday.
In addition to mode-specific information, the Suunto X3HR
display includes several symbols.
2.1.1. Function symbols
The function symbols indicate that either a function has been
activated (such as Alarm) or something needs to be done
(battery symbol). The function symbols are:
Heart: Active when the device is receiving the heart rate signal. (The symbol is
displayed next to the measured heart rate.)
Stopwatch: Active when measuring time in the Training-mode or when the stop
watch has not been reset.
HR limit arrows: Active when the HR limits have been set on.
HR limit alarm: Active when Al Tone is on and HR limits have been set on.
Alarm: Active, when the alarm function is on.
Low battery: Active when battery needs changing.
MEM: Active when in the Memory mode. It shows that you are viewing a
memory entry and not the active training data.
9
2.2. BUTTONS
2.2.1. Short and long press
The buttons may have different functions depending on how long you press them.
The ordinary press or short press means that the
button is pressed quickly.
The long press means that the button is pressed
for more than 2 seconds.
2.2.2. START/STOP button
Short press
• Starts and stops the Stopwatch in the Training
mode.
Long press
• Resets the Stopwatch time displays (top and bottom rows) in the Training mode.
2.2.3. SET button
Short press
• Switches between the shortcuts on the bottom row of the display.
• When you change units, it accepts the current selection and moves to the next
selection. (The next selection starts flashing.)
• In the Memory mode, it is used to view the selected displays of the recorded training sessions.
10
Long press
• Goes deeper into the functional hierarchy of the chosen shortcut. The top-level
function is displayed on the bottom row of the mode’s main display.
• Returns to the main display and accepts the current selections.
2.2.4. ARROW UP/LIGHT button
Short press
• Scrolls to the next mode.
• Changes the selected unit or setting to a different one (e.g. On/Off).
• Increases the selected numeric values.
• Navigates to the next adjusting/selecting state (displayed on the bottom row).
Long press
• Activates the backlight of the display. The light is active for 10 seconds after the last
push of a button.
2.2.5. ARROW DOWN/LAP button
Short press
• Scrolls to the previous mode.
• Changes the selected unit or setting to a different one (e.g. On/Off).
• Decreases the selected numeric values.
• Navigates to the previous adjusting/selecting state (displayed on the bottom row).
• When Stopwatch has been activated (with START/STOP), this action stores the
Split/Lap times in the memory. You can only navigate to another main mode with
ARROW UP/LIGHT when the Stopwatch has been activated.
Long press
No specific functions.
11
2.3. NAVIGATING IN THE FUNCTIONS
The function menus are organized under the modes. When you select a mode, its
main display appears. In each mode you can display different sets of information on
the bottom row. These alternatives are called shortcuts. They all include several
shortcut-specific settings.
You can change the shortcuts in each mode with the SET button. When you long
press SET in the mode's main display, you enter the function menu of the active
shortcut. The name of the setting is displayed in reversed color on the bottom row
and the values of the setting are displayed on the top and middle rows. Press SET to
enter the value fields. You can change the value in the active (flashing) field by pressing up or down arrows. Press SET again to enter the next field. To return to the menu,
short press SET so many times that the name of the setting is displayed in reversed
color again.
To navigate to the other settings of the shortcut, press the up or down arrow when the
setting name is displayed in reversed color. To return to the main display of the current mode, long press SET at any time during the setting process.
The following figure presents the basic idea of the menu structure.
12
13
2.4. HEART RATE MONITOR AND TRANSMITTER BELT
2.4.1. Activating the heart rate monitor
To activate the heart rate monitor:
1. Attach the transmitter to the elastic strap.
2. Adjust the strap length to fit snugly and comfortably. Secure the strap around your
chest, below the chest muscles. Lock the buckle.
3. Raise the transmitter a little off your chest and carefully wet the grooved electrode
areas on the backside.
4. Check that the wet electrode areas are firmly against your skin and the logo is in a
central upright position.
5. Wear the Suunto X3HR as you would wear an ordinary watch.
NOTE: You should wear the transmitter against your bare skin to ensure flawless
operation. However, if you wish to wear the transmitter over a shirt, moisten the shirt
well under the electrodes.
2.4.2. Electromagnetic interference
Disturbances may occur near high voltage power lines, traffic lights, overhead lines of
electric railways, electric bus lines or trams, televisions, car motors, bike computers,
some motor driven exercise equipment, cellular phones or when you walk through
electric security gates.
2.4.3. Warnings
Persons who have a pacemaker, defibrillator, or other implanted electronic device use
the heart rate monitor at their own risk and it is recommended they undergo an exercise test under a doctor's supervision before using the heart rate monitor for the first
14
time. This will ensure the safety and reliability of the pacemaker and heart rate monitor when being used simultaneously.
Exercise may include some risk, especially for those who have been sedentary. We
strongly advise you to consult your doctor prior to beginning a regular exercise program.
It is best to position the Wristop computer within 3 feet or 1 meter of the transmitter.
Ensure no other transmitters are within that range; signals from other transmitter(s)
can cause an incorrect readout.
Repeated kinetic shock to the Suunto X3HR may cause an incorrect heart rate readout, and should be avoided.
2.4.4. The Suunto X3HR and transmitter belt usage in water
Heart rate measurement in water is technically demanding for the following reasons:
• Pool water with a high-chlorine content and seawater may be very conductive and
the electrodes of the transmitter may get short-circuited; the transmitter unit cannot
detect the ECG (electrocardiogram) signals.
• Jumping into the water or strenuous muscle movement during swimming may
cause water resistance that shifts the transmitter on the body to a location where it
cannot pick up the ECG signal.
The ECG signal strength varies depending on the individual’s tissue composition.
People have more problems with heart rate measurement in water than elsewhere.
15
3. MODES
3.1. GENERAL INFORMATION
Suunto X3HR has three modes: Time, Training and Memory. To select a mode, press
either the up or down arrow. When you change from one mode to another, the name
of the new mode is displayed on the bottom row of the display for a short while.
3.2. TIME MODE
In the Time mode you can view the current time, date, temperature and absolute air
pressure. You can also use it to set alarms and monitor your heart rate.
3.2.1. Main display
The main display of the Time mode has three rows:
Date
The top row displays the date in the selected format (dd.mm
or mm.dd).
Time
The middle row displays the time in the selected format (12h/
24h).
Shortcuts
The bottom row displays alternatively the weekday, the heart rate or the temperature
and absolute air pressure. Switch between these with SET.
• Weekday: Displays the current weekday (three letters).
• Heart rate: Displays your heart rate. When you activate this shortcut for the first
16
time, it displays the figure 00. If it has been activated previously, it displays the previously measured heart rate. The new heart rate is displayed if the connection with
the HR signal is present within 5 minutes after the activation of this shortcut.
• Temperature and Absolute air pressure: Displays the temperature (C/F) and the
absolute air pressure (hPa/InHg) in the units of your choice. The air pressure and
temperature are updated every time you select this shortcut and every 15 minutes
if the selection is active for a longer time period.
3.2.2. Day
Day is one of the three shortcuts that can be seen on the bottom row of the Time
mode’s main display. Short press SET to scroll to the Day shortcut. When it is visible,
you can access its functions by long pressing SET. Here is a list of the functions and
instructions on how to use them.
Set Alarm
To set an alarm:
1. In the function menu, Set Alarm is already the first menu
item. Short press SET to select it. The alarm information is
displayed on the screen (status, time). The alarm status is
activated.
2. Press either the up or down arrow to change the alarm status to On. Short press SET. The hour selection is activated.
3. Set the correct hour with the arrow buttons and press SET.
The minute selection is activated.
4. Set the correct minutes with the arrow buttons and press SET. The Set Alarm text
on the bottom row is activated. Now you can either
17
5. Long press SET to switch back to the main display.
6. or scroll to the next selection with the arrow buttons.
Set Time
To set the time:
1. In the function menu, scroll to Set Time with the arrow buttons and short press SET. The current time is displayed
on the middle row with the seconds active.
2. Reset the seconds with the arrow buttons and short press
SET. The minute selection is activated.
3. Set the correct minutes with the arrow buttons and short
press SET. The hour selection is activated.
4. Set the correct hour with the arrow buttons and short
press SET. The 12/24h display format selection on the top
row is activated.
5. Choose either 12h or 24h format with the arrow buttons
and short press SET. (The time format on the middle row
also changes on the basis of the selection.) The Set Time
text on the bottom row is activated. Now you can either
6. Long press SET to switch back to the main display.
7. or scroll to the next selection with the arrows.
18
Set Date
To set the date:
1. In the function menu, scroll to Set Date with the arrow buttons and short press SET. The current date is displayed on
the middle row, and the day selection is active. (The date
format depends on the time selection. In the 12h format,
the month is displayed before the day, and in the 24h format it is the other way round.)
2. Set the correct day (1-31) with the arrow buttons and short
press SET. The month selection is activated.
3. Set the correct month (1-12) with the arrow buttons and
short press SET. The year selection is activated.
4. Set the correct year (the years 01-49 on the display mean 2001-2049) with the
arrow buttons and short press SET. The Set Date text on the bottom row is activated. Now you can either
5. Long press SET to switch back to the main display.
6. or scroll to the next selection with the arrows.
19
3.2.3. Heart rate
Heart rate is one of the three shortcuts that can be seen on the bottom row of the
Time mode’s main display. Short press SET to scroll to the Heart rate shortcut. When
it is visible, you can access its functions by long pressing SET. Here is a list of the
functions and instructions on how to use them.
HR Limits
This setting determines whether the HR limit alarm is active or not. The alarm informs
you when your heart rate goes outside the upper or lower HR limit. Two different
sounds are used to inform whether it is outside the upper or the lower limit. The HR
value also starts to flash on the main display when the alarm is activated. If Al tone is
set off (see page 24) and HR Limits On, the Suunto X3HR only flashes the HR digits.
To set the HR limits:
1. In the function menu, HR Limits is already the first menu
item. Short press SET to select it. The state of the set HR
limits on the middle row of the display is activated.
2. Change the state with the arrow buttons and short press
SET. The HR Limits text on the bottom row is activated.
Now you can either
3. Long press SET to switch back to the main display.
4. or scroll to the next selection with the arrows.
Set Limits
This selection determines the upper and lower Heart rate limits. Heart rate outside
these values activates the alarm (either by flashing the heart rate digits or flashing the
digits and activating the alarm tone). The top row displays the upper limit (higher HR
20
than this activates the alarm) and the middle row the lower limit (lower HR than this
activates the alarm).
To set the limits:
1. In the function menu, scroll to Set Limits with the arrow
buttons and short press SET. The upper limit is activated.
2. Set the upper limit (max. 239) with the arrow buttons and
short press SET. The lower limit is activated.
3. Set the lower limit (min. 31) with the arrow buttons and
short press SET. The Set Limits text on the bottom row is
activated. Now you can either
4. Long press SET to switch back to the main display.
5. or scroll to the next selection with the arrows.
Al Tone
This selection determines whether the alarm tone is activated when the current heart
rate goes outside the upper or lower HR limit. The alarm tone remains active as long
as the heart rate is outside the set limits (see above).
To set the Al Tone:
1. In the function menu, scroll to Al tone with the arrow buttons and short press SET. The current alarm state is activated.
2. Change the state with the arrow buttons and short press
SET. The Al Tone text on the bottom row is activated. Now
you can either
3. Long press SET to switch back to the main display.
4. or scroll to the next selection with the arrows.
21
3.2.4. Temperature and absolute air pressure
Temperature and absolute air pressure is one of the three shortcuts that can be seen
on the bottom row of the Time mode’s main display. Short press SET to scroll to the
Temperature and absolute air pressure shortcut. When it is visible, you can access its
functions by long pressing SET. Here is a list of the functions and instructions on how
to use them.
Altitude
You can use this setting to define the current altitude. Suunto X3HR uses the set altitude as a benchmark for the altitude changes measured from the air pressure
changes.
To set the altitude:
1. In the function menu, Altitude is already the first menu
item. Short press SET to select it. The current altitude on
the middle row is activated.
2. Set the new altitude (-500 m to 9000m/-1500 to 29995ft)
with the arrow buttons and short press SET. The Altitude
text on the bottom row is activated. Now you can either
3. Long press SET to switch back to the main display.
4. or scroll to the next selection with the arrows.
NOTE: Suunto X3HR measures the altitude from the barometric pressure. If it displays different altitude readings at the same location on different days, this means
that the barometric pressure has changed due to weather. To receive correct altitude
readings, always set the reference altitude when the weather changes considerably.
22
Units
This setting is used for defining the altitude, air pressure and temperature formats.
To change Units:
1. In the function menu, scroll to Units with the arrow buttons
and short press SET. The altitude format on the middle row
(left side) is activated.
2. Change the altitude unit (m/ft) with the arrow buttons and
short press SET. The air pressure format on the top row is
activated.
3. Change the air pressure unit (hPa/inHg) with the arrow
buttons and short press SET. The temperature format on
middle row (right side) is activated.
4. Change the temperature unit (C/F) with the arrow buttons and short press SET.
The Units text on the bottom row is activated. Now you can either
5. Long press SET to switch back to the main display.
6. or scroll to the next selection with the arrows.
23
3.3. TRAINING MODE
3.3.1. Main display
The main display of the Training mode has three rows:
Stopwatch overall running time/split time
The top row displays the overall running time/split time.
When you start the stopwatch with START/STOP, this row
displays the overall running time from the start. However, if
you press ARROW DOWN/LAP when the stopwatch is running, the time elapsed since the start is displayed for 3 seconds. After this the overall time is displayed until you press
ARROW DOWN/LAP again or stop the stopwatch with
START/STOP.
If the stopwatch is not active, this row shows either the last time measured with the
stopwatch or 0.00,0 (default display) if you have reset the stopwatch.
The overall time is displayed in minutes, seconds and tenths of a second. However, if
the measured time is more than one hour, it is displayed in hours, minutes and seconds.
Heart rate
The middle row displays the heart rate. A heart symbol that flashes according to HR
is also displayed on the left side of the HR value (digits). If the connection to the transmitter belt is not established within 5 minutes after navigating to the Training mode,
this row displays zeros.
Shortcuts
The bottom row displays alternatively the Overall/Lap time, Stopwatch/Timer, the Altitude, the Avg. heart rate or HR relative to set HR limits (if the Stopwatch is activated
24
and the HR limits are on). If the Stopwatch is not activated and the HR limits are off,
the HR limits are displayed instead of the last two mentioned above. Switch between
these with SET.
• Overall/Lap time, Stopwatch/Timer: When you start the stopwatch with START/
STOP, this time measurement is identical to the one on the top row. When you
press ARROW DOWN/LAP, the time elapsed since the last press of the button is
displayed. (However, if you have not pressed ARROW DOWN/LAP previously, the
time displayed here is the same as on the top row, and the lap number is 1).
The number of laps is displayed on the left side of the time value (with a smaller font
than the running time). When you stop the stopwatch with START/STOP, the lap time
also stops running and remains to display the number of laps and the time of the last
lap.
When you reset the stopwatch by long pressing START/STOP, this display is also
reset and shows 0.00,0 (default value). The maximum number of laps/splits stored in
one training is 10. After the 10th lap/split, no more values are stored in the memory.
Although the lap/split values are displayed as before, the lap number indicator just
displays - -.
If the interval timer is set on (and at least one interval value is set), this row displays
the interval time in a countdown style. So, for example, if the interval is set to 3.00,
this row shows time running backwards from three minutes and when it reaches zero,
it starts again from the set interval. The number of repetitions is shown on the left side
with smaller digits. This countdown procedure is activated when you start the stopwatch with START/STOP.
All these actions can/will be performed even when this shortcut is not displayed.
• Altitude: This displays the current altitude based on the air pressure changes after
your latest Altitude value definition. The altitude is displayed in the format of your
25
choice (m/ft).
• Avg. heart rate: This displays the average HR (measured from the start of the
stopwatch). The value is updated in real time throughout the training.
• HR relative to set HR limits: A graphical indicator displays what the current HR is
in relation to the set heart rate limits. The indicator is displayed as a bar and a
scale. If the heart rate limits are off, this shortcut is not available.
3.3.2. Stopwatch
Stopwatch is one of the three shortcuts that can be seen on the bottom row of the
Training mode’s main display. Short press SET to scroll to the Stopwatch shortcut.
When it is visible, you can access its functions by long pressing SET. Here is a list of
the functions and instructions on how to use them.
Interval
This setting is used to activate/deactivate the Interval, that counts the intervals you
have set (maximum two different time intervals) and alarms you when the time has
run out and the new interval begins. The alarm tone is different from the HR limits
alarms.
To set the Interval On/Off:
1. In the function menu, Interval is already the first menu
item. Short press SET to select it. The Interval status is
activated.
2. Press either the up or down arrow to change the Interval
status to on. Short press SET. The Interval text on the bottom row is activated. Now you can either
3. Long press SET to switch back to the main display.
4. or scroll to the Intervals selection with the arrows.
26
Intervals
This setting is used to define the used interval(s) for the interval function.
To define the Intervals:
1. In the function menu, scroll to Intervals with the arrow buttons and short press SET. The minute selection is activated.
2. Set the minutes with the arrow buttons and short press
SET. The second selection is activated.
3. Set the seconds with the arrow buttons and short press
SET. The minute selection for the interval number two is
activated. (If you only wish to set one interval, long press
SET after this selection and you return to the main display.)
4. Set the minutes for the interval number two with the arrow buttons and short press
SET. The second selection for the interval number two is activated.
5. Set the seconds for the interval number two with the arrow buttons and short press
SET. The Intervals text on the bottom row is activated. Now you can either
6. Long press SET to switch back to the main display.
7. or scroll to the Interval selection with the arrows.
Before the stopwatch is activated, this shortcut displays the HR Limits you have
defined.
3.3.3. Altitude
Altitude is one of the three shortcuts that can be seen on the bottom row of the Training mode’s main display. Short press SET to scroll to the Altitude shortcut. When it is
visible, you can access its functions by long pressing SET. Here is a list of the functions and instructions on how to use them.
27
Altitude
This setting is used for defining the current altitude. Suunto X3HR uses the set altitude
as a benchmark for the altitude changes measured from the air pressure changes.
To set the Altitude:
1. In the function menu, Altitude is already the first menu
item. Short press SET to select it. The current altitude on
the middle row is activated.
2. Set the new altitude (-500 m to 9000m/-1500 to 29995ft)
with the arrow buttons and short press SET. The Altitude
text on the bottom row is activated. Now you can either
3. Long press SET to switch back to the main display.
4. or scroll to the next selection with the arrows.
Units
This setting is used to define the format in which altitude, air pressure and temperature are displayed.
To change Units:
1. In the function menu, scroll to Units with the arrow buttons
and short press SET. The altitude format on the middle row
(left side) is activated.
2. Change the altitude unit (m/ft) with the arrow buttons and
short press SET. The air pressure format on the top row is
activated.
3. Change the air pressure unit (hPa/inHg) with the arrow
buttons and short press SET. The temperature format on
middle row (right side) is activated.
28
4. Change the temperature unit (C/F) with the arrow buttons and short press SET.
The Units text on the bottom row is activated. Now you can either
5. Long press SET to switch back to the main display.
6. or scroll to the next selection with the arrows.
3.3.4. Hr Limits
Hr limits is one of the three shortcuts that can be seen on the
bottom row of the Training mode’s main display. If the stopwatch is activated and the Hr limits are on, this shortcut
shows your current heart rate in relation to the set heart rate
limits. Otherwise, it shows the limits in numbers. The brackets in the graph indicate the set limits. The two arrowheads
show your heart rate. If your heart rate is outside one of the
limits, the arrow heads flash. Short press SET to scroll to the
Hr limits shortcut. When it is visible, you can access its functions by long pressing SET. Its functions include Hr Limits,
Set Limits and Al Tone. They are similar to the ones in section 3.2.3. So you can find more information on their usage
there.
29
3.4. MEMORY MODE
When you use Suunto X3HR for the first time and thus no memory files are stored in
the memory, all the numeric values of the memory files are replaced with - -, and
there are no lap displays. You can still browse through the memory files with the
arrow buttons.
3.4.1. Main display
The main display of the Memory mode has three rows:
Total time of the measured training session: The top row
displays the total time of the training in minutes, seconds
and tenths of a second. (Or in hours, minutes and seconds if
the measured training has lasted more than one hour.)
Average Heart rate: The middle row displays the average
heart rate during training.
Identification of the recorded training session: The bottom row displays the date and time of each training session
stored in the memory. (The time is the starting moment of the stopwatch.) The maximum
number of training sessions that can be stored in the memory is 8. When the memory is
full and you store a new training session, the oldest session is erased from the memory.
To view a specific training session:
1. Short press SET to scroll to the desired training session.
2. Long press SET to choose the training session. The Date/Time of the training is activated and the following summary displays can be viewed with ARROW UP/LIGHT.
(After the first display, ARROW DOWN/LAP can be used to navigate backwards.)
• 1. Display: The bottom row displays the text Max/Min. The middle row displays
the highest heart rate recorded during training (HR symbol also displayed).
30
The top row displays the lowest heart rate recorded.
• 2. Display: The bottom row displays the text Asc/Dsc. The middle row displays
the total amount of descent recorded. The top row displays the total amount of
ascent recorded.
• 3. Display: The bottom row displays the text High /Low. The middle row displays
the highest altitude recorded during training in the unit of your choice (m/ft). The
top row displays the lowest altitude recorded during training in the unit of your
choice (m/ft).
• 4-14. Displays: The bottom row displays the lap number and time. The middle
row displays the heart rate at the time of the lap/split recording. The top row displays the split time. The displays that follow the number 4 are similar. There are
as many displays as there are lap/splits recorded (maximum 10).
• Last display: The middle row displays the text End. The bottom row displays the
date and time when the training session ended.
3. Long press SET at any time to stop navigating through the summary displays.
Suunto X3HR returns back to the main display, and the date and time of the training session you just investigated is displayed on the bottom row.
When you long press SET, Suunto X3HR returns to the main memory display of the
file that is displayed at the moment.
NOTE: A training session cannot be seen in the memory until the stopwatch has been
switched off.
NOTE: The values that are shown in the displays 1.-3. are updated in 10s intervals
when the stopwatch is active.
NOTE: You cannot change the main modes with the arrow buttons when you browse
through the memory summary displays. First you have to long press SET to return to
the main display, and then the main mode navigation functions normally.
31
3.5. SUUNTOSPORTS.COM
SuuntoSports.com is an international free Web community where you can participate
in conversations, find new locations for sporting activities, rank and vote on different
topics and of course, find interesting material published by users on
Suuntosports.com.
Suuntosports.com offers you a number of features that help you make most out of
your sports instrument and improve your performance.
To join the SuuntoSports.com community, connect to the Internet, open your Web
browser and go to www.suuntosports.com. When the opening page appears, click the
Register icon and register yourself and your Suunto X3HR. Please read the
SuuntoSports.com privacy policy before registration. You can change and update
your personal and equipment profiles in the My Suunto section afterwards.
After the registration you will automatically enter the SuuntoSports.com home page
that introduces the site structure and functional principles.
32
4. SUUNTO X3HR SELF-TEST PROCEDURE
This chapter describes the Suunto X3HR self-test procedure used for maintenance
and testing purposes. The test does not benefit the regular user in any way so you do
not need to perform it. The test is only described here because it is possible to
activate it by accident and therefore it is necessary to know how to get back to the
normal display.
So if you at any time see all the symbols on the display at the
same time, you have activated the self-test procedure.
Follow the instructions below (from step 2) to get back to the
normal operation.
To perform the self-test procedure
1. Press and hold all 4 keys at the same time for 5 seconds.
The device displays all the possible segments of the LCD.
2. Press ARROW UP/LIGHT. The device starts to count
down from 4 to 0. After the countdown is finished the top
and middle rows display 5 zeroes.
3. Press ARROW DOWN/LAP. The message “TEST EPM” is displayed on the bottom
row and the device emits a long beeping sound. Then the message “EPM-OK” is
displayed on the bottom row.
4. Press SET. A set of numbers appears on the top and middle rows.
5. Press START/STOP. The device displays the Time mode’s name and switches to
the Time mode.
NOTE: The self-test procedure resets all the settings and clears the memory.
33
5. TECHNICAL SPECIFICATIONS
General
• Operating temperature –20 °C to +50 °C/-4 °F to +120 °F
• Storage temperature –20 °C to +60 °C/-4 °F to +140 °F
• Weight 50 g
• Water-resistant to 30m / 100ft (according to ISO 2281 standard)
• User replaceable battery CR2032
Barometer
• Display range 300 to 1100 hPa / 8.90 to 32.50 inHg
• Resolution 1hPa / 0.01 inHg
• Accuracy ±2 hPa / ±0.06 inHg
Altimeter
• Display range -500m to 9000m/-1600ft to 29995ft
• Resolution 1m/3ft
• Accuracy ±20 m
Thermometer
• Display range -20°C to +60°C/-4°F to +140°F
• Resolution 1°C / 1°F
• Accuracy ±2°C
Calendar Clock
• Resolution 1 s
• Programmed until Year 2049
34
Stop watch / Interval timer
• Stop watch range 0 – 19 h 59 min 59 sec
• Lap time range 0 – 9 h 59 min 59 sec
• Lap / split times: max 10 / training session
• Resolution 0.1 sec (until 1h)
1 sec (1h to 19,59 h)
• Interval timer range 1 0 – 59 min 59 sec (Upper row of LCD)
• Interval timer range 2 0 – 39 min 59 sec (middle row of LCD)
• Maximum intervals 99
Heart Rate
• Resolution 1 beat
• Accuracy +/- 1 beat / min
• Display range 30 - 240 beats / min
• HR upper limit 32 – 239
• HR lower limit 31 – 238
• Operating distance: Max range 95 - 135 cm
Transmitter belt
• Weight 59 g
• User replaceable battery CR2032
• Water resistant to 20m/66ft (according to ISO 2281 standard)
• Modulation frequency ca 5kHz
35
6. TERMS AND CONDITIONS
6.1 COPYRIGHT
This publication and its contents are proprietary to Suunto Oy and are intended solely
for the use of its clients to obtain knowledge and key information regarding the operation of Suunto X3HR products. Its contents shall not be used or distributed for any
other purpose and/or otherwise communicated, disclosed or reproduced without the
prior written consent of Suunto Oy.
While we have taken great care to ensure that information contained in this documentation is both comprehensive and accurate, no warranty of accuracy is expressed or
implied. Its content is subject to change at any time without notice. The latest version
of this documentation can always be downloaded in www.suunto.com.
6.2 TRADEMARKS
Suunto, Wristop Computer, Suunto X3HR, Replacing Luck, and their logos are registered or unregistered trademarks of Suunto Oy. All rights are reserved. Suunto X3HR
is manufactured for Suunto Oy.
6.3 CE COMPLIANCE
The CE mark is used to mark conformity with the European Union EMC directives 89/
336/EEC.
6.4 ISO 9001 COMPLIANCE
Suunto's Quality Assurance System is certified by Det Norske Veritas to be ISO 9001
compliant in all SUUNTO Oy's operations (Quality Certificate No. 96-HEL-AQ-220).
36
7. LIMITS OF LIABILITY
If this product should fail due to defects in materials or workmanship, Suunto Oy will,
at its sole option, repair or replace it with new or rebuilt parts, free of charge, for two
(2) years from the date of its purchase.
This warranty is only extended to the original purchaser and only covers failures due
to defects in materials and workmanship that occur during normal use while in the
period of the warranty.
It does not cover battery, battery replacement, damage or failures resulting from accidents, misuse, neglect, mishandling, alteration or modifications of the product, or any
failure caused by operation of the product outside the scope of its published specifications, or any causes not covered by this warranty.
There are no express warranties except as listed above.
The client can exercise the right to repair under the warranty by contacting Suunto
Oy's Customer Service department to obtain a repair authorization. Suunto Oy and its
subsidiaries shall in no event be liable for any incidental or consequential damages
arising from the use of or inability to use the product.
Suunto Oy and its subsidiaries do not assume any responsibility for losses or claims
by third parties that may arise through the use of this instrument.
37
EN | FR | DE | ES | IT | NL | FI | SV
Suunto Oy 2/2003, 1/2005