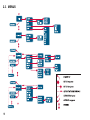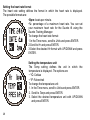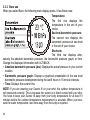
1
EN
CUSTOMER SERVICE CONTACTS
Global Help Desk
Suunto USA Phone
Canada Phone
Suunto website
+358 2 284 11 60
+1 (800) 543-9124
+1 (800) 776-7770
www.suunto.com
COPYRIGHT
This publication and its contents are proprietary to Suunto Oy.
Suunto, Wristop Computer, Suunto t6 and their logos are registered or unregistered
trademarks of Suunto Oy. All rights reserved.
While we have taken great care to ensure that information contained in this
documentation is both comprehensive and accurate, no warranty of accuracy is
expressed or implied. Its content is subject to change at any time without notice.
TABLE OF CONTENTS
1. GENERAL INFORMATION ...................................................................................6
1.1. CHECKLIST .................................................................................................7
1.2. GETTING STARTED ...................................................................................7
1.3. SUUNTO T6 FEATURES ............................................................................8
1.4. CARE AND MAINTENANCE .......................................................................9
1.5. WARRANTY ................................................................................................9
1.6. WATER RESISTANCE ................................................................................9
1.7. REPLACING THE BATTERY ....................................................................10
1.8. REPLACING THE BATTERY OF THE TRANSMITTER BELT ..................13
1.9. HEART RATE TRANSMITTER BELT ........................................................14
1.9.1. Activating the heart rate transmitter belt ..........................................14
1.9.2. Warnings .........................................................................................15
1.10. WIRELESS SPEED AND DISTANCE SENSORS ...................................15
1.10.1. Activating the wireless speed and distance sensor .......................15
2. HOW TO USE YOUR SUUNTO T6 ....................................................................16
2.1. DISPLAY AND BUTTONS .........................................................................16
2.2. KEY LOCK .................................................................................................17
2.3. MENUS ......................................................................................................18
2.3.1. Basic menu structure .......................................................................19
2.3.2. Press and long press .......................................................................19
2.3.3. Navigating in the menus ..................................................................20
3. MODES ...............................................................................................................21
3.1. GENERAL INFORMATION ........................................................................21
3.2. TIME MODE ...............................................................................................21
2
3.2.1. Main display .................................................................................... 21
3.2.2. Alarm .............................................................................................. 22
3.2.3. Time ................................................................................................ 23
3.2.4. Date ................................................................................................ 24
3.2.5. General ........................................................................................... 24
3.2.6. Units ................................................................................................ 27
3.3. ALTI/BARO MODE .................................................................................... 32
3.3.1. Use (Alti/Baro) ................................................................................ 32
3.3.2. Alti use ............................................................................................ 33
3.3.3. Baro use ......................................................................................... 34
3.3.4. Reference altitude and barometric pressure ................................... 35
3.3.5. Memory ........................................................................................... 37
3.4. TRAINING MODE ..................................................................................... 38
3.4.1. Stopwatch ....................................................................................... 39
3.4.2. Connect .......................................................................................... 39
3.4.3. Logbook .......................................................................................... 40
3.4.4. HR limits ......................................................................................... 42
3.4.5. Timers ............................................................................................. 43
3.4.6. History ............................................................................................. 46
3.4.7. Pair ................................................................................................. 47
3.5. SPD/DST MODE ....................................................................................... 49
3.5.1. Main display .................................................................................... 49
3.5.2. Connect .......................................................................................... 50
3.5.3. Autolap ............................................................................................ 51
3.5.4. Distance intervals ........................................................................... 52
3
3.5.5. Speed limits .....................................................................................53
3.5.6. Calibrating the wireless speed and distance sensor .......................54
3.5.7. Pair ..................................................................................................54
4. USING SUUNTO T6 IN TRAINING .....................................................................55
4.1. MAKING THE MOST OF YOUR TRAINING ..............................................55
4.2. TRAINING EXAMPLE ................................................................................59
5. SUUNTO TRAINING MANAGER ........................................................................60
5.1. SUUNTO TRAINING MANAGER FEATURES ..........................................60
5.2. SUUNTO TRAINING MANAGER WINDOWS ...........................................62
5.2.1. t6 Device window (1) .......................................................................63
5.2.2. My Training window (2) ...................................................................63
5.2.3. Graph window (3) ............................................................................63
5.2.4. Properties window (4) ......................................................................64
5.2.5. SuuntoSports.com window (5) ........................................................64
5.3. FOLLOWING YOUR TRAINING PROGRESS ..........................................65
5.4. SYSTEM REQUIREMENTS ......................................................................66
5.5. PC-INTERFACE ........................................................................................67
5.6. INSTALLATION .........................................................................................67
5.6.1. Installing Suunto Training Manager .................................................67
5.6.2. Installing USB drivers for Suunto sport instruments ........................67
5.7. UNINSTALLING USB DRIVERS FOR SUUNTO SPORT INSTRUMENTS 71
6. SUUNTOSPORTS.COM .....................................................................................72
6.1. GETTING STARTED .................................................................................72
6.2. SECTIONS .................................................................................................73
6.3. MY SUUNTO .............................................................................................74
4
6.4. COMMUNITIES ......................................................................................... 74
6.5. SPORT FORUMS ..................................................................................... 75
7. TECHNICAL SPECIFICATIONS ........................................................................ 76
8. INTELLECTUAL PROPERTY ............................................................................. 79
8.1. COPYRIGHT ............................................................................................. 79
8.2. TRADEMARK ............................................................................................ 79
8.3. PATENT NOTICE ..................................................................................... 79
9. DISCLAIMERS ................................................................................................... 80
9.1. USER’S RESPONSIBILITY ....................................................................... 80
9.2. CE ............................................................................................................. 80
9.3. ICES .......................................................................................................... 80
9.4. FCC COMPLIANCE .................................................................................. 80
5
1. GENERAL INFORMATION
Suunto t6 is your personal tool for better performance in sports. It measures the time
between your heartbeats with the accuracy of milliseconds and records it for deeper
analysis. The Suunto Training Manager PC software uses the heart rate variation
data to analyze the effect of your training and to calculate several other body
parameters. Relating this information with your current fitness level, the software also
indicates the scale of training load that you need for different training effects.
For the first time in field conditions, Suunto t6 tells you whether your training really
improves your condition and helps you adjust your training programs accordingly.
When you set the target effect for your training, you can use the software to calculate
the time and heart rate to reach it. During a training session, Suunto t6 helps you
reach the target by offering several control functions, such as heart rate limits, real
time average heart rate, and a customizable display of stopwatch, lap time, interval
timer and altitude. Together with versatile timing, altimeter and logbook functions this
makes Suunto t6 a perfect performance monitor for all kinds of sports at all
performance levels.
Suunto t6 can be upgraded with different wireless accessories, such as speed and
distance sensors.
These ANT accessories and the Suunto t6 heart rate belt communicate digitally on
2.4 GHz radio frequency. This offers several benefits, such as improved transmission
capacity, error-free 2-way transmission and range up to 10 m / 33 ft. Conventional
heart rate monitoring devices use inductive low frequency communication methods.
Therefore other heart rate belts are not compatible with Suunto t6.
NOTE: Read this User’s Manual carefully and make sure you understand the use,
displays and limitations of this instrument before using it. Also read the guidebook
‘How not to rely on luck when optimizing the training effect’ to learn how to get the
6
best benefits out of using the Suunto t6. You find the guidebook on the CD supplied
with the Suunto t6.
1.1. CHECKLIST
Make sure the package contains the following items:
• Suunto t6
• Transmitter belt (Suunto ANT-transmission compatible)
• PC-interface cable
• CD containing the Suunto Training Manager, Suunto t6 User’s Manuals and
Training Guidebook
• Suunto t6 User’s Guide
Should any of these be missing from the package, contact the representative who
sold you the package.
1.2. GETTING STARTED
To get started using your Suunto t6, follow these simple steps:
1. Put on your HR transmitter belt and make sure it snugly fits against your chest.
2. Make sure the electrodes of the transmitter belt are lightly wet.
3. In the Training mode, long press ALT/BACK to connect the Suunto t6 to the heart
rate transmitter belt. Wait for acknowledgement that the transmitter belt has been
found.
4. Start your training and activate the stopwatch in the Training mode by pressing
START/STOP.
5. Store lap/split times by pressing UP/LAP.
6. Press START/STOP to stop the stopwatch.
7. Long press UP/LAP to reset the stopwatch.
8. Download information on your training to Suunto Training Manager for analysis.
7
1.3. SUUNTO T6 FEATURES
The Suunto t6 has the following features.
Time mode
• Time, calendar, alarm, adjustment of units and general settings
Alti/Baro mode
• Altitude, vertical speed, cumulative ascent and descent
• Temperature, air pressure, weather memory
Training mode
• Heart rate, stopwatch with split times, interval timer, logbook and other training
control functions
SPD/DST mode (available only when the wrist unit is paired with an external speed
and distance sensor)
• Speed, distance, automatic lap time by distance, interval training by distance,
speed limit alarm
PC Software
• Upload and store the logs on your PC
• Follow up the training effect and several physiological parameters based on the
recorded heart rate interval data
• Create training plans and monitor your progress
SuuntoSports.com
• Upload your logs and publish them on the Web
• Share and compare your training experiences with others
• Download training plans published by other users
8
1.4. CARE AND MAINTENANCE
Only perform the procedures described in this manual. Never attempt to disassemble
or service your Suunto t6. Protect your Suunto t6 from shocks, extreme heat and
prolonged exposure to direct sunlight. If not in use, store your Suunto t6 in a clean
and dry environment at room temperature.
Your Suunto t6 can be wiped clean with a lightly moistened (warm water) cloth. If
there are stubborn stains or marks, you can apply mild soap to the area. Do not
expose your Suunto t6 to strong chemicals, such as gasoline, cleaning solvents,
acetone, alcohol, insect repellents, adhesives and paint, as they will damage the
unit’s seals, case and finish. Keep the area around the sensor free of dirt and sand.
Never insert any objects into the sensor opening.
1.5. WARRANTY
For warranty and additional care and maintenance instructions please refer to the
separate "Warranty, Care and Maintenance - Wristop Computers" leaflet.
1.6. WATER RESISTANCE
Your Suunto t6 is water resistant up to 100 m/330 ft and the transmitter belt to 20m/
66ft according to ISO 2281 standard (www.iso.ch). This means that you can use your
Suunto t6 for swimming and other water sports activities but it must not be used for
scuba diving or freediving.
To maintain water resistance and to ensure that the warranty remains valid, it is
strongly recommended to have all service, except for battery change, done by
authorized Suunto service personnel.
NOTE: Never push the buttons while swimming or in contact with water. Deliberate or
unintentional pressing of the buttons while the unit is submerged could cause the unit
to malfunction.
9
NOTE: Even though both the Suunto t6 and the transmitter belt are water-resistant,
the radio signal does not carry in water, which makes the communication between
Suunto t6 and the transmitter belt impossible.
1.7. REPLACING THE BATTERY
Your Suunto t6 operates on a 3-Volt lithium cell, type: CR 2032. The life expectancy is
approximately 12 months in the Time mode or 300 hours of heart rate transmission in
ideal operating temperatures.
The low-battery warning indicator
is activated on the display when
approximately 5–15 percent of the battery capacity is still available. When this occurs,
you should replace the battery. However, extremely cold weather may activate the
low battery warning indicator even when the battery is still fully operational. If the lowbattery warning indicator is activated in temperatures above 10°C (50°F), replace the
battery.
NOTE: To reduce the risk of fire or burns, do not crush, puncture or dispose of used
batteries in fire or water. Only replace them with manufacturer-specified batteries.
Recycle or dispose of used batteries properly.
10
To replace the battery:
Make sure that you have purchased an original Suunto battery kit (including battery
and battery lid with installed O-ring) before you start replacing the battery.
1. Insert a coin into the slot or a Suunto battery-opening coin into the slot or holes
located in the battery compartment cover on the backside of your device.
2. Turn the coin counterclockwise until it is aligned with the open position marker.
Then, turn and lift the cover with the coin simultaneously, until the cover opens.
3. Remove the battery compartment cover and the old battery carefully. Avoid
damaging the contact plate.
11
4. Carefully clean the inside sealing surface of the battery compartment before
placing your new battery in the compartment.
5. Place the new battery into the battery compartment with the positive side facing up.
Gently slide the battery underneath the contact plate, ensuring that the contact
plate does not break or bend out of place.
6. Place the new battery compartment cover on top of the battery compartment,
aligning the position marker on the cover with the open position marker on the
backside of your device.
7. Using the coin, gently press and turn the cover clockwise, until the position marker
on the cover is aligned with the close position marker on the back.
NOTE: When the battery has been replaced, ensure that the battery compartment is
correctly closed. This helps your Suunto device remain water-resistant. Careless battery replacement may void the warranty.
NOTE: Heavy use of the backlight, especially in the Night Use setting, will significantly reduce battery life.
12
1.8. REPLACING THE BATTERY OF THE TRANSMITTER BELT
The transmitter belt operates on a 3-Volt lithium cell, type: CR 2032. The average
expected battery life of the transmitter belt is 300 hours of use in ideal operating
temperatures.
If your Suunto t6 is not receiving a signal when the transmitter belt is active, you might
need to replace the battery.
To replace the battery:
1. Insert a coin into the slot located on the battery compartment cover on the backside
of the transmitter belt.
2. Turn the coin counterclockwise until it is aligned with the open position marker, or
even slightly further for easy opening.
3. Remove the battery compartment cover. Ensure that the O ring and all surfaces are
clean and dry. Do not stretch the O ring.
4. Carefully remove the old battery.
5. Place the new battery into the battery compartment with the positive side facing up.
NOTE: Suunto recommends that the battery cover and the O ring are changed simultaneously with the battery to ensure that the transmitter remains clean and water
resistant. Replacement covers are available with replacement batteries.
13
NOTE: Battery covers of the transmitter belt and the wristop computer are not interchangeable.
1.9. HEART RATE TRANSMITTER BELT
1.9.1. Activating the heart rate transmitter belt
To activate the transmitter belt:
1. Attach the transmitter to the elastic strap.
2. Adjust the strap length to fit snugly and comfortably. Secure the strap around your
chest, below the chest muscles. Lock the buckle.
3. Raise the transmitter a little off your chest and moisten the grooved electrode area
on the backside. The electrodes must be wet during the exercise.
4. Check that the wet electrode areas are firmly against your skin and the logo is in a
central upright position.
5. Wear the Suunto t6 like you would wear an ordinary watch.
6. In the Training mode, long press ALT/BACK to connect your Suunto t6 to the heart
rate transmitter belt. Wait for acknowledgement that the transmitter belt has been
found.
7. Activate the stopwatch in the Training mode.
NOTE: We recommend you to wear the transmitter against your bare skin to ensure
flawless operation.
14
1.9.2. Warnings
People who have a pacemaker, defibrillator, or other implanted electronic device use
the transmitter belt at their own risk. Before starting the initial use of the transmitter
belt, we recommend an exercise test under a doctor’s supervision. This will ensure
the safety and reliability of the pacemaker and transmitter belt when being used
simultaneously.
Exercise may include some risk, especially for those who have been sedentary. We
strongly advise consulting your doctor prior to beginning a regular exercise program.
1.10. WIRELESS SPEED AND DISTANCE SENSORS
Wireless speed and distance sensors are accessories that can be bought separately
to update the Suunto t6. This manual includes instructions that are related to Suunto
t6 functions that are visible only if a speed and distance sensor is paired with your
Suunto t6. Before taking the wireless speed and distance sensor into use, pair it (see
section 3.4.7. Pair).
1.10.1.Activating the wireless speed and distance sensor
For information on activating the wireless speed and distance sensor, refer to the
User’s Guide for your wireless speed and distance sensor.
15
2. HOW TO USE YOUR SUUNTO T6
2.1. DISPLAY AND BUTTONS
Battery level
indicator
HR/speed alarm
indicator
UP/LAP
START/STOP
Mode indicators
Time
Alti/Baro
Training
SPD/DST
ALT/BACK
1
2
3
4
5
6
7
Key lock
ENTER
DOWN/LIGHT
Training type
indicator
Time alarm
16
2.2. KEY LOCK
The key lock prevents you from accidentally pushing the buttons.
To activate the key lock:
1. Press ENTER.
2. Press START/STOP within 2 seconds. The buttons are locked and the key lock
symbol is displayed in the upper right corner. If you try to press a button, the
message ‘UNLOCK PRESS ENTER ’ is displayed.
To deactivate the key lock:
1. Press ENTER. The text ‘NOW PRESS START’ is displayed.
2. Press START/STOP within 2 seconds.
17
2.3. MENUS
18
2.3.1. Basic menu structure
The menus are organized hierarchically under the modes. When you select a mode
with UP/DOWN, first the icon of the mode is displayed, then its main display opens. If
the stopwatch is on, switch between the modes with DOWN/LIGHT. When you scroll
from one mode to another quickly, only the icons of the modes are displayed. When
you press ENTER in the mode’s main display, the mode’s menu opens. The menus
have several functions, all of which have sub-functions or settings.
2.3.2. Press and long press
The buttons may have different functions depending on how long you press them.
‘Press’ means that the button is pressed quickly, ’long press’ means that the button is
pressed for more than 2 seconds. If a function requires a long press, it is always
mentioned.
19
2.3.3. Navigating in the menus
To navigate in the menus:
1. Scroll the menu items with the UP/DOWN buttons. The name of the new mode is
displayed for a short while before the main display opens. The indicator bar on the
left side of the display tells you what the currently active mode is.
2. Press ENTER to open the selected menu. Three menu items are displayed at the
same time. The menu item that is currently active and can thus be selected is
displayed in reversed color.
3. To move deeper in the hierarchy, select a menu item and press ENTER.
4. To return one step up in the hierarchy, press ALT/BACK. Remember that if you only
press ALT/BACK, the changes made in the menu are not saved. First you have to
accept the changes with ENTER.
5. If you want to return to the main display of the active mode, press either ENTER
(saves the changes) or ALT/BACK (discards the last change) for more than 2
seconds.
20
3. MODES
3.1. GENERAL INFORMATION
Suunto t6 has four different modes: TIME, ALTI/BARO, TRAINING and SPD/DST.
You can switch between the modes with the UP/DOWN buttons. If the stopwatch is
on, switch between the modes with DOWN/LIGHT. The mode indicator on the left
side of the display indicates the active mode.
3.2. TIME MODE
The Time mode includes normal watch functions such as time, date and alarm. In the
Time menu, you can define the measuring units for the data displayed in other modes
and adjust the general settings.
3.2.1. Main display
When you select the Time mode, the main display opens. It has three rows.
The third row displays alternatively
the weekday, seconds or dual time.
Change the displayed information
with ALT/BACK.
21
3.2.2. Alarm
You can set three different time alarms. When the alarm is set, the time alarm symbol
appears on the main display.
Activating alarms
To activate an alarm:
1.In the Time menu, Alarm is the first menu item. Press
ENTER to select it.
2.Scroll to the alarm you want to set and press ENTER.
3.Press either the UP or DOWN button to change the
alarm status to On. Press ENTER.
4.Set the correct hour with UP/DOWN and press ENTER.
5.Set the correct minutes with UP/DOWN and press
ENTER. The alarm is now set and you return to the Alarm
menu.
If the time is set to 12-hour format, the letter A is displayed for AM. PM is not
separately indicated.
Deactivating alarms
To deactivate the alarm:
1. In the Time menu, Alarm is the first menu item. Press ENTER to select it.
2. Scroll to the alarm you want to deactivate and press ENTER. The alarm
information is displayed and the On/Off field is activated.
3. Press either the UP or DOWN button to change the alarm status to Off and long
press ENTER. The alarm symbol disappears from the main display.
22
Acknowledging alarms
When you hear the alarm, you can acknowledge it by pressing any of the Suunto t6
buttons. If you do not acknowledge the alarm, it will automatically stop sounding after
30 seconds.
3.2.3. Time
The current time is displayed on the second row of the Time mode’s main display.
The dual time enables you to keep track of another time, for example, another time
zone. The dual time can be displayed as a shortcut on the third row of the Time
mode’s main display. Scroll to the dual time with ALT/BACK.
Setting the time and the dual time
To set the time and dual time:
1. In the Time menu, scroll to Time and press ENTER.
2. Scroll to either Time or Dual time and press ENTER.
3. Change the hour with UP/DOWN and press ENTER.
4. Change the minutes with UP/DOWN and press ENTER.
If you are setting the time, the seconds are activated.
With dual time you can only set the hours and minutes.
The seconds are synchronized from the current time
setting.
5. Press DOWN to zero the seconds. If you want to set
specific seconds, press and hold UP and the seconds
start running. When the seconds are correct, press
ENTER. You return to the Time menu.
NOTE: When you set the seconds for Time, they are automatically updated in Dual time as well.
23
3.2.4. Date
The current date is displayed on the first row of the Time mode’s main display.
The current weekday can be displayed as a shortcut on the third row of the Time
mode’s main display. Scroll to the weekday with ALT/BACK.
Setting the date
To set the date:
1.In the Time menu, scroll to Date and press ENTER.
2.Change the day with UP/DOWN and press ENTER.
3.Change the month with UP/DOWN and press ENTER.
4.Change the year with UP/DOWN and press ENTER.
You return to the Time menu.
3.2.5. General
The general menu contains several general settings for your Suunto t6.
Setting the tones
Tones are the sounds that indicate that you have successfully pressed a button. You
can set the tones on or off.
To set the tones:
1. In the Time menu, scroll to General and press ENTER.
2. Scroll to Tones and press ENTER. The On/Off field is activated.
3. Change the field to either On or Off with UP/DOWN and press ENTER.
24
Setting the icons
When the Icons function is on and you scroll to a mode, the mode icon appears on
the display for a while before the main display opens. When it is off, the main display
opens straight away.
To set the icons:
1. In the Time menu, scroll to General and press ENTER.
2. Scroll to Icons and press ENTER. The On/Off field is
activated.
3. Change the field to either On or Off with UP/DOWN
and press ENTER.
Setting the light
With the light setting you can adjust the backlight of the Suunto t6 display. It has three
possible settings:
• Normal: The light switches on when you press DOWN/LIGHT for more than 2
seconds or when an alarm is activated. The light stays on for 6 seconds after the
last press of a button.
• Off: The light does not switch on from any button or during any alarm.
25
• Night Use: The light switches on when you press any of
the buttons and stays on for 6 seconds after the last
press of a button.
To change the light settings:
1.In the Time menu, scroll to General and press ENTER.
2.Scroll to Light and press ENTER. The current light
setting is displayed in reversed color.
3.Select a suitable light setting with UP/DOWN and press
ENTER.
Sensor
With this function you can calibrate the air pressure
sensor of your Suunto t6. Normally there is no need for
this but if a certified reference barometer verifies that your
Suunto t6 does not display correct values, you can adjust
the offset with this function.
To change the sensor settings:
1.In the Time menu, scroll to General and press ENTER.
2.Scroll to Sensor and press ENTER. The current setting
is displayed.
3.Change the sensor settings with UP/DOWN and press
ENTER.
NOTE: You can return the original calibration by selecting
‘DEFAULT’ as the sensor calibration value.
26
3.2.6. Units
The Units menu includes the unit and format settings used with all Suunto t6
functions. They have an effect on how the information is displayed in the modes.
Setting the time format
The time format setting defines the format in which the time is displayed. The possible
formats are:
• 12h: using the 12-hour time format (i.e. 1.57 pm)
• 24h: using the 24-hour time format (i.e. 13.57)
To change the time format:
1. In the Time menu, scroll to Units and press ENTER.
2. Time is the first menu item. Press ENTER to select it.
3. Select the desired time format with UP/DOWN and press
ENTER.
Setting the date format
The date setting defines the format in which the date is
displayed. The possible formats are:
• d.m: day before the month (i.e. 22.3.)
• m.d: month before the day (i.e. 3.22.)
• Day: only the day is displayed (i.e. 22)
To change the date format:
1. In the Time menu, scroll to Units and press ENTER.
2. Scroll to Date and press ENTER.
3. Select the desired date format with UP/DOWN and
press ENTER.
27
Setting the heart rate format
The heart rate setting defines the format in which the heart rate is displayed.
The possible formats are:
•Bpm: beats per minute.
•%: percentage of a maximum heart rate. You can set
your maximum heart rate for the Suunto t6 using the
Suunto Training Manager.
To change the heart rate format:
1.In the Time menu, scroll to Units and press ENTER.
2.Scroll to Hr and press ENTER.
3.Select the desired Hr format with UP/DOWN and press
ENTER.
Setting the temperature unit
The Temp setting defines the unit in which the
temperature is displayed. The options are:
• °C: Celsius
• °F: Fahrenheit
To change the temperature unit:
1. In the Time menu, scroll to Units and press ENTER.
2. Scroll to Temp and press ENTER.
3. Select the desired temperature unit with UP/DOWN
and press ENTER.
28
Setting the barometric pressure unit
The Pres setting defines the unit in which the barometric
pressure is displayed. The possible formats are:
•
hPa: hectopascal (i.e. 1013 hPa)
•
inHg: inches of mercury (i.e. 29.90 inHg).
To change the barometric pressure unit:
1. In the Time menu, scroll to Units and press ENTER.
2. Scroll to Pres and press ENTER.
3. Select the desired pressure unit with UP/DOWN and
press ENTER.
Setting the altitude unit
• The Elev setting defines the unit in which the altitude is
displayed. The options are:
• m: meters
• ft: feet
To change the altitude unit:
1. In the Time menu, scroll to Units and press ENTER.
2. Scroll to Elev and press ENTER.
3. Select the desired altitude unit with UP/DOWN and
press ENTER.
29
Setting the ascent/descent rate unit
The Ascent/Descent rate setting defines the format in
which rates of ascent and descent are displayed. The
possible formats are:
•m/h: meters per hour
•m/min: meters per minute
•m/s: meters per second
•ft/h: feet per hour
•ft/min: feet per minute
•ft/s: feet per second
To change the Ascent/Descent rate:
1.In the Time menu, scroll to Units and press ENTER.
2. Scroll to Asc and press ENTER. The vertical speed unit field is activated.
3. Select the desired unit with UP/DOWN and press ENTER.
Setting the distance unit
The DST setting defines the format in which the distance
is displayed (if you have paired a wireless speed and
distance sensor). The possible formats are:
• km: kilometers
• mi: miles
To change the distance unit:
1. In the Time menu, scroll to Units and press ENTER.
2. Scroll to Dst and press ENTER.
3. Select the desired distance unit with UP/DOWN and
press ENTER.
30
Setting the speed unit
The SPD setting defines the format in which the speed is
displayed (if you have paired a wireless speed and
distance sensor). The possible formats are:
• km/h: kilometers per hour
• mph: miles per hour
• min/: Either minutes per kilometer or minutes per mile
depending on the distance unit selection.
To change the speed unit:
1. In the Time menu, scroll to Units and press ENTER.
2. Scroll to Spd and press ENTER.
3. Select the desired speed unit with UP/DOWN and
press ENTER.
31
3.3. ALTI/BARO MODE
The Alti/Baro mode has two alternative displays: Altitude and related parameters in
Alti use and weather data, such as barometric pressure and temperature, in Baro
use. With the Use selection you can select whether you use this mode as an altimeter
or as a weather station. The Alti/Baro mode also contains the weather memory and
the reference setting needed to relate the current weather state to your current
altitude.
3.3.1. Use (Alti/Baro)
With this function you can set your Suunto t6 to display either barometric or altituderelated information. It also defines whether the Training logbook records an altitude
profile or not.
When the Alti use is active, your Suunto t6 assumes that all the barometric pressure
changes are due to altitude changes. The logbook in the Training mode records
altitude data. Alti is intended for measuring the altitude whenever you are on the
move. However, since substantial barometric pressure changes can take place during
a day, you should compare the changes reported by your Suunto t6 to well-known
references. If these differ from each other too much, the reason is the weather
change and you should set a new reference value as advised in section 3.3.4.
Reference altitude and barometric pressure. A general rule is that a 10 m change in
altitude equals 1,2 hPa in the barometric pressure at sea level and 0,5 hPa at 8000 m.
When the Baro use is active, your Suunto t6 assumes that all the barometric pressure
changes are due to weather changes. The training logbook does not record altitude
data. Baro use is practical for following and predicting weather trends when staying in
a constant altitude.
32
To change the Use setting:
1. In the Alti/Baro menu, scroll to Use and press ENTER.
2. Select Alti or Baro with UP/DOWN and press ENTER.
3.3.2. Alti use
When you select Alti, the following main display opens. It has three rows:
Vertical speed:
The first row displays the vertical
speed, i.e. how fast you are currently
moving up or down in a straight
vertical direction, in the unit of your
choice. For more information on
setting the vertical speed unit, see
section 3.2.6. Units.
Altitude:
The second row displays your altitude
from the sea level.
Shortcuts:
The third row displays alternatively the ascent, descent or time. Change the displayed
information with ALT/BACK.
• Ascent: Displays the total ascent, i.e. vertical movement upwards during an active
log in the unit of your choice.
• Descent: Displays the total descent, i.e. vertical movement downwards during an
active log in the unit of your choice.
• Time: Displays the current time.
33
3.3.3. Baro use
When you select Baro, the following main display opens. It has three rows:
Temperature:
The first row displays the
temperature in the unit of your
choice.
Sea level barometric pressure:
The second row displays the
barometric pressure at sea level
in the unit of your choice.
Shortcuts:
The third row displays alternatively the absolute barometric pressure, the barometric pressure graph, or time.
Change the displayed information with ALT/BACK.
• Absolute barometric pressure (abs): Displays the actual pressure in your current
location.
• Barometric pressure graph: Displays a graphical presentation of the sea level
barometric pressure development during the last 6 hours in 15-minute intervals.
• Time: Displays the current time.
NOTE: If you are wearing your Suunto t6 on your wrist, the outdoor temperature is
not measured correctly. This is because the sensor is in direct contact with your skin.
You have to keep your Suunto t6 away from your body temperature for at least 15
minutes before the outdoor temperature measurement is accurate. When you measure the water temperature, less time away from the body is required.
34
3.3.4. Reference altitude and barometric pressure
To ensure that the altimeter shows correct readings, you first have to set an accurate
reference altitude. To do this, go to a location whose altitude you have checked, for
example, with the help of a topographical map, and set the reference altitude to
match the map reading.
If you do not have accurate altitude information, you can use the current sea-level
barometric pressure as the reference value. Your Suunto t6 has a factory-set
reference altitude that corresponds to the standard barometric pressure (1013 hPa/
29.90inHg at sea level).
Setting the reference altitude
To set the reference altitude:
1. In the Alti/Baro menu, scroll to Refer and press
ENTER.
2. Altitude is the first menu item. Press ENTER to select
it.
3. Change the altitude with UP/DOWN and press ENTER.
35
Setting the sea level barometric pressure
To set the sea level barometric pressure:
1.In the Alti/Baro menu, scroll to Refer and press ENTER.
2.Select Sea level with UP/DOWN and press ENTER.
3.Change the pressure with UP/DOWN and press
ENTER. The sea level barometric pressure is now set
and you return to the Reference menu.
36
3.3.5. Memory
With this function you can view weather information regarding the last 48 hours. The
following information is displayed:
• Maximum sea level air pressure, time and weekday
• Minimum sea level air pressure, time and weekday
• Maximum temperature, time and weekday
• Minimum temperature, time and weekday
• Sea level air pressure and temperature in relation to time in 1-hour intervals for the
last 6 hours, then in 3-hour intervals
NOTE: If the Use function has been set to Alti, the barometric value in the memory is
always the same.
To view the weather information:
1. In the Alti/Baro menu, scroll to Memory and press
ENTER.
2. Scroll the information with the UP/DOWN buttons.
3. Press ENTER to stop viewing the information.
37
3.4. TRAINING MODE
The Training mode contains the
functions you need during a training session. It displays stopwatch
and heart rate data, offers a number of control functions for reaching ideal training intensity and
records data for further analysis.
The logbook gives an overview of
your performance during individual training sessions and the history function sums up your
training over a longer period of
time.
Heart rate
The first row displays your current Heart Rate.
Stopwatch
The second row displays the stopwatch.
Shortcuts
The third row displays alternatively 6 different functions. Change the displayed
information with ALT/BACK.
• Laptime/Timer: Displays the current lap time or timer.
• Time: Displays the current time.
• Avg: Displays the average heart rate since the beginning of the recording or lap.
• Altitude: Displays the altitude in selected units.
38
• Speed: Displays the speed in selected units (only if paired with a wireless speed
and distance sensor).
• Distance: Displays the distance from the beginning of the recording or lap (only if
paired with a wireless speed and distance sensor).
NOTE: If the altitude is not correct when the training starts, set it in the Alti/Baro
mode.
3.4.1. Stopwatch
With the stopwatch you can time your activities and record lap times. You can start
the stopwatch, stop it, and then restart it without having to reset it.
To use the stopwatch:
1. Press START/STOP to start the stopwatch.
2. Press UP/LAP to store lap/split times.
3. Press START/STOP to stop the stopwatch.
4. Long press UP/LAP to reset the stopwatch.
NOTE: When the stopwatch is on, the UP/LAP button is used for recording lap times
and the DOWN/LIGHT button switches between modes.
3.4.2. Connect
Connect is the first item in the Training menu. Press ENTER and choose Connect to
connect your Suunto t6 to the HR transmitter belt or a wireless speed and distance
sensor. Your Suunto t6 displays the message ‘SEARCHING’, while connecting to the
device. After this, the device informs you the device has been found. If the connection
fails, Suunto t6 displays the message ‘NO DEVICES FOUND’. Make sure the HR
transmitter belt fits snugly around your chest and the electrode area is wet or that the
wireless speed and distance sensor is switched on.
39
NOTE: You can also connect your Suunto t6 to your HR transmitter belt or a wireless
speed and distance sensor by long pressing ALT/BACK in the Training mode.
3.4.3. Logbook
With this function you can view and erase logbook information. Logbook information
is recorded whenever the stopwatch is activated in the Training and Speed/Distance
modes. The maximum length of a log is 99 hours.
To view logbook information:
1.In the Training menu, scroll to Logbook and press
ENTER.
2.View is the first menu item. Press ENTER to select it.
3.Scroll to the desired date with the UP/DOWN buttons
and press ENTER.
4.Scroll the information with the UP/DOWN buttons.
The information is displayed in the following order:
•Total duration and number of laps
•Average heart rate
•Minimum and maximum heart rate
• Heart rate inside the set limits and elapsed time
• Heart rate over the high limit and elapsed time
• Heart rate below the low limit and elapsed time
• Distance and speed (if paired and connected to a wireless speed and distance
sensor)
• Cumulative ascent and average ascent speed
• Cumulative descent and average descent speed
• Highest altitude and corresponding log time
40
• Lowest altitude and corresponding log time
Information on split and lap times is displayed in the following order:
• Lap number, split time and lap time
• Heart rate and average heart rate
• Distance and speed (if paired and connected to a wireless speed and distance sensor)
• Current altitude and cumulative ascent and descent
To erase logbook information:
1. In the Training menu, scroll to Logbook and press ENTER.
2. Scroll to Erase with the UP/DOWN buttons and press ENTER.
3. Select the file to be erased and press ENTER.
4. Confirm file deletion by pressing ENTER again. Press ALT/BACK to return without
accepting file deletion.
The content of a log depends on the Alti/Baro selection and what sensors have been
connected to your Suunto t6 when you start the stopwatch. This allows you to record
different combinations of information in the log.
The possibilities are:
• only lap times
• lap times and HR information
• lap times and altitude profile
• lap times, HR information and altitude profile
• with the optional wireless speed and distance sensor all of the above, and speed
and distance information
NOTE: To check the available memory for your logbook, scroll to Logbook in the
Training menu and press ENTER. The available memory capacity is displayed on the
bottom row.
41
NOTE: When the stopwatch is on, you cannot view or erase the logs.
3.4.4. HR limits
With this function you can set limits for your target heart rate zone and receive an
alarm to notify when your heart rate is above or below the set limits. You can toggle
between HR limits on and off, by long pressing ENTER in the main modes. If HR
limits are active, number
is displayed on the right hand side of the Training mode
display. Refer to chapter 4 for more information on alarms and limits.
• Low limit signal: - - - - - • High limit signal: ------------To set the limits:
1.In the Training menu, scroll to Hr Limits and press
ENTER.
2.Press UP/DOWN to select On and press ENTER.
3.Set the desired high limit with UP/DOWN and press
ENTER.
4.Set the desired low limit with UP/DOWN and press
ENTER.
NOTE: The maximum heart rate limit is 240 and the minimum heart rate limit is 30. The maximum limit cannot be
lower than the minimum and vice versa. If the maximum
rate is scrolled above 240, it continues from the minimum
rate upwards.
NOTE: In the log, the training session is divided into different zones according to your
HR limits regardless whether the limit alarm is on or off.
42
3.4.5. Timers
The timer functions enables you to create and follow different timers for interval
training, warm-up or countdown to start. Refer to chapter 4 for more information on
timers.
NOTE: When a timer or Autolap is on, Suunto t6 stores information to the log according to the settings that were valid when you activated the stopwatch. If you adjust the
settings after activating the stopwatch, Suunto t6 will still use the old settings. The
new settings will only come to effect after you reset the stopwatch and start it again.
Time intervals
The interval timer enables you to set and follow different timed intervals. This function
is useful in timing intervals between your periods of activity and rest. In addition to
alerting at selected time intervals, your Suunto t6 records lap information for each
interval. If time intervals are active, number
is displayed on the right hand side of
the Training mode display.
To set the interval timer:
1. In the Training menu, scroll to Timers and press
ENTER.
2. Interval is the first menu item. Press ENTER to select
it.
3. Press UP/DOWN to select On and press ENTER.
4. Set the number of rounds with UP/DOWN and press
ENTER.
5. Set the interval time for interval 1. Set the minutes with
UP/DOWN and press ENTER. Set the seconds with
UP/DOWN and press ENTER.
43
Repeat for the second interval. The intervals are now set and you return to the
Training menu.
NOTE: Interval 1 can be set to alert in a range between 0.05 and 59.59. For interval 2
the range is between 0.00 and 59.59.
NOTE: After the timer reaches zero for interval 1, your Suunto t6 automatically
switches to interval 2 and starts the countdown of the interval. If interval 2 is set to
zero, it goes back to countdown for interval 1.
NOTE: If interval timer rounds are set to “- -”, the timer will run continuously, as long
as the stopwatch is running.
Warm-up
The warm-up timer starts after the Stopwatch has been activated. When the warm-up
time ends, a signal beeps, lap information is recorded and the time interval starts, if
activated. If warm-up is active, number
is displayed on the right hand side of the
Training mode display.
To set the warm-up timer:
1.In the Training menu, scroll to Timers and press
ENTER.
2.Scroll to Warm-Up with UP/DOWN and press ENTER.
3.Press UP/DOWN to select On and press ENTER.
4.Set the minutes with UP/DOWN and press ENTER.
5.Set the seconds with UP/DOWN and press ENTER.
NOTE: Warm-up can be set to alert in a range between
0.00 and 59.59.
44
Countdown
The Countdown functions as a start timer. It measures remaining time and upon
reaching zero, it alerts you at the start and automatically starts the timer/log. If
Countdown is active, number
is displayed on the right hand side of the Training
mode display.
To set the countdown timer:
1. In the Training menu, scroll to Timers and press
ENTER.
2. Scroll to Countd with UP/DOWN and press ENTER.
3. Press UP/DOWN to select On and press ENTER.
4. Set the minutes with UP/DOWN and press ENTER.
5. Set the seconds with UP/DOWN and press ENTER.
NOTE: The countdown timer can be set to alert in a
range between 0.00 and 59.59.
45
3.4.6. History
History is a cumulative of several logs. With this function you can view and reset the
history information stored in the Suunto t6 memory. The bottom row of the History
display shows the date when the History was last reset.
To view history information:
1.In the Training menu, scroll to History and press
ENTER.
2.View is the first menu item. Select it by pressing
ENTER.
3.Scroll the information with the UP/DOWN buttons.
The information is displayed in the following order:
•Total heart rate over the low limit
•Hr inside (lower limits): Heart rate inside the lower
heart rate limits
•Hr inside (upper limits): Heart rate inside the upper
heart rate limits
• Hr over: Heart rate over the highest heart rate limit set in the history HR limits
• Distance in the selected units (if paired with a wireless speed and distance sensor)
• Ascent: Total ascent in selected units
• Descent: Total descent in selected units
• High point: Highest measured point and date
NOTE: The history HR limits are used for displaying time spent within each history
HR zone. They are not used as alarms, as with HR limits described in section 3.4.2.
These History HR limits can be different than those for the target training zone of a
46
single training session. They are set with the Suunto Training Manager PC software in
the t6 settings History tab of the Properties window.
To reset history information:
1. In the Training menu, scroll to History and press ENTER.
2. Select Reset. Your Suunto t6 displays the message ‘RESET HISTORY?’.
3. Press ENTER to confirm the history reset. Press ALT/BACK to return without
resetting the history.
3.4.7. Pair
With this function you can pair the Suunto t6 with the transmitter belt, a wireless
speed and distance sensor or both.
Transmitter belt
To pair the transmitter belt:
1. Remove the battery from the transmitter belt.
2. Short-circuit the - and + metal plates in the battery compartment by connecting
them with a metal instrument.
3. Select Pair in the Training menu of your Suunto t6.
4. Select Hr belt. The message ‘TURN ON NEW DEVICE’ is displayed.
5. Insert the battery in the battery compartment and wait for acknowledgement. Within
30 seconds either ‘PAIRING COMPLETE’, or, if pairing failed, ‘NO DEVICES FOUND’ is
displayed.
6. If pairing is successful, close the battery compartment cover. If pairing fails and no
devices can be found, remove the battery and repeat steps 2-6.
Removing the battery, short-circuiting the transmitter belt and putting the battery back
again activates the ID transmission of the transmitter belt.
47
NOTE: The transmitter belt is already paired with the device when it leaves the factory. However, if you use either another device or transmitter belt or if you encounter
problems with the heart rate measurement, you need to pair it again.
Wireless speed and distance sensor
To pair the wireless speed and distance sensor:
1. Select Pair in the Training menu.
2. Select the wireless speed and distance sensor you want to pair from the list.
The message ‘TURN ON NEW DEVICE’ is displayed.
3. Turn the wireless speed and distance sensor on. Within 30 seconds either ‘PAIRING
COMPLETE’, or, if pairing failed, ‘NO DEVICES FOUND’ is displayed.
48
3.5. SPD/DST MODE
The Speed/Distance mode
is available when you pair
your Suunto t6 with an
external
speed
and
distance sensor. These
sensors are designed, for
instance, for running and
cycling and they will be
available at your Suunto
dealer.
This mode displays the
speed and distance information of your activity and offers a combination of distancebased training tools. You can, for instance, set alarm limits for your target speed or
pace, record automatic lap times at regular distances and define the work and
recovery cycles of interval training by distance.
The use of the stopwatch is identical and synchronized with the stopwatch used in the
Training mode. When the stopwatch is on, the UP/LAP button is dedicated for taking
lap times and the DOWN/LIGHT button switches between modes.
3.5.1. Main display
When you select the Speed/Distance mode, the main display opens. It has three
rows.
Speed
The first row displays your current speed.
49
Distance
The second row displays the distance.
Shortcut: You may select 5 different functions to be displayed on the bottom row with
ALT/BACK.
• Average speed: Average speed since the beginning of recording or lap
• Lap distance
• Time
• Heart rate: Displays the heart rate if the transmitter belt is in use.
• Stopwatch
3.5.2. Connect
Connect is the first item in the SPD/DST menu. Refer to section 3.4.2 for more
information on connecting your HR transmitter belt and wireless speed and distance
sensor.
NOTE: You can also connect your Suunto t6 to your HR transmitter belt or a wireless
speed and distance sensor by long pressing ALT/BACK in the SPD/DST mode.
50
3.5.3. Autolap
With this function you can set the Suunto t6 to record lap
times automatically by setting the lap distance. After the
stopwatch is started, the Suunto t6 alerts and records lap
times and other data after every completed lap. If Autolap
is active, number
is displayed on the right hand side
of the SPD/DST mode display. Refer to chapter 4 for
more information on autolaps.
To set the autolap:
1. In the Speed and distance menu, scroll to Autolap and
press ENTER.
2. Select On with UP/DOWN and press ENTER.
3. Set the lap distance with UP/DOWN and press
ENTER.
NOTE: Autolap can be set to alert in a range between 0.0 and 99.9.
NOTE: When a timer or Autolap is on, Suunto t6 stores information to the log according to the settings that were valid when you activated the stopwatch. If you adjust the
settings after activating the stopwatch, Suunto t6 will still use the old settings. The
new settings will only come to effect after you reset the stopwatch and start it again.
51
3.5.4. Distance intervals
With this function you can set distance intervals for
interval training. After the stopwatch is started, the
Suunto t6 alerts and records lap times and other data
after every completed interval. If distance intervals are
active, number
is displayed on the right hand side of
the SPD/DST mode display. Refer to chapter 4 for more
information on distance intervals.
To set distance intervals:
1.In the Speed/Distance menu, scroll to Interval and
press ENTER.
2.Press UP/DOWN to select On. Press ENTER.
3.Set the first interval with UP/DOWN and press ENTER.
4.Set the second interval and so on.
NOTE: Distance interval 1 can be set to alert in a range between 0.1 and 9.9. For distance interval 2 the range is between 0.0 and 9.9.
NOTE: After distance interval 1 has been completed, your Suunto t6 automatically
switches to distance interval 2. If distance interval 2 is set to zero, it goes back to distance interval 1.
NOTE: When a timer or Autolap is on, Suunto t6 stores information to the log according to the settings that were valid when you activated the stopwatch. If you adjust the
settings after activating the stopwatch, Suunto t6 will still use the old settings. The
new settings will only come to effect after you reset the stopwatch and start it again.
52
3.5.5. Speed limits
With this function you can set speed limits to alarm you when you go above or below
the limits. If speed limits are active, number
is displayed on the right hand side of
the SPD/DST mode display. Refer to chapter 4 for more information on speed limits.
To set speed limits:
1. In the Speed/Distance menu, scroll to Spd Lim and
press ENTER.
2. Press UP/DOWN to select On. Press ENTER.
3. Set the high speed limit with UP/DOWN and press
ENTER.
4. Set the low speed limit with UP/DOWN and press
ENTER.
NOTE: HR limits and speed limits cannot be used at the
same time. Suunto t6 alerts you according to the limits
activated last. Long pressing ENTER toggles between
the limits being On and Off.
NOTE: Speed limits can be set to alert in a range between 2.0 and 150.
53
3.5.6. Calibrating the wireless speed and distance sensor
To calibrate the wireless speed and distance sensor, first
cover a known distance using the stopwatch. Then
complete the following steps:
1.In the Speed/Distance menu, scroll to Calibrate and
press ENTER.
2.Press UP/DOWN to select the wireless speed and
distance sensor you want to calibrate and press ENTER.
3.Press UP/DOWN to select Calibrate.
4.Set the covered distance with UP/DOWN.
5.Press ENTER to finish calibration. The device
calculates and displays the calibration factor on the
second row of the display.
Alternatively, you can provide the calibration factor manually by scrolling with the UP/
DOWN buttons.
More information on calibrating your wireless speed and distance sensor can be
found in the User’s Guide for the wireless speed and distance sensor.
3.5.7. Pair
This function is identical to the Pair function described in section 3.4.7. Pair.
54
4. USING SUUNTO T6 IN TRAINING
4.1. MAKING THE MOST OF YOUR TRAINING
This section describes different possibilities and methods on how to use your Suunto
t6 in training and thus how to make the most of your training.
Using heart rate and speed limits in training
Suunto t6 assists you in staying within the target HR or speed zones during your
training. Whenever your heart rate or speed drops below or exceeds the set zone
limits, Suunto t6 alerts you - making it easier to fully benefit from your training.
Suunto t6 alerts you whenever your heart rate or speed goes outside the preset zone
using alarm signals:
• Low limit signal: - - - - - • High limit signal: ------------The limit currently active and in use is identified by a number on the right hand side of
the display:
• Number
for HR limits
• Number
for Speed limits
NOTE: HR limits and speed limits cannot be active at the same time. When one limit
is activated, the other is switched off. Long pressing ENTER turns on the last active
limit.
55
Using the average heart rate in training
In the Training Mode, the real-time average heart rate of the current lap can be
displayed on the bottom row. You can use the training effect calculator of the Suunto
Training Manager software to define the time and average heart rate needed for the
desired physiological training effect. If you train close to the calculated average heart
rate within the targeted total time, you will reach the desired training effect in the best
possible way. The average heart rate is also a useful measure during training where
the heart rate levels vary a lot, such as biking in hilly terrain. In these cases the target
zone limits are less practical than the average heart rate training.
Starting your training and stopwatch
You can start your training by:
• Pressing START/STOP in the Training or SPD/DST modes and thus activating the
Stopwatch.
• Using the countdown function, which upon reaching zero automatically starts the
stopwatch and log.
If the Countdown function is on, number
is displayed on the right hand side of the
display.
Training possibilities
You can make the most out of your training by choosing the most suitable training
method in your Suunto t6. The use of time or distance intervals and heart rate limits
can greatly contribute to the overall effectiveness of your training.
56
The figure below illustrates different training possibilities. Note that only one method
of training can be activated at a time.
57
The numbers in the figure above correspond to the numbers displayed on the right
hand side of the display, indicating the active interval or limit in use:
Warm-up is intended for distinguishing a separate warm-up period in the
beginning of the training. Data measured during warm-up is stored in the memory.
Suunto t6 offers you the possibility to start your training session with a warm-up and
move on to normal training or time interval training.
Time intervals can be used to perform interval training.
Autolap can be used for recording preset distance laps automatically.
Distance intervals can be used to perform interval training based on distance.
NOTE: When a timer or Autolap is on, Suunto t6 stores information to the log
according to the settings that were valid when you activated the stopwatch. If you
adjust the settings after activating the stopwatch, Suunto t6 will still use the old
settings. The new settings will only come to effect after you reset the stopwatch and
start it again.
58
4.2. TRAINING EXAMPLE
Example: Rita Runner
Rita Runner is about to start her interval training using set heart rate limits. She starts
off by setting and activating suitable HR limits and intervals in the Training mode of
her Suunto t6.
She puts on her HR transmitter belt, making sure the strap fits snugly, and checks
that the electrodes are moistened. By long pressing ALT/BACK in the Training or
SDP/DST mode, she connects the heart rate transmitter belt with her Suunto t6.
In the Training or SPD/DST mode, she checks the stopwatch and resets it by long
pressing the UP/LAP button. After that, she presses the START/STOP button which
activates the stopwatch and interval timer, at which point she begins her training.
The heart rate limits alert her during her training, whenever her heart rate is too slow
or too fast.
After completing each interval, the interval timer alerts her and Suunto t6 displays and
stores lap information, Then Rita presses START/STOP to stop the Stopwatch and
stop the recording of the log.
At home, she downloads her training log to Suunto Training Manager, where she can
evaluate how effective her training was.
59
5. SUUNTO TRAINING MANAGER
Suunto Training Manager is a software designed for athletes who want to enhance
the functionality of their Suunto t6 wristop computer. The heart rate analysis of the
software is based on the calculation model developed by Firstbeat Technologies Ltd.
You can use Suunto Training Manager to transfer information, such as training logs,
from the Suunto t6 memory. When you have transferred the data, you can easily view
and organize it, design training programs and sessions, send them to the Web and
add them in the calendar.
You can always download the latest version of Suunto Training Manager from
www.suunto.com or www.suuntosports.com. Please check for updates regularly as
new features are continuously developed.
NOTE: Titles and views may differ depending on the software version in use.
5.1. SUUNTO TRAINING MANAGER FEATURES
Suunto Training Manager enables the following features:
Training analysis
Suunto Training Manager measures up to seven body parameters from your training
session:
• Heart rate
• EPOC*
• Training effect (EPOC related to personal capacity)
• Ventilation volume
• Respiratory rate
• Oxygen consumption (VO2)
• Energy consumption
60
Other performance graphs include:
• Altitude
• Speed (with additional wireless speed and distance sensor)
*EPOC = Excess Post-Exercise Oxygen Consumption is a measure of accumulated training load.
You receive a personal EPOC scale for your training levels based on your height, weight, age,
sex, smoking (yes/no), and activity level.
NOTE: For more information on the Suunto Training Manager features and parameters, refer to Suunto Training Guidebook available on the Suunto t6 CD.
Training statistics
Suunto Training Manager enables you to manage your training logs and training
plans:
• Download logs from your Suunto t6
• Create, export or import training plans
• Connect with suuntosports.com for exchange of training data
• Export and import training logs for exchange of data by email
NOTE: When creating a new user profile, Suunto Training Manager asks for your
basic personal parameters. By defining your personal parameters, such as resting
HR and maximum HR, in the User’s Personal tab in the Properties window, you will
get more accurate results. Also remember to update your personal parameters in
Suunto Training Manager, whenever they change.
61
5.2. SUUNTO TRAINING MANAGER WINDOWS
The Suunto Training Manager display is divided into five separate windows. These
are marked in the figure below and their functions are briefly introduced in the
following sections. For more detailed instructions, refer to Suunto Training Manager
Help.
62
5.2.1. t6 Device window (1)
The t6 Device window displays the content of your Suunto t6. In this window you
establish the connection between your Suunto t6 and Suunto Training Manager. After
reading the data, Suunto Training Manager displays the logs stored in the device in
the t6 Device window. You can then transfer the logs to Suunto Training Manager or
SuuntoSports.com by dragging and dropping them into suitable folders or with the
help of the Transfer selected logs icon.
5.2.2. My Training window (2)
The My Training window displays the content of your Suunto Training Manager either
in a tree view or calendar view. You can choose the appropriate view in the menu bar
or with the buttons.
When you click on a file, its content information is displayed in the Graph and
Properties windows.
You can transfer data from your Suunto t6, or to and from SuuntoSports.com by
dragging the files and dropping them into suitable folders.
You can also add items (sessions, training programs and manual logs) by rightclicking within an appropriate folder and selecting the type of item you wish to add.
Similarly, you can delete items from the list by right-clicking within the My Training
window and selecting Delete.
5.2.3. Graph window (3)
The Graph window displays various logs in the form of graphs and log summaries.
Various analytical graphs may be displayed depending on your choices in the My
Training window. You can choose either one or several log files in the tree or calendar
views.
63
5.2.4. Properties window (4)
The Properties window displays data selected in the My Training window in more
detail.
In this window, you can view and edit the information of the item you selected in the
My Training window. You can view and edit six types of items:
• User
• Log (view in figure above)
• Folder
• Plans (for single training sessions)
• Training program (combination of several plans)
• t6 settings
5.2.5. SuuntoSports.com window (5)
The SuuntoSports.com window displays the data you have stored in
SuuntoSports.com.
In this window, you establish the connection to the SuuntoSports.com Web site. Once
you have a connection, this window displays the following folders:
• My logs: Contains the logs you have stored in SuuntoSports.com.
• My training programs: Contains the training programs you have stored in
SuuntoSports.com
• Published logs: Contains all the Suunto t6 logs published in SuuntoSports.com
• Published training programs: Contains all the Suunto t6 training programs
published in SuuntoSports.com
You can view logs and training programs and transfer them to and from Suunto
Training Manager.
64
5.3. FOLLOWING YOUR TRAINING PROGRESS
65
Suunto Training Manager gives you a comprehensive overview of your training
progress.
To open the training overview:
1. Select a time period in the Calendar view.
2. Press the Training Effect button in the Graph window.
The Graph window displays the lengths of your individual training sessions and their
EPOC values correlated to the training effect level.
This format gives you the following training information:
• Variation: Does the training include sessions at different EPOC levels and with
different lengths.
• Rest: Do you rest after hard training sessions or periods of intensive training to let
your body recover.
• Overtraining: Are you training at the right level for you to avoid overtraining, i.e.
your sessions do not all graph in the higher EPOC levels.
For more information on how to build up a training program, refer to the instructions in
the training guidebook on the Suunto t6 CD-ROM.
5.4. SYSTEM REQUIREMENTS
• Minimum CPU speed 500 MHz
• 64 MB of RAM (recommended 128 MB)
• 80 MB of available hard disk space
• Microsoft Windows 98, Windows 2000, Windows XP, Windows Vista
• Minimum resolution: 1024 x 768
66
5.5. PC-INTERFACE
With the PC-interface cable you can transfer information between your Suunto t6 and
your computer. The interface cable is delivered in the same package with your
Suunto t6. The PC interface cable is plugged to the USB port of your computer, and
the other end of the cable clips on to your Suunto t6 with three docking points.
5.6. INSTALLATION
In order to use Suunto Training Manager you will need to install both the Suunto
Training Manager software and appropriate Suunto USB drivers.
5.6.1. Installing Suunto Training Manager
To install Suunto Training Manager:
1. Insert the Suunto Training Manager CD-ROM into the drive.
2. Wait for the installation to begin and follow the installation instructions.
NOTE: If the installation does not automatically start, click Start --> Run and type
D:\setup.exe.
5.6.2. Installing USB drivers for Suunto sport instruments
These instructions assume that you are installing Suunto sports Instrument drivers on
a clean system, i.e. one that does not contain any Suunto sports Instrument drivers. If
this is not the case, uninstall the previously installed drivers before proceeding with
the installation. See section 5.7 Uninstalling USB drivers for Suunto sport instruments
for more information.
WINDOWS 98
The installation is in two parts. First you install the drivers for the Suunto sports
instrument and then for the virtual USB serial port.
67
To install the Suunto sports Instrument:
1. The drivers are located on your PC software installation CD-ROM. Insert the CDROM into your computer.
2. Attach the Suunto sports Instrument PC interface cable to the computer USB port.
The Add New Hardware Wizard is activated.
3. Click Next.
4. Choose Search for the best driver for your device (recommended) and click Next.
5. Select Specify a location and browse for the driver folder on the installation CDROM. Click Next. The located driver is shown on the screen.
6. Click Next to install the located driver.
7. Click Finish to finish the first part of the installation and proceed to the serial port
installation.
To install the USB serial port:
This should follow automatically once the Suunto sports Instrument installation is
complete and take a couple of seconds. Do not interrupt the installation before both
parts of the installation are finished.
Once the installation of the serial port is completed, check that it has been successful.
Select Start - Settings - Control Panel - System - Device Manager. Then select View Devices by connection.
The device should have been installed as Suunto USB Serial Port (COMx), attached
to Suunto sports Instrument.
WINDOWS 2000
The installation is in two parts. First you install the drivers for the Suunto sports
instrument and then for the virtual USB serial port.
68
To install the Suunto sports Instrument:
1. The drivers are located on your PC software installation CD-ROM. Insert the CDROM into your computer.
2. Attach the Suunto sports Instrument PC interface cable to the computer USB port.
The Found New Hardware Wizard is activated.
3. Click Next. The Install Hardware Device Drivers window opens.
4. Choose Search for a suitable driver for my device (recommended) and click Next.
The Locate Driver Files window opens.
5. Select Specify a location and browse for the driver folder on the installation CDROM. Click Next. The Driver Files Search Results window opens.
6. Click Next to install the located driver.
7. Click Finish to finish the first part of the installation and proceed to the serial port
installation.
To install the USB serial port:
This should follow automatically once the Suunto sports Instrument installation is
complete. Repeat steps 3-6 to install the USB serial port. Then click Finish to close
the wizard. Do not interrupt the installation before both parts of the installation are
finished.
Once the installation of the serial port is completed, check that it has been successful.
Select Start - Settings - Control Panel - System - Hardware - Device Manager. Then
select View - Devices by connection.
The device should have been installed as Suunto USB Serial Port (COMx), attached
to Suunto sports Instrument.
WINDOWS XP/VISTA
The installation is in two parts. First you install the drivers for the Suunto sports
instrument and then for the virtual USB serial port.
69
To install the Suunto sports Instrument:
1. The drivers are located on your PC software installation CD-ROM. Insert the CDROM into your computer.
2. Attach the Suunto sports Instrument PC interface cable to the computer USB port.
The Found New Hardware Wizard is activated.
3. The Install Hardware Device Drivers window opens.
4. Choose Install the software automatically (recommended) and click Next.
The Locate Driver Files window opens.
5. A Hardware Installation warning sign may be displayed: Suunto sports Instrument
has not passed Windows Logo testing to verify its compatibility with Windows XP/
Vista. If so, click Continue Anyway.
6. Click Finish to finish the first part of the installation and proceed to the USB port
installation.
To install the USB serial port:
This should follow automatically once the Suunto sports Instrument installation is
complete. Repeat steps 3-6 to install the USB serial port. Then click Finish to close
the wizard. Do not interrupt the installation before both parts of the installation are
finished.
Once the installation of the serial port is completed, check that it has been successful.
Select Start - Settings - Control Panel - System - Hardware - Device Manager. Then
select View - Devices by connection.
The device should have been installed as Suunto USB Serial Port (COMx), attached
to Suunto sports Instrument.
70
5.7. UNINSTALLING USB DRIVERS FOR SUUNTO SPORT INSTRUMENTS
Windows 98, Windows 2000 and Windows XP/Vista
To uninstall Suunto sports Instrument drivers:
1. Select Start - Settings - Control Panel - Add/Remove Programs. A window that
shows the currently installed programs opens.
2. Select Suunto USB Drivers and then click Add/Remove (in Windows 98) or
Change/Remove (in Windows 2000 and Windows XP/Vista). This will bring up the
Suunto Uninstaller screen, which asks if it is OK to delete the drivers.
3. Select Continue to finish the uninstallation.
71
6. SUUNTOSPORTS.COM
SuuntoSports.com is an Internet community for all Suunto sports instrument users. It
is a service that adds a new dimension to your sport and to the way in which you use
your sports instrument. In SuuntoSports.com you can share your best experiences
and the data measured during your activities with other sports participants. You can
compare your performance with other Suunto users and learn from their activities.
SuuntoSports.com membership is free and open for all sports participants. However,
to be able to send your data to SuuntoSports.com, you need a Suunto sports
instrument. You will also need the PC software delivered with the product to transfer
the data from your PC to SuuntoSports.com. Before becoming a registered member,
you can also log in as a guest to check what SuuntoSports.com has to offer.
6.1. GETTING STARTED
To join SuuntoSports.com:
1. Install Suunto Training Manager and ensure that your computer is connected to the
Internet.
2. Click the SuuntoSports.com text
in the SuuntoSports.com
window, located in the lower left corner of Suunto Training Manager.
3. Click
to open the SuuntoSports.com registration page.
4. Click Register and follow the instructions to become a member and to register your
Suunto t6. After the registration, you will automatically enter the SuuntoSports.com
72
home page that introduces the site structure and functional principles. If needed,
you can update your personal and equipment profiles in the My Suunto section.
You can also enter SuuntoSports.com directly from www.suuntosports.com.
NOTE: SuuntoSports.com is continuously developed and its content is subject to
change.
NOTE: Please read the SuuntoSports.com Privacy Policy.
6.2. SECTIONS
SuuntoSports.com includes three sections for different levels of privacy. My Suunto is
your personal area that other users do not have access to, Communities includes
functions for groups, and Sports Forums contain information that members have
published for all SuuntoSports.com visitors. This is a short description of the functions
and basic principles of SuuntoSports.com. To learn about the functions and activities
in detail, visit the site, try them and, if needed, use the step-by-step instructions that
you find in the Help. The Help is available on each page and its icon is located on the
right side of the bar that divides the screen.
The information published on SuuntoSports.com contains internal links that help your
navigation within the site. For example, if you view a resort description, you can follow
the links and view the personal information of the one who sent the resort information
and the logs and travel reports related to the resort.
SuuntoSports.com offers several possibilities for searching for information on the
website. You can search for groups, members, resorts, logs or just type in your own
keywords to find what you need.
73
6.3. MY SUUNTO
My Suunto contains your personal information. You can write an introduction of
yourself to other members, register your wristop computer, list your sports activities,
and manage your membership profile. When you upload Suunto t6 logs and/or
training programs to SuuntoSports.com with Suunto Training Manager, they are
displayed on your My Suunto front page. You can decide whether you want to make
your logs and/or training programs public to all members, to limited groups or to keep
them just for your own use. In My Suunto, you can also compare your logs and/or
training programs with the ones that others have published.
My Suunto section contains a personal event calendar that helps you plan your
activities and keep a logbook of your training, development and favorite locations.
6.4. COMMUNITIES
Communities are meeting places for smaller groups of SuuntoSports.com members.
In the Communities section, you can create and manage communities and search for
other communities. For example, you can create a community for all your friends with
similar interests, share your logs and results, and discuss and plan activities.
The information published in a community is only visible to the members of the
community. Communities can be either open or closed. To participate in the activities
of a closed community, you first have to be invited or you have to apply for
membership and be accepted.
All communities have a home page that lists the latest group activities, such as news,
discussions, events and recent logs. Community members can also use groupspecific bulletin boards and calendars, create their own link lists and group activities.
All registered SuuntoSports.com users become automatically members of the ‘World
of SuuntoSports’ community.
74
6.5. SPORT FORUMS
Suunto users are active in many different sports. SuuntoSports.com has several
Sports Forums that collect information to inform and inspire participants of these
activities. All forums include sport-specific news, bulletin boards, event calendars,
ranking lists and discussions. In the forums you can suggest links to sports-related
Web sites, exchange training programs and read travel reports written by other
members.
Sport forums introduce interesting locations and resorts related to different sports.
You can rank the resorts and suggest your own favorites. You can also view ranking
lists from the SuuntoSports.com database by your own criteria, for example, the
members who have visited the highest places, collected the most vertical climb or
published the biggest number of logs, the communities with the most members, etc.
75
7. TECHNICAL SPECIFICATIONS
General
• Operating temperature -20°C to +60°C / -5°F to +140°F
• Storage temperature -30°C to +60°C / -22°F to +140°F
• Weight 56 g
• Water-resistant to 100 m / 330 ft (ISO 2281)
• User replaceable battery CR2032
• Compatible with certain wireless Suunto ANT devices
• Memory capacity 128 kB, corresponds to 100,000 heart rate intervals + other
recorded data (approximately 14 h at a heart rate of 120 bpm)
• Recording intervals for altitude and speed (measured only with an optional
accessory) 2 s / 10 s
Thermometer
• Display range -20°C to +60°C / -5°F to + 140°F
• Resolution 1°C / 1°F
• Air pressure
• Display range 300 hPa - 1100 hPa / 8.90 InHg - 32.50 InHg
• Resolution 1 hPa / 0.01 InHg
Altitude
• Display range -500 m - 9000 m / -1600 ft - 29 995 ft
• Resolution 1 m / 3 ft
Calendar Clock
• Resolution 1 s
• Programmed until 2099
76
Stopwatch
• Stopwatch range 99 hours
• Lap time range 99 hours
• Lap / split times 100/log
• Resolution 0.1 s
HR
• Display range 30 bpm - 240 bpm
Minimum and maximum values:
• HR limits: min. 30 bpm, max. 240 bpm
• History HR limits (set with Suunto Training Manager): min. 30 bpm max .240 bpm
• Maximum HR for percentage display (set with Suunto Training Manager): max. 240
bpm
Timer
Minimum and maximum values:
• Interval 1: min. 0.05 max. 59.59
• Interval 2: min. 0.00 max. 59.59
• Warm-up: min. 0.00 max. 59.59
• Countdown: min. 0.00 max. 59.59
SPD/DST
Minimum and maximum values:
• Speed limits: min. 2.0 max. 150
• Autolap: min. 0.0 max. 99.9
• Distance interval 1: min. 0.1 max. 9.9
• Distance interval 2: min. 0.0 max. 9.9
77
Transmitter belt
• Water resistance: 20 m / 66 ft
• Weight: 61g
• Frequency: 2.465 GHz Suunto ANT compatible
• Transmission range: up to 10 meters
• User-replaceable battery CR2032
78
8. INTELLECTUAL PROPERTY
8.1. COPYRIGHT
This publication and its contents are proprietary to Suunto Oy and are intended solely
for the use of its clients to obtain knowledge and key information regarding the operation of Suunto t6 products.
Its contents shall not be used or distributed for any other purpose and/or otherwise
communicated, disclosed or reproduced without the prior written consent of Suunto Oy.
While we have taken great care to ensure that information contained in this
documentation is both comprehensive and accurate, no warranty of accuracy is
expressed or implied. Its content is subject to change at any time without notice.
The latest version of this documentation can always be downloaded in
www.suunto.com.
8.2. TRADEMARK
Suunto, Wristop Computer, Suunto t6, Replacing Luck, their logos, and other Suunto
brand trademarks and made names are registered or unregistered trademarks of
Suunto Oy. All rights are reserved. Firstbeat & Analyzed by Firstbeat are registered or
unregistered trademarks of Firstbeat Technologies Ltd. All rights reserved.
8.3. PATENT NOTICE
This product is protected by WO2004016173 and WO03099114 patent applications.
79
9. DISCLAIMERS
9.1. USER’S RESPONSIBILITY
This instrument is intended for recreational use only. Suunto t6 must not be
substituted for obtaining measurements that require professional or industrial
precision and must not be used to obtain measurements when skydiving, hang
gliding, paragliding, gyrocopter riding or flying an aircraft.
9.2. CE
The CE mark is used to mark conformity with the European Union EMC directives 89/
336/EEC and 99/5/EEC.
9.3. ICES
This Class [B] digital apparatus complies with Canadian ICES-003.
9.4. FCC COMPLIANCE
This device complies with Part 15 of the FCC limits for class B digital devices. This
equipment generates, uses, and can radiate radio frequency energy and, if not
installed or used in accordance with the instructions, may cause harmful interference
to radio communications. There is no guarantee that interference will not occur in a
particular instance. If this equipment does cause harmful interference to other
equipment, try to correct the problem by relocating the equipment.
Consult an authorized Suunto dealer or other qualified service technician if you
cannot correct the problem. Operation is subject to the following conditions:
(1) This device cannot cause harmful interference.
(2) This device must accept any interference received, including interference that
may cause undesired operation.
80
Repairs should be made by authorized Suunto service personnel. Unauthorized
repairs will void warranty.
Tested to comply with FCC standards.
For home or office use.
FCC WARNING: Changes or modifications not expressly approved by Suunto Oy
could void your authority to operate this device under FCC regulations.
81
Suunto Oy 6/2004, 11/2004, 8/2007