1
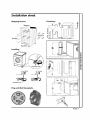
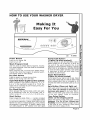
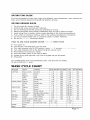
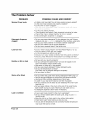
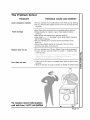
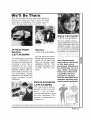
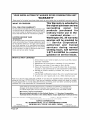
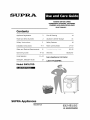
SUPRA
WASHER DRYER COMBO
COMBINADA
LAVADORA SECADORA
COMBINE
LAVE-LINGE/SECHE-LINGE
ELECTRONIC
Contents
Appliance Registration
2
Care & Cleaning
14
Model and Serial Numbers
2
Vacation & Winter Storage
15
Safety Instructions
3
Safety Features
16
Installation Instructions
4N7
Water and Electrical Requirements
Operating
9_10
11_ 12
Detergent, Detergent Guide
Model
17_19
8
Guide
Cycle Selection
Fabric Care Symbols
13
20_22
Warranty
Backcover
Supra Appliances Call Center
1.877.44.SUPRA
SW5L70D
SUPRA Appliances
461305725
UL HARMONIZED
Help us Help You...
Before using your Washer
this book carefully.
Dryer
read
It is intended to help you operate and maintain
your new Washer Dryer properly.
Energy - Saving Tips
The power and water consumption of your
Washer Dryer can be minimized if you follow
these suggestions.
Keep it handy for answers to your questions. If
you don't understand something or need more
help write (include your phone number) :
Technical Service & Support
Supra Appliances
101, 3rd Street,
Kentwood, LA, 70444
Phone: 1.877.44.SUPRA
email: [email protected]
• Operate Washer Dryer only in full load,
Write down the model and serial
numbers
You will find them on a label fastened at the rear
of the unit. Before using your washer dryer
please write these numbers here.
• Always soak or treat stains before the
When you put in a partial cotton load, press the
Super Rinse button. This automates the cycle for
energy needs.
• If you don't need pre-wash
avoid using
cycle 1.
• Always select cycle 3 for cotton load and
keep temperature at 140.
wash.
• Always select spin speed 1200 rpm to
reduce moisture content.
If you need
Service
To obtain service see the consumer services page
in the back of this book. We' re proud of our service
Model Number
and want you to be pleased. If for some reason you
are not happy with the service you receive here are
three steps to follow for further help.
FIRST, contact the people who serviced your appli-
Serial Number
ance. Explain why you are not pleased. In most
If you received
damaged
cases, this will solve the problem.
a
Washer
NEXT, if you are still not pleased write all the details
Dryer .....
and call 1.877.44.SUPRA. Explain your problem, a
Immediately
contact thed:}veyco
:ps_y
dealer or the builder
v,*c
th_ _ tw_,s
customer service representative from Supra Appliances Technical service will assist you to get a closure.
FINALLY, if your problem is still not resolved, email:
Save Time and Money
Before
you request
service
....
Check the problem solver (Pages 20 to 22).
It lists causes of minor operating problems
that you can correctyo
_;_:i.
Page 2
[email protected]
Supra Appliances Division
Supra Corporation
Tokyo, Japan
Page 3
Installation
Tools
needed
sheet
for
®
Installation
Operation
Multi wrench
Utility Knife
Channel Lock
Nut driver
Level
Screw driver
- Flat Blade
Parts
supplied
for installation.
Inlet Water Hose - One Washers
Refer to serial plate for specific
electrical
requirements
Water
Dryer
needs
one standard
water supply faucet with a pressure
30 to 120 pounds
per square
inch
Cabinet
3/4
inch
between
Dimensions
u
C
The Supra washer dryer combo offers many
improvements
in this method of drying, The
condensing
chamber (b) is located outside of
the tub assembly reducing the amount of heat
to overcome.
This allows for more cooling of
there-circulated
air.
The air inside the unit is completely recycled and
never escapes the unit. This eliminates the need
for constantly
heating
cool outside
air as
necessary with traditional
flow through (vented)
dryers, resulting in reduced energy consumption.
In a ventless system the cool air is passed over
the heater assembly and injected into the drum
creating steam within the unit. The hot, moist
air is then drawn from the drum of the unit and
passed through the condensing chamber where
it is subjected
to the cooling
effect
of the
condensing
spray, and the water is collected.
(The effect is similar to having a glass of ice
water sitting on a table and condensation
starts
to puddle).
The air is then reheated and sent
back into the drum to absorb more moisture.
This cycle is repeated
until all moisture
is
removed from the air stream.
During the drying cycle water is flowing through
the baffle system of the condenser assembly at
a minimal rate. This cooling water is collected
along with the condensation
and pumped out
of the system by the washer pump. Below is a
sketch of the air flow through a ventless system.
_o
Key:
.4
a-
Fan
motor
& heating
rq
b-
Condensing
chamber
c-
Pump
d- Condensation
-r
Width
Page 4
23.62 inch
Dryer
In a properly designed "ventless"
system it is
physically impossible for any air (steam) to escape
the unit because the intake of the fan must equal
the output. The only way air can be forced from
the unit is for additional outside air to be drawn
into the system, creating
a positive pressure.
- Two
Electrical
Washer
Of A Condensing
e-
Cooling
water
To Drain
and
cooling
inlet
assembly
water
discharge
Installation
Installation
is extremely
STEP 1
PREPARE
1, Carefully
sheet
important
WASHER
remove
packaging
for your
STEP 2
INSTALL
front
adjustable
WASHER
Dryer
to function
correctly.
:_:
:or:
t e
DRYER
materials
2, The Drain hose pipe and the power
3, Unscrew
and remove four shipping
4, Loosen two
four legs,
Washer
Washer
from
the outside
of the Washer
Dryer.
cord are tied up, Please unstrap.
screws, Remove four spacers,
!:_:Je
Dryer
legs and lock nuts,
Install
Vinyl
_ ?:_e p_e
feet
below
all
DRYER
1, Place the drain hose in the drain facility, Prevent hose from collapsing or becoming damaged,
2, Be sure an air tight connection is not made between the drain hose and stand pipe,
3, For best performance the drain hose should not be restricted in any way,
4, The drain stand pipe should be not be higher than 2,6 ft and not lower than 1,64 ft,
5, Caution must be exercised to avoid collapsing or damaging the drain hose,
6, Strap drain hose to the stand pipe,
7, Thread inlet water hose to cold faucet connection, Tighten by hand until snug, Turn 2/3rd by plyer, i
i
8, Do not OVERTIGHTEN,
Repeat step for the machine connections at the back of the unit,
i|
9, Turn cold water supply, Check all connections at the water valve and faucet for leaks,
O
10, Plug power cord into a grounded 220V, 60Hz approved electrical service protected by a
10 amp fuse or a comparable circuit breaker. The Washer Dryer is grounded through the
third and
prong
_:: V::
t_ _:ie
_
tD
tD
11, Slide Washer Dryer into position, Make sure the drain hose remains routed straight
through the clip without collapsing or
12, Level Washer Dryer by turning the leveling legs in or out as necessary,
13, Tighten leg lock nuts,
14, The Washer Dryer must be level on four sides, To properly level use a carpenters level, It is
always a good idea to check for level again after the first few washes and re-level if necessary,
Page 5
Installation
STEP
Final
3
Installation
Check
and other te,;::have
1,
2,
3.
4.
5.
6.
7.
8.
9.
Sheet
List
been removed from thetub.
Shipping screws have been removed,
Washer Dryer is plugged in to an electric outlet and is properly grounded.
Water hose is connected to the faucet with inlet screens and washers.
Water is turned on and checked for leaks at faucet and machine end connections.
Drain hose is properly located into drain facility and is not collapsed or damaged.
Washer Dryer has been properly levelled, all legs firmly on the floor and lock nuts engaged.
Water fills properly.
Test for proper operation by running the Washer Dryer through a complete cycle.
SW5L70D
Test
Run
1, Prepare your laundry
2. Select fabric type and Wash cycle Program.
3. Load cotton
wt
laundry
4. Load detergent
Refer to fabric care label for instructions.
into the drum. Load 6 Ibs. Do not over load. (,o_,::d
in dispenser
2 for main wash. Follow detergent
"t_,:i_i:_o>
guide. Use IowsLds
:_t_ y
vs
_:detergent.
5. Turn Wash Program knob to select the desired wash cycle.
6. Press the desired buttons.
7. Press dry time button to start drying.
8. Press Start.
9. Verify Washer Dryer is filling
with water.
10. Verify Washer Dryer stops filling.
11. Verify drum is turning
and the cycle is ON.
12. Verify unit rinses during the rinse cycle.
13. Verify unit spins during spin cycle.
14. Pull on the door to make sure it does not open.
15. Allow the cycle to finish.
16. O _
Release start button to
," oc_ door. (/
ow
_
t_o
oo_
to "oci'
door, take out laundry.
17. Verify laundry
is clean and dry. Fold and ut
18, Repeat I to 8 for a second
19. Press Antiwrinkle button.
cotton
away.
load of 6 lbs, Do not overload.
20. Press Start.
21. Check if your clothes _::_ wrinkle
Make any corrections
free 1.877.44.SUPRA
free.
necessary
to properly
complete
the
for guidance
on installation
issues.
installation.
If
in doubt,
call
toll-
WARNING
Proper installation is the responsibility
of the owner. Service performed
adjustment or connection are the responsibility
of the installer.
Page 6
as a result of improper
setup
, y
Installation
Shipping
sheet
Plumbing
Screws
/
Spacers
q
H (7
(7 J
sPa_ers
Spacers
Levelling
i
i
im
0
(,t}
t_
Plug and Wall
Receptacle
Page 7
Water and Electrical Requirements
Electrical
220V, 60Hz 10 Amp fuse or circuit breaker
We recommend an individual branch circuit meant only for the Washer Dryer.
The Washer Dryer is equipped with a power cord and a four prong NEMA 14-30P plug.
Never use an Extension cord
Electrical ground is required on this appliance. This unit is equipped with a four prong grounding plug for
use in a properly installed and grounded outlet.
Warning
Improper connection of the equipment grounding conductor can result in a risk of electric shock. Check
with a qualified electrician or servicer if you are in doubt on grounding the appliance. Do not modify the
plug provided with this appliance. Have a qualified electrician install the plug into the wall receptacle if the
plug does not fit the outlet. To prevent risk or fire, electric shock or personal injury all wiring and grounding must be done in accordance with National Electrical Code, local codes and ordinances. The owner of
the appliance is responsible to provide adequate electrical service for this appliance.
Water
Water pressure of 30 to 120 p.s.i, is required to correctly fill the Washer Dryer. Pressure of less than 30
p.s.i, may cause a failure in the water valve or extended fill time. The inlet valve system may not shut off
correctly. To avoid the possibility of water damage should a hose leak, always have faucets accessible.
Turn off faucet when Washer Dryer is not in use.
Drain
Facility
We recommend the height of the standpipe to be not higher than 2.63ft and not lower than 1,64 ft.
Make sure the drain facility is capable of accepting the drain hose pipe in a secure manner.
Flooring
For best performance the unit must be installed on a solidly constructed floor. Wooden floors need
reinforcement to minimize machine vibration. Carpeting and soft tile surfaces are contributing factors in
vibration and may cause the Washer Dryer to move slightly during the spin and dry cycles. Never install
the Washer Dryer on a raised platform or on any weak structure. Proper flooring is the responsibility of
the owner.
Location
We recommend the Washer Dryer not to be installed in areas where water may freeze or boil. The
Washer Dryer maintains some amount of water in its internal components like the valve, pump and in the
hose areas. This can lead to damage to belts, pump, motor, hoses and other components. Make sure the
operating temperature is not above 60 degrees R Your Washer Dryer is a ventless system, therefore it
can be installed in a closet or an in an alcove.
Warning
Your Supra washer Dryer is manufactured for operation on 60Hz AC approved electrical service. This
model is not designed for use on 50 Hz AC electrical service. We do not recommend conversion.
For Technical Assistance or if your Washer Dryer requires service, replacement parts or
accessories contact Supra Appliances Technical Service toll free 1,877,44,SUPRA
Page 8
HOW TO USE YOUR
WASHER
DRYER
Making It
Easy For You
®
X
0
0
220
Power
Button
Push to turn Power ON
Push to turn off
Wash Program
Knob
Use this knob to select Wash programs.
turn knob clockwise, Point the knob to the
program number,
Each program has a pre set spin speed
drying time. Once the program is selected
the display area to view details.
Always
desired
and a
watch
Dry time button
Press to select or choose drying time
Refer to the drying chart for help
Super Wash Button-(Lights
Up when pushed)
When pressed in the cotton cycles of 1, 2, 3, 4
& 5 or in the synthetic cycles of 6, 7 & 8 the
wash time is increased by 20 minutes giving your
clothes an extra wash.
Pro Wash
Button
When pressed the machine does a 40 C pre wash
as an additional
cycle for 10 minutes.
Use in
cotton cycles of 1, 2, 3, 4, 5, 6, 7, 8 & 16 only.
Start
Button
Press to begin the cycle. Once _o_, laundry is loaded
yo:_ s_:_;:toih;:;;¢_ cot p_t,pressstartbutton
to commence operation. Display panel lights up and
flashes two dots to indicate starting. Once pressed
the program is irreversible. To Modify, reset or edit
turn wash program to OFF position and start again.
V. soHz
tD
Qi
tD
-<
0
€
Antiwrinkle
Button
( Lights Up when
pushed)
Press to obtain an anti wrinkle effect. Use in
cotton cycles of 1 to 10 and 16, 17 & 19. At
the end of the wash program the drum
performs a special operation creating a sponge
effect that re- arranges your delicate clothes
to avoid wrinkles. When pressed, spin speed tD
is restricted
to 800 rpm and wash time
increases by 28 minutes.
Super Rinse Button
tD
(Lights
Up when
pushed)
Do not press if your load is half or less. Press
if your load is large and you need an extra rinse
When pressed wash time is increased by 10
minutes and water consumption goes up by 12
liters.
Spin Button
(Does
not light up)
Each wash cycle is pre set at a defined spin
speed You can choose to increase or
decrease spin speed to suit your fabric.
Refer to the wash cycle chart and decide
on the spin speed. Press to increase.
Time Delay
Button
(Seen on the display
panel)
Delays the starting of the wash cycle, choose
between
1 hr to 16 hrs, Allows you
flexibility and the freedom to begin laundry
at the time of your choosing. Each press
raises the time in steps of lhr.
Page 9
DISPLAY
PANEL
READINGS
The display window / panel is divided in two parts - Upper and lower. Upper part displays the
current ongoing operations. Lower part displays numbers to indicate cycle time, delay time or
spin speed.
When Power button is pressed
-
Three horizontal,
lines show RESET, if wash prog
knob is at OFF position.
When Wash Prog is selected
Background
lights up, two dots flash,
cycle description,
total time in minutes
set spin speed.
When start button is pressed
Background lights up, cycle description
is flashed,
time left to complete comes up, and when the cycle
is completed END gets flashed.
When drying time is selected
Background
When Drying cycle starts
Background
lights up, a sun sign appears an the
display window and drying time is shown. At the
end of the cycle
the sun sign
disapears.
DISPLAY
followed by
and the pre
lights up, drying time selected is shown.
PANEL READINGS
Good washing starts with hot water. To get your clothes clean and dry you need hot water, To
help you get hot water you Supra washer Dryer automatically
_:_::tsthe water in the wash cycle.
There are 7 basic wash programs
and 2 drying
programs.
WASH
Cotton,
Permanent
Press, Quick,
Delicate,
Woot, Rinse and Spin, Daily and Cold wash.
DRY
Cotton
Manual,
Permanent
Press Manual.
Each of these basic programs have many sub cycles that allow you to make a personal preference.
Refer to the wash program knob and to the wash cycle chart for assiatance. Besides this, you
also have many options to choose from. Refer to the button description
Low.
1.
SUPER
WASH
2.
RINSE
PLUS
3.
SPIN
4.
ANTIWRINKLE
For delicated
5.
TIME
Choose a time to begin washing
6.
PRE WASH
For stained laundry.
7.
START
!_::_ r:the
8.
DRY
Choose between
Page 10
SPEED
DELAY
TIME
For washing large loads which need additional detergent,
that soak up detergents or people with sensitive skin.
or fabrics
Alter or vary spin speed to choose from 400, 600, 800, 1000 or 1200 RPM.
clothes.
Limits the spin to 800 rpm.
program.
4 drying
times.
laundry.
DRYING
TIME
GUIDE
Dry time can depend on fabric type, wash cycle selected, room temperature,
Allow your Personal experience to guide the selection process.
DRYING
1.
2.
3.
4.
5.
6.
7.
8.
GROUND
room moisture
etc.
RULES
Do not tumble dry woolen clothes.
Avoid drying woven and loop knit materials.
Do not overload permanent press and synthetics for drying.
Remove permanent press clothes immediately
after dryying to reduce wrinkles.
Avoid drying fibre or leather clothes unless specified by the clothing manufacturer.
To dry infant or children's clothing, refer to the clothing manufacturer
instructions.
Do not dry clothes made from or containing rubber or plastic materials.
Do not dry f b::_ {! _::; reinforced clothes.
HOW TO USE YOUR WASHER
DRYER :::::©
::_
FIRST
TIME
o
®
o
o
®
o
Turn power on.
Load laundry, load detergent, shut the door.
Turn wash program knob to OFF position. Leave
5 minuteso
Turn wash program knob to the desired program and sub cycle.
Press buttons to choose your option.
Press time delay button if you need to delay.
o
•
Choose drying
Press start.
time required
CYCLE
Program
Cycle
COTTON
Heavy
PERM
PRESS
DELICATES
WOOL
wash, rinse spin and dry clothes,
CHART
Laundry
y Duty
::_:::::-_:.
if you wish to bypass the pre set speed.
Your SUPRA washer dryer will automatically
for you to fold and I_,, away.
WASH
:/:
Very
Cycle
Dirty
time
Pre set speed
Load
Pre set Temp
1.47
1200
11 Ibs
194
Super
Normal
1.47
1200
11 Ibs
167
Regular
Color
1.49
1200
11 Ibs
140
Color
Color
1.45
1200
11 Ibs
113
Gentle
Delicate
1.22
1200
11 Ibs
104
Regular
Normal
0.42
1200
11 Ibs
86
Gentle
Delicate
0.41
1000
11 Ibs
86
Eco
Normal
1.38
1200
6.85 Ibs
140
Regular
Normal
1.18
800
6.85 Ibs
104
Eco
Normal
1.12
800
6.85 Ibs
86
color
color
Regular
Woolen
clothes
Cold
Delicate
woolen
Wash
DRYING
Delicate
DRYING
Cotton
QUICK
Cotton
Quick
Cold
RINSE
Rinse
SPIN
Spin
Man made
express
Wash
Wash
clothes
Fibre
1.09
800
6.85 Ibs
104
0.57
550
6.85 Ibs
86
0.50
550
6.85 Ibs
86
Cotton
clothes
0.54
800
3 Ibs
104
Cotton
clothes
0.41
800
3 Ibs
Cold
Perm
press
For cold water
0.50
wash
~ 1.10
1.10 ~ 1.30
3 ~ 6 Ibs
11 Ibs
Page 11
Drying Options
Choose
your
drying
options
from
the
table
below
Fabric
Load
RPM
Cotton &
Linen
6 Ibs
Cotton &
Linen
to suit your
personal
preference.
Dry
Damp Dry
1200
85
65
4.4 Ibs
1200
75
55
Synthetic
& Delicate
3.3 Ibs
850
80
65
Synthetic
& Delicate
2.2 Ibs
850
50
45
Minutes
Minutes
|
Page 12
Detergent
How
to choose
and Detergent
and
Guide
use
Front load machines need much lower detergent
the right detergent
quantity. Follow detergent manufacturer instrucFirst, use only detergent specifically made for use tions for front load machines. Detergent is flushed
automatically into the drum from the detergent disin i_ t
Washers. Other types will cause
penser. Over sudsing will cause your unit t_;
over sudsing,
malfunction. Suds may rise through detergent disSecond, use only low _ {:::s__: powder or liquid
penser and may spill on your floor, so, be very caredetergent. Performance of this machine will be
ful in choosing the detergent quantity based on launeffected if high suds detergents are used.
Third, check your water hardness. If your water is dry load, fabric type and soil/stain conditions. Alhard (7 grain's or more) your detergent has to work ways choose a low sud detergent for this
machine.
harder.
Your water department can tell you how hard
your water is, So can your county extension agent Bleach Recommendation
or your area's water softener company. Just call and Always dilute bleach before using.
ask them how many grain's of hardness's are in Excessive/ Frequent use of bleach can damage
clothes.
your water.
How much detergent you use? That depends. Bleaching Whitens clothes, removes problem
tD
Is your water hardened or softened? With hard stains, deodorizes & sanitizes.
tD
i I
and always follow
bleach u_
water you need extra detergent to get your clothes Use discretely
t_
clean. With soft water you need less detergent. Too manufacturer instructions.
much detergent with soft water not only waste Do not add bleach while rinsing. Pour bleach in f_
8J
money, it can be harmful, it can cause serious detergent dispenser 3.
problems in the performance of your machine. So, Do not overfill bleach, This can damage clothes,
why take a chance when it is easy to find out the
Fabric Softener
Recommendation
tD
hardness of water and use low sud detergent.
Keep your detergent fresh. Under the sink isn't All fabrics benefit by the use of softeners. We i I
a good place to store detergent. Too much moisture recommend use of softener to reduce clinging effect
in synthetics and make laundry feel soft.
If your powder detergent gets older or lumpy Pour Softener in detergent dispenser 4, Do not
throw it away, It won't wash well, Old detergent overfill. Excessive use of softener may affect wash €
ii
often won't dissolve. If you use a liquid detergent results. Always follow softener manufacturer
o.
tD
these precautions are not necessary because liquid instructions,
detergents don't lump as they age or come in contact
with water.
You will find four :o;_J;:: t;_ _t_,in your Washer
Dryer
Pre-wash, Wash, Softener, Bleach.
1234
123 4 -
Pre Wash 1.76 ounce Max.
Main Wash 4.41Ounce
Max.
Bleach 2.71 Fluid Ounce
Softener 2.71 Fluid Ounce Max.
Page13
Care and Cleaning
/_
Unplug electric
Cleaning
the
power cord before cleaning
Washer
Dryer to avoid shock.
Exterior
Use a soft damp cloth or sponge to wipe up any spills. Occasionally
unit to keep it looking new.
wipe the outside of your
Cleaning
the Interior
The drum is made of stainless steel, specks of rust can be caused by small metal articles like safety pins,
paper clips or belt buckles. The drum should be cleaned regularly. Not cleaning the drum may lead to a
build up of scale clogs, limescale and dirt leading to replacement. Clean the drum by using chlorine
bleach. Mix one cup 8.5 ounce and two scoops or caps of detergent. Pour this into detergent drawer
compartment two. Choose automatic wash program, rotate Wash program knob to position four. Rotate
Water Temperature knob to 203°F position. Push Power button to start. Repeat if necessary. To remove
hard water deposits or scales, use Washer safe labeled cleaners. Wipe drum thoroughly with a damp
cloth. Apply a liquid nonflammable household cleaner to stained areas, wipe with a soft cloth to remove
stains or colors. Never use steel wool. Use descaling agents suitable for use on stainless steel. Some
descalers contain chemical components that can attack parts of your washer dryer. Be careful in selecting
the rightdescaler.
J_ft_
wtl !i_:_ w_t_: to
_,:i_':%
b:_fo: _
_ ,_::y
Water
Inlet
hose
Replace hose after five years of use to reduce risk of hose failure. Periodically inspect and replace if
bulges, kinks, cuts, wear or leaks are found. Mark the date of replacement on the hose by a permanent
marker.
Lint Filter
To avoid
__
_::_
water
spills
during
removal
of lint
filter,
place
a bowl
or tray
_ _,_:_
_:_::_
_/_ _
The Lint filter is located at the bottom right corner. Always run the unit on spin mode before removing the
lint filter to drain away residual water. Place a bowl or tray under the lint filter area to catch any residual
water, We recommend this strongly to avoid water spills on your floor. Open bottom panel,
unscrew and remove the lint filter. Run water on the filter to clean away detergent or softener residue.
Rinse with hot water, dry using a clean towel and reinsert the filter back. Turn it clock wise and lock it in
position. We recommend cleaning after every 25 full loads, t _s ot ::_::_s_: y to clean lint
filter after every load.
Detergent
Drawer
Pull the detergent drawer out. Wash all compartments under running water. Clean the recess with an old
toothbrush. Make sure all detergent accumulations are removed. Use a jet of running hot water to flush
out residues. Replace the drawer and run a rinse cycle without laundry.
Page 14
Vacation
& Winter
Storage
Install and store your washer/dryer where it will not freeze. Because some water may stay in the hose
freezing can damage your washer dryer. If storing or moving your washer dryer during freezing
weather, winterize it.
Nonuse
or Vacation
care
To Transport
If you are going away on vacation or not using your
Washer/dryer
for an extended period of time, you
should ....
• Unplug Washer/Dryer
or disconnect power
• Turn off water supply. This helps avoid accidental
flooding due to water pressure surge while you
are away,
the Washer
Dryer
• Shut the Water tap.
• Disconnect and drain water inlet hose.
• Disconnect drain hose from the drain system.
• If your Washer/dryer
is moved during freezing
weather, winterize it before moving.
• Unplug Washer/dryer
• Wash lint filter.
or disconnect
power,
g,i
g,I
f,_
0
• Make sure leveling legs are secure,
• Place inlet hose into the drum.
To Winterize
Washer
Dryer
• Shut off water tap.
• Disconnect and drain water inlet hose,
• Fill all four detergent drawer compartments
with RV-type antifreeze, Run Washer Dryer
on Program 4 for about 30 seconds to mix
antifreeze in water, Unplug Washer Dryer or
disconnect power,
To use Washer
Dryer
again
• Drape power cord and drain hose over edge
and secure it firmly by a tape.
• Insert shipping bolts and pads.
• Use masking tape to secure Washer Dryer
door.
ii
"9
I'D
0
Reinstalling
your
Washer
Dryer
Follow installation instructionsas given.
Run the Washer Dryer through an automatic
cycle, Select program four, Use one scoop or cap
full of detergent to remove the antifreeze if used,
Load detergent in compartment two.
•
•
•
•
•
Flush out Water pipe and hose.
Reconnect Water inlet hose.
Turn on water tap,
Plug in Washer Dryer or reconnect power
Run Washer Dryer through a complete automatic
cycle. Choose program four position on the dial.
• Load the detergent drawer compartment two
with _;_:! ounces of
_i:s
_; detergent to
clean out anti freeze,
Page 15
Safety
Features
We Care For You...
For the protection of your family and loved ones your Supra Washer Dryer is equipped with many
safety features.
Child
Safe Door
An electromechanical safety device in the door prevents it from opening during operation. Door will not
open till the unit is shut down and the power button turned OFF.
Washer
Motor
A thermal safety device protects the motor from overload or underload giving the motor long life.
Temperature
A safety thermostat prevents excessive water temperature. Water will not heat if the water level is
inadequate, water from the tap stops flowing or the tap is not turned ON. The machine will not start if
prescribed water level is not available.
Water Spills
The filling valve stops if the water inlet filter is clogged or if the drain pump motor malfunctions.
Protects flooring, carpets and rugs from water spills.
Safe Areas
By design, access is denied to children/adults reaching into the door or touching the pump motor filter
while the unit is ON.
Fuse
A safety fuse built into the unit prevents excessive electrical overload.
Plug
Your Supra Washer Dryer plug is equipped with two grounding terminals to protect against leakage
currents. System and equipment are both grounded by two prongs in the plug.
Page 16
Fabric Care
Care Label Guide
The following information is provided by U.S. Federal Trade Commission as par of
Project Clean. The symbols appearing on garment labels provide care instructions from
the garment manufacturer. These symbols seen on the fabric serve as minimum laundering instructions to indicate washing, bleaching drying, ironing & dry cleaning. Additional
symbols or words or both may be used to clarify the instructions. The water temperature listed below are provided as a guideline. Actual water temperatures obtained in the
home depend on washing machine settings, regional supply temperatures and water
heater settings.
?
It's time to wash
new clothes that
you brought last
week and you
don't
understand a care
label?
WASH
A care information tag is available in most clothing sold in the United States, These written instructions will only give normally a single care
method for your garment, When an international
care symbol tag is also present, all care methods
will usually be shown, We are happy to present
the International symbol guide as a handy reference to help you select a correct wash and dry
program that supports the care method prescribed
by the garment manufacturer,
=11
Cr
ii
t_
t_
Press/Wrinkle Resistant
Wash
i Water Temperature 120 F (Hot)
iliiliiiii/iiii/!!il/ii_
ii:iiiiii!i:i::iiiiiiiWaterTemperature105 F (Warm)
i Water Temperature 85 F (Cold/Cool)
[)o Not Wring
i
Page17
Fabric Care
BLEACH
IRON
Any Bleach (when needed)
Iron
Only non-chlorine bleach (when needed)
High
Warn rig: Do Not Bleach
Medium
DRY
Low
Dry
W\srnrig: Do Not :I:ro_
Normal
Warn rig: No Steam
Permanent Press/Wrinkle Resistant
DRY-CLEAN
Gentle/Delicate
Heat Setting: High
Dry Clean
Any Solvent
Heat Setting: Medium
Dry Clean - Normal Cycle: Any Solvent
expect Trichloroethylene
Heat Setting: Low
Dry Clean - Normal Cycle: Petroleum
Solvent Only
Special Instructions:
Line Dry/Hang to Dry
Professionally Dry-clean: Reduce Moisture
Special Instructions: Drip Dry
Professionally Dry-clean: Short Cycle
Special Instructions: Dry Flat
Professionally Dry-clean: No Steam Finishing
Special Instructions: Dry in Shade
Professionally Dry-clean: Low Heat
Warning: Do Not Dry
(used with do not wash)
Wdrning: Do Not I::::)ry
clean
Warning: Do Not Tumble Dry
Page 18
•
i
Questions?
_:'_ U
se Th
" ....... .....
PROBLEM
POSSIBLE
CAUSE
AND
REMEDY
Washer won't fill, rinse or
drum will not turn
•
•
•
•
•
•
•
•
•
Drum does not fill, but
• ts your drain hose fixed at the correct height?
• ts the power cord plugged into a 220V power receptacle?
• At the start of the cycle Water inflow is low and is absorbed by the
laundry quickly. This creates a perception that water is not flowing.
• This is normal, allow the program and the cycle to continue.
Water is flowing
Washer
Dryer stops
Washer won't drain
Washer continues to fill or
drain or the cycle seems
stuck
•
•
•
•
•
•
•
Is power cord plugged into a 220V power receptacle?
Is Wash Program knob pointing to the correct program number?
ts water inlet hose kinked?
Is water pressure at the tap correct? Is the tap ON?
Is the door closed?
ts the fuse blown or circuit breaker tripped?
Are shipping screws and spacers removed?
Are knobs rotated clock wise?
Is your Wash Program knob working correctly?
Is power cord plugged into a 220V power receptacle?
Are all knobs correctly rotated. Do they point to the program?
ts water inlet hose blocked or kinked? ts the tap on?
ts there electrical power at the wall receptacle?
Call an electrician to check the wall socket.
Are you using an extension cord? Do not use an extension cord.
Is the drum overloaded with laundry?
• Is the drain hose clogged? Is the end of drain hose more than
2.63 ft above the floor.
ast_: _tft_:
co?_!_d?(D_ _ot
sf_ oivw_t_
• See installation instructions for proper installation of drain hose.
• ts the door open?
• Are there excessive suds?
• Is your voltage low? Check your electrical service or call an
electrician. Do not use an extension cord.
• Is the end of the drain hose more than 2.63 ft above the floor?
• Is there a air gap in the drain hose?
• Are all knobs correctly positioned?
• Is the unit plugged into a 220V power receptacle?
• Is voltage low? Check electrical service or call an electrician.
Washer makes noise
•
•
•
•
•
•
•
Are shipping screws and spacers removed?
Are gears engaging? These are normal Washer Dryer noises.
Coins or safety pins or metals may be in the drum
Heavy wash loads can produce a thumping sound, This is normal,
Is the Washer Dryer levelled? Are all four feet resting firmly?
Adjust levelling legs if necessary.
Is your flooring correct? Refer page 8.
Page19
tD
"U
i I
O
tD
3
O
i
€
tD
i I
The Problem Solver
PROBLEM
Washer/Dryer
leaks
POSSIBLE
• Is Water inlet hose tight? Are all hose washers properly seated?
• Is the drain hose clamped and properly installed?
• Is the sink or drain clogged?
•
•
•
•
Detergent
clogged
dispenser
Load too wet
Residue or lint on load
Stains after Wash
CAUSE AND REMEDY
t e
IS the
Check
Check
Check
to :,re ion,
unit resting firmly?
levelling and adjust Check household plumbing for leaks
filter cap is closed tightly? Is trim in place?
detergent dispenser is clogged
• Did you use excess detergents? Is the detergent low sud? Always
measure and use _:v, ,_ :,,;_; detergents. Pour carefully, wipe spills.
• Did you pour fabric softener in the fabric softener dispenser?
• Did you pour bleach into its correct dispenser?
• Did you use a powered bleach? Use liquids only.
•
•
•
•
•
Is your wash cycle program correct? Read Page 11 to 12.
Did you select 1200 rpm spin speed?
Is the temperature setting correct?
Did you turn your knobs correctly? Do they point correctly?
Did you press Rinse and Hold button? Is voltage correct?
• Did you sort your laundry properly?
• Did you overload the washer/dryer? Lint can be trapped in the
load if overloaded. Wash smaller loads.
• Was paper or tissue left in the pockets?
• Did you use enough detergent? Follow detergent guide.
• Did you set temperature correctly?
Cold water will not dissolve detergent completely.
• Did you clean lint filter?
•
•
•
•
•
Did you follow the guide when adding detergents? Refer page 13
Use just enough detergent to remove soil and become soluble.
Use correct fabric softener depending on fabric type,
Is water in your tap hard? Install an ion filter if possible.
Did you properly sort the load? Is color bleeding? Mix only if color
does not run,
• Did you leave clothes in the drum at the end of the cycle? Some
dyes transfer during dry cycle, Make sure color does not run,
• Is detergent dispenser clean? Clean if necessary.
Load is wrinkled
• Is your wash cycle correct? Is the drum overloaded?
• Did you remove clothes after the wash cycle, hang dry and
use the dryer?
• Allow the unit to run from wash to dry without interruption
• Check fabric type? Some fabrics are drip dry only
• Did you set the temperature knob correctly? Excess temperature
may cause the load to wrinkle
Page 20
The Problem
Solver
PROBLEM
Load is tangled or twisted
POSSIBLE
CAUSE
AND
REMEDY
• Did you overload drum? Loads should move freely during washing.
• Did you place laundry loosely into the drum? Do not wrap clothing
together.
Fabric damage
Washer does not dry
• Were sharp items removed from the pockets before washing?
• Empty pockets, zip zippers, snap or hook fasteners before
washing.
• Were strings and sashes tied to prevent tangling?
• Were items _:v_ _:_/ damaged? Mend rips & broken threads in
seams before washing.
• Did you overload drum? Laundry should move freely during
washing.
• Did you pour bleach directly on the laundry? Did you follow
clothing care label instructions?
• Did you overload drum? TSyour Washer Dryer draining properly?
• Ts your laundry load too small to tumble : properly? Add
more laundry.
i
.........................
,
Door does not open
........
V,
-4
i I
O
;
• Check unit is Off, Have you pressed Stop? Wait for about three
minutes.
• Gently hit the door to cause a vibration to release the safety device.
3
U_
O
i
i I
To receive more information
call toll-free
1.877.44.SUPRA
Page 21
Notes
Page 22
We'll
Be There
With the Purchase of your new Supra appliance,
receive
the assurance
that if you ever need
informatio
or assistance
from Supra, we'll
there, All you have to do is call toll - free
be
Supra Call Center
I_877_44_$UPRA
In-Home
Repair
Services
1.877.44.SUPRA
An authorized
consumer
service professional
will
provide expert repair service,
schedule a time that is
convenient for you. Many
consumer service company
operated locations offer you
service today, tomorrow or at
your convenience. Trained
technicians will handle your
repair smoothly
to your
satisfaction.
Service
l_877_44_5UPAA
You can have the secure
feeling that Supra consumer
service will be there right
after you purchase Supra
appliances. Call Toll - Free
to obtain information on a
servicer
close to your
home.
Ask any question about
Supra appliances. Supra call
center information service is
available to help. Your call
and your question is important
to us and will be answered
promptly and courteously.
User Maintenance
instructions
contained
in this
cover
book
procedures
intended
to
be performed
by any
user. Other
Servicing
should
be referred
to
a qualified
service
personnel.
Caution
must be exercised
since
Parts & Accessories
improper
servicing
may
cause unsafe operation.
1.877.44.SUPRA
The Supra parts system
provides access to several
parts ..... and all Supra
genuine replacement parts
are fully warranted.
Call
toll-free to obtain parts or
accessories.
_The manufacturer
does not guarantee for possible impressions due to print or transcription
errors contained in this manual, The manufacturer
reserves
to change/alter/modify
product specifications
and design without compromise to enhance product safety and standards and in the user's interest.
the right
Page 23
YOUR
SUPRA
AUTOMATIC
WASHER
DRYER
COMBINATION
UNIT
WARRANTY
Save proof
of original
purchase
date
such
as your
WHAT IS COVERED
NOT
warranty
period,
is extended
to
the original purchaser and any
succeeding
owner
for
products
purchased
for
ordinary
home use in the
_!!:i mainland
states _,_:_
Washington DC. All warranty
services will be provided by
Service
Corporation
authorized
and
trained
servicers
during
normal
working hours. Call toll-free
1.877.44.SUPRA
to receive
guidance on service issues.
LIMITED
SECOND
YEAR
WARRANTY
For the second year from the date of original purchase,
Supra will provide free of charge replacement parts
for the stainless steet drum and gear case assembly
that fails because of a manufacturing
defect.
Associated parts and plumbing parts or not covered
by this warranty. You pay for the service trip to your
home and service labor chargas
IS
slip to establish
This Warranty
FULL ONE-YEAR
WARRANTY
For one year from the date of original purchase, Supra
will provide free of charge parts and service labor in
!our home to repair or replace any part of the Washer
Dryer that fails because of manufacturing defect.
WHAT
sales
COVERED
1. Service
trips
2. Improper
to your
3. Replacement
4. Cleaning
5. Failure
to teach
to
fuses
of
product
or used
6. Damage
acts
of house
or servicing
of the
purpose
home
you
how
to use the
product.
installation
or resetting
hose
if it is used
commercially
product
pipes
for other
or used
caused
of circuit
or drain
outside
by accident,
fire,
breakers.
facility.
than
the
its
intended
United
flood,
States.
riots
or
of God.
7. Unauthorized
8. If used
modifications
on a 110
made
V power
grid
to the
unit or unauthorized
or on a 50Hz
electrical
repair.
cycle.
Read your Use and Care guide book carefully. If you have any questions about operating the product,
)lease call toll-free 1.877.44.SUPRA. If you have an installation problem contact your dealer or installer.
You are responsible to provide adequate electrical, plumbing, drain and other connecting facilities.
WARRANTOR is not responsible for consequential
damages.
Some states do not allow the exclusion
or limitation
of incidental
or consequential
damages, so the above limitation or exclusion may not apply to you. This warranty gives
you specific legal rights, and you may have other rights which vary from state to state
Warrantor:
Supra Corporation
Warranty
Administrator
in the United States:
Services Corporation
Technical Service Provider in the United States: Supra Appliances Technical Service
Contact
Supra
Corporation
at [email protected];
Contact
Supra Appliances
SUPRA
Contact
Technical
Services
Corporation
at
SUPRA
CORPORATION
6F, SHARMAN
BLDG, 17-21,
Visit us at
SHINJUKU-KU,
TOKYO,
www.supraamerica.com
Page 24
J;:,
Service at :[.877.44.SUPRA
NISHIWASEDA
CHOME
169-0051,
JAPAN
Visit us at
www.supraservice.com