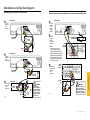
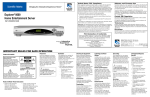
1
SureWest
Customer Handbook
Welcome to
SureWest
Welcome to SureWest
You’re now connected to one of the highest quality fiber-optic network in the
nation. With SureWest you’ll go faster and further than you've ever dreamed.
Our network was constructed to deliver cutting-edge telephone, digital TV
and high-speed Internet services together—giving you better quality, more
choices and faster speeds.
Five-Star Customer Service
Experience personal customer support from a local company that’s always
ready to help you. No automated answering systems. No long hold times.
When you call SureWest, you talk to a live person who is ready to answer
your questions and help you in any way he or she can.
Reliable Telecommunication & Entertainment Services
No other company can compete with our 24/7 network monitoring that
delivers the most reliable service. Plus, our telephone services are certified
by 911 with back-up capabilities providing your family with the security and
safety they deserve.
We’re committed to providing you with an exceptional customer experience.
3
What's Inside
Digital TV............................................................................................................................................................................. 6
• Menu...............................................................................................................................................................................................6
• DVR...................................................................................................................................................................................................6
• Setting a Timer for a Future Program............................................................................................................................7
• Canceling an Active Record Timer..................................................................................................................................7
• Parental Controls.......................................................................................................................................................................8
• On-Screen Help.........................................................................................................................................................................9
• Caller ID on TV........................................................................................................................................................................10
• Interactive...................................................................................................................................................................................12
• Record TV...................................................................................................................................................................................12
• Watch recorded.......................................................................................................................................................................13
• Ordering a PPV Event..........................................................................................................................................................13
• Guide............................................................................................................................................................................................14
• Connect the Set-Top Box to a Stereo TV and Non-Stereo VCR...................................................................16
• Using Your Explorer 2200 Set-Top Box.....................................................................................................................17
• Connecting the Set-Top Box............................................................................................................................................19
• HDTV Formats.........................................................................................................................................................................19
• Using Your Explorer 3250HD Set-Top Box..............................................................................................................21
• Connect the Digital Video Recorder to a Stereo TV and Stereo VCR.......................................................23
• Connecting Entertainment Devices.............................................................................................................................26
• Watching Live TV....................................................................................................................................................................27
• Using the Interactive Program Guide..........................................................................................................................29
• Watching a Program that is on Now...........................................................................................................................29
• Exiting the IPG.........................................................................................................................................................................29
• Explorer 2200 Digital Home Communications Terminal Installation Instructions............................30
• Explorer 3250HD Digital Interactive Set-Top Installation Instructions......................................................31
• Explorer 8000 Digital Video Recorder.......................................................................................................................32
• Explorer 8300 HD/Digital Video Recorder..............................................................................................................33
• Performance Tips..................................................................................................................................................................34
• Motion Picture and TV Ratings.......................................................................................................................................35
High-Speed Internet..................................................................................................................................36
• Internet Speed Test .............................................................................................................................................................36
• Access E-mail Away from Home..................................................................................................................................36
• Create Additional E-mail Addresses............................................................................................................................36
• Set up your Smartphone for SureWest Email........................................................................................................36
• Troubleshooting......................................................................................................................................................................37
• SureWest E-mail.....................................................................................................................................................................37
• Set Up Other E-mail Programs (Microsoft Outlook, Windows Live Mail, etc.)...................................37
• SureWest Home Networking .........................................................................................................................................37
4
• Personal Web Space............................................................................................................................................................38
• SureWest Internet Security powered by Kaspersky®.......................................................................................38
• SureWest High Speed Internet — Minimum System Requirements........................................................39
• Safety............................................................................................................................................................................................39
Phone..............................................................................................................................................................40
• Getting Started........................................................................................................................................................................41
• Anonymous Call Rejection ............................................................................................................................ 41
• Auto Redial .........................................................................................................................................................42
• Call Blocker .........................................................................................................................................................42
• Call Forwarding ..................................................................................................................................................43
• Call Return ..........................................................................................................................................................43
•
•
•
•
•
•
•
•
•
•
•
•
•
•
•
•
Call Trace (Pay Per Use) .................................................................................................................................44
Call Waiting............................................................................................................................................................................... 44
Cancel Call Waiting ..........................................................................................................................................45
Call Waiting ID.........................................................................................................................................................................45
Caller ID Block.........................................................................................................................................................................46
Caller ID Name and Number..........................................................................................................................................46
Personalized Ring...................................................................................................................................................................47
Priority Call ..........................................................................................................................................................48
Remote Access to Call Forwarding..............................................................................................................................48
Selective Call Forwarding ...............................................................................................................................49
Speed Calling 8 .................................................................................................................................................50
Speed Calling 30 ..............................................................................................................................................50
Three-Way Calling..................................................................................................................................................................51
How to Use Your SureWest Trail Notes.....................................................................................................................52
At the Main Menu – Reviewing and Responding to Messages..................................................................53
Extension Mailboxes ...........................................................................................................................................................54
Miscellaneous..............................................................................................................................................56
• Miscellaneous Set-Top Box Diagrams.......................................................................................................56
• Battery Replacement.......................................................................................................................................64
Subscriber Notification....................................................................................................................................................................66
• Equipment capability.......................................................................................................................................66
• Billing and complaint procedures...............................................................................................................68
Billing.........................................................................................................................................................................................................70
5
Digital TV
Digital TV
Watch Two Programs at the Same Time
Setting Menu Options
You do not need a special TV to watch two programs at the same time. Use the picture-in-picture
(PIP) keys on the remote and you will see a PIP screen on your TV.
The Explorer 3250HD Set-Top offers the following two menu settings that you can use to configure
your set-top features based on your preferences:
•
The Quick Settings menu gives you quick access to the more commonly used settings such as
parental control, favorite channel lists and sleep timers.
•
The General Settings menu gives you access to all of the quick settings plus advanced settings,
such as on-screen languages and Personal Identification Numbers (PINs).
To Access the Menu
•
Press Settings once to view the Quick Settings menu. Press Settings again to view the General
Settings menu. Press Settings a third time to hide both settings menus.
•
Use the arrow keys to scroll through the settings options.
•
Press Select to change the highlighted setting.
•
Press Info to learn more about the highlighted setting.
DVR
Controlling Live TV
The Pause, Rewind, Fast-Forward, Play, Instant Replay, and Live keys on the remote control are used
to control the live program in the Main screen (also known as full-screen TV). These same keys are
known as the dedicated DVR keys.
For example, when you are watching your favorite program and the telephone rings, press Pause to
pause the program for up to 1 hour, and then press Rewind or Fast-Forward to reverse or advance
one frame at a time.
To resume watching your favorite program, press Play, and then press Rewind or Fast-Forward to cycle
through three different speeds of rewind or fast-forward.
To replay the last 8 seconds of a program, press Instant Replay. And to watch the live program
currently in progress, press Live.
Note: Use these same dedicated DVR keys to control the reduced screen (also known as the quarter
screen) in the program guide and in all DVR screens.
Digital TV
Menu
Setting a Timer for a Future Program
You can set up several types of timers to automatically remind you of programs to watch or record.
You can set up to eight timers and eight VCR timers for future programs.
1. Press Guide to display the IPG.
2. Press the Up, Down, Left or Right arrow keys to highlight the future program you want to watch.
3. Press Select. The Future Program Options menu opens.
4. From here, there are three available options for non-PPV channels:
5. Tune to the current channel now.
6. Set a Reminder Timer to display a message on your screen reminding you of the selected
program you want to watch just before it begins.
7. Set a VCR Timer to tune your Explorer set-top box to a particular channel at the proper time to
record the selected program.
Note: For PPV channels, there is an additional option to purchase the PPV event.
8. Use the Up or Down arrows to choose the timer you want to set.
9. Press Select.
Note: If you are setting a VCR timer, you must program your VCR to record at the proper time. If you
have an optional VCR Commander module, the set-top box automatically starts and stops the record
function of the VCR.
Canceling an Active Record Timer
If the VCR is actively recording a program, the set-top box power indicator must be on and you
must use the remote control to cancel the active record timer.
1. If the set-top box power indicator is off, press the Power key on the set-top box or the
remote control.
2. Press the Exit key on the remote control. The recording is cancelled.
Record One Program While Watching Another
When two of your favorite programs are scheduled at the same time, you can record one program
on the built-in DVR while watching the other. Use the DVR keys on the remote control to record
programs or to play back recorded programs.
Back to Table of Contents
6
7
Digital TV
Digital TV
Parental Controls
On-Screen Help
Using Parental Control
For additional information concerning Parental Controls, Ordering Pay-Per-View and more, consult the
Help screen on your television.
Parental Control allows you to restrict the viewing of certain programming by rating, channel or time.
To Access On-Screen Help:
To Block by Channel:
1. Press the A key on your remote (below the yellow triangle).
1. Press the Settings key twice.
2. Scroll down to Help.
2. Scroll to “Block: Channels.”
3. Press Select.
3. Press Select.
4. You will receive the following message: “Interactive information service being loaded.”
Once this information loads, review on-screen instructions.
4. Enter your Block PIN (the default PIN is 0000).
5. Scroll to the specific channel you wish to block.
6. Press Select.
7. Repeat steps 5 and 6 until you have blocked all channels for which you wish to restrict viewing.
To Block by Rating:
1. Press the Settings key twice.
2. Scroll to “Block: Rating.”
3. Press Select.
4. Enter your Block PIN (the default PIN is 0000).
5. Press Select to begin.
You will find information regarding:
•
Program Guide
•
Ordering Pay-Per-View
•
Parental Controls
•
Quick Settings
•
General Settings
•
Your Remote Control
•
Need More Help?
5. Scroll to the specific program rating you wish to restrict.
6. Press Select. By doing this you will block the rating listed and all ratings listed below the selected
rating. For example, if you select “TVMA” you will also block “R” and “NC 17” rated programming.
To Change Your Block PIN:
1. Press the Settings key twice.
2. Scroll to “Block: PIN.”
3. Press Select.
4. Scroll to “Change.”
5. Press Select.
6. Enter the current or default PIN.
7. Enter your new four-digit PIN.
If, after accessing the on-screen help, you still have questions, call the SureWest Customer Service
Professionals at 913.825.3000.
SureWest Enhanced Services
Press the A key on your remote control to enjoy interactive TV services!
SureWest On Demand
With SureWest Digital Cable and SureWest On Demand, you can see what you want, when you
want, day or night. Including FREE content from HGTV, A&E, Nickelodeon and more, subscription content from HBO, Showtime, Cinemax, The Movie Channel and Starz!, and exclusive On
Demand events, new releases and hit movies. Never wait for TV again!
Back to Table of Contents
8
9
Caller ID on TV
Take Control of Your Incoming Calls
Before the phone even rings, SureWest’s Caller ID on TV will let you decide whether an incoming call
will be an interruption. Our convenient, easy-to-read overlay will display the incoming caller’s name
and phone number allowing you to make an immediate decision on how to handle the call. Ignore
nuisance calls, immediately inform the proper person of a call or answer important calls all without
interruption or fumbling for the phone. SureWest Caller ID on TV allows you to run to the phone only
when you need to.
In addition, Caller ID on TV keeps track of your calls while you’re away. The caller’s name, number,
date and time they called are stored in the caller’s log for future reference.
Digital TV
Digital TV
Easy to read overlay displays
incoming caller’s name and
phone number.
Interactive, on-screen control
on SureWest channel 100.
Convenience
•
Handles calls instantly
•
End unwanted interruptions
•
Easy to read on-screen display
•
Send the right person to the phone
Interactive Control – Channel 100
•
On-screen options to turn Caller ID on TV on or off
•
Instant Caller ID on TV disable option
•
Simple operation using existing remote control
Use your remote control to
customize your Caller ID on TV.
Security
•
Screen calls while you watch TV
•
Avoid nuisance calls
•
Know when callers block their ID
•
Extra visibility for important calls
Caller ID on TV keeps track of
your calls while you’re away.
Caller’s Log
Name, number, date and time of call Up to 10 callers
SureWest’s Caller ID on TV is a feature of Caller ID. SureWest customers with Digital Cable service
and Caller ID receive Caller ID on TV at no additional charge. Tune to channel 100 to customize your
Caller ID on TV service.
10
Back to Table of Contents
11
Digital TV
Digital TV
Interactive
Watch recorded
My TVi
Access and Playback Your Recorded Programs from the Program Guide
Provides you with the ability to select and retrieve news, weather, sports, finance and local
information.
1. Press Guide
2. Use the arrow keys to choose the DVR channel. The DVR channel is a dedicated channel
that accesses your recorded programs.
•
News - Program up to 11 news categories and view in scrolling or ticker formats.
•
Finance – Program up to 20 individual stocks to create your personalized stock ticker.
•
Weather – View the weather anywhere in the US. Program up to 5 locations.
3. Press Select.
Note: If you are currently playing back a recorded program and you press Guide to select
the PVR channel, the playback appears paused in the full screen.
•
Sports – Select and view scores and headlines for your favorite sports teams.
4. Use the arrow keys to choose the recorded program.
•
Local Interest – View movie times, concert dates and community events.
5. Press Select.
eBay on TV
6. Press Select again to play your recorded program.
Bay on TV is an extension of your eBay account. It allows you to search, track and bid on items
within eBay. You have access to the world’s largest marketplace through your TV!
Activate PIP on Your TV
•
My Auctions – Be updated on items which you have bid on.
•
My Watch List – Updates you on the items you have selected to watch.
While watching a program, press the dedicated PIP on key to activate the PIP screen.
•
You can only use the dedicated DVR keys to control the program shown in the Main screen.
•
To change the channel in the PIP screen, use the dedicated PIP CH+ and CH- keys.
Record TV
•
To pause or record the video in the PIP screen, swap it to the Main screen.
Record a TV Program from the Program Guide
Ordering a PPV Event
1. Press Guide.
2. Press the arrow keys to highlight a TV program, and then press Record.
PPV events are special programs not available on other channels. You can purchase these
upcoming events by pressing a key on your remote control.
3. In the Confirm Recording screen, press Select to record the TV program.
1. Press the Guide key to display the IPG.
4. Note: The recording program is highlighted in the program guide.
2. Press the Up, Down, Left or Right arrow keys to highlight the event you want to purchase.
Note: Look for the PPV symbol that indicates PPV channels.
Record Episodes of a TV Program
3. Press the Select key; then do one of the following:
1. To record a single episode or all episodes of a TV program, press Guide.
2. Highlight a TV program, and then press Record.
3. While in the Confirm Recording screen, press A to select more recording options.
4. While in the Edit Recording screen, press the arrow keys to make your selections.
5. Note: The title of the fourth column will change based upon your selections of
single episode or all episodes.
6. Press A to save your selections.
•
If the event is scheduled for future broadcast, the IPG displays the Future Program
Options menu. Follow the instructions on the screen.
•
If the event is about to begin, the preview or purchase screen appears with the event
information. Press the B key to buy the event, or follow the instructions on your screen.
4. If you have a purchase PIN for PPV, the PIN Entry screen appears. Enter your purchase PIN to
authorize the purchase (the default PPV Pin is 0000).
Note: Once your purchase has been authorized, a confirmation message appears for a few
seconds. If the program has not already started, an attention screen counts down until the
program begins.
Back to Table of Contents
12
13
Guide
12. VOL+ and VOL - Increases and decreases volume.
Using the Interactive Program Guide
13.
Power – Provides power to the set-top box. The light to the left of the Power key illuminates
when the power is on. To receive nightly programming updates, keep the power on.
The Interactive Program Guide (IPG) is an on-screen guide to current and future programs and events
that allow you to see programming listed by channel, theme or title.
Digital TV
Digital TV
*Contact our Customer Service Professionals at 913.825.3000 for more information.
Use the following keys on your remote to:
•
Guide – Open and close the guide on your television.
•
Select – Select an option.
•
Arrow Keys – Move around in the guide to make selections with the left, right, up and
down arrows.
•
A B C Keys – Perform actions that are prompted on the screen, for example accept a selection
or buy a pay-per-view (PPV) event.
Explorer 2200 Digital Home Communications Terminal Installation Instructions
1.
Serial Number – Located in the lower left corner of the bar code. WE may ask for this
number if your system requires troubleshooting in the future. You must know the serial number
to join the Scientific Atlanta Explorer Club (www.scientificatlanta.com/explorerclub).
2.
IR Port – Connect to optional VCR Commander service.
3.
S-Video Out – Connect to S-Video input of TV or VCR (standard definition).
4.
Digital Audio Out – Connect to external digital inputs surround-sound receiver.
5.
Video Out – Connect to video input of TV or VCR (standard definition).
6.
Audio Out – Connect to left/right (L/R) audio inputs of a stereo receiver or a TV with
stereo sound.
1.
Message Indicator – Indicates a message from SureWest is waiting when blinking or
illuminated. To access the message, press the Info key.
7.
Cable Out – Connect to cable input of TV or VCR (standard definition).
8.
Cable In – Connect to cable signal from SureWest.
Bypass – Connect an optional RF Bypass module.
2.
LED Display – Displays the selected channel number and time of day.
3.
Guide – Accesses on-screen services, such as the on-screen guide and pay-per-view.
9.
4.
Info – Displays a description of the selected program; available from the on-screen guide
and while viewing a program.
10.
AC Power Input – Connect the set-top box to an AC electrical outlet using the cord provided.
5.
Bypass Indicator – Indicates the optional bypass feature is on when illuminated.*
6.
USB (Universal Serial Bus) – Connects to external equipment, such as a keyboard,
external modem or similar equipment.*
7.
Exit – Exits menus, on-screen guide and program information.
8.
Settings – Accesses the Settings menu.
9.
Smart Card Slot – Allows smart card access.
11. AC Switched Outlet – Connect the AC power cord from another device, such as a TV.
10. Select – Accesses your on-screen selection.
11. CH+ and CH - Scrolls up and down through the channels.
Back to Table of Contents
14
15
Connect the Set-Top Box to a Stereo TV and Non-Stereo VCR
Using Your Explorer 2200 Set-Top Box
Use the connection diagram and follow these steps to connect the set-top box to a stereo TV and a
non-stereo VCR.
Access Cable Services and Programs
Required Cables:
Set of Video/Audio Cables 75 ohm Coaxial Cables
Digital TV
Digital TV
You can access your cable services using the remote control or the keys on the front panel of the
set-top box. (Refer to your remote control user’s guide for programming instructions.)
1. Unplug all electronic devices before connecting the set-top box.
Press the Guide key to access the on-screen guide. The on-screen guide displays programming
schedules and other services, such as pay-per-view.
2. Connect the set-top box to the TV and VCR as shown in the diagram.
Use the arrow keys to highlight a program in the schedule.
3. Connect the set-top box to the coaxial cable coming from the wall.
Press the Info key for a description of a specific program (either from the on-screen guide or while
viewing a program).
4. Plug the set-top box and the TV into an AC power source.
Important: Do not press the Power key on the set-top box yet.
Press the Select key to view a specific program in the guide.
5. Turn on the power to your TV, and set the input channel to 3.
Explorer 3250HD Digital Interactive Set-Top Installation Instructions
6. Wait for the time to display on the LED display.
Important: It takes 2 to 3 minutes for the set-top box to be updated with the latest
programming and service information. When the front panel displays the time,
the update is complete.
7. Press the Power key on the set-top box.
8
T
9
8
1. Message Indicator – Indicates a message from SureWest is waiting when blinking or
illuminated. To access the message, press the Info key.
Back
of TV
Back
of VCR
LEFT
OUT
IN
AU IO
OUT
IN
RI
CABLE/
ANTENNA
IN FROM ANT.
2. LED Display – Displays the selected channel number and time of day.
Cable Input
3. Guide – Accesses on-screen services, such as the on-screen guide and pay-per-view.
4. Info – Displays a description of the selected program; available from the on-screen guide and
while viewing a program.
OUT TO TV
VI EO
OUT
IN
T
T9885
Audio Output
Audio output from the Cable Out is monaural (non-stereo).
Audio output from the Audio Out Left and Right is stereo.
If you connect to the S-Video Out, you must connect the Left and Right Audio Out on the set-top box
to the Left and Right Audio In connectors on your TV, VCR or stereo.
Other Types of Connections
If you are connecting the set-top box to a different type of TV or VCR, or to additional devices, access
the Scientific Atlanta web site for connection information: www.scientificatlanta.com.
5. Bypass Indicator – Indicates the optional bypass feature is on when illuminated.*
6. USB (Universal Serial Bus) – Connects to external equipment, such as a keyboard, external
modem or similar equipment.*
7. Exit – Exits menus, on-screen guide and program information.
8. Settings – Accesses the Settings menu.
9. Smart Card Slot – Allows smart card access.
10.Select – Accesses your on-screen selection.
11.CH+ and CH – Scrolls up and down through the channels.
12.VOL+ and VOL – Increases and decreases volume.
13.Power – Provides power to the set-top box. The light to the left of the Power key illuminates
when the power is on. To receive nightly programming updates, keep the power on.
*Contact our Customer Service Professionals at 913.825.3000 for more information.
Back to Table of Contents
16
17
Connecting the Set-Top Box
Explorer 3250HD
Follow these steps using the connection diagrams on the following pages to connect the
Explorer 3250HD to your HDTV and other devices.
CAUTION
AUDIO OUT
0003B4287797
SABDQXTL
N0006246618
OPTICAL
R
Pb
1394 1394
1
DVI
RISK OF ELECTRIC SHOCK
DO NOT OPEN
L
Pr
AVIS: RISQUE DE CHOC
ELECTRIQUE NE PAS OUVRIR
IR
AUDIO
OUT
Y
S-VIDEO
OUT
2 3 4 5
Digital TV
Digital TV
HDTV
DIGITAL VIDEO
AUDIO OUT
OUT
CABLE
OUT
THIS DEVICE IS INTENDED TO BE ATTACHED
TO A RECEIVER THAT IS NOT USED TO
RECEIVE OVER-THE-AIR BROADCAST
SIGNALS. CONNECTION OF THIS DEVICE
IN ANY OTHER FASHION MAY CAUSE
HARMFUL INTERFERENCE TO RADIO
COMMUNICATIONS AND IS IN VIOLATION
OF THE FCC RULES, PART 15.
6 7 8 910
CABLE IN
120 VAC
60HZ 400W
120 VAC
60HZ 400W
1. Unplug all electronic devices before connecting the set-top box.
BYPASS
11 12
13 14
T10997
2. Connect the set-top box to your HDTV and other devices as shown in the following diagrams.
3. Connect the set-top box to the coaxial cable coming from the wall.
1. 1394* – Connect to optional 1394-equipped (FireWire) devices. This connector is reserved for
future use and may not be available on all Explorer 3250HD models.
4. Plug the set-top box and the HDTV into an AC power source.
Important: Do not press the Power key on the set-top box or HDTV yet.
2. Optical Audio Out* – Connect an optical cable to send a digital audio signal to a
surround-sound receiver or other digital audio device. This connector may not be available on
all Explorer 3250HD models.
5. Wait for either the time or four dashes to display on the LED display.
Important: It takes 2 to 3 minutes for the set-top box to be updated with the latest
programming and service information. When the front panel displays the time, the update
is complete.
3. DVI – Connect to the DVI (Digital Video Interface) input port on your HDTV. This port provides
digital video signals to the HDTV.
6. Press the Power key on the set-top box.
4. IR Port* Connect the IR Blaster cable to use with the optional VCR Commander™ service.
7. Turn on the power to your HDTV.
5. S-Video Out – Connect an S-Video cable to send an S-Video signal to your TV or VCR. This
signal is standard definition but higher quality than other SDTV connections.
8. Press the Input or TV/Video key on the HDTV remote or on the HDTV and scroll to the video
input you chose for the connection. For example, Video 6.
6. YPbPr Out – Connect the HDTV (Y, Pb, Pr) component output ports to the HDTV input on your
HDTV. You must use these ports to provide HDTV signals to your HDTV.
HDTV Formats
7. Digital Audio Out – Connect an RCA cable to send a digital audio signal to a surround-sound
receiver or other digital audio device.
8. Video &.Audio Out* – Connect an RCA cable to Video Out and Left/Right Audio Out to send
analog video and audio signals to a standard TV or VCR. This signal is SDTV.
Most HDTVs include YpbPr connectors for component video inputs, and your Explorer 3250HD
set-top includes a YpbPr cable for these inputs. However, some HDTVs only have RGB inputs. If you
have one of these HDTVs, you may need an RGB adaptor. Check with SureWest for information
about receiving an RGB adaptor. Also, some SDTVs include YpbPr inputs. Your 3250HD set-top will
function correctly with these inputs only when outputting in 480i mode.
9. Cable Out – Connect a coaxial cable to Cable Out to send analog audio and video signals to a
TV or VCR. These signals are SDTV video with mono audio.
Audio Output
10.Audio Out – Connect RCA cables to Audio Out to send analog audio signals (left and right) to a
stereo receiver or a TV with stereo outputs.
To hear stereo sound, you must do one of the following:
11.Cable In – Connect the coaxial cable that delivers the signal from your cable service provider.
Connect stereo audio cables from the Audio Out Left/Right connectors on the set-top to the Audio In
Left/Right connectors on your HDTV.
12.RF Bypass* – Connect an optional RF Bypass module to the set-top. This module allows
viewing one channel while recording another.
Connect RCA cable from the Digital Audio Out on your set-top to the Digital Audio In on your HDTV
(if equipped) or stereo receiver.
13.AC Switched Outlet – Connect the AC power cord from another device, such as a TV.
14.AC Power Input – Connect the power cord to deliver power to the set-top.
*Contact our Customer Service Professionals at 913.825.3000 for more information.
In addition, you may also connect an S-Video cable from the S-Video Out connector on the set-top to
the S-Video connector on the HDTV or VCR. However, the S-Video connection does not supply audio.
You must also use audio cables with the S-Video cable. If you connect the set-top to your HDTV using
only the coaxial cable at the Cable Out connection, your HDTV will not receive stereo sound from
your set-top.
Note: S-Video and coaxial cables only deliver SDTV programming. They do not deliver HDTV
programming.
Back to Table of Contents
18
19
Set-Top Connected to an HDTV Using Component Video Cables
Set-Top Connected to a Home Theater Receiver, HDTV and Stereo VCR
Connecting an Explorer 3250HD Set-Top to an HDTV using the component video cable (YPbPr)
provides all programming content – both HDTV and SDTV programming – through the HDTV inputs
on the HDTV.
This diagram shows an Explorer 3250HD Set-Top connected to a home theater receiver, HDTV and
stereo VCR.
Digital TV
Digital TV
Set-Top Connected to HDTV and Stereo VCR
Connecting an Explorer 3250HD Set-Top to an HDTV and a stereo VCR enables you to record and
playback TV programming. Note: HD programs record to your VCR in SD format.
Using Your Explorer 3250HD Set-Top Box
After you set up your Explorer 3250HD Set-Top, and the front panel displays the current time, you
can turn on the set-top and begin watching TV. Press the Power button on the front of the set-top to
turn it on. SureWest will send nightly programming updates to your set-top (such as program guide
information). You should leave your set-top on at all times to receive these updates.
Interactive Program Guide
The Interactive Program Guide organizes programs and events into listings by channel, theme or title.
•
The current channel continues to display in the upper right corner of the guide. The upper left
corner displays information about the highlighted program.
•
To view or hide the guide, press Guide.
•
To view information about a program, use the arrow keys on the remote control to highlight
the program.
•
To view more information about a highlighted program, press Info.
•
To view the highlighted program, press Select.
•
The A B C keys provide additional functions that vary based on the current menu screen.
The functions assigned to each of these keys is shown on the bottom of the screen.
Back to Table of Contents
20
21
Digital TV
Digital TV
CH+
CABLE
OUT
INPUT (AUX)
VOL+
VOL—
POWER
GUIDE
THIS DEVICE IS INTENDED TO BE ATTACHED
TO A RECEIVER THAT IS NOT USED TO
RECEIVE OVER-THE-AIR BROADCAST
SIGNALS. CONNECTION OF THIS DEVICE
IN ANY OTHER FASHION MAY CAUSE
HARMFUL INTERFERENCE TO RADIO
COMMUNICATIONS AND IS IN VIOLATION
OF THE FCC RULES, PART 15.
0003B4287797
INFO
EXIT
LIST
SABDQXTL
IR
CH—
N0006246618
OUT 2
(VCR)
RECORD
OUT 1
(TV)
ETHERNET
CATV CONVERTER
MADE IN MEXICO
T9995
1
2
3
4
5
6 7 8 9 10 11 12 13 14
USB
1394
1394
1
S-VIDEO
OUT
DIGITAL
AUDIO OUT
2 3 4
VIDEO
L
AUDIO
120 VAC
60HZ 5A
CABLE
IN
CAUTION
120 VAC
60HZ 80W
RISK OF ELECTRIC SHOCK
DO NOT OPEN
AVIS: RISQUE DE CHOC
ELECTRIQUE NE PAS OUVRIR
R
56 78
9
10
11
12
T10490
1. Power – Provides power to the Digital Video Recorder. The light to the right of the Power key
illuminates when the power is on.
1. 1394 – Connects to optional 1394-equipped (fire wire) devices. This connector is reserved for
future use and may not be available on all Explorer 8000 models.*
2. Message Indicator – Indicates a message from SureWest is waiting when blinking or
illuminated. To access the message, press the Info key.
2. S-Video Out – Connect to S-Video input of TV or VCR (standard definition).
3. LED Display – Displays the selected channel number and time of day.
4. Digital Audio Out – Connect to external digital surround-sound receiver.
4. IR Sensor – Receives the infrared signal from the remote control.
5. TV Out – Connect to video and left/right (L/R) audio inputs of a TV (standard definition).
The video outlet is also referred to as “COMPOSITE” video.
5. Recording Indicator – Indicates the DVR feature is active when illuminated.
6. VOL+ and VOL - Increases and decreases volume.
7. Select – Accesses your on-screen selection.
8. USB (Universal Serial Bus) – Connects to external equipment, such as a keyboard, external
modem or similar equipment.*
3. IR Port – Connects to optional VCR Commander service
6. VCR Out – Connect to video and left/right (L/R) audio inputs of a VCR.
7. Cable Out – Connect to cable input of TV or VCR (standard definition).
8. Auxiliary Input – Connects to video and left/right (L/R) audio output of external device.
9. CH+ and CH - Scrolls up and down through the channels.
9. Serial Number – Located in the lower left corner of the bar code. Your cable service provider
may ask for this number if your system requires troubleshooting in the future. You must know
the serial number to join the Explorer eClub.
10.Guide – Accesses on-screen services, such as the on-screen guide and pay-per-view.
10.Cable In – Connects to cable signal from cable service provider.
11.Info – Displays a description of the selected program; available from the on-screen guide and
while viewing a program.
11.AC Switched Outlet – Connect the AC power cord from another device, such as a TV.
12.Smart Card Slot – Allows smart card access.*
13.Exit – Exits menus, on-screen guide and program information.
14.List – Accesses the list of recorded programs displayed on the TV screen.
*Contact our Customer Service Professionals at 913.825.3000 for more information.
12.AC Power Input – Connects the Digital Video Recorder to an AC electrical outlet.
*Contact our Customer Service Professionals at 913.825.3000 for more information.
Connect the Digital Video Recorder to a Stereo TV and Stereo VCR
Use the connection diagram and follow these steps to connect the Explorer Digital Video Recorder to
a stereo TV and a stereo VCR.
Required Cables: Set of Video/Stereo Audio Cables
Back to Table of Contents
22
23
Digital TV
Digital TV
CAUTION
CABLE
OUT
RISK OF ELECTRIC SHOCK
DO NOT OPEN
OUT 1
CH +
GUIDE
POWER
VOL Ñ
INFO
CH Ñ
SELECT
EXIT
CABLE
IN
LIST
CATV CONVERTER
MADE IN MEXICO
L AUDIO R
1
2
8 9
10
11 12 13
T11179
T11274
THIS DEVICE IS INTENDED TO BE ATTACHED
TO A RECEIVER THAT IS NOT USED TO
RECEIVE OVER-THE-AIR BROADCAST
SIGNALS. CONNECTION OF THIS DEVICE
IN ANY OTHER FASHION MAY CAUSE
HARMFUL INTERFERENCE TO RADIO
COMMUNICATIONS AND IS IN VIOLATION
OF THE FCC RULES, PART 15.
AVIS: RISQUE DE CHOC
ELECTRIQUE NE PAS OUVRIR
L
TV
VIDEO
VIDEO
34 567
OUT 2
VOL +
1
A
U
D
I
O
IR
R
DIGITAL
AUDIO OUT
VIDEO
2 3 4 5 6
7
120 VAC
60HZ 5A
SATA
S - VIDEO
OUT
120 VAC
60HZ 80W
LISTED 14H1
CABLE EQUIP.
8
9
10 11
1. Power – Turns the 8300 on and off
1. Cable In – Connect the coaxial cable that delivers the signal from your cable service provider
2. Video and Audio Input – Connects to video and left/right (L/R) audio outputs of
an external device to deliver the video and audio to a TV or other device
2. Cable Out – Connect a coaxial cable to Cable Out to send analog audio and video signals to
a TV or VCR. These signals are SDTV video and stereo audio
3. List – Displays the list of recorded programs
3. Audio Out (LEFT and RIGHT) – Connect RCA cables to Audio Out to send analog audio
signals (left and right) to a stereo receiver or TV with stereo outputs
4. Exit – Exits menus, the on-screen guide, and program information
5. Info – Displays a description of the selected program. The key is available from the
on-screen guide and while viewing a program
6. Guide – Accesses on-screen services, such as the on-screen guide, video-on-demand, or
pay-per-view
4. Video Out – Connect to video input of TV or VCR
5. Digital Audio – Connect an RCA cable to send a digital audio signal to a surround-sound
receiver or other digital audio device
7. IR Sensor – Receives the infrared signal from the remote control
6. Secondary Video and Audio Out – Connect either to a VCR for archiving saved content
from the 8300 or connect to another set of inputs (composite) on your TV
8. LED Display – Displays the selected channel number and time of day. The LED also
displays the following:
7. S-Video Out – Connect an S-Video cable to send an S-Video signal to your TV or VCR. This
signal is standard definition but higher quality than other SDTV connections
8. IR – (This connector reserved for future use)
• Message
• Power
• RECORD
9. VOL + and VOL – Enables you to increase and decrease volume
10.CH + and CH – Enables you to scroll up and down through the channels
11.Select – Provides access to your on-screen selection
12.Smart Card* – Allows smart card access
13.USB Port* – Connects to external equipment, such as a keyboard
9.. SATA – Connect to an external Serial ATA (SATA) hard disk drive for expanded recording capability.
Please check with your cable service provider for a list of approved hard drive models for use with
the 8300
10.AC Outlet – Connect the AC power cord from another device, such as a TV
11.AC Power Input – Connect the power cord to deliver power to the 8300
*This connector is reserved for future use or may not be available on all 8300 models.
Back to Table of Contents
24
25
Connecting Entertainment Devices
How Do I Set Up Stereo Sound?
Use the connection diagrams on the following pages show examples of common ways to connect
the 8300 to your TV, VCR, and home theater receiver. However, these diagrams do not show every
possible combination of devices. Please consult the user’s guides that came with your other electronic
devices for further information.
To set up stereo sound, choose one of the following options:
What Cables Do I Need?
•
Connect an RCA cable from the DIGITAL AUDIO OUT on the 8300 to the DIGITAL AUDIO IN on
your TV (if equipped) or stereo receiver.
•
Connect stereo audio cables from the AUDIO OUT LEFT and RIGHT connectors on the 8300 to
the AUDIO IN LEFT and RIGHT connectors on your TV.
Some of the cables shown in the diagrams may not be included with the 8300. The required cables
are shown in the connection diagrams on the following pages.
Watching Live TV
How Do I Connect the 8300 to My TV and Other Entertainment Devices?
Access Services and Programs
When you are ready to connect the 8300, follow these instructions.
Access cable services and programs by pressing the
following keys on the remote control:
1. Power off all electrical devices before connecting to avoid electrical shock.
•
Guide-Access the on-screen guide. The on-screen
guide displays schedules of TV programs and other
services available from your cable service provider, such
as video-on-demand and pay-per-view programs.
4. Plug the 8300 and the TV into an AC power source.
•
Arrows-Highlight a program in the schedule.
5. Do not turn on the set-top or TV yet.
•
Info-Display a specific program description (either from
the on-screen guide or while viewing a program).
•
Select-View a specific program.
2. Connect the 8300 to your TV, VCR, and other entertainment devices as shown in the diagrams on
the following pages. (The diagrams in this guide do not cover every possible combination.)
3. Connect the 8300 to the coaxial cable coming from the wall.
6. Wait until you see one of the following displays on the front of the set-top:
•
Current time
•
Four dashes (- - - -)
Digital TV
Digital TV
T10964
Note: It may take several minutes for the set-top to receive the latest software, programming, and
service information. When the front panel displays the time or four dashes, the update is complete.
7. After the update is complete, turn on the TV.
Back to Table of Contents
26
27
Use the remote control to operate your Set-Top Box, TV and VCR. Many of the keys on the remote
control share the same function as keys on the front panel. Your remote control may be different
from the one illustrated here. The remote control must be programmed for use. If SureWest has not
programmed your remote control, refer to the remote control instruction guide supplied by SureWest.
SYSTEM ON/OFF
Designed to send Power On/
Off commands for up to five
Components with one button press.
Refer to section E for details.
MENU
Displays the Applications Menu.
GUIDE
Displays the program guide listings.
•
Guide – Open and close the guide on your television.
AUX,DVD,VCR,TV,CVL
•
Select – Select an option.
Used to select the component you want to
operate and signals remote control activity.
•
Arrow Keys – Move around in the guide to make selections with the left, right,
up and down arrows.
•
A B C Keys – Perform actions that are prompted on the screen, for example accept
a selection or buy a pay-per-view (PPV) event.
INFO
Displays information about the program currently
playing or highlighted in the program guide.
EXIT
Exit from current screen.
Watching a Program that is on Now
PAGE +/-
CURSOR NAVIGATION PAD (st
Silences the audio. Press to activate.
Press again to restore sound to the
previous level.
Navigate to and highlight an item from the
on-screen choices.
s
MUTE
FAV
A,B,C,D
Make direct selections from on-screen menus.
CHANNEL st
Selects the next higher or lower channel.
Displays favorite channels.
ON DEMAND
Provides direct access to
On Demand channel.
s
s
DAY
)
s
Displays settings menu.
Accesses pages above or below the information
currently displayed.
Raises or lowers the sound level.
Skip forward or backward a whole day
in the program guide.
M BUTTONS
Cable company customprogrammable Macros.
The Interactive Program Guide (IPG) is an on-screen guide to current and future programs and events
that allow you to see programming listed by channel, theme or title.
Use the following keys on your remote to:
POWER
OK/SELECT
VOLUME st
Using the Interactive Program Guide
Allows you to turn your TV, VCR, DVD,
AUX and Cable Box On and Off.
Selects highlighted screen options.
SETTINGS
LAST
Returns to the previously tuned channel.
LIVE
Displays live television programming.
VCR/DVD/VOD KEYS
Perform standard VCR and DVD functions when
in VCR and DVD mode, and Video-On-Demand
functions when in CABLE mode.
NUMBER PAD
1. Press Guide to display the IPG. The current time, date, channel and program you are currently
watching should be displayed in the upper right area of your screen with the guide filling the
other three-quarters of your screen.
2. Do one of the following:
•
Press the Up or Down arrow keys to move through the channels.
•
Press the Left or Right arrow keys to move through the time periods to find the program
you want to watch.
3. Press Select to begin watching the highlighted program if it is on now.
Viewing the IPG by Theme or Title
When you first display the IPG, the programs are listed by Channel. You can change the listing to view
programs by Theme or Title.
1. Press Guide to display the IPG.
REW
Enter numbers to tune to channels. Also,
make numeric entries on on-screen menus.
2. Press A key to open the Browse By menu.
Replays the previous few seconds of
a program.
NOTE: You can also use the CH Up/Down or the
program guide as alternate ways to tune to channels.
3. Press the Up or Down arrow keys to choose Title or Theme.
LIST
Displays a list of programs you have
recorded, allowing you to select one
for viewing.
*
Reserved for future use.
ON-OFF
Opens or closes the PIP (Picture-InPicture) window through the Cable STB.
VIDEO SOURCE
Selects the video source from available video
Components through the Cable STB.
SWAP
Swaps the contents of the PIP (Picture-In-Picture) window
and the main viewing screen through the Cable STB so that
the PIP window displays on the main screen.
28
Digital TV
Using the Remote Control
ASPECT #
Changes the HD screen viewing
aspect ratio through the Cable STB.
PIP CH +/Selects the next higher or lower channel in the PIP
(Picture-In-Picture) window through the Cable STB.
MOVE
Moves the PIP (Picture-In-Picture) window to another
location on the screen through the Cable STB.
LIGHT BUTTON
Press to backlight all keypad buttons. Press again to turn off
(or simply wait 10 seconds for automatic shut-off).
4. Press Select.
5. Press the Up or Down arrow keys to select a program.
6. Press the Left arrow key to choose a different Theme or Title.
7. Press the Up or Down arrow keys to choose the Theme or Title you want.
Note: When using Browse By Theme or Title, programs marked with a star are on now.
Exiting the IPG
At any time, you can press the Exit key on the remote control to exit the IPG and resume
watching your program full screen.
Back to Table of Contents
29
Digital TV
Troubleshooting
Explorer 2200 Digital Home Communications Terminal Installation Instructions
The LED on the Front Panel Displays Question Marks
Before Installing the Set-Top Box
Press the Info key on the remote control or the front panel of the set-top box. You may have pressed
the Power key before all of the latest programming updates were received by the set-top box.
Before you begin to install the set-top box, locate the set-top box serial number. The serial number is
located on the back panel of the set-top box, and looks similar to this example:
0003B4287797
SABDQXTL
N0006246618
The serial number is located in the lower left corner of the bar code. Write the serial number here:
______________________________ . It is always good to have the serial number on file. If your
system requires troubleshooting in the future, our customer service professional may ask for the serial
number. If you plug the set-top box into an outlet that is controlled by a wall switch, keep the switch in
the ON position. The on-screen guide is updated nightly. If the wall switch is in the OFF position, your
set-top box will not receive the latest programming updates. Keep the top of your set-top box free of
all objects and electronic devices, including your TV. It is recommended that you use a surge protector
with your cable equipment and electronic devices.
For more information, read the user’s guides included with the set-top box installation package.
These guides provide operating instructions for the on-screen guide, your remote control, and the
VCR Commander service (if available).
Check and Correct
•
If your set-top box does not perform as expected, check the following conditions:
•
Verify that the power to your TV is turned on.
•
If plugged into a wall switch, verify the switch is in the ON position.
•
Verify that all cables are properly connected.
•
Verify that your TV is tuned to the proper output channel (3).
If your set-top box does not perform as expected after checking the power, cables and output
channel, check the following conditions:
No Picture
If your system includes a VCR and/or stereo, verify that you have properly connected them to the
set-top box. Verify that the set-top box Power light is on and the Bypass light is off.
No Color
Verify that the current TV program is broadcast in color. Adjust the TV color controls.
No Sound
If your setup includes a VCR and/or stereo, verify that you have properly connected them to the
set-top box. Verify that the volume is turned up. Verify that the Bypass feature is disabled.
The TV Screen Displays a Message Indicating the Set-Top Box is Automatically
Updating its Software
Wait for the time to display on the LED before continuing with the install process. When the front
panel displays the time, the update is complete.
Explorer 3250HD Digital Interactive Set-Top Installation Instructions
Before Installing the Set-Top Box
Before you begin to install the set-top box, locate the set-top box serial number. The serial number is
located on the back panel of the set-top box, and looks similar to this example:
0003B4287797
SABDQXTL
N0006246618
The serial number is located in the lower left corner of the bar code. Write the serial number here:
______________________________ . It is always good to have the serial number on file. If your
system requires troubleshooting in the future, our customer service professional may ask for the
serial number. If you plug the set-top box into an outlet that is controlled by a wall switch, keep
the switch in the ON position. The on-screen guide is updated nightly. If the wall switch is in the
OFF position, your set-top box will not receive the latest programming updates. Keep the top of
your set-top box free of all objects and electronic devices, including your TV. It is recommended
that you use a surge protector with your cable equipment and electronic devices.
Check and Correct
If your set-top box does not perform as expected, check the following conditions:
•
Verify that the power to your TV is turned on.
•
If plugged into a wall switch, verify the switch is in the ON position.
•
Verify that all cables are properly connected.
•
Verify that your TV is tuned to the proper output channel (3).
If your set-top box does not perform as expected after checking the power, cables and output
channel, check the following conditions:
No Picture
If your system includes a VCR and/or stereo, verify that you have properly connected them to the
set-top box. Verify that the set-top box Power light is on and the Bypass light is off.
Back to Table of Contents
30
31
Digital TV
Digital TV
No Color
No Picture
Verify that the current TV program is broadcast in color. Adjust the TV color controls.
If your system includes a VCR and/or stereo, verify that you have properly connected them to the
set-top box. Verify that the set-top box Power light is on and the Bypass light is off.
No Sound
If your setup includes a VCR and/or stereo, verify that you have properly connected them to the
set-top box. Verify that the volume is turned up. Verify that the Bypass feature is disabled.
The TV Screen Displays a Message Indicating the Set-Top Box is Automatically
Updating its Software
Wait for the time to display on the LED before continuing with the install process. When the front
panel displays the time, the update is complete.
Explorer 8000 Digital Video Recorder
No Color
Verify that the current TV program is broadcast in color. Adjust the TV color controls.
No Sound
If your setup includes a VCR and/or stereo, verify that you have properly connected them to the
set-top box. Verify that the volume is turned up. Verify that the Bypass feature is disabled.
The LED on the Front Panel Displays Question Marks
Press the Info key on the remote control or the front panel of the set-top box. You may have pressed
the Power key before all of the latest programming updates were received by the set-top box.
Before Installing the Digital Video Recorder
Before you begin to install the Digital Video Recorder, locate the Digital Video Recorder serial number.
The serial number is located on the back panel of the Digital Video Recorder, and looks similar to
this example:
The TV Screen Displays a Message Indicating the Set-Top Box is Automatically Updating its Software
wait for the time to display on the LED before continuing with the install process. When the front
panel displays the time, the update is complete.
Explorer 8300 HD/Digital Video Recorder
0003B4287797
SABDQXTL
N0006246618
The serial number is located in the lower left corner of the bar code. Write the serial number here:
______________________________ . It is always good to have the serial number on file. If your
system requires troubleshooting in the future, our customer service professional may ask for the
serial number. If you plug the Digital Video Recorder into an outlet that is controlled by a wall switch,
keep the switch in the ON position. The on-screen guide is updated nightly. If the wall switch is in
the OFF position, your Digital Video Recorder will not receive the latest programming updates. Keep
the top of your Digital Video Recorder free of all objects and electronic devices, including your TV. It is
recommended that you use a surge protector with your cable equipment and electronic devices.
Before Installing the Digital Video Recorder
Before you begin to install the Digital Video Recorder, locate the Digital Video Recorder serial
number. To find the serial number for your 8300, look on the back for a label that is similar to
the example shown here.
0003B4287797
SABDQXTL
N0006246618
Check and Correct
The serial number begins with SA and is located in the lower left corner of the bar code. Use the
space provided here to record the serial number:______________________________
If your set-top box does not perform as expected, check the following conditions:
If the 8300 requires troubleshooting in the future, your cable service provider may ask for this
serial number.
•
Verify that the power to your TV is turned on.
•
If plugged into a wall switch, verify the switch is in the ON position.
•
Verify that all cables are properly connected.
•
Verify that your TV is tuned to the proper output channel (3).
If your set-top box does not perform as expected after checking the power, cables and output
channel, check the following conditions:
Back to Table of Contents
32
33
Performance Tips
Motion Picture and TV Ratings
If the 8300 does not perform as expected, the following tips may help. If you need further assistance,
contact your cable service provider.
Motion Picture Ratings
No Picture
•
Verify that the power to your TV is turned on.
•
If plugged into a wall switch, verify the switch is in the ON position.
•
Verify that all cables are properly connected.
•
If your system includes a VCR and/or stereo, verify that you have properly connected
them to the 8300.
•
Verify that the TV is set to the proper input.
•
Verify that your TV is connected to the proper TV input port.
No Color
•
Verify that the current TV program is broadcast in color.
•
Adjust the TV color controls.
Digital TV
Digital TV
G
General Audience – All ages approved.
PG
Parental Guidance Suggested – Some material may not be suitable for children
PG-13
Parents Strongly Cautioned – Some material may be inappropriate for children under 13. Expect a mature theme, violence, nudity and adult language.
R
Restricted – Contains adult-theme material, which may include adult language,
violence, nudity, sexual content and drug abuse.
NC-17
No One Under 17 Admitted
Adults Only
Adults Only – Content is sexually explicit, and, in most cases, not rated by
the MPAA.
Adults Only programming is not a standard feature of the SureWest digital cable service. To order, call your
SureWest Customer Service Professional.
No Sound
•
If your setup includes a VCR or stereo, verify that you have properly connected them to
the 8300.
•
Verify that the volume is turned up.
•
Verify that the mute function is not engaged.
Automatic Software Updates
The TV screen displays a message that indicates the 8300 is automatically updating its software.
Wait for the time to display on the front panel of your 8300 before continuing with the installation
process. When the front panel displays the time, the update is complete.
Back to Table of Contents
34
35
High-Speed Internet
See our support site at surewestkc.net for step-by-step instructions for the iPhone and Droid phones.
SureWest offers some of the fastest connection speeds available, monitored 24 hours a day seven
days a week to ensure optimum reliability.
Troubleshooting
Available in multiple speeds from 1 Mbps to 50 Mbps!
SureWest E-mail
Internet Speed Test
1. Check all physical connections behind your PC, modem and wired/wireless router to ensure they
are secure.
You can measure your High-Speed Internet service by testing the speed of your connection using the
SureWest speed test tool at surewestkc.net/speedtest.
2. Completely power off and then on in this order: modem, router, computer. Wait at least 10
seconds before turning on your devices.
Note: This speed test uses web-based software to approximate the connection speed. Results
may vary due to routers and wireless home networks, operating system configuration, browser
configuration, CPU speed, network card configuration, background applications, etc. To receive a true
speed reading, connect directly into your internet connection, bypassing any wireless routers.
3. If you still cannot connect to the Internet and you have a router, disconnect the router and
connect your computer directly to your wall jack or modem.
Access E-mail Away from Home
• SMTP (outgoing mail server): smtp.kc.surewest.net (default port of 25)
You can access your e-mail account when you are not at home from any Internet connection:
• Newsgroup server: news.kc.surewest.net (only available from SureWest network). This service
used default port (WNIP 119) and no ID required to log in.
POP3, SMTP, and Newsgroup Server Names
• POP3 (incoming mail server): pop3.kc.surewest.net (default port of 110)
1. Access: webmail.kc.surewest.net.
2.
Enter your complete e-mail address.
3. Enter your password.
Create Additional E-mail Addresses
Need to add an email address for spouse or children? You can create them via our web site.
Set Up Other E-mail Programs (Microsoft Outlook, Windows Live Mail, etc.)
You can use SureWest e-mail application program to manage your e-mail, but you also have the
option of using a different e-mail program, such as Microsoft Outlook. You will need your SureWest
e-mail address and password in order to set up and use another e-mail program.
Use these general instructions to set up other e-mail programs. For detailed instructions, see the
SureWest support site at http://www.surewest.kc.net.
1.
Go to www.surewestkc.net.
2.
Click Manage My Services.
2. When prompted for Display Name, enter your name.
3.
Click Manage your family e-mail accounts.
3. When prompted, enter your complete e-mail address (e.g., [email protected]).
4.Login with your email address & password. Note: Each account has a master account. This is the
first email address created for your account. If you enter the wrong email address, it will change
the login screen to the master email account.
1. Open your e-mail program and locate the e-mail configuration settings.
4. When prompted for incoming mail or POP3 Server, enter pop3.kc.surewest.net.
5. When prompted for outgoing mail or SMTP Server, enter smtp.kc.surewest.net.
5.
Enter you new email address and password.
6. Enter your username, which must be the same as your complete SureWest e-mail address
(e.g., [email protected]).
6.
Click on Create button.
7. Enter your SureWest e-mail password.
Set up your Smartphone for SureWest Email
SureWest Home Networking
Your SureWest email account will work with any Smartphone such as iPhone, Droid, etc. Use the
following email settings to set up your SureWest email account:
Home Networking allows multiple computers in your home to share your Internet connection at the
same time through a common wired or wireless technology. You can enjoy all these benefits for FREE
just for being a SureWest Internet customer.
•
Email Address: Your full SureWest email address e.g., [email protected]
•
Incoming server: pop3.kc.surewest.net (Port 110)
•
Outgoing server: smtp.kc.surewest.net (Port 587)
Note: Outgoing server uses authentication
36
Cost savings: Included with your High-Speed Internet service. Pay only for a single Internet
connection, not multiple access fees for each computer.
Back to Table of Contents
37
High Speed internet
1.
Message Indicator – Indicates a message from SureWest is waiting when blinking or
High-Speed Internet
Mobile computing: Connect to the Internet from a laptop and roam around your home or even
your back patio — and still stay online!
includes Kaspersky Internet Security 2012. As a valued residential Internet customer you get this
software for FREE! (A $79.95 value).
Security: Protect your data and privacy with an advanced firewall to keep Internet intruders and
attackers out. Wireless transmissions can be protected by powerful data encryption. Safeguard your
family with parental controls such as Internet access time limits and keyword search blocking.
Take advantage of these features and benefits:
Hybrid Protection, Combining the Power of the Cloud and Your PC
•
Internet Safety Checks
•
Easier-to-Use Interface
SureWest's Home Networking is available in all areas where we provide high-speed Internet service.
•
Rapid, Real-Time Reaction to New Threats
•
Secure Online Banking and Shopping
Personal Web Space
SureWest provides free personal web space to all of our high-speed Internet customers.
Suitable for hobbyists, our personal websites are simple, shared-domain sites. Each personal web
space account includes an FTP account for uploading files.
A great way to use this web space is to create a personal website to keep in touch with friends and
family. Use the free SureWest WebsiteCreator tool to create your own website in a matter of minutes
with no technical skills required! Follow these instructions to use WebsiteCreator:
1. Go the High-Speed Internet page on surewestkc.net.
2. In the WebsiteCreator section, click the link to create your own website.
3. Log in using your kc.surewest.net or everestkc.net email address and password.
Note: Each email address on the account can have a separate website. The personal web
space is shared by email addresses at the account level.
You can also use your favorite web design program to create HTML files and upload them to your
personal web space via FTP.
Personal
website address
FTP host name
FTP user name
http://home.kc.surewest.net/<username> or
http://home.everestkc.net/<username> [first part of your kc.surewest.net or everestkc.net email address]
Advanced Identity Theft Protection
Secure Social Networking
•
Advanced Parental Controls
Follow these instructions to download the software:
1. Go to the High-Speed Internet page on surewestkc.net
2. In the Internet Security section, click the link to download SureWest Internet Security Software
3. Log in using your kc.surewest.net or everestkc.net e-mail address
4. Click download SureWest Internet Security Software. (You will need to uninstall any antivirus or
Internet security software before installing SureWest Internet Security Software.)
SureWest High Speed Internet — Minimum System Requirements
While SureWest’s high-speed Internet service may function on systems not meeting the minimum
system requirements below, these are the minimum system configurations that operate on our
network at optimal speed.
PC
Macintosh (Apple)
Example: http://home.kc.surewest.net/jdoe123
Operating System
Windows 7, Vista, XP, 2000, ME, 98
Mac OS 10.X, Mac OS 9
If your email address ends in kc.surewest.net, use ftp.kc.surewest.net.If
your email address ends in everestkc.net, use ftp.everestkc.net.
Network Card /
Ethernet
10/100 NIC or wireless network adapter
10/100 NIC or wireless
network adapter
First part of your kc.surewest.net or everestkc.net email address.
Free Hard
Drive Space
25 MB of free disk space
25 MB of free disk space
Processor
486 or better PC (Pentium recommended)
PowerPC (G3, G4, G5)
Memory
Minimum of 32 MB of RAM (64 MB RAM
for Windows 2000)
Minimum of 64 MB of RAM
(64 MB RAM for OS 9.0)
Example: If surewest.net email address is
[email protected], user name is jdoe123.
FTP password
Same as your kc.surewest.net or everestkc.net email password.
Memory
Minimum of 64 MB of RAM (64 MB RAM for OS 9.0)
SureWest Internet Security powered by Kaspersky®
Available FREE to SureWest Internet customers on surewest.net (valued at $79.95)
Get the new unmatched security that won’t slow you down. SureWest High Speed Internet service
38
•
•
High Speed internet
•
Shared Internet Connection: Connect multiple computers in your household to the same fast
Internet connection — all at the same time!
Safety
For your safety and the protection of your equipment, SureWest recommends the use of surge
protectors at all times. Surges in electrical power, like lighting strikes and power outages (when the
power returns), can occur anytime and unprotected equipment can be permanently damaged.
Back to Table of Contents
39
Phone Feature
Quick
Reference
Guide
Phone Features
Quick
Reference Guide
Feature
Activate
Cancel
SureWest Phone
SureWest’s telecommunication services are certified by 911 with back up capabilities and our fiberoptic delivery provides your family with the security and safety they deserve.
Getting Started
Anonymous Call Rejection
Before you begin, here are a few tips to help you use this guide.
Auto Redial
Call Blocker
Call Forwarding
The touch call pad is the numbered keypad on your phone.
•
When using some of your SureWest services, you may be instructed to
press the
or the
button. These are located to the left and right
of the 0 on your keypad.
•
A rotary dial phone has a round dial for placing calls. When using a
rotary phone, you need to dial
instead of pressing
. Ignore
pressing
. Instead, wait 4 seconds before proceeding. Example:
Instead of pressing
, dial
. Instead of
pressing
, dial
and wait 4 seconds.
•
A switchhook is the button that disconnects your call when you hang
up the phone. When the directions tell you to “press and release the
switchhook,” hold the switchhook for one second.
•
If your phone has a “Flash” button, you may use this instead of the
switchhook.
•
If your phone has a “Pulse/Tone” switch, make sure you place the switch
on “Tone” if you have touchtone service.
Call Return
Call Trace
Call Waiting
Switchhook
Hang Up
Cancel Call Waiting
Caller ID Block (per call)
Anonymous Call Rejection
Priority Call
Remote Access to Call Forwarding
Access Number
Selective Call Forwarding
Anonymous Call Rejection allows you to automatically reject calls that have been blocked or marked
anonymous by the calling party. With this service, your phone will not ring and the calling party will hear
a recording stating that you are not accepting anonymous calls, please remove the block and call again.
To Turn ON:
Speed Calling 8
1.
Lift the receiver and listen for a dial tone.
2.Press
Speed Calling 30
Three-Way Calling
PHONE
•
3.
Switchhook
You will hear a confirmation tone letting you know that your Anonymous
Call Rejection is ON.
To Turn OFF:
1.
Lift the receiver and listen for a dial tone.
2.Press
3.
If you have any questions, please contact our Customer Service Professionals at 913.825.3000.
.
.
You will hear a confirmation tone letting you know that your Anonymous
Call Rejection is OFF.
Back to Table of Contents
40
41
Phone
Phone
Auto Redial
Call Forwarding
Auto Redial automatically stores and redials the last number you dialed. If you reach a busy signal,
just activate Auto Redial and it will monitor the number and call you back when the number is
available. Auto Redial monitors a busy number for 30 minutes. And, you can use Auto Redial to return
calls to more than one busy number at the same time.
With Call Forwarding you can take all your calls no matter where you are. Call Forwarding allows you
to forward your incoming calls to another phone number.
To Forward Your Calls:
To Use After Receiving a Busy Number:
1.
1.
2.Press
Hang up (or press and release the switchhook). Lift the receiver and listen
for a dial tone.
2.Press
3.
4.
Hang up.
5.
When the number you called is no longer busy, your phone will ring
with a special ring. (Occasionally, the person you are calling may use the
phone before Auto Redial can complete your call. If this happens, a voice
recording will tell you to hang up and reactivate Auto Redial.)
Lift your receiver. You will hear a normal ringing tone, and your call will
be connected. The number you are calling will not ring until you pick up
your phone.
To Turn OFF:
1.
Lift the receiver and listen for a dial tone.
2.Press
When you hear a second dial tone, dial the number that you want your
calls forwarded to.
5.
If the “forwarded-to” person answers, Call Forwarding is ON.
6.
If you receive a busy signal or no answer, hang up and repeat the
procedure. You will hear a confirmation tone to verify that your Call
Forwarding is ON.
.
To Turn OFF:
1.Press
2.
.
A confirmation tone will verify that your Call Forwarding is OFF.
Notes:
•
You can still place calls from your phone when Call Forwarding is ON.
•
You cannot answer calls on your phone when Call Forwarding is ON. You will hear a short ring each time a call forwards to remind you that Call Forwarding is ON.
•
PHONE
6.
.
3.
.
You will hear two normal ringing tones or an announcement. If the called
number is still busy, a voice recording will tell you that your call is next in
line. If the number is no longer busy, you call will be placed immediately.
Lift the receiver and listen for a dial tone.
If you forward your calls to a long distance number, you will
incur the long distance charges.
Call Blocker
Call Return
Call Blocker lets you prohibit unwanted calls. You can block up to 10 specific numbers. Blocked callers
will hear a voice recording that says you are not presently accepting calls. Even the last person that
called (even if you don’t know the number) can be put on the list.
Call Return automatically allows you to store and redial the number of the last person who called you.
You can use Call return to return a call whether you answered the call or not. If the number you are
calling back is busy, Call Return will alert you with a special ring when the line is idle.
To Turn ON:
Note: This feature is also available on a pay-per-use basis.
1.
When You Miss a Call:
Lift the receiver and listen for the dial tone.
2.Press
.
1.
Lift the receiver and listen for a dial tone.
3.
Listen to the voice-recorded instructions for Call Blocker options. The phone
numbers you entered on your Call Blocker list will be repeated to you.
. If the line is busy, Call Return will try to redial the
2.Press
number (up to 30 minutes).
3.
The number of the last person who called may be added to your Call
Blocker list by following the voice-recorded instructions.
To Cancel:
If you want to add to your list, or your list is full, listen to the voicerecorded instructions.
2.Press
4.
1.
Lift the receiver and listen for a dial tone.
.
Back to Table of Contents
42
43
Phone
Call Trace (Pay Per Use)
Cancel Call Waiting
Call Trace is available on a pay-per-use basis. Call Trace allows you to automatically trace threatening or
harassing phone calls any time, day or night. The record of the traced call will be stored at SureWest.
Cancel Call Waiting allows you to cancel the Call Waiting tone while you are on a call, or before you
place a call, if you don’t want any interruptions.
After Receiving a Harassing Call:
To Cancel While You are on the Phone:
1.
Hang up (or press the switchhook).
1.
2.
Lift the receiver and listen for a dial tone.
2.Press
3.Press
.
4.
A voice recording will tell you whether the trace has been successful.
5.
To take legal action, record the exact time and date of the call and contact
SureWest within 10 days at the number provided to you by the voice
recording, or call your SureWest Customer Service Professional. If the
situation is an emergency, call your local law enforcement agency at 911.
Call Waiting
3.
Press and release the switchhook.
.
Call Waiting returns automatically to your line when you hang up
your phone.
To Cancel Before You Make a Call:
1.
Lift the receiver and listen for a dial tone.
2.Press
.
3.
Listen for a special tone, followed by a normal dial tone.
4.
Dial the phone number you wish to call.
5.
Call Waiting returns automatically to your line when you hang up
your phone.
To Use:
1.
You will hear a special tone while you are on your current call.
The person calling only hears a normal ringing tone until you answer.
2.
Alert your current caller that you have another call.
3.
Press and release the switchhook to put your first caller on hold and
answer the second call.
4.
To return to the first call, simply press and release the switchhook.
You may alternate between calls as many times as you like.
Call Waiting ID
Call Waiting ID lets you see the number or name and number of the person calling while you are
on the phone. You must have a compatible display device to use Call Waiting ID. However, some
calls may be shown as “Unknown,” “Out-of-Area” or “Private Number” depending on the long
distance carrier of the caller. If the caller has Caller ID Block or has a private number, the number
will not be displayed.
To Use:
1.
Similar to Call Waiting, you will hear a special tone while you are on your
current call. The person calling only hears a normal ringing tone until
you answer.
2.
The number or name and number of the incoming call will display on
your Call Waiting ID device.
Note:
Call Waiting allows you to have two people on your line at the same time (one to whom you are speaking, and one on hold). A third caller will receive a busy signal.
PHONE
Call Waiting alerts you that a second call is incoming on your phone line.
Notes:
•
•
Call Waiting allows you to have two people on your line at the same time (one to whom you are speaking, and one on hold). A third caller will receive a busy signal.
You must have Call Waiting, Caller ID and a Call Waiting ID display device to use Call Waiting ID.
Back to Table of Contents
44
45
Phone
Caller ID Block
Personalized Ring
Caller ID Block prevents your phone number from being displayed on the Caller ID equipment of the
person you are calling.
Personalized Ring gives you the benefit of having up to four phone numbers on one line (primary
phone number, plus up to three additional directory numbers). You can assign one number and
special ring to yourself and the others to your spouse, children, etc. Each special ring will tell you
whom the call is for. You may list additional names with your Personalized Ring phone numbers in
your local directory.
Note:
This feature is also available on a per-call basis.
Caller ID Block (per call)
your number blocked from.
allows you to select the calls you want
Personalized Ring is compatible with all SureWest calling services.
1.
Calls placed to your primary number will ring in the
normal way.
2.
Calls placed to a Personalized Ring number will have a special ring, each
different from the other.
3.
The person calling will only hear the normal ring, no
matter which number they are dialing (primary or additional numbers).
4.
Personalized Ring with Caller ID, Call Waiting,
Call Waiting ID and Cancel Call Waiting.
To Use Caller ID Block (per call):
1.
Lift the receiver and listen for a dial tone.
2.
Press
3.
Listen for the confirmation tone, followed by the dial tone.
4.
Place the call as you would normally. Your number will NOT be
displayed for that call. One call at a time.
.
Caller ID Name and Number will display the name and/or number
of the person who is calling you, no matter which number has been
dialed.
•
If you have Call Waiting, you have Call Waiting on all your numbers.
You can tell which number is being called by the Call Waiting tones.
•
If a caller calls the primary number, you will hear the normal Call
Waiting tone.
The Caller ID display device must detect one ring before it can display the number of the
person calling.
•
If a caller calls a Personalized Ring number, you will hear a special
Call Waiting tone, each different from the other.
Caller ID display devices vary in design, features, and the amount of numbers that can be displayed
in memory. The Caller ID display device is an additional piece of equipment that is required for this
service, and is available at a local retail store.
•
If you have Call Waiting ID, you have Call Waiting ID on all your
numbers. You can tell which number is being called by the Call
Waiting tones, and the number will be displayed.
•
When you cancel your Call Waiting feature and are on a call,
additional callers to any number — primary or Personalized Ring —
will hear a busy signal. Call Waiting returns automatically to your line
when you hang up.
Caller ID Name and Number
Caller ID Name and Number lets you see the name and number of the person calling you.
In addition, the date and time of each call received may be displayed. This information will be
displayed on a Caller ID display device between the first and second ring.
Some calls may be shown as “Unknown,” “Out-of-Area” or “Private Number” depending on the long
distance carrier of the caller. If the caller has Caller ID Block or a private number, the number will not
be displayed.
5.
Personalized Ring with Call Forwarding.
•
6.
PHONE
•
If you forward your calls to another number, all of your calls —
primary or Personalized Ring — will forward.
Personalized Ring with Priority Call.
•
The special Priority Call list is shared by both the primary number
and the Personalized Ring numbers. Calls to any number are treated
the same.
Back to Table of Contents
46
47
Phone
Priority Call
Selective Call Forwarding
Priority Call allows you to program up to 15 numbers that will ring differently from other calls.
Selective Call Forwarding allows you to create a special list of 15 phone numbers that you want to be
forwarded to another number. Calls from other numbers will not be forwarded.
Lift the receiver and listen for a dial tone.
Press
To Create a List:
.
Listen to the voice instructions that will tell you whether the service is
OFF or ON, how to turn the service off and on, how many numbers are
on your list, and how to add, delete and review your list.
Remote Access to Call Forwarding
1.
Listen to the voice instructions that will tell you whether the
service is OFF or ON, how many numbers are on your list, ask you to
enter, confirm, or change the number to which your calls are
being forwarded.
4.
to enter the number to which
Dial the forward number, then press
you want preferred calls to be forwarded.
•Press
and listen to the instructions to change the
forward-to number.
To Activate:
2.
Dial the number to access Remote Access to Call Forwarding,
913.322.0909 (KS), or 816.268.0909 (MO).
3.
Listen for instructions, and dial your home phone number
(number which subscribes to Call Forwarding).
4.
Listen for the confirmation of the number you just entered.
5.
5.
If the number is correct, enter your personal identification number (PIN).
If the number is incorrect, press
and repeat steps 3-5.
6.
Listen to instructions, and enter the Call Forwarding access code. Press
.
7.
Listen for the announcement that states you have activated the
service. If the service is correct, press
. If the service is incorrect, press
and repeat steps 6 and 7.
8.
Listen for instructions and dial the number to which your calls are
to be forwarded.
9.
Listen for confirmation of the number you have entered. If the
number is correct, press
. If the number is incorrect, press
repeat steps 8 and 9.
and
•
Press
to review the list and change the existing
forward-to number.
•
Press
to turn OFF or ON.
To enter a new number on your list:
•
Press
•
Enter the 10-digit phone number.
.
•
Press
again.
For rotary phones, dial
6.
then the 10-digit phone number.
To add the number of the last caller:
•
Press
as private.
. Numbers added this way are listed
For rotary phones, dial
7.
PHONE
Lift the receiver and listen for a dial tone.
.
3.
Remote Access to Call Forwarding allows you to activate Call Forwarding when away from your
own phone.
1.
Lift the receiver and listen for a dial tone.
2.Press
.
To delete a number from your list:
•
Press
•
Dial the 10-digit number.
.
•
Press
again.
For rotary phones, dial
then the 10-digit phone number.
•
Press
to delete a number after it is announced.
•
Press
to delete all numbers from your list.
Back to Table of Contents
48
49
Phone
Speed Calling 8
Speed Calling 8 allows you to create a list of one-digit codes for up to eight phone numbers.
6.
Wait for a normal dial tone, or you may hang up.
7.
Repeat steps 3-6 for each number you want to add to your
Speed Calling 30 list.
To Create Your Speed Calling List:
To Call a Number Using Speed Calling 30:
1.
Assign a one-digit code (2-9) to each number.
1.
Lift the receiver and listen for a dial tone.
2.
Lift the receiver and listen for a dial tone.
2.
Dial the assigned code (20-49) for the number you want to call.
3.Press
4.
.
Notes:
Wait until you hear a second dial tone. Dial the one-digit code (2-9)
that you have assigned, then the complete number you want the code
to represent.
5.
A confirmation tone will let you know that your number has been
accepted.
6.
Wait for a normal dial tone, or you may hang up.
7.
Repeat steps 3-6 for each number you want to add to your
Speed Calling 8 list.
To Call a Number Using Speed Calling 8:
Lift the receiver and listen for a dial tone.
2.
Dial the assigned code (2-9) for the number you want to call.
•
When saving a long distance number, enter “
followed by the number.
” and the area code The maximum number of digits you can program is 28 (access code, area code and phone number).
Three-Way Calling
Three-Way Calling allows you and two others, at different phone numbers, to talk together at the same
time. You can initiate the call to both parties, or add another party to an existing call no matter
who placed the call.
Notes:
•
•
When saving a long distance number, enter “
followed by the number.
” and the area code The maximum number of digits you can program is 28 (access code, area code and phone number).
Speed Calling 30
Speed Calling 30 allows you to create a list of two-digit codes for up to 30 phone numbers.
To Create Your Speed Calling List:
1.
Assign a two-digit code (20-49) to each number.
2.
Lift the receiver and listen for a dial tone.
3.Press
To Use Three-Way Calling:
1.
Lift the receiver and listen for a dial tone.
2.
Dial the phone number of the first person (Party A).
3.
To add another person (Party B) to the call, quickly press and release
the switchhook.
4.
Listen for the confirmation tone.
5.
Dial the phone number of Party B.
6.
At any time after dialing is complete, quickly press and release the
switchhook to connect yourself, Party A and Party B. (If Party B is
busy, quickly press and release the switchhook to disconnect Party B.
You will be reconnected to Party A.)
.
4.
Wait until you hear a second dial tone. Dial the two-digit code (20-49)
that you have assigned, then the complete number you want the code
to represent.
5.
A confirmation tone will let you know that your number has
been accepted.
Back to Table of Contents
50
51
PHONE
1.
•
Phone
How to Use Your SureWest Trail Notes
Setting Up Your Trail Notes
The first time you access Trail Notes the system will provide you with instructions to help you set up
your personalized password, record your name and record a personalized greeting.
The following information will help you set up your Trail Notes:
•
Trail Notes telephone number: KS: 913.322.MAIL (6245); MO: 816.268.MAIL (6245)
•
Your mailbox number (your 10-digit phone number): ____________________________________.
•
Your temporary password number (last four digits of your phone number):___________________.
•
Call Trail Notes.
•
Press
•
Enter mailbox number.
•
Enter your password.
.
At the Main Menu – Reviewing and Responding to Messages
Listening to Messages:
Listen to unheard messages. . . . . . . . . . . . . . . . . . . . . . . . . . . . . . . . . . . . Press
While Listening to Messages:
•
Exit message review. . . . . . . . . . . . . . . . . . . . . . . . . . . . . . . . . . . Press
1. Call Trail Notes.
•
Rewind. . . . . . . . . . . . . . . . . . . . . . . . . . . . . . . . . . . . . . . . . . . . . . Press
2. Enter your mailbox number.
•
Rewind to beginning of message. . . . . . . . . . . . . . . . . . . . . . . . Press
3. Enter your temporary password.
•
Pause for 15 seconds. . . . . . . . . . . . . . . . . . . . . . . . . . . . . . . . . . Press
•
Forward 10 seconds. . . . . . . . . . . . . . . . . . . . . . . . . . . . . . . . . . . Press
•
Forward to the end of message . . . . . . . . . . . . . . . . . . . . . . . . . Press
•
Decrease playback speed. . . . . . . . . . . . . . . . . . . . . . . . . . . . . . . Press
•
Increase playback speed. . . . . . . . . . . . . . . . . . . . . . . . . . . . . . . . Press
•
Envelope information. . . . . . . . . . . . . . . . . . . . . . . . . . . . . . . . . . Press
•
Softer volume. . . . . . . . . . . . . . . . . . . . . . . . . . . . . . . . . . . . . . . . . Press
4. Follow the tutorial prompts to:
•
Change to a personal password.Your password can have up to 15 digits
(the first digit cannot be 0).
You should create passwords that are easy for you to remember.
•
Record a personal greeting.
•
To record a personal greeting, press
•
Record an extended greeting.*
•
Normal volume. . . . . . . . . . . . . . . . . . . . . . . . . . . . . . . . . . . . . . . Press
To record an extended greeting, press
•
Louder volume. . . . . . . . . . . . . . . . . . . . . . . . . . . . . . . . . . . . . . . . Press
•
Skip message. . . . . . . . . . . . . . . . . . . . . . . . . . . . . . . . . . . . . . . . . Press
•
•
•
.
Record your name.
To record your name, press
•
.
.
Learn about other options such as Fax Store and Forward, Extension Mailboxes, Outcall, and
Future Delivery/Reminder Service.*
*Only available with Trail Notes Pro
Accessing Your Trail Notes From Home:
•
Call Trail Notes.
•
Enter your password.
Accessing Your Trail Notes From Another Location:
PHONE
Once you have this information, follow these steps:
After Listening to Messages:
•Replay message. . . . . . . . . . . . . . . . . . . . . . . . . . . . . . . . . . . . . . . . . Press
•Erase message. . . . . . . . . . . . . . . . . . . . . . . . . . . . . . . . . . . . . . . . . . Press
•Save message. . . . . . . . . . . . . . . . . . . . . . . . . . . . . . . . . . . . . . . . . . . Press
•Send a copy*. . . . . . . . . . . . . . . . . . . . . . . . . . . . . . . . . . . . . . . . . . . . Press
•Reply to sender*. . . . . . . . . . . . . . . . . . . . . . . . . . . . . . . . . . . . . . . . . Press
*Only available with Trail Notes Pro
Outcall
(only available with Trail Notes Pro)
Back to Table of Contents
52
53
Phone
Your mailbox can automatically place a call to your pager or a telephone to notify you of waiting
messages. You can define the location, time interval and message types for notification.
Reviewing Fax Messages:
Notification Schedules:
After Reviewing Faxed Messages:
From the main menu . . . . . . . . . . . . . . . . . . . . . . . . . . . . . . . . . . . . . . . . . Press
• From the main menu. . . . . . . . . . . . . . . . . . . . . . . . . . . . . . . . . . Press
• Print fax. . . . . . . . . . . . . . . . . . . . . . . . . . . . . . . . . . . . . . . . . . . . . . Press
• Replay annotation and number of pages. . . . . . . . . . . . . . . . . . Press
Future Delivery/Reminder Service
• Send a copy to another subscriber. . . . . . . . . . . . . . . . . . . . . . . Press
(only available with Trail Notes Pro)
Your mailbox can automatically notify you of important upcoming appointments and special
events. You can program up to 15 messages for yourself, up to 60 days in advance. Trail Notes
Pro will deposit your reminder message into your mailbox on the specific date and time you have
programmed. Then on that day when you check your messages, Trail Notes Pro will remind you of
that special event.
Extension Mailboxes
(only available with Trail Notes Pro)
With Trail Notes Pro, you can add up to three additional mailboxes – great for keeping important
messages separate from the rest of the family’s messages, or for leaving the family reminder
messages.
• Reply to an annotation sent to another subscriber. . . . . . . . . . Press
•Save. . . . . . . . . . . . . . . . . . . . . . . . . . . . . . . . . . . . . . . . . . . . . . . . . Press
Printing Faxed Messages:
•
From the main menu press
then
Press
for primary fax machine
Press
for alternate fax machine
Press
for fax machine from which you are calling
Press
to print to non-voice mail subscriber
Having Trouble?
•
For help while using Trail Notes, press
PHONE
There are several special delivery options available to you when sending a message to others on
your system.
•Erase. . . . . . . . . . . . . . . . . . . . . . . . . . . . . . . . . . . . . . . . . . . . . . . . Press
.
Sending a Private Message:
•
After recording a message and entering the mailbox number, press
.
Sending an Urgent Message:
•
.
After recording a message and entering the mailbox number, press
Message Confirmation:
•
After recording a message and entering the mailbox number, press
.
Future Delivery:
•
After recording a message and entering the mailbox number, press
.
Fax Messages
(only available with Trail Notes Pro)
Your Trail Notes Pro can print a fax at a specified location or store it for retrieval at any fax machine in
the world.
Back to Table of Contents
54
55
Miscellaneous Set-Top Box Diagrams
Connecting the Explorer® 3250HD to a Stereo TV and Stereo VCR and Stereo
Receiver/Amplifier
Connecting the Explorer® 3250HD to a Home Theater System with HDTV
Miscellaneous
Back to Table of Contents
56
57
Miscellaneous Set-Top Box Diagrams
Connecting the Explorer® 8000 to a Non-Stereo TV
Connecting the Explorer® 8000 to a Stereo TV and Stereo VCR and Stereo
Receiver/Amplifier
Miscellaneous
Back to Table of Contents
58
59
Miscellaneous Set-Top Box Diagrams
Connecting the Explorer® 3250HD to a Home Theater System with a DVD Player
Connecting the 8300 to your TV and VCR
1
Explorer 8300
Connect
the 8300
to the TV.
CABLE
OUT
CAUTION
RISK OF ELECTRIC SHOCK
DO NOT OPEN
OUT 1
CABLE
IN
THIS DEVICE IS INTENDED TO BE ATTACHED
TO A RECEIVER THAT IS NOT USED TO
RECEIVE OVER-THE-AIR BROADCAST
SIGNALS. CONNECTION OF THIS DEVICE
IN ANY OTHER FASHION MAY CAUSE
HARMFUL INTERFERENCE TO RADIO
COMMUNICATIONS AND IS IN VIOLATION
OF THE FCC RULES, PART 15.
OUT 2
TV
CATV CONVERTER
MADE IN MEXICO
AVIS: RISQUE DE CHOC
ELECTRIQUE NE PAS OUVRIR
A
U
L D
I
O
R
IR
120 VAC
60HZ 5A
SATA
S - VIDEO
OUT
VIDEO DIGITAL VIDEO
AUDIO OUT
120 VAC
60HZ 80W
LISTED 14H1
CABLE EQUIP.
Cable
Input
LEFT
OUT
IN
CABLE/
ANTENNA
Standard
TV
VIDEO
OUT
IN
AUDIO
OUT
IN
RIGHT
2
Explorer 8300
Connect
the 8300
to the VCR.
CABLE
OUT
CAUTION
RISK OF ELECTRIC SHOCK
DO NOT OPEN
OUT 1
THIS DEVICE IS INTENDED TO BE ATTACHED
TO A RECEIVER THAT IS NOT USED TO
RECEIVE OVER-THE-AIR BROADCAST
SIGNALS. CONNECTION OF THIS DEVICE
IN ANY OTHER FASHION MAY CAUSE
HARMFUL INTERFERENCE TO RADIO
COMMUNICATIONS AND IS IN VIOLATION
OF THE FCC RULES, PART 15.
CATV CONVERTER
MADE IN MEXICO
A
U
L D
I
O
R
TV
T11327
VIDEO
OUT
IN
OUT TO TV
OUT TO TV
120 VAC
60HZ 80W
LISTED 14H1
CABLE EQUIP.
VCR
Standard
TV
IN FROM ANT.
120 VAC
60HZ 5A
VCR
Miscellaneous
RIGHT
CABLE/
ANTENNA
SATA
S - VIDEO
OUT
IN FROM ANT.
LEFT
OUT
IN
AUDIO
OUT
IN
IR
VIDEO DIGITAL VIDEO
AUDIO OUT
Cable
Input
Connect
the TV to
the VCR.
AVIS: RISQUE DE CHOC
ELECTRIQUE NE PAS OUVRIR
CABLE
IN
3
OUT 2
WARNING:
Electric shock
hazard! Unplug all
electronic devices
before connecting
or disconnecting
any device cables
to the 8300.
Back to Table of Contents
60
61
Miscellaneous Set-Top Box Diagrams
Connecting the 8300 to your Stereo TV and Stereo VCR
1
Connecting the 8300 to your HomeTheater, Stereo TV and External SATA Hard Disk Drive
Explorer 8300
Connect
the 8300
to the
stereo TV.
Explorer 8300
1
CABLE
OUT
CAUTION
RISK OF ELECTRIC SHOCK
DO NOT OPEN
OUT 1
OUT 2
AVIS: RISQUE DE CHOC
ELECTRIQUE NE PAS OUVRIR
CABLE
IN
THIS DEVICE IS INTENDED TO BE ATTACHED
TO A RECEIVER THAT IS NOT USED TO
RECEIVE OVER-THE-AIR BROADCAST
SIGNALS. CONNECTION OF THIS DEVICE
IN ANY OTHER FASHION MAY CAUSE
HARMFUL INTERFERENCE TO RADIO
COMMUNICATIONS AND IS IN VIOLATION
OF THE FCC RULES, PART 15.
L
TV
CATV CONVERTER
MADE IN MEXICO
A
U
D
I
O
IR
R
VIDEO
DIGITAL
AUDIO OUT
120 VAC
60HZ 5A
SATA
S - VIDEO
OUT
VIDEO
120 VAC
60HZ 80W
LISTED 14H1
CABLE EQUIP.
Connect
the 8300
to the
Home
Theater
Receiver.
CABLE
OUT
CAUTION
RISK OF ELECTRIC SHOCK
DO NOT OPEN
OUT 1
CABLE
IN
THIS DEVICE IS INTENDED TO BE ATTACHED
TO A RECEIVER THAT IS NOT USED TO
RECEIVE OVER-THE-AIR BROADCAST
SIGNALS. CONNECTION OF THIS DEVICE
IN ANY OTHER FASHION MAY CAUSE
HARMFUL INTERFERENCE TO RADIO
COMMUNICATIONS AND IS IN VIOLATION
OF THE FCC RULES, PART 15.
OUT 2
TV
CATV CONVERTER
MADE IN MEXICO
AVIS: RISQUE DE CHOC
ELECTRIQUE NE PAS OUVRIR
A
U
L D
I
O
R
IR
120 VAC
60HZ 5A
SATA
S - VIDEO
OUT
VIDEO DIGITAL VIDEO
AUDIO OUT
120 VAC
60HZ 80W
LISTED 14H1
CABLE EQUIP.
2
LEFT
OUT IN
Cable
Input
Connect
the 8300
to the
SATA hard
disk drive.
VIDEO 2
OUT IN
AUDIO 2
OUT IN
CABLE/
ANTENNA
RIGHT
LEFT
OUT IN
VIDEO 1
OUT IN
2
RIGHT
Explorer 8300
Connect
the 8300
to the
stereo VCR.
CABLE
OUT
RISK OF ELECTRIC SHOCK
DO NOT OPEN
OUT 2
AVIS: RISQUE DE CHOC
ELECTRIQUE NE PAS OUVRIR
CABLE
IN
CATV CONVERTER
MADE IN MEXICO
L
TV
IR
DIGITAL
AUDIO OUT
VIDEO
Stereo
VCR
120 VAC
60HZ 5A
SATA
S - VIDEO
OUT
120 VAC
60HZ 80W
LISTED 14H1
CABLE EQUIP.
RF IN
L
R
L
R
RF OUT
VIDEO
IN
Connect the
stereo TV
to the
stereo VCR.
L
R
L
R
RF OUT
VIDEO
IN
AUDIO
IN
VIDEO
OUT
LEFT
OUT IN
VIDEO
OUT
Connect the
Home Theater
Receiver
to the
stereo TV.
VIDEO 2
OUT IN
AUDIO 2
OUT IN
CABLE/
ANTENNA
RIGHT
AUDIO 1
OUT IN
Stereo
TV
RIGHT
Home
Theater
Receiver
VIDEO 1
COMPONENT VIDEO
Y
Y
Y
S-VIDEO
S-VIDEO
S-VIDEO
S-VIDEO
VIDEO
VIDEO
VIDEO
VIDEO
PB
PB
PB
PR
PR
PR
2
MONITOR
S-VIDEO
OUT
3
L
L
L
L
AUDIO
AUDIO
AUDIO
AUDIO
R
R
4
OUT
R
1
IN
2
OUT
VIDEO OUT
R
IN
VIDEO 1
OUT IN
DIGITAL
AUDIO
DVD
VIDEO 1
S-VIDEO
S-VIDEO
S-VIDEO
S-VIDEO
VIDEO
VIDEO
VIDEO
VIDEO
L
L
L
L
AUDIO
AUDIO
AUDIO
AUDIO
R
R
4
LEFT
OUT IN
OUT
Y
Y
Y
PB
PB
PB
PR
PR
PR
MONITOR
S-VIDEO
OUT
CABLE/
ANTENNA
RIGHT
LEFT
OUT IN
AUDIO 1
OUT IN
RIGHT
R
IN
1
IN
2
OUT
VIDEO OUT
R
VIDEO 2
OUT IN
AUDIO 2
OUT IN
T11329
COMPONENT VIDEO
3
AUDIO
OUT
WARNING:
Electric shock
hazard! Unplug all
electronic devices
before connecting
or disconnecting
any device cables
to the 8300.
TV/CABLE
1
2
Stereo
TV
AUDIO
OUT
LEFT
OUT IN
T11328
AUDIO
IN
3
Stereo VCR
RF IN
DVD
VIDEO 1
OUT IN
WARNING:
Electric shock hazard!
Unplug all electronic
devices before connecting
or disconnecting any
device cables to the 8300.
Back to Table of Contents
62
63
Miscellaneous
3
TV/CABLE
R
VIDEO
Cable
Input
A
U
D
I
O
DIGITAL
AUDIO
SATA
1
External SATA hard disk drives
allow for greater program storage
capacity and are not meant to
be used for archiving.
CAUTION
OUT 1
THIS DEVICE IS INTENDED TO BE ATTACHED
TO A RECEIVER THAT IS NOT USED TO
RECEIVE OVER-THE-AIR BROADCAST
SIGNALS. CONNECTION OF THIS DEVICE
IN ANY OTHER FASHION MAY CAUSE
HARMFUL INTERFERENCE TO RADIO
COMMUNICATIONS AND IS IN VIOLATION
OF THE FCC RULES, PART 15.
Home
Theater
Receiver
Notes:
Consult with your cable
service provider for a list of
approved external SATA hard
disk drives that work with the 8300.
AUDIO 1
OUT IN
Stereo
TV
External SATA
Hard Disk Drive
Battery Replacement
(not applicable to all customers)
The UPS (uninterruptible power supply) unit has an easy to replace, hot-swappable battery. Once the
battery’s charge has been completely depleted or the battery itself has been disconnected, the
connected equipment is not protected from power outages. It is the customer’s responsibility to
monitor and replace the battery. Replacement is a safe procedure, isolated from electrical hazards. You
may leave the UPS and connected equipment on for this procedure. To replace the battery module
refer to Battery Installation Guide, below.
Outdoor Series
Indoor Series
Red light indicates
when the battery is
depleted. Expected
battery life is 3–5 years.
Red light indicates
when the battery is
depleted. Expected
battery life is 3–5
years.
Miscellaneous
Batteries are a
hazardous material
and require special
handling. Please deliver
spent batteries to a
recycling facility near you.
Back to Table of Contents
64
65
Subscriber Notification for SureWest
Equipment Compatibility
Cable television services are delivered via cable on a composite signal called “RF broadband.” Older TV
receivers cannot tune to all of the channels delivered on this broadband. Although many “cable-ready”
televisions and VCRs can receive these channels, some may experience interference, as they are not
adequately shielded.
In cases where a television or VCR on an additional outlet cannot clearly tune to all of the 75+
channels provided on the Basic Cable Service, an extended tuner, called a converter, can be used to
receive the channels. These may be purchased at retail stores.
To help ease confusion about whether a television or VCR is “cable ready,” the Federal
Communications Commission has for several years prohibited the importing or selling of televisions
and VCRs to be marketed as “cable-ready” or “cable-compatible” unless they meet certain
performance standards.
For delivery of digital services beyond Basic Cable Service, SureWest employs scrambling technologies
to ensure secure signals to authorized homes. Customers will need to use the digital cable set-top box
to gain access to these services, even if the television is “cableready.” We provide one box and one
remote control device to every Basic Cable customer free of charge. Additional digital cable set-top
boxes may be rented on a monthly basis.
By using only one digital cable set-top box, you will not be able to simultaneously watch one
scrambled channel while recording another scrambled channel, or access features on two scrambled
channels such as picture-in-picture. The digital cable set-top box has only one tuner, and two tuners
would be necessary for these operations. Therefore, two digital cable set-top boxes are needed for
simultaneous use of two scrambled channels. As long as at least one of the two channels is not
scrambled, you can simultaneously watch or record by using a special bypass switch, commonly
known as an A/B switch. SureWest makes bypass switches available for purchase, or you can obtain
one from a retail store.
SureWest encourages customers to allow our representative to connect VCRs to their cable service.
We perform this service on a complimentary basis during normal installation of service, and will do
so for a minimal charge if requested to perform this connection exclusively. We use properly shielded
materials, unlike the jumper provided by most VCR manufacturers, and we therefore urge customers
to consider employing our services to retain the high quality of SureWest’s pictures.
SureWest has selected remote-controlled digital cable set-top boxes that work with a number of
remote controls sold with popular televisions and VCRs. Universal remote controls that are compatible
with our converters can also be purchased at local retail stores. Some of the universal remote
manufacturers compatible with our equipment are Magnavox, RCA, Sony Electronics, Zenith Allegro,
Phillips Electronics, Radio Shack, and Universal Electronics.
SureWest provides enough signal to your home for at least three Cable/Internet connections. If you
would like more outlets connected, you may need to obtain a house amplifier. A house amplifier will
provide extra signal to your home, enabling you to have more than three outlets. The amplifier can be
purchased at a retail location of your choice.
We are committed to helping you maximize your voice, video and data experience. Please don’t
hesitate to contact us if you are experiencing equipment compatibility problems, as we’d like to work
with you to provide the best solution possible.
We publish PC specifications that are compatible with our high-speed Internet service. Our Web site,
www.surewestkc.net, has all the necessary information, or you can call our local office for clarification
at 913.825.3000.
Digital cable set-top boxes for use on our system can only legally be obtained from SureWest.
Advertisements for cable converters selling descramblers to obtain services from cable operators for
free are deceptive, as the sale and use of these devices are illegal under Federal and State laws.
66
67
Notifications
Back to Table of Contents
Subscriber Notification for SureWest
Billing and Complaint Procedures
Following is a brief explanation of some taxes and surcharges that may appear on customer bills:
We bill for services one month in advance, and ask for receipt of payment approximately 21 days after
the bill is mailed. All bills are fully itemized, and rendered on a cyclical basis on or about the same day
of each month. Customers with account balances of zero are not sent bills. When service does not
begin on the first day of the month, or end on the last day of the month, the charge for the fraction
of the month in which service was furnished will be calculated on a pro rata basis. For billing that is
based upon customer usage, usage charges will be billed monthly for the preceding billing period.
End User Common Line Charge: The FCC allows a local phone company to charge to recover a
portion of the costs of completing long distance calls on its local network. These charges apply to each
access line to which a unique telephone number is assigned. The FCC caps the amount that phone
providers can charge.
Customers will have at least a 21-day period to remit payment to SureWest once the bill is mailed.
Customers are expected to pay amounts due by the date indicated on the bill. Charges not paid on or
before the due date will be subject to a 3% late payment penalty.
If you have questions regarding your bill, questions about your service, or wish to make changes to
your service, please call our Call Center at 913.825.3000, 7 a.m. to 12 a.m. seven days a week.
For service outages, we are available after regular hours, 24 hours a day, seven days a week. We will
ensure the prompt resolution of inquires.
Your basic phone service can’t be shut off for failure to pay unregulated telephone charges you are
disputing as long as you notify us about the problem immediately and pay for the part of the total bill
not in dispute. Optional telephone features and other services such as cable entertainment and highspeed Internet can be suspended until the charges are settled. Customers with past-due balances
who fail to make an effort to pay may be disconnected. Customers will be given at least seven days
notice prior to disconnection. Once disconnected, Customers may then be subject to paying the full
amount of late charges and a reconnection fee. For these reasons, we urge you to call us as soon as
possible if the bill payment will be delayed.
Billing disputes resolved in your favor will be credited back to your account. If we do not resolve
cable-related problems to your satisfaction, you may direct inquiries to your local franchising authority
displayed on your monthly bill.
Customers can register complaints concerning phone services with the Federal Communications
Commission (FCC). Consumers can also directly contact their state’s Public Service Commission to
register an informal complaint, as the Public Service Commission regulates telephone service. Contact
information for the Missouri and Kansas Commissions are as follows:
Missouri Public Service Commission
P.O. Box 360 Jefferson City, MO 65102-0360 Telephone: 800.392.4211 Universal Service Fees: These fees are charged by most local and long distance providers as part of a
federal program to subsidize local telephone service for low-income consumers or those who live in
areas where the cost of providing telecommunications service are exceptionally high. These fees also
help cover discounted communications services for schools, libraries and rural health-care facilities.
Kansas Universal Service Fund: These fees are collected to help cover Lifeline, Kansas Relay Services,
Telecommunications Access Program and to support network enhancements and upgrade to the
phone service in rural areas.
Local Number Portability: This fee allows the phone company to recover the cost of making changes
to the equipment and software in order to provide consumers with the option of keeping their phone
number even though they change carriers.
Excise and Sales Tax: The federal government charges an excise tax on telephone service, and you are
also charged state, city and local county sales taxes on phone service. Some state and local
municipalities also charge sales tax on cable services.
911 Surcharge: A fee is collected on behalf of local governments to cover the cost of providing 911
emergency services.
Telecommunications Relay Service Fee: Relay fee is collected from all customers to help cover the cost
of providing a translator service for hearing-impaired callers making calls between a special type of text
telephone and traditional voice telephones.
City Franchise Fees: These fees are collected to offset the cost of regulating the public rights-of-way
used for telecommunication and cable services.
For subscribers terminating services, charges will continue to accrue on accounts until SureWest
equipment is returned to the SureWest Customer Center, 9647 Lackman Road, Lenexa, KS.
Kansas Corporation Commission
1500 SW Arrowhead Road
Topeka, KS 66604-4027
Telephone: 785.271.3100
68
69
Notifications
Back to Table of Contents
With SureWest, whether you subscribe to one service or all, we combine your services on ONE
monthly bill that is easy to read and understand.
Questions? We’re Hands-On, Not ‘On-Hold’
For any questions or concerns, from billing to service issues, the only SureWest phone number you’ll
ever need is 913.825.3000. To find out more about SureWest, or to send a question or inquiry via
email, visit our web site at: www.surewestkc.net.
Helpful Tips
•
Your first bill will include all taxes and the proration of your first month’s service plus the full
amount of the subsequent month (e.g. if your service is installed on the 15th, your first bill will
include the last 15 days of that month plus the subsequent full month’s billing). We have four
billing cycles every month. The date your bill is issued depends on your installation date.
•
The section titled “Summary of Charges” itemizes monthly charges due for each SureWest Service,
including taxes, service charges (if applicable) and credits.
•
The “Payment Due Date” refers to the day your payment in full must be received. We advise
mailing your payment at least 3 days prior to the due date to ensure we receive your payment
on time.
•
Please write your account number on all correspondence and personal checks to ensure accurate
processing of monthly payments and written inquiries.
•
Please immediately inform us of any changes in your name and address.
Billing
Your Monthly Statement
Help the planet by using SureWest
• Sign up for paperless billing and receive your bill via e-mail. Reduce paper waste and say
goodbye to paper statements!
• Enjoy the convenience and savings on postage by paying your bill online.
Signing up is easy, select either a one-time payment or auto pay.
• View your account information on a secure site.
Go to My SureWest (surewestkc.net) under “Billing and Payment” and do your part to save energy
and valuable resources. Individually this may not make a huge difference, but if we act together,
the results matter.
Easy Payment Options
1. Pay online with a check or credit card at www.surewestkc.net. Simply click on the Online
Payment option.
2. Set up Auto Pay using the form on the following page or retrieve the form online at
www.surewestkc.net.
3.Call 913.825.3000 and pay with a check-by-phone or credit card.
4. Drop off or mail your payment to our office at the following address:
SureWest Customer Center
14859 W. 95th Street
Lenexa, KS 66215
Back to Table of Contents
70
71
10070.584 KC Handbook Online
913.825.3000
surewest.com