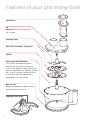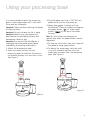
1
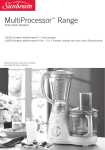
SM0500
MASTER
SERIES
Processing Bowl
User Guide
Accessory for:
StickMaster® (SM7200)
StickMaster® Plus (SM7400)
StickMaster® Platinum (SM9000)
SM8650 featured
Contents
Sunbeam’s Safety Precautions
1
Features of your processing bowl
2
Using your processing bowl
3
Care and Cleaning
6
Recipes7
Important instructions –
retain for future use.
Sunbeam’s Safety Precautions
SAFETY PRECAUTIONS FOR YOUR SUNBEAM
STICKMASTER ACCESSORY.
• Do not handle appliance with wet hands.
• Avoid contact with moving parts.
• Do not touch the blade while it is operating.
After the appliance has been switched off the
blade will continue to rotate a moment longer.
• Turn the power off and disconnect from supply
before changing accessories or approaching parts
that move in use.
• Do not use the appliance with hot liquids, as
there is a risk of burns due to splashing.
Allow hot liquids to be cool enough to touch.
• Hold the stick mixer firmly and upright while
using it.
• Care should be taken when handling sharp cutting
blades, emptying the bowl and during cleaning.
• Injury may occur if the stick mixer is not used as
intended.
• Do not operate the appliance without a workload.
• When using extremely heavy loads, the appliance
should not be operated for more than 4 seconds.
This does not apply to the recipes detailed in this
booklet.
• Never insert metal or other utensils, such as
knives or forks, into the inside of the blade
system while the appliance is operating.
Sunbeam is very safety conscious when
designing and manufacturing consumer products,
but it is essential that the product user also exercise
care when using an electrical appliance. Listed
below are precautions which are essential for the
safe use of an electrical appliance:
• Read carefully and save all the instructions
provided with an appliance.
• Always turn the power off at the power outlet
before you insert or remove a plug. Remove
by grasping the plug - do not pull on the cord.
• Turn the power off and remove the plug when
the appliance unattended, before assembling,
disassembling or cleaning.
• Do not use your appliance with an extension cord
unless this cord has been checked and tested by
a qualified technician or service person.
• Always use your appliance from a power outlet of
the voltage (A.C. only) marked on the appliance.
• This appliance is not intended for use by persons
(including children) with reduced physical,
sensory or mental capabilities, or lack of
experience and knowledge, unless they have been
given supervision or instruction concerning use
of the appliance by a person responsible for their
safety.
• Children should be supervised to ensure that they
do not play with the appliance.
• The temperature of accessible surfaces may be
high when the appliance is operating.
• Never leave an appliance unattended while
in use.
• Do not use an appliance for any purpose other
than its intended use.
• Do not place an appliance on or near a hot gas
flame, electric element or on a heated oven.
• Do not place on top of any other appliance.
• Do not let the power cord of an appliance hang
over the edge of a table or bench top or touch any
hot surface.
• Do not operate any electrical appliance with a
damaged cord or after the appliance has been
damaged in any manner. If damage is suspected,
return the appliance to the nearest Sunbeam
Appointed Service Centre for examination,
repair or adjustment.
• For additional protection, Sunbeam recommend
the use of a residual current device (RCD)
with a tripping current not exceeding 30mA in
the electrical circuit supplying power to your
appliances.
• Do not immerse the appliance in water or any
other liquid unless recommended.
• Appliances are not intended to be operated by
means of an external timer or separate remote
control system.
• This appliance is intended to be used in
household and similar applications such as: staff
kitchen areas in shops, offices and other working
environments; farm houses; by clients in hotels,
motels and other residential type environments;
bed and breakfast type environments.
If you have any concerns regarding the performance and use of your appliance,
please visit www.sunbeam.com.au or contact the Sunbeam Consumer Service Line.
Ensure the above safety precautions are understood.
1
Features of your processing bowl
Food pusher
Lid
Important: Do not immerse the
lid in water.
Chopping blade
Dual sided shredding / slicing disc
Spindle
Processing bowl attachment
1250ml/5 cup processing bowl
attachment conveniently attaches
to the stick blender motor housing to
process ingredients for pastries, patties
etc. as well as chop, shred and slice
a variety of food including meats,
vegetables, nuts and herbs.
Non-slip mat
Keeps the processing bowl secure
on the bench during use.
PUSH
Chopping blade holder
2
Using your processing bowl
It is recommended to wash the processing
bowl in warm soapy water with a soft cloth.
Rinse and dry thoroughly.
Important: Take care when washing the blades
as they are sharp.
Important: Do not immerse the lid in water
Important: Before using your processing
bowl remove any packaging material and
promotional labels or tags.
Important: Ensure that the StickMaster is
unplugged from the power outlet before
assembling or removing attachments.
1.Attach lid to processing bowl.
2.Insert the motor housing into the
processing bowl lid and twist the wand in
a clockwise position until you hear a click.
See Figure 1.
3.Plug the power cord into a 230-240 volt
power outlet and turn the power on.
4.Select from speed 1 through to 9 (on
StickMaster® Platinum model) and depress
the power button ( ) or 'turbo speed
button' (
) at the top of the motor
housing.
Note: All stick mixers are designed to
operate only when the power buttons remain
depressed.
5.To stop the stick mixer, take your finger off
the power or turbo speed button.
6.To detach the motor body, twist the shaft
in an anti clockwise position until the
motor body unscrews from the processing
bowl. See Figure 2.
Figure 2
Figure 1
3
Using your processing bowl continued
Using the processing bowl with the chopping
blade
1.Place the processing bowl on the non-slip
mat, ensuring the surface is clean and
level.
2.Fit the stainless steel chopping blade into
the processing bowl.
3.Place food into the processing bowl.
4.Attach the lid onto the processing bowl and
rotate the lid in a clockwise direction until
it locks into position.
5.Insert the motor housing into the
processing bowl lid and twist the wand in
a clockwise position until you hear a click.
See Figure 3.
6.Plug the power cord into a 230-240 volt
power outlet and turn the power on.
Note: All stick blenders are designed to
operate only whilst the power buttons remain
depressed.
8.For an extra boost of power during
operation, the turbo speed button (
)
may be depressed.
Note: The power button ( ) should be
released when selecting the turbo speed
button (
).
9.To stop the stick blender, take your finger
off the power button or turbo speed button.
10.To detach the motor body, twist the shaft
in an anti clockwise position until the
motor body unscrews from the processing
bowl. See Figure 4.
Figure 4
Figure 3
7.Hold the bowl with one hand while
operating the power button with the other.
Select from speed 1 through to 9 (on
StickMaster® Platinum model) and depress
the power button ( ) or turbo speed
button (
) at the top of the motor
housing.
4
Using your processing bowl continued
Using the processing bowl attachment with the
slicing/shredding disc
1.Place the processing bowl on the non-slip
mat, ensuring the surface is clean and
level.
2.Place food into the processing bowl.
3.Fit the shredding/slicing disc with the
spindle into the processing bowl.
4.Attach the lid onto the processing bowl and
rotate the lid in a clockwise direction until
it locks into position.
5.Insert the motor housing into the
processing bowl lid and twist the wand in
a clockwise position until you hear a click.
See Figure 5.
6.Plug the power cord into a 230-240 volt
power outlet and turn the power on.
Figure 5
7.Remove the food pusher and place
ingredients into the feed tube. Using the
food pusher guide food down the feed tube
evenly, while operating the power button
with the other hand.
8.Select from speed 1 through to 9 (on
StickMaster® Platinum model) and depress
the power button ( ) or turbo speed
button (
) at the top of the motor
housing.
Note: All stick blenders are designed to
operate only whilst the power buttons
remain depressed.
Note: The power button ( ) should be
released when selecting the turbo speed
button
(
).
9. To stop the stick blender, take your finger
off the power button or turbo speed
button.
10.To detach the motor body, twist the shaft in an anti clockwise position until the
motor body unscrews from the processing
bowl. See Figure 6.
Figure 6
Note: Discolouring of the interior of the chute
can occur overtime, with heavily coloured
foods such as carrots or berries.
5
Care and Cleaning
After each use it is recommended
1.Always remove the power cord from the
power outlet before cleaning.
2.For thorough cleaning, dismantle the
processing bowl and all attachments.
Wash all components in warm soapy water
and dry thoroughly.
Important: Blades are extremely sharp.
Handle with care.
Important: Ensure that the motor housing or
lid is not immersed in water or any other
liquid.
6
Dishwasher Use
All plastic components deteriorate through
prolonged dishwasher use.
Note: Place only on the top rack of the
dishwasher.
Important: Motor housing and lid is not
dishwasher safe.
Recipes
Pesto
Makes 1 cup (approximately)
Rocket, chilli and cashew nut dip
Makes about 2 cups
2 cups fresh basil leaves (approx 1 bunch)
1 clove garlic, peeled
2 cloves garlic, peeled
1 large red chilli, seeds removed and roughly
2 teaspoons lemon juice
chopped
½ cup pine nuts, roasted
3 cups wild rocket leaves
60g pecorino or parmesan, grated
½ cup light olive oil
Salt and pepper, to taste
2-3 teaspoons lemon juice
½ cup extra virgin olive oil
²⁄³ cup unsalted toasted cashews
1.Place the basil, garlic, juice, pine nuts and
cheese in the processor bowl fitted with
the chopping blade. Process until chopped.
2.With the motor operating, add oil through
the feed tube. Continue processing until
combined. Season with salt and pepper.
½ cup grated parmesan cheese
Salt and freshly ground black pepper
1.Place the garlic, chilli, rocket, oil and
juice in the processor bowl fitted with the
chopping blade. Process until chopped.
Scrape down any ingredients that may have
come up the sides of the bowl.
2.Add cashews and cheese. Pulse again until
a desired texture is achieved. Season with
salt and pepper.
7
Recipes continued
Thai Fish cakes
Makes 25 (approx)
Buttermilk Pikelets
Serves 6
500g firm white fish fillets (ie. Ling,
1 cup self raising flour
Gemfish, Redfish)
½ teaspoon bicarbonate soda
2 tablespoons mild red curry paste
¼ cup caster sugar
50g green beans, chopped finely
1 egg, lightly beaten
Oil, for deep frying
½ cup buttermilk
Sweet Chilli sauce and lime wedges, to serve
40g butter, melted
Coriander leaves, to garnish
Jam and whipped cream, to serve
1.Using the processor bowl fitted with the
chopping blade, process fish, fish sauce
and curry for 30-40 seconds or until
smooth.
Note: Be careful not to over process the
seafood as this will toughen the fish cakes.
1.Add all the ingredients except the jam and
cream to the chopper bowl, process until
well combined on the highest speed.
2.Heat non stick frying pan over a medium
heat.
3.Spoon heaped spoonfuls of batter in frying
pan and cook on both sides until golden.
4.Serve warm with jam and whipped cream.
2.Transfer mixture to a bowl and stir through
beans.
3.Using wet hands, roll tablespoons of
mixture into balls, flatten slightly and
place on a plate.
4.Deep-fry fish cakes until golden and
cooked through. Drain on absorbent paper
towel.
5.Serve with sweet chilli dipping sauce and
lime wedges; garnish with coriander.
8
Pinch salt
1 teaspoon fish sauce
12
Month
Replacement
Guarantee
This Sunbeam product is covered by a
12 month replacement or repair warranty,
which is in addition to your rights under the
Australian Consumer Law (if your product
was purchased in Australia) or New Zealand
Consumer Guarantees Act (if your product
was purchased in New Zealand).
Upon receipt of your claim, Sunbeam will
seek to resolve your difficulties or, if the
product is defective, advise you on how to
obtain a replacement or refund.
To assist us in managing warranty claims,
we recommend you register your product
as soon as practicable after purchase by
creating a MySunbeam account on our
website and uploading a copy of your
original receipt.
Should you experience any
difficulties with your product
during the warranty period,
please contact our customer
service line for advice on 1300
881 861 in Australia, or 0800
786 232 in New Zealand.
Australia
www.sunbeam.com.au
1300 881 861
Units 5 & 6,
13 Lord Street,
Botany NSW 2019
Australia
New Zealand
www.sunbeam.co.nz
0800 786 232
Level 6, Building 5,
Central Park,
660-670 Great South Road,
Greenlane, Auckland
New Zealand
In order to make a claim under our
warranty, you must have the original proof
of purchase documentation for the
product and present it when requested (if
not already uploaded to our website).
Should your product develop any defect
within 12 months of purchase because of
faulty materials or workmanship, we will
replace or repair it, at our discretion, free
of charge. A product presented for repair
may be replaced by a refurbished product
of the same type rather than being
repaired. Refurbished parts may be used
to repair the product.
Our replacement or repair warranty only
applies where a defect arises as a result
of faulty material or workmanship during
the warranty period. Your warranty does
not cover misuse or negligent handling
(including damage caused by failing to use
the product in accordance with this
instruction booklet), accidental damage,
or normal wear and tear.
Your warranty does not:
• cover freight or any other costs incurred
in making a claim, consumable items,
accessories that by their nature and
limited lifespan require periodic renewal
(such as filters and seals) or any
consequential loss or damage; or
• cover damage caused by:
- power surges, power dips, voltage
supply problems, or use of the product
on incorrect voltage;
- servicing or modification of the
product other than by Sunbeam or an
authorised Sunbeam service centre;
- use of the product with other
accessories, attachments, product
supplies, parts or devices that do not
conform to Sunbeam specifications; or
- exposure of the product to
abnormally corrosive conditions; or
• extend beyond 3 months if the product
is used in commercial, industrial,
educational or rental applications.
The benefits given to you by our
warranty are in addition to other rights
and remedies under law in relation to
the product.
In Australia our goods come with
guarantees that cannot be excluded
under the Australian Consumer Law. You
are entitled to a replacement or refund
for a major failure and for compensation
for any other foreseeable loss or
damage. You are also entitled to have the
goods repaired or replaced if the goods
fail to be of acceptable quality and the
failure does not amount to a major
failure.
Our goods also come with guarantees
that cannot be excluded under the New
Zealand Consumer Guarantees Act.
If your warranty claim is not accepted, we
will inform you and if requested to do so
by you, repair the product provided you
pay the usual charges for such repair.
You will also be responsible for all freight
and other costs.
Should your product require repair or
service after the warranty period, contact
your nearest Sunbeam service centre.
For a complete list of Sunbeam’s service
centres, visit our website or call our
customer service line for advice on 1300
881 861 in Australia, or 0800 786 232 in
New Zealand.
Need help with your appliance?
Contact our customer service team
or visit our website for information
and tips on getting the most from
your appliance.
Australia
| visit
phone
mail
New Zealand | visit
phone
mail
www.sunbeam.com.au
1300 881 861
Units 5 & 6, 13 Lord Street,
Botany NSW 2019 Australia.
www.sunbeam.co.nz
0800 786 232
Level 6, Building 5, Central Park,
600-670 Great South Road,
Greenlane, Auckland, New Zealand.
Sunbeam Corporation Limited | ABN 45 000 006 771
Sunbeam Corporation is a division of GUD Holdings Limited.
Sunbeam is a registered trademark.
StickMaster® is a trademark of Sunbeam Corporation
Made in China to Sunbeam’s specification.
Due to minor changes in design or otherwise,
the product you buy may differ slightly from the one shown here.
Approved by the appropriate electrical regulatory authorities.
©Copyright Sunbeam 2014.
4/14