1
SC743 X9 Universal Air Shroud
User’s Guide
Revison 1.0
SC743 X9 Universal Air Shroud User’s Guide
The information in this User’s Guide has been carefully reviewed and is believed to be accurate. The
vendor assumes no responsibility for any inaccuracies that may be contained in this document, makes no
commitment to update or to keep current the information in this manual, or to notify any person or
organization of the updates. Please Note: For the most up-to-date version of this manual, please see
our web site at www.supermicro.com.
Super Micro Computer, Inc. ("Supermicro") reserves the right to make changes to the product described
in this manual at any time and without notice. This product, including software and documentation, is the
property of Supermicro and/or its licensors, and is supplied only under a license. Any use or reproduction
of this product is not allowed, except as expressly permitted by the terms of said license.
IN NO EVENT WILL SUPERMICRO BE LIABLE FOR DIRECT, INDIRECT, SPECIAL, INCIDENTAL,
SPECULATIVE OR CONSEQUENTIAL DAMAGES ARISING FROM THE USE OR INABILITY TO USE
THIS PRODUCT OR DOCUMENTATION, EVEN IF ADVISED OF THE POSSIBILITY OF SUCH
DAMAGES. IN PARTICULAR, SUPERMICRO SHALL NOT HAVE LIABILITY FOR ANY HARDWARE,
SOFTWARE, OR DATA STORED OR USED WITH THE PRODUCT, INCLUDING THE COSTS OF
REPAIRING, REPLACING, INTEGRATING, INSTALLING OR RECOVERING SUCH HARDWARE,
SOFTWARE, OR DATA.
Any disputes arising between manufacturer and customer shall be governed by the laws of Santa Clara
County in the State of California, USA. The State of California, County of Santa Clara shall be the
exclusive venue for the resolution of any such disputes. Super Micro's total liability for all claims will not
exceed the price paid for the hardware product.
FCC Statement: This equipment has been tested and found to comply with the limits for a Class A digital
device pursuant to Part 15 of the FCC Rules. These limits are designed to provide reasonable protection
against harmful interference when the equipment is operated in a commercial environment. This
equipment generates, uses, and can radiate radio frequency energy and, if not installed and used in
accordance with the manufacturer’s instruction manual, may cause harmful interference with radio
communications. Operation of this equipment in a residential area is likely to cause harmful interference,
in which case you will be required to correct the interference at your own expense.
Manual Revison 1.0
Release Date: September 22, 2011
Unless you request and receive written permission from Super Micro Computer, Inc., you may not copy
any part of this document.
Information in this document is subject to change without notice. Other products and companies referred
to herein are trademarks or registered trademarks of their respective companies or mark holders.
Copyright © 2011 by Super Micro Computer, Inc.
All rights reserved.
Printed in the United States of America
ii
Preface
About this Manual
This manual is written for professional system integrators, Information Technology
professionals, service personnel and technicians. It provides information for the
installation and use of Supermicro's SC743 X9 universal air shroud. Installation and
maintenance should be performed by experienced professionals only.
Manual Organization
Chapter 1: Introduction
The first chapter provides a checklist of the main components included with the SC743
X9 universal air shroud and describes its main features.
Chapter 2: System Safety
You should familiarize yourself with this chapter for a general overview of safety
precautions that should be followed when installing and servicing the SC743 X9
universal air shroud.
Chapter 3: Configuration and Installation
Refer here for details on installing the SC743 X9 universal air shroud on a computer
system mainboard.
iii
SC743 X9 Universal Air Shroud User’s Guide
Notes
iv
:
Table of Contents
Chapter 1 Introduction....................................................................... 1-1
1-1 Overview ............................................................................................. 1-1
1-2 Product Checklist of Typical Components..................................... 1-1
1-3 Features .............................................................................................. 1-2
1-4 Returning Merchandise for Service ................................................ 1-2
1-5 Contacting Supermicro ..................................................................... 1-3
Chapter 2 System Safety .................................................................. 2-1
2-1 Electrical Safety Precautions........................................................... 2-1
2-2 General Safety Precautions............................................................. 2-2
2-3 Electrostatic Discharge Precautions .............................................. 2-2
2-4 Operating Precautions ...................................................................... 2-2
Chapter 3 Configuration and Installation............................... 3-1
3-1 Overview ............................................................................................. 3-1
3-2 SC743 X9 Universal Air Shroud Components .............................. 3-1
Component Part B .................................................................................. 3-2
Component Part D .................................................................................. 3-3
Component Part E .................................................................................. 3-4
3-3 Removing Breakable Tabs for Cabling .......................................... 3-5
3-4 Configuring the SC743 X9 Universal Air Shroud ......................... 3-6
3-5 Installing the SC743 X9 Universal Air Shroud .............................. 3-7
v
SC743 X9 Universal Air Shroud User’s Guide
Notes
vi
Chapter 1
Introduction
1-1
Overview
The SC743 X9 universal air shroud is a configurable air shroud for system mainboards
to enable maximum efficient air flow through the system. It can be configured to fit
12"X13" MB Extended-ATX sized system mainboards. The SC743 X9 universal air
shroud is optimized for use with Supermicro SC743 series chassis designs and for
Supermicro X9DRx, X8DTx and H8DGx series mainboards. See Chapter 3 for
configuration details.
1-2
Product Checklist of Typical Components
The SC743 X9 universal air shroud comes packaged with components parts as shown
in Table 1-1:
Table 1-1. SC743 X9 Universal Air Shroud Parts and Components
Part Number
Description
Quantity
MCP-310-49002-0N
SC743 Intel DP X9 universal PC air shroud 12”x13” MB
MCP-310-49009-1N
SC743 X9 universal air shroud component, main body (Part A)
1
MCP-310-49010-1N
SC743 X9 universal air shroud component, moving part (Part B)
1
MCP-310-29005-1N
SC825/826/216/213 X9 universal air shroud component,
tear-drop 33mm (part D)
1
MCP-310-49011-1N
SC743 X9 universal air shroud component, moving part (Part E)
1
NOTE: The default configuration is for Component Parts A, B, D and E
connected.
NOTE: Each individual part for the SC743 X9 universal air shroud is labeled
with its component part letter for easy identification.
1-1
SC743 X9 Universal Air Shroud User’s Guide
1-3
Features
The SC743 X9 universal air shroud includes the following features:
•
Main air shroud component
•
Three detachable components for creating multiple configurations
•
Breakable sections for power cable management
•
Clear plastic material construction for ease of viewing
1-4
Returning Merchandise for Service
A receipt or copy of your invoice marked with the date of purchase is required before
any warranty service will be rendered. You can obtain service by calling your vendor for
a Returned Merchandise Authorization (RMA) number. When returning to the
manufacturer, the RMA number should be prominently displayed on the outside of the
shipping carton, and mailed prepaid or hand-carried. Shipping and handling charges will
be applied for all orders that must be mailed when service is complete.
For faster service, RMA authorizations may be requested online at:
http://www. supermicro.com/support/rma/
Whenever possible, repack the chassis in the original Supermicro carton, using the
original packaging material. If these are no longer available, be sure to pack the chassis
securely, using packaging material to surround the chassis so that it does not shift within
the carton and become damaged during shipping.
This warranty only covers normal consumer use and does not cover damages incurred
in shipping or from failure due to the alteration, misuse, abuse or improper maintenance
of products.
During the warranty period, contact your distributor first for any product problems.
1-2
Chapter 1: Introduction
1-5
Contacting Supermicro
Headquarters
Address:
Super Micro Computer, Inc.
980 Rock Ave.
San Jose, CA 95131 U.S.A.
Tel:
Fax:
+1 (408) 503-8000
+1 (408) 503-8008
[email protected] (General Information)
Email:
[email protected] (Technical Support)
Web Site:
www.supermicro.com
Europe
Address:
Super Micro Computer B.V.
Het Sterrenbeeld 28, 5215 ML
‘s-Hertogenbosch, The Netherlands
Tel:
+31 (0) 73-6400390
Fax:
+31 (0) 73-6416525
[email protected] (General Information)
Email:
[email protected] (Technical Support)
[email protected] (Customer Support)
Asia-Pacific
Address:
Super Micro Computer, Inc.
4F, No. 232-1, Liancheng Rd.
Chung-Ho 235, Taipei County
Taiwan, R.O.C.
Tel:
+886-(2) 8226-3990
Fax:
+886-(2) 8226-3991
Web Site:
www.supermicro.com.tw
Technical Support:
Email:
[email protected]
Tel:
+886-(2) 8226-5990
1-3
SC743 X9 Universal Air Shroud User’s Guide
Notes
1-4
Chapter 2
System Safety
Please read and follow all safety precautions below before using your Supermicro
product.
2-1
Electrical Safety Precautions
Basic electrical safety precautions should be followed to protect yourself from harm and
the server from damage:
•
Be aware of how to power on/off the enclosure power supplies and the individual
blades as well as the room's emergency power-off switch, disconnection switch or
electrical outlet. If an electrical accident occurs, you can then quickly remove power
from the system.
•
Do not work alone when working with high voltage components.
•
Power should always be disconnected from the blade module when removing or
installing such system components as the mainboard, memory modules and
processors.
•
When working around exposed electrical circuits, another person who is familiar
with the power-off controls should be nearby to switch off the power if necessary.
•
Use only one hand when working with powered-on electrical equipment. This is to
avoid making a complete circuit, which will cause electrical shock. Use extreme
caution when using metal tools, which can easily damage any electrical components
or circuit boards they come into contact with.
•
Do not use mats designed to decrease electrostatic discharge as protection from
electrical shock. Instead, use rubber mats that have been specifically designed as
electrical insulators.
•
The power supply power cords must include a grounding plug and must be plugged
into grounded electrical outlets. Power input requires 110-240 VAC, depending upon
your power supply module.
•
Mainboard Battery: This battery must be replaced only with the same or an
equivalent type recommended by the manufacturer (CR2032 Lithium 3V battery).
Dispose of used batteries according to the manufacturer's instructions.
WARNING: There is a danger of explosion if the onboard battery is installed
upside down, which will reverse its polarities.
•
Mainboard replaceable soldered-in fuses: Self-resetting PTC (Positive Temperature
Coefficient) fuses on the mainboard must be replaced by trained service technicians
only. The new fuse must be the same or equivalent as the one replaced. Contact
technical support for details and support.
2-1
SC743 X9 Universal Air Shroud User’s Guide
2-2
General Safety Precautions
Follow these rules to ensure general safety:
•
Keep the area around the server clean and free of clutter.
•
Place the blade module cover and any system components that have been removed
away from the system or on a table so that they won't accidentally be stepped on.
•
While working on the system, do not wear loose clothing such as neckties and
unbuttoned shirt sleeves, which can come into contact with electrical circuits or be
pulled into a cooling fan.
•
Remove any jewelry or metal objects from your body, which are excellent metal
conductors that can create short circuits and harm you if they come into contact with
printed circuit boards or areas where power is present.
•
After accessing the inside of the system, replace the blade module's cover before
installing it back into the blade enclosure.
2-3
Electrostatic Discharge Precautions
Electrostatic discharge (ESD) is generated by two objects with different electrical
charges coming into contact with each other. An electrical discharge is created to
neutralize this difference, which can damage electronic components and printed circuit
boards.
The following measures are generally sufficient to neutralize this difference before
contact is made to protect your equipment from ESD:
•
Use a grounded wrist strap designed to prevent static discharge.
•
Keep all components and printed circuit boards (PCBs) in their antistatic bags until
ready for use.
•
Touch a grounded metal object before removing the board from the antistatic bag.
•
Do not let components or PCBs come into contact with your clothing, which may
retain a charge even if you are wearing a wrist strap.
•
Handle a board by its edges only; do not touch its components, peripheral chips,
memory modules or contacts.
•
When handling chips or modules, avoid touching their pins.
•
Put the mainboard and peripherals back into their antistatic bags when not in use.
•
For grounding purposes, make sure the blade enclosure provides excellent
conductivity between the power supplies, the blade modules and the mainboard.
2-4
Operating Precautions
Care must be taken to assure that the cover of the blade unit is in place when the blade
is operating to assure proper cooling. Out of warranty damage to the blade can occur if
this practice is not strictly followed.
Any drive carrier without a hard drive installed must remain fully installed in the drive bay
when the blade module is operating to ensure proper airflow.
2-2
Chapter 3
Configuration and Installation
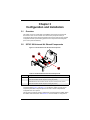
3-1
Overview
This chapter covers the configuration and installation of the SC743 X9 universal air
shroud into a server or into a chassis. The main section (Component Part A) is
connected to other sections (Component Parts B, D and E) to make up many possible
configurations based upon the sliding positions of the components and locking tabs
(even more if parts are detached).
3-2
SC743 X9 Universal Air Shroud Components
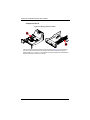
Figure 3-1. SC743 X9 Universal Air Shroud Components
B
E
A
D
Table 3-1. SC743 X9 Universal Air Shroud Components
Item
Description
A
SC743 X9 universal air shroud component, main body (Part A)
B
SC743 X9 universal air shroud component, moving part (Part B)
D
SC825/826/216/213 X9 universal air shroud component, tear-drop 33mm (Part D)
E
SC743 X9 universal air shroud component, moving part (Part E)
The SC743 X9 universal air shroud comes with the main body and three detachable
component parts (Figure 3-1 and Table 3-1). See below for details on these various
component parts.These component parts can be used to create multiple different
configurations for use in sytems.
The SC743 X9 universal air shroud is optimized for use with Supermicro X9DRx, X8DTx
and H8DGx series mainboards. See Section 3-4 for further details on configurations.
3-1
SC743 X9 Universal Air Shroud User’s Guide
Component Part B
Figure 3-2. Moving Component Part B
B
B
The SC743 X9 universal air shroud’s Component Part B (Figure 3-2) can be moved in
and out to resize the X9 universal air shroud’s size to fit the mainboard using three
sliding positions (“A”, “B” and “C”). The bottom of Component Part B can be detached to
allow for cable access under the air shroud.
3-2
Chapter 3: Configuration and Installation
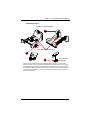
Component Part D
Figure 3-3. Component Part D
D
Component Part D Alignment Slots
D
D
Component Part D
Locking Tabs
The SC743 X9 universal air shroud’s Component Part D (Figure 3-3), 33mm wide
tear-drop module, can be mounted on the underside of Component Part A by inserting
its locking tabs into the alignment slots provided on Component Part A. Three positions
are indicated for attaching the first tab of Component Part D into the locking tab slots on
Component Part A (labeled “a”, “b” and “c”). Component Part D may also be removed
out if it is not required.
3-3
SC743 X9 Universal Air Shroud User’s Guide
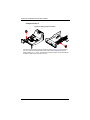
Component Part E
Figure 3-4. Moving Component Part E
E
E
The SC743 X9 universal air shroud’s Component Part E (Figure 3-4) can be moved in
and out to resize the X9 universal air shroud’s size to fit the mainboard using three
sliding positions (“0”, “1” and “2”. The bottom of Component Part E can also be detached
to allow for cable access under the air shroud.
3-4
Chapter 3: Configuration and Installation
3-3
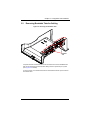
Removing Breakable Tabs for Cabling
Figure 3-5. Removing the Breakable Tabs
Breakable
Tabs
Component Parts B and E for the SC743 X9 universal air shroud have breakable tabs
that can be permanently removed to allow cabling access if required for your system
(see Figure 3-5 for details).
To remove, simply cut or break the tabs off from their attachments with a pair of scissors
and discard them.
3-5
SC743 X9 Universal Air Shroud User’s Guide
3-4
Configuring the SC743 X9 Universal Air Shroud
The SC743 X9 universal air shroud can be customized into multiple configurations for
Supermicro systems. With all parts attached, with three positions each for Component
Parts B and E, and three possible locking positions for Part D, many possible
combinations can be configured for the SC743 X9 universal air shroud. With parts
detached more configurations are possible.
Some recommended example configurations for specific Supermicro motherboards are
shown below in Table 3-2. All are 12” x 13” E-ATX Intel Xeon or AMD Opteron
motherboards.
Table 3-2. Examples of SC743 X9 Universal Air Shroud Configurations
Example
Motherboard
Slot and Tab Positions
X9DA6
Tab Position C (Part B), Tab Position 2 (Part E) and Slot Positon “b” (Part D)
X9DR6-F
Tab Position B (Part B), Tab Position 2 (Part E) and Slot Positon “c” (Part D)
X8DT6-F
Tab Position A (Part B), Tab Position 0 (Part E) and Slot Positon “b” (Part D)
H8DG6
Tab Position B (Part B), Tab Position 1 (Part E) and Slot Positon “b” (Part D)
NOTE: The default configuration is with Component Parts A, B, D and E
already connected (Figure 3-6).
Figure 3-6. Default Configuration
3-6
Chapter 3: Configuration and Installation
3-5
Installing the SC743 X9 Universal Air Shroud
To install the SC743 X9 universal air shroud follow the procedure below. This procedure
is the same for all configurations of the SC743 X9 universal air shroud in Supermicro
systems.
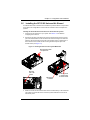
Installing the SC743 X9 Universal Air Shroud in SC743 Chassis Systems
1. Configure the air shroud to fit in your system. See Section 3-4 for details on
configuring the air shroud.
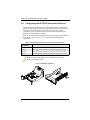
2. Secure the rear edge of the SC743 air shroud (Component Part A) to the top-rear
part of the chassis interior so that the SC743 air shroud mounting screw holes are
aligned in with the mounting screw holes of the chassis. Align it so that the slot of
the air shroud’s front mounts with the mounting tab at the top-front part of the
chassis interior (see Figure 3-7).
Figure 3-7. Inserting Air Shroud onto a System Mainboard
Mounting Holes in Rear
of Component A
Mounting
Slot on Air
Shroud
Mounting Tab
on Chassis
Mounting Holes
in Top Rear Edge
of Chassis Interior
3. Make sure the SC743 X9 universal air shroud is mounted directly on the mainboard
of its system so that the air shroud covers the system mainboard over the CPU’s
and memory slots.
3-7
SC743 X9 Universal Air Shroud User’s Guide
NOTE: The air shroud should be mounted flush with the power supply housing
if installing properly. Some cables are supposed to go under the air shroud.
Detach breakaway tabs if required for cable access.
4. Secure the top cover back on your system.
3-8
Disclaimer
The products sold by Supermicro are not intended for and will not be used in life support
systems, medical equipment, nuclear facilities or systems, aircraft, aircraft devices,
aircraft/emergency communication devices or other critical systems whose failure to
perform be reasonably expected to result in significant injury or loss of life or
catastrophic property damage. Accordingly, Supermicro disclaims any and all liability,
and should buyer use or sell such products for use in such ultra-hazardous applications,
it does so entirely at its own risk. Furthermore, buyer agrees to fully indemnify, defend
and hold Supermicro harmless for and against any and all claims, demands, actions,
litigation, and proceedings of any kind arising out of or related to such ultra-hazardous
use or sale.
1-1
SC743 X9 Universal Air Shroud User’s Guide
Notes
1-2