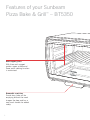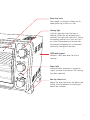
1
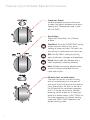
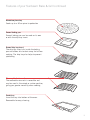
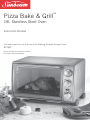
Pizza Bake & Grill™
19L Stainless Steel Oven
Instruction Booklet
This book covers the use and care of the following Sunbeam Compact Oven:
BT5350
Please read these instructions carefully
and retain for future reference.
Contents
Sunbeam’s Safety Precautions
1
Features of your Pizza Bake & Grill 2
Using your Pizza Bake & Grill
6
Cooking Pizza guide
8
Roasting guide
8
Grilling guide
9
Roasting tips for vegetables
10
Care and cleaning
11
Recipes12
Important instructions – retain for
future use.
Sunbeam’s Safety Precautions
SAFETY PRECAUTIONS FOR YOUR
SUNBEAM BAKE & GRILL OVENS.
• Always operate on a flat surface.
• Avoid contact with oven surfaces, including
oven door, during and after use, as they will
be hot.
• Use well away from walls and curtains.
• Do not place items on top of the oven whilst in
use.
• Do not block or cover the air vents on the top,
back or side of the oven.
• Do not use in confined spaces.
• Do not immerse the unit in water.
Sunbeam is very safety conscious when
designing and manufacturing consumer products,
but it is essential that the product user also
exercise care when using an electrical appliance.
Listed below are precautions which are essential
for the safe use of an electrical appliance:
• Read carefully and save all the instructions
provided with an appliance.
• Always turn the power off at the power outlet
before you insert or remove a plug. Remove
by grasping the plug - do not pull on the cord.
• Turn the power off and remove the plug when
the appliance is not in use and before cleaning.
• Do not use your appliance with an extension
cord unless this cord has been checked and
tested by a qualified technician or service
person.
• Always use your appliance from a power outlet of
the voltage (A.C. only) marked on the appliance.
• This appliance is not intended for use by
persons (including children) with reduced
physical, sensory or mental capabilities, or lack
of experience and knowledge, unless they have
been given supervision or instruction concerning
use of the appliance by a person responsible for
their safety.
• Children should be supervised to ensure that
they do not play with the appliance.
• The temperature of accessible surfaces may be
high when the appliance is operating.
• Never leave an appliance unattended while
in use.
• Do not use an appliance for any purpose
other than its intended use.
• Do not place an appliance on or near a hot gas
flame, electric element or on a heated oven.
• Do not place on top of any other appliance.
• Do not let the power cord of an appliance hang
over the edge of a table or bench top or touch
any hot surface.
• Do not operate any electrical appliance with a
damaged cord or after the appliance has been
damaged in any manner. If damage is suspected,
return the appliance to the nearest Sunbeam
Appointed Service Centre for examination, repair
or adjustment.
• For additional protection, Sunbeam recommend
the use of a residual current device (RCD)
with a tripping current not exceeding 30mA in
the electrical circuit supplying power to your
appliances.
• Do not immerse the appliance in water or any
other liquid unless recommended.
• Appliances are not intended to be operated
by means of an external timer or separate remote
control system.
• This appliance is intended to be used in
household and similar applications such as: staff
kitchen areas in shops, offices and other working
environments; farm houses; by clients in hotels,
motels and other residential type environments;
bed and breakfast type environments.
If you have any concerns regarding the performance and use of your appliance,
please visit www.sunbeam.com.au or contact the Sunbeam Consumer Service Line.
Ensure the above safety precautions are understood.
1
Features of your Sunbeam
Pizza Bake & Grill™ – BT5350
Rack support guides
With three rack support
guides: upper, middle and
lower, each cooking function
is maximised.
Removable crumb tray
Crumb tray slides out for
emptying without the need
to open the door and has a
cool touch handle for added
safety.
2
Extra deep back
Extra depth in the back allows you to
cook pizzas up to 30cm in size
Heating light
Light on indicates that the oven is
heating. When the set temperature is
reached, the light will switch off. During
the cooking process this light will turn
on and off occasionally to ensure that
the desired temperature is maintained
constantly throughout the oven.
1600 watt element
Powerful 1600 watt oven for a fast
heat-up.
Power light
Indicates when the oven is turned on.
Lights up when the timer or 'ON' setting
has been selected.
Non-slip rubber feet
Keeps the oven secure on the bench top
during use and prevents scratching of
bench top surfaces.
3
Features of your Sunbeam Bake & Grill continued
Temperature Control
Variable temperature control allows you
to select the perfect temperature for each
cooking task. Temperature range is from
60ºC to 240ºC.
Oven Settings
Select from Pizza/Toast, Grill, Reheat
or Bake.
Pizza/Toast: Using the pizza/toast setting
allows maximum heat for fast, quick
cooking of pizzas and toast. For toast, use
this setting in combination with the timer.
Grill: Use the GRILL setting for grilling
open sandwiches, sausages and vegetables.
Reheat: Heats food from beneath and is
ideal for perfectly reheating leftovers.
Bake: Suitable for roasting baked dinners
as well as baking homemade biscuits,
cakes and muffins.
60 minute timer and on/off control
The timer can be set up to 60 minutes
and will automatically turn the oven off
and sound a bell at the end of the cooking
time. Alternatively, the dial can be set to
the ON position for continuous operation,
until it is turned off manually. Variable
browning control allows you to toast your
bread to a desired colour. Light Toast on
the timer represents the lightest toasting
shade and Dark Toast represents the
darkest toasting shade.
4
Features of your Sunbeam Bake & Grill continued
Aluminium pizza tray
Cooks up to a 30cm pizza to perfection
Enamel baking pan
Enamel baking pan can be used on its own
or with the drip tray insert.
Enamel drip tray insert
The drip tray insert sits inside the baking
pan and allows fats to drain away for fat-free
cooking. The drip tray also helps to prevent
splattering.
Chrome plated wire rack
The removable wire rack is reversible and
may be used in the raised or sunken position,
giving you greater versatility when cooking.
Sunken
Raised
Crumb tray
Insert the tray into bottom of the oven.
Removable for easy cleaning.
5
Using your Bake & Grill™
Position the oven on a dry, level surface,
ensuring that the ventilation slots on the side
and top of the appliance are not obstructed.
Plug the power cord into a 230-240 volt
power outlet and turn the power on.
Note: When turned on for the first time,
your Bake & Grill may give off vapours for
up to 10 minutes. This is due to the initial
heating of the materials used. It is safe, not
detrimental to the performance of the oven
and will not re occur.
Important: Do not force open the oven door
beyond its limit or let the door drop open
as this will distort the door and hinder the
oven's ability to maintain a proper seal.
For pizza
The top two and bottom two elements will
heat when the 'pizza' setting has been
selected.
1.Place the wire rack in the middle shelf in
the sunken position.
2.Place the pizza tray on the shelf.
3.Turn the oven setting to ‘Pizza/Toast’.
4.Set the temperature to 210ºC and allow
tray to preheat for 5-10 minutes before
using.
To toast
The top two and bottom two elements will
heat when the ‘Toast’ setting has been
selected.
1.Place the wire rack into the middle rack
support guide, in the sunken position.
2.Arrange bread on the wire rack.
3.Turn the oven setting to ‘Toast’.
4.Set the temperature control to the
maximum 240ºC.
6
5.To set the time first turn the dial fully
clockwise to 60 minutes, then turn it
ant-clockwise to the toast icons to start the
timer. This ensures accurate timing. Light
Toast represents the lightest toast shade
and Black Toast represents the darkest
shade.
6.A bell will sound when the selected toast
cycle has ended.
Note: Toasting times will vary depending
on the type of bread used. Sweet and fruit
breads generally take less time than white or
wholemeal breads.
To grill
The top two elements will heat when the
‘Grill’ setting has been selected.
1.Place the wire rack, in the sunken position,
into the highest rack support guide.
2.Place the drip tray inside the baking pan
and position the food on the drip tray.
Place the baking pan on the wire rack.
3.Turn the oven setting to ‘Grill’.
4.Set the temperature control to maximum
240ºC.
Note: For best results, allow the oven to
preheat for 5 -10 minutes or as per recipe
instructions.
5.To turn the grill on, turn the timer control
clockwise to the desired time. Alternatively,
for continuous operation, turn the timer
control to the ON position.
6.When finished grilling, the oven will switch
off automatically and a bell will sound if
the timer was selected. Alternatively, turn
the timer control to OFF position if the
continuous mode was selected.
Using your Bake & Grill continued
To reheat
The bottom two elements will heat when the
‘Reheat’ setting has been selected.
1.Place the wire rack in either the raised
or sunken position, into the desired rack
support guide, depending on the type of
food/dish that is being reheated.
2.Place the food in an oven-proof dish.
3.Turn the oven setting to ‘Reheat’.
4.Select the desired temperature on the
temperature control. See page 10 for a
guide.
5.To turn the oven on, turn the timer control
clockwise to the desired time. Alternatively,
for continuous operation, turn the timer
control to the 'ON' position.
6.Stir food occasionally to ensure even
reheating of food.
Note: Use oven mitts to remove dish as it will
be very hot.
7.When finished reheating, the oven will
switch off automatically and a bell
will sound if the timer was selected.
Alternatively turn the timer to the 'OFF'
position if the continuous mode was
selected.
To bake or roast
The top two and bottom two elements will
heat when the ‘Bake’ setting has been
selected.
1.Place the wire rack in the sunken position,
into the desired rack support guide.
2.Place the food to be baked on the wire
rack, using the appropriate pan, tray etc.
3.Place the drip tray inside the baking pan
and position the food on the drip tray.
Place the baking pan on the wire rack.
4.Turn the oven setting to ‘Bake’.
5.Select the desired temperature on the
temperature control.
Note: For best results, allow the oven to
preheat for 5 -10 minutes or as per recipe
instructions.
Important: If baking cakes, biscuits etc, using
recipes other than those provided with this
instruction booklet, it is recommended that
oven temperatures for the ‘Bake’ setting
be reduced by approximately 20-30°C. The
recipes in the back of this book have already
been adjusted.
5.To turn the oven on, turn the timer control
clockwise to the desired time. Alternatively,
for continuous operation, turn the timer
control to the ON position.
6.When finished baking, the oven will switch
off automatically and a bell will sound if
the timer was selected. Alternatively, turn
the timer control to OFF position if the
continuous mode was selected.
7
Cooking guide
TEMPERATURE
SETTING ºC
OVEN TEMPERATURE
DESCRIPTION
FUNCTION/FOOD
Low / 80
Moderately Warm
Warming plates/dishes
90
Moderately Warm
Slow reheating
120
Warm
Shortbread
150
Warm
Cakes, reheating
180
Moderate
Roasts, biscuits, quiche
210
Moderately Hot
Pizza, frittata
240
Hot
Scones
Roasting guide
For best results cook all beef, lamb, veal or pork at 200˚C for 15 minutes, then reduce to
180˚C and use the remaining cooking times from the chart below:
MEAT
Approximate time per 500g cooked at
180ºC (after initial 15mins @ 200°C)
15 minutes
Beef – Rare
Beef – Medium
20 minutes
Beef – Well done
25 minutes
Lamb – Medium
20 minutes
Lamb – Well done
25 minutes
Veal – Well done
30 minutes
Pork – Well done
POULTRY
35 minutes
Approximate time per 500g
cooked at 180ºC
25-30 minutes
Chicken Note: Chicken is cooked when the juices run clear after piercing with a skewer or knife.
8
Grilling guide
Preheat compact oven to maximum heat for 5 minutes. Oven rack should be positioned in
the highest rack support guide with the rack either sitting in the raised or sunken position
depending on the height of your meat. Place meat on baking pan with drip tray.
Food Type
Approximate Cooking Times
Thin Sausages – up to 10 sausages
11 minutes, turning occasionally
Thick sausages – up to 8 sausages
18 minutes, turning occasionally
Lamb Chops – up to 8 small chops
5-7 minutes, turning once
Steaks – 2-4 steaks, depending on size
5-10 minutes, turning once. Note: Cooking time will vary depending on thickness of food and individual preferences.
9
Roasting tips for vegetables
Grilled Capsicum
• Preheat oven to maximum heat using the
Grill setting. Place rack in the top shelf
in the sunken position.
• Cut capsicum in half and remove seeds
and membrane. Spray with vegetable oil
spray.
• Bake for 30 minutes or until skin blackens
and blisters.
• Remove from oven, and cover with plastic
until cool enough to handle
• Peel off skin and cut into strips.
Caramelised Onion
• Preheat oven to 200°C using the Bake
setting. Place rack in the middle shelf in
the sunken position.
• Line baking pan with aluminium foil; spray
with vegetable oil spray.
• Peel and thinly slice one large onion (red is
preferable).
• Mix through 1 tablespoon of olive oil and
spread over baking tray.
• Bake 30 - 40 minutes, turning tray half
way or until onion is soft and browned.
10
Roasted Sweet Potato or Potatoes
• Preheat oven to 180°C using the Bake
setting. Place rack in the middle shelf in
the sunken position.
• Grease baking tray with vegetable oil spray.
• Peel and chop sweet potato or potato into
1-2 cm pieces, place on baking tray and
spray generously with vegetable cooking
spray. Season with sea salt and freshly
ground black pepper.
• Bake for 30 minutes or until potato is
cooked.
Note: If a cooking spray is not available,
lightly apply oil using a brush.
Care and cleaning
• Always turn the power off and remove the
plug from power outlet after use and before
cleaning. Allow the oven to cool before
cleaning.
• It is recommended that you clean the oven
after each use to prevent a build up of
grease and to avoid unpleasant odours.
Note: Do not clean any part of the oven in the
dishwasher.
• The wire rack, baking pan, drip tray, and
crumb tray, may be washed in warm soapy
water and rinsed.
Note: Never immerse the oven in water.
• The interior walls and ceiling of the
compact oven can be wiped with a mild
detergent and a damp cloth.
• To clean the exterior of the compact oven,
wipe the walls with a cloth dampened with
mild detergent. Polish with a soft dry cloth.
• To clean the glass door, wipe with a damp
sponge and dry.
11
Recipes - Pizza
All the recipes have been specifically created
and tested by the Sunbeam Test Kitchen for
the Pizza Bake and Grill Oven.
We hope you enjoy using your oven.
Pizza Dough Makes: 2 small or 1 large
2 teaspoons (7g) dry yeast
1 teaspoon caster sugar
¾ cup warm water
2 cups plain flour
½ teaspoon salt
2 tablespoons olive oil
1.Combine the yeast, sugar and water in a
bowl. Stir to combine. Cover mixture with
cling wrap and place in a warm area until
the mixture starts to bubble.
2.Combine the yeast mixture, flour, salt and
oil in a large bowl and mix until combined.
Turn dough onto a floured surface and
knead for about 10 minutes or until the
dough is firm and elastic. Place dough in
a bowl and allow to rest in a warm place
until the dough has doubled in size.
3.Using your fist, punch the dough down.
Fold sides to centre and turn dough over.
Place dough onto a floured surface and
lightly knead. Cut dough in half. Roll
dough out to fit a pizza tray. Dress pizza
dough as required.
12
Pumpkin, Caramelized Onion Makes: 2 Pizzas
and Goats Cheese Pizza
1kg pumpkin, peeled, deseeded, cubed
3 onions, sliced
1 clove garlic, crushed
1 teaspoon fresh thyme
¹⁄³ cup olive oil
1 quantity basic pizza dough, rolled out into
two 26cm circles
1 cup pizza sauce
150g goats cheese, crumbled
Salt and freshly ground black pepper, to taste
1.Preheat oven to 210°C using the PIZZA
setting. Place wire rack in the middle shelf
in the sunken position.
2.Toss pumpkin, onions, garlic and thyme in
oil. Place onto a lined baking tray and bake
for 25-30 minutes or until pumpkin and
onions are tender and golden.
3.Spread pizza sauce evenly over pizza
bases. Scatter pumpkin mixture and goats
cheese over the bases.
4.Place on pizza tray and bake for 15-20
minutes or until golden brown. Season to
taste with salt and pepper.
Pizza (continued)
Margherita Pizza
Makes: 2 pizzas
Meat Lovers Pizza
Makes: 2 pizzas
1 quantity basic pizza dough, rolled out into
two 26cm circles
1 quantity basic pizza dough, rolled out into
two 26cm circles
1 cup tomato puree
1 cup tomato puree
150g mozzarella, thinly sliced
1 red onion, finely sliced
2 tablespoons fresh basil, chopped
100g pepperoni, sliced
Salt and freshly ground black pepper, to taste
100g prosciutto, roughly chopped
1.Preheat oven to 210°C using PIZZA
setting. Place wire rack in the middle shelf
in the sunken position.
100g salami, sliced
2.Spread tomato puree over bases. Top with
cheese.
3.Place on pizza tray and bake for about
15-20 minutes or until golden.
3.Top with basil. Season to taste with salt
and pepper.
100g mozzarella, grated
¼ cup barbeque sauce
Salt and freshly ground black pepper, to taste
1.Preheat oven to 210°C using PIZZA
setting. Place wire rack in the middle shelf
in the sunken position.
2.Spread tomato puree over pizza bases.
Scatter onion, pepperoni, prosciutto and
salami over the bases. Top with mozzarella
and barbeque sauce.
3.Place on pizza tray and bake for 15-20
minutes or until golden. Season to taste
with salt and pepper.
13
Pizza (continued)
Mediterranean Pizza
Makes: 2 pizzas
1 quantity basic pizza dough, rolled out into
two 26cm circles
Tandoori Chicken Pizza
Makes: 2 pizzas
1 quantity basic pizza dough, rolled out into
two 26cm circles
¼ cup basil pesto
½ cup plain Greek yoghurt
200g roasted eggplant; chopped *
¹⁄³ cup tandoori paste
100g roasted artichoke; chopped *
400g chicken thigh fillets
100g roasted red pepper; chopped *
200g tzakiki spread
100g semi dried tomato *
1 teaspoon mint sauce
50g kalamata olives, pitted *
1 red onion, finely sliced
150g feta cheese, crumbled
200g bocconcini cheese, roughly chopped
½ teaspoon dried basil
¼ cup fresh coriander, chopped
Salt and freshly ground black pepper, to taste
Salt and freshly ground black pepper, to taste
1.Preheat oven to 210°C using PIZZA
setting. Place wire rack in the middle shelf
in the sunken position.
1.Preheat oven to 210°C using PIZZA
setting. Place wire rack in the middle shelf
in the sunken position.
2.Spread pesto over the pizza bases. Top
with roasted vegetables, tomatoes and
olives. Scatter feta and dried basil over
pizza.
2.Combine yoghurt and tandoori paste. Stir
through chicken, cover and refrigerate for 1
hour.
3.Place on pizza tray and bake for 15-20
minutes or until golden. Season to taste
with salt and pepper.
* If you don’t wish to roast your own
vegetables, roasted vegetables are also
available from your local supermarket in
the deli section.
14
3.Place chicken on a lined baking tray and
bake for 10 minutes or until the chicken
juices run clear. Cool and roughly chop. 4.Combine tzakiki and mint sauce. Season
with salt and pepper. Spread over pizza
bases. Scatter bases with chicken and
onion. Top with cheese.
5.Place on pizza tray and bake for 15-20
minutes or until golden. Top with
coriander. Season to taste with salt and
pepper.
Pizza (continued)
Garlic Prawn Pizza
Makes: 2 pizzas
1 quantity basic pizza dough, rolled out into
two 26 cm circles
¼ cup olive oil
2 cloves garlic, crushed
400g fresh ricotta
¾ cup grated parmesan cheese
1 tablespoon lemon zest
600g prawns, deveined, tails removed,
washed
Salt and freshly ground black pepper, to taste
Freshly chopped parsley, if desired
1.Preheat oven to 210°C using PIZZA
setting. Place wire rack in the middle shelf
in the sunken position.
2.In a bowl combine half of the oil, garlic,
ricotta, parmesan and lemon zest.
Season to taste with salt and pepper.
3.Spread ricotta mixture over pizza bases.
Top with prawns and remaining oil.
4.Place on pizza tray and bake for 15-20
minutes or until golden. Season to taste
with salt and pepper. Top with parsley.
15
Roasts
Lemon and Rosemary Roast Chicken Serves: 4
Perfect Roast Beef
8 chicken thighs
2 onions, quartered
6 cloves garlic, finely sliced
1 bulb garlic, broken into cloves
6 sprigs fresh rosemary
6-8 fresh thyme sprigs
½ cup olive oil
½ cup olive oil
¼ cup lemon juice
2-2.5kg beef topside, tied*
Serves: 6-8
2 tablespoons lemon rind
Salt and freshly ground black pepper, to taste
Salt and freshly ground black pepper, to taste
1.Preheat oven to 200°C using the BAKE
setting. Place wire rack on the bottom
shelf in the raised position.
1.Preheat oven 180°C using the BAKE
setting. Place wire rack on the bottom
shelf in the raised position.
2.In a large bowl toss chicken, garlic,
rosemary, oil, lemon juice and lemon rind.
Cover and refrigerate for 1 hour.
3.Place chicken and marinade in baking
dish. Bake for 25-30 minutes or until
chicken is cooked.
4.Change to GRILL setting. Place wire rack
on top shelf in the sunken position and
grill chicken for 3-4 minutes or until skin
and golden and crispy. Allow to rest for
5-10 minutes before serving.
16
2.Combine onion, garlic, thyme and half of
the olive oil in the base of the baking dish.
3.Season beef generously with salt and
pepper. Place on top of onion mixture and
drizzle with remaining oil.
4.Place in oven and bake for 50 minutes or
until done. Remove beef from dish, cover
and allow to rest for 10 minutes.
* Ask your local butcher to do this for you.
TIP: To make gravy, strain juice in base of
baking dish. Heat in a small saucepan over
medium heat. Mix ½ cup beef stock and 1
tablespoon of cornflour to form a smooth
paste, whisk constantly until thickened.
Season with salt and pepper. Serve over beef.
Roasts (continued)
Crispy Roast Potatoes
Serves: 4-6
1kg Coliban or Sebago potatoes, peeled,
quartered
Slow Roasted Pork Belly
Serves: 6-8
1.5kg pork belly, skin scored
8 cloves garlic
2 tablespoons fresh thyme leaves, finely
chopped
8 sprigs fresh thyme
1 tablespoon salt
½ cup olive oil
3 medium apples, peeled, quartered, sliced
Salt and freshly ground black pepper, to taste
2 onions, sliced
1.Preheat oven to 210°C using the BAKE
setting. Place wire rack on the bottom
shelf in the raised position.
Salt and freshly ground black pepper, to taste
2.Line a baking tray with baking paper.
Scatter over potatoes, garlic, thyme and
oil. Season with salt and pepper.
3.Place in oven and bake for 20 minutes.
Remove from oven and gently crush
potatoes with a fork. Place back in oven
and bake for a further 15-20 minutes or
until golden and crispy.
TIP: Use any left over potatoes for bubble and
squeak.
4-6 fresh sage leaves
1.Preheat oven to 210°C using the BAKE
setting. Place wire rack on the bottom
shelf in the raised position.
2.Dry pork belly thoroughly. In a small bowl
combine thyme and salt. Rub salt mixture
over the pork.
3.Place apples, onion and sage in the base of
a baking dish. Place pork on top of apple
mixture and bake for 25-30 minutes or
until skin is crispy. Reduce heat to 180°C
and cook for a further hour, or until done.
4.Remove pork from oven. Allow to rest for
10 minutes before serving with apple and
onions.
17
Roasts (continued)
Rosemary Leg of Lamb Serves: 4-6
with Mint Sauce
2kg leg of lamb
4 cloves garlic, crushed
30g butter, softened
5-6 stalks fresh rosemary
Salt and freshly ground black pepper, to taste
1.Preheat oven to 210°C using the BAKE
setting. Place wire rack on the bottom
shelf in the raised position.
2.Remove lamb from fridge and bring to
room temperature.
3.In a small bowl combine garlic and butter.
Season to taste with salt and pepper.
4.With a sharp thin knife, make between
20-30 small incisions into the flesh of the
lamb. Push the butter and garlic into each
incision with a few rosemary leaves.
5.Place in oven and bake for 1- 1 ½ hours or
until cooked. Allow lamb to rest for 10-15
minutes before serving.
Mint Sauce
Makes: ½ cup
1 bunch fresh mint
3 tablespoons boiling water
1 tablespoon caster sugar
2 tablespoons white wine vinegar
Salt and freshly ground black pepper, to taste
1.Strip mint leaves from stalk and roughly
chop.
2.Place mint leaves, water and sugar in a
small jug. Stir and allow to cool.
3.Add vinegar and season to taste with salt
and pepper.
18
Roast Chicken Stuffed with Herbs
Serves: 4
1-1.5kg whole chicken
1 bunch fresh parsley
1 bunch fresh sage
5-6 sprigs fresh thyme
1 lemon, quartered
4 cloves garlic, chopped
50g butter, softened
Kitchen twine
Salt and freshly ground black pepper, to taste
1.Preheat oven to 180°C using the BAKE
setting. Place rack in the middle shelf in
the sunken position.
2.Rinse chicken under cold water, remove
giblets. Pat dry.
3.Place parsley, sage, thyme, lemon and half
of the garlic in the chicken cavity.
4.In a small bowl combine butter and
remaining garlic. Season with salt and
pepper. Spread the butter mixture
underneath the skin of the chicken.
Tie together chicken legs with kitchen
twine.
5.Place on baking tray and cook for 40-50
minutes or until juices run clear. Allow
chicken to rest for 10-15 minutes before
serving.
TIP: Soak the kitchen twine in water for
1 hour before tying the chicken. This will
prevent the string from burning.
Other Meals
Baked Eggs
Serves: 3
This is a great way of cooking breakfast in
one pan!
2 red onions, chopped
2 long red chillies, deseeded, chopped
1 clove garlic, crushed
2 tablespoons olive oil
2 400g can cherry tomatoes
2 teaspoons brown sugar
1 teaspoon balsamic vinegar
6 eggs
Fresh basil, to garnish
Salt and freshly ground black pepper, to taste
Mushroom and Ricotta Quiche
Serves: 8-10
Olive oil spray
1 sheet short crust pastry
350g portabella mushrooms, sliced
2 tablespoons olive oil
1 ½ teaspoons fresh thyme, chopped
250g fresh ricotta
3 egg yolks, beaten
1 ¼ cups cream
Salt and freshly ground black pepper, to taste
1.Preheat oven to 180°C using the BAKE
setting. Place rack in the middle shelf in
the sunken position. Grease a 25cm round
tart tin.
1. Preheat oven to 200°C using the BAKE
setting. Place rack in the middle shelf in
the sunken position.
2.Roll pastry out to fit into tin. Cover and
place in refrigerator to rest for 15 minutes.
2. Line baking tray with baking paper.
Scatter over onions , chilli and garlic.
Drizzle with half of the olive oil. Bake for
20-30 minutes or until onions are golden. 3.Cover pastry with baking paper and fill with
uncooked rice. Place in oven and bake for
10 minutes. Gently remove baking paper
and rice. Bake for a further 5 minutes or
until golden brown.
3.In a medium baking dish combine onion
mixture, tomatoes, brown sugar and
balsamic vinegar.
4.Using the back of a spoon make 6 indents
in the mixture. Crack the eggs into the
indents.
5.Place in oven and bake for 15-20 minutes,
or until eggs are set. Season to taste with
salt and pepper.
6.Serve with basil and hunks of crusty pieces
of bread.
4.Toss mushrooms, oil and thyme. Place on
a lined baking tray and cook for 10-12
minutes or until mushrooms have softened.
Set aside.
5.In a bowl combine ricotta, eggs and cream.
6.Place mushrooms in tart shell and pour
over the ricotta mixture.
7.Cook for 20-30 minutes or until golden
and set. Allow to cool completely in pan
before serving.
TIP: Add chorizo or green capsicum when
baking the onions.
19
Other Meals (continued)
Asian Style Baked Fish
Serves: 4
2 long green onions, chopped
1 red capsicum, deseeded, finely sliced
1 carrot, peeled, cut into fine matchsticks
1 long red chilli, deseeded, finely sliced
¼ cup soy sauce
1 teaspoon caster sugar
1 teaspoon sesame oil
2 teaspoons lime juice
Fresh coriander, garnish
Salt and freshly ground black pepper, to taste
1.Preheat oven to 180°C using the BAKE
setting. Place rack in the middle shelf in
the sunken position.
2.Combine onion, capsicum, carrot and chilli
in a large bowl.
3.Place the fish on a lined baking tray.
Divide the vegetable mixture evenly and
place on top of fish fillets.
4.Place another sheet of baking paper over
fish. Fold sides together to form a parcel.
Bake for 15-20 minutes, or until fish
flakes when tested with a fork.
5.Garnish with lime juice and coriander if
desired.
20
Garlic Toasts
Serves: 3
These are great accompaniments with
salads / soups.
¹⁄³ cup olive oil
3 cloves garlic, crushed
1 loaf sour dough bread, sliced
Salt and freshly ground black pepper, to taste
1.Preheat oven to 200°C using the TOAST
setting. Place rack in the middle shelf in
the raised position. Position the drip tray
beneath the rack.
2.Combine the oil and garlic. Season with
salt and pepper.
3.Brush the oil mixture over both sides of
the bread. Place on rack and grill for 3-4
minutes or until golden brown. These
toasts can be served hot or cold.
Other Meals (continued)
3 Cheese Rarebit
Serves: 2
4 slices crusty bread
4 tablespoons creamy cheese and chive dip
½ cup grated cheddar cheese
¼ cup grated parmesan cheese
Freshly ground black pepper, to taste
1.Preheat oven to 200°C using the GRILL
setting. Please rack in the middle shelf in
the raised position. Position the drip tray
beneath the rack.
2.Place a tablespoon of dip in the centre
of each piece of bread. Gently press and
flatten with a spoon keeping a gentle dome
shape.
3.Top with cheddar cheese then parmesan
cheese. Sprinkle with black pepper.
4.Place on rack and grill for 5 minutes or
until cheese is melted and golden. Serve
hot.
21
Sweets
Chocolate Coconut Slice
Banana Cinnamon Muffins
125g butter, melted
2 cups plain flour
1 cup brown sugar
2 teaspoons baking powder
1 egg
1 ½ teaspoons ground cinnamon
½ cup plain flour
1 ½ cups mashed banana
½ cup self-raising flour
¾ cup milk
¹⁄³ cup cocoa
¹⁄³ cup caster sugar
¼ cup honey
¾ cup shredded coconut
Icing
¾ cup icing sugar
¼ cup cocoa
50g butter, melted
1.Preheat oven to 160°C using the BAKE
setting. Place rack in the middle shelf in
the sunken position. Line a 20 x 20 cm
slice pan.
2.In a bowl combine butter, sugar and egg.
Sift over the flours and cocoa.
Add coconut, stir to combine
3.Press mixture into prepared pan. Place in
oven and bake for 25-30 minutes or until
firm.
4.For the icing, combine icing sugar and
cocoa in a bowl. Add butter and stir to
combine.
5.Spread icing over hot slice and allow to
cool in pan.
Makes: 12
¼ cup vegetable oil
1 egg
1.Preheat oven to 160°C using the BAKE
setting. Place rack in the middle shelf in
the sunken position. Lightly grease muffin
pan.
2. Sift flour, baking powder and half of the
cinnamon into a large bowl.
3.In a separate bowl combine banana, milk,
sugar, honey, oil and egg. Pour the liquid
ingredients into the flour mixture. Gently
stir until just combined. Divide mixture
evenly into pans. Sprinkle with remaining
cinnamon.
4.Place in oven and bake for 15 minutes or
until golden and firm. TIP: Only mix the muffin mixture until just
combined. Over stirring will result in a dense
and tough muffin. Sweets (continued)
Moist Date Cake
Makes: 12
1 ½ cups dates, deseeded, roughly chopped
1 cup boiling water
1 teaspoon bicarbonate soda
80g butter, softened
½ cup brown sugar
2 eggs
1 cup self raising flour, sifted
Custard, to serve
1.Preheat oven to 180°C using the BAKE
setting. Place rack in the middle shelf in
the sunken position. Line a 18cm cake pan
with baking paper.
2.In a small bowl combine dates, water
and bicarbonate soda. Let stand for 10
minutes.
3.In a separate bowl cream butter and sugar
until light and fluffy. Add eggs one at a
time, mixing well after each addition.
4.Add date mixture and flour to the butter
mixture. Stir until well combined. Pour
into pan. Place in oven and bake for 35-40
minutes or until cooked. Serve warm with
custard.
Easy Chocolate Cake with Butter Cream Icing
2 ¼ cups plain flour, sifted
1 ¾ cups caster sugar
1 cup milk
½ cup cocoa powder, sifted
½ cup vegetable oil
1 ½ teaspoons baking powder
1 ½ teaspoons baking soda
2 eggs
1 cup boiling water
200g butter, softened
Icing
2 ½ cups icing sugar, sifted
¹⁄³ cup cocoa, sifted
¼ cup milk
1.Preheat oven to 160°C using the BAKE
setting. Place rack in the middle shelf in
the sunken position. Line a 23cm round
cake pan with baking paper.
2.In a large bowl combine all ingredients,
except boiling water. Mix until smooth.
While stirring, gradually add small amounts
of boiling water.
3.Pour into pan. Bake for 35-40 minutes or
until a skewer comes out clean from the
centre of the cake. Cool cake in pan before
removing.
4.Beat butter in a large bowl until light and
pale. Gradually add icing sugar, cocoa and
milk.
5.Place cake on a flat work surface. Cover
the top and sides of cake with icing.
TIP: To make icing look smooth keep a
container of hot water close by. Dip your
knife into the water to help create a smoother
finish to the icing.
Notes
12 Month Replacement Guarantee
In the unlikely event that this appliance develops any malfunction
within 12 months of purchase (3 months commercial use) due to
faulty materials or manufacture, we will replace it for you
free of charge.
Should you experience any difficulties with
your appliance, please phone our customer
service line for advice on 1300 881 861 in
Australia, or 0800 786 232 in New Zealand.
Alternatively, you can send a written claim
to Sunbeam at the address listed below.
On receipt of your claim, Sunbeam will
seek to resolve your difficulties or, if the
appliance is defective, advise you on how
to obtain a replacement or refund.
Your Sunbeam 12 Month Replacement
Guarantee naturally does not cover misuse
or negligent handling and normal wear and
tear.
Similarly your 12 Month Replacement
Guarantee does not cover freight or any other
costs incurred in making a claim. Please
retain your receipt as proof of purchase.
The benefits given to you by this guarantee
are in addition to your other rights and
remedies under any laws which relate to the
appliance.
Our goods come with guarantees that cannot
be excluded under the Australian Consumer
Law and under the New Zealand Consumer
Guarantees Act.
In Australia you are entitled to a
replacement or refund for a major failure and
for compensation for any other reasonably
foreseeable loss or damage. You are also
entitled to have the goods repaired or
replaced if the goods fail to be of acceptable
quality and the failure does not amount to
a major failure.
Should your appliance require repair or
service after the guarantee period, contact
your nearest Sunbeam service centre.
For a complete list of Sunbeam’s authorised
service centres visit our website or call:
Australia
www.sunbeam.com.au
1300 881 861
Units 5 & 6, 13 Lord Street
Botany NSW 2019 Australia
New Zealand
www.sunbeam.co.nz
0800 786 232
26 Vestey Drive, Mt Wellington
Auckland, New Zealand
Need help with your appliance?
Contact our customer service team or visit
our website for information and tips on
getting the most from your appliance.
In Australia
Visit www.sunbeam.com.au
Or call 1300 881 861
In New Zealand
Visit www.sunbeam.co.nz
Or call 0800 786 232
is a registered trademark.
‘Bake & Grill’ is a trademark of Sunbeam Corporation.
Made in China.
Due to minor changes in design or otherwise,
the product may differ from the one shown in this leaflet.
© Copyright. Sunbeam Corporation Limited 2010.
ABN 45 000 006 771
Units 5 & 6, 13 Lord Street
Botany NSW 2019 Australia
Unit 3, Building D
26 Vestey Drive
Mt Wellington Auckland
New Zealand
Sunbeam Corporation is a division of GUD Holdings Ltd.
11/12