1
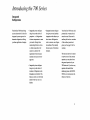
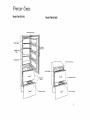
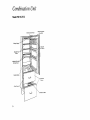
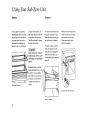
700 Series
Use and Care
Guide
Introducing
the 700 Series
Integrated
Refrigeration
Your Sub-Zero 700 Series unit is
The Sub-Zero 700 Series brings
Integrated systems refrigera-
• Integrated systems refrigera-
you true innovation! It is the first
tion gives you the choice of
tion gives you total aesthetic
integrated systems approach to
proportion ... of refrigeration
integration with cabinets you
protected by a warranty that is
second to none. Please read it
domestic refrigeration, offering
to freezer temperatures to meet
have chosen. Refrigeration
and keep this book as a reminder
you three significant advantages.
your needs. Storage below
units, in essence, are refrigera-
of the excellent protection it
counter height level is a draw-
tion cabinets. They literally
gives you. See page 22 for the
er, while storage above the
counter is a cabinet. The
become a part of the kitchen
furniture.
warranty
ergonomic division of space
This use and care book is meant
increases your access to stor-
to answer most of the common
age areas.
questions you may have about
the general operation of your
Integrated systems refrigera-
700 Series unit. If you have any
tion gives you the choice of
questions that need further
location of refrigeration units
addressing please call 800/200-
throughout your kitchen. This
7820 for your local product distributor or Sub-Zero.
helps you meet your individual
needs for the way you use a
kitchen.
Refrigerator
Units
Model 700 TR
Model 700 BR
Electronic Control Panel
Magnetically-Sealed
Dairy Shelf
Halogen Lighting
Adjustable
Door Shelves
Adjustable Glass
Shelves
Adjustable Glass Shelf
& Deli Drawer
Seamless
Molding
--
_°11_1
_
I
" nicHuComi
nditrty°
" ICP
0 ann
t elrolled
Humidity-Controlled
Crisper Cover
Compartment
Drawers
_
4
Compartment
Drawers
Freezer
Units
Model 700 TF/TFI
Model 700 BF/BFI
Electronic Control Panel
Halogen Lighting
Adjustable Glass
Shelves
Seamless Molding
Electronic
Control
Panel
Seamless Molding
Compartment
Drawers
_"Compartment
Drawers
Automatic
Ice Maker
5
Combination
Model
Unit
700 TC/TCI
Electronic Control Panel
Magnetically-Sealed
Dairy Shelf
Halogen Lighting
Adjustable
Door Shelves
Adjustable Glass
Shelves
A6
& Crisper Drawer
SeandessMolding
Drawers
Freezer
Drawers
; Maker
6
Features
of the 700 Series
Sub-Zero's tradition of integrat-
Seamless Molding
Dairy Shelf
lee Container
ed design and quality continues
A single piece of molding forms
A positive-sealing
in the 700 series, with the fol-
the complete front of each unit's
partment, divided by a small
easily removable from the lower
lowing standard features.
interior, giving a sculptured look
that is both utilitarian and ele-
internal wall, is standard on tall
drawer. It is offered as an option
and combination refrigerator
on the base and tall freezers, as
gant.
units. This fully adjustable com-
well as the combination refrigerator/freezer.
Electronic Control Panel
partment is a convenient place
for deli foods and small items
A microprocessor controls all
that need a fresh environment.
dairy com-
electronic functions ... tempera-
This clear, molded container is
Deli Compartment
This enclosed compartment in
ture, adaptive defrost, lights,
Adjustable Shelves
refrigerator units is adjustable
cooling fan, and door/drawer
A single sculptured molding,
ajar warning. The liquid crystal
with tempered glass molded into
with the shelves. It gives you a
convenient area for deli foods or
display (LCD) lets you monitor
it, forms each sealed, adjustable
other small items.
all temperature zones on the
shelf. This design feature pre-
unit, and easily make adjustments.
vents spills from dripping
Egg Tray
throughout the unit.
A portable egg tray offers handy
Halogen Lighting
Crisper Compartment
Flat to the ceiling, this superior
A large, enclosed crisper comes
lighting provides white, efficient
with the refrigerator/freezer
combination unit. An inter-
storage and is easily removable.
light in cabinet and drawer units.
changeable lift-up cover provides maximum humidity in the
base and tall refrigerator units,
helping you keep produce at its
best quality, longer.
Using Your Sub-Zero
Unit
The Electronic
Control Systems
The sophisticated electronic
The control panel is located on
LCD Display
Alarm Button
control system provides you
the top of the tall units, and in
This display shows the actual
You can turn the alarm on or off
with the best control of your
the top drawer of the base. All
of the essential controls and
temperature of different zones in
refrigerated foods. By main-
your unit. The temperature and
with this button, or stop it with
this control once the alarm has
taining recommended
sounded.
refriger-
information are displayed in
name of each corresponding
ator and freezer temperatures,
this easy-to-reach-and-see
zone appear every five seconds.
you can keep food safe and
panel.
retain the best quality possible.
Zone Button
By pressing this button, you can
A microprocessor
accurately
see the temperatures set in dif-
controls the temperature of the
ferent zones of your unit. For
cooling zones. It samples the
example, if you press this button
temperature every second, and
and the words "top drawer" are
makes adjustments to maintain
flashing, you will see the tem-
the temperature you have indicated.
perature of that zone displayed.
CoMer Button
This button allows you to
decrease the temperature of a
selected zone.
Tall unit control panel
Warmer Button
Similar to the colder button, you
can raise the temperature in any
zone by pressing this button.
8
Base unit control panel
Recommended
How to Adjust
Temperatures
Temperature
How to Operate
the Alarm
Settings
Refrigerator units are factory
ature in any area of the unit,
To decrease the temperature
When the selected zone is dis-
pre-set to maintain zones 38 °
When your alarm is on, the
alarm bell will be illuminated
press the zone button, until the
played, you can decrease the
Fahrenheit. The temperature
on the control panel. To turn the
name of the zone you want to
temperature in that zone by one
range is 34 ° to 45°F.
alarm off, press the alarm button
adjust is flashing. If you do not
degree each time you press the
adjust the temperature within
colder button. For example, if
five seconds, the control panel
you have selected the "cabinet"
Freezer units are factory pre-set ,
to maintain zones at 0°
will automatically go out of the
set mode and continue to moni-
zone and a temperature of 38°F
Fahrenheit. The temperature
is displayed, you can decrease
range is +5 ° to -5°F.
tor the unit.
the temperature by pressing the
colder button two times.
To use the integrated system
If you need to adjust the temper-
one more time to make the bell
disappear from the display.
efficiently, set temperatures to
To increase the temperature--
decrease from the top cabinet to
Similar to the decrease tempera-
the lower drawer. A suggestion
ture instructions, you can
that offers great flexibility is...
increase the temperature by one
degree each time you press the
• cabinet
38°F
warmer button for the zone you
have selected.
• top drawer
• lower drawer
36°F
34°F
9
Using Your Sub-Zero
Unit
Shelves
Drawers
You can remove or adjust the
To clear the door shelves, lift
To remove a drawer front your
Where you are removing the top
tempered glass shelves by tilting
and tilt the right end of the shelf
unit, pull it open until it stops.
the shelf up at the front, then lift-
up, and tilt the left end down.
Raise the drawer front and pull
drawer of a base unit, you must
disconnect the control cable
ing up and out of the tracks on
Then lift out the shelf, clearing
the unit's door shelves.
out, as shown in the diagram.
before removing the drawer.
rear wall of the refrigerator or
Refer to the diagram.
To replace a drawer, raise the
freezer, as shown in the diagram.
[/NCAUTION
I
Always exercise care when you
•handle the glass shelves, to prevent breakage or scratching the
interior.
front of it and place onto the
tracks. Be sure to engage the
front holes of the drawer rail
with the small pegs at the end of
each rail.
1
To replace shelves, select the
desired shelf height. Then, with
the shelf front raised slightly,
place shelf in tracks at the rear
of the unit. Lower the front of
the shelf until it locks into
Glass shelf removal
position.
Control
Drawer
10
removal
cable disconnection.
Drawer
One crisper
The drawer divider is easily
The door shelves and dairy com-
with each tall and base refrigera-
removed by pulling forward and
partment are adjustable within
tor. You can easily remove
sliding the back edge away from
the back of the drawer. Reverse
the guides of the door liner.
another drawer by lifting the
the procedure as illustrated in the
front edge up and pulling out
diagram for installation.
To remove, lift straight up and
out from the bottom.
cover is standard
cover for cleaning
this
or moving to
Divider
Door Shelves and
Dairy Compartment
CrisperCover
from the back.
To replace, select a desired posiThe clear-view
window
easy access and visibility
vegetables
tion and push down into the
allows
guides.
to all
stored in the drawer.
Door shelf removal
Drawer divider insertion
Crisper lid removal
11
Using Your Sub-Zero
Unit
Deli Shelf and
Drawer
Glass Tray
Icemaker
Sounds
The deli shelf and drawer assem-
Tall Units
Freezer Units
Certain noises may be evident
bly is one piece and is easily
The glass tray with tall units
The icemaker in your Sub-Zero
with the normal operation of the
removed for cleaning and reposi-
only is packed on the top shelf
is fully automatic and has been
unit. Surrounding acoustics like
tioning for your use. The small
deli drawer is convenient for
of your Sub-Zero. Place this
factory re-tested. To put into
walls, floors and cabinets may
shelf on the bottom portion of
operation it requires only a con-
those small easy-to-loose
the top cabinet area. It is neces-
nection to the house water sup-
affect the sound level of your
unit.
sary to have this glass installed
ple. The icemaker shuts off
properly to ensure an even flow
when you remove the ice storage
container from the freezer. When
items
as well as to keep deli items
fresh.
Remove this assembly in much
of air through the 700 Series
unit.
the same way you remove the
standard shelves in your unit.
Do not place food or packages
Refer to the instructions and dia-
close to the edges of the walls.
gram under Shelves.
you replace the container, the
icemaker will resume producing
ice.
When you fill the first ice bucket
with ice, you should toss this
supply out as in any new connection, there may be dirt in the ice.
12
General
Maintenance
Shelves
Cleaning
Condenser
Your 700 Series unit, like all
I/ WARNING
I
kitchen appliances, is necessary
For maintenance and cleaning,
To clean this area remove the
All refrigerator and freezer com-
screws holding the toe kick in
partment glass shelves are dish-
place. The toe kick plate will
washer safe and may be cleaned
slide forward easily, giving you
access to the condenser area.
in this manner. However, you
can clean them with a mild solu-
al spills on the interior with
Use a soft bristle brush and vac-
tion of soap and lukewarm
mild, soapy, warm water. Do not
uum hose to remove the accu-
water. Rinse and dry thoroughly.
to keep clean to ensure a
we recommend the circuit
smoother operating unit and
breaker or master power switch
keep food safe. Clean any gener-
to the unit be shut off.
Important
Note:
use any abrasive clea_aers as you
cient performance
may scratch interior surfaces.
Series
months
of your 700
unit, your condenser
be cleaned
should
To ensure effi-
regularly.
This
be done every three
under normal
use.
must
mulation of dust and lint particles. If you have pets in your
[ z_xCAUTION
home you may want to clean the
condenser area more often than
Do not submerge
once every three months.
Allow
or pour hot
water over cold glass shelves.
them to come to room
temperature
Condenser location
I
before
cleaning.
13
General
Maintenance
Lighting
Information
Light Bulb
Replacement
You will quickly notice the
I _CAUTION
absence of any light switches on
your 700 Series unit. In the
upper cabinet portion of a tall
unit, the switch is mounted to
the interior of the door itself and
as it passes a point in closing, it
I
For your safety, the circuit
breaker to the unit should be
shut off or turn off the master
power switch before replacing
bulbs. Protective gloves should
be worn when handling bulbs.
breaks a circuit enabfing the
light to go out.
Top Compartment
If you need to replace a 35 watt
Switches in the drawer compartment are mounted on the right
side of the drawer area. In some
halogen light in the tall unit's
top cabinet, you must open the
Do not pull the panel down from
Slide the glass lens to the left,
the center. Instead, grasp the
revealing the 20 watt halogen
edges of the control panel and
light bulb. Remove the bulb by
pull down. Two tabs on each
pulling straight out and complete
comer will release enabling the
the reinstallation by following
panel to drop down.
the reverse of these steps.
] z_CAUTION I
J_CAU'rlON
The halogen lights may be very
hot and may burn you. Use a
soft cloth or protective gloves
and grasp the bulb firmly and
pull straight up.
To prevent a possible burn,
grasp the bulb with a soft cloth
or protective gloves.
I
control panel area.
instances the drawer switch may
Follow the reverse steps in
interfere with the safe closing of
replacing the bulb and position-
a drawer. If this occurs, merely
ing the control panel.
move the switch to the raised
position and try closing the
Drawer Compartment
drawer again. Do not force the
drawer to close.
To replace a light bulb in the
drawer compartment, you must
pull the drawer out to its maximum extension. You may find it
easier to remove the entire drawer.
Light bulb replacement
drawer compartment.
14
Light bulb replacement
tall unit's top cabinet.
in
in
Vacation Time
Master Power
Switch
90 Degree Door
Stop
All the 700 Series units have a
Your tall 700 Series unit is
stops at 90 degrees is you want
master power switch. The
equipped with a built-in 90
to safely use the door.
switch, located behind the toe
degree door stop for the top
kick plate, will turn off all elec-
compartment.
You can go to the maximum of
off. Empty all contents in the
trical power to the equipment.
This switch can be used for
119 degree opening by using the
unit and block the doors open
You can easily actuate the stop
screwdriver and advancing the
either shutting down the unit for
by using a blade-type screwdriv-
brass cam to the next stop.
slightly. About one inch space
will let fresh air in to keep the
Servicing or during extended
vacations.
er and advancing the brass fit-
For extended vacations your
Sub-Zero should be turned off or
the circuit breaker can be shut
interior dry.
ting in both the top and bottom
Iz WARNING
l
hinges. You must actuate both
The door swing on the tall 700
During short vacations, you
Series unit may cause severe
should remove all perishable
finger pinching or damage to
items and leave the temperature
the unit itself. Watch that fin-
settings at their set point.
gers are not placed in the door
opening on the hinge side when
If for any reason this unit is put
the door is open.
into service on a temporary
basis, and later shut off, the
Also, when the door is open to
119 degrees, the door panel,
depending on its thickness, may
strike the face frame of the SubZero causing serious damage to
the unit.
Master power switch:
Actuating
stop.
doors should be blocked open to
allow fresh air to circulate with
the compartments. Also, the circuit breaker to the unit should be
shut off.
the 90 ° degree door
15
Troubleshooting
If refrigerator/freezer
is not
If refrigerator/freezer
operating-
much-
, Is there electrical power to
, Is condenser
equipment?
• Is home fuse blown or circuit
• Has door/drawer
breaker off?.
• Is refrigerator/freezer
off?.
runs too
- Be sure door/drawer is closed
clean?
been open for
extended
time of large
amounts
of food added?
control
If refrigerator/freezer
If condensation forms on the
outside-
is frosted
and gasket is sealing.
. Completely clean the product.
call your Sub-Zero service
center for assistance.
• Cover all food tightly.
. Has door been left open?
If light bulb needs replacing-
• Are doors closing and sealing
[ ,_WARNINGJ
is
, Is control set properly?
If condensation forms inside
the unit. This is normal during high
• Has door been open too long?
humidity and frequent door
• Have you recently added a
openings.
large quantity of food?
16
LCD display board, you
closed as much as possible and
• If still not running, unit may
If refrigerator/freezer
warmer than usual-
flashing words appear in the
should keep the door/drawer
up-
properly?
. If the following numbers of
If there is odor in the unit-
• Is your condenser clean?
be in defrost; wait 30 minutes
to see if unit will restart.
LCD display board warnings-
• 20 displayed and indicator
• Turn off circuit breaker to
Sub-Zero, wear gloves to protect against broken glass or
burns.
flashing
• 55 displayed and indicator
flashing
• Su displayed and top lights off
• -88 displayed, top lights off
and buttons do not operate
• buttons do not operate and top
lights are off
Keeping
Food at its Best
Keeping Food Fresh
Your Sub-Zero unit is the most
Most food deteriorates over
But good handling practices can
When food does spoil, it's usual-
advanced refrigeration system
time. That is inevitable. From
ly obvious. It becomes moldy,
available to help keep food
the time it is harvested, slaugh-
minimize the rate of changes in
food...
fresh, and keep it safe to eat.
tered, or manufactured, until it is
consumed, food undergoes
(bacte-
has an off-odor, looks rotten,
slimy, or discolored. But there
Follow the recommended stor-
are times when it may not be so
But the quality and safety of
changes. Microorganisms
age times and temperatures on
obvious. As a general rule, if
your food depends not only on
ria, yeasts and molds) get into
page 17. Your Sub-Zero unit
you think afood has been stored
having the best refrigeration sys-
food, multiply in number, and
accurately maintains tempera-
tem. It also depends on you and
cause spoilage. Enzymes that
tures in different temperature
too long and may be spoiled,
discard it. Don't taste it to check
how you handle your food.
occur naturally in food continue
zones, helping to slow the
and see if it's ok. While the bac-
the ripening process, even after
growth of food spoilage
teria that cause this kind of food
The information in this section
the food is harvested. Improper
microorganisms,
spoilage will not cause food-
gives you the most current food
temperatures cause food to dete-
ripening process.
handling and storage recommen-
riorate faster. Changes in humid-
dations to help you keep food at
ity cause wilting and shriveling
Use specially designed com-
its best. If you have specific
that can lead to spoilage.
partments for dairy foods, deli
and slow the
borne illness, or food poisoning,
it's not a recommended practice.
questions that are not addressed
foods, and fresh produce.
here, contact your University or
These compartments maintain
County Extension Service, or
temperature and humidity
your local utility company.
levels that keep foods fresh.
• Rotate food in refrigeration
units, using a "first-in-firstout" system.
17
Keeping
Food at its Best
Keeping Food Safe
to Eat
When
You're
Shopping
Most foodborne illness is caused
• Place packages of raw meat,
When
You Store Food
Keep eggs in their carton in the
seafood or poultry in plastic
Monitor temperatures of refrigeration zones on the electronic
cus aureus, salmonella, perfrin-
bags to keep them from drip-
control panel of your Sub-Zero
or broken eggs.
gens, e coli, and botulism. These
ping on other foods.
unit. Refrigerator temperature
by bacteria such as staphylococ-
bacteria grow rapidly at temperatures between 40°F and 140°F,
• Shop for meat, seafood and
refrigerator. Discard any cracked
should be kept at 40°F or below,
For refrigerator storage, leave
and freezer temperature should
raw meat, poultry and seafood in
be kept at 0°F.
its original wrapper unless it is
a range that's called the Danger
Zone. Food should riever be left
poultry last. Don't leave these
in the Danger Zone for more
than two hours. When the bacte-
have finished shopping. Take
Follow the recommended refrig-
torn. Repeated handling can
introduce bacteria to these
along a cooler in hot weather
erator and freezer storage times
foods. For freezer storage, use
ria have multiplied to the mil-
or when you have to travel
and temperatures on page 21.
freezer wrap, freezer-quality
lions in warm temperatures, they
cause illness. Some bacteria
long distances.
cause flu-like systems, while
others cause serious illness or
become fatal. Young children,
foods in a hot car when you
Store raw meat, poultry and
• Check "use-by" or "sell-by"
dates on foods to make sure
they are fresh.
the elderly, and people who are
already ill are more likely to
become sick from food poisoning.
° Use extra care when buying
deli food. Buy only the
amount you will use in 1-2
days. Discard any hot or cold
To reduce your risk for food-
deli food that may have been
borne illness, use the following
I
techniques to keep your food
safe to eat.
at room temperatures for more
than two hours.
18
plastic bags, or aluminum foil
seafood separate from other
over the commercial wrap if
foods will be stored in the freez-
foods. Keep juices from these
er for more than a couple of
packages from dripping on other
food.
months. This minimizes dehy-
Never taste food that looks or
smells strange to see if you can
still use it. Discard it.
dration and quality loss.
When
You Store
Food
Food stored in refrigerator units
should be wrapped in foil or
When You Prepare
Food
Clean everything that comes in
contact with food.
plastic wrap, or placed in plastic
bags or airtight containers to
keep it from drying out. Date all
packages.
Food stored in freezer units
should be wrapped in freezer
• Wash your hands for 20 seconds before and after handling
food.
• Sanitize counters, equipment
meat, seafood or poultry (rinse
with a dilute chlorine bleach
tainers. (Single layers of alu-
solutionml
minum foil may not be
water).
adequate-this
Thoroughly clean your cutting
microwave, not on the counter.
boards (plastic and wooden).
When you thaw food in a
microwave oven, you should
Wash with hot water and soap,
and rinse with a dilute chlorine
cook it immediately.
bleach solution (1 teaspoon/quart
of water).
Marinate food only in the refrigerator.
and utensils after handling raw
ty plastic bags or freezer con-
wrap, or placed in freezer-quali-
Thaw food in the refrigerator or
Rinse poultry and seafood in
cold water before cooking.
teaspoon/quart of
Avoid cross contamination in
preparing food. Keep raw meat,
wrap can develop
holes and cause freezer burn.)
Use clean kitchen towels,
poultry, and seafood and their
Date all packages.
sponges and cloths. Replace
juices away from other food. For
sponges every few weeks.
example, don't use the same surface and utensils for preparing
Use disposable plastic gloves if
raw meat poultry and seafood as
you have an infected cut or burn
you would lbr preparing salad
on your hands.
ingredients.
19
Keeping
Food at its Best
When You Cook Food
When You Have
Suggested Food Storage
Leftovers
Don't taste raw or partially
Cook eggs until the yolk and
Refrigerate or freeze cooked
A note about the following
cooked meat, poultry, eggs, or
fish.
white are firm, not runny. Don't
leftovers in small, covered con-
chart: The time limits for refrig-
use recipes in which eggs remain
tainers within 2 hours after soak-
eration will help keep food from
raw or partially cooked.
ing. Make sure there is adequate
air space around containers, so
spoiling or becoming dangerous
to eat. The time limits for frozen
Cook meat to an internal temperature of 165°F or above, poultry
If your microwave has a temper-
food can cool down more quick-
foods are to maintain flavor and
to 180°F or higher. For cuts
more than two inches thick, use
ature probe, use it. Check tem-
ly.
texture. If food is kept longer
than the recommended time in
a meat thermometer to check the
at least three spots. Rotate foods
Remove stuffing from meat or
the freezer, it will still be safe to
temperature. For thinner cuts,
during microwaving.
poultry; store it separately.
eat, but the quality won't be as
clear juices (not pink) are signs
of doneness.
peratures of meat and poultry in
good.
Date packages of leftovers and
use within a safe period of time.
If you are cooking frozen meat
or poultry that has not been
Cover and reheat leftovers thor-
defrosted, increase the cooking
oughly before serving. Bring
time to 1 1/2 times the time
sauces, soups and gravy to a
required for thawed items.
boil. Heat other foods to 165°F.
Roast meats or poultry in oven
If you think a food may have
temperatures of 325°F or above.
spoiled, discard it. When in
doubt, throw it out.
20
Keeping
Food
Food at its Best
Form
fresh, in shell
hardcooked
liquid pasteurized
opened
unopened
Eggs
,1
Deli Foods
Refrigerator
at 32-40017
Freezer
3 weeks
1 week
don't freeze
don' freeze well
3 days
10 days
don't freeze
I year
or egg substitutes
thinly sliced lunch meats
store prepared or homemade egg,
chicken, tuna, ham, macaroni salads
pre-stuffed chops, chicken breasts
store-prepared convenience meals
1-2 days
3-5 days
Soups and Stews
vegetable or meat added
3-4 days
2-3 months
Hamburger, Ground
and Stew Meats
hamburger and stew meats
ground turkey, veal pork, lamb and mixtures
1-2 days
1-2 days
3-4 months
3-4 months
hotdogs, opened package
unopened package
lunch meats, opened package
unopened package
1 week
2 weeks
3-5 days
2 weeks
in freezer wrap, 12 months
bacon
sausage (pork, beef, turkey), raw
smoked breakfast links, patties
hard sausage-pepperoni, jerky sticks
7 days
1-2 days
7 days
2-3 weeks
I month
1-2 months
1-2 months
1-2 months
drained, wrapped
corned beef
ham, whole
ham, half
ham, slices
in pouch with
pickling juices
5-7 days
7 days
3-5 days
3-4 days
Fresh Meat
beef steaks, roasts
lamb chops, roasts
pork and veal chops, roasts
variety meats (tongue, liver, etc.)
3-5
3-5
3-5
1-2
6-12 months
6-9 months
4-6 months
3-4 months
Meat Leftovers
cooked meat and meat dishes
gravy and meat broth
3-4 days
1-2 days
2-3 months
2-3 months
Fresh Poultry
chicken or turkey, whole
chicken or turkey, pieces
giblets
1-2 days
1-2 days
1-2 days
1 year
9 months
3-4 months
fried chicken
cooked poultry dishes
pieces, plain
pieces covered with broth or gravy
chicken nuggets, patties
3-4
3-4
3-4
1-2
I-2
4 months
4-6 months
4 months
6 months
1-3 months
Packaged Hotdogs
and Lunch Meats
Bacon and Sausage
;
Ham and Corned Beef
Cooked Poultry
|
Comments
at 0 °
check use-by or sell by dates
don't freeze well
i day
I-2 days
days
days
days
days
days
days
days
days
days
If you are going to freeze any of these
foods, freeze immediately...not after
they have been held in the refrigerator.
check "sell-by" dates, do not use more
than one week after this date.
1-2 months
1-2 months
1-2 months
21
Service
Information
Service
"Sub-Zero
Full 5 Year Warranty
Protection
Plan"
and Limited 6th Through 12th Year Warranty
on the Sealed System
Full 2 Year Warranty on Total Product
If you need service...
Take the necessary steps to preserve food in your unit.
Door/drawers should be left
closed as much as possible when
unit is back in service. Please
have model and serial number
available (look for thdm on the
left-hand side of the top drawer
compartment). Call your nearest
Sub-Zero Factory Authorized
Service Center in your area,
your dealer or Sub-Zero Freezer
Company, P.O. Box 44130,
Madison, WI 53744-4130.
Telephone 800/222-7820.
For installation questions or
general product operating information call 800-200-7820 for
your local product distributor or
Sub-Zero.
Full Five Year Warranty
For five years from the date of original installation, your Sub-Zero warranty covers all parts and labor to repair or
replace any components that prove to be defective in materials or workmanship in the sealed system. The sealed
system consists of the compressor, condenser, evaporator, drier and all connecting tubing.
Full Two Year Warranty
For two years from the date of original installation, your Sub-Zero warranty covers all parts and labor to repair or
replace any part of the product which proves to be defective in materials or workmanship.
Limited 6th Through 12th Year Warrdnty
From the 6th through the 12th year from the date of original installation, your Sub-Zero warranty covers all parts
that prove to be defective in materials or workmanship in the sealed system (parts only). The sealed system consists of the compressor, condenser, evaporator, drier and all connecting tubing.
Terms Applicable To Each Warranty
All service provided by Sub-Zero under the above warranty must be performed by authorized Sub-Zero service
representatives, unless otherwise specified by Sub-zero. Service will be provided in the home during the normal
business hours. This warranty applies only to products installed for normal residential use. Details regarding a
non-residential warranty are available upon request.
The warranty applies only to products installed in any one of the fifty states of the United States, the District of
Columbia or the ten provinces of Canada. This warranty does not cover any parts or labor to correct any defect
caused by negligence, accident or improper use, maintenance, installation, service or repair, including but not
limited to improper removal and reinstallation (whether in the unit or at a remote location) of the condensing
unit.
The remedies described above for each warranty are the only ones which Sub.Zero will provide, either under
these warranties or under any warranty arising by operation of law. Sub.Zero will not be responsible for any
consequential or incidental damages arising from the breach of these warranties or any other warranties,
whether express, implied or statutory.
Some states do not allow the exclusion or limitation of incidental or consequential damages, so the above limitation or exclusion may not apply to you. This warranty gives you specific legal rights and you may also have other
legal rights which vary from state to state.
To receive parts and/or service and the name of the Sub-zero authorized service representative nearest you, contact your Sub-zero dealer or distributor or contact Sub-Zero Freezer Company, Service Department, P.O. Box
44130, Madison, Wisconsin, 53744-4130 or call
22
Sub-Zero Freezer Company, Inc.
Post Office Box 44130
Madison, Wisconsin 53744-4130
375-4420
800-200-7820
or 608-271-2233